Aqualife IQ Bar User manual

1
Countertop IQ Bar Water Dispenser
Instruction Manual
Variety of Colors to match interior design.
Please read this manual carefully before Using!
CONTENT
1.
Brief Introduction.
(1). Brief Introduction of the Appearance
(2). Touch panel Introduction
2.
Technical Parameters
3. Installation
(1). Overview
(2). Water Supply connection
4. Operation
(1).
I
nitially connected to electrical source
(2). Attentions before using for first time
(3) . Get water operation
(4) . Setting parameters
5. Machine maintenance and parts replacement
1. Replace the consume parts
2. Clear airframe
6. Attentions
7. Trouble Shooting
www.aqualifeusa.com
718-236-7000

1
Countertop IQ Bar Water Dispenser
Instruction Manual
Variety of Colors to match interior design.
Please read this manual carefully before Using!
CONTENT
1.
Brief Introduction.
(1). Brief Introduction of the Appearance
(2). Touch panel Introduction
2.
Technical Parameters
3. Installation
(1). Overview
(2). Water Supply connection
4. Operation
(1).
I
nitially connected to electrical source
(2). Attentions before using for first time
(3). Get water operation
(4). Setting parameters
5. Machine maintenance and parts replacement
(1). . Replace the consume parts
(2). Clear airframe
6.
Attention
7. Trouble Shooting
www.aqualifeusa.com
718-236-7000

2
1.
Brief Introduction.
1. Touch Panel 9.
Condenser
2. Cover of the Drip Tray 10. Heating Switch
3. Drip tray 11. Water Inlet Whole
4. 2.8”TFT LCD screen 12. Switch Panel
5. Faucet 13. Fan
6. Panel 14. Fuse
7. Drain tray 15. Power Switch
8. Decorative Panel 16. Power Cord
(2).Touch Panel Introduction
1. Day - Month - Year
2. Child Lock status icon
3. UV light status icon
4. Hot key and select key
5. Heating and hot water temperature icon
6. Extra-hot Key

2
1.
Brief Introduction.
(1) Brief Introduction of the Appearance
1. Touch Panel 9. Condenser
2. Cover of the Drip Tray 10. Heating Switch
3. Drip tray 11. Water Inlet Whole
4. 2.8”TFT LCD screen 12. Switch Panel
5. Faucet 13. Fan
6. Panel 14. Fuse
7. Drain tray 15. Power Switch
8. Decorative Panel 16. Power Cord
(2). Touch Panel Introduction
1. Day - Month - Year
2. Child Lock status icon
3. UV light status icon
4. Hot key and select key
5. Heating and hot water temperature icon
6. Extra-hot Key

3
7.Return key and child lock button
8. Mixed water keys
9. Logo
10. Clock
11. Automatic Switcher icon
12. Power-saving mode icon
13. Cold water key and Select key
14. Cooling and cold water temp icon
15. Set key and Enter key
16.
One cup of water key and select key
17. Water outlet indicator light
2.
Technical parameters
(1). Unit parameters
Maximum working temperature::38℃
** The capacity is calculated under the ambient temperature is 25 ℃and the
water inlet temperature is 25℃.
Notes::Our company reserves the right to change any product specifications
and parameters without notice and without incurring any obligations
or liabilities for such changes.
Item Specification Parameter
1Electricity features
Rated Voltage/Frequency
Rated Power*
Rated Current*
230 VAC/50 Hz
1700 W
10A
2Heating system
Rated Heating Power
Heating Capability
Hot Water Temperature
1500 W
4G/H
194-204
F
(Adjustable)
3Cooling system
Rated Cooling Power
Rated Cooling Current
Cooling Capability
Cold Water Temperature
138 W
0.8A
1.5G/H
40-50
F
(Adjustable)
4Purifying system
Filtering Rate of Carbon filter
Power of UV sterilizer lamp
0.5 micron
11W
5Inlet Water Pressure
Minimum-Maximum 0.1MPa—0.6MPa
6Dimension of the Unit
Width*Depth*Height*
7Weight(Net weight)
11.8"x13.6"x13.4"
31 Lb
'14 Kg

3
7 Return key and child lock button
8. Mixed water keys
9. Logo
10. Clock
11. Automatic Switcher icon
12. Power-saving mode icon
13. Cold water key and Select key
14. Cooling and cold water temp icon
15. Set key and Enter key
16. One cup of water key and select key
17. Water outlet indicator light
2.
Technical parameters
(1). Machine parameter
Maximum working temperature: 100F
**The capacity iscalculated under the ambient temperature is 77F and
the waterinlet temperature is 77F.
Notes: Our company reserves the right to change any product specifications
and parameters without notice and without incurring any obligations
or liabilities for such changes.
Item Specification Parameter
1Electricity features
Rated Voltage/Frequency
Rated Power*
Rated Current*
230 VAC/50 Hz
1700 W
10A
2Heating system
Rated Heating Power
Heating Capability
Hot Water Temperature
1500 W
4G/H
194-204
F
(Adjustable)
3Cooling system
Rated Cooling Power
Rated Cooling Current
Cooling Capability
Cold Water Temperature
138 W
0.8A
1.5G/H
40-50
F
(Adjustable)
4Purifying system
Filtering Rate of Carbon filter
Power of UV sterilizer lamp
0.5 micron
11W
5Inlet Water Pressure
Minimum-Maximum 0.1MPa—0.6MPa
6 Dimension of the Unit
Width*Depth*Height*
7Weight(Net weight)
11.8"x13.6"x13.4"
31 Lb
'14 Kg

4
(2). Unit Electric Wiring:
Note: Our company reserves the right to change any product specifications and
parameterswithout notice and without incurring any obligations or liabilities
for such changes.
3.Installation
(1). Overview
Please install the machine in a place of cool, ventilation and soundness, but away
from hot objects. Keep the unit 10cm(4") away from the wall and leave
enough space for both sides of the unit. In order to insure the water quality,
please use our company original settings.
(2).Water Supply Connection:
Please keep the machine in the place nearby the water supply (not more than 3
Meters, the water pressure should be configured with between 0.1 MPa. and
0.6MPa. Please make sure there are accessories ball valve, inlet 3 ways, elbow, 3
meters two way PE water pipe. It must be installed ball valve between the
machine and the water pipe and make sure that is easily be maintained.
A
.
connect the inlet 3 ways to tap (Picture 1), to be sure there is no leakage.
(Picture 1) (Picture 2)
B. Twist the ball valve 12-15 rounds thread seal tape (to sure air tightness),
connect it on inlet 3 ways,at last connect two way PE water pipe to inlet 3 ways
(Picture 2)

4
(2).Theoretical sketch:
Noted::Our company reserves the right to change any product specifications
and parameter without notice and without incurring any obligations or liabilities
for such changes.
3. Unit Installation
(1). Overview
Please install the machine in a place of use , keep the unit 4" away from the
wall and leave enough space for both sides of the unit. In order to insure the
water quality, please use our company original settings.
(2). Water Supply Connection:
Please keep the machine inthe place nearby the water supply (not more than 10
Feet), the water pressure should be configured with between 15 and 60 PSI.
Please make sure there are accessories ball valve, inlet 3 ways, elbow, 10' Ft
tubing two way PEwater pipe. The ball valve must be installed between the
machine and the water line, to make sure that it'seasily be maintained.
A
.
Connect the inlet 3 ways to tap (Picture 1), to be sure there is no leakage.
Picture 1 Picture 2
B. Twist the ball valve 12-15 rounds thread seal tape (to insure air tightness),
connect it on inlet 3 ways,at last connect two way PEwater pipe to inlet 3 ways
(Picture 2)

5
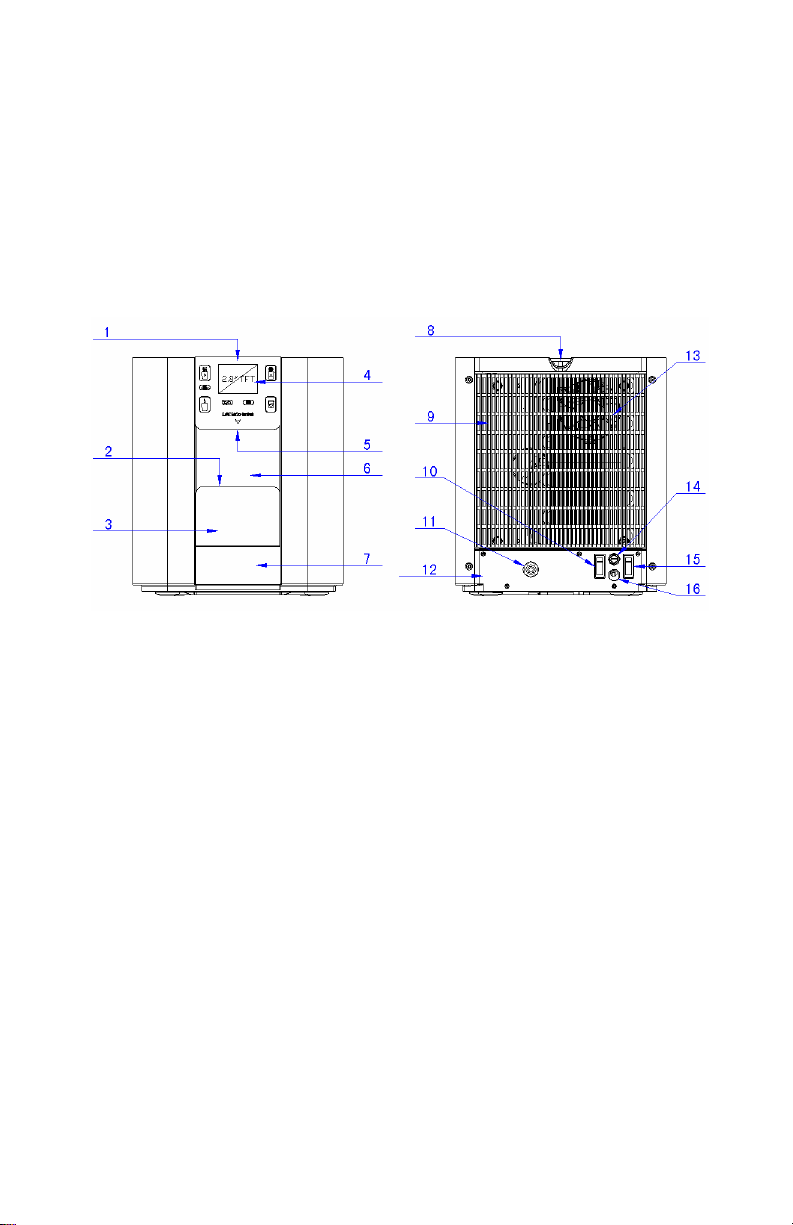
C. Please remove the cover of the inlet water connector and block head(first
remove the Claw)(Picture 3),and insert the water pipe to inlet (first insert
water pipe and install the claw(Picture 4)(Picture 5),
Picture 3Picture 4 Picture 5
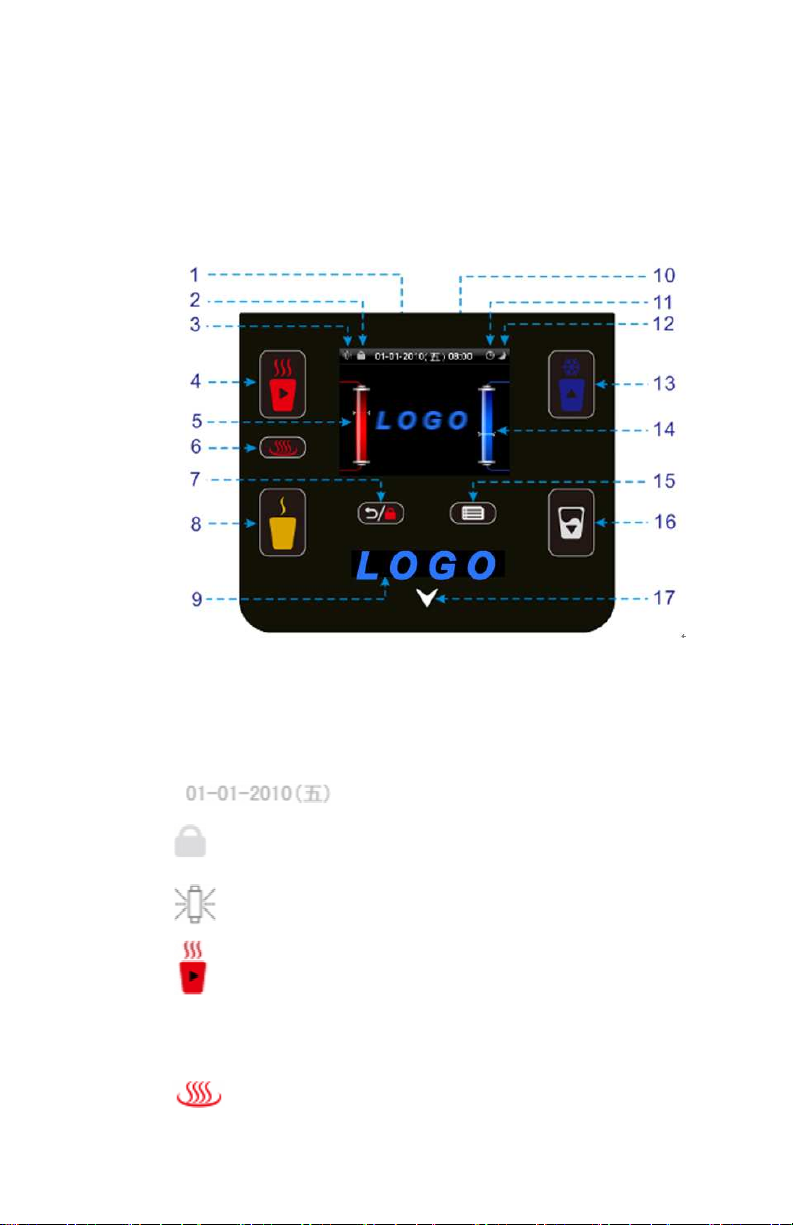
4. Operation
(1).Initially Connect with Electric Supply
Once connected to power, screen displays the company logo, means it is starting the
unit. Interface display shown as below, after entering into initial adding water
interface, operate as per notice on the interface, add water to both hot tank and cold
tank. (You need to check if the water added fully by touching the cold and hot button,
if there is water flowing out of hot and cold water outlet mouth , it means OK. )
(2).Attentions Before Using
First time to use the unit, please check all water pipe fittings and valve
connections, making sure they are well connected. After tuning on the unit,
firstly please release 10-15L water, and then pushing the hot and cold buttons to
see if there’s water running out.
Safety Warnings: New machine(or cleaned) first time to use, please ensure that
there is water flowing out from faucet in hot and cold water outlet mouth. Only
after that you can start to use the heating function!!! The heating system will not
work if there is not enough water in hot tank .

5
C.
please remove the cover of the inlet water connector and block head(firstly
remove the Claw)(Picture 3),and insert the water pipe to inlet(firstly insert
water pipe and install the claw(Picture 4)(Picture 5),
(Picture 3) (Picture 4) (Picture 5)
4. Operation
(1) Initially Connect with Electric Supply
Once connected to power, screen displays the company logo, means it is opening
unit. Interface display shown as below, after entering into initial adding water interface,
operate as per notice on the interface, add water to both hot tank and cold tank. (You
need to check if the water added fully by touching the cold and hot button ,if there is
water flowing out of hot and cold water outlet mouth , it means OK. )
(2). Attention!Before Using:
First time to use the unit, please check all water pipe fittings and valve
connections, making sure they are well connected. After tuning on the
unit, firstly please release 3-4 Gal water, and then push the hot and cold
buttons to see if there’s water running out.
Safety Warnings: New machine or before first time of use, please ensure that
there is water flowing out from faucet in hot and cold water outlet. Only after
that you can start to use the heating function!!! The heating system will not
work if there is not enough water in hot tank .

6
(3). Getting Water Operation:
A.
Hot water
①When setting with the child lock, firstly touch ,then touch you
can get the hot water after 3 seconds, touch any press key to stop the water。
②When setting without a child lock,firstly touch ,then touch can
fetch the hot water,touch any press Key to stop the water。
◎At this time, open the heating switch at back of the machine to "ON" position,
the heating system begins to work, then hot water icon will be dynamically displayed in
the screen accordingly
◎touch for 0.5second,enter into the re-boiling condition
B. Cold water
①touch can get cold water,then touch any press key to stop the water.
C. Warm Water:
Touch can get mixed water, touch any press key to stop the water.
D. Get One Cup of Water
Firstly touch ,touch or can get one cup of hot or cold
water.

6
(3). Getting Water Operation:
A.
Hot water
①
When setting with the child lock, firstly touch ,then touch you
can get the hot water after 3 seconds, touch any press key to stop the water。
②
When setting without a child lock,firstly touch ,then touch can
fetch the hot water,touch any press Key to stop the water。
◎At this time, open the heating switch at back of the machine to "ON" position,
the heating system begins to work, then hot water icon will be dynamically displayed in
the screen accordingly
◎touch for 0.5second,enter into the re-boiling condition
B.
Cold water
①
touch can get cold water,then touch any press key to stop the water.
C.
Warm Water:
Touch can get mixed water, touch any press key to stop the water.
D.
Get One Cup of Water
Firstly touch ,touch or can get one cup of hot or cold
water.

7
(4). Parameter Settings
A. Enter the Setting Interface
①Press
on thesetting interface, follow to theinterface prompts.
Setting interface including temperature settings, water settings, time
and date settings, energy saving mode, child lock settings, filters and
UV change settings, language settings, ring settings and restore
factory settings
②Press choose setting item, then press enter the selected
setting interface, press back to last interface, press and
choose specific parameters.
B. Temperature Settings
Select the temperature setting item, enter into temperature control interface,
then follow the prompts to set parameters, as follows:
C. Water Quantity Settings
Select water quantity setting, enter into the water regulation interface,
and follow the prompts to set parameters, as follows:

7
(4). Parameter Settings
A. Enter the Setting Interface
①Press into the setting interface, follow to the interface prompts.
Setting interface including temperature settings, water settings, time
and date settings, energy saving mode, child lock settings, filters and
UV change settings, language settings, ring settings and restore
factory settings
②Press choose setting item, then press enter the selected
setting interface, press back to last interface, press and
choose specific parameters.
B. Temperature Settings
Select the temperature setting item, enter into temperature control interface,
then follow the prompts to set parameters, as follows:
C. Water Quantity Settings
Select water quantity setting, enter into the water regulation interface,
and follow the prompts to set parameters, as follows:

8
D. Time Settings (year - month - day)
Select Calendar settings, enter into the time adjustment interface, follow
the prompts to set the parameters, as follows:
Then press to save parameters
E. Energy Saving Mode
Select energy-saving mode, enter into power saving mode adjustment
interface, follow the prompts to set parameters, as follows:
①Sleep Mode
When the machine turned into sleep mode, it appears as:
②Automatic On/Off Switch
In standby mode, it shows as below:
Press any key

9
F. Child Lock Settings
Select Child Lock setting item, enter into the child lock adjustment
interface, and follow the prompts to set parameters, as follows:
G. Filter / UV Maintenance Settings
Select Filter / UV maintenance setting item, enter into the filter / UV
maintenance adjustment interface, and follow the prompts to set
parameters, as follows:
①Maintain the Filter Mode
②Maintain the UV Mode
H. Language Settings
I. Ring Settings
J. Restore Factory Settings

9
F. Child Lock Settings
Select Child Lock setting item, enter into the child lock adjustment
interface, and follow the prompts to set parameters, as follows:
G. Filter / UV Maintenance Settings
Select Filter / UV maintenance setting item, enter into the filter / UV
maintenance adjustment interface, and follow the prompts to set
parameters, as follows:
①Maintain the Filter Mode
②Maintain the UV Mode
H. Language Settings
I
. Ring Settings
J. Restore Factory Settings

10
5. Maintenance And Replacement of Machine Parts
(1). Replacement
A. Filter maintenance
Filter should be replaced every 6 months (about 500 Gal of water),
when the filter is reaching the lifetime, the unit will remind you to
replace the filter
Remove the decoration tray
OPEN-rotateto replace thefilter (anticlockwise change)
CLOSE-install the filter (clockwise installation)
Enter into the setting mode after replacing the filter - filter / UV
maintenance - filters - filter replacement - Confirm
B. UV Maintenance
UV should be replaced once a year, when the UV lamp is reaching the
lifetime, the unit will remind you to replace the UV lamp
Check the accessory of the unit, you will find a UV replacement
instrument, put it into the UV hole, latch release and rotation UV as
counter clockwise and remove the UV light

10
5. Maintenance And Replacement of Machine Parts
(1). Replacement
A. Filter maintenance
Filter should be replaced every 6 months (about 500 Gal of water),
when the filter is reaching the lifetime, the unit will remind you to
replace the filter
Remove the decoration tray
OPEN-rotation to replace the filter (anticlockwise change)
CLOSE-install the filter (clockwise installation)
Ent
er into the setting mode after replacing the filter - filter / UV
maintenance - filters - filter replacement - Confirm
B. UV Maintenance
UV should be replaced once a year, when the UV lamp is reaching the
lifetime, the unit will remind you to replace the UV lamp
Che
ck the accessory of the unit, you will find a UV replacement
instrument, put it into the UV hole, latch release and rotation UV as
counter clockwise and remove the UV light
Table of contents
Popular Water Dispenser manuals by other brands

Watts
Watts PWS10T Series Installation, operation and maintenance manual

CASO DESIGN
CASO DESIGN HW 400 Original operating manual

CSI
CSI TN15-S2 Installation and operating manual

3M
3M CFS1254 Installation and operation instructions

Elkay
Elkay EFA Series Installation, care & use manual

Ispring
Ispring WCB Series user manual

AQUAPHOR
AQUAPHOR S800 Operation manual

Elkay
Elkay EFW16 1F Series Installation, care & use manual

Halsey Taylor
Halsey Taylor HACFSCD C Series owner's manual

Aquaport
Aquaport AQP-WCS Installation & operating instructions

US Water Systems
US Water Systems Pulsar Bodyguard 390-PWFMS1-A owner's manual

Booth
Booth TRM9HC product manual