Aqualin YL21076 User manual

YL21076 Double Outlet Water Timer Manual
Dial and button:
Button description:
MAN: manual watering, 1-240 mins, default is 30 mins
+: When timer is under settings, + serves as a plus button; when dial is at AUTO, + serves as a setting
button for Rain Delay
-: serves as a minus button
OK: to confirm a setting
L/R: to shift between left or right valve
ECO: Ecological watering
Dial description:
RUN: timer is running under set program
SET CLOCK: to set clock time
START TIME: to set start watering time
HOW LONG: to set watering duration, 1-240 mins
HOW OFTEN: to set watering frequency, 4 hrs, 6hrs, 12hrs, or 1-15 days
OFF: to turn off timer
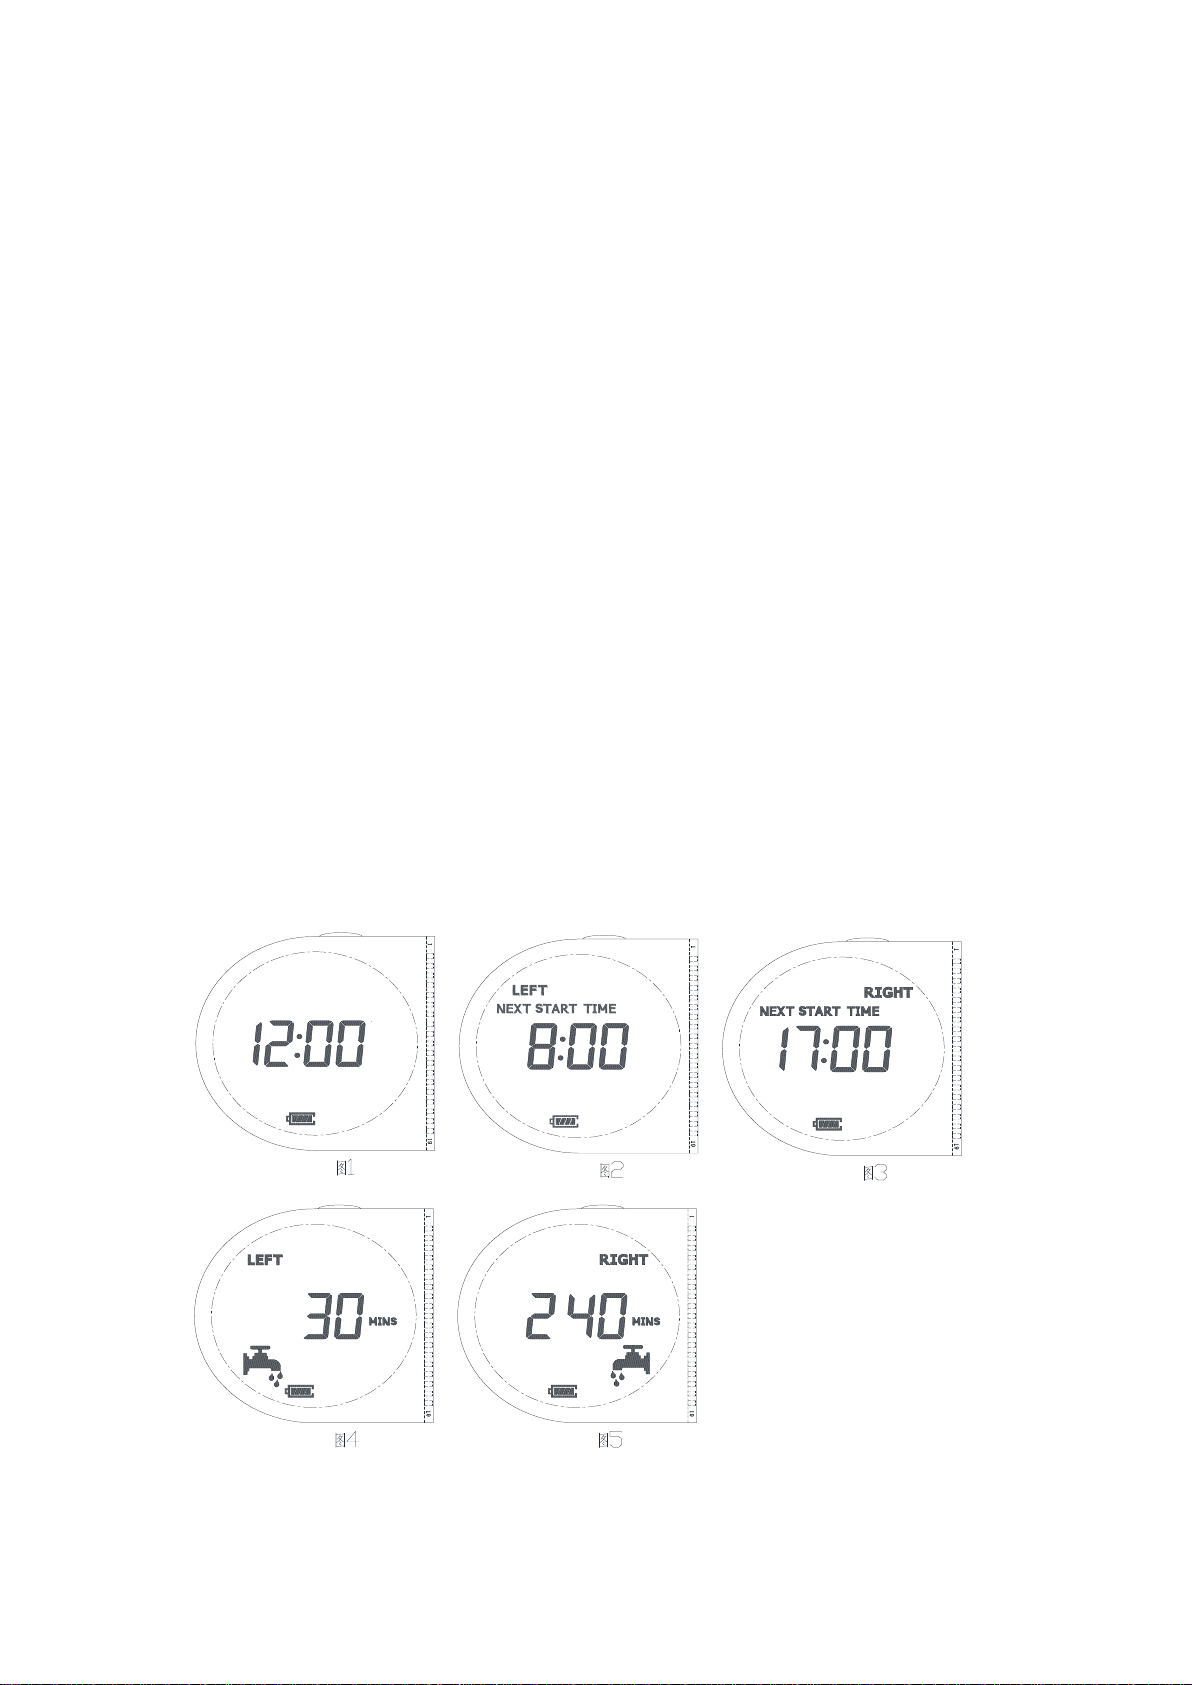
RUN, MANUAL, OFF:
RUN: when dial is at RUN, timer is in auto watering mode. Display will show clock time(as picture 1),
next start watering clock time for left valve(as picture 2), and next start watering clock time for right
valve(as picture 3),every 2 seconds in alternative. If no program is set, display will only show clock time.
When 1 of the 2 valve opens, display will show countdown of the run time(as picture 4 or 5), and clock
time, every 2 seconds in alternative. When both valves open, display will show countdown of the run time
for each valve every 2 seconds in alternative., it will not show clock time.

MANUAL: to set one time manual watering from 1-240 mins
When dial is at RUN, if press MAN button, timer will entering manual watering mode, display shows as
picture 6
Press L/R button to choose left or right valve(as picture 6 or 7)
Press + or –button, to set watering duration (as picture 8 or 9)
After all set is done, press OK to confirm setting, watering will start immediately and display will show
countdown of watering time as picture 10 and 11
When manual watering is running, it can be stopped by pressing again the MAN button, or turning the dial
to OFF. Then timer go back to the auto run mode
When 1 of the 2 valve opens, display will show countdown of the run time, and clock time, every 2
seconds in alternative. When both valves open, display will show countdown of the run time for each
valve every 2 seconds in alternative, it will not show clock time.
OFF: When dial is at OFF, all valves are closed

Display will show clock time and OFF (as picture 12) every 2 seconds in alternative.
Battery sign:
Voltage is over 3V: battery sign is full(as picture 13)
Voltage is at 2.6V-3V: battery sign is half(as picture 14)
Voltage is below 2.6V: battery sign is empty and the sign will blink quickly(as picture 15)
(valves are closed, auto and manual watering are both closed)
How to set:
Turn dial to the point where the arrow is pointing at
Each turn of the dial will save previously set input
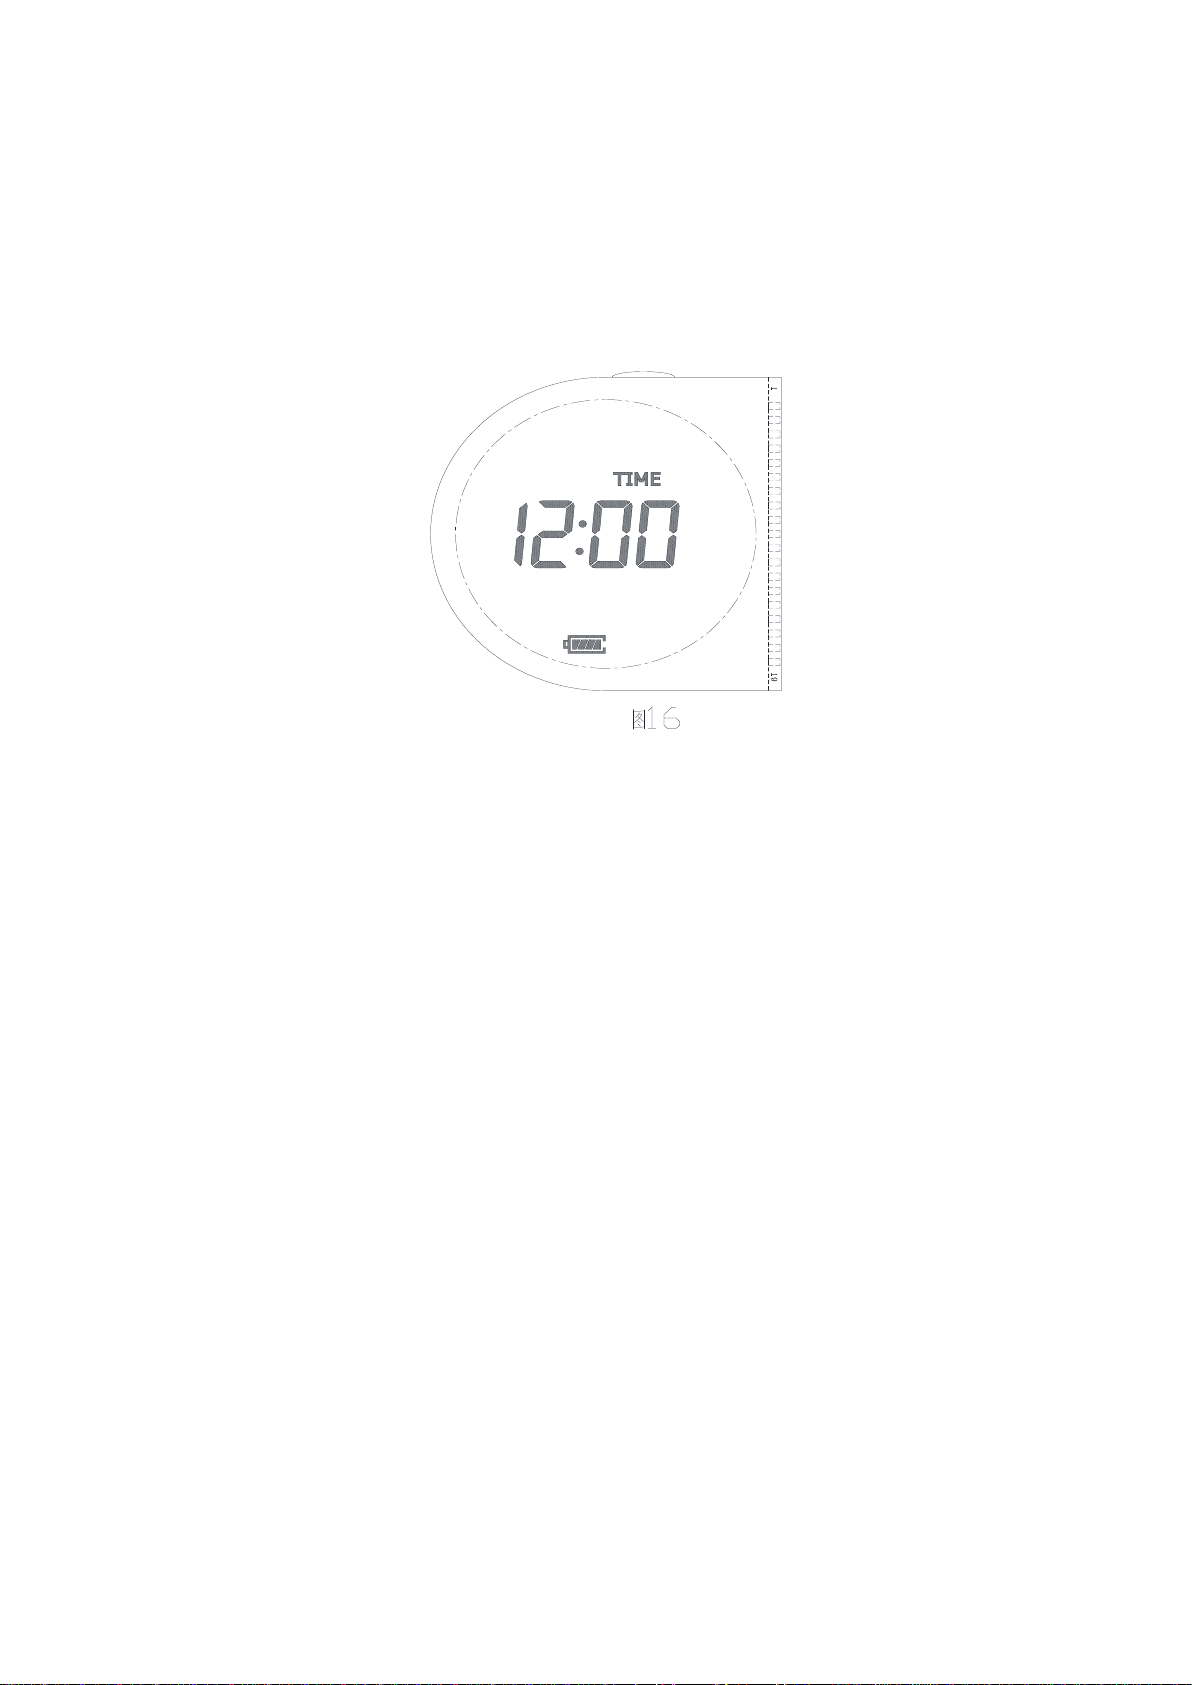
How to set clock time
Turn dial to SET CLOCK, as picture 16
Digits for hours will blink, make settings and confirm by pressing OK button, then digits for minutes will
blink, make settings and confirm by pressing OK button
Press + button for bigger numbers (by keeping +button pressed, digit will change quickly)
Press - button for bigger numbers (by keeping -button pressed, digit will change quickly)
Default is 12:00
How to set Start Time
Turn dial to START TIME, as picture 17
Press L/R button to shift between left and right valve(as picture 17 and 18)
Press OK button or + button, to confirm valve, display will show as picture 19 or 20, then is ok to set the
start time
Digits for hours will blink, make settings and confirm by pressing OK button, then digits for minutes will
blink, make settings and confirm by pressing OK button
Press + button for bigger numbers (by keeping +button pressed, digit will change quickly)
Press - button for bigger numbers (by keeping -button pressed, digit will change quickly)
Confirm setting by pressing OK button
Default Start Time is —— : ——, press + button or OK button, default time change to 12:00

How to set How Long (1-240 mins)
Turn dial to HOW LONG, as picture 21
Press L/R button to shift between left and right valve(as picture 22 and 23)
Press OK button or + button, to confirm valve, display will show as picture 22 or 23, then is ok to set the
watering duration
Digits for hours will blink, make settings and confirm by pressing OK button, then digits for minutes will
blink, make settings and confirm by pressing OK button
Press + button for bigger numbers (by keeping +button pressed, digit will change quickly)
Press - button for bigger numbers (by keeping -button pressed, digit will change quickly)
Confirm setting by pressing OK button
Default How Long is ———, press + button or OK button, default time change to 30 MINS

How to set How Often(4 hrs, 6hrs, 12hrs, or 1-15 days)
Turn dial to HOW OFTEN, as picture 25
Press L/R button to shift between left and right valve(as picture 25 and 26)
Press OK button or + button, to confirm valve, display will show as picture 25 or 26, then is ok to set the
how often
Digits for hours will blink, make settings and confirm by pressing OK button, then digits for minutes will
blink, make settings and confirm by pressing OK button
Press + button for bigger numbers (by keeping +button pressed, digit will change quickly)
Press - button for bigger numbers (by keeping -button pressed, digit will change quickly)
Confirm setting by pressing OK button
Default How Often is 1 DAYS
How to set Rain Delay
When dial is at RUN, then press + button, display shows as picture 27, digits will blink, timer is in rain
delay setting mode, it is ok to set rain delay from 0 HRS, 24 HRS, 48 HRS, or 72 HRS, by pressing + or –
button
Press OK button to confirm setting, display shows as picture 28, rain delay is activated immediately,
display will show clock time and the rain delay countdown, every 2 seconds in alternative
Setting is saved after 5 seconds if without further input

Rain sensor or moisture sensor connection
At the bottom of the timer, there is a connection point for rain sensor or moisture sensor. The sensor
type is NC(normally closed). When it is activated, the switch is off, then timer will skip all auto run watering
programs, until rain is over or soil go dry again. When sensor is activated, timer display will show an umbrella
sign, as picture 29. Manual watering is still ok to use, even sensor is activated.
How to set ECO
ECO means ecological watering mode: to split the watering duration into several smaller watering
durations with pause, while still keep the total watering duration same. Each valve can be set independently for
ECO settings
When dial is at RUN, press ECO button, display will show as picture 30
Press L/R button to shift between left and right valve(as picture 30 and 31)
Press + or –button to complete settings for smaller watering duration(as picture 32 or 34)
Press OK button to confirm above settings and then go to set pause watering time between each smaller
watering durations (as picture 33 or 35)
Press OK button to confirm all settings for ECO

Smaller watering duration can be set from 1 minutes to larger watering duration, pause watering time can
be set from 1-240 mins
Display will show ECO icon after setting is saved
Table of contents


