Aquaosmo BT-KM38R User manual

1/9
ATMOSPHERIC WATER GENERATOR
BT-KM38R
Please read this the manual carefully before operating this unit, “keep it properly”.

2/9
Content
I. Introduction
II. Safety instruction
III. Announcements before use
IV. Maintenance
V. Working principles of the product
VI. Product characteristics
VII. Instructions for use
VIII. Product's technical parameters
IX.Problems indication
X. Electrical diagrams
XI.Packing list
I. Introduction
Thanks for purchasing the atmospheric water generator. We have been adhering to the philosophy to design this product: i.e.
producing maximum high quality drinking water with minimum energy consumption. When the product external is connected with
the municipal water, the product can be used as the water purifier, which gives the product a dual function machine.
II. Safety instruction
1. The socket grounding shall be safe and reliable.
2. Do not remove the grounding terminal out from the power line.
3. Neither external plugs nor external power adapters shall be used.
4. The product shall be far away from toxic gas and liquid.
5. Do not use any worn power cords or plugs.
6. Unplug the power cord before maintenance.
7. The product shall not share a socket with other electrical equipments with high power consumption.
8. Replace components correctly with the corresponding ones suggested by the manufacturer.
9. Do not unplug live plugs with wet hands.
10. When moving this product, please pull out the power plug and empty all the water tanks with the tilt angle not over 20°during
moving.
11. The appliance must not be immersed.
12. This appliance is not intended for use by persons (including children) with reduced physical, sensory or mental capabilities, or
lack of experience and knowledge, unless they have been given supervision or instruction concerning use of the appliance by a
person responsible for their safety.
Children should be supervised to ensure that they do not play with the appliance.
13. This appliance is intended to be used in household and similar applications such as
– staff kitchen areas in shops, offices and other working environments; farm houses and by clients in hotels, motels and other
residential type environments;
– bed and breakfast type environments; catering and similar non-retail applications.
15. If the supply cord is damaged, it must be replaced by the manufacturer, its service agent or similarly qualified persons in order
to avoid a hazard.
III. Announcements before use
1. Do not place the machine too close to the wall, and keep the product 20 cm away from the wall for its best performance.
2. The product shall not be used outdoor.
3. Keep out of the direct sun.
4. The product shall be placed stably during operation.
5. Working voltage shall not be lower than 90% of rated voltage. Otherwise, the product will generate unusual noise and heat
excessively. If this happens, cut off the power immediately until the voltage returns to be normal.

3/9
6. When using the product, do not stare at the product directly for long time to prevent the ultraviolet device from harming eyes.
7. Children shall not operate the machine without any adult guidance.
8. The product is not recommended to place under heavy fog environment.
9. When the ambient temperature falls under 0° C, drain out all water from the machine and stop operation to prevent the
condenser from damaging.
10. If there is any damage of power cords, call on professional electrician for replacement to avoid danger.
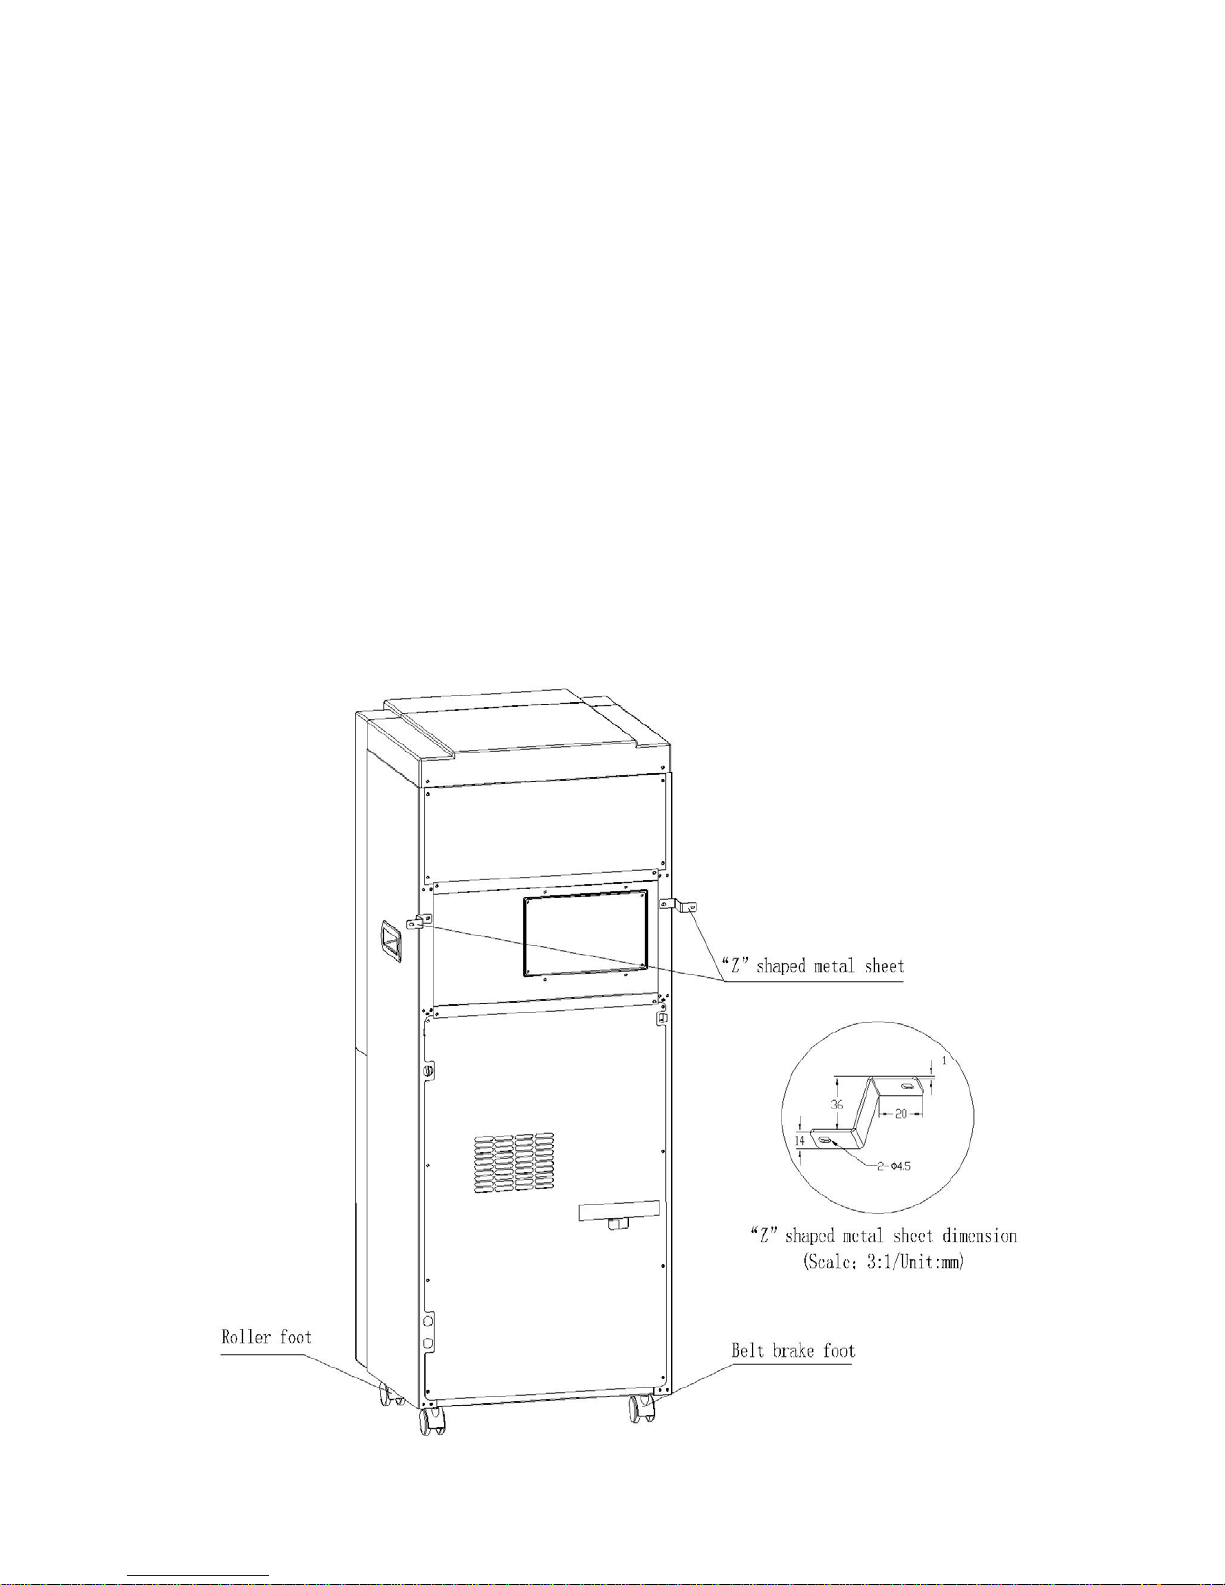
11. If the placed location is not flat, adjust the machine to stay level before use.
12. Do not lay heavy objects on top of the machine, and keep good ventilation for the best performance.
13. To avoid a hazard due to instability of the appliance, it must be fixed in accordance with the instructions.
14. The new hose-sets supplied with the appliance are to be used and that old hose-sets should not be reused.
IV. Maintenance
1. Clean the product frequently. Wipe the shell with soft wet cloth, wash the product with clean water and the stimulating
detergent shall be avoided.
2. Do not clean water tank with detergent.
3. Clean the air filter frequently to keep favorable ventilation.
4. Drain out remaining water if the product will not be used for long time.
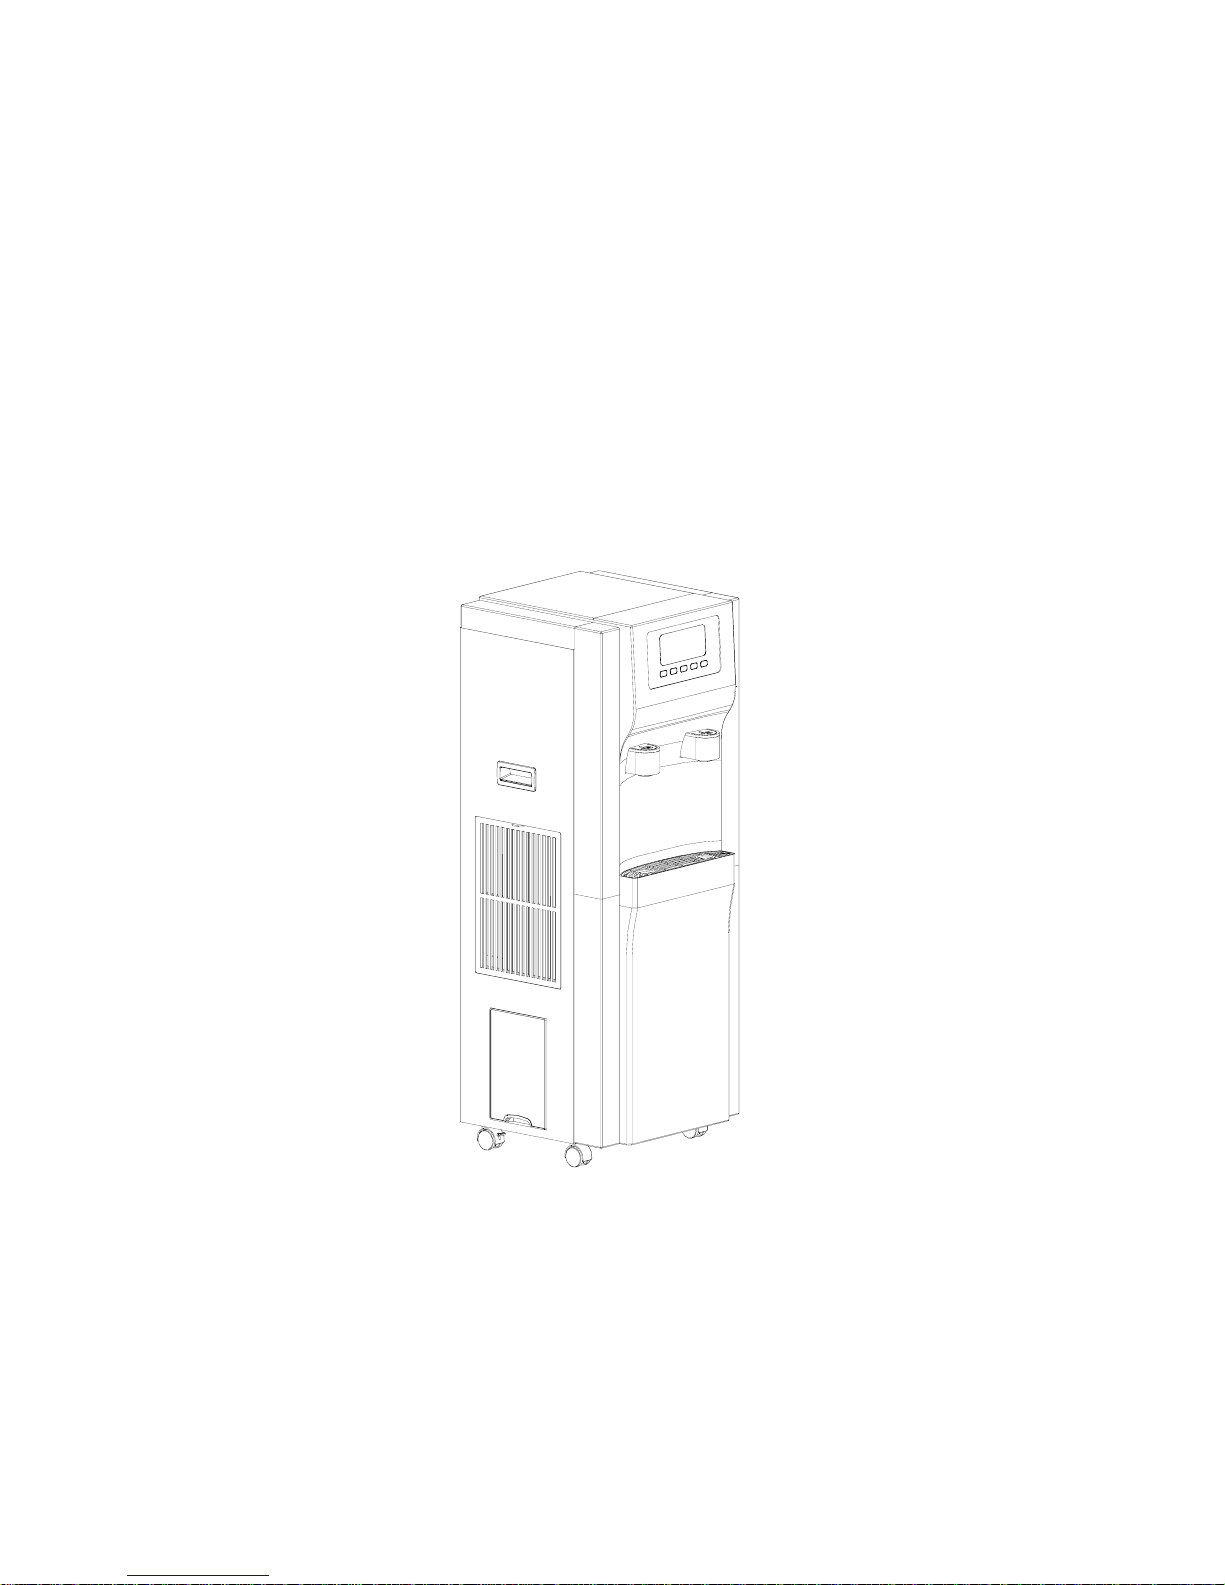
V. Working principle of the product
The atmospheric water generator gets water by the drive of air humidity and air temperature, i.e. it means the total water quantity
the product takes depends on air humidity and temperature. The best performance of the product can be achieved in the ideal
condition when air humidity is at least over 70%. The product can also take water but with water taking speed decreased in areas
with lower humidity levels. In family environment, the product is generally placed around the kitchen, under the open window and
in the comparatively large room. Also, the product works in rooms with air-conditions, but we suggest that the windows shall be
open for ventilation at night.
Since the atmospheric water generator converts the water vapor in the air into water, the product can also be used as the
dehumidifier. The product can be used as not only the atmospheric water generator but the dehumidifier in areas with
comparatively high humidity, which guarantees the users' fitness and longer service life for other household appliances.
The product adopts the multiple-air filtering technology for high quality.
The water producing speed will drop suddenly in the cold and dry season.
VI. Product characteristics
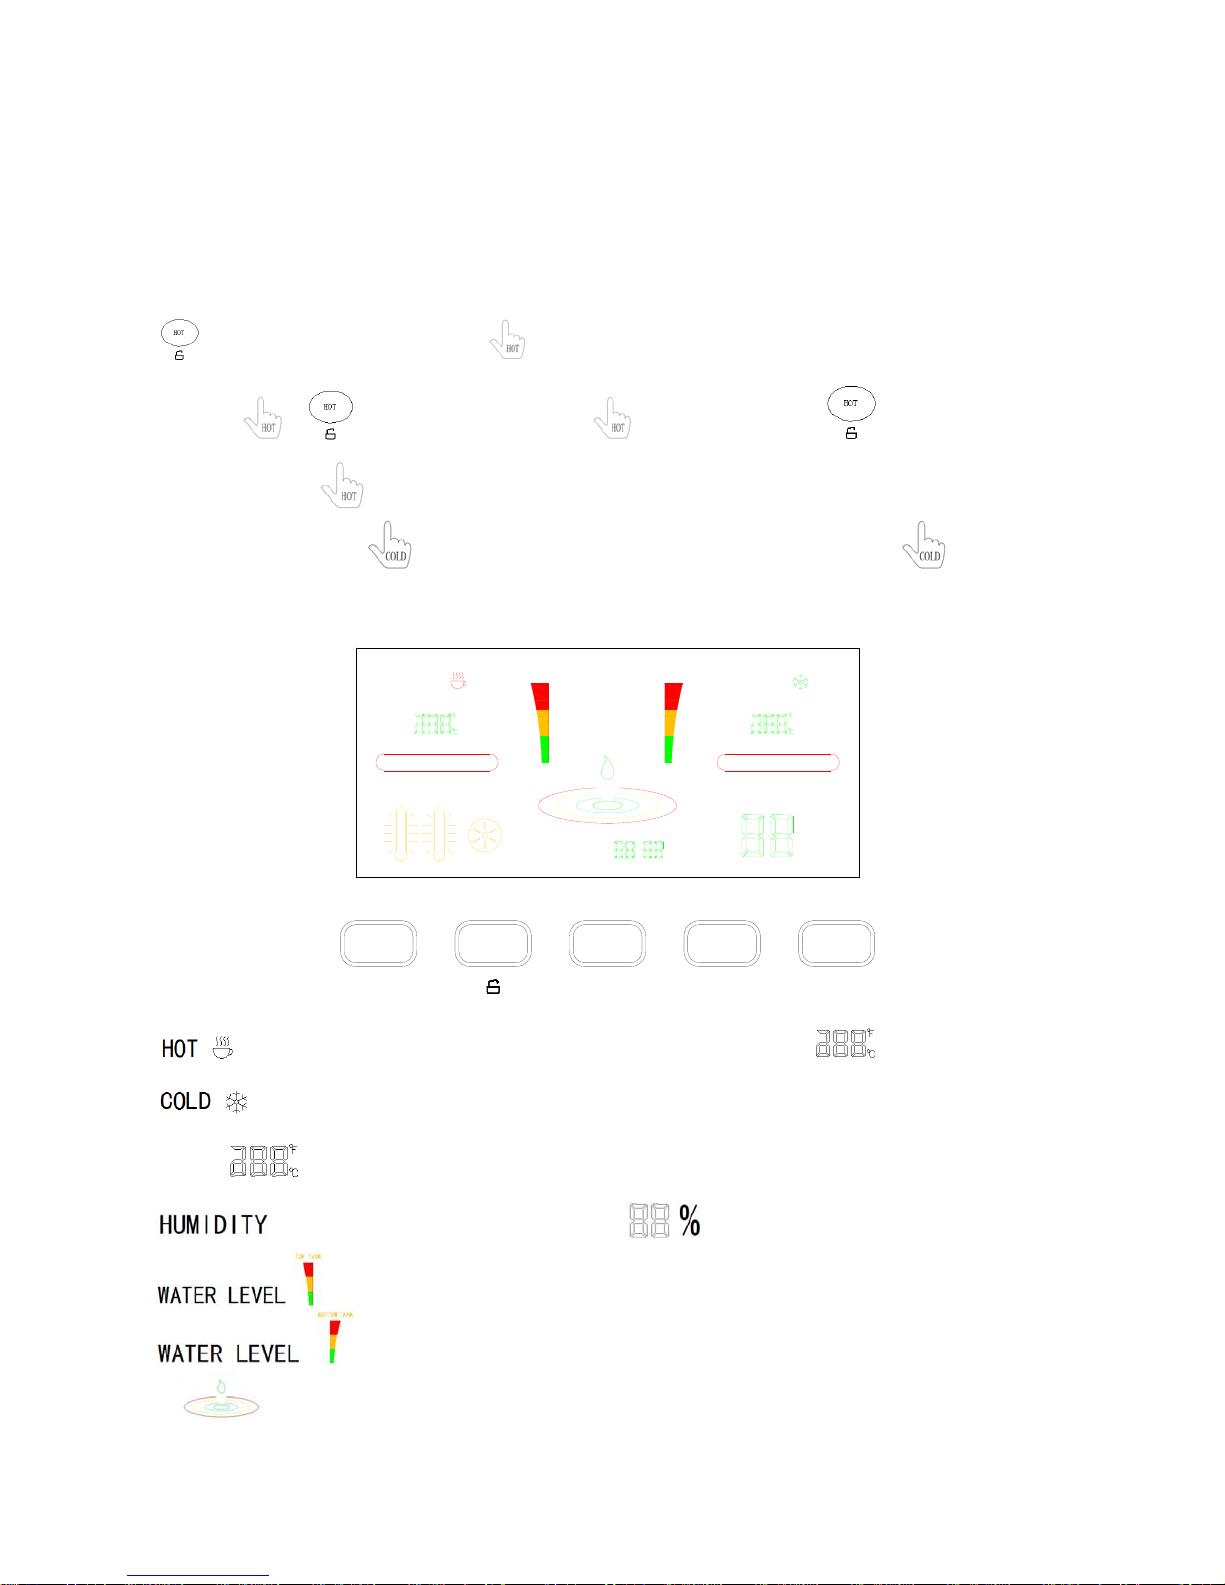
a. Microcomputer board control: This product adopts the microcomputer board control which can guarantee the stable working of
all the internal components and the working conditions of each component inside the machine.
b. Electronic sensor: Each component of the product is accompanied by various kinds of sensors, such as: UV light, heating
apparatus sensors, humidity sensors and ice water sensors. These sensors can ensure that each component inside the product
works coordinately, and can give an alarm automatically when some components fail.
c. Energy conservation: The electronic sensor is installed in the water tank to save electric power. The product will stop producing
water automatically when the sensor induces that the water tank is full, and will stop heating or refrigeration automatically when
the cold water or hot water reaches the set temperature.
d. Child safety lock: The function can prevent children from burns resulting from touching the hot water tap.
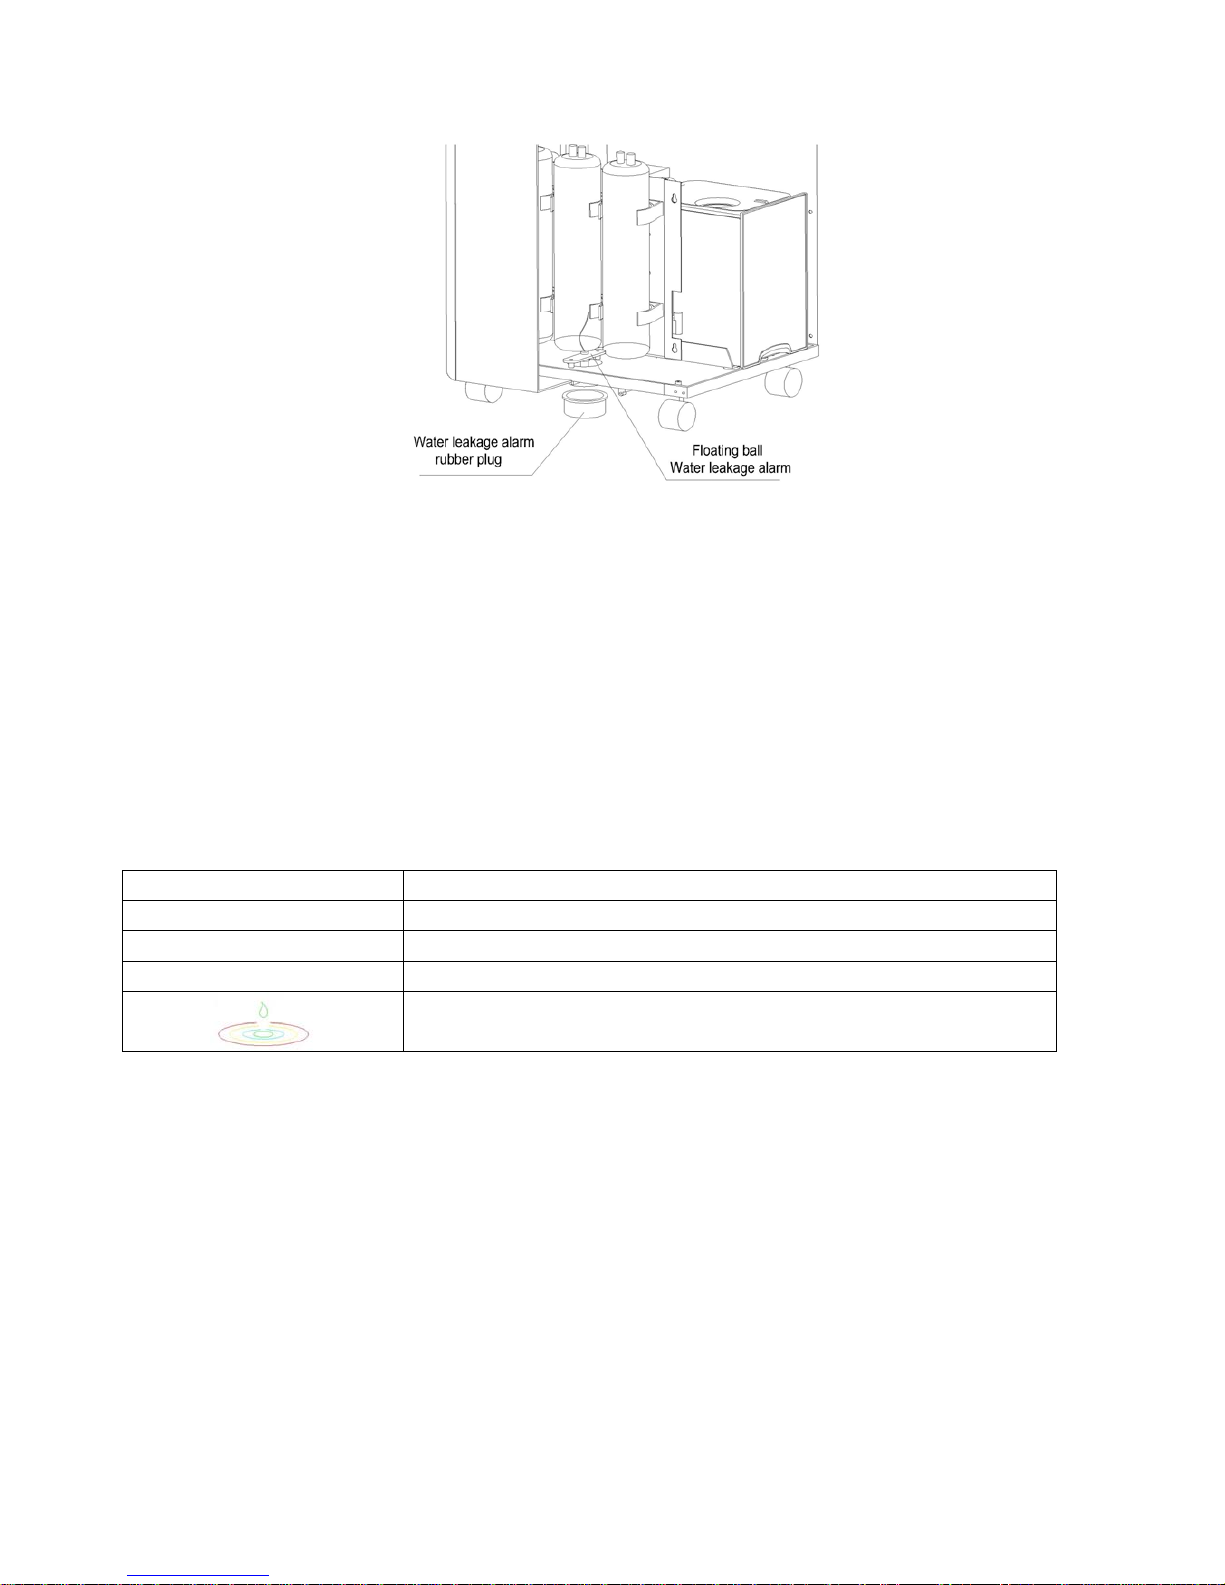
e. Water leakage detector: The machine will stop working automatically and make a sound warning and simultaneously cut off the
power supply under the condition that the water leakage happens.
f. Condensing coil: Adopt the spray finishing of food grade to prevent metallic pollution and improve the working efficiency of
water production.
g. Filter screen: The first layer filter screen is used after air is condensed and converted into water. This filter screen can prevent
effectively harmful bacteria, dust, silt and other floaters from entering the machine.
h. Ultraviolet sterilization treatment: There are special ultraviolet germicidal lamps in the machine to guarantee all the
microorganisms and bacteria in the water can be eliminated. The sterilization process is controlled by the microcomputer

4/9
automatically.
i. Ozone germicidal treatment: The machine possesses special ozone germicidal treatment which can eliminate the bacteria in
raw water and circulating water.
j. Water circulation system: Disinfect the storage water periodically and carry out the RO filtration treatment again to ensure the
bacteria free water.
k. Multistage filtration system: The four-stage filtration system helps our product provide consumers with the drinking water with
high quality and terrific taste.
1) PP fiber filter element: Eliminate suspended solids and silt and other granular impurities.
2) Granular active carbon: With high adsorptive capacity, it can eliminate organics and residual chlorine with abnormal color and
taste and so on.
3) Precise active carbon: Eliminate organic compounds, chlorides, heavy metals and so on.
4) Reverse osmosis RO membrane: Eliminate dangerous bacteria, virus, mineral salts, heavy metals and organic compounds
and so on.
VII. Instructions for use
Used according to the following operation guides and simple maintenance procedures, the machine can work with no faults and
produce the maximum pure drinking water with high quality. Please read carefully the instruction before the product is used, and
you will be very familiar with all the functions of the product after looking through the instruction carefully, which can ensure the
correct use of the machine.
(I): Setting up the machine for use:

5/9
1. Please make sure all the components inside the package are installed well completely. Lay the product on hard and smooth
ground, with the placing location favorable for air ventilation, keep not less than 20 cm away from the wall and pull down the
brake pulley pole to fix the machine.
When the unit placed on the ground with big angle, this part one connect to the middle of the back of unit , the other side connect
to the wall next with unit which could prevent tilt. At the same time Belt brake foot brake.
Note: The “Z” shaped metal sheet is optional, if customers need, could ask for the distributor when you buy or installation.
2. Allow the machine to acclimate for at least 1 hours before plugging onto any power.
3. The limited load current of sockets and power cords shall be not lower than 15 Amp and electric shock protector shall be
installed and grounded well.
4. For the first time operation, it is suggested to fill up the bottom tank with tap water. Turn on the power switch ON/OFF after
being charged until water flows from the hot water tap, press down the button of cold and hot water with 1 L water discharged
respectively, and at last drain the remaining water from the hot water outlet at the back of the machine.
(II): Operating steps
1. The toot sound can be heard after plugging the attaching plug of the machine, which shows that the machine is on standby.
Press the power switch ON/OFF button, and the LED indicator lights. Press the water producing button COLD, and the
compressor starts to work after 1.5 minutes. The machine also has a power failure memory function, call again after power can
automatically return operation.
2. If the machine does not produce cold or hot water in the first 12 hours, there is no need to worry for the users, because the
heating and refrigeration function of the machine will start only when the water level of the machine reaches the appropriate water
line.
3. Pressing the HOT button can start the heating process when there is sufficient water, and the red teacup mark will light and
blink, and if the heating is completed, the mark will only light but not blink. Pressing HEAT button for 5 second can stop heating in
the heating stage.
4. Pressing the COLD button can start the refrigeration process when there is sufficient water, and the green snowflake mark will
light and blink, and if the refrigeration is completed, the mark will only light but not blink. Pressing COLD button can for 5 second
stop refrigeration in the refrigeration stage.
5. Press ℃/F button can achieve the free switch between the centigrade degree and degree Fahrenheit and can close sound by
pressing for 5 seconds.
6. The cooling and heating can start at the same time. The refrigerated water temperature and the hot water temperature will be
kept within the preset range automatically, and the current water temperature will be indicated.
The preset hot water temperature is 87-92℃; the preset cold water temperature is 6-10℃.
7. When it is necessary to replace the filtration system, the REPLACE FILTER icon on the display screen will blink automatically
to remind the user to replace filter elements (please refer to the part of the filter element replacement in the instruction).
8. The system will enter into defrosting status when the ambient temperature is excessive low.
9. The cold water will flow by pressing “”button.
10. The water producing speed will drop in the dry and cold season.
(I): Touch key operation instructions:
1. Power switch “ON/OFF”: “ON/OFF” can keep the machine on standby or not, and LED screen lights.
2. Water producing and cooling water producing button ““COLD”: Press this button to control the cooling system starting and
closing. The icon “ ” will light or flicker.
3. Heating water producing button “HOT”: Press it to start the function of producing hot water and press it again to stop. The icon
“”will light or flicker.
4. Button “SET”: Press this button to set the hot water temperature, the cold water temperature and the clock.

6/9
Step: Press the button one time, the hot water temperature is flickering, then press the button “HOT + ” or “COLD - ” to set the hot
water maximum temperature.
Press the button two time continuous, the cold water temperature is flickering, then press the button “HOT + ” or “COLD - ” to set
the hot water minimum temperature.
Press the button three time continuous, the clock is flickering, then press the button “HOT + ” or “COLD - ” to set the clock.
5. Switching button “℃/F”: Press this button to switch between Celsius and Fahrenheit, and switch sound by pressing it for 5
seconds.
6. “ ” button: children lock, and hot button “ ” are used together.
7. Hot button “ ”+“ ” button: first press the button “ ”, then press the button “ ” you can get hot water, you
can press the hot button“ ”again if you do not need the hot water,the machine is no longer out of hot water.
8. Cold water drainage button “ ”: Press this button to drain cold water. you can press the button“ ”again if you do not
need the cold water,the machine is no longer out of cold water.
(II): Display instructions of LED the display screen.
HOT COLD
WATER
WATER LEVEL
TOP TANK
REPLACE FILTERWATER REFLUX
O3
UV1
℃/ F
HOT SET
CLOCK :
COLD
+-°
HUMIDITY
%
ON/OFF
UV2
BOTTOM TANK
1. “ ”: Hot water producing icon – It is producing hot water if the icon is flickering. : Hot water temperature.
2. “ ”: Cold water producing and Water producing icon – It is producing cold water or producing Water if the icon is
flickering. “ ”: Cold water temperature.
3. “ ”:Humidity icon – It shows the current humidity. “ ”: It shows the current humidity digital.
4. “ ”: Water level display of the upper water tank – Show the current water level of the upper water tank.
5. “ ”:Water level display of the lower water tank – Show the current water level of the lower water tank.
6. “ ”:Water leakage alarm of the system – Icon’s flickering means water leaks from the system and all functions will
be closed, and the other icon will be closed.

7/9
7. “ ”: Water circuit circulation - Icon’s flickering means the water circuit is recycling and the
machine is sterilization.
8. “ ”: Filter element replacement – Icon’s flickering means the filter elements shall be replaced.
9. “ ”: UV light working - Icon’s displaying means the lower UV light is working.
10. “ ”: UV light working - Icon’s displaying means the upper UV light is working.
11. “ ”: Ozone generator working - Icon’s displaying means the Ozone generator is working.
12. “ ”: Time icon– It shows the current time, but need to set the time by hand at the first switching on/off.
1). PP fiber filter element –Replacement time is 3-6 months.
2). Granular activated carbon –Replacement time is 6 months.
3). Precision activated carbon – Replacement time is 6 months.
4). Reverse osmosis RO membrane –System prompt.
Note: 1).The replacement time proposed above is only for reference.
2). We recommend users replace the filter elements after the use for a long time to make sure the filter elements can produce
pure and clean drinking water.
(III) Cleaning
1. Clean air strainer: Rinse it in clean water to remove dust and then install it as it is originally.
2. Clean water receiving box: Take out the water box from the back of the machine, clean it and then put it back.
3. Clean the lower water tank.
(IV) Announcements
1. It is recommended producing at least 3 liters of water per day.
2. If the machine is not used within 2-5 days, please use it after draining 500ml water from the cold water tap, if the machine is not
used over 5 days, we recommend to drain all the water in the water tank and turn off the machine in advance, and for next use,
please operate the system to produce 5L water and drain it out of the machine.
3. If the machine is not used over 7 days or used for a long time over 4 months, please refer to the chapters of Cleaning to Keep
Hygiene and Component Replacement to maintain the machine system clean.
4. For the first use, fill tap water into the lower water tank and make it work automatically until the water tank is full.
5. Drain all the water from the water tap.
6. Identify whether the temperature is within the appropriate appliance range.
7. Please check the indoor air humidity and it will produce little water if the humidity is excessive low.
8. Please check whether the inlet and outlet of air vents are blocked.
9. Please check whether the machine is too close to the wall.
10. Please check whether the voltage is too high or too low.
11. Please check whether BOOSTER pump works properly.
12. Please confirm the machine is laid in a well ventilated place and the air strainer is cleaned constantly to allow air to flow free.
13. Please confirm there is nothing on the machine
14. Please confirm there is no cup on the water receiving box.
15. Special remind: water leakage alarm.

8/9
At the bottom of the machine is provided with a water leakage alarm float ball, when the machine water leakage, the floating ball
float, machine alarm. Only when the water leakage plug is pulled, will let out the water, the floating ball falls, the alarm can be
relieved.
VIII. Technical Parameters
a. Product dimensions
Width*Length* Height: 41 * 41 * 111 cm Packing dimensions:46 *46 *117cm Gross/Net weight: 46/49 KG
b. Power supply: 120V/60 Hz Capacity: 38L/24h (27℃/RH70%) Total input Power: 1250W Heating Power: 550W
Cooling Power: 600W Air water making Power: 700W Refrigerant & amount : R410A/540g
c. Water quality coefficient
Working humidity: RH40%-95% Climate type: SN/N
Water storage capacity: 12.5 L Temperature for cold water: 6℃-10℃Temperature for hot water: 87℃-92℃
IX.Problems indication
E1 Sensor for hot water temperature error
E2 Sensor for cold water temperature error
E3 Sensor for climate temperature error
E4 Hot water temperature ≥100℃
Water leakage alarm of the system – Icon’s flickering means water leaks from the
system and all functions will be closed, and the other icon will be closed.
X. Electrical diagrams

9/9
XI. Packing list
Carton box Atmospheric water generator(1pcs);
Information package Instruction manual(1pcs);
Popular Water Dispenser manuals by other brands

GreenTech
GreenTech pureWash ProX2 owner's manual

BWT
BWT Rondomat Duo Series Installation and operating manual

Bunn
Bunn H5E Installation & operating guide

Crysalli
Crysalli CR-2 Installation & service manual

vitapur
vitapur VWD5206W Use & care guide

Neptune
Neptune WTA Series Installation, operation and maintenance manual