Aquatic MP6 Guide

USER / INSTALLATION MANUAL
MP600
MP6 Basic DIN Series Stereo
WATERPROOF STEREO
! PLEASE READ THIS INSTALLATION GUIDE BEFORE
INSTALLATION AND OPERATION !
If you have any questions, visit support.aquaticav.com
or your nearest authorized dealer.
CHARGING
RADIO
AM/FM
RADIO
AM/FM
288W
POWER
TRIGGER
12V
TRIGGERS
12V
DSP EQ
DSP EQ

1Getting Started...................................................................
1.1 Contents............................................................................
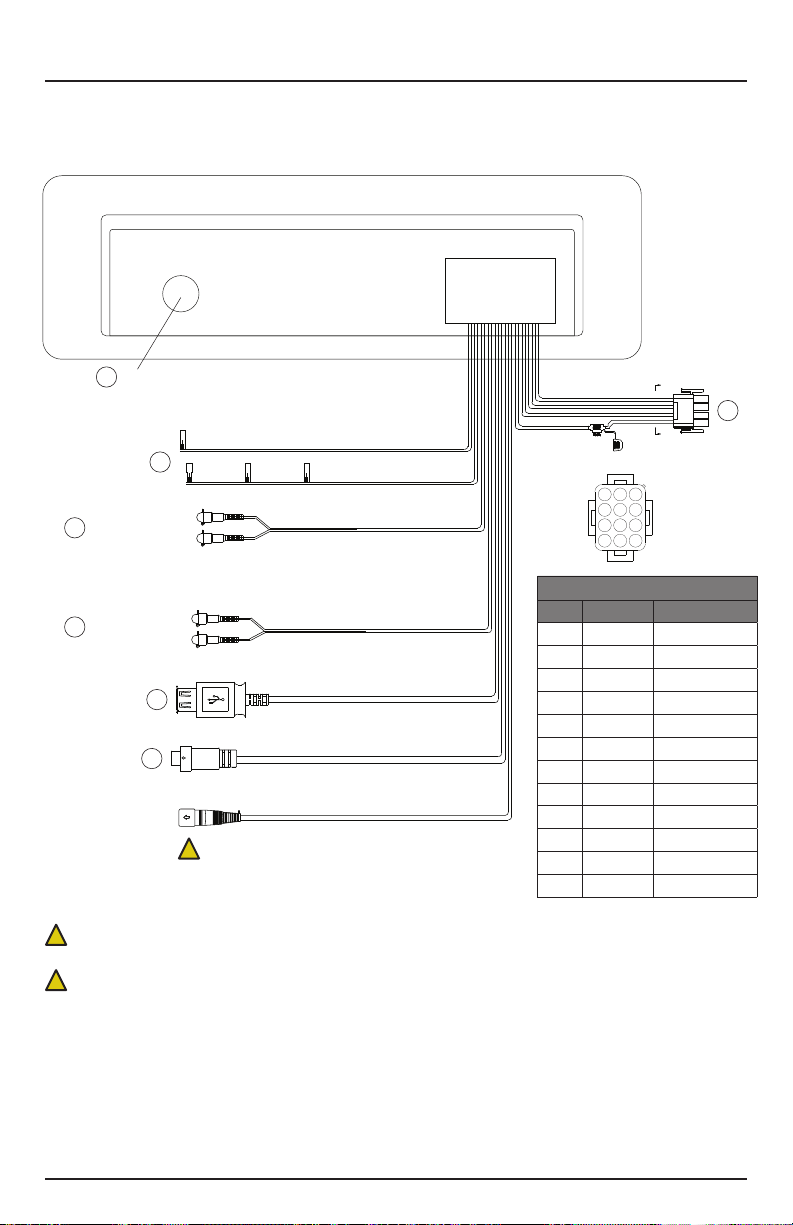
1.2 Connections......................................................................
1.3 Connections Diagram......................................................
1.4 Power On..........................................................................
1.5 Installation........................................................................
1.5.1 Mounting Hole...........................................................
1.5.2 Installation.................................................................
2Controlling the Stereo.......................................................
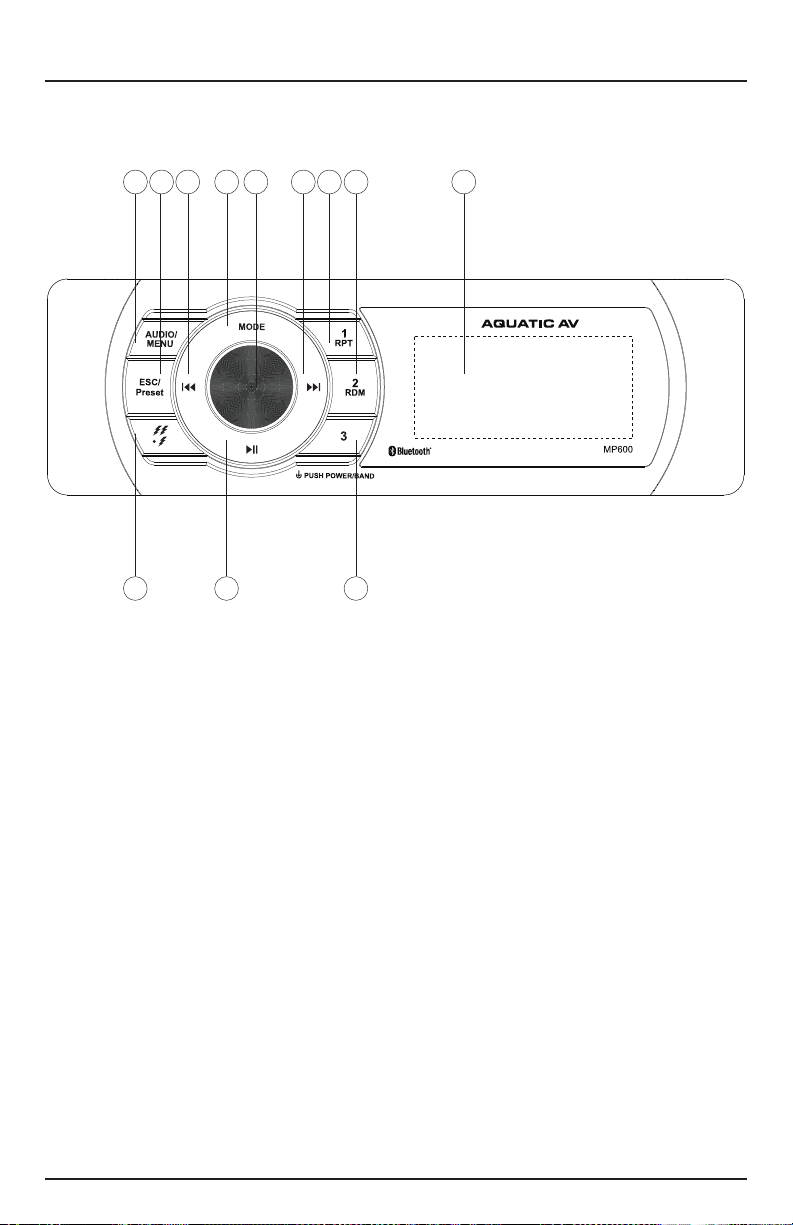
2.1 Location of Controls.........................................................
2.2 Control Functions.............................................................
3Listening via Bluetooth......................................................
3.1 Listening via Bluetooth....................................................
3.2 Pair with Bluetooth Audio Device....................................
3.3 Listening via Bluetooth Audio Device.............................
3.4 Bluetooth Multi-Link.........................................................
4Listening via USB..............................................................
4.1 Listening via USB.............................................................
4.2 Direct Search by Folder/File............................................
4.3 Direct Search by Track Number.......................................
4.4 Random Playback............................................................
4.5 Repeat Playback..............................................................
4.6 Device Charging...............................................................
5Listening to DAB+ Digital Radio.........................................
5.1 What is DAB+ Digital Radio?............................................
5.2 Listening to DAB+ Digital Radio......................................
5.3 Manually Save DAB+ Stations to Memory......................
5.4 Automatically Save DAB+ Stations to Memory..............
5.5 Listening to Saved Radio Memory...................................
6Listening to AM/FM Radio.................................................
6.1 Listening to AM/FM Radio...............................................
6.2 Manually Save AM/FM Radio Stations to Memory.........
6.3 Automatically Save AM/FM Radio Stations to Memory.
6.4 Listening to Saved Radio Memory...................................
3
3
3
4
5
6
6
6
8
8
9
10
10
10
10
10
10
11
11
11
11
11
11
11
12
12
12
12
12
12
13
13
13
13
7Audio & Settings Menus...................................................
7.1 Audio Menu......................................................................
7.1.1 Beep Tone................................................................
7.1.2 EQ..............................................................................
7.1.3 Loudness...................................................................
7.2 Setting Menu...................................................................
7.2.1 Dimmer High/Low.....................................................
7.2.2 Priority Display (Info/Clock).....................................
7.2.3 Power On Volume.....................................................
7.2.4 Area US/Euro............................................................
7.2.5 Local On/Off.............................................................
7.2.6 Stereo/Mono.............................................................
7.2.7 Clock Settings...........................................................
7.2.8 Bluetooth Off/Link....................................................
7.2.9 Restore......................................................................
8Additional Features...........................................................
8.1 Listening to Auxiliary Devices.........................................
8.2 External 12V Triggers......................................................
9Specications & Dimensions............................................
9.1 Specications..................................................................
9.2 Dimensions......................................................................
10 Warranty Information.....................................................
14
14
14
14
14
14
14
15
15
15
15
15
15
15
15
16
16
16
17
17
17
18
Contents
MP600: MP6 Basic DIN Series Stereo
Table of Contents
www.aquaticav.com
2

• MP600 Waterproof Stereo
• Silicon Faceplate
• User/Installation Manual
• Mounting Chassis and Hardware
• Four (4) Stainless Steel Mounting Screws*
• Mounting Template*
1.1 Contents
1. 12-pin Watertight Harness*
The 12-pin harness supplies power and ground connections to the stereo and
four (4) speaker channel output connections from the stereo.
Do not cut or modify the 12-pin harness on the stereo side or warranty will be void.
2. AM/FM Radio Antenna Jack
Allows connection of AM/FM radio antenna. For best AM/FM performance
make sure the antenna is extended to the highest achievable position.
3. Auxiliary Outputs
Allows external amplifiers to be connected to power additional speakers.
4. Auxiliary Inputs
Allows an additional RCA input, from a standalone unit or another stereo
source.
5. 12V DC External Trigger (x2)
Allows for external lighting or relays to be triggered (3A max load).
6. USB Input
Play USB thumb drives with supported audio media and charge devices when
connected.
7. DAB Input Cable
Allows connection of the AQ-DAB+ Digital Radio Receiver (sold separately).
1.2 Connections (see Connections Diagram 1.3)
*Retail packaged models only.
!
MP600: MP6 Basic DIN Series Stereo
Getting Started
www.aquaticav.com
3

1
4
7
10
2
A- A
5
8
11
3
6
9
12
A
A
FUSE
1.3 Connections Diagram
All open wire connections should be soldered and protected against water and dust for best long-
term performance.
No lower than a 2 Ohm speaker load should be used or damage may occur to the stereo. Make
sure the polarity of speakers is connected correctly.
*Retail packaged models only.
AM/FM Radio Antenna Jack
12-pin Watertight Harness*
Pin No. Wire Color Description
1 Green LR Speaker (+)
2 Green/Black LR Speaker (-)
3 Red Acc (+12V)
4 White LF Speaker (+)
5 White/Black LF Speaker (-)
6 Yellow Battery (+12V)
7 Gray RF Speaker (+)
8 Gray/Black RF Speaker (-)
9 Blue Power AMP Remote
10 Violet RR Speaker (+)
11 Violet/Black RR Speaker (-)
12 Black Ground
12V DC External Trigger 1 (Brown)
12V DC External Trigger 2 (Brown)
RCA Auxiliary Inputs (Black)
RCA Auxiliary Outputs (Gray)
USB Input (Black)
DAB Input (Black)
Wired Remote Connector (Black)
12-pin Watertight Harness*
Fuse
Right Channel (Red)
Left Channel (White)
Right Channel (Red)
Left Channel (White)
1
2
4
3
5
6
7
!
!
The Wired Remote Control feature is not currently supported
on the MP600. Please do not use this connector.
!
MP600: MP6 Basic DIN Series Stereo
Getting Started
www.aquaticav.com
4

In a spa application the red and yellow wires should be jumped together and
then connected to the +12VDC output of the power source. In this set up the
MP600 will always be on, with a very low current draw when idle.
In a boat, ATV or other application requiring power from a battery, the yellow
wire (constant power) should be connected to the battery, and the red wire
should be connected to the ignition or a switch.
Once all connections are made press the rotary knob and the stereo will turn
ON. Press and hold rotary knob for 2 seconds to turn the unit OFF.
1.4 Power On
MP600: MP6 Basic DIN Series Stereo
Getting Started
www.aquaticav.com
5

PLEASE READ THIS INSTRUCTION MANUAL BEFORE INSTALLATION AND
OPERATION.
Aquatic AV recommends installtion of this stereo by a professional
technician.
A mounting template is included (retail packaged models only). Aquatic AV
recommends using the ‘measure twice, cut once’ method!
1. Check clearances on both sides of a planned installation area before drilling
any holes.
2. Cut the mounting hole using the method detailed below.
3. When routing RCA cables, keep them away from power cables and output
speaker wires.
4. Once complete make sure the outside surface is clean and clear of debris.
The MP600 stereo has an external water/dust proof gasket which requires a
clean and at surface for best performance.
1.5 Installation
*Retail packaged models only.
1.5.1 Mounting Hole
1. Using a jigsaw cut a rectangluar hole with dimensions 183mm (W) x 53mm
(H).
1. Slide the mounting sleeve into mounting hole.
2. Remove mounting sleeve handles by bending the backing bracket handles
until they break off as shown below.
1.5.2 Installation
183mm
53mm
Not to scale!
Please use
the mounting
template
provided*
!
MP600: MP6 Basic DIN Series Stereo
Getting Started
www.aquaticav.com
6

Make sure to connect other wires before power connection.
3. Remove the front trim covers from the MP600 stereo to reveal the four (4)
front locking screws.
4. Slide the MP600 stereo into the mounting sleeve and through the mounting
hole and secure the stereo using the front locking screws and a screwdriver.
During nal mounting, apply equal pressure to all points for the best water/
dust outer seal performance. Make sure screws are snug and do not over
tighten.
5. Review all outside surfaces of the MP600 stereo to ensure a proper
water/dust seal. This is important for long-term environmental protection
performance.
6. After installation is complete snap the trim covers back rmly in to place to
cover the screw holes.
7. After installation in complete snap the trim covers back rmly in to place to
cover the screw holes.
1.5.2 Installation cont.
Dashboard
Mounting Hole
(183 x 53mm)
Mounting Sleeve
Locking
Screws
MP600
Trim Cover
!
MP600: MP6 Basic DIN Series Stereo
Getting Started
www.aquaticav.com
7

1. Audio/Menu
2. ESC/Preset
3. Fast Rewind
4. Mode button
5. Rotary Selector
6. Fast Forward
7. Preset 1 / Repeat Playback
8. Preset 2 / Random Playback
9. LCD Display
10. 12V Triggers
11. Play/Pause
12. Preset 3
2.1 Location of Controls
1 2 3 4 5 6
12
10 11
7 8 9
MP600: MP6 Basic DIN Series Stereo
Controlling the Stereo
www.aquaticav.com
8

2.2 Control Functions
If your music player is connected via the Auxiliary input you will not be able to control track or
receive track information.
Button Action AM/FM USB BLUETOOTH DAB AUX
Audio/Menu Short Press Audio Menu: Bass - Treble - Balance - Fader - Beep - EQ - Loud
Long Press Settings Menu: Dim H/L - PRI Info/Clk - P-Vol - Area US/Euro - Loc On/Off - Stereo/Mono -
Clock Set - BT Off/Link - Restore
ESC/Preset Short Press 1) In MENU: EXIT
2) In FM: CH1-> CH2-
> CH3->
CH4-> CH5->
CH6-> CH1…
1) In MENU: EXIT
2) In USB: Direct
Search / Number
Search
1) In MENU: EXIT
2) In BT: No Function
1) In MENU: EXIT
2) In DAB: CH1->
CH2-> CH3->
CH4-> CH5->
CH6-> CH1…
1) In MENU: EXIT
2) In AUX: No
Function
Long Press Auto Store No Function No Function DAB Scan No Function
Fast Rewind Short Press Seek Down Previous Track Previous Track Previous Station No Function
Long Press Manual Tune Fast Rewind No Function No Function No Function
Fast Forward Short Press Seek Up Next Track Next Track Next Station No Function
Long Press Manual Tune Fast Forward No Function No Function No Function
Play/Pause Short Press Mute Play/Pause Play/Pause Mute Mute
Long Press Manual Tune No Function No Function Manual Store No Function
Mode/Disp Short Press Changes Source
Long Press Display Clock/Info
1/RPT Short Press Preset Ch.1 Read Repeat One /
Repeat All
No Function Preset Ch.1 Read Display Software
Version
Long Press Preset Ch.1 Save DIR / Folder Down No Function Preset Ch.1 Save No Function
2/RDM Short Press Preset Ch.2 Read Random No Function Preset Ch.2 Read No Function
Long Press Preset Ch.2 Save DIR / Folder Up No Function Preset Ch.2 Save No Function
3 Short Press Preset Ch.3 Read No Function No Function Preset Ch.3 Read No Function
Long Press Preset Ch.3 Save No Function No Function Preset Ch.3 Save No Function
Rotary Selector Rotate Volume Up/Down and Navigate Menus
Power/Band
(Push Rotary
Selector)
Short Press Power On / Band
Change / Enter
Enter when in Menu Power On Band Change / Enter Power On
Long Press Power Off
12V Triggers Short Press 12V DC Trigger 1 Output On/Off
Long Press 12V DC Trigger 2 Output On/Off
Navigating past the last Settings Menu item (Restore) will automatically exit the Settings Menu
and enter the Audio Menu. Press and hold Audio/Menu button to enter the Settings Menu again.
MP600: MP6 Basic DIN Series Stereo
Controlling the Stereo
www.aquaticav.com
9

1. Enable Bluetooth Audio mode by pressing MODE and selecting Bluetooth.
2. Switch on your Bluetooth Audio device.
3. Select ‘MP6’ from the list of available devices to pair. No password should
be required however if prompted for a password use ‘0000’.
4. A Bluetooth logo will illuminate on the stereo’s LCD to verify Bluetooth is
connected.
3.2 Pair with Bluetooth Audio Device
3.1 Listening via Bluetooth
The Bluetooth Audio menu is accessible by pressing the Audio/Menu button
and is used to connect a Bluetooth Audio device or disconnect a Bluetooth
Audio device that has already been paired.
3.3 Listening via Bluetooth Audio Device
1. Bluetooth Audio mode will be activated once a Bluetooth Audio device is
paired in any mode. Use MODE to change to Bluetooth Audio mode to listen to
music from your device.
2. Play the song from device and the sound will play through the stereo.
3. Press PLAY/PAUSE to play/pause the song.
4. Press FAST REWIND/FORWARD buttons to play previous/next song le.
5. Previous/next track and volume up/down can also be controlled directly
from your Bluetooth Audio device.
3.4 Bluetooth Multi-link
A second Bluetooth Audio device can pair to the stereo even when music is
playing from the rst Bluetooth Audio device.
Once paired, playing music from device 2 will override device 1 and the stereo
will begin playing music from device 2.
Should you wish to play music from device 1 again, wait 10 seconds and
press play on device 1. This process can be repeated between device 1 and
device 2 indenitely while both devices are paired.
MP600: MP6 Basic DIN Series Stereo
Listening via Bluetooth
www.aquaticav.com
10

4.6 Device Charging
When specied USB devices such as Smartphones or MP3 players are con-
nected with a standard male-to-female USB cable the device’s battery will
charge automatically. The USB connection will deliver 2.1A of current to
charge a device battery.
4.1 Listening via USB
1. Attach your USB thumb drive to the female USB connector.
2. If your USB device is readable then USB source mode will be automatically
selected and your compatible content will begin to play.
3. Press PLAY/PAUSE to play or pause the music.
4. Press FAST REWIND / FAST FORWARD once play previous / next song le.
5. Press and hold FAST REWIND / FAST FORWARD to fast forward / fast
rewind the song le.
Playback and navigation of music les via USB includes MP3 and WMA les.
4.4 Random Playback
Press the RDM button to toggle Random Play on or off.
4.5 Repeat Playback
Press the RPT button to toggle Repeat One or Repeat All.
1. Press ESC/Preset once and display will show ‘DIR SCH’
2. Turn the Rotary Selector to select a desired folder. (If you have les in the
Root, select ‘Root’). Then press the Rotary Selector to enter into that folder.
3. Turn the Rotary Selector to select the desired le that you wish to play. Only
compatible les will be displayed.
4. You can either allow the unit to auto select the track that is being displayed
or press the Rotary Selector to select the desired track.
4.2 Direct Search by Folder/File
1. Press ESC/Preset twice and the display will show ‘NUM SCH’
2. Turn the Rotary Selector to select the desired track number. Turning clock-
wise will increase the track number and turning anti-Clock-wise will decrease
the track number.
3. You can either allow the unit to auto select the track that is being displayed
or press the Rotary Selector to select the desired track.
4.3 Direct Search by Track number
MP600: MP6 Basic DIN Series Stereo
Listening via USB
www.aquaticav.com
11

5.3 Manually Save DAB+ Stations to Memory
1. Tune to the station you would like to be saved as a preset.
2. Press and hold the Play/Pause button and the stereo will display ‘SAVE
CH1’.
3. Turn the Rotary Selector to select the desired preset slot you would like to
save the current station to.
4. Press the Rotary Selector to save the preset.
5. Upon successfully saving a preset the preset number that was chosen will
be shown in the right corner.
Presets are only for the current band you are on. Each band has six presets for a total of 18
presets.
5.4 Automatically Save DAB+ Stations to Memory
Press and hold the ESC/Preset button for 2 seconds to auto store stations to
numeric buttons 1-6 of bands 1-3.
5.1 What Is DAB+ Digital Radio?
DAB+ Digital Radio provides access to hundreds of stations when used with
Aquatic AV’s Digital Radio Receiver AQ-DAB+ (sold separately). DAB+ is only
available within certain countries - please check your local network for more
information.
5.5 Listening to Saved Radio Memory
Press button 1, 2 or 3 to listen to preset 1, 2 or 3 respectively; or alternatively:
1. Press the ESC/Preset button to display your presets.
2. Turn the Rotary Selector to navigate to the desired preset.
3. Press the Rotary Selector to listen to the preset.
When a DAB station is received the station’s clock will auto update the stereo’s clock.
1. Connect the AQ-DAB+ Digital Radio Receiver (sold separately) to the stereo.
2. Enter DAB+ mode by pressing MODE and selecting DAB.
3. The rst time DAB+ mode is used the stereo will automatically scan all
available DAB+ stations.
4. If required, to re-scan for new stations, press and hold the ESC/Preset
button for 2 seconds to scan all available DAB+ stations.
5. Navigate the available stations using the Fast Forward/Fast Rewind
buttons.
6. Select the desired station by pressing the Rotary Selector button.
7. Press the Rotary Selector to change the DAB+ radio band.
5.2 Listening to DAB+ Digital Radio
Always ensure you connect and disconnect the stereo with dry hands!
!
MP600: MP6 Basic DIN Series Stereo
Listening to DAB+ Digital Radio
www.aquaticav.com
12

6.2 Manually Save AM/FM Radio Stations to Memory
1. Tune to the station you would like to be saved as a preset.
2. Press and hold the Play/Pause button and the stereo will display ‘SAVE
CH1’.
3. Turn the Rotary Selector to select the desired preset slot you would like to
save the current station to.
4. Press the Rotary Selector to save the preset.
5. Upon successfully saving a preset the preset number that was chosen will
be shown in the right corner.
Presets are only for the current band you are on. Each band FM1, FM2, FM3, AM1 and AM2 has
six presets for a total of 30 (18x FM & 12x AM).
6.1 Listening to AM/FM Radio
1. Enter radio mode by pressing MODE and selecting RADIO.
2. Navigate the available stations using the Fast Forward/Fast Rewind
buttons.
3. Select the desired station by pressing the Rotary Selector button.
4. Press FAST REWIND/FAST FORWARD to seek another station.
5. Press and hold FAST REWIND/FAST FORWARD for manual tuning. (Manual
tuning will time out after 5 seconds of no action then we revert back to Seek/
Auto).
6. Press the Rotary Selector to change the AM/FM radio band.
6.3 Automatically Save AM/FM Radio Stations to Memory
Press and hold the ESC/Preset button for 2 seconds to auto store stations to
preset locations 1-6 of bands 1-3.
6.4 Listening to Saved Radio Memory
Press button 1, 2 or 3 to listen to preset 1, 2 or 3 respectively; or alternatively:
1. Press the ESC/Preset button to display your presets.
2. Turn the Rotary Selector to navigate to the desired preset.
3. Press the Rotary Selector to listen to the preset.
MP600: MP6 Basic DIN Series Stereo
Listening to AM/FM Radio
www.aquaticav.com
13

7.1 Audio Menu
Any changes made in the Audio menu are system wide and will affect all modes.
1. Press the AUDIO/MENU button to enter the Audio menu. The available
Audio options are:
BASS - TREBLE - BALANCE - FADER - BEEP - EQ - LOUD
2. Turn the Rotating Selector to navigate the menu options.
3. Press the Rotary Selector to open the desired Audio option or conrm
changes to the Audio settings.
7.1.2 EQ
The MP600 stereo is equipped with an audio DSP (Digital Signal Processor)
to provide preset listening experiences for different music types. If you have
chosen a preset equalizer setting (Flat, Rock, Classic, or Pop) the previous
Bass & Treble settings will be overridden.
7.1.1 Beep Tone
The beep tone plays when any button is pressed and can be switched on and
off from this selection.
7.1.3 Loudness
Increases the sound output level by
15dB.
7.2 Settings Menu
Any changes made in the Audio menu are system wide and will affect all modes.
1. Press and hold the AUDIO/MENU button to enter the Settings menu. The
available Settings options are:
DIM H/L - PRI INFO/CLK - P-VOL - AREA USA/EUR - LOC ON/OFF -
STEREO/MONO - CLOCKSET - BT OFF/LINK - RESTORE
2. Turn the Rotating Selector to navigate the menu options.
3. Press the Rotary Selector to open the desired Audio option or conrm
changes to the Audio settings.
7.2.1 Dimmer High/Low
Adjust the display brightness from 100% for normal operation to 30%
brightness to reduce screen glare during night time operation.
MP600: MP6 Basic DIN Series Stereo
Audio & Settings Menus
www.aquaticav.com
14

7.2.9 Restore
Restores all factory settings.
7.2.3 Power On Volume
Sets the maximum volume the stereo will be set when powering the unit on. If
the stereo is switched off with a lower volume than the P-Vol setting then the
lower volume setting will be used.
Normal volume control and operation is resumed once the Rotary Selector is
turned after switching the stereo on.
7.2.4 Area US/Euro
Select US or European AM/FM radio frequencies.
7.2.6 Stereo/Mono
Change the output mode between stereo and mono. Some applications only
accept a mono input.
7.2.7 Clock Settings
Adjust the time and switch the clock on or off.
7.2.8 Bluetooth Off/Link
Switches Bluetooth connectivity on or off. All paired devices will be discon-
nected in Bluetooth Off mode.
US mode will increase and decrease the FM frequency in steps of 0.1 MHz, e.g. 88.5, 88.6,88.7
MHz. EUR mode will increase and decrease the FM frequency in steps of 0.05 MHz, e.g. 88.25,
88.30, 88.35 MHz.
7.2.5 Local On/Off
When Local is turned on the stereo seeks to only the radio channels with
strong signal strength. When Local is turned off the stereo will seek to all
radio channels it receives signal from.
When Local setting is turned on the word ‘Local’ will appear in the upper right hand corner of the
stereo’s display.
7.2.2 Priority Display (Info/Clock)
When set it to PRI INFO the display will by default show information relating
to the music being played. Press and hold the MODE button to display the
clock for 5 seconds.
When set it to PRI CLK the display will by default show the clock. Pressing
any key it will display information relating to the music being played for 5
seconds.
MP600: MP6 Basic DIN Series Stereo
Settings Operation
www.aquaticav.com
15

The MP600 stereo has two independent 12V ‘accessory’ triggers. These could
activate any 12V based device, such as 12V lights or 12V motors.
In any operational mode, press the 12V TRIGGER button to activate. Press
again to deactivate.
If using two external trigger wires you can also activate the second external
trigger by pressing and holding the 12V TRIGGER button to activate. Press
and hold again to deactivate.
8.2 External 12V Triggers
Aquatic AV strongly recommend you speak to our technical service staff or your local Aquatic AV
dealer if you are considering using this feature.
8.1 Listening to Auxiliary Devices
1. Connect your audio device to the rear RCA connectors using a stereo RCA
cable.
2. Press MODE on the stereo to select ‘AUX’ mode.
3. Play the song from your auxiliary audio device and the sound will play
through the stereo.
Always ensure you connect and disconnect the stereo with dry hands!
!
Load on External Trigger should not exceed 3A.
!
MP600: MP6 Basic DIN Series Stereo
Additional Features
www.aquaticav.com
16

9.1 Specications
9.2 Dimensions
107mm
32mm
25.2mm
65.2mm
210mm
97mm
170mm
196.2mm
36mm
48mm
Media
Supported Media.....................................................
Device Charging......................................................
Inputs
Auxiliary....................................................................
Outputs
Pre-Out.....................................................................
12V Trigger...............................................................
Power
Output Voltage @ 2 Ohm........................................
Output Voltage @ 4 Ohm........................................
Operation Voltage...................................................
Max Current Draw....................................................
Standby Current Draw.............................................
Radio
DAB+ Digital Radio..................................................
AM/FM Radio..........................................................
Multi-Environment Certications
Waterproof / Dustproof..........................................
Conformal PCB Coating..........................................
UV Protection..........................................................
Salt/Fog Protection................................................
Stainless Steel Mountings.....................................
Bluetooth Audio / USB / DAB+ / MP3 / AM /
FM / AUX
via rear USB cable (2.1A)
1x stereo pair RCA
1x stereo pair RCA (2V)
2x 12V triggers (3A)
4x 72W
4x 45W
10.5V - 14.4V DC
10A
<3mA
18 pre-set memory
Requires AQ-DAB+ Radio Receiver (sold
separately)
18x FM pre-set & 12x AM pre-set memory. US/
Euro frequencies
US: FM 88.7 to 108.0 (100kHz spacing). AM
530 to 1710 (10kHz spacing)
EURO: FM 87.5 to 108.0 (50kHz spacing). AM
522 to 1620 (9kHz spacing)
IP65
Yes
500 hours stable, ASTM D4329 compliant
500 hours stable, ASTM B117 compliant
Yes
MP600: MP6 Basic DIN Series Stereo
Specications & Dimensions
www.aquaticav.com
17

Aquatic AV offers a limited warranty of our products on the following terms:
Length of warranty
2 years on audio systems, electronics, speakers, and accessories (receipt
required).
Coverage
This warranty covers only the original purchaser of an Aquatic AV product
purchased from an authorized Aquatic AV dealer. In order to receive service,
the purchaser must provide Aquatic AV with a copy of the receipt stating the
customer name, dealer name, product purchased and date of purchase.
Defective products
Products found to be defective during the warranty period will be repaired or
replaced (with a product deemed to be equivalent) at Aquatic AV’s discretion.
What is not covered
Damage caused by accident, abuse, improper operations or theft. Any
cost or expense related to the removal or reinstallation of product. Service
performed by anyone other than an authorized Aquatic AV service center. Any
product with the serial number or tamper labels defaced, altered, or removed.
Subsequent damage to other components. Any product not purchased from
an authorized Aquatic AV dealer.
Limit on implied warranties
Any implied warranties including warranties of tness for use and
merchantability are limited in duration to the period of the express warranty
set forth above. Some states do not allow limitations on the length of an
implied warranty, so this limitation may not apply. No person is authorized to
assume for Aquatic AV any other liability in connection with the sale of the
product.
How to obtain service
You must obtain a return material authorization number (RMA) to return any
product to Aquatic AV. You are responsible for shipping charges of returned
products to Aquatic AV.
Please record the model and serial number[s] of your equipment in the space
provided below as your permanent record and will assist us with your factory
warranty coverage. These numbers can be found on the rear of the stereo.
Model number[s]: Serial number[s]:
MP600: MP6 Basic DIN Series Stereo
Warranty Information
www.aquaticav.com
18

Product design and specication subject to change without notice. E&OE.
Doc V1.5
FCC ID:
MADE IN CHINA
FCC Statement to the User
This equipment has been tested and found to comply with the limits
for a Class B digital device, pursuant to Part 15 of the FCC Rules. These
limits are designed to provide reasonable protection against harmful
interference in a residential installation. This equipment generates, uses
and can radiate radio frequency energy and, if not installed and used
in accordance with the instructions, may cause harmful interference to
radio communications. However, there is no guarantee that interference
will not occur in a particular installation. If this equipment does cause
harmful interference to radio or television reception, which can be
determined by turning the equipment off and on, the user is encouraged
to try to correct the interference by one of the following measures:
1. Reorient or relocate the receiving antenna.
2. Connect the equipment into an outlet on a circuit different from that to
which the receiver is connected.
3. Increase the separation between the equipment and receiver.
4. Consult the dealer or an experienced radio/TV technician for help.
FCC Caution:
Any changes or modications not expressly approved by the party
responsible for compliance could void the user’s authority to operate this
equipment.
This device complies with Part 15 of the FCC Rules. Operation is subject
to the following two conditions: (1) This device may not cause harmful
interference, and (2) this device must accept any interference received,
including interference that may cause undesired operation
MP600: MP6 Basic DIN Series Stereo
FCC Statement
www.aquaticav.com
19

282 Kinney Drive • San Jose, CA 95112 • USA
Direct: 1-408-559-1668 • Toll-free: 1-877-579-2782
WWW.AQUATICAV.COM
Get the latest Aquatic AV®updates and special
deals when you sign up for our newsletters
This manual suits for next models
1
Table of contents
Other Aquatic Stereo System manuals