aram huvis Aramo Smart NavigatorII-100 User manual

ASNII-100
User’s Manual
Aramo Smart Navigator
SKIN DIAGNOSIS SYSEM
Aramo Smart NavigatorII-100

FCC Statement
This device complies with Part 15 of the FCC Rules. Operation is subject to the following
two conditions:
(1) This device may not cause harmful interference. and
(2) This device must accept any interference received, including interference that may cause
undesired operation.
Caution
Any changes or modifications (including the antenna) made to this device that are not
expressly approved by the manufacturer may void the user’s authority to operate the
equipment.
This equipment has been tested and found to comply with the limits for a Class B digital
device, pursuant to part 15 of the FCC Rules. These limits are designed to provide reasonable
protection against harmful interference in a residential installation.
This equipment generates uses and can radiate radio frequency energy and, if not installed
and used in accordance with the instructions, may cause harmful interference to radio
communications. However, there is no guarantee that interference will not occur in a
particular installation. If this equipment does cause harmful interference to radio or television
reception, which can be determined by turning the equipment off and on, the user is
encouraged to try to correct the interference by one or more of the following measures:
—Reorient or relocate the receiving antenna.
—Increase the separation between the equipment and receiver.
—Connect the equipment into an outlet on a circuit different from that to which the receiver
is connected.
—Consult the dealer or an experienced radio/TV technician for help.

Content
1. How to use
2. How to operate
•System setting
•Wireless & network setting
3. How to diagnosis
•Full mode
•View mode
4. How to set
5. Additional information
•Standard & Features
•Troubleshooting Guide & FAQ
•CAUTION UPON INSTALL& USE
Aramo Smart NavigatorII-100

System and components
2 BatteriesManual Charger USB cable Cleaning cloth
Sebum paper
(100 paper)
Hand strip
①
②
③
④⑤⑥
⑦⑧
⑨
⑬
⑩
⑪
⑫⑭
Number
Function Number
Function
①
Moisture/Elasticity sensor
⑧
SD memory card slot
②
LED light & Lens
⑨
On / Off
③
Touch screen
⑩
No function
④
Go to "Setup"
⑪
Volume on MP3
⑤
Capture button
⑫
Volume on MP3
⑥
Go to "Back"
⑬
Capture button
⑦
External Adaptor connection
⑭
Battery cover
Cradle Leather case
How to use
Touch pen

Battery uses
Open the cover. Insert the battery. Close the cover.
How to charge
By Battery charger By Cradle
Charge the unit after connecting the
cable.
Plug the charger into the cradle and
connect the device to the cradle.
* Available to check the charging status on system main page
Note
Available to re-charge the spare bat
tery on back side of cradle.
Battery front side
How to use

The touch screen lets you select items or perform function. Learn basic
actions to use touch screen.
•Tap : Touch once with your finger to select or launch the menu option, or
application
•Drag : Tap and drag your finger up, down, left, or right to move to items on lists.
•Tap and hold : Tap an item and hold it for more than 2 seconds to open pop-up
option list
•Double-tap : Tap twice quickly with your finger to zoom in or out while viewing
photos.
Use the touch screen
Enter text
Enter text by selecting characters on the virtual keypads
①
③
②
No. Function
①
Shortcuts for frequent use
②
Capitals lock key
③
Switch between ABC and Number(symbol) mode
④
Space
⑤
Delete
⑥
Start new line
④
⑤
⑥
④
③
②⑤
⑥
How to use

Icons to operate in Manual
Icons To do
Touch to take images from the device
Go to capturing page
OK
Go back to previous page
Use the image taken for diagnosis
Analyze the image
3D Image
Go back to previous page on skin image
Change the lighting mode
OK
Cancel
Analysis
3D
USE
Mode
* Touch the “>” or fling the screen to go to next page.
* Tap the screen to focus.
Note
How to use

Icons
To do Icons
To do
Diagnosis application Alarm
Gallery (album) Add alarm
MP3 Internet
System setting
Turn on / off & System main page
How to operate_ Turn on/off
Go back to system main pageGo to “setup” page
- On/Off button: Press and hold for 3 seconds
- “Sleep” mode on / off : Press the button
* Tap in red box
Turning on… Turning off…

≫ Brightness setting
How to set the system
Adjust the Brightness to display the application
more effectively.
How to operate_ System setting
* Tap in red box
Check the “√” mark.
The setting have to be a
ctivated to download ap
plication.
≫ Application setting

Deactivate
Changed the keyboard
language
Select the language you
want to use
①
②
≫ Language setting
Keyboard language
How to operate_ System setting
* Tap in red box
How to set the system

How to operate_ System setting
* Tap in red box
How to set the system
≫ Language setting
How to change the System language
Select the language you want
to use
How to change the keyboard language
Drag left or right to choose
the language
Press and hold the “space-bar” to show the language
selection

≫ Date & Time setting
How to set date
Enter the current date
How to set time zone & time
Select user’s time zone or
city name
Enter the current time
How to operate_ System setting
* Tap in red box
How to set the system
Tap “setup”.
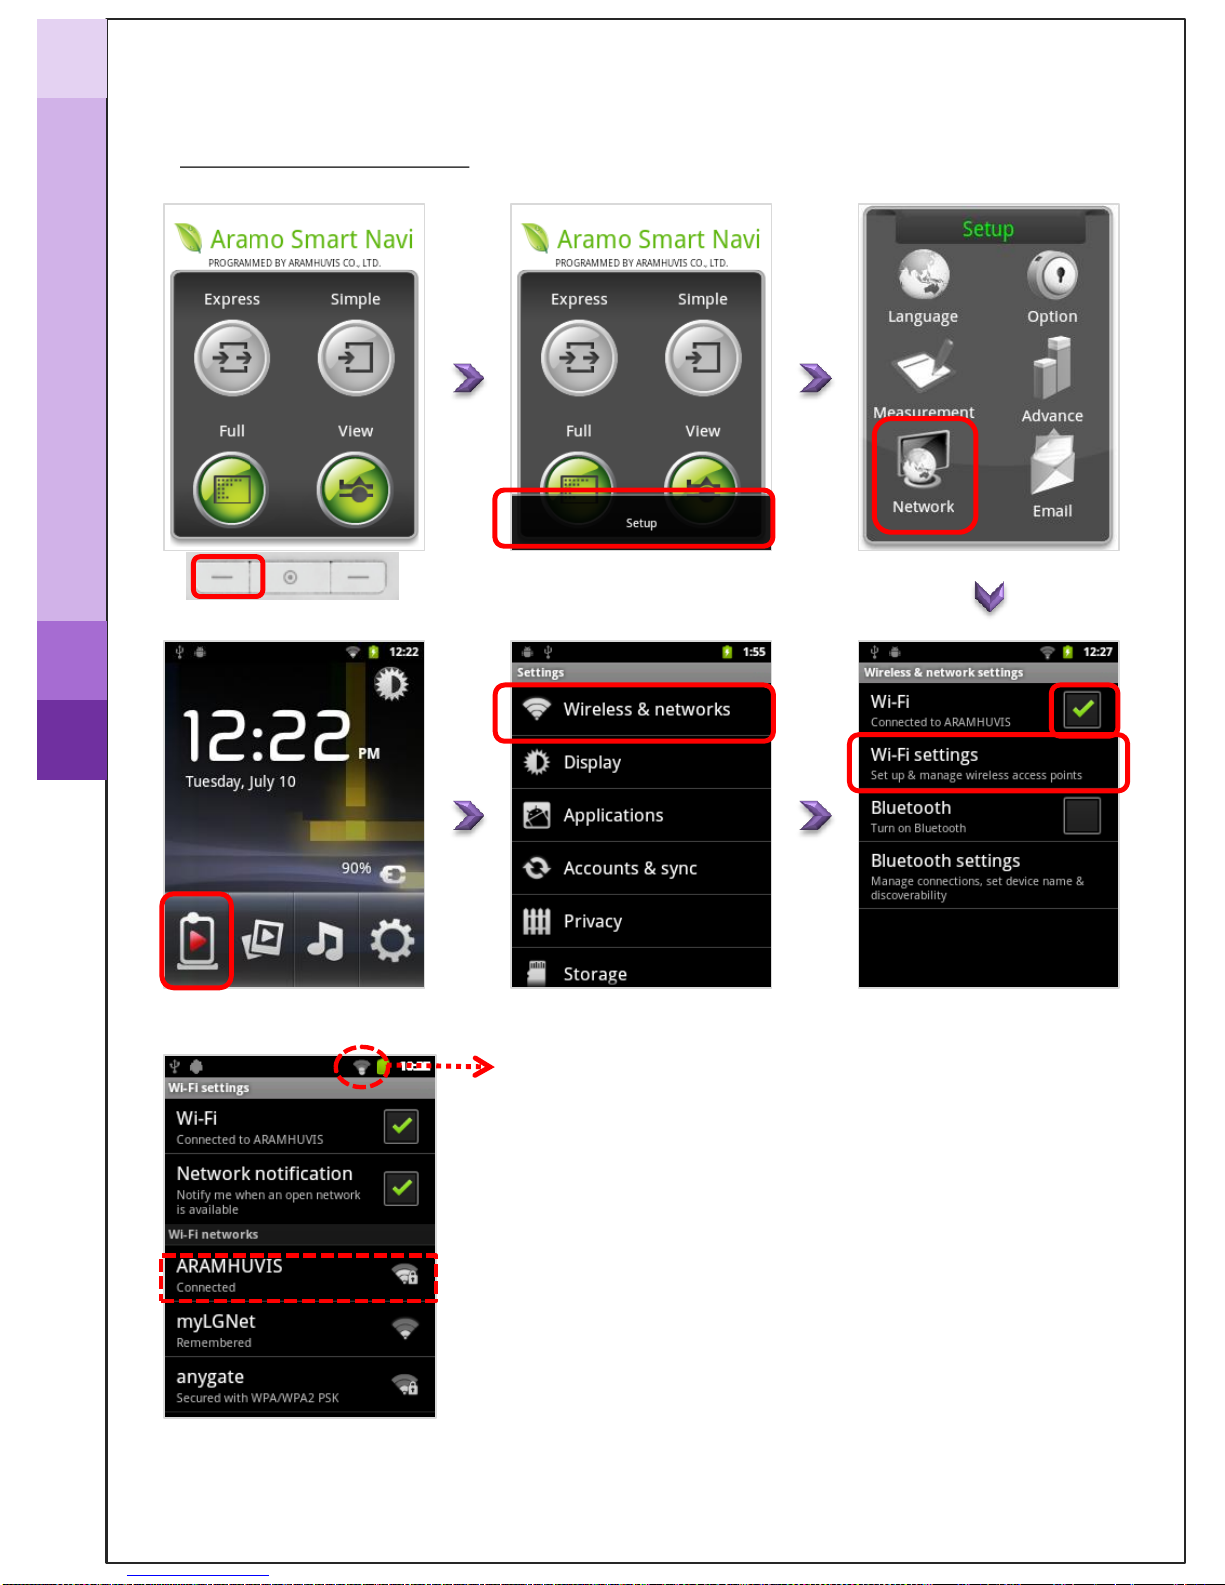
On System main page
Find and connect the available Wi-Fi
①
②
Check the Wi-Fi mark
≫ Wi-Fi connection
How to operate_ System setting
* Tap in red box
How to set the system

≫ Bluetooth Pairing
How to pair the diagnosis system with the host device
* Host device : all kinds of PC including tablet PC you want to send the
diagnosed result or the related images.
Note
Check the name of host device
Select the host device
Activate the Bluetooth function
on host device for the diagnosis
system to search and pair with
host device.
← Example image
Scan for host device
Accept the paring request sent
from diagnosis system.
Password: 0 (number)
On host device
Check the pairing status
Check the Bluetooth mark
How to operate_ System setting
* Tap in red box
How to set the system

≫ Bluetooth Pairing
Enter the device name
what you want
How to change the name of diagnosis system
How to operate_ System setting
* Tap in red box
How to set the system

Diagnosis Process ≫How to setup
Tap “setup”.
≫ Language
Select the language
≫ Option
* Show measurement page before
starting diagnosis.
- Green: activate status
- Gray: deactivate status
≫ Measurement
Select what you want to diagnose
* Show the diagnosed result
by number on the capture page.
Green : activate → Analyze
Gray : deactivate → Do not analyze
How to operate_ setting
* Tap in red box
Drag

Diagnosis Process ≫How to setup
≫ Advance ≫ Network
Check the version of
application Set Wireless connection; Wi-Fi or Bluetooth
Register the sender’s email account
Selected status
Unselected status
≫ Email
Enter the ID (ex. abcd1234)
Enter the Domain (ex. @gmail.com)
Enter the Password (ex. aaaa1234)
* Tap in red box
How to operate_ setting

Place the sensor onto your skin and tap
Diagnosis Process ≫Full mode
Note
* Gray : deactivate status
* Black : activate status
Enter age group and gender
of customer
≫ Start diagnosis
≫ Hydration & Elasticity
Note
* Do NOT move during the measurement.
* “Please, rescan…” : To measure again by taping
How to diagnose_ Full mode
* Tap in red box

U - ZONE
Diagnosis Process ≫Full mode
Put the below sebum tape (pink area) onto the U or T-zone of your face for 3 seconds.
T - ZONE
≫ Sebum ( T & U zone)
* Tap in red box
How to diagnose_ Full mode
→ How to hold the sebum paper
How to put the sebum paper on T-zone
How to put the sebum paper on U-zone
Popular Other manuals by other brands


Painless Performance Products
Painless Performance Products 10106 installation instructions

NEC
NEC GPRS user guide

Bose
Bose QUIETCOMFORT 35 owner's guide

LG
LG Optimus Dynamic L38C user guide

Abicor Binzel
Abicor Binzel TCS Compact operating instructions

LAUNCH TECH
LAUNCH TECH CRP12X Premium Series user manual