Arboria Rosedale Arbor User manual
1
2
3
4
P L E A S E R E A D C O M P L E T E L Y B E F O R E Y O U B E G I N A S S E M B L Y
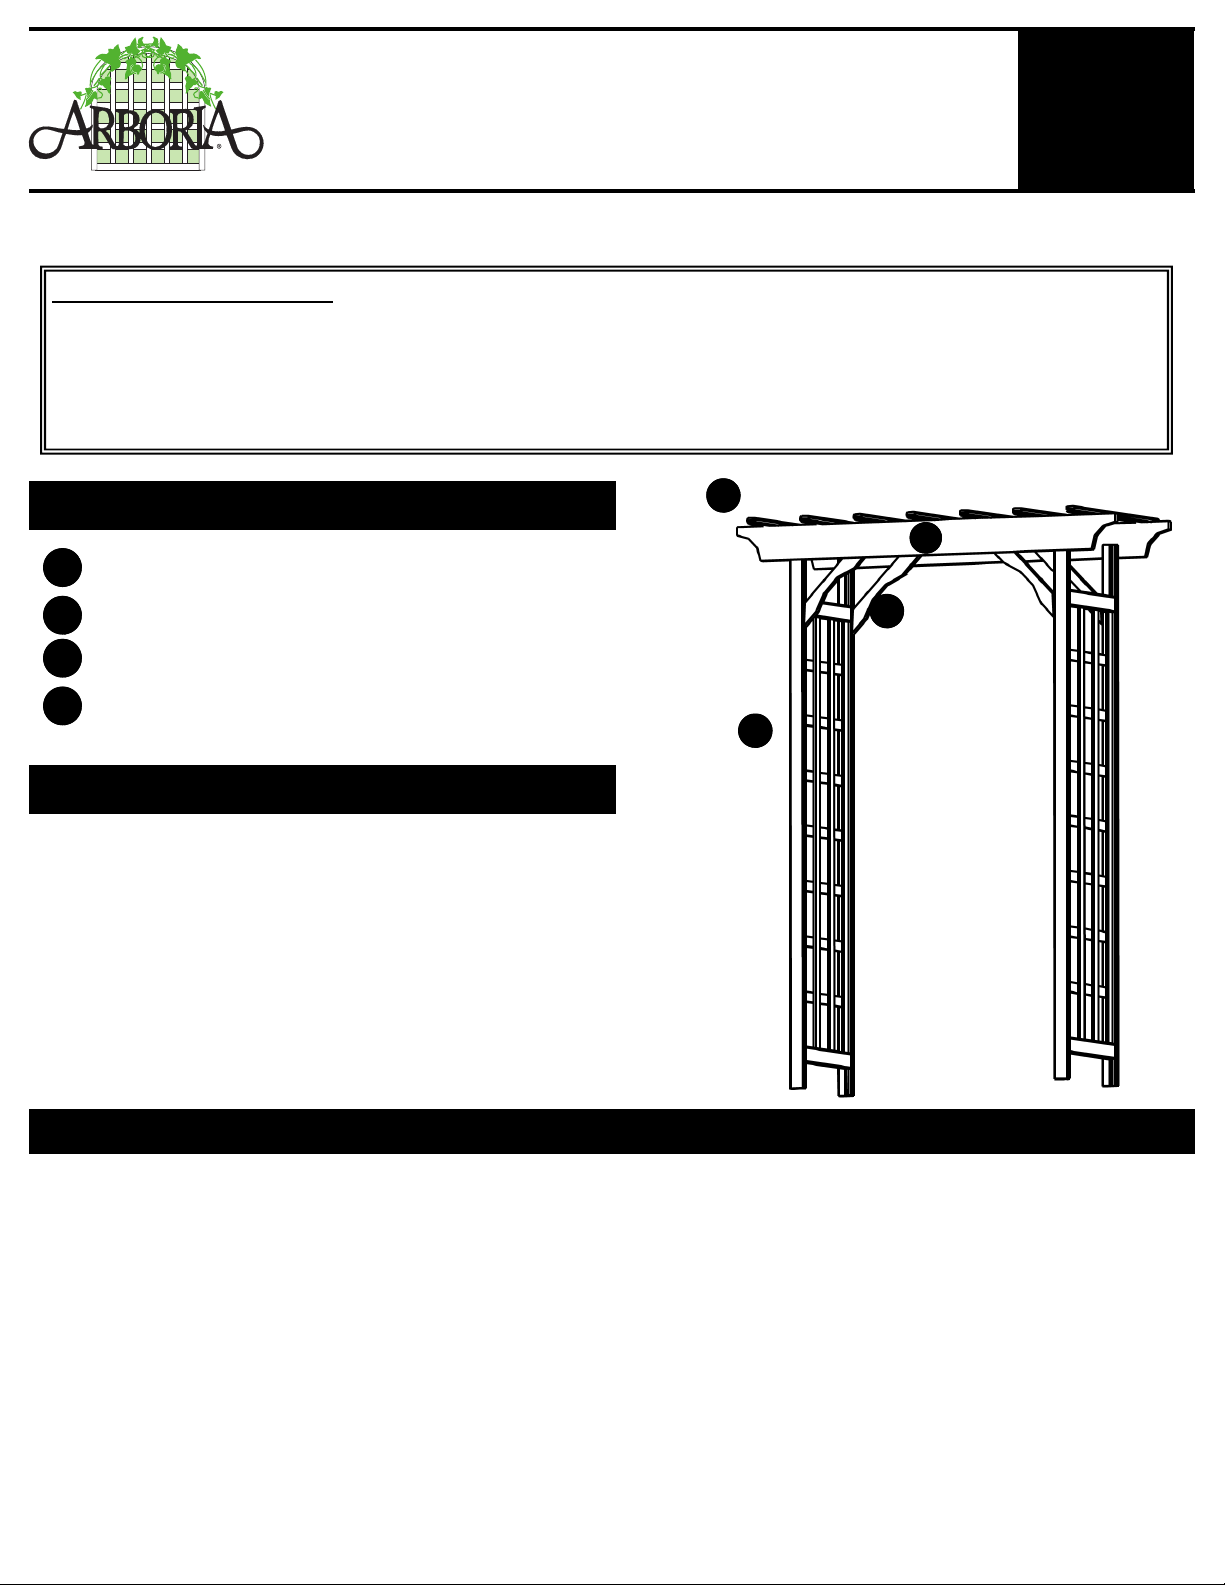
Rosedale Arbor
A S S E M B L Y I N S T R U C T I O N S
2
22
2
PRELIMIN A R IES
TOOLS Y OU WILL NEED
•
Power screwdriver or drill ha accep s in erchangeable
bi s*
•
Two bags of concre e mix (60#) o anchor he arbor
* A bit holder may be needed if using a drill with a quick-change chuck.
If you wish o s ain or pain your arbor, we recommend ha you do so before assembly, i makes he job eas-
ier. Use a high quali y ex erior s ain or pain . Be careful no o cover up guide marks on op of headers.
IF YOU PLAN TO
HANDY TO HAVE
•
Tape measure
•
Carpen ers Square
•
S ool or shor ladder
WORK AREA
Selec an area close o where he arbor will be finally placed. While he assembled uni is no very heavy, i is
awkward o move far and requires wo people o do so easily.
The assembly area should be rela ively fla and open, a leas 8’ square. A lawn, driveway or wide pa h will be
sa isfac ory.
I is a good idea o lay ou he arbor box on your work surface o pro ec he arbor from nicks and scra ches.
445.35.98 4/27/2007
Trellis Caps (7)
Headers (2)
Braces (4)
La ice Side Panels (2)
1
2
3
4
HARDWARE
- 2 1/2” Wood screws (30)
- Driver bi
(if o her han Phillips head)
- Wood block marked “spacer” (1)
- Anchoring ki
CHECK BOX FOR THESE CONTENTS
Win FREE Arboria Products
Win FREE Arboria ProductsWin FREE Arboria Products
Win FREE Arboria Products
Give us feedback about this Arboria product and be entered into a drawing to win Arboria goods. It’s easy go to
www.Arboria.com choose a product then click on the link to review
reviewreview
review. Be sure to enter your email and telephone so
that we may contact you if you win. Upload a photograph for an extra chance to win.
Upload a photograph for an extra chance to win. Upload a photograph for an extra chance to win.
Upload a photograph for an extra chance to win.
Visit www.Arboria.com for offi-
cial rules. No purchase necessary.

ATTACHING THE HEAD E RS TO TH E S IDE PANELS
Lay one of he 2” x 6” header boards fla on your work sur-
face, wi h he 12 small pilo holes facing up and he shor er
side oward you.
STEP 1
ATTACH S E COND HEAD E R
Turn he assembly over and a ach he second header following he same me hod as he firs . Take special care o:
•
Make sure he inside edge of he panel ( he edge wi h he single hole 12” from he op of he pos ) is facing in-
ward.
•
Be careful o use he ma ching pair of screw holes o give you he opening wid h you have selec ed.
STEP 2
Place one of he wo la ice side panels on i s edge, wi h he
upper end (2 screw holes, closely spaced) oward he header
board and he inside edge of he side pos (single screw hole
abou 12” from he op) oward he cen er of he header board.
Drive one of he 2 1/2” screws hrough he op hole in
he bo om side pos , holding he frame up a bi so ha
he poin of he screw s ick hrough abou 1/2” inch.
Choose he pair of pilo holes in he header for he wid h
of opening you prefer.
Ou side Holes - for a 48 ½” wid h opening
Cen er Holes - for a 42 ½” wid h opening
Inside Holes - for a 36 ½” wid h opening
Place he op edge of he frame over he header board
wi h he poin of he screw lined up wi h he upper pilo
hole of he pair you have selec ed. When you are sure
ha he screw poin is properly aligned, drive i firmly
in o he header.
NOTE: Do not drive in the second screw at this time.
IMPORTANT: It is possible to drive a screw into the
wood without usin a pilot hole. So, it is critical that
you line up the screw with the pilot hole before you
drive in the screw.
Pilot holes
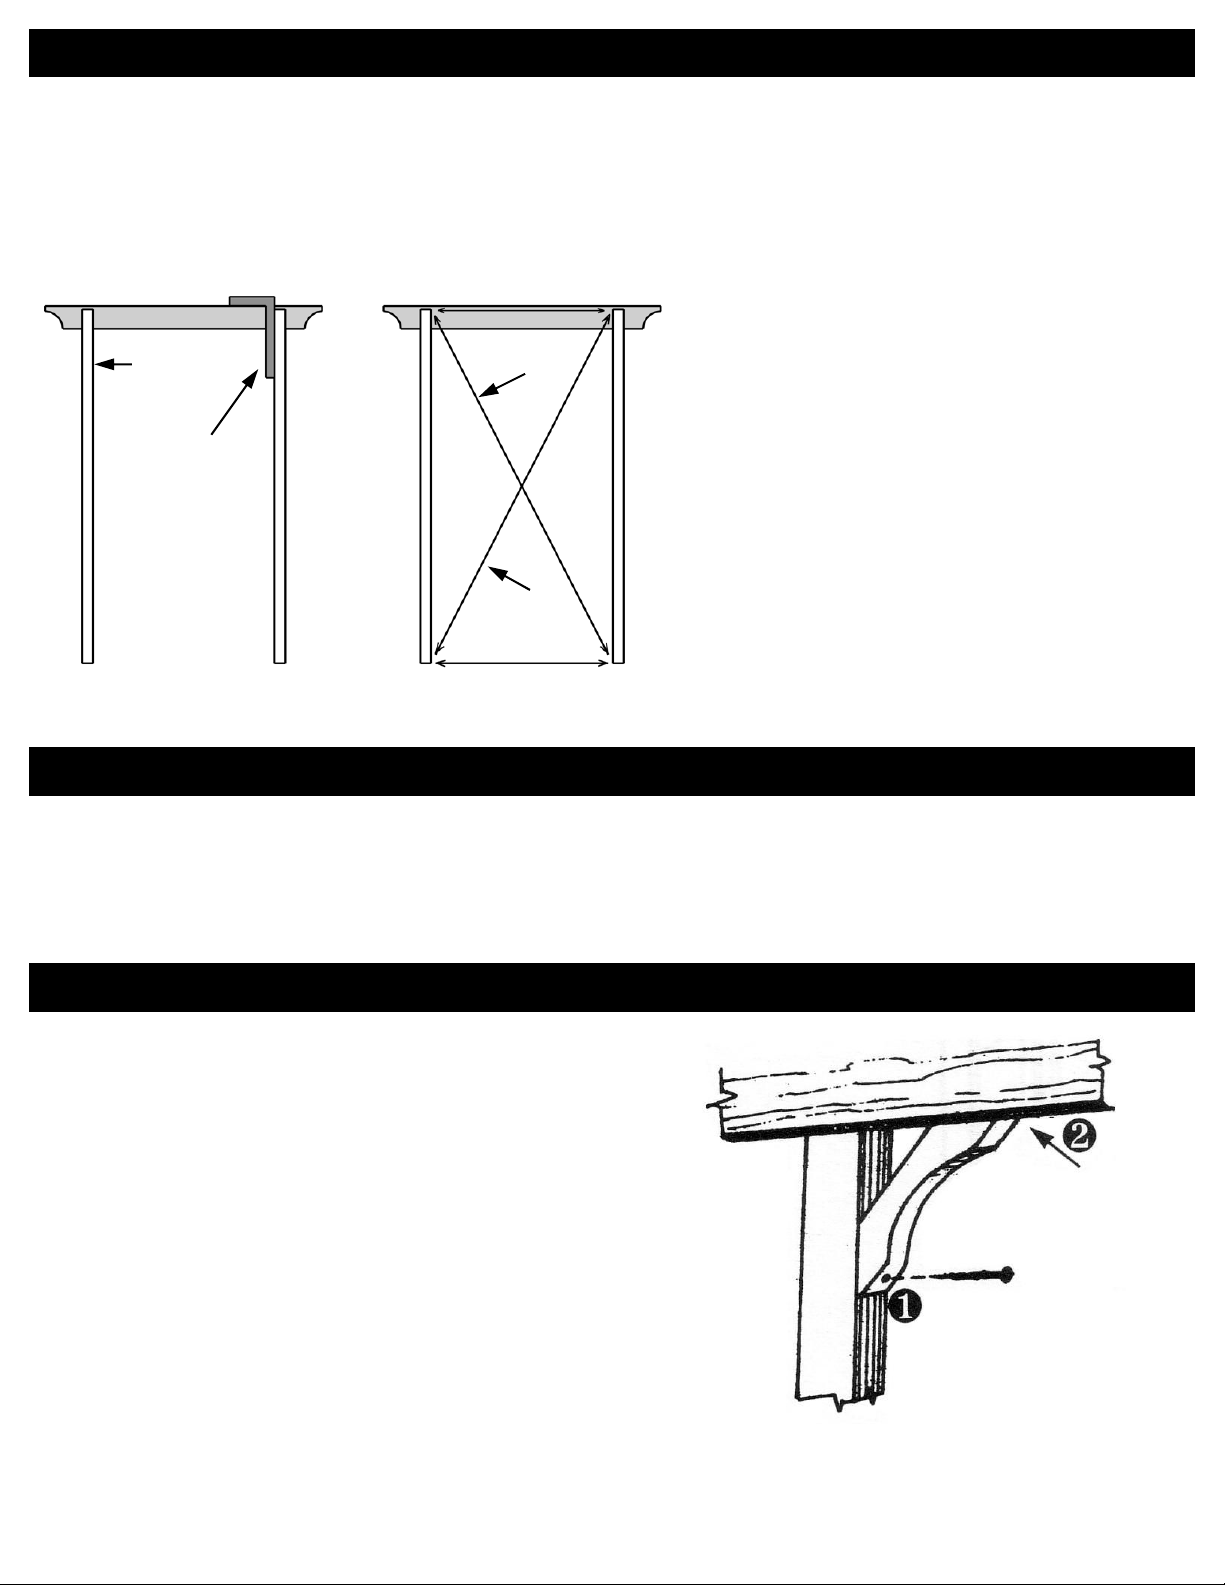
SQUARE U P THE ARBOR
ATTACH THE BRACES T O TH E H E A D E RS AND P A N E LS
Carefully ip your assembled arbor o he uprigh posi ion and
check ha he side panels are ver ical and parallel.
A ach he four braces o he pos , using he same echnique as
for he header boards: drive he 2 1/2” screw hrough he bo -
om hole in he brace so ha i pro rudes abou 1/2”, and in-
ser he poin in o he pilo hole on he inner edge of he panel
frame. Then drive he screw in firmly.
Double-check your side panel pos s o make sure hey are
square wi h he header board and parallel o he pos on he
o her side.
When he posi ion is se , hold he upper end of he brace
firmly in con ac wi h he header and drive he screw in.
Tigh en all screws in your assembly.
STEP 4
STEP 3
Now square up he arbor. This can be easily done wi h a large Carpen er’s Square, a ape measure, or even a leng h
of s ring as shown below.
SQUARE U P SECOND SIDE PANEL & HEADER
When he arbor is squared up, drive he second screw a he op of each pos in o he lower pilo hole in he header.
Set post screw first
into pilot hole
Top screw into
back of header
Turn he assembly over so ha he a ached header board is on he upper side, wi h he free edge of he side panels
on he ground or working surface.
1. Measure he dis ance “a” a pos ops.
2. Se bo om of pos s o same spacing
“b”.
3. Measure diagonal dis ance “x”.
4. Check opposi e diagonal dis ance “y”.
When a=b and x=y, he arbor is
pilot hole
carpenter’s
square
“x”
“y”
“a”
“b”
With a square: With a tape measure or
LWO Corpora ion
3841 N. Columbia Blvd.
Por land, Oregon 97217
(503) 286-5372
(800) 459-8718
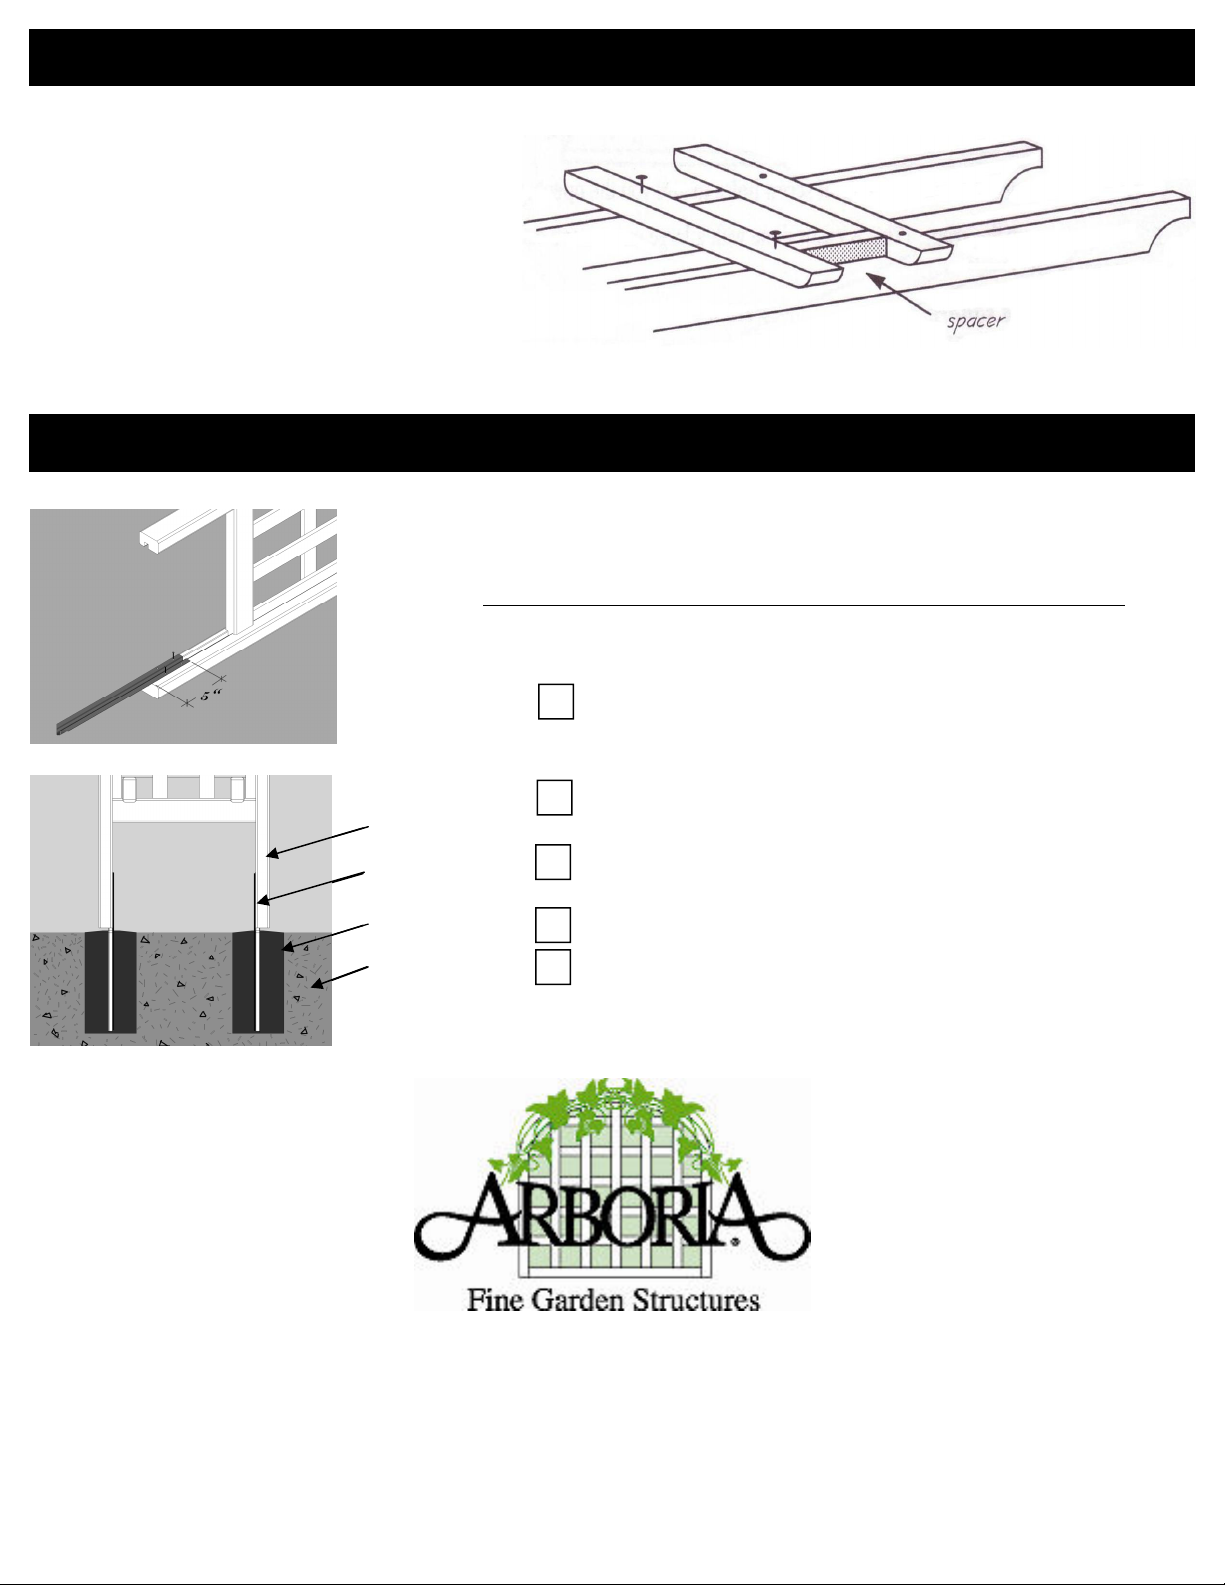
INSTAL L I NG THE ARBOR
ATT A CH THE CAP PIECES
STEP 5
Cen er one of he cap pieces across he wo
headers, placing i be ween he wo marks.
Cen er one screw hole on op edge of header.
Secure cap o second header in same manner.
Using spacer provided, a ach o her cap pieces
a equal in ervals, 3 boards on each side of he
cen er one.
Arbor post
Anchor
Soil
Concrete
A ach all four anchors o he bo om of he arbor using he
provided screws, wo screws per anchor, s aggering he
screws.
Measure he dis ance in be ween all anchors and dig four 8”
diame er holes o accommoda e he anchors.
Carefully lif he arbor and posi ion in place, avoid il ing
he arbor on he anchors.
Plumb and level he arbor.
Mix concre e according o he manufac urer's ins ruc ions,
fill each hole wi hin 1/4” of he bo om of each pos , pos s
should no be se in he concre e.
This arbor may be secured using a varie y of echniques. These include a ach-
ing o an exis ing s ruc ure or anchoring wi h gravel or river rock ins ead of
concre e. The ins ruc ions below represen secure moun ing wi h concre e. Use
cau ion when moving he arbor o i s final placemen . Two people are required
o lif or move he arbor.
1
2
3
4
5
STEPS
Other Arboria Lawn And Garden Equipment manuals

Popular Lawn And Garden Equipment manuals by other brands

Sunforce
Sunforce SOLAR user manual

GARDEN OF EDEN
GARDEN OF EDEN 55627 user manual

Goizper Group
Goizper Group MATABI POLMINOR instruction manual

Rain Bird
Rain Bird 11000 Series Operation & maintenance manual

Cub Cadet
Cub Cadet BB 230 brochure

EXTOL PREMIUM
EXTOL PREMIUM 8891590 Translation of the original user manual


Vertex
Vertex 1/3 HP Maintenance instructions

GHE
GHE AeroFlo 80 manual

Land Pride
Land Pride Post Hole Diggers HD25 Operator's manual

Yazoo/Kees
Yazoo/Kees Z9 Commercial Collection System Z9A Operator's & parts manual

Premier designs
Premier designs WindGarden 26829 Assembly instructions

Snapper
Snapper 1691351 installation instructions