arcelik beko B13 GOOD PLUS User manual

B13 GOOD PLUS WASHING MACHINE SERVICE MANUAL
B13 GOOD PLUS
CONTROL SYSTEM
WASHING MACHINE
SERVICE MANUAL
SERVICE MANUAL NO:1

B13 GOOD PLUS WASHING MACHINE SERVICE MANUAL
1. COVER PAGE ............................................................................................................................................ 2
2. CONTENTS ................................................................................................................................................. 2
3. SAFETY WARNINGS...........................................................................................................................5
3.1. GENERAL SAFETY ........................................................................................................................................... 5
3.2. INTENDED USE .............................................................................................................................................. 6
3.3. CHILD SAFETY ............................................................................................................................................... 6
3.4. COMPLIANCE WITH EEE DIRECTIVE..................................................................................................................... 6
3.5. PACKAGE INFO .............................................................................................................................................. 6
3.6. DISPOSAL OF WASTE PRODUCT .......................................................................................................................... 7
3.7. POINTS TO BE PAID ATTENTION TO DURING SERVICE ................................................................................................ 7
4. PRODUCT INSTALLATION / INSTALLATION RULES / SETTINGS....................................................9
4.1. CORRECT PLACE FOR INSTALLATION .................................................................................................................... 9
4.2. REMOVING THE PACKAGE SUPPORT .................................................................................................................. 10
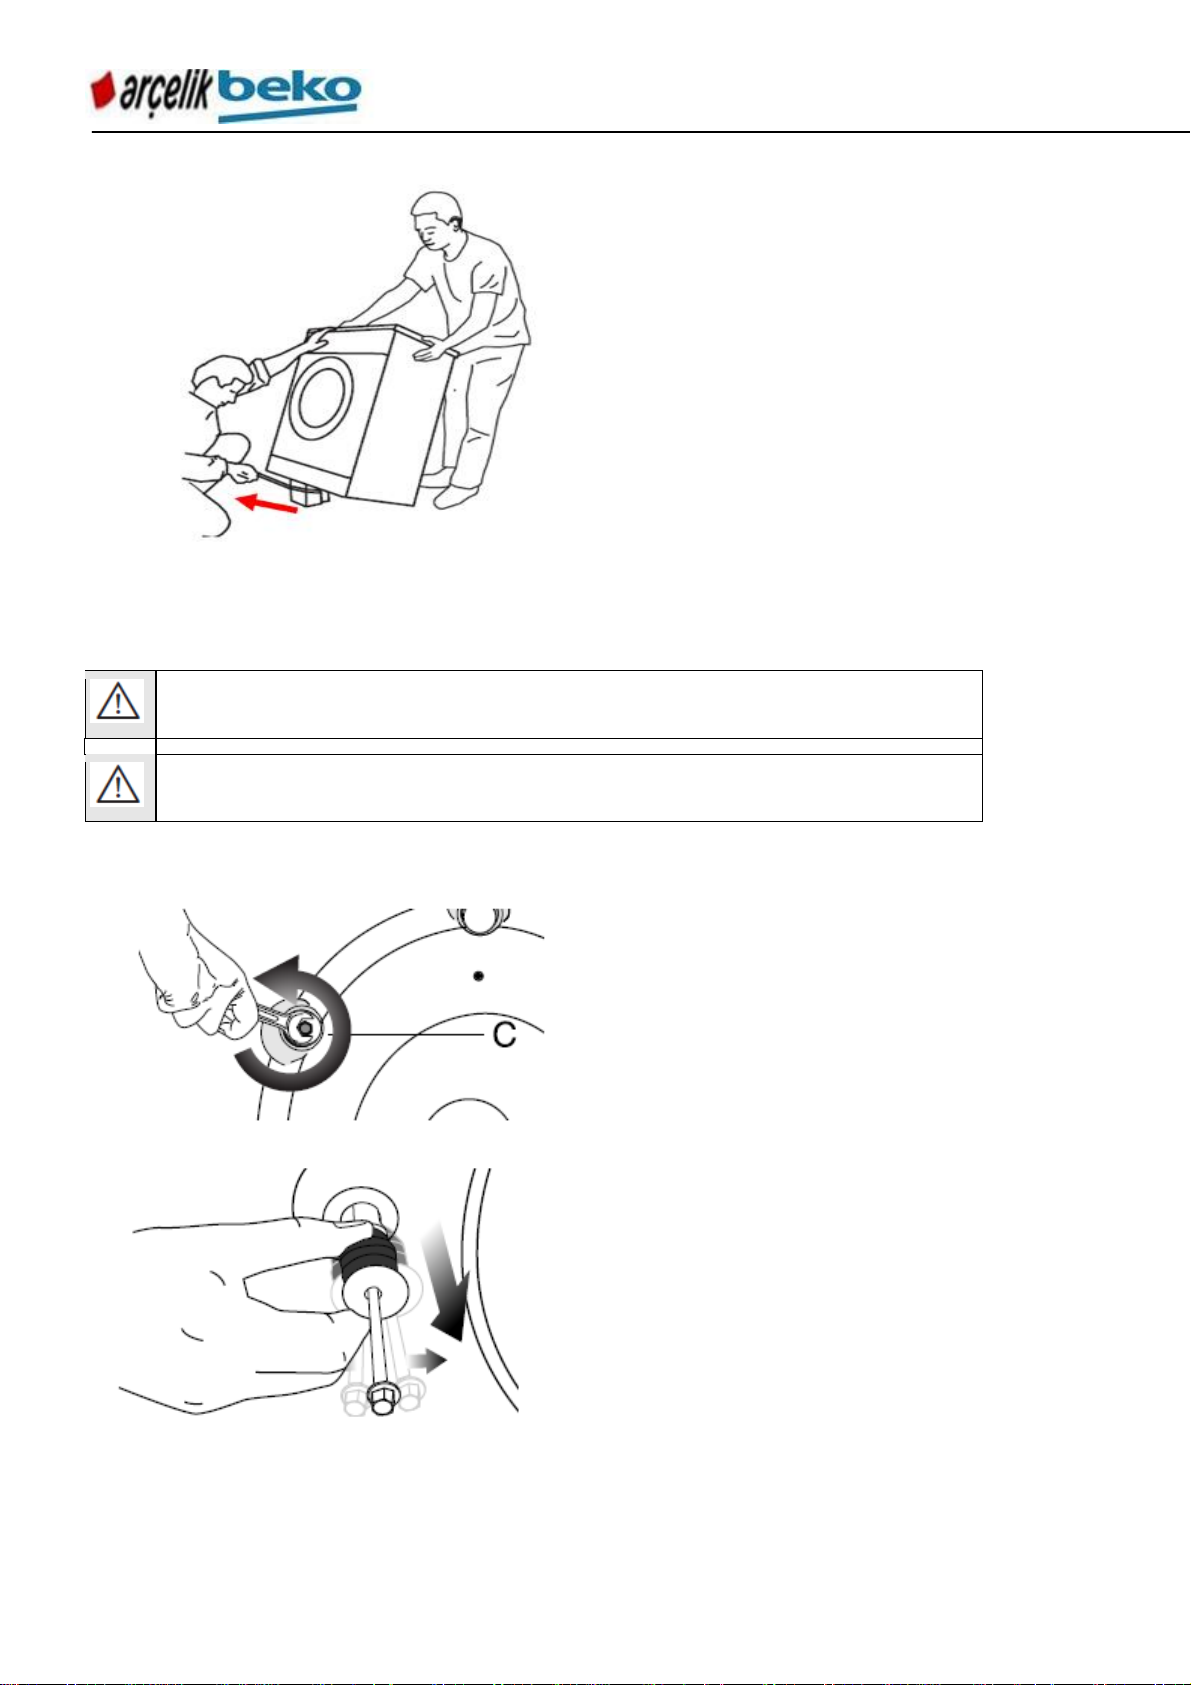
4.3. REMOVING THE TRANSPORT SAFETY BOLTS ........................................................................................................ 10
4.4. CONNECTION TO THE SUPPLY WATER................................................................................................................ 11
4.5. CONNECTION TO THE WATER DRAIN .................................................................................................................. 12
4.6. ADJUSTMENT OF LEGS ................................................................................................................................... 13
4.7. ELECTRIC CONNECTION .................................................................................................................................. 14
4.8. TRANSPORTING THE PRODUCT ......................................................................................................................... 14
5. USE OF PRODUCT AND BYPRODUCTS..........................................................................................16
5.1. PREPARATION ............................................................................................................................................. 16
5.1.1 Sorting the Laundry................................................................................................................................. 16
5.1.2 Preparation of the garments to be washed .............................................................................................. 16
5.1.3 Things to do for energy saving................................................................................................................. 17
5.1.4 Correct load capacity............................................................................................................................... 18
5.1.5 Loading laundry ...................................................................................................................................... 18
5.1.6 Use of detergent and softener ................................................................................................................. 19
5.1.7. Initial operation .................................................................................................................................. 22
5.1.8. Tips for efficient washing .................................................................................................................... 23
5.2. CONTROL PANEL .......................................................................................................................................... 24
5.3. SCREEN SYMBOLS AND PANEL/BUTTON SERIGRAPHIES............................................................................................ 24
5.4. PREPARING THE MACHINE .............................................................................................................................. 25
5.5. PROGRAMME SELECTION................................................................................................................................ 25
5.6. MAIN PROGRAMMES .................................................................................................................................... 25
5.7. ADDITIONAL PROGRAMMES ............................................................................................................................ 26
5.8. SPECIAL PROGRAMS ...................................................................................................................................... 28
5.9. TEMPERATURE SELECTION .............................................................................................................................. 28
5.10. SPIN SPEED SELECTION................................................................................................................................... 29
5.11. AUXILIARY FUNCTION SELECTION ...................................................................................................................... 30
5.12. END TIME .................................................................................................................................................. 32
5.13. STARTING THE PROGRAMME........................................................................................................................... 33
5.14. LOADING DOOR LOCK .................................................................................................................................... 34
5.15. CHANGING SELECTIONS AFTER PROGRAMME IS STARTED......................................................................................... 34
5.16. CHILD LOCK ................................................................................................................................................ 35
5.17. CANCELING THE PROGRAMME......................................................................................................................... 36
5.18. PROGRAMME END........................................................................................................................................ 37
5.19. SETTING FAVORITE PROGRAMME ..................................................................................................................... 37
6. CLEANING AND CARE.....................................................................................................................38
6.1. CLEANING THE DETERGENT DISPENSER ............................................................................................................... 38
6.2. CLEANING THE LOADING DOOR AND THE DRUM .................................................................................................. 38
6.3. CLEANING THE BODY AND CONTROL PANEL ......................................................................................................... 39
6.4. CLEANING THE WATER INLET FILTERS ................................................................................................................. 39
6.5. DRAINING THE REMAINING WATER AND CLEANING THE PUMP FILTER ......................................................................... 40
7. GENERAL OPERATING PRINCIPLE ................................................................................................43

B13 GOOD PLUS WASHING MACHINE SERVICE MANUAL
3
7.1. WATER INTAKE PROFILE ................................................................................................................................ 43
7.2. HEATING PROFILE ........................................................................................................................................ 45
7.3. ANTI-FOAMING PROFILE ................................................................................................................................ 46
7.4. FOAM DETECTING AND EXTINUISHING ALGORITHM .............................................................................................. 47
7.5. PROGRAMME FLOWS .................................................................................................................................... 48
8. COMPONENT WORKING PRINCIPLES............................................................................................58
8.1. ELECTRONIC CARD GROUP ............................................................................................................................. 58
8.2. WATER INLET VALVE..................................................................................................................................... 59
8.2.1. Single Water Inlet Valve ...................................................................................................................... 59
8.2.2. Double Water Inlet Valve with Flowmeter ........................................................................................... 59
8.3. WATER LEVEL SENSOR .................................................................................................................................. 60
8.4. PARASITE FILTER .......................................................................................................................................... 61
8.5. WASHING MOTOR ....................................................................................................................................... 61
8.5.1. Atlas Motor ........................................................................................................................................ 61
8.6. SAFETY SWITCH (DOOR LOCK) ......................................................................................................................... 62
8.7. HEATER ..................................................................................................................................................... 62
8.8. NTC......................................................................................................................................................... 63
8.9. DRAIN PUMP .............................................................................................................................................. 64
9. SERVICE FUNCTION TEST ..............................................................................................................65
10. FAILURE / ERROR CODES...............................................................................................................68
11. FAILURE FLOW / TROUBLESHOOTING DIAGRAMS ......................................................................69
11.1. ELECTRONIC CARD SOCKETS............................................................................................................................ 69
11.2. MACHINE DOES NOT WORK........................................................................................................................... 70
11.3. ERROR CODES AND POSSIBLE CUSTOMER COMPLAINTS .......................................................................................... 72
A.E1................................................................................................................................................................ 74
B.E2................................................................................................................................................................ 75
C.E3................................................................................................................................................................ 76
D.E4................................................................................................................................................................ 77
E.E5................................................................................................................................................................ 78
F.E7................................................................................................................................................................ 78
G.E8................................................................................................................................................................ 80
H.E9 -E10........................................................................................................................................................ 81
I.E11_1 .......................................................................................................................................................... 82
J.E17 .............................................................................................................................................................. 86
K.E18 .............................................................................................................................................................. 87
L.E27 .............................................................................................................................................................. 88
M.E28 .............................................................................................................................................................. 89
N.E29 .............................................................................................................................................................. 90
O.PROGRAM SELECTION SWITCH DOES NOT FUNCTION. ............................................................................................... 91
P.MACHINE IS BLOWING THE FUSE ........................................................................................................................... 92
Q.WATER TAKEN FROM THE WRONG COMPARTMENT.................................................................................................... 93
12. ELECTRIC CIRCUIT / CONNECTION / E-CARD DIAGRAMS............................................................94
13. COMPONENT ASSEMBLY / DISASSEMBLY....................................................................................95
13.1. UPPER TABLE ASSEMBLY /DISASSEMBLY ........................................................................................................... 95
13.1.1. Attachment.................................................................................................................................... 95
13.1.2. Detachment ................................................................................................................................... 96
13.2. PANEL ATTACHMENT /DETACHMENT ............................................................................................................... 98
13.2.1. Attachment.................................................................................................................................... 98
13.2.2. Detachment ................................................................................................................................... 98
13.3. DOOR GROUP ATTACHMENT/DETACHMENT .................................................................................................... 102
13.4. FRONT WALL ATTACHMENT /DETACHMENT..................................................................................................... 112
13.4.1. Attachment.................................................................................................................................. 112
13.5. DETERGENT BOX ATTACHMENT /DETACHMENT ................................................................................................ 113

B13 GOOD PLUS WASHING MACHINE SERVICE MANUAL
13.5.1. Attachment.................................................................................................................................. 113
13.5.2. Detachment ................................................................................................................................. 114
13.6. SINGLE VALVE ATTACHMENT /DETACHMENT.................................................................................................... 115
13.7. DOUBLE VALVE ATTACHMENT /DETACHMENT .................................................................................................. 115
13.8. WATER LEVEL SENSOR ATTACHMENT /DETACHMENT ......................................................................................... 116
13.9. PARASITE FILTER ATTACHMENT /DETACHMENT................................................................................................. 116
13.10. POWER CABLE ATTACHMENT /DETACHMENT............................................................................................... 116
13.11. MOTOR .............................................................................................................................................. 117
13.11.1. Atlas motor .................................................................................................................................. 117
13.12. POLY VBELT ATTACHMENT...................................................................................................................... 117
13.13. SHOCK ABSORBER AND SHOCK ABSORBER PIN ATTACHMENT /DETACHMENT....................................................... 118
13.14. UPPER COUNTERWEIGHT ATTACHMENT /DETACHMENT ................................................................................. 119
13.15. LOWER COUNTERWEIGHT ATTACHMENT /DETACHMENT ................................................................................ 119
13.16. DRAIN PUMP ATTACHMENT /DETACHMENT ................................................................................................ 119
13.17. WATER INLET HOSE ATTACHMENT /DETACHMENT ........................................................................................ 120
13.18. DRAIN HOSE ATTACHMENT /DETACHMENT ................................................................................................. 120
14. LIST OF COMPONENTS.................................................................................................................121
15. FIGURE AND PICTURE LIST..........................................................................................................121
16. TABLE LIST ....................................................................................................................................122

B13 GOOD PLUS WASHING MACHINE SERVICE MANUAL
3. SAFETY WARNİNGS
This section contains safety instructions that will help protect from risk of personal injury or
property damage. Failure to follow these instructions shall void any warranty.
3.1. General Safety
This product can be used by the children who are at the age of 8 and over and the
people whose physical, sensory or mental skills are not fully developed or who do not
have necessary required experience and knowledge as long as they are supervised or
trained about the safe use of the product and its risks. Children should not play with the
device. Cleaning and maintenance works should not be performed by children unless
they are supervised by someone.
Do not place the machine onto a floor covered with a carpet. Otherwise, lack of airflow
beneath the machine will cause electrical parts to overheat. This will cause problems
with your product.
If the product is faulty, it should not be operated before it is repaired by the authorized
service! There is the risk of electric shock!
This product is designed to resume operation when power is on again after a power
cut. If you wish to cancel the programme, see "Cancelling the programme" section.
Plug the product into a grounded outlet protected by a 16-ampere fuse. Be sure to
make a qualified electrician arrange the grounding installation. Our company shall not
be liable for any damages that will arise when the product is used without grounding in
accordance with the local regulations.
Water mains and drain hose should be fixed securely and undamaged. Otherwise,
there is the risk of water leakage.
While there is still water inside the product, never open the loading door or remove the
filter. Otherwise, risk of flooding and injury from hot water will occur.
Do not force open the locked loading door. Door can be opened a few minutes after the
washing cycle ends. In case of forcing the loading door to open, the door and the lock
mechanism may get damaged.
Unplug the product if it is not in use.
Do not wash the product by spraying or pouring water onto it! There is the risk of
electric shock!
Never touch the plug with wet hands! Do not grab the power cord to unplug the
machine, always unplug it by holding its plug.
Use only the detergents, softeners and additives intended for washing machines.
Observe the instructions on the label of textiles and the detergent package.
Product should be unplugged during installation, maintenance, cleaning and repair
procedures.
Always have the installation and repairing procedures carried out by the
Authorized Service Agent. Manufacturer shall not be held liable for damages that may

B13 GOOD PLUS WASHING MACHINE SERVICE MANUAL
arise from procedures carried out by unauthorized persons.
If the power cord is damaged, it should be replaced by the manufacturer, aftersales
service or a similarly qualified, certified person (preferably electrician) or a person to be
designated by the importer, in order to prevent the risk.
3.2. Intended Use
This product is for domestic use only. It is not suitable for commercial use and it must
not be used out of its intended use.
Product should only be used to wash and rinse the textile products having the
appropriate labels.
Manufacturer does not accept any responsibility for any damages arising out of
incorrect use or transport.
Service life of the product you purchased is 10 years. During this period, original spare
parts will be available to operate the appliance properly.
3.3. Child Safety
Packaging materials are dangerous for the children. Keep the packaging materials out
of the reach of the children.
Electric products are dangerous for children. Keep children away from the product
when it is in use. Do not allow them to play with the product. Activate child lock to
prevent the children to tamper with it.
Do not forget to close the loading door when leaving the room where the product it
located.
Keep all detergents and additives in a safe place out of the reach of the children with
their lids or packages are closed.
3.4. Compliance with EEE Directive
This product does not contain the harmful and prohibited substances which are
specified in Directive * “Restriction on Use of Some Hazardous Substances in
Electrical and Electronic Equipments” (EEE) * issued by the Ministry of Environment
and Forestry of Republic of Turkey.
It complies with EEE * Directive
3.5. Package info
Packaging materials of the product are manufactured from recyclable materials in
accordance with our National Environment Regulations. Do not dispose of the packaging
materials together with the domestic or other wastes. Take them to the packaging material
collection points designated by the local authorities.

B13 GOOD PLUS WASHING MACHINE SERVICE MANUAL
7
3.6. Disposal of waste product
This product has been manufactured with high quality parts and materials which can be
reused and are suitable for recycling.
Therefore, do not dispose the product with normal domestic waste at the end of its service
life. Take it to a collection point for the recycling of electrical and electronic equipment.
Please consult your local authorities to learn the nearest collection point. Help protect the
environment and natural resources by recycling used products. For children's safety, cut
the power cable and break the locking mechanism of the loading door so that it will be
non-functional before disposing of the product.
3.7. Points to be paid attention to during service
During panel installation, make sure that the cables to be mounted onto the electronic
card are not pinched between the bracket sheets. It should be ensured that all the
sockets on the electronic card are seated well.
Is should be ensured that cable in the installation of cable group is not damaged.
Stripped or damaged cables should not be installed.
Cable route should be taken into account during installation; cable’s coming into
contact with sharp surfaces should be avoided and it should not be pinched.
It should be ensured that the sockets of all components which are serviced are seated
well. Arc may occur in case of inadequate contact.
It should be checked that the serviced product is connected to a grounded outlet which
is protected by a fuse with suitable current. Connection should not be made with
extension cable or multiple outlet. Moreover, no extension should be made to the
power cord or internal cables.
Put the serviced product onto a sound ground; do not put it on a carpet with high pile or
other similar grounds. Electrical parts may get overheated since air cannot circulate
from under the device.
Do not put the serviced product onto its power cord or another cable.
If you have to unplug the serviced product from the mains, never grab it from its power
cord, always unplug it by holding its plug only.
Check the power cord and plug of the serviced product. If its power cord or plug is
faulty, replace the power cord group completely with a new group. Please make sure
that the cables are not shortened, snapped, stripped, hardened and plug ends are not
broken, cracked, oxidized or loosened.
Check the outlet which the serviced product is plugged in. Product should not be
plugged in the outlets which are loosened, dislocated from its housing, broken, in
contact with water, dusty, dirty, oiled.
Along the route of the power cord from the outlet to the machine, make sure that the
cord does not come under heating sources, cupboards, devices, etc. which may
damage the product.
During service, do not perform hot works on the machine, such as soldering, welding,
etc. Do not leave these devices on the machine.
During service, do not wipe the machine with flammable and combustible substances
such as thinner, alcohol, etc.

B13 GOOD PLUS WASHING MACHINE SERVICE MANUAL
After the machine is serviced, do not forget any paper-based materials inside the
machine such as service slip, brochure, etc.
IMPORTANT:
When the machine is required to be serviced by being tilted to the front, its transport safety
bolts should be installed.
This is required for the front components of the machine not to be damaged.

B13 GOOD PLUS WASHING MACHINE SERVICE MANUAL
9
4. PRODUCT INSTALLATION / INSTALLATION RULES / SETTINGS
Apply to the nearest Authorized Service agent for the installation of your product. In order
to make your machine ready for use, before calling the authorized service, make sure that
electrical installation, clean water installation and water drain are appropriate by checking
the user manual. If this is not the case, call for a qualified electrician and technician and
take necessary actions.
Customer is liable to prepare the place of installation for the product, electricity, clean
water and waste water installations.
Installation and electrical connections of the product should be performed by Authorized
Service. Manufacturer shall not be held liable for damages that may arise from
procedures carried out by unauthorized persons.
CAUTION: Before use, check whether there is any damage on the product. If so, do not
have it installed. Damaged products cause risks for your safety.
Make sure that the water inlet and drain hoses and the power cord of the machine are not
folded, pinched or broken during when the product is pushed into its place after the
installation or cleaning works.
4.1. Correct Place for Installation
Place the product on a solid and level floor. Do not place it onto a carpet with high pile
or other similar surfaces.
On a graduated floor, do not place the product next to the edge or on a platform.
When the washing machine and drier are placed on top of each other, their total weight
–when loaded–amounts to 180 kilograms. Place the product on a solid and flat floor
that has sufficient load carrying capacity!
Do not place the product on the power cable.
Do not install the product in the environments where the temperature falls below 0 ºC.
Leave a minimum space of 1 cm between the machine and the furniture.

B13 GOOD PLUS WASHING MACHINE SERVICE MANUAL
4.2. Removing the Package Support
Figure 4.1
4.3. Removing the Transport Safety Bolts
CAUTION: Do not remove the transport safety bolts before removing the packaging
support.
CAUTION: Before operating the washing machine, remove the transport safety
bolts! Otherwise, the product will get damaged.
Figure 4.2
Figure 4.3
Tilt the machine backwards in order
to remove the package support.
Remove the packaging
reinforcement by pulling the ribbon.
1. Loose all bolts with an
appropriate key until they
turn freely (C).
2. Remove the transport safety
bolts by turning them slightly.

B13 GOOD PLUS WASHING MACHINE SERVICE MANUAL
11
Figure 4.4
Keep transport safety bolts in a safe place for future requirement when the washing
machine is to be transported to another location.
Never move the product without the transportation safety bolts properly fixed in place!
4.4. Connection to the Supply Water
The water supply pressure required to run the product is between 1 to 10 bars (0.1 –10
MPa). For the healthy operation of the machine, 10 –80 liters of water per minute should
be supplied from a fully opened tap. Attach a pressure reducing valve if water pressure is
higher.
If you are going to use the double water-inlet product as a single (cold) water-inlet unit,
you must install the supplied stopper to the hot water valve before operating the product.
(It applies to the products with which blind plug group is assigned.)
CAUTION: Models with a single water inlet should not be connected to the hot water tap. In
such a case the laundry will get damaged or the product will switch to protection mode and
will not operate.
CAUTION: Do not use old or used water inlet hoses on the new product. It may cause
stains on your laundry.
Figure 4.5
3. Insert the plastic covers in the bag
containing the user manual to the
openings on the rear panel. (P)
1. Connect the special hoses
supplied with the product to
the water inlets on the
product. Hose with red
marking (left) (max. 90 ºC)
is for hot water inlet, hose
with blue marking (right)
(max. 25 ºC) is for cold
water inlet.

B13 GOOD PLUS WASHING MACHINE SERVICE MANUAL
CAUTION: Make sure that the hot and cold water taps are connected correctly when
the product is being installed. Your laundry may come out hot at the end of the
washing cycle and be worn.
Figure 4.6
3. When hose connection is completed, check whether there is leak problems at the
connection points by opening the taps fully. If any leaks occur, turn off the tap and
remove the nut. Retighten the nut carefully after checking the gasket. In order to
prevent the water leaks and resultant damages, keep the taps closed when you do
not use the product.
4.5. Connection to the water drain
End of the drain hose should be attached directly to waste water drain, lavatory or
bathtub.
CAUTION: If the hose is dislocated during water draining, it will flood your house.
Moreover, there is risk of scalding due to high washing temperatures! In order to prevent
such situations and make sure that the machine performs water intake and discharge
processes without any problem, fix the drain hose securely.
Hose should be connected to a minimum height of 40 cm and a maximum height of
100 cm.
Figure 4.7
If the hose is placed at floor level or near to floor (less than 40 cm) and heightened
2. Tighten the nuts of the hose
by hand well. Never use a
tool when tightening the
nuts.

B13 GOOD PLUS WASHING MACHINE SERVICE MANUAL
13
later on, water drain becomes difficult and laundry may come out extremely wet.
Therefore, observe the heights described in the figure.
To prevent the waste water to go back into the machine again and to ensure easy
drainage, do not immerse the end of the hose into the waste water or do not insert it
into the drain for more than 15 cm. If it is too long, cut it short.
End of the hose should not be bent, stepped on and folded between the drain and the
machine.
If the hose is not long enough, add the original extension hose to be supplied and use it
in this way. Length of the hose may not be longer than 3.2 m. To avoid water leak
failures, the connection between the extension hose and the drain hose of the product
must be fitted well with an appropriate clamp as not to come off and leak.
4.6. Adjustment of legs
CAUTION: In order to ensure that the product operates more silently and vibration-
free, it must stand level and balanced on its feet. Balance the machine by adjusting
the feet. Otherwise, the product may move from its place and cause crushing, noise
and vibration problems.
Figure 4.8
1. Manually loose the lock nuts on the legs.
Figure 4.9
2. Adjust the legs until the product stands in a stable and balanced way.

B13 GOOD PLUS WASHING MACHINE SERVICE MANUAL
Figure 4.10
3. Tighten all lock nuts by hand again.
Figure 4.11
CAUTION: Do not use any tools to loosen the lock nuts. Otherwise, they will
get damaged.
4.7. Electric connection
Connect the product to a grounded outlet protected by a 16 A fuse. Our company shall not
be liable for any damages that will arise when the product is used without grounding in
accordance with the local regulations.
Connection should comply with the national regulations.
Power cable's plug should be easily accessible after installation.
If the current value of your fuse is below 16 amperes, make a qualified electrician
connect a 16-ampere fuse.
Voltage specified in the “Technical specifications” section should match the mains
voltage.
Do not connect to the extension cables or multiple outlets.
CAUTION: Damaged power cables must be replaced by the Authorized Service
Agent.
4.8. Transporting the product
1. Before transporting the product, unplug it from the mains.

B13 GOOD PLUS WASHING MACHINE SERVICE MANUAL
15
2. Remove the connections of water drain and water mains.
3. Discharge the entire amount of water left inside the product.
4. Install the transport safety bolts in reverse order of the disassembly procedure.
Never transport the machine unless its transport safety bolts are installed!
CAUTION: Packaging materials are dangerous for the children. Keep the
packaging materials out of the reach of the children.

B13 GOOD PLUS WASHING MACHINE SERVICE MANUAL
5. USE OF PRODUCT AND BYPRODUCTS
5.1. Preparation
5.1.1 Sorting the Laundry
Sort the laundry according to the fabric type, color, soil degree and permitted water
temperature.
Always follow the instructions specified on the garment label.
Şekil 5.1 Washing Symbols
5.1.2 Preparation of the garments to be washed

B13 GOOD PLUS WASHING MACHINE SERVICE MANUAL
17
Laundry items which contain accessories such as support wire, buckle or metal button
may damage the washing machine. Remove the metal pieces or wash such clothes by
putting them in a laundry bag or pillow case.
Figure 5.2
Remove all objects such as coins, pens, paper clips, etc. and reverse the pockets and
brush them. Such objects may damage the product or cause noise problem.
Put the small size laundry items such as children socks or nylon socks into a laundry
bag or pillow case.
Place the curtains without squeezing them. Remove curtain attachment items.
Close the zips, sew the loose buttons, mend any tears and rips.
Wash the items at appropriate programs according to “Machine Wash” or “Hand Wash”
labels.
Do not wash the colored items with whites. New, dark coloured cottons release a lot of
dye. Wash them separately.
Tenacious stains should be handled appropriately before wash. If unsure, check with a
dry cleaner.
Only use the dyes / color changers and descaling agents which are appropriate to
machine wash. Always follow the instructions on the package.
Wash the pants and delicates by reversing them.
Before washing the garments made of angora wool, wait them in the freezer
compartment of the refrigerator for a few hours. This will reduce pilling.
Before putting the laundry items which are frequently exposed to substances such as
flour, lime powder, milk powder, etc., shake them well. Such powders on the garments
may accumulate on the internal components of the machine and lead to failures in the
course of the time.
5.1.3 Things to do for energy saving
Following information will help you use the product in an ecological and energy-efficient
manner.
Operate the machine with the highest capacity permitted by the program you selected
and do not over load it. See, “Programme and consumption table"
Observe the temperature recommendations given on the detergent package.

B13 GOOD PLUS WASHING MACHINE SERVICE MANUAL
Wash your slightly soiled laundry at low temperatures.
Prefer short programs for the slightly soiled and small amounts of laundry.
Do not use pre-wash and high temperatures for your laundry which are not heavily
soiled and stained.
If you will dry your laundry in a drier, select the highest spin speed which is
recommended for your washing program.
Do not use more detergent than the recommended amount specified on its package.
5.1.4 Correct load capacity
The maximum load capacity depends on the type of laundry, the degree of soiling and the
washing programme desired.
The product automatically adjusts the water amount according to the weight of the laundry
put inside it.
CAUTION: Observe the information in the "Program and consumption table”. When it
is overloaded, washing performance of the machine will be decreased. Moreover,
noise and vibration problems may occur.
Laundry type
Weight (g)
Bathrobe
1200
Napkin
100
Quilt cover
700
Bed sheet
500
Pillow case
200
Table cover
250
Towel
200
Hand towel
100
Night dress
200
Underwear
100
Men’s smock
600
Men’s shirt
200
Men’s pajamas
500
Blouse
100
Figure 5.3 Laundry weights
5.1.5 Loading laundry
1. Open the loading door.
2. Put the garments into the machine in a loose manner.
3. Push and close the loading door until you hear the locking sound. Ensure that no
items are caught in the door.
The loading door is locked while a programme is running. The loading door is unlocked a
while after the programme comes to an end.

B13 GOOD PLUS WASHING MACHINE SERVICE MANUAL
19
CAUTION: In case of misplacing the laundry, noise and vibration problems may occur in
the machine.
5.1.6 Use of detergent and softener
When using detergent, softener, starch, fabric dye, bleacher and decolorant, descaling
agents; read the manufacturer's instructions written on the package and follow the
dosages specified. Use measuring cup if available.
DETERGENT DISPENSER
The detergent drawer is composed of three compartments:
–(1) for prewash
–(2) for main wash
–(3) for softener
–(*) Moreover, there is a siphon part in the softener compartment.
Figure 5.4 Compartments of the detergent dispenser
DETERGENT, SOFTENER AND OTHER CLEANING AGENTS
Before starting the wash program, add detergent and softener.
While the washing cycle is in progress, do not leave the detergent dispenser open!
If you are using a program without prewash, do not add detergent into the prewash
compartment (compartment number “1”).
In a prewash program, do not add liquid detergent into the prewash compartment
(compartment number “1”).
If you are using detergent bag or dosage ball, do not select a prewash program. Place
the detergent bag or dosage ball directly among the garments in the machine.
If you are using liquid detergent, do not forget to place the liquid detergent container
into the main wash compartment (compartment number “2”).
CHOOSING THE DETERGENT TYPE
Detergent type to be used depends on the fabric type and color.

B13 GOOD PLUS WASHING MACHINE SERVICE MANUAL
Use separate detergents for color and white laundry items.
Wash your delicate garments only with the special detergents which are used for
delicates (liquid detergent, wool shampoo, etc.).
You are recommended to use liquid detergent when washing dark color garments or
quilts.
Only wash the woolens with the special detergent used for woolens.
CAUTION: Use only detergents manufactured specifically for washing machines.
CAUTION: Do not use soap powder.
ADJUSTMENT OF DETERGENT AMOUNT
Amount of detergent to be used depends on the laundry amount, soil degree and hardness
of water.
Do not exceed the dosages which are recommended on the detergent package in
order to prevent the excessive foam and bad rinse results, to save detergent and to
protect the environment.
Use lower amounts of detergent for a small amount of laundry or slightly soiled items.
USING SOFTENERS
Pour the softener into the softener compartment of the detergent drawer.
Do not exceed the (>max<) level sign on the softener compartment.
If the softener lost its fluidity, dilute it with water before putting it into the compartment.
USING LIQUID DETERGENTS
If the product has a liquid detergent container
Make sure that you place the liquid detergent container into the compartment number
“2”.
If the liquid detergent lost its fluidity, dilute it with water before putting it into the
detergent container.
Figure 5.5 Use of liquid detergent container
If the product does not contain a liquid detergent cup:
In a prewash program, do not use liquid detergent for prewash.
Table of contents
Other arcelik Washer manuals

arcelik
arcelik 5064 F User manual

arcelik
arcelik 9140 PM User manual

arcelik
arcelik 7104 HE User manual

arcelik
arcelik 5083 FY User manual

arcelik
arcelik 6104 HS User manual

arcelik
arcelik 3340 SJ User manual

arcelik
arcelik BEKO RETRO User manual

arcelik
arcelik 10120 M User manual

arcelik
arcelik 9141 PM User manual

arcelik
arcelik 10140 PM User manual

arcelik
arcelik Beko B13 How to use

arcelik
arcelik 10140 PMI User manual

arcelik
arcelik 9100 PMG User manual

arcelik
arcelik 7100 M User manual

arcelik
arcelik 8101 PMB User manual

arcelik
arcelik 8123 H User manual

arcelik
arcelik 8104 HE User manual

arcelik
arcelik 8100 MT User manual

arcelik
arcelik 10140 PMF User manual

arcelik
arcelik 8124 HSE User manual