Arctic ARLF-350 User manual

ARLF-350
CHEST FREEZER
МОРОЗИЛЬНЫЙ ЛАРЬ
МОРОЗИЛЬНА СКРИНЯ


3
GB
CHEST FREEZER
Dear Buyer!
We congratulate you on having
bought the device under trade
name “Arctic”. We are sure that
our devices will become
essential and reliable assistance
in your housekeeping.
Avoid extreme temperature
changes. Rapid temperature
change (e.g. when the unit is
moved from freezing temperature
to a warm room) may cause
condensation inside the unit and a
malfunction when it is switched
on. In this case leave the unit at
room temperature for at least 1.5
hours before switching it on.
If the unit has been in transit,
leave it indoors for at least 1.5
hours before starting operation.
SAFETY INFORMATION
In the interest of your safety and to
ensure the correct use, before
installing and first using the appliance,
read this user manual carefully,
including its hints and warnings. To
avoid unnecessary mistakes and
accidents, it is important to ensure
that all people using the appliance are
thoroughly familiar with its operation
and safety features. Save these
instructions and make sure that they
remain with the appliance if it is
moved or sold, so that everyone using
it through its life will be properly
informed on appliance use and safety.
For the safety of life and property
keep the precautions of these user’s
instructions as the manufacturer is not
responsible for damages caused by
omission.
Children and vulnerable people
safety:
This appliance can be used by children
older 8 years and persons with limited
physical, sensory or mental
capabilities, or lack of experience and
knowledge if they are under the
supervision of an adult or are trained
to use the device in a safe way and
understand the hazards involved.
Ensure that children do not play with
the appliance.
Children aged from 3 to 8 should not
connect, set or clean the appliance, or
perform the servicing.
Keep all packaging well away from
children. There is risk of suffocation.
If you are discarding the appliance pull
the plug out of the socket, cut the
connection cable (as close to the
appliance as you can) and remove the
door to prevent playing children to
suffer electric shock or to close
themselves into it.
General safety:
WARNING! Keep ventilation
openings, in the appliance enclosure
or in the built-in structure, clear of
obstruction.
WARNING! Do not use mechanical
devices or other means to accelerate
the defrosting process, other than
those recommended by the
manufacturer.
WARNING! Do not damage the
refrigerant circuit.
WARNING! Do not use other
electrical appliances (such as ice
cream makers) inside of refrigerating
appliances, unless they are approved
for this purpose by the manufacture.
Do not store explosive substances
such as aerosol cans with a flammable
propellant in this appliance.
The refrigerant isobutane (R600a) is
contained within the refrigerant circuit
of the appliance, a natural gas with a
high level of environmental
compatibility, which is nevertheless
flammable.
During transportation and installation
of the appliance, be certain that none
of the components of the refrigerant
circuit become damaged.
- avoid open flames and
sources of ignition;
- thoroughly ventilate the room
in which the appliance is situated.
It is dangerous to alter the
specifications or modify this product in
any way. Any damage to the cord may
cause a short circuit, fire and/or
electric shock.
This appliance is intended to be used
in household and similar applications
such as
- staff kitchen areas in shops,
offices and other working
environments;
- farm houses and by clients in
hotels, motels and other residential
type environments;
- bed and breakfast type
environments;
- catering and similar non-retail
applications.
WARNING! Any electrical
components (plug, power cord,
compressor etc.) must be replaced by
a certified service agent or qualified
service personnel.
Power cord must not be lengthened.
Make sure that the power plug is not
squashed or damaged by the back of

4
the appliance. A squashed or damaged
power plug may overheat and cause a
fire.
Make sure that you can come to the
mains plug of the appliance.
Do not pull the mains cable.
If the power plug socket is loose, do
not insert the power plug. There is a
risk of electric shock or fire.
This appliance is heavy. Care should
be taken when moving it.
Do not remove nor touch items from
the freezer compartment if your hands
are damp/wet, as this could cause
skin abrasions or frost/freezer burns.
Avoid prolonged exposure of the
appliance to direct sunlight.
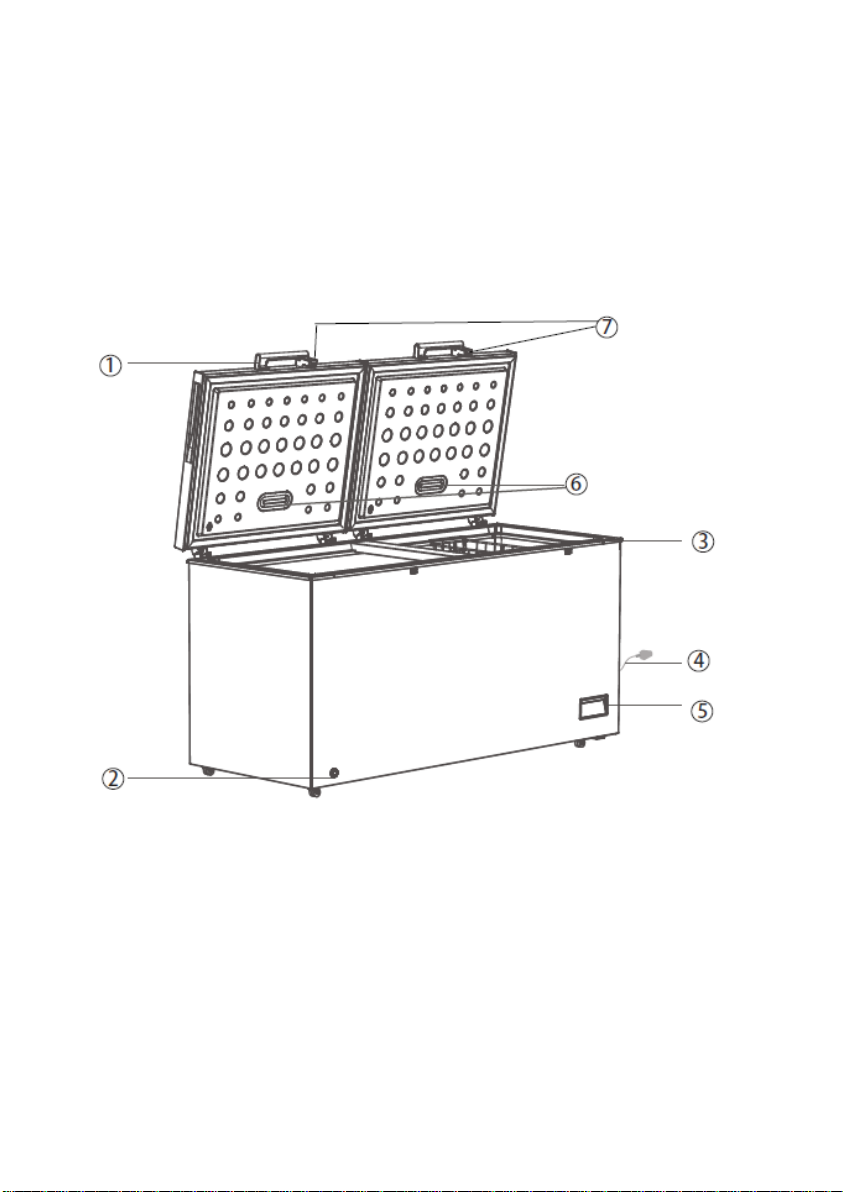
OVERVIEW
1- External Handle
2- Drain hole
3- Basket
4- Power cord
5- Thermostat control panel
6- LED lamp
7- Lock
Installation
Important! For electrical connection
carefully follow the instructions given
in specific paragraphs.
Unpack the appliance and check if
there are damages on it. Do not
connect the appliance if it is damaged.
Report possible damages immediately
to the place you bought it. In that
case retain packing.
It is advisable to wait at least four
hours before connecting the appliance

5
to allow the oil to flow back in the
compressor.
Adequate air circulation should be
around the appliance, lacking this
leads to overheating. To achieve
sufficient ventilation follow the
instructions relevant to installation.
The appliance must not be located
close to radiators or cookers.
Make sure that the mains plug is
accessible after the installation of the
appliance.
Energy saving
Don’t put hot food in the appliance;
Don’t pack food close together as this
prevents air circulating;
Make sure food don’t touch the back
of the compartment(s);
If electricity goes off, don’t open the
door(s);
Don’t open the door(s) frequently;
Don’t keep the door(s) open for too
long time;
Don’t set the thermostat on exceeding
cold temperatures;
Some accessories, such as drawers,
can be removed to get larger storage
volume and lower energy
consumption.
Install door external handle

6

7
Note: If the lock ring failed to hold
the lock when installing handle, please
unscrew the round head screws (5) on
the back of the door and adjust the
position of door upper and lower. Then
drive the screw to fix the handle.
Space Requirement
The following are recommend.
Clearances around the chest freezer
Sides 10cm
Back 10cm
Top 70cm
Positioning
Install this appliance at a location
where the ambient temperature
corresponds to the climate class
indicated on the rating plate of the
appliance:
Climate class
Ambient temperature
SN
+10°C to +32°C
N
+16°C to +32°C
ST
+16°C to +38°C
T
+16°C to +43°C
Location
The appliance should be installed well
away from sources of heat such as
radiators, boilers, direct sunlight etc.
Ensure that air can circulate freely
around the back of the cabinet. To
ensure best performance, if the
appliance is positioned below an
overhanging wall unit, the minimum
distance between the top of the
cabinet and the wail unit must be at
least 100 mm. Ideally, however, the
appliance should not be positioned
below overhanging wan units.
Accurate leveling is ensured by one or
more adjustable feet at the base of
the cabinet.
Warning! It must be possible to
disconnect the appliance from the
mains power supply: the plug must
therefore be easily accessible after
installation.

8
Electrical connection
Before plugging in, ensure that the
voltage and frequency shown on the
rating plate correspond to your
domestic power supply. The appliance
must be earthed. The power supply
cable plug is provided with a contact
for this purpose. If the domestic
power supply socket is not earthed,
connect the appliance to a separate
earth in compliance with current
regulations, consulting a qualified
electrician.
The manufacturer declines all
responsibility if the above safety
precautions are not observed.
This appliance complies with the
Е.Е.С. Directives.
DAILY USE
Do not put hot on the plastic parts in
the appliance.
Frozen food must not be re-frozen
once it has been thawed out.
Store pre-packed frozen food in
accordance with the frozen food
manufacture’s instructions.
Appliance's manufactures storage
recommendations should be strictly
adhered to. Refer to relevant
instructions.
Do not place carbonated of fizzy drinks
in the freezer compartment as it
creates pressure on the container,
which may cause it to explode,
resulting in damage to the appliance.
Ice lollies can cause frost burns if
consumed straight from the appliance.
First use
Cleaning the interior
Before using the appliance for the first
time, wash the interior and all internal
accessories with lukewarm water and
some neutral soap so as to remove
the typical smell of a brand new
product, then dry thoroughly.
Important! Do not use detergents or
abrasive powders, as these will
damage the finish.

9
Temperature Setting
1.0 Electrical connection
When the appliance is plugged in, all
LED indicator lights will flash once.
Then the appliance will resume the
mode previously set before the
electrical outage.
2.0 Temperature Setting
Setting: Press “SET" button, enter
the temperature setting mode. The
temperature indicator bar of
temperature goes up a scale by each
press. This setting runs in cycles.
Temperature can run from Scale MIN
to Scale MAX. Scale MAX is the
coldest. The temperature is
automatically set in 5 seconds after
last press.
Super Freezing
Press “SET" button consecutively to
enter “SUPER" freezing mode from
Scale MAX, the indicator bar on the
left hereby will turn dark whereas the
indicator light of “SUPER” turns on.
This mode is automatically set in 5
seconds after last press.
The compressor keeps working in
“SUPER" freezing mode.
If the “SUPER" mode keeps running
for 52 hours and not stopped
manually, the system will
automatically cut out this mode, with
the temperature back at
Scale 5.
Power ON/OFF
If the appliance is working, press
“ON/OFF” for 3 seconds to turn off.
If the appliance is off, press “ON/OFF"
for 3 seconds to turn on.
3.0 Indicator Lights
Temperature Indicator Light (Bright
Blue): To adjust the temperature from
Scale MIN to Scale MAX. MAX is the
coldest.
Super Freezing Indicator Light (Bright
Blue): Light on = in “SUPER" mode;
light off = exit “SUPER" mode.
Running Indicator Light (Bright
Green): Light on = compressor in
work; light off = compressor stops.
30 minutes after the last operation,
the indicator light will be on in half
luminance.
4.0 Resumption Function
The appliance will automatically
resume the mode previously set
before the electrical outage.
5.0 Temperature Sensor Fault
Alarm
When there is a disconnection or short
out of the temperature sensor, as a
fault alarm, the temperature indicator
bar will flash from left to right every
0.5 second.
Daily use
Freezing fresh food
•The freezer compartment is suitable
for freezing fresh food and storing
frozen and deep-frozen food for a long
time.
•Place the fresh food to be frozen in
the bottom compartment.
•The maximum amount of food that
can be frozen in 24 hours is specified
on the rating plate.
•The freezing process lasts 24 hours:
during this period do not add other
food to be frozen.
Storing frozen food
When first starting-up or after a period
out of use. Before putting the product
in the compartment let the appliance
run at least 2 hours on the higher
settings.
Important! In the event of accidental
defrosting, for example the power has
been off for longer than the value
shown in the technical characteristics
chart under "rising time”, the
defrosted food must be consumed

10
quickly or cooked immediately and
then re-frozen (after cooked).
Thawing
Deep-frozen or frozen food, prior to be
used, can be thawed in a fridge
compartment or at room temperature,
depending on the time available for
this operation.
Small pieces may even be cooked still
frozen, directly from the freezer. In
this case, cooking will take longer.
Helpful hints and tips
Hints for freezing
To help you make the most of the
freezing process, here are some
important hints:
•The maximum quantity of food which
can be frozen in 24 hrs. is shown on
the rating plate;
•The freezing process takes 24 hours.
No further food to be frozen should be
added during this period;
•Only freeze top quality, fresh and
thoroughly cleaned foodstuffs;
•Prepare food in small portions to
enable it to be rapidly and completely
frozen and to make it possible
subsequently to thaw only the
quantity required;
•Wrap up the food in aluminum foil or
polythene and make sure that the
packages are airtight;
•Do not allow fresh, unfrozen food to
touch food which is already frozen,
thus avoiding a rise in temperature of
the latter;
•Lean foods store better and longer
than fatty ones; salt reduces the
storage life of food;
•Water ices, if consumed immediately
after removal from the freezer
compartment, can possibly cause the
skin to be freeze burnt;
•It is advisable to show the freezing in
date on each individual pack to enable
you to keep tab of the storage time.
Hints for storage of frozen food
To obtain the best performance from
this appliance, you should:
- make sure that the commercially
frozen foodstuffs were adequately
stored by the retailer;
- be sure that frozen foodstuffs are
transferred from the food store to the
freezer in the shortest possible time;
- not open the door frequently or
leave it open longer than absolutely
necessary.
•Once defrosted, food deteriorates
rapidly and cannot be refrozen.
•Do not exceed the storage period
indicated by the food manufacturer.
CARE AND CLEANING
For hygienic reasons the appliance
interior, including interior accessories,
should be cleaned regularly.
Regularly examine the drain in the
chest freezer for defrosted water. If
necessary, clean the drain.
Caution! The appliance may not be
connected to the mains during
cleaning. Danger of electrical shock!
Before cleaning switch the appliance
off and remove the plug from the
mains, or switch off or turn out the
circuit breaker or fuse.
Do not clean the appliance with metal
objects.
Do not use sharp objects to remove
frost from the appliance. Use a plastic
scraper.
Never clean the appliance with a
steam cleaner. Moisture could
accumulate in electrical components,
danger of electrical shock! Hot vapors
can lead to the damage of plastic
parts.
The appliance must be dry before it is
placed back into service.
Important! Ethereal oils and organic
solvents can attack plastic parts, e.g.
lemon juice or the juice form orange
peel, butyric acid, cleanser that
contain acetic acid. Do not allow such
substances to come into contact the
appliance parts.
Do not use any abrasive cleaners.
Cleaning
•Remove the food from the freezer.
Store them in a cool place, well
covered.
•Switch the appliance off and remove
the plug from the mains, or switch off
or turn out the circuit breaker of fuse.
•Clean the appliance and the interior
accessories with a cloth and lukewarm
water. After cleaning wipe with fresh
water and rub dry.
•Accumulation of dust at the
condenser increases energy
consumption. For this reason carefully
clean the condenser at the back of the
appliance once a year with a soft
brush or a vacuum cleaner (if the
condenser is at back of appliance.)
•After everything is dry place the
appliance back into service.
Defrosting the freezer
The freezer, however, will become
progressively covered with frost. This
should be removed.

11
Never use sharp metal tools to scrape
off frost from the evaporator as you
could damage it.
However, when the ice becomes very
thick on the inner liner, complete
defrosting should be carried out as
follows:
•Unplug the unit. Remove the drain
plug from the inside of the freezer.
Defrosting usually takes a few hours.
To defrost faster keep the freezer door
open.
•For draining, place a tray beneath the
outer drain plug. Pull out the drain
dial.
•Rotate the drain dial 180 degree.
This will let the water flow out in the
tray. When done, push the drain dial
in. Re-plug the drain plug inside the
freezer compartment. Note: monitor
the container under the drain to avoid
overflow.
•Wipe the interior of the freezer and
replace the electrical plug in the
electrical outlet.
•Reset the temperature control to the
desired setting.
Service
Any electrical work required to do the
servicing of the appliance should be
carried out by a qualified electrician or
competent person. This product must
be serviced by an authorized Service
Center, and only genuine spare parts
must be used.
Troubleshooting
Caution! Before troubleshooting,
disconnect the power supply. Only a
qualified electrician or a competent
person must do the troubleshooting
that is not in this manual.
Important! There are some sounds
during normal use (compressor,
refrigerant circulation).
Problem
Possible cause
Solution
Appliance does
not work
Mains plug is not plugged in
or is loose
Insert mains plug
Fuse has blown or is defective
Check fuse, replace if necessary
Socket is defective
Mains malfunctions are to be
corrected by an electrician
Appliance freezes
too much
Temperature is set too cold or
the appliance runs at MAX
setting
Turn the temperature regulator
to a warmer setting temporarily
The food is not
frozen enough
Temperature is not properly
adjusted
Please look in the initial
Temperature Setting section
Door was open for an
extended period
Open the door only for as long
as necessary
A large quantity of warm food
was placed in the appliance
within the last 24 hours
Turn the temperature regulation
to a colder setting temporarily
The appliance is near a heat
source
Please look in the installation
location section
Heavy build-up of
frost on the door
seal
Door seal is not air-tight
Carefully warm the leaking
sections of the door seal with a
hair dryer (on a cool setting). At
the same time shape the
warmed door seal by hand such
that it sits correctly
Unusual noises
The appliance is touching the
wall or other objects
Move the appliance slightly

12
A component, e.g. a pipe, on
the rear of the appliance is
touching another part of the
appliance or the wall
If necessary, carefully bend the
component out of the way
If the malfunction appears again, contact the Service Center.
Replacing the lamp
The switch of LED lamp is gravity
controlled, when the angle of door-
opening is bigger than 30 degrees, the
light will switch on, and it will switch
off when the angle is smaller than 30
degrees.
Note: If LED lamp does not work
when door is open, please check as
said below:
- Firstly, loosen screws on the lamp
cover;
- Secondly, loosen the screws on the
lamp electric parts.
- Thirdly, check the cable terminals of
electric parts and terminals of
contacting lines for door lamps is
loosening or not. Please, fix them if
they are not fixed. Then, check the
light is on or not. If the lamp is switch
on, please install the lamp cover. If
not, please further check the electric
part is intact or not. If necessary,
replace the electric part to check the
lamp is on or not. If the lamp still does
not work, please contact with staff of
the after-sale service for assistance.
The steps of LED lamp installing
Fix the cable terminals of electric parts
and contacting lines in the door liner;
Install LED electronic part in the door
liner and fix with screws;
Install lamp cover on the holder and
fix to finish all process.
SPECIFICATIONS
Freezer capacity: 720 L
Energy consumption: 1.12 kW/24 h
Rated voltage: 220-240 V
Rated frequency: 50 Hz
Rated current: 2,25 A
Net weight: 72,00 kg
Gross weight: 82,00 kg
SET
CHEST FREEZER 1
INSTRUCTION MANUAL 1
WARRANTY BOOK 1
PACKAGE 1
ENVIRONMENT FRIENDLY DISPOSAL
You can help protect the
environment! Please
remember to respect the
local regulations: hand in
the non-working
electrical equipment to
an appropriate waste
disposal center.
The manufacturer reserves the
right to change the specification
and design of goods.

13
RU
МОРОЗИЛЬНЫЙ ЛАРЬ
Уважаемый покупатель!
Поздравляем Вас с
приобретением изделия
торговой марки “Arctic”. Мы
уверены, что наши изделия
будут верными и надежными
помощниками в Вашем
домашнем хозяйстве.
Не подвергайте устройство
резким перепадам температур.
Резкая смена температуры
(например, внесение устройства
с мороза в теплое помещение)
может вызвать конденсацию
влаги внутри устройства и
нарушить его работоспособность
при включении. Устройство
должно отстояться в теплом
помещении не менее 1,5 часов.
Ввод устройства в эксплуатацию
после транспортировки
производить не ранее, чем через
1,5 часа после внесения его в
помещение.
ПРАВИЛА БЕЗОПАСНОСТИ
В интересах вашей безопасности и
для обеспечения правильной
работы, перед установкой и первым
использованием прибора
внимательно прочитайте эту
инструкцию, в том числе
рекомендации и предупреждения.
Чтобы избежать нежелательных
ошибок и несчастных случаев,
важно, чтобы все пользователи были
ознакомлены с правилами
эксплуатации прибора и правилами
техники безопасности. Храните эту
инструкцию вместе с прибором, если
он перевозится, чтобы каждый
пользователь был ознакомлен с
правилами эксплуатации и
безопасности.
Для обеспечения безопасности
жизни и имущества придер-
живайтесь мер предосторожности,
приведенных в данной инструкции
по эксплуатации, поскольку
производитель не несет ответствен-
ности за ущерб, причиненный в
результате несоблюдения указаний.
Безопасность детей иинвалидов:
Данный прибор может
использоваться детьми в возрасте от
8 лет и старше и лицами с
ограниченными физическими,
сенсорными или умственными
способностями или отсутствием
опыта и знаний, если они находятся
под надзором или
проинструктированы относительно
безопасного использования прибора
и у них есть понимание связанной с
этим опасности.
Дети не должны играть с прибором.
Дети в возрасте от 3 лет и младше 8
лет не должны подключать,
регулировать и чистить прибор или
выполнять обслуживание.
Следите, чтобы дети не играли с
прибором.
Во избежание риска удушения
храните упаковочные материалы в
недосягаемом для детей месте.
Если вы захотите выбросить
морозильный ларь, отрежьте от него
шнур питания как можно короче и
снимите крышку, для того, чтобы
дети играя с ним на улице не
заперли себя случайно в ларе или
не получили удар током.
Общие правила безопасности:
ВНИМАНИЕ!Никогда не
загораживайте вентиляционные
отверстия прибора.
ВНИМАНИЕ! Не используйте
механические устройства или другие
средства для ускорения процесса
размораживания, кроме рекомендо-
ванных производителем.
ВНИМАНИЕ! Не повредите систему
циркуляции хладагента.
ВНИМАНИЕ! Не используйте другие
электроприборы (например,
мороженицы) внутри морозильного
ларя, если они не одобрены для этой
цели изготовителем.
Не храните в морозильном ларе
взрывоопасные вещества, такие как
аэрозольные баллончики с
легковоспламеняющимся топливом.
Хладагент изобутан (R600a),
содержащийся в системе
циркуляции, - это газообразное
вещество с высоким уровнем
экологической совместимости. Тем
не менее, оно легко воспламеняется.
Во время транспортировки и
установки прибора следите, чтобы
не повредились детали системы
циркуляции хладагента.
- держите прибор вдали от
открытого огня и источников
возгорания.
- хорошо проветривайте
помещение, где находится
морозильный ларь.
Запрещено изменять технические
характеристики прибора. Любое
повреждение шнура питания может
привести к короткому замыканию,
пожару и/или поражению
электрическим током.
Прибор предназначен для
использования в домашнем
хозяйстве, а также: в кухнях

14
заведений общественного питания,
офисов и организаций; в коттеджах,
отелях, мотелях и других подобных
заведениях; в заведениях типа
«ночлег и завтрак»; для
кейтеринговых организаций.
ВНИМАНИЕ! Любые электрические
детали (шнур, штепсель, компрессор
и т.д.) в случае необходимости
должны быть заменены агентом
авторизированного сервисного
центра или квалифицированным
специалистом.
Запрещено удлинять шнур питания.
Следите, чтобы не прижать шнур
питания ларем. Прижатый шнур
может перегреться и вызвать
возгорание.
Обеспечьте свободный доступ к
розетке.
Не тяните за шнур, вынимая
штепсель из розетки.
Если штепсель неплотно держится в
розетке, не вставляйте его в такую
розетку во избежание риска
электрошока или возгорания.
Будьте осторожны при перемещении
прибора, так как он очень тяжелый.
Не вынимайте и не трогайте
предметы из морозильного ларя,
если ваши руки влажные/мокрые,
так как это может привести к
повреждению или обморожению
кожи рук.
Избегайте длительного воздействия
на прибор прямых солнечных лучей.
Срок службы – 2 года
До введения в эксплуатацию
срок хранения неограничен.
ЧАСТИ ПРИБОРА
1- Ручка крышки
2- Сливное отверстие
3- Корзина
4- Шнур питания
5- Панель управления
термостатом
6- LED лампа
7- Замок
УСТАНОВКА
Важно!При подключении к
электросети внимательно следуйте
инструкциям.

15
Распакуйте прибор и проверьте на
наличие повреждений. Не
подключайте прибор, если он
поврежден. Немедленно сообщите о
проблеме продавцу. В этом случае
не выбрасывайте упаковку.
Рекомендуется подождать не менее
четырех часов, прежде чем
подключать прибор, чтобы масло
затекло обратно в компрессор.
Достаточная циркуляция воздуха
должна быть обеспечена в месте
нахождения прибора, иначе прибор
может перегреться. Для обеспечения
достаточной вентиляции следуйте
инструкциям в разделе
«Размещение».
Нельзя размещать морозильный
ларь вблизи батарей отопления и
кухонных плит.
При размещении прибора
обеспечьте легкий доступ к розетке.
Экономия электроэнергии
Не кладите горячую пищу в
морозильник;
Не кладите продукты вплотную друг
к другу, так как это препятствует
циркуляции воздуха;
Следите, чтобы продукты не
касались задней стенки
морозильника;
Если пропадает ток, не открывайте
крышку морозильного ларя;
Не открывайте крышку слишком
часто;
Не держите крышку открытой
слишком долго;
Не устанавливайте термостат на
чрезмерно низкую температуру;
Некоторые аксессуары (например,
корзину) можно вынуть для
увеличения места и уменьшения
потребления электроэнергии.
Установка наружной ручки крышки
Шаг 1
Возьмите 4 винта (1) и основание ручки (2).
Шаг 2
Закрепите основание ручки (2) на крышке ларя четырьмя
винтами (1).
Шаг 3
Закрепите дужку замка (4) на ларе двумя винтами (1)

16
Примечание: Если дужка замка не
держит замок после установки
ручки, то выкрутите пять винтов
сзади крышки ларя (5) и
отрегулируйте положение крышки.
Затем привинтите обратно.
Размещение
Рекомендуются следующие рассто-
яния от ларя:
От боковых сторон 10 см
От задней стенки 10 см
От крышки 70 см
Температурные условия
Установите прибор в месте, где
температура окружающей среды
соответствует климат-классу,
указанному на заводской табличке
прибора:
Климат-класс
Окружающая t°
SN
+10°C to +32°C
N
+16°C to +32°C
ST
+16°C to +38°C
T
+16°C to +43°C
Размещение
Морозильный ларь должен
размещаться вдали от источников
тепла, таких как батареи отопления,
обогреватели, бойлеры, прямые
солнечные лучи и т.п. Обеспечьте
свободную циркуляцию воздуха
возле задней панели ларя. Если
морозильный ларь находится под
навесным шкафчиком, то расстояние
между ними должно быть не менее
100мм. Лучше всего, если над ларем
не будет навесной мебели.
Внимание! Размешайте моро-
зильный ларь таким образом, чтобы
штепсельную вилку было удобно
вынимать из розетки.
Подключение к электросети
Перед подключением убедитесь, что
напряжение и частота, указанные на
заводской табличке, соответствуют
параметрам вашей электросети.
Прибор необходимо заземлить. В
штепселе наличествует контакт для
заземления. Если в розетке нет
контакта для заземления,
подключите прибор к отдельному
заземлению (обратитесь к
квалифицированному электрику).

17
Производитель не несет
ответственности, если пользователь
не соблюдает технику безопасности.
Этот прибор соответствует
директивам Е.Е.С.
ЭКСПЛУАТАЦИЯ
Не ставьте горячие предметы на
пластиковые части прибора.
Не замораживайте ранее
размороженные продукты повторно.
Храните упакованные замороженные
продукты в соответствии с
инструкциями производителя
продуктов.
Строго придерживайтесь правил
хранения продуктов, как описано
ранее в этой инструкции.
Не кладите в морозильный ларь
газированные напитки, так как тара
может лопнуть и повредить
внутреннюю камеру.
Не употребляйте мороженное,
только что вынутое из морозильного
ларя, так как оно может вызвать
обморожение.
Перед первым использованием
Очистка внутренней камеры
Перед первым использованием
прибора помойте внутреннюю
камеру и аксессуары теплой
мыльной водой, чтобы устранить
типичный заводской запах, затем
аккуратно протрите насухо.
Важно!Не используйте моющие
средства или абразивные порошки,
так как они могут повредить
поверхность.
Установка температуры

18
1.0 Электрическое подключение
Когда прибор подключен, все
светодиодные индикаторы будут
мигать один раз. Затем прибор
возобновит режим, ранее
установленный до отключения
электричества.
2.0 Установка температуры
Настройка: Нажмите кнопку «SET»,
войдите в режим установки
температуры. Индикатор
температуры на шкале
увеличивается при каждом нажатии.
Эта настройка работает циклично.
Температура может изменяться от
положения MIN до положения MAX.
Положение MAX самое холодное.
Температура автоматически
устанавливается через 5 секунд
после последнего нажатия.
Супер заморозка
Нажимайте кнопку «SET»
последовательно, чтобы перейти в
режим замораживания «SUPER» из
положения MAX, индикаторная
полоса слева потемнеет, загорится
индикатор «SUPER». Этот режим
автоматически устанавливается
через 5 секунд после последнего
нажатия.
Компрессор продолжает работать в
режиме «SUPER».
Если режим «SUPER» продолжает
работать в течение 52 часов и не
останавливается вручную, система
автоматически отключит этот режим,
при этом температура вернется к
положению 5 шкалы.
Если прибор работает, нажмите
кнопку «ON/OFF» на 3 секунды,
чтобы его выключить.
Если прибор выключен, нажмите
«ON/OFF» в течение 3 секунд, чтобы
его включить.
3.0 Световые индикаторы
Индикатор температуры (ярко-
синий): для регулировки
температуры от шкалы MIN до
шкалы MAX. Макс самый холодный.
Индикатор супер заморозки (ярко-
синий): горит = в режиме «SUPER»;
гаснет = выход из режима «SUPER».
Индикатор работы (ярко-зеленый):
светится = компрессор в работе;
выключен = компрессор
останавливается.
Через 30 минут после последней
операции индикатор будет светиться
наполовину.
4.0 Функция возобновления
Прибор автоматически возобновит
режим, установленный ранее перед
отключением электричества.
5.0 Аварийный сигнал
неисправности датчика
температуры
При отключении или коротком
замыкании датчика температуры,
полоска индикатора температуры
будет мигать слева направо каждые
0,5 секунды.
Замораживание свежих
продуктов
•Морозильный ларь предназначен
для замораживания свежих
продуктов и хранения
замороженных продуктов в течение
длительного времени.
•Кладите свежие продукты в нижнее
отделение камеры.
•Максимальное количество
продуктов для замораживания за 24
часа указано на заводской табличке.
•Процесс заморозки длится 24 часа:
в этот период не добавляйте другие
продукты для замораживания.
Хранение замороженных
продуктов
При первом использовании или
после долгого перерыва в работе,
прежде чем положить продукты,
дайте морозильному ларю
поработать пустым в течение 2
часов в режиме мороза.
Важно!В случае непредвиденного
размораживания, например, при
долговременном отключении
электроэнергии, необходимо быстро
употребить/приготовить разморо-
женные продукты.
Размораживание продуктов
Замороженные продукты перед
употреблением можно разморозить в
холодильнике или при комнатной
температуре, в зависимости от
времени, которым вы располагаете.
Небольшие кусочки можно начинать
готовить еще замороженными, но
готовка займет больше времени.
Полезные советы
Замораживание:
Для более эффективного
замораживания придерживайтесь
таких рекомендаций:
•Максимальное количество
продуктов для замораживания за 24
часа указано на заводской
табличке;
•Процесс замораживания занимает
24 часа. В этот период не
добавляйте другие продукты для
замораживания;
•Замораживайте только
высококачественные, свежие и
хорошо вымытые продукты;

19
•Делите продукты для заморозки на
небольшие порции для более
быстрого замораживания и для
удобства их последующего
размораживания;
•Тщательно заворачивайте продукты
в алюминиевую фольгу или
пищевую пленку;
•Следите, чтобы незамороженные
продукты не соприкасались с уже
замороженными;
•Постные продукты хранятся лучше
и дольше, чем жирные. Соль
сокращает время хранения
продуктов;
•Замороженные напитки, употребля-
емые сразу из морозильника, могут
вызвать обморожение кожи;
•Для удобства рекомендуется
проставлять даты замораживания на
упаковках продуктов.
Советы по хранению
замороженных продуктов
Для наиболее эффективного
использования морозильного ларя:
- убедитесь, что купленные
замороженные продукты правильно
хранились в магазине;
- доставляйте купленные
замороженные продукты в
морозильный ларь как можно
быстрее;
- не открывайте крышку
морозильного ларя слишком часто
или дольше, чем это необходимо.
•После размораживания продукта не
замораживайте его повторно.
•Не превышайте сроки хранения,
указанные производителем
продукта.
ЧИСТКА И УХОД
В целях гигиены следует регулярно
чистить внутреннюю камеру прибора
и аксессуары.
Регулярно проверяйте сливное
отверстие и удаляйте воду в случае
ее наличия.
Осторожно!Прибор следует
выключить и отключить от
электросети перед чисткой во
избежание удара током.
Не очищайте морозильный ларь с
помощью металлических предметов.
Не пользуйтесь острыми
предметами, чтобы удалить лед.
Пользуйтесь пластиковым скребком.
Запрещается чистить морозильный
ларь паровым очистителем, так как
влага может собраться в
электрических частях и вызвать
замыкание. Горячий пар может
повредить пластиковые детали.
Прибор необходимо полностью
просушить перед последующим
использованием.
Важно!Эфирные масла и
органические растворители
(например, лимонный сок, сок из
шкуры апельсина, масляная
кислота, уксус) могут повредить
пластиковые детали. Следите, чтобы
такие вещества не контактировали с
частями прибора.
Не используйте абразивные
чистящие средства.
Процедура чистки
•Выньте продукты из морозильного
ларя. Положите их в прохладное
место, хорошо укройте.
•Выключите прибор и отключите его
от электросети.
•Очистите внутреннюю камеру и
аксессуары тканью, смоченной в
теплой, слегка мыльной воде. Затем
очистите тканью, смоченной чистой
водой. Затем протрите насухо.
•Накопление пыли на конденсаторе
увеличивает потребление энергии.
По этой причине тщательно
очищайте конденсатор один раз в
год мягкой щеткой или пылесосом.
•После полного просыхания
морозильный ларь готов к работе.
Размораживание ларя
Со временем слой льда в
морозильном ларе утолщается. Его
необходимо удалять.
Запрещается использовать острые
металлические предметы для
удаления льда, так как они могут
повредить прибор.
Когда лед внутри становится очень
толстый, следует проводить полное
размораживание следующим
образом:
•Отключите прибор от электросети.
Выньте пробку из сливного
отверстия внутри морозильного
ларя. Размораживание обычно
занимает несколько часов. Для
ускорения процесса откройте
крышку морозильного ларя.
•Для слива воды поставьте поддон
под внешнее сливное отверстие .
Выдвиньте диск сливного отверстия.
Table of contents
Languages:
Other Arctic Freezer manuals

Arctic
Arctic AMK-148 User manual

Arctic
Arctic A11 User manual

Arctic
Arctic ARSK-144In User manual

Arctic
Arctic ARL-320 User manual

Arctic
Arctic AML-220 User manual

Arctic
Arctic A11 User manual

Arctic
Arctic ARL-210 User manual

Arctic
Arctic ARLF-420 User manual

Arctic
Arctic ARK-085 User manual

Arctic
Arctic AML-325 User manual
Popular Freezer manuals by other brands

Signature
Signature SCT1003A+X Instructions for use

Indel Webasto Marine
Indel Webasto Marine BI29 Dual Installation and operation manual

Gorenje
Gorenje FH401IW Instructions for use

Electrolux
Electrolux TF776 User handbook

Meech
Meech A70025EX operating manual

Zanussi
Zanussi ZFC 22 JB OPERATING AND INSTALLATION Manual