Arden FN639 User manual

Before returning to your retailer, call our customer
service department at 1-800-501-7271, 7 a.m. – 5:30 p.m., EST, Monday – Friday.
Email: [email protected]
Español p. 9
MODEL #FN639

2
SAFETYINFORMATION
When using an electrical appliance, always follow basic precautions, including the following:
WARNING
READ AND FOLLOW ALL SAFETY INSTRUCTIONS
To reduce the risk of electrical shock, burns, fire or injury to persons:
• This pump is supplied with a grounding conductor and a grounding type attachment plug. To reduce
risk of electric shock, connect only to properly grounded outlet.
• Do not remove the grounding pin from the plug.
• The national electric code requires that a ground fault circuit interrupter (GFCI) be used in the branch
circuit supplying fountain pumps. See your electrical supply dealer for this device.
• To reduce the risk of electrical shock, use only on portable self-contained fountains no larger than 5
feet in any dimension.
• Do not install fountain within 5 feet of a pool or spa when connected to a GFCI protected circuit.
• Inspect cord for damage before installation and/or maintenance. Replace entire pump if damaged.
• Ensure that the electrical cord loops below the electrical outlet to form a “Drip Loop”. This will prevent
water from running down the cord into the electrical outlet. (Fig. 1)
CAUTION
To reduce the risk of electric shock:
• Always unplug the appliance from the electrical outlet immediately after using and before cleaning.
• Do not connect to any voltage other than that shown on the pump.
• Do not pump flammable liquids.
• Do not use water above 86º F (30ºC).
• Always disconnect from electrical outlet before handling the pump.
• Do not let the pump run dry.
• Do not lift the pump by the power cord.
• Do not pump heated liquids.
• Keep cord away from heated surfaces.
• Operate in fresh water only.
• Never drop or insert any object into any opening.
• Operate pump completely submerged for proper operation and cooling.
• Keep fountain out of reach of children and pets.
• Install on a level surface for best operation.
• If in a freeze-area, remove water from fountain. Store the fountain with pump indoors during
freezing conditions.
SAVE THESE INSTRUCTIONS
This manual contains important
safety and operating instructions for
power units.
Fig. 1
“Drip Loop”

3
PACKAGECONTENTS
Pump Cover
Electrical Cord
Thank you for purchasing your Outdoor Fountain.
Please read the operation and safety instructions before assembly.
Bucket Notch
Plug Pump
Basin
Hose
Cord Notch
Plug Hole
Bucket

4
PREPARATION
Before beginning assembly of product, make sure all parts are present. Compare parts with package
contents list. If any part is missing or damaged, do not attempt to assemble the product. Contact customer
service for replacement parts.
Estimated Assembly Time: 10 minutes
No Tools Required for Assembly.
Use at least one other person to assemble this fountain.
ASSEMBLYINSTRUCTIONS
1. Place the fountain on a flat, level surface.
2. Locate the pump and turn the water flow control
to the “Maximum (+)” setting. (Fig. 2)
3. Locate the electrical cord and secure it in the
cord notch. (Fig. 3)
4. Connect the hose to the pump making sure the
connection is tight. Place the pump at the bottom
of the basin. (Fig. 4)
5. Insert the pump cover into the basin. (Fig. 5)
Fig. 4
J
Pump
Hose
Fig. 3
Fig. 5
Pump
Cover
Basin
Fig. 2
Pump
Water
Flow Control
MAXIMUM
MINIMUM
Cord
Notch
Electrical
Cord

5
6. Locate the bucket and place handle in notch on
the boy’s hand. (Fig. 6)
7. Fill the basin with clean water to a minimum of
75% full, completely submerging the pump.
The pump will not work if it is not completely
submerged at all times. (Fig. 7)
NOTE: To help prevent mineral build-up
and keep the fountain clean, distilled water
is recommended.
8. To turn on the fountain, connect the adaptor to
a properly grounded outlet, following GFCI outlet
regulations. A GFCI outlet must be used. Your
fountain will begin to flow. (Fig. 8)
9. Once the fountain is on and running determine if
it needs more or less water, or if the water flow
control needs to be adjusted. Relax & enjoy
your fountain!
Fig. 7
Fig. 8
“Drip Loop”
Electrical Cord
Fig. 6
Notch
Bucket
Handle

6
FOUNTAINMAINTENANCE
1. Periodically change the water and clean according to the water condition. This will keep the water
from becoming sticky, microorganisms from developing, and mineral deposits from building up.
Avoid placing the fountain underneath trees. This will help keep debris out of the fountain, ensuring
proper functioning of the pump.
2. Do not use harsh chemicals when cleaning the surface of the unit. Doing so will damage the finish. It
is best to wipe clean with a damp cloth.
3. Regularly check the water level to ensure it is above the pump. In hot or windy weather, the water
will evaporate and splash out of the fountain at a faster rate. Check the water level more frequently in
these conditions. The water must always be kept above 75% full.
4. Splashing and/or dripping may occur when the fountain is running. Do not place the fountain where
you are concerned about possible water damage. To prevent water from splashing unnecessarily,
adjust the water flow control.
5. The water flow may not function properly if the fountain is not level. You can use a level to help make
this determination. If it is not level, use shims or an object to level the fountain before operating.
6. When the fountain will not be used for extended periods of time, disconnect the cord from the power
supply and empty the water.
7. Only use the correct power voltage, as indicated on the pump.
If your fountain is located in a freeze/frost climate (32°F and below), follow these steps to safeguard
your fountain:
1. Drain all water from the unit.
2. Leave as assembled, or disassemble fountain and store indoors for the winter months.
3. If you are unable to store inside, drain all water and dry the fountain.
4. If possible, remove the pump and bring indoors.
5. Fill the basins or reservoirs with an absorbent material, such as blankets or burlap.
6. Wrap the unit with plastic for protection.
REPLACEMENTPARTSLIST
For replacement parts, call our customer service department at 1-800-501-7271, 7 a.m. – 5:30 p.m., EST,
Monday – Friday, or email: [email protected]
ILLUSTRATION DESCRIPTION PART NUMBER
Hose HOSEDB21CM-11
Pump PUMPP333splg-11
Bucket FN639088B9-9D1
Pump Cover QTY09195PC-11

7
TROUBLESHOOTING
Failure to follow the instructions and warnings in this manual may result in pump damage and/or injury. Keep
this manual for future reference.
Problem Possible Cause & Corrective Action
The pump is not
pumping water. 1. Check if the power supply is correctly connected and the pump is completely
submerged in water.
2. Check the pump and the hose for any obstructions or kinks in the hose, clean
if necessary.
3. The pump may have air built up in it. Unplug the pump’s electrical cord from the power
supply for approximately 15 seconds. Plug the pump’s electrical cord back into the
power supply; this should clear out built up air. You may need to repeat this step
several times.
4. The impeller may be jammed or clogged with debris. Disconnect the power supply, and
remove the front cover on the pump and the water leave seating. Check the impeller,
turning it, to see if anything is jammed or broken. Rinse off the front cover and impeller
cover to remove any debris. (Fig. 9)
The water flow is not
strong enough, or is too
strong.
1. Check the water flow control on the pump and adjust accordingly. (Fig.9)
The pump is making
abnormal noises. 1. Check the water level to ensure the pump is completely submerged.
2. Disconnect the pump and check the impeller assembly: (Fig. 9)
• Remove the front cover and water leave seating from the pump body.
• Grip the impeller and gently take it out of the pump.
• Rinse the impeller and pump body to remove any debris.
• If any damage is found in the pump, please contact customer service.
Water is not
flowing correctly. 1. Check to ensure your fountain is level. If it is not, level it with support such as a shim.
2. The impeller may be jammed or clogged with debris. Disconnect the power supply, and
remove the front cover on the pump and the water leave seating. Check the impeller,
turning it, to see if anything is jammed or broken. Rinse off the front cover and impeller
cover to remove any debris. (Fig. 9)
3. Check the water level to ensure the pump is completely submerged. Adding water can
help to improve the water flow.
4. Check the water outlets to ensure there is no debris clogging them. If so, remove
the debris.
5. Wipe the spouts down with a wet cloth to remove any build-up that may impede the water flow.
Fig. 9
Front
Cover
Water
Leave
Seating
Water
Leave
Water
Outlet
Regulator
Shaft
Back
Cover
Suction
Cups
Pump
Body

8FN639.V1XPrinted in China
ONE-YEARLIMITEDWARRANTY
The manufacturer warrants this product to be free from manufacturing defects and defects in material for 12
months from the date of purchase, subject to the following conditions. This warranty gives you specific legal
rights, and you may also have other rights which vary from state to state.
ANY IMPLIED WARRANTIES, INCLUDING ANY WARRANTY OF MERCHANTABILITY, ARE LIMITED
TO THE DURATION OF THIE WARRANTY. Some states do not allow limitations on how long an implied
warranty lasts, so the above limitations may not apply to you.
In all events, the manufacturer’s liability is limited to the cost of replacing the defective part or parts, as
determined in the manufacturer’s sole discretion, and the manufacturer shall not be liable for any special,
incidental, or consequential damages caused as a result of any defect. Some states do not allow the
exclusion or limitation of incidental or consequential damages, so the above limitations or exclusions may not
apply to you. To make a claim under this Limited Warranty for a manufacturing defect or a defect in material,
you must notify the manufacturer, in writing, at the following address:
Warranty Administrator, Arden Companies
30400 Telegraph Road, Suite 200, Bingham Farms, Michigan 48025
This written statement must be accompanied with proof of purchase in the form of a sales receipt or invoice
copy and must set forth at least the following information: your name and address, the date of purchase, and
a description of the claimed defect.
This Limited Warranty does not apply to, and the manufacturer assumes no responsibility for, damage or
defect due to any one or more of the following:
1. Improper handling, maintenance, or installation of the product.
2. Modification or alteration to the product in any manner which increases its susceptibility to damage.
3. Any case where the product has been misused, intentionally damaged, or damaged as a result of
negligence by you.
4. Use of the pump with anything other than fresh water at temperatures of 32° to 86° F (0° to 30° C) and
with a pH range of 5 to 9.
To the extent that any warranty exclusion herein is not permitted by some state law, the said exclusions may
not apply to you.

English p. 1
MODELO FN639

10
INFORMACIÓNDESEGURIDAD
Al usar un aparato eléctrico, debes seguir siempre las precauciones básicas, incluyendo
las siguientes:
ADVERTENCIA
LEE Y SIGUE TODAS LAS INSTRUCCIONES DE SEGURIDAD
Para reducir el riesgo de descargas eléctricas, quemaduras, incendios o lesiones personales:
• Esta bomba contiene un conductor a tierra y un accesorio de enchufe para conexión a tierra. Para
reducir el riesgo de una descarga eléctrica, conéctalo únicamente a un tomacorrientes conectado
apropiadamente a tierra.
• No desprendas la espiga de conexión a tierra del enchufe.
• El código eléctrico nacional exige el uso de un interruptor de circuito para fallos de conexión a tierra
(GFCI) en el circuito que abastece las bombas para fuentes. Consulta a tu distribuidor de materiales
eléctricos acerca de este dispositivo.
• Para reducir el riesgo de descarga eléctrica, úsala únicamente en fuentes portátiles autónomas de un
máximo de 5 pies de largo en cualquier sentido.
• No instales la fuente a menos de 5 pies de cualquier piscina o tina de hidromasaje conectada a un
circuito protegido por GFCI.
• Asegúrate de que el cable no tenga daños antes de instalarla y/o hacerle mantenimiento. Si se daña,
reemplaza la bomba completa.
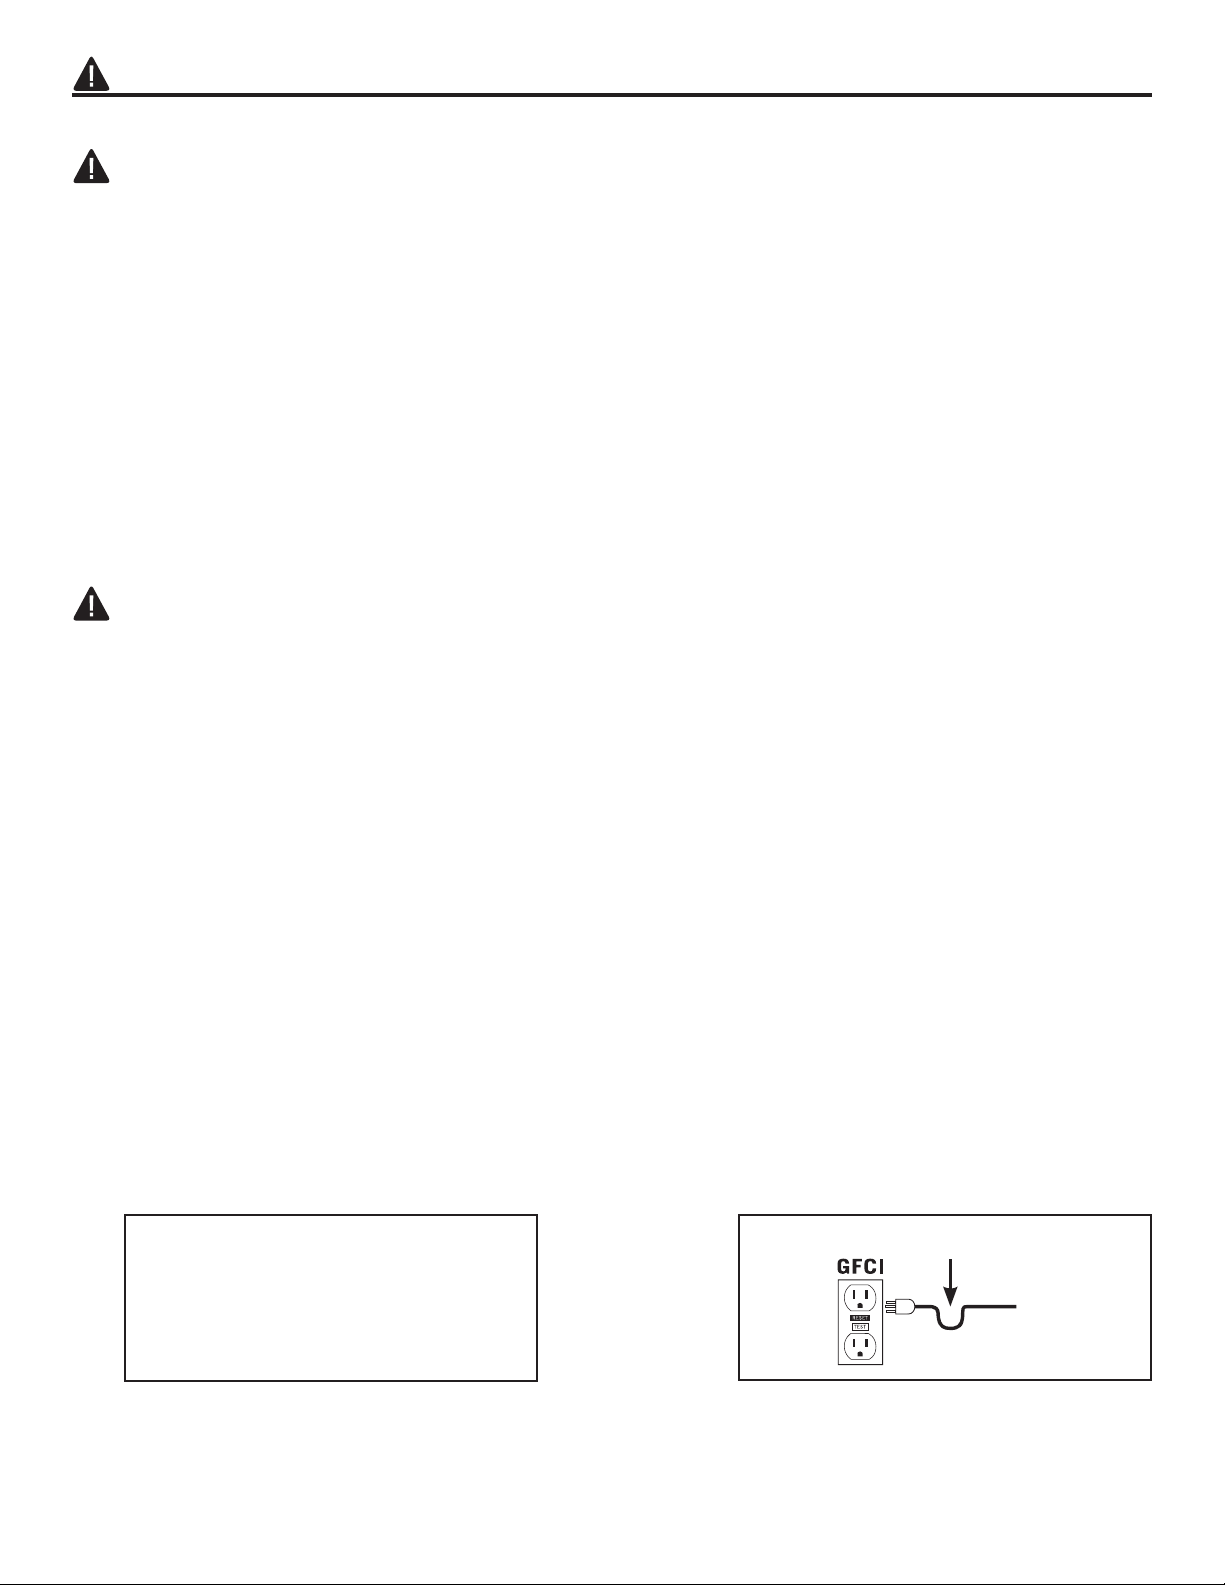
• Asegúrate de que el cable eléctrico se curve bajo el tomacorrientes para formar un “lazo de goteo”.
Esto evitará que el agua corra por el cable hacia el tomacorrientes. (Fig. 1)
PRECAUCIÓN
Para reducir el riesgo de descargas eléctricas:
• Desconecta siempre el dispositivo del tomacorrientes inmediatamente después de usarlo y antes
de limpiarlo.
• No lo conectes a voltajes distintos a los señalados en la bomba.
• No bombees líquidos inflamables.
• No uses agua a más de 86º F (30ºC).
• Desconéctalo siempre del tomacorrientes antes de manipular la bomba.
• No dejes que la bomba funcione sin agua.
• No levantes la bomba por el cable.
• No bombees líquidos calientes.
• Mantén el cable alejado de superficies calientes.
• Úsalo solamente con agua fresca.
• Jamás insertes objetos en ninguna abertura.
• Para un funcionamiento y refrigeración adecuados, la bomba debe estar sumergida completamente
mientras se usa.
• Mantén la fuente fuera del alcance de los niños y las mascotas.
• Instálala en un área nivelada para que funcione mejor.
• Si estás en una zona de heladas, saca completamente el agua de la fuente. Guarda en interiores la
fuente con su bomba cuando haya condiciones de helada.
GUARDA ESTAS INSTRUCCIONES
Este manual contiene instrucciones
importantes de seguridad y
funcionamiento para unidades
de motor.
Fig. 1
“Lazo de goteo”

11
CONTENIDODELPAQUETE
Cubierta de la
bomba
Cable eléctrico
Gracias por comprar tu nueva fuente de exteriores.
Por favor, lee las instrucciones de seguridad y funcionamiento antes de armarla.
Muesca de
la cubeta
Tapón Bomba
Recipiente
Manguera
Muesca para
el cable
Orificio para
tapón
Cubeta

12
PREPERACIÓN
Antes de comenzar a armar el producto, asegúrate de tener todas las piezas. Compara las piezas con las
de la lista de contenido. No intentes ensamblar el producto si alguna parte falta o está dañada. Comunícate
con atención al cliente para obtener piezas de repuesto.
Tiempo estimado para armarla: 10 minutos
No necesita herramientas para armarla.
Pide ayuda al menos a persona para armar esta fuente
INSTRUCCIONESDEENSAMBLAJE
1. Coloca la fuente sobre una superficie plana y
nivelada.
2. Ubica el control de la bomba y coloca el control
de flujo de agua en la configuración “Maximum
(+)” (máxima). (Fig. 2)
3. Ubica el cable eléctrico y asegúralo a la muesca
para cable. (Fig. 3)
4. Conecta la manguera a la bomba, asegurándote de
que la conexión sea segura. Coloca la bomba en el
fondo del recipiente. (Fig. 4)
5. Inserta la cubierta de la bomba en el recipiente.
(Fig. 5)
Fig. 4
J
Bomba
Manguera
Fig. 3
Fig. 5
Cubierta de la
bomba
Recipiente
Fig. 2
Bomba
Control de
flujo de agua
MÁXIMO
MÏNIMO
Muesca
para el
cable
Cable
eléctrico

13
6. Ubica la cubeta y coloca el asa en la muesca de la
mano del niño. (Fig. 6)
7. Llena el recipiente con agua limpia, al menos
a un 75% o completamente, sumergiendo la
bomba en su totalidad. La bomba no funcionará
si no está completamente sumergida todo el
tiempo. (Fig. 7)
NOTA: Para ayudar a prevenir la acumulación
de minerales y mantener limpia la fuente se
recomienda el uso de agua destilada.
8. Para encender la fuente, conecta el adaptador a
un tomacorrientes apropiadamente conectado a
tierra, de acuerdo con las regulaciones de tomas
GFCI. Debe utilizarse una toma GFCI. Tu fuente
comenzará a fluir. (Fig. 8)
9. Una vez que la fuente esté encendida y
funcionando, determina si necesita más o menos
agua y si el control de flujo debe ajustarse.
¡Relájate y disfruta tu fuente!
Fig. 7
Fig. 8
“Lazo de goteo”
Cable eléctrico
Fig. 6
Muesca
Asa de la
cubeta

14
MANTENIMIENTODELAFUENTE
1. Cámbiale regularmente el agua y límpiala de acuerdo con la condición del agua. Esto evitará que el
agua se vuelva pegajosa, que los microorganismos se propaguen y que se acumulen los depósitos
de minerales. Evita colocar la fuente bajo árboles. Esto mantendrá las basuras fuera de la fuente,
asegurando el funcionamiento apropiado de la bomba.
2. No uses químicos fuertes para limpiar la superficie de la unidad. Hacerlo dañará el acabado. Es
mejor limpiarla con un paño húmedo.
3. Revisa regularmente el nivel del agua para garantizar que siempre cubra la bomba. En días calientes
o de mucho viento, el agua se evaporará o saltará fuera de la fuente mucho más rápidamente.
Revisa el nivel del agua con más frecuencia en estas condiciones. El agua debe mantenerse siempre
sobre el 75%.
4. Mientras la fuente funciona, es normal que salpique o gotee. No la coloques en sitios en los que el
agua pudiera causar daños. Para evitar que el agua salpique más de lo necesario, ajusta el control
de flujo.
5. El flujo de agua pudiera no funcionar apropiadamente si la fuente está desnivelada. Puedes usar un
nivel para ayudarte a determinar si está o no nivelada. Si no está nivelada, usa cuñas u otros objetos
para nivelarla antes de ponerla a funcionar.
6. Si la fuente no se va a usar durante un largo periodo, desconecta el cable de la fuente eléctrica y
vacía el agua
7. Usa sólo el voltaje correcto, como se indica en la bomba.
Si tu fuente se encuentra en climas de heladas/congelación (32°F o menos), sigue estos pasos para
cuidarla:
1. Drena toda el agua de la unidad.
2. Déjala ensamblada, o desármala y guárdala en interiores durante los meses de invierno.
3. Si no puedes guardarla adentro, drena toda el agua y seca la fuente.
4. De ser posible, saca la bomba y guárdala en interiores.
5. Llena los recipientes con materiales absorbentes, como toallas o arpilleras.
6. Envuelve la unidad con plástico para protegerla.
LISTADEPIEZASDEREPUESTO
Si necesitas piezas de repuesto, llama a nuestro departamento de atención al cliente al 1-800-501-7271, de
lunes a viernes entre las 7:00 am. y las 5:30 pm., o envía un email a [email protected]
ILUSTRACIÓN DESCRIPCIÓN NÚMERO DE PIEZA
Manguera HOSEDB21CM-11
Bomba PUMPP333splg-11
Cubeta FN639088B9-9D1
Cubierta de la bomba QTY09195PC-11

15
SOLUCIÓNDEPROBLEMAS
No seguir las instrucciones y advertencias de este manual podría resultar en daños a la bomba y/o lesiones.
Guarda este manual para utilizarlo como referencia en el futuro.
Problema Causa posible y medida correctiva
La bomba no envía agua 1. Revisa si la fuente de energía está conectada correctamente a la bomba y que esta
última esté completamente sumergida en el agua.
2. Revisa que la bomba y la manguera estén libres de obstrucciones y que la manguera no
esté doblada. Límpialas si es necesario
3. La bomba puede tener aire adentro. Desconecta el cable eléctrico de la bomba del
tomacorrientes por aproximadamente 15 segundos. Conecta de nuevo el cable eléctrico
a la fuente eléctrica, esto debe eliminar el aire acumulado. Puede que necesites repetir
este paso varias veces.
4. El propulsor puede estar atascado o saturado con residuos. Desconecta la fuente de
energía y saca la cubierta frontal de la bomba y el escape de agua. Revisa el propulsor,
girándolo para ver si tiene partes atascadas o rotas. Enjuaga la cubierta frontal y la
cubierta del propulsor para eliminar cualquier residuo. (Fig. 9)
El flujo de agua no es lo
suficientemente fuerte o es
demasiado fuerte.
1. Revisa el control de flujo de agua y ajústalo según la situación. (Fig.9)
La bomba hace ruidos
anormales 1. Revisa el nivel del agua para garantizar que la bomba esté completamente sumergida.
2. Desconecta la bomba y revisa el ensamblaje del propulsor: (Fig. 9)
• Retira la cubierta frontal de la bomba y el escape de agua del cuerpo de la bomba.
• Sostén el propulsor y sácalo cuidadosamente de la bomba.
• Enjuaga el propulsor y el cuerpo de la bomba para eliminar cualquier residuo.
• Comunícate con el departamento de atención al cliente si encuentras cualquier tipo
de daño en la bomba.
El agua no fluye
correctamente. 1. Revisa que la fuente esté nivelada. De no estarlo, nivélala con una cuña u otro soporte.
2. El propulsor puede estar atascado o atascado con residuos. Desconecta la fuente de
energía y retira la cubierta frontal de la bomba y el escape de agua. Revisa el propulsor,
girándolo para ver si tiene partes atascadas o rotas. Enjuaga la cubierta frontal y la
cubierta del propulsor para eliminar cualquier residuo. (Fig. 9)
3. Revisa el nivel del agua para garantizar que la bomba esté completamente sumergida.
Agregar agua puede mejorar su flujo.
4. Revisa las salidas de agua para garantizar que no estén atascadas por residuos. Si lo
están, elimina los residuos.
5. Limpia los caños con un paño húmedo para quitar cualquier acumulación que pueda estar
impidiendo el flujo de agua.
Fig. 9
Cubierta
frontal
Expulsor de
agua
Escape de
agua
Salida de
agua
Regulador
Eje
Cubierta
trasera
Ventosas
Cuerpo
de la
bomba

16 FN639.V1XImpreso en China
GARANTÍALIMITADAPORUNAÑO
El fabricante garantiza que este producto está libre de defectos de fabricación y defectos de materiales
por 12 meses a partir de la fecha de compra, sujeto a las siguientes condiciones. Esta garantía te otorga
derechos legales específicos y también podrías tener otros derechos que varían según el estado.
CUALQUIER GARANTÍA IMPLÍCITA, INCLUYENDO CUALQUIER GARANTÍA DE
COMERCIALIZACIÓN, ESTÁ LIMITADA A LA DURACIÓN DE ESTA GARANTÍA. Algunos estados no
permiten las limitaciones de duración de garantías implícitas, por lo tanto las limitaciones arriba mencionadas
pueden no aplicarse a ti.
En cualquier evento, la responsabilidad del fabricante se limita al costo de reemplazo de la pieza o piezas
defectuosas, determinado a la discreción única del fabricante, y el fabricante no será responsable por ningún
daño especial, incidental o consecuencial causado como resultado de cualquier defecto. Algunos estados
no permiten la exclusión o la limitación de daños incidental o resultantes de otras acciones, por lo que la
limitación o exclusión anterior puede no aplicarse a ti. Para efectuar una reclamación bajo esta Garantía
Limitada por un defecto de fabricación o un defecto de materiales, debes notificar al fabricante, por escrito, a
la siguiente dirección:
Warranty Administrator, Arden Companies
30400 Telegraph Road, Suite 200, Bingham Farms, Michigan 48025
Esta declaración escrita debe ir acompañada por una prueba de compra, en la forma de un recibo de venta
o copia de la factura, y mostrar al menos la siguiente información: Tu nombre y dirección, la fecha de compra
y una descripción del supuesto defecto.
Esta Garantía Limitada no se aplica a, ni el fabricante asume responsabilidad por daños o defectos debidos a
una o más de las siguientes causas:
1. Manipulación, mantenimiento o instalación inapropiada de este producto.
2. Modificación o alteración del producto en cualquier forma que incremente el riesgo de daños
3. Cualquier caso en que el producto haya sido mal utilizado, dañado intencionalmente o dañado a causa de
tu negligencia.
4. Uso de la bomba en temperaturas distintas a las del agua fresca entre 32° y 86° F (0° a 30° C) y con unos
márgenes de pH entre 5 y 9.
En la medida en la que alguna exclusión de garantía aquí indicada no sea permitida por las leyes de algún
estado, dichas exclusiones podrían no aplicarse a ti.
Table of contents
Languages: