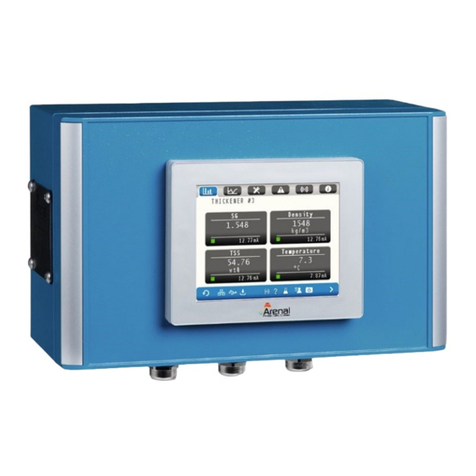
Arenal QA03-SDA User manual

Installation Manual
Инструкция по установке
SLURRY DENSITY ANALYSER
плотности суспензий
Doc No: KWR-7QA03-921-20220321-EN-RU

QA03-SDA Installation Manual KWR-7QA03-20190503-EN-RU Page 2/16
CONTENT
Preface / ПРЕДИСЛОВИЕ ..............................................................................................................3
Symbols and conventions / Символы и условные обозначения ..............................................3
STEP 1. ANALYSER Installation / ШАГ 1. АНАЛИЗАТОР Установка ........................................4
1.1 Mounting locations / Монтажные площадки .......................................................................4
1.2 Mounting angle / Угол монтажа.............................................................................................4
1.3 Mounting to the wall / Монтаж на стену ............................................................................ 4
1.4 Electrical cables installation / Установка электрических кабелей ...................................5
1.4.1 To connect the UDT to the analyser / Подключение UDT к анализатору..........5
1.4.2 Power supply of the QA03-SDA / Источник питания............................................... 6
1.4.3 mA wiring output / сигналы мА .................................................................................. 6
1.4.4 mA wiring input / сигналы мА..................................................................................... 7
1.4.5 Open collector outputs..................................................................................................7
1.4.6 Open collector inputs.....................................................................................................8
STEP 2. Spool piece/wafer Installation / ШАГ 2. АНАЛИЗАТОР Установка........................ 10
2.1 Mounting position / Монтажное положение.......................................................................10
2.2 mounting location / место установки................................................................................. 11
STEP 3. Start up............................................................................................................................... 12
STEP 4. Correcting mA outputs.....................................................................................................13

QA03-SDA Installation Manual KWR-7QA03-20190503-EN-RU Page 3/16
Preface / ПРЕДИСЛОВИЕ
Symbols and conventions / Символы и условные обозначения
Caution! This sign indicates that failure to follow directions
could result in damage to the equipment or loss of
information.
Внимание! Этот знак указывает на то, что
несоблюдение указаний может привести к
повреждению оборудования или потере информации.
Warning! This sign indicates that failure to follow directions
in the warning could result in bodily harm.
Предупреждение! Этот знак указывает на то, что
несоблюдение указаний в предупреждении может
привести к телесным повреждениям.
Important! This word indicates that the text that follows
contains clarifying information or specific instructions.
Важный! Это слово означает, что следующий текст
содержит уточняющую информацию или конкретные
инструкции.

QA03-SDA Installation Manual KWR-7QA03-20190503-EN-RU Page 4/16
STEP 1. ANALYSER Installation / ШАГ 1. АНАЛИЗАТОР Установка
1.1 Mounting locations / Монтажные площадки
For IP66 built analyser inside canopy
Для IP66 встроенный анализатор внутри навеса
Temperature
температура
Operating: 0-50 degC; Storage: -10ºC to +60ºC
Операционная: 0-50 degC; место хранения -10ºC to +60ºC
Relative humidity
10-90% (non condensing)
1.2 Mounting angle / Угол монтажа
1.3 Mounting to the wall / Монтаж на стену
Remove the aluminum plates to mount the analyser to the wall
Use the "4-Mounting set" screws and bolts to mount the analyser to the wall

QA03-SDA Installation Manual KWR-7QA03-20190503-EN-RU Page 5/16
Снимите алюминиевые пластины, чтобы установить анализатор на стену
Используйте винты и болты «4-монтажного комплекта» для установки анализатора
на стену
1.4 Electrical cables installation / Установка электрических кабелей
1.4.1 To connect the UDT to the analyser / Подключение UDT к
анализатору
Name in Analyser
Имя в
Analyzer
Name in UDT
Имя в
UDT
Explanation
объяснение
Wire numbers
номера
проводов
Wire Colour
цвет провода
24VDC
GND
B
-
A+
24VDC
0VDC
B
-
A+
24Vdc +
0 Vdc
Modbus RTU
Modbus RTU
1
2
3
4
Brown / коричневый
White / белый
Green / зеленый
Yellow / желтый

QA03-SDA Installation Manual KWR-7QA03-20190503-EN-RU Page 6/16
1.4.2 Power supply of the QA03-SDA / Источник питания
90-263 Vac
50-60 Hz
L
N
1.4.3 mA wiring output / сигналы мА
On LT4301TADAC display
Parameter
Terminal on HMI
Colour
E1 – mA-1 common ground- / Заземление
E2 – mA-1 +
E3 – mA-2 common ground / Заземление
E4 – mA-2 +
SG
Temperature
D14
C15
D14
D15
Yellow
Green
White
Brown
On QM132-IOM Module
Parameter
Terminal on QM132
mA-1 common ground- / Заземление
mA-1 +
mA-2 common ground / Заземление
mA-2+
SG
Temperature
25) Aout1 GND
26) Aout 1+
23) Aout2 GND
24) Aout 2+

QA03-SDA Installation Manual KWR-7QA03-20190503-EN-RU Page 7/16
1.4.4 mA wiring input / сигналы мА
On LT4301TADAC display
Terminal on HMI
4-20 mA input +
D13 AND C12 (connect them together)
4-20 mA input -
D12
On QM132-IOM Module
Terminal on QM132
4-20 mA input 1+
1) Ain1+
4-20 mA input 1-
2) Ain1 GND
4-20 mA input 2+
3) Ain2+
4-20 mA input 2-
4) Ain2 GND
1.4.5 Open collector outputs
The 6 open collector outputs can be programmed to suit your application in process control. Currently
three collector outputs have been used. As a standard these are set to be sourced outputs (positive logic).
Pre-wiring all these outputs will give the following schedule:
Wire
Terminal on HMI
24Vdc+
A3 (“V1+”)
24Vdc GND
B3 (“V1-“)
Output (24V)
B4 (“Q2”) SG value is lower than the low alarm value
Output (24V)
A4 (“Q3”) SG value is higher than the high alarm level
Pulse (24V)
B5 (“Q4”) Solids Production pulse per ton
Output (24V)
A5 (“Q5”) Analyzer fault
Free
B6 (“Q6”)
Free
A6 (“Q7”)
Below is a description of each open collector:
SG value is lower than the low alarm value
This open collector output will give a positive constant voltage when the SG is lower than the low alarm
level. This voltage can be used to switch a relay contact that switches a valve or pump.
The output can be powered by the internal power on the main board. Add a second fuse after the power
convertor to the 24Vdc connector on the left bottom and wire this to the below mentioned terminals on
top of the HMI.
Wire
Terminal on HMI
Terminal on QM132
24Vdc+
A3 (“V1+”)
Not yet available
24Vdc GND
B3 (“V1-“)
Output (24V)
B4 (“Q2”)
SG value is higher than the high alarm level
The open collector output #3 will give a positive constant voltage when the SG is higher than the high
alarm level. This voltage can be used to switch a relay contact that switches a valve or pump.

QA03-SDA Installation Manual KWR-7QA03-20190503-EN-RU Page 8/16
The output can be powered by the internal power on the main board. Add a second fuse after the power
convertor to the 24Vdc connector on the left bottom and wire this to the below mentioned terminals on
top of the HMI.
Wire
Terminal on HMI
Terminal on QM132
24Vdc+
A3 (“V1+”)
Not yet available
24Vdc GND
B3 (“V1-“)
Output (24V)
A4 (“Q3”)
Solids Production pulse
This open collector output will give a positive pulse when 1 ton solids is produced.
This is only the case when the production shift is started.
When the production shift is started and the analyzer is restarted, the shift is started again, but the totals
are reset to 0.
The output can be powered by the internal power on the main board. Add a second fuse after the power
convertor to the 24Vdc connector on the left bottom and wire this to the below mentioned terminals on
top of the HMI.
Set the pulse duration in steps of 10 ms in the IO Module settings, Digital IN/OUT.
Wire
Terminal on HMI
Te r minal on QM132
24Vdc+
A3 (“V1+”)
D1-2out COM
24Vdc GND
B3 (“V1-“)
D1-2out GND
Pulse (24V)
B5 (“Q4”)
Dout1
Analyzer fault
This open collector output will give a positive constant voltage when the analyzer is in fault mode. A fault
mode is triggered when a measurement is not possible anymore. In general this is the case when the
analyzer cannot communicate with the transmitters. This voltage can be used to switch a relay contact
that switches a valve or pump.
The output can be powered by the internal power on the main board. Add a second fuse after the power
convertor to the 24Vdc connector on the left bottom and wire this to the below mentioned terminals on
top of the HMI.
Wire
Terminal on HMI
Terminal on QM132
24Vdc+
A3 (“V1+”)
D1-2out COM
24Vdc GND
B3 (“V1-“)
D1-2out GND
Output (24V)
A5 (“Q5”)
Dout2
1.4.6 Open collector inputs
The 6 open collector inputs can be programmed to suit your application in process control. Currently one
collector input is used. As a standard these are set to be sourced inputs (positive logic). Pre-wiring all
these outputs will give the following schedule:

QA03-SDA Installation Manual KWR-7QA03-20190503-EN-RU Page 9/16
Wire
Terminal on HMI
24Vdc+
Connect + to positive side of your switch. Protect by fuse.
24Vdc GND
D3 (IC1)
Free
D2 (i2)
Input switch
C3 (I3) Negative side of your switch. Take a sample of the process by
pressing this
button for 0,5-9 secs. After 10 seconds, you can press
again to indicate that sampling stopped. Logging file contains of ID of
sample.
Free
D4 (i4)
Free
C4 (i5)
Free
D5 (i6)
Free
C5 (i7)

QA03-SDA Installation Manual KWR-7QA03-20190503-EN-RU Page 10/16
STEP 2. Spool piece/wafer Installation / ШАГ 2. АНАЛИЗАТОР Установка
2.1 Mounting position / Монтажное положение
a. In vertical pipe, mounting position is not relevant
В вертикальной трубе монтажное положение не имеет значения
b. In horizontal pipe, mounting position must be as in the picture:
В горизонтальной трубе монтажное положение должно быть таким, как на
рисунке:

QA03-SDA Installation Manual KWR-7QA03-20190503-EN-RU Page 11/16
2.2 mounting location / место установки
a. Mounting 7x diameter after last obstruction and 5x diameter before next
obstruction (pump, bend, narrowing, valve)
Монтаж диаметром 7x после последней обструкции и 5-кратным диаметром
перед следующим препятствием (насос, изгиб, сужение, клапан)

QA03-SDA Installation Manual KWR-7QA03-20190503-EN-RU Page 12/16
STEP 3. Start up
Start up and commissioning by unauthaurised personnel is at own risk.
During start up, when the mA outputs are not connected,an error code is shown. Simply press
the X to remove the error and it won’t show up anymore.

QA03-SDA Installation Manual KWR-7QA03-20190503-EN-RU Page 13/16
STEP 4. Correcting mA outputs
a) The mA output of the SG and the Density is not the same. To get these the
same, follow below instructions.
b) Press the SG box in above picture, the following menu will open with a prompt
for a level 2 User ID and Password code in order to gain access.
c) A tap on the User ID block will open the keypad. Type EL as the user ID and
press enter.

QA03-SDA Installation Manual KWR-7QA03-20190503-EN-RU Page 14/16
d) The keypad will open again for the password. Type 07AF as the password and
press enter, which will then take you back to the level 2 menu as above, but
now indicating both the user ID (EL) and the password as ****.
e) Press OK, which will then open the Field Calibration menu below. Press > to go
to the DO and AO settings:
f) Note that the range of 4-20 mA for the SG is here: 1..2 SG. And that the
current mA output is 14,60. Now, go back to the main screen:

QA03-SDA Installation Manual KWR-7QA03-20190503-EN-RU Page 15/16
g) Press DENSITY
h) Make sure all settings are as above. Then Press > to go to following screen.
i) The 4-20 mA value is 17,24 because the range is here 1000..1800 (while SG was 1..2).
Change as follows:
j) Press save. The next screen will be shown:

QA03-SDA Installation Manual KWR-7QA03-20190503-EN-RU Page 16/16
Other manuals for QA03-SDA
1
Table of contents
Other Arenal Measuring Instrument manuals
Popular Measuring Instrument manuals by other brands

Teledyne
Teledyne 3300TB operating instructions

Johnson
Johnson LDM85 Operator's manual

Keithley
Keithley 172 instruction manual

Rohm
Rohm F-SENSO CHUCK Quick start instructions

SENSIRION
SENSIRION SLF3 Series Operating guidelines

PCB Piezotronics
PCB Piezotronics IMI SENSORS 606B01/ICS-14 Installation and operating manual