manuals.online logo
Brands
  1. Home
  2. •
  3. Brands
  4. •
  5. Arista
  6. •
  7. Accessories
  8. •
  9. Arista ALC-CMP-BT User manual

Arista ALC-CMP-BT User manual

ALC-CMP-BT 360˚ PIR Ceiling
Mount Bluetooth Occupancy
Sensor
COMPLIANCE
This device complies with part 15 of the FCC. Operation is subject to
the following two conditions: (1) this device may not cause harmful
interference, and (2) this device must accept any interference received,
including interference that may cause undesired operation.
FCC NOTE: The manufacturer is not responsible for any radio or TV
interference caused by unauthorized modifications to this equipment.
Such modifications could void the user’s authority to operate the
equipment.
NOTE: This equipment has been tested and found to comply with the
limits for a Class B digital device, pursuant to Part 15 of the FCC Rules.
These limits are designed to provide reasonable protection against
harmful interference in a residential installation. This equipment
generates, uses and can radiate radio frequency energy and, if not
installed and used in accordance with the instructions may cause
harmful interference to radio communications. However, there is no
guarantee that interference will not occur in a particular installation. If
this equipment does cause harmful interference to radio or television
reception, which can be determined by turning the equipment off and
on, the user is encouraged to try to correct the interference by one or
more of the following measures:
• Reorient or relocate the receiving antenna.
• Increase the separation between the equipment and receiver.
• Connect the equipment into an outlet on a circuit different from that
to which the receiver is connected.
• Consult the dealer or an experienced radio/TV technician for help.
Important note: To comply with the FCC RF exposure compliance
requirements, no change to the antenna or the device is permitted.
Any change to the antenna or the device could result in the device
exceeding the RF exposure requirements and void user ’s authority to
operate the device.
This Class B digital apparatus complies with ICES-005 of Canada.
WARNINGS/SAFETY
WARNING
Risk of Fire or Electric Shock
• Turn OFF power at circuit breaker or fuse and test that the
power is OFF before wiring.
• To be installed and/or used in accordance with appropriate
electrical codes and regulations.
• If you are not sure about any part of these instructions, consult
a qualified electrician.
• Use this device only with copper or copper clad wire.
• INDOOR USE ONLY
NOTICE
Dispose of product per local regulations on the disposal of lithium
batteries.
NOTES: For Programming instructions please visit www.Intermatic.
com. The Arista App is available on Apple App and Google Play stores.
(Search for Arista by Intermatic)
RATINGS:
Voltage - 24 VDC, 25mA or Lithium CR123A 3 V Battery
Dry Location
Ambient Operating temperature - 0° - 40° C (32° - 104° F)
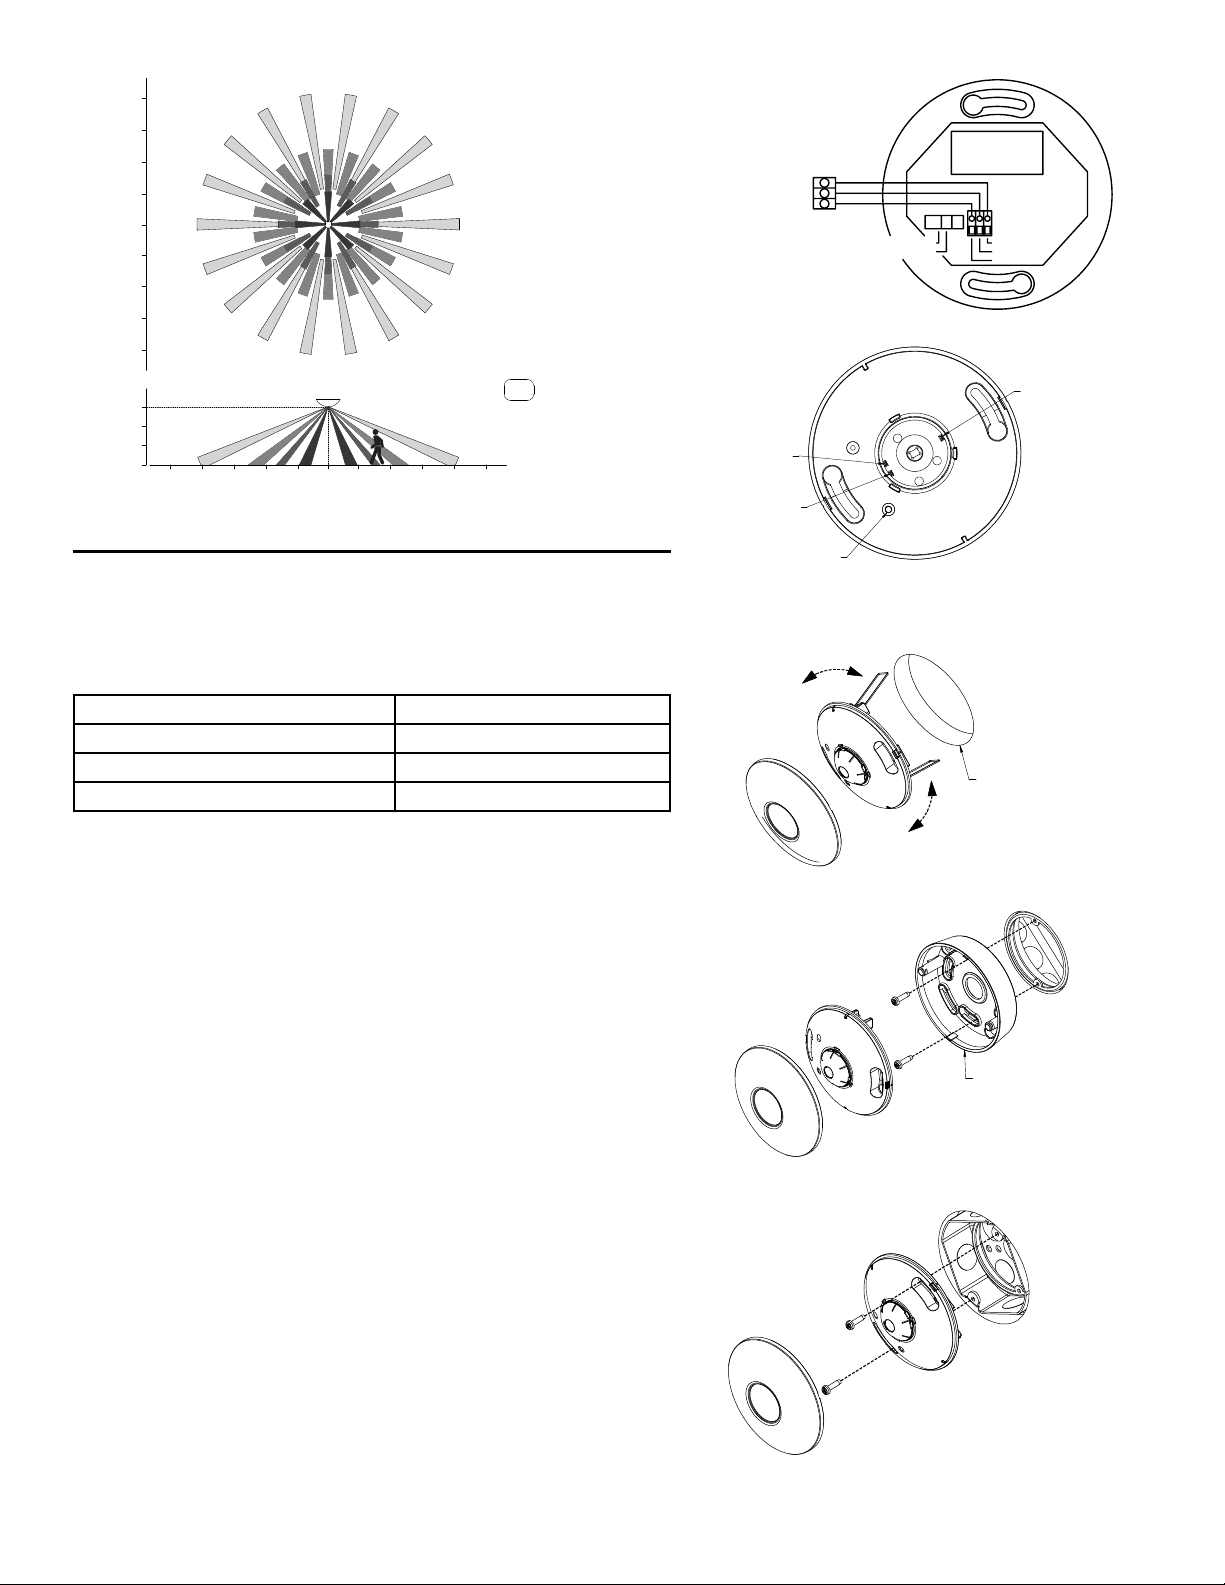
PIR Coverage - Up to 1200 ft²
Wiring Terminals are suited for 16-22 AWG wire with a maximum length
of 200 ft. 18 AWG solid wire is recommended.
PRODUCT OVERVIEW:
The ALC-CMP-BT is a Passive Infrared Sensor designed for use with
the ARISTA Lighting Controls System by Intermatic and will control
lighting based upon occupancy/vacancy. If the space is configured for
Occupancy and movement is detected, the sensor informs the ARISTA
controller(s) in the space and the lights will illuminate. The lights will
turn off after the ARISTA controller(s) deem the space vacant and the
timeout period completes. If the space is configured for Vacancy, the
ARISTA controller(s) in the space will only react when they are manually
activated. The lights will turn off after the ALC-CMP-BT deems the
space vacant and the timeout period completes. This sensor provides a
360° coverage pattern, up to 1200 ft².
INSTALLATION INSTRUCTIONS
NOTE: To be used with Class II low voltage wiring.
1
SQUARE TO ROUND RING
SURFACE MOUNT ADAPTER
(CAN BE USED TO MOUNT TO ANY SURFACE
TO ALLOW FOR PROPER COVERAGE)
Figure 2
NO WIRING NEEDED
WHEN BATTERY
POWERED
BATTERY
COMPARTMENT
24VDC
BATTERY
COM
DIN
24 V
CONTROLLER
TERMINALS
24 VDC
DO
COM
SIDE VIEW
TOP VIEW
0 5 10 20155101520 0
0
5
10
20
15
5
10
15
20
369
25
25
(ft)
(ft)
(ft)
PIR coverage area
Figure 1
Figure 3
RED LED
BLUE LED
BUTTON
SHOWN WITHOUT COVERS
RESET
GREEN LED
WIRING DIAGRAM AND MOUNTING OPTIONS
Select from the mounting options below.To wire the sensor to the ARISTA controller,
follow the wiring diagram seen in Figure 2 (communication wire is optional). If you
are not wiring the sensor, insert battery and mount the sensor.
NOTE: If using battery, make sure the switch is in the Battery position, If wired to
controller terminals, select 24VDC switch position.
Wire from Terminal on ARISTA Controller To Terminal on Occupancy Sensor
24 VDC 24 VDC
COM (Common) COM (Common)
DI (Digital Input) DO (Digital Output)
NOTE: Wired units must be powered from Intermatic ARISTA controllers.
Option 1 - Spring Mounting (see Figure 4)
1. Drill 3 1/2” hole in the location that the control will be mounted.
2. Pull both springs towards the center of the sensor to allow for them to
pass through the 3 1/2” - 4” hole.
3. Slowly push up the sensor allowing the springs to grab the inside if the
hole securing it to the ceiling. Refer to Figure 4.
Option 2 - Mount to a square to round drywall ring (see Figure 5)
NOTE: this will require the use of the surface mount adapter
1. Remove pre-attached springs from the base unit by gently squeezing
the spring to allow for it to get by the molded posts and slide it out.
2. Install 8/32 screws into the box leaving approximately 1/4” to 3/8” of
space between ring and screw head.
3. There is a plastic housing that is mounted to the electrical box and then
the sensor can be inserted and twisted to lock in place.
4. Tighten the screws till snug. (Do not over tighten.)
Option 3 - Mount to a 4” octagon box (see Figure 6)
1. Remove pre-attached springs from the base unit by gently squeezing
the spring to allow for it to get by the molded posts and slide it out.
NOTE: If mounting to electrical box or surface mounting, use protective
eyewear as the pre-installed springs are under tension and must be
removed from the housing.
2. Loosen screws on the octagon box.
3. There is a plastic housing that is mounted to the electrical box and then
the sensor can be inserted and twisted to lock in place.
4. Tighten the screws till snug. (Do not over tighten.)
OCTAGON ELECTRICAL BOX
IF DESIRED THE SURFACE MOUNTING
BASE CAN ALSO BE USED
Figure 6
SURFACE SPRING MOUNT
3-1/2" to 4" DIAMETER HOLE
Figure 4
Figure 5
2
TROUBLESHOOTING
Symptom
During installation, the ARISTA Mobile App
can’t find the sensor when scanning for
devices in the area
24 V Powered
• Verify power is supplied to the sensor
• Verify the switch on the back of the sensor is in the 24 V position
• Make sure the Blue LED is blinking slowly. If not, the sensor could already be provisioned into
another area. If this is incorrect, factory reset the device by pressing and holding the reset
button for more than 10 seconds
• Make sure the phone/tablet and sensor are within 30 feet of each other
Battery Powered
• Verify the switch on the back of the sensor is in the battery position
• Verify good battery; and good installation of battery
• Make sure the Blue LED is blinking slowly. If not, the sensor may be asleep (to conserve
battery). To wake up a sleeping sensor, press the button (for less than 5-seconds).
Sensor is energizing the lights without motion
being detected in the space
24 V or Battery Powered
• Verify zone configuration using the ARISTA Mobile App is correct
• Verify sensor configuration (i.e. – wired vs. wireless)
• Sensitivity may be set too high. Using the ARISTA Mobile App, lower the sensors sensitivity
setting
• Change mounting location
Sensor doesn’t detect motion when person
enters the space
24 V Powered
• Verify power is supplied to the sensor
• Verify the switch on the back of the sensor is in the 24 V position
• If Blue LED is blinking slow, the sensor hasn’t been provisioned into the zone using the ARISTA
Mobile App and will not operate properly
• Verify the sensor is detecting motion by walking underneath the sensor and verifying the
Green LED blinks briefly
• Sensitivity setting may be set too low. Using the ARISTA Mobile App, increase the sensors
sensitivity setting
• Verify sensor configuration (i.e. – wired vs. wireless).
• Verify sensor configuration (i.e. – time delay)
• Change mounting location
Battery Powered
• Check batteries
• Verify the sensor is detecting motion by walking underneath the sensor and verifying the
Green LED blinks briefly
• Sensitivity setting may be set too low. Using the ARISTA Mobile App, increase the sensors
sensitivity setting
Sensor’s Red LED is blinking once every 30
seconds
Battery Powered
• Replace battery
Sensor’s Red LED is on solid 24 V or Battery Powered
• Replace Sensor
Sensor is de-energizing the lights while still
in the space
24 V or Battery Powered
• Change mounting location
• Sensitivity setting may be set too low. Using the ARISTA Mobile App, increase the sensors
sensitivity setting
Sensor leaves the lights energized after
having left the space
24 V or Battery Powered
• Verify sensor configuration (i.e. – time delay)
3
158--02092REF
LIMITED WARRANTY
Warranty service is available by either (a) returning the product to the dealer from whom the unit was purchased or
(b) completing a warranty claim online at www.intermatic.com. This warranty is made by: Intermatic Incorporated, 1950
Innovation Way, Suite 300, Libertyville, IL 60048.
For additional product or warranty information go to: http://www.Intermatic.com or call 815-675-7000.
4

Other Arista Accessories manuals

Arista ALC-CMP-DT-BT User manual

Arista

Arista ALC-CMP-DT-BT User manual

Arista ALC-DT-BT-WH User manual

Arista

Arista ALC-DT-BT-WH User manual

Arista ALC-WM-DT-BT User manual

Arista

Arista ALC-WM-DT-BT User manual

Arista ALC-DH-BT User manual

Arista

Arista ALC-DH-BT User manual

Popular Accessories manuals by other brands

AVS Electronics WIC 4 manual

AVS Electronics

AVS Electronics WIC 4 manual

Giropes GI400i user manual

Giropes

Giropes GI400i user manual

Black & Decker Workmate 525 instruction manual

Black & Decker

Black & Decker Workmate 525 instruction manual

Pepperl+Fuchs RLK28-55/31/116 quick start guide

Pepperl+Fuchs

Pepperl+Fuchs RLK28-55/31/116 quick start guide

PCB Piezotronics IMI SENSORS 691A51 Series Installation and operating manual

PCB Piezotronics

PCB Piezotronics IMI SENSORS 691A51 Series Installation and operating manual

BaiYou Electronic BY213-C021-W installation instructions

BaiYou Electronic

BaiYou Electronic BY213-C021-W installation instructions

Chauvin Arnoux AmpFlex A110 user manual

Chauvin Arnoux

Chauvin Arnoux AmpFlex A110 user manual

Festo VN Series Assembly instructions

Festo

Festo VN Series Assembly instructions

Velleman MP1000 quick start guide

Velleman

Velleman MP1000 quick start guide

Aanderaa DCPS 5400 operating manual

Aanderaa

Aanderaa DCPS 5400 operating manual

kincrome KP152 manual

kincrome

kincrome KP152 manual

Huawei iSiteC BTS3601C installation manual

Huawei

Huawei iSiteC BTS3601C installation manual

Lanaform Mahe LA120320 manual

Lanaform

Lanaform Mahe LA120320 manual

Quincy lab 140E Series operating manual

Quincy lab

Quincy lab 140E Series operating manual

Imetec F2005 operating instructions

Imetec

Imetec F2005 operating instructions

J&E Hall Cellar Plus 70-S1 Technical manual

J&E Hall

J&E Hall Cellar Plus 70-S1 Technical manual

Emos ALPHA 10S user manual

Emos

Emos ALPHA 10S user manual

4B P300 Series Operation manual

4B

4B P300 Series Operation manual

manuals.online logo
manuals.online logoBrands
  • About & Mission
  • Contact us
  • Privacy Policy
  • Terms and Conditions

Copyright 2025 Manuals.Online. All Rights Reserved.