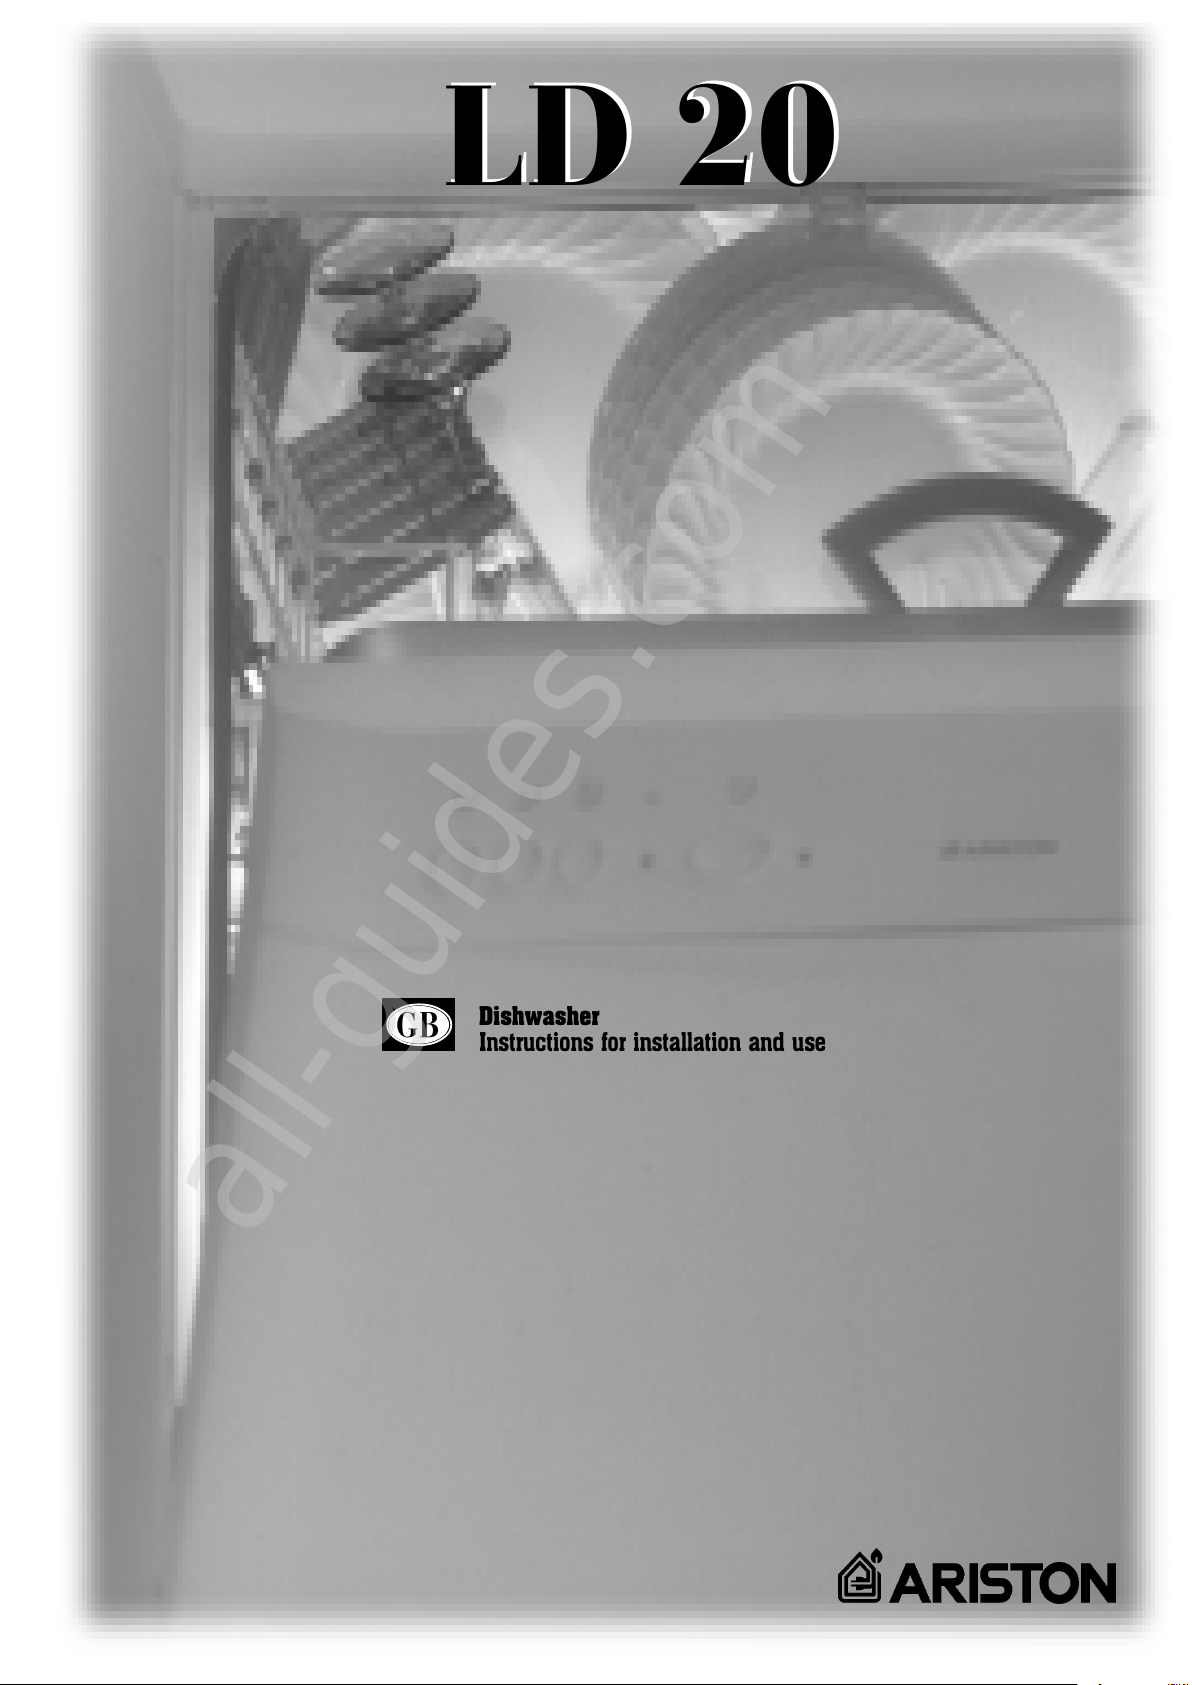
manuals.online logo
Brands
  1. Home
  2. •
  3. Brands
  4. •
  5. Ariston
  6. •
  7. Dishwasher
  8. •
  9. Ariston LD 20 User manual

Ariston LD 20 User manual

Other manuals for LD 20

1

Other Ariston Dishwasher manuals

Ariston LFF 8M122 User manual

Ariston

Ariston LFF 8M122 User manual

Ariston LL 420 User manual

Ariston

Ariston LL 420 User manual

Ariston LFB 5B010 User manual

Ariston

Ariston LFB 5B010 User manual

Ariston LL 64 B NA User manual

Ariston

Ariston LL 64 B NA User manual

Ariston LFZ 3284 User manual

Ariston

Ariston LFZ 3284 User manual

Ariston HDA110 Installation instructions

Ariston

Ariston HDA110 Installation instructions

Ariston AS 150 User manual

Ariston

Ariston AS 150 User manual

Ariston LFC2C19 Installation and operation manual

Ariston

Ariston LFC2C19 Installation and operation manual

Ariston LFF 825 User manual

Ariston

Ariston LFF 825 User manual

Ariston LL 69 User manual

Ariston

Ariston LL 69 User manual

Ariston LFZ 328 User manual

Ariston

Ariston LFZ 328 User manual

Ariston LFT 216 User manual

Ariston

Ariston LFT 216 User manual

Ariston LL 64 B - S - W Guide

Ariston

Ariston LL 64 B - S - W Guide

Ariston LFD 11m132 User manual

Ariston

Ariston LFD 11m132 User manual

Ariston LL 43 User manual

Ariston

Ariston LL 43 User manual

Ariston LFS 114 User manual

Ariston

Ariston LFS 114 User manual

Ariston LL 63 User manual

Ariston

Ariston LL 63 User manual

Ariston LL 42 User manual

Ariston

Ariston LL 42 User manual

Ariston LV 680 DUO User manual

Ariston

Ariston LV 680 DUO User manual

Ariston LFT 2284 User manual

Ariston

Ariston LFT 2284 User manual

Ariston LS 248 T User manual

Ariston

Ariston LS 248 T User manual

Ariston LKF 720 User manual

Ariston

Ariston LKF 720 User manual

Ariston L 63 B-S-W Guide

Ariston

Ariston L 63 B-S-W Guide

Ariston L 64 User manual

Ariston

Ariston L 64 User manual

Popular Dishwasher manuals by other brands

Samsung DW-FN320T user manual

Samsung

Samsung DW-FN320T user manual

LG LDS 5811WW Service manual

LG

LG LDS 5811WW Service manual

Elba EDW-B1462D owner's manual

Elba

Elba EDW-B1462D owner's manual

VESTEL NOVUS Series Service manual

VESTEL

VESTEL NOVUS Series Service manual

Bosch SMS4EMW00E Instructions for use

Bosch

Bosch SMS4EMW00E Instructions for use

Global-Tek GT-CR 2 manual

Global-Tek

Global-Tek GT-CR 2 manual

Smeg Dishwasher 85028 Instructions for installation and use

Smeg

Smeg Dishwasher 85028 Instructions for installation and use

LG LD-4080W Service manual

LG

LG LD-4080W Service manual

Bauknecht GCF 625 operating instructions

Bauknecht

Bauknecht GCF 625 operating instructions

Sharp QW-HX13F47EI-EU user manual

Sharp

Sharp QW-HX13F47EI-EU user manual

Asko D5536XLFI operating instructions

Asko

Asko D5536XLFI operating instructions

Modena WP 7134 WVM User manual book

Modena

Modena WP 7134 WVM User manual book

Beko DFN39340X instruction manual

Beko

Beko DFN39340X instruction manual

AEG FAVORIT 65050 VI1P user manual

AEG

AEG FAVORIT 65050 VI1P user manual

Siemens SN23HI37VE user manual

Siemens

Siemens SN23HI37VE user manual

Maytag MDB4651AWB - Tall Tub Dishwasher User instructions

Maytag

Maytag MDB4651AWB - Tall Tub Dishwasher User instructions

Hotpoint Ariston LL 42 Instruction book

Hotpoint Ariston

Hotpoint Ariston LL 42 Instruction book

Siemens SN45ZW56CS user manual

Siemens

Siemens SN45ZW56CS user manual

manuals.online logo
manuals.online logoBrands
  • About & Mission
  • Contact us
  • Privacy Policy
  • Terms and Conditions

Copyright 2025 Manuals.Online. All Rights Reserved.

LD 20
LD 20
GB Dishwasher
Instructions for installation and use
All manuals and user guides at all-guides.com
all-guides.com
All manuals and user guides at all-guides.com
ARISTON DISHWASHER - Instructions for installation and use
1
DISHWASHER
This manual explains pleasantly all your new
electric household appliance has to offer. In
addition, you will discover a world of useful
hints and handy tips to help you get a better
wash from your dishwasher and to make it last
longer.
Quick guide to your
dishwasher
1. Installation and moving (p. 8)
Installation, after delivery or your moving house, is the most important
procedureforthecorrectoperationofyourdishwasher.Alwayscheck:
1. That the electricity system is in accordance with norms;
2. That the water inlet and outlet hoses are connected correctly;
3. That the dishwasher is level on the ground. It is worth it: for the
longer life span and the correct operation of your dishwasher.
2. Control panel at your orders (p.2)
Learn to get to know the parts which make up your dishwasher, you
will use it better for it. This is where you will find the description of the
controls and the internal parts.
3. How to load your dishes (p.3)
Thispageincludesusefultipsto help youloadyour dishwasher correctly
and make the most of all the available space.
4. How to start your dishwasher (pages 4-5)
Onceyou haveloadedyour dishesintothe dishwasher,thelatter requires
some information from you in order to select the most suitable wash
cycle.Pourinthedetergent and rinse aid correctly.Readingthesepages
will help you through all the wash phases.
5. Salt: an important ally (p.6)
Using the right salt and in the right quantity will help you maintain your
dishwasherin topcondition,to washbetter andtoavoid possibledamage
causedbylimescale.
6. Advice and suggestions to help you make
savings as well (p.7)
This is where you will find small tips on how to wash your dishes better
and to help make savings.
7. Troubleshooting (p.10)
Before calling for a technician, have a look here: a lot of problems can
have an immediate solution. If you can't manage to solve it yourself,
then call the Ariston helpline and any problem will be solved as quickly
aspossible.
8. Safety for you and your family (p.10)
Readthischaptercarefully, as itwillprovideyouwith useful information
on installation, use and maintenance safety. To avoid nasty surprises.
9. Special care and maintenance (p.11)
Once in a while, once a month, spend a little time on the filter assembly
and the sprayer arms. This is where you can learn how.
10. Keeping your dishwasher in shape (p.11)
Respectthe few rulesyouwill find here,andthe result willbean enduring
top-shapedishwasher.
11. Technical characteristics (p.2)
All your appliance's technical data, in accordance with norms and
regulationsasalways.
12. Ariston is still with you after purchase (p.12)
Ariston supports its products by means of after-sales services and
assistance, offering you special guarantees, professional assistance as
well as quality spare parts and accessories. To find out more, call the
AristonFreefoneNumber.
D
All manuals and user guides at all-guides.com
DISHWASHER
2
ARISTONDISHWASHER-Instructionsforinstallationanduse
Control panel under your
command
A. ON-OFF Button
Press this button to turn
the appliance on.
B.START/RESET Button
With START, the wash
cycle begins, whereas all
the settings are cleared
with RESET.
C. Dish type selector knob
Choose the wash sector.
D.Door opening handle
Use this handle to open
the dishwasher door.
E.Display
Displays the special
wash cycles, options
and messages.
F.Standard cycle select
button
Press this button to se-
lect the desired tradi-
tional wash cycle
G.Upper or lower rack se-
lect button
You can select which
rack to perform the
wash cycle on.
H.Timer delay setting
button
Use it to delay the start
of the wash cycle by 1
to 24 hours and to ex-
clude the turbo-dry.
I. Timer delay indicator
It lights up to indicate
that a delayed start has
been set.
How is it made?
Learn to get to know the parts which make up
your dishwasher, you will use it better for it.
E. Upper rack
F. Top sprayer arm
G. Rack height adjuster
H. Lower rack
I. Bottom sprayer arm
Let's open up your dishwasher together
J. Salt container cap
K . Washing filter
L. Detergent and rinse
aid dispenser
M ."Turbo Dry" Fan
Technical Characteristics
This dishwasher
conforms to the
following European
Community
Directives:
 73/23/EEC of 19/
02/73 (Low
Voltage) and
subsequent
modifications;
 89/336/EEC of
03/05/89
(Electromagnetic
Compatibility) and
subsequent
modifications.
BC
E
F
D
A
G
H
E
G
F
H
I
K
L
J
M
L. Standard wash cycles
It lights up to indicate
Quick wash, Soak
cycle, Super Intensive.
M .Low salt indicator
light
It lights up to warn you
that it's time to add
more salt.
N. Aquastop indicator
light
Indicates a water leak.
Call for technical
assistance.
O. Low rinse aid
indicator light
It lights up to warn you
that it's time to add
more rinse aid.
P. Telephone or message
symbol
Only active if the
Ariston Digital system
has been installed in
your home.
R. Saucepans sector
High wash intensity
indicator.
S. Plates sector
Medium wash intensity
indicator.
T. Cups sector
Moderate wash
intensity indicator.
U. Crystal sector
Delicate crystal cycle
indicator.
Technical characteristics
Width cm. 60
Depth cm. 60
Height cm. 85
Capacity 12 standard place settings
M ains water pressure 20 KPa÷ 1MPa (0,2 ÷10 bar)
Power voltage See data plate
Total absorber power See data plate
Fuse See data plate
P
M
L
NO
I
R
ST
U
All manuals and user guides at all-guides.com
ARISTON DISHWASHER - Instructions for installation and use
3
DISHWASHER
How to load your dishes
Before washing, a few small steps can help you get a better wash and keep your dishwasher for longer.
Remove the largest scraps of food left over on your plates, soak saucepans and frying pans with tough
incrustations. After loading your dishes, make sure the blades on the sprayer arm turn well
There are two handles on the sides
of the upper rack: use these to
adjust its height (see fig. C)
upper rack
lower rack
First of all.
Before placing the dishes in the
racks, remove the largest scraps
of food left over on your plates,
you will thus avoid blocking the
filter, which would reduce the
efficacy of the wash.
If the saucepans and frying pans
are very dirty, allow them to soak
before being washed. To make it
easier to load your dishes, pull the
racks out.
Multisystem racks
Thisdishwasher model isfittedwith
newer and more modern upper and
lower racks and a cutlery basket.
They are made to provide greater
flexibility in loading dishes, making
them more suitable to meet your
specific needs.
The rack handles can be cleaned
regularly: pull out the two fastening
plugs,removethe handles and rinse
them under running water. Put the
handles back in place and fasten
them using the plugs you removed
previously.
What goes into the
lower rack?
We recommend you place the most
difficult dishes to wash into the
lower rack: saucepans, lids, soup
dishes and plates, but also: mugs,
cups and glasses (see photos for
load examples).
 Serving dishes and large
lids: place them on the sides
of the rack.
 Saucepans, salad bowls:
must always be placed upside
down
 Very deep dishes: place
them obliquely, thus allowing
water to run down them and
cleaning them better
Glasses and cups: Position
them as indicated in the figure.
The cutlery basket can be split up
by pulling out the handle and
removing the metal clip that keeps
the two parts joined together.
When you only have little cutlery
to wash, you can use just half the
basket; save space for other
crockery or place the other half of
the basket in the upper rack instead
(see figures A and B).
This basket is equipped with two
removable grids: insert the cutlery
one by one into the slots, with the
handles at the bottom. Position
them so that they don't touch.
In this specific model, the cutlery
Load examples
Where to put the different parts of the cutlery basket
basket is fitted with two
detachable side compartments, as
shown in figure A1, which can be
hooked on either to the upper or
lower rack, as required.
What goes into the
upper rack?
Place delicate and lightweight
dishes in the upper rack: glasses,
tea cups and coffee cups, saucers
- but plates too - shallow salad
bowls, slightly dirty frying pans and
shallow pans.
Position light weight dishes in such
awayas to avoid their being moved
by the spray of water.
The appliance can also be equipped
with one or two tip-up
compartments onto which you can
place mugs and cups, as well as
long sharp knives and serving
cutlery.
After loading the dishes, remember
to check that the blades on the
sprayer arms can turn freely
without hitting against any dishes.
How to adjust the top
rack.
The upper rack can be set in high
or low position to enable you to
organise your dishes effortlessly.
A1
A
Fig.C
A1
A
B
All manuals and user guides at all-guides.com
DISHWASHER
4
ARISTONDISHWASHER-Instructionsforinstallationanduse
Did you know that?
Ariston Dialogic is an intelligent
dishwasher, equipped with so-
phisticated software that allows
it to assess how dirty the dishes
are and the type of dishes to
wash. The appliance can wash
the racks differently, all you
need to do is tell it how deli-
cate the dishes are and which
rack you have loaded them on.
The appliance will do the rest:
selecting the most suitable
wash cycle and the optimal wa-
ter temperature.
Keep an eye on the display, it's
your dishwasher's means of
communications with you
where it can send you simple
messages to inform you as to
what it's doing. It can even re-
quest that you carry out a few
simple tasks, and it can signal
any oversights on your part.
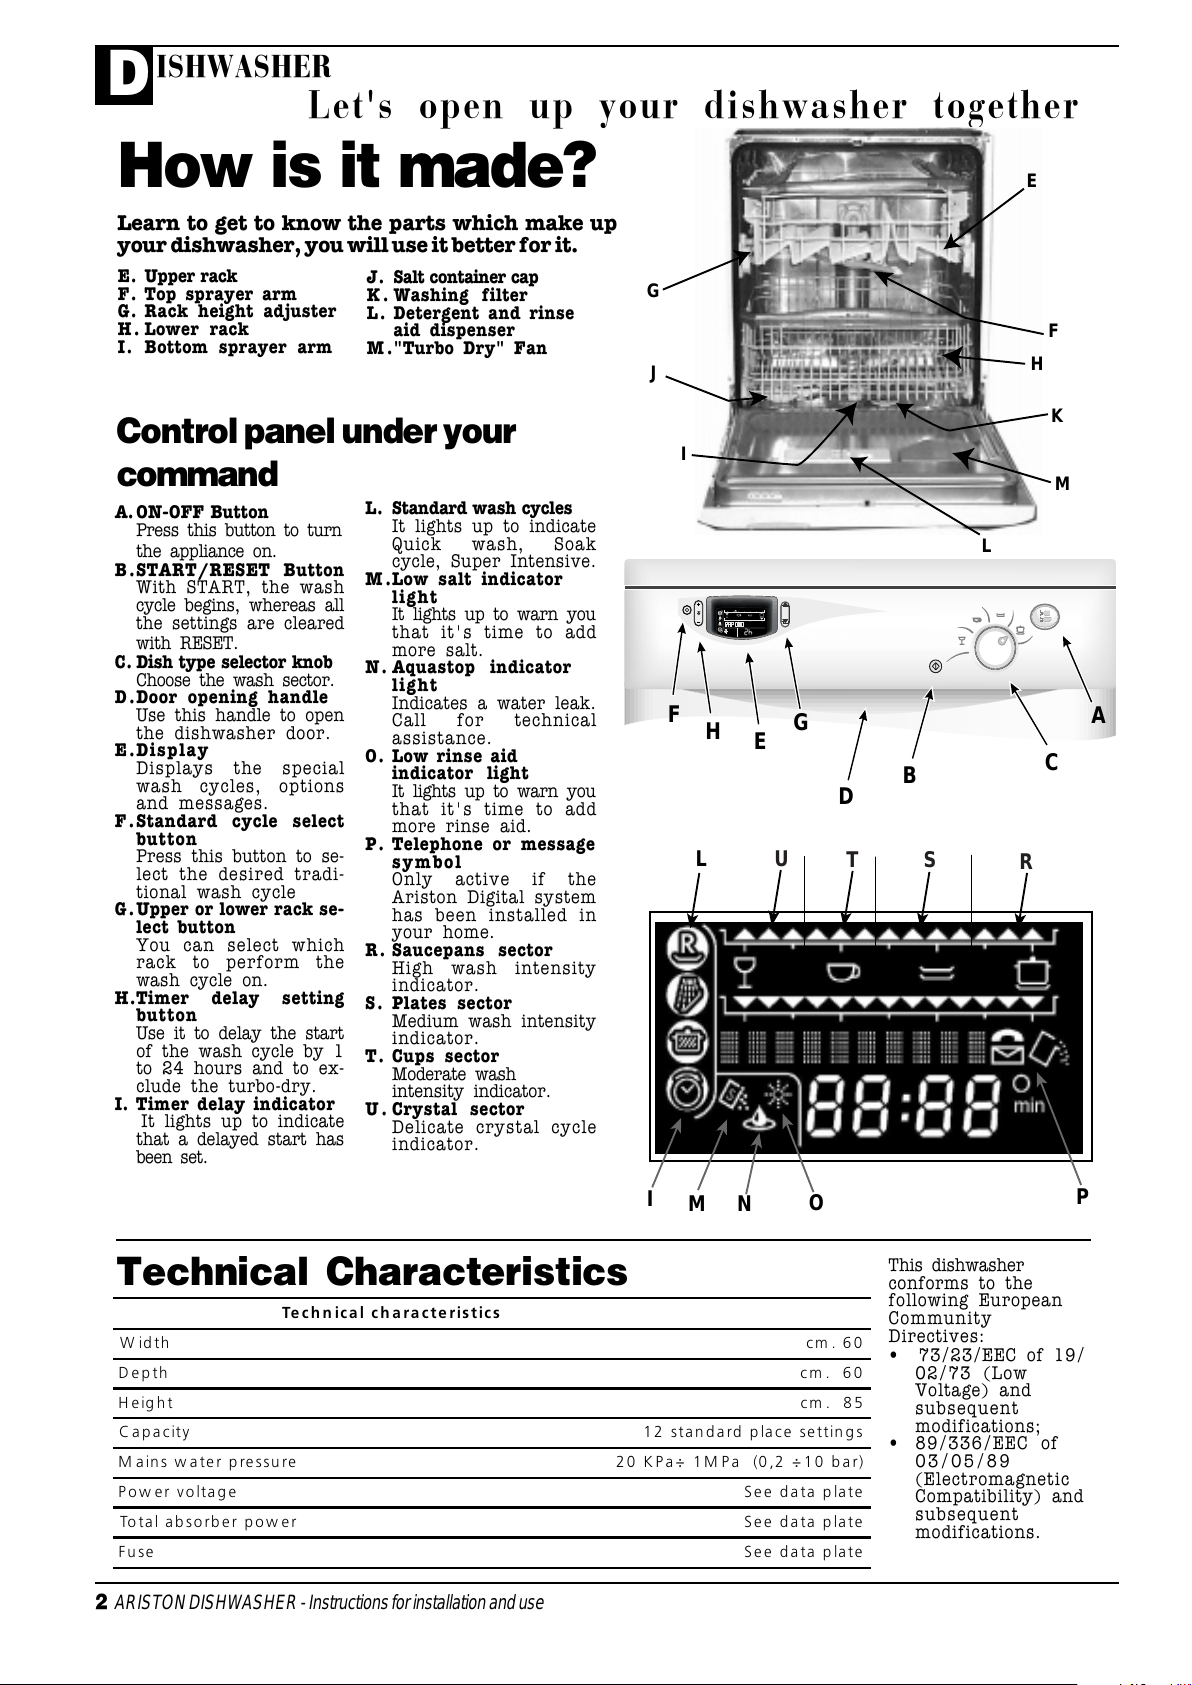
First of all.
Turn on the water tap com-
pletely and press ON-OFF but-
ton "A". the wording that ap-
pears on display "E" indicates
the wash sector onto which the
knob is set.
Assess your needs and
choose from the follow-
ing possibilities:
 Full load wash on both
racks, with mixed dishes.
You only need to identify how
delicate the dishes you have
loaded are. Turn the knob and
set it to the wash sector you
deem most suitable for the
dishes loaded. Within each in-
dividual sector, turn the knob
clockwise to increase the wash
intensity.
R. Saucepans sector
3 high wash
intensity positions.
S. Plates sector
4 medium wash
intensity positions.
T. Cups sector
3 moderate wash
intensity positions.
U. Crystal sector
3 positions for the
delicate crystal
cycle.
Start the appliance, following
the instructions in the "Start-
ing the dishwasher" paragraph.
You need not do anything else,
as your dishwasher will set the
wash cycle by itself, along with
the most suitable temperatures,
the duration of the cycles and
everything deemed necessary
for a perfect result.
 You have special load and
wash requirements.
(lots of glasses and plates, for
example).
Your dishwasher offers you the
possibility of washing every-
thing at the same time with just
one wash cycle, but you need
to tell it, in the following order:
- which rack you have loaded
them on;
- what type of dishes need to
be washed
Look on the right-hand side of
the display, there are two small
arrow-shaped buttons. Press
button to select the upper
rack. Now set the knob to the
"Crystal" setting. Observe how
these operations are indicated
at the same time on the display.
Now press button to select
the lower rack, and set the
knob to the "plates" setting.
Start the dishwasher using
START.
 You want to wash just half
a load?
Have you only got a few dishes
that need washing? If so, load
them all on a single rack to save
on water and electricity.
If you intend to wash on the
upper rack only, keep button
pressed for a few seconds.
Use the knob to select the wash
sector you deem most suitable
for the degree of delicacy of the
dishes you have loaded (such
as cups for example).
The wording "cups" - "only up-
per basket" will scroll along the
display. A luminous triangle
moves, indicating the rack and
the wash sector selected.
Have you selected the
wrong rack?
Keep the arrow corresponding
to the rack excluded pressed
for approximately 2 seconds.
Now make the correct selec-
tion.
Ready, steady, go!
Starting the dishwasher
You have loaded your dishes into the appliance, and
you want to know how to start it? Just read on. You
only need a few minutes to learn how
Starting the dishwasher
Press the START button "B",
and a short beep will indicate
the appliance has begun wash-
ing. You need do nothing else,
the display will inform you
which phase is under way (pre-
wash, wash, rinses, drying) and
after a few seconds the coun-
ter will indicate the amount of
time left until the end of the
wash cycle. Don't expect a pre-
cise countdown, but keep in
mind that this is an intelligent
appliance and therefore starts
with an estimated time. As the
wash cycle progresses, this time
is updated because the appli-
ance acquires and assesses
many parameters which allow
it to optimise the wash cycle
(water hardness and tempera-
ture, degree of soil, type of
dishes, etc.).
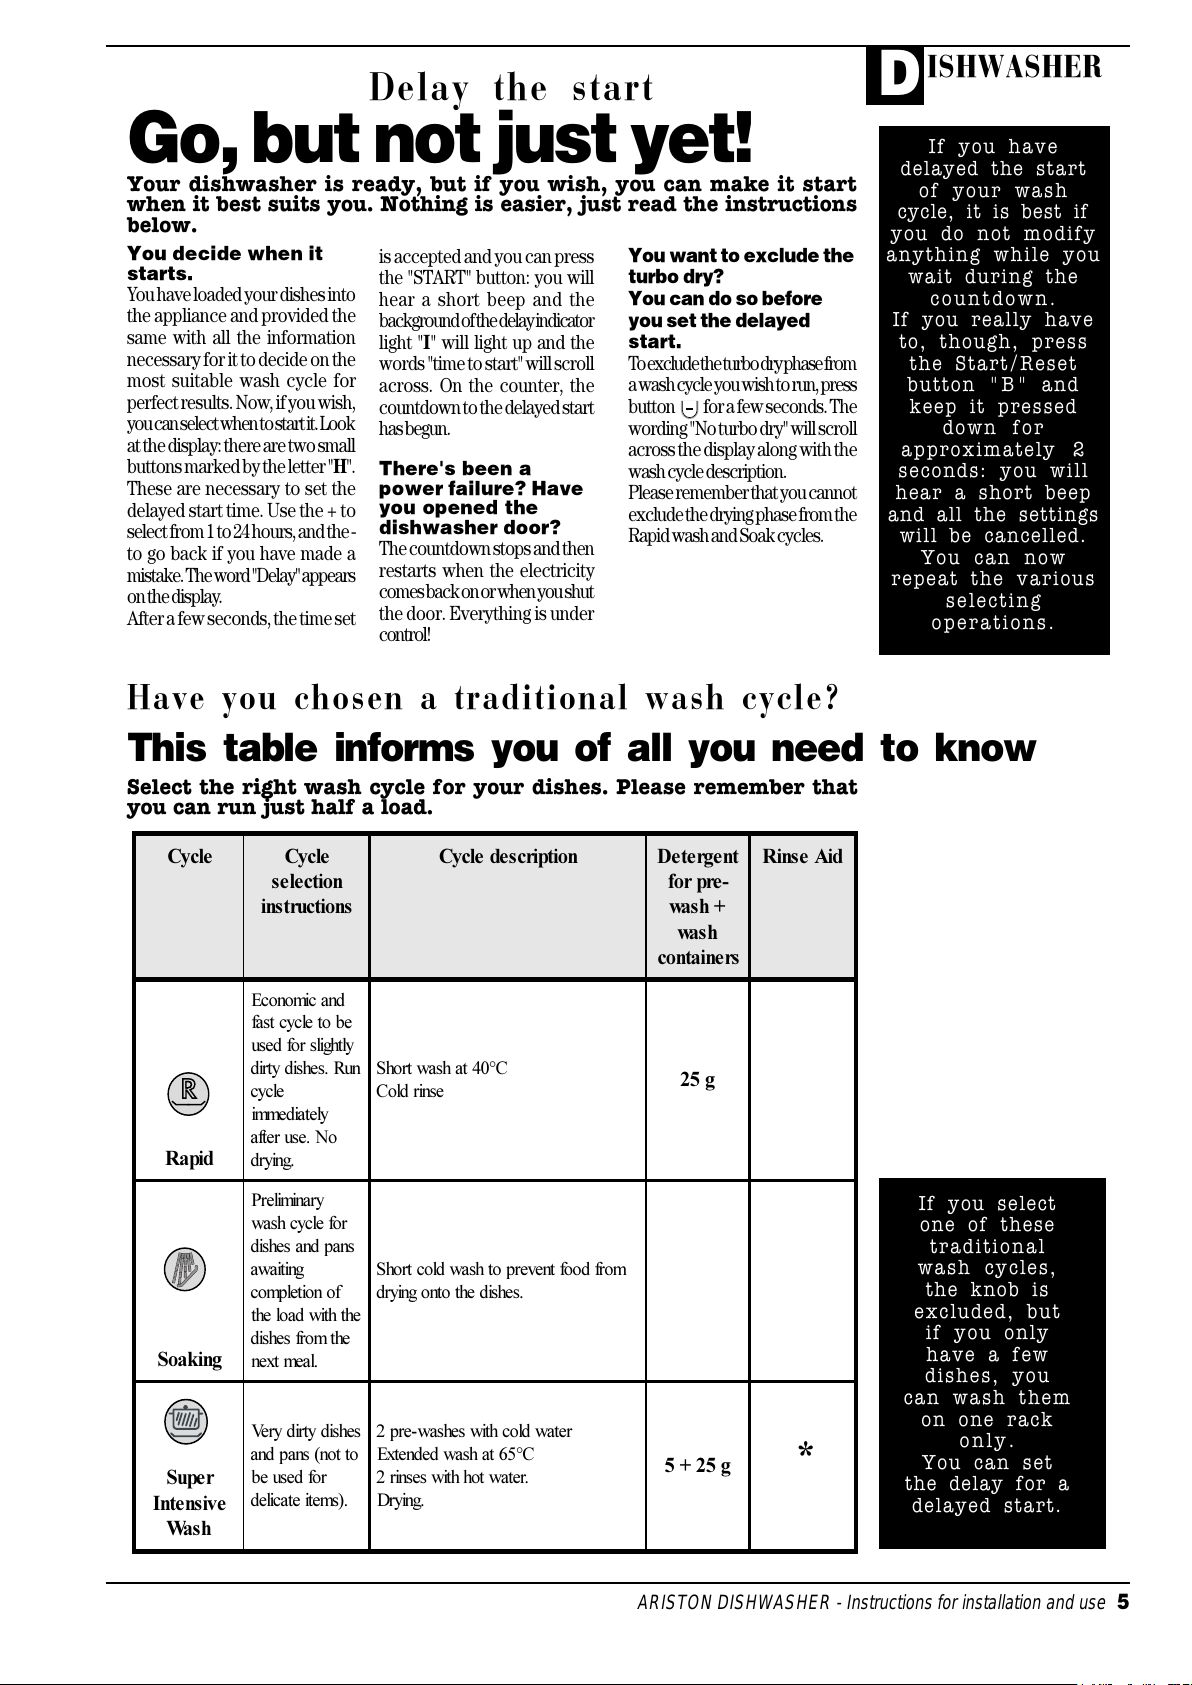
Traditional wash cycles
Look on the left-hand side of
the display, you will see button
"F". Press it to select one of the
following 3 wash cycles, in se-
quence:
Rapid
Soaking
Super Intensive
The wording for the selected
wash cycle appears on the dis-
play and the background of the
corresponding symbol turns
blue.
These are traditional wash cy-
cles. You are not required to
use the knob, but if you only
have a few dishes to wash, then
run a half-load. Press the
START button to make the dish-
washer strt washing. You will
be given the usual information
as to the duration of the wash
cycle and the sequence of the
phases. To find out more about
these wash cycles, read the ta-
ble on page 5.
Changing the settings
when the cycle is under
way.
Have you just realised you se-
lected the saucepans on the up-
per rack instead of crystal? You
had better inform the appli-
ance, otherwise the type of
wash could be too intensive,
thus damaging your glasses.
Press RESET button "B" and
keep it pressed down for a few
seconds. You will hear a short
beep and the word "reset" will
appear on the display, followed
by the name of the wash sector
on which the knob is set. Now
you can re-set everything cor-
rectly.
Have you opened the ap-
pliance door? Has there
been a power failure?
Not to worry, the wash cycle
will start up again as soon as
you shut the door or the power
has returned.
Finished?
The end of the wash cycle is
signalled by a double beep, and
a flashing "Washing finished"
comes up on the display. Turn
the appliance off by pressing
the ON-OFF button.
Wait a few minutes before un-
loading the dishes: they are very
hot!
Remember that if you
want to wash on just
one rack, you need to
halve the quantity of
detergent in both
dispensers.
If you have cancelled a
wash cycle under way,
remember that water is
always drained when a
new wash cycle is
started. Check whether
the detergent was
unloaded together with
the wash water. In this
case, add some more.
All manuals and user guides at all-guides.com
all-guides.com
ARISTON DISHWASHER - Instructions for installation and use
5
DISHWASHER
If you have
delayed the start
of your wash
cycle, it is best if
you do not modify
anything while you
wait during the
countdown.
If you really have
to, though, press
the Start/Reset
button "B" and
keep it pressed
down for
approximately 2
seconds: you will
hear a short beep
and all the settings
will be cancelled.
You can now
repeat the various
selecting
operations.
Delay the start
Go, but not just yet!
You decide when it
starts.
You have loaded your dishes into
the appliance and provided the
same with all the information
necessary for it to decide on the
most suitable wash cycle for
perfect results. Now, if you wish,
youcanselect whentostartit.Look
at the display: there are two small
buttons marked by the letter "H".
These are necessary to set the
delayed start time. Use the + to
select from 1 to 24 hours, and the -
to go back if you have made a
mistake.Theword"Delay" appears
onthedisplay.
After a few seconds, the time set
Your dishwasher is ready, but if you wish, you can make it start
when it best suits you. Nothing is easier, just read the instructions
below.
is accepted and you can press
the "START" button: you will
hear a short beep and the
backgroundofthedelayindicator
light "I" will light up and the
words "time to start" will scroll
across. On the counter, the
countdown to the delayed start
hasbegun.
There's been a
power failure? Have
you opened the
dishwasher door?
The countdown stops and then
restarts when the electricity
comesbackonor whenyou shut
the door. Everything is under
control!
Have you chosen a traditional wash cycle?
Select the right wash cycle for your dishes. Please remember that
you can run just half a load.
This table informs you of all you need to know
If you select
one of these
traditional
wash cycles,
the knob is
excluded, but
if you only
have a few
dishes, you
can wash them
on one rack
only.
You can set
the delay for a
delayed start.
&\FOH &\FOH
VHOHFWLRQ
LQVWUXFWLRQV
&\FOHGHVFULSWLRQ 'HWHUJHQW
IRU SUH 
ZDV K 
ZD V K
FRQWDLQHUV
5LQVH$LG
5DSLG
(FRQRPLFDQG
IDVWF\FOHWREH
XVHGIRUVOLJKWO\
GLUW\GLVKHV5XQ
F\FOH
LPPHGLDWHO\
DIWHUXVH1R
GU\LQJ
6KRUWZDVKDW&
&ROGULQVH J
6RDNLQJ
3UHOLPLQDU\
ZDVKF\FOHIRU
GLVKHVDQGSDQV
DZDLWLQJ
FRPSOHWLRQRI
WKHORDGZLWKWKH
GLVKHVIURPWKH
QH[W PHDO
6KRUWFROGZDVKWRSUHYHQWIRRGIURP
GU\LQJRQWRWKHGLVKHV
6XSHU
,QWHQVLYH
:D V K
9HU\GLUW\GLVKHV
DQGSDQVQRWWR
EHXVHGIRU
GHOLFDWHLWHPV
SUHZDVKHVZLWKFROGZDWHU
([WHQGHGZDVKDW&
ULQVHVZLWKKRWZDWHU
'U\LQJ
J 
You want to exclude the
turbo dry?
You can do so before
you set the delayed
start.
Toexcludetheturbodryphasefrom
awash cycleyouwish to run,press
button for a few seconds. The
wording "No turbo dry" will scroll
across the display along with the
washcycledescription.
Pleaserememberthatyoucannot
excludethedryingphase from the
Rapidwashand Soak cycles.
All manuals and user guides at all-guides.com
DISHWASHER
6
ARISTONDISHWASHER-Instructionsforinstallationanduse
Never without salt
Loading the salt.
Always use salt which is intended
for dishwasher use.
The salt container is situated
underneath the lower rack, fill it
up as follows:
1. Pull out the lower rack
completely, unscrew and
remove the container cap
2. Is it the first time you load the
salt? First fill the container up
with water (you won't have to
do this again next time)
3. Put the dishwasher funnel on
the hole and pour in
approximately two kilos of
salt. It is normal that some
water comes out of the
container.
4. Screw the cap back in place
carefully.
Water in your home
When should I load the
salt?
The salt container should be filled
up when the low salt indicator
light "M" lights up and the words
"add salt" scroll across the display.
Water hardness varies according to where you live. If the water in
your home is hard, without water softening, incrustations would
form on your dishes. Your dishwasher is fitted with a water softener
which uses special salt to get rid of limescale in the water.
Detergent and rinse aid
The rinse aid.
Thisproduct makesdishessparkle
more as it improves their drying.
The rinse aid container is situated
on the inside of the door. You
shouldfillitupwhenthelowrinse
aid indicator light "O" lights up on
andthe words"addrinse aid"scroll
acrossthedisplay.
The detergent
Loading the detergent
To open lid A, press button B. The
detergent should be poured into
the two containers up to the rim.
Now you can close the lid: press it
down until you hear it click.
If you prefer to use the detergent
in tablet form, then place one
inside the container "D" and close
the lid.
It won't close!
Check whether there is any
detergent residue on the edges of
the dispenser. It is due to this resi-
due that the lid won't close. Get
ridofitandyou'llseethatitcloses.
Only use specific dishwasher detergents. Pour the detergent into the
dispenser on the inside of the door. Before the wash cycle starts!
Useful tips
To prevent rust
from forming,
load the salt just
before beginning
a wash cycle.
Intelligent salt.
Your dishwasher can adjust its salt
consumption according to the
hardness of the water in your
home. It will add the correct
quantity to the wash cycle, thus
optimising and customising the
salt consumption (not too much
nor too little). At the end of the
wash cycle, if your dishwasher
detects a water hardness which is
below the default threshold, the
message "do not use any salt" will
appear.

Use the right
amount of
detergent: if you
use too much, you
will not get cleaner
dishes, but just
more
environmental
pollution.

Keep your
dishwasher
detergent and rinse
aid in a cool, dry
place and away
from children.
Proper dosage of
the rinse aid
improves drying.
If drops of water
remain on the
dishes or spotting
occurs, turn the
dosage adjuster to
a higher setting.
If, on the other
hand, the dishes
have white
streaks, then turn
the dosage
adjuster down to a
lower setting.
C
A
B
D
5
gr.
25
gr.
F
C
Loading the rinse aid.
To openthedispenser,turncapC
anticlockwise. Take care when
you pour in the rinse aid to avoid
itoverflowing.You can adapt the
amount of rinse aid used by the
dishwasher:usea screwdriver or
a coin to adjust the dosage
adjuster F situated underneath
the lid C. You can choose from six different
positions. It is normally set to 4.
All manuals and user guides at all-guides.com
ARISTON DISHWASHER - Instructions for installation and use
7
DISHWASHER
Using your electric household
appliances wisely helps you make
savings and is good for the environment.
Savings are easy
Maximum load.
To optimise consumption levels, try to use
the dishwasher with a full load only. If it
takes quite some time to fill up your
dishwasher, use the soaking cycle to avoid
the formation of bad odours and caked-on
food.
Half load.
Remember that, if need be, your dishwasher
also allows you to wash half a load (using
one rack only).
Remember to use half the amount of
detergent.
How to look after and protect the dishes you hold dear
■Forparticularly delicate dishes,
we recommend you use the
specific wash cycle offered by
yourdishwasher.
Suggestions and advice for you.
■Silverplatesand serving dishes
shouldbe washedimmediately
afteruse, especiallyifthey have
contained salt, eggs, olives,
mustard, vinegar, fruit juices
andcookedvegetables.
■Almost all silverware can be
cleanedinadishwasher. There
are two exceptions: old
silverware and silverware
decorated with an oxidising
agent.Hot watercanloosen the
handles on old silverware and
wearoffthe decorations on the
other.
Neverlet silverware come into
contact with other metals: you
will thus avoid stains and
blackening.
Language setting
and demo programme
The messages, time and date functions are available if you have had the Ariston Digital
system with the GSM node installed in your home.
Access to the menu
Keep these two buttons
pressedtogetherforapproximately
3 seconds to enter the menu.
Now you can set a few functions.
The buttonworks asthe "Mode"
button:toallow you to scrollalong
themenuoptions.
The button works as the
"Select" button: to allow you to
select the selection shown by the
display.
The buttonworksas the "Canc"
button: to allow you to go back to
the last menu level; press it
repeatedlytoquit the menuandgo
back to normal mode. Follow the
diagram to select the desired
option.
normal
display
TIME
MESSAGGES
-
+
-
+
-
DATE
+
-
-
+
LANGUAGE
DEMO MODE
-
+
language updated
1-8
ENGLISH
8-8
TURKCE
+
- +
-
-
LANGUAGE
DEMO ON
DEMO OFF
+
- +
-
-
DEMO MODE
Apart from
making you save
time and energy,
your dishwasher
disinfects your
dishes, washing
them at a high
temperature.
If your
dishwasher is
linked up to the
Ariston Digital
system, even if it
is switched off
the display stays
on and indicates
the correct time.
Demo mode
Enterthemenu by pressing the
buttons for approximately
3 seconds, then scroll through the
wording using the button until
youreach"demo mode", selectthe
latterusingthe buttonandthen
scroll through "demo-on" and
Language selection
Your dishwasher is factory-set to
English, but you can change the
setting,using button ,selecting
one of the 7 languages available:
Italian,French,German,Spanish,
Portuguese,Dutch andTurkish.
Follow this diagram to select the
desiredlanguage.
"demo-off" using the button.
Use button to make your
selection.
In "demo mode", if you press the
"START"buttonaftersettinga wash
cycle, a demo programme starts
and lasts approximately 45
seconds. The wording "demo
mode"scrollsacrossthedisplayand
thephasesofanormal wash cycle
follow one another in succession.
To disable the "demo", just select
"demooff"or turn themachineoff,
even, by pressing the START/
RESET button and keeping it
pressed while it comes back on: a
beep will confirm it has been
disabled. Follow this diagram to
enablethedemoprogramme.
All manuals and user guides at all-guides.com
DISHWASHER
8
ARISTONDISHWASHER-Instructionsforinstallationanduse
If the power
socket to which
the appliance is
connected is not
compatible with
the plug, replace
it with a suitable
plug rather than
using adapters or
multiple plugs as
these could cause
overheating or
burns.
Installation and moving
After having bought or moved your dishwasher to another
home, a correct installation ensures that your dishwasher
will operate smoothly and efficiently.
Hot water connection.
Your dishwasher can be supplied
with hot water from the mains
supply(ifyou haveacentralheating
systemwithradiators)atatempe-
rature of no more than 60°C.
In this case, the wash cycle time
will be about 15 minutes shorter
and the wash will be slightly less
effective.
The connection must be made to
thehotwatersupplyfollowing the
sameproceduresasthoseindicated
forthecoldwaterconnection.
Anti-flooding protection.
Yourdishwasherisprovidedwitha
special system which blocks the
water supply in the event of leaks
inside the appliance. It is further
equipped with a water inlet hose
thatcanwithstand extremely high
pressuresandthat turns brightred
in the event of breakage. Safety in
theeventoffloodingisensuredby
thesecondclearhose thatcontains
theformer and thus highlights the
latterwhen ithasturned brightred.
It is vital that you check it on a
regularbasis:ifyouseeithasturned
brightred,thenyouknowyouhave
to replace it as soon as possible.
Call for an authorised technical
engineer to come and replace it.
If the indicator light "N"
corresponding to the aquastop
system comes on, turn off the
watertap,unplug theapplianceand
callfortechnicalassistance.Ifyou
are linked up to the TLI telephone
node,thecall will be forwarded to
our service centre automatically
and the telephone symbol "P" will
lightup.
Drain hose connection.
Fit the drain hose into a drain line
with a minimum diameter of 4 cm
or place it over the sink. Avoid
restricting or bending it. Use the
specialplastic elbowprovided(see
figure) to position it in the best
possible way. The free end of the
hoseshouldbebetween 40and 100
cm above the ground and should
notbe immersed in water.
Choose where you want to install
your dishwasher, you can even
place it so that its sides or back
panelaresidebysidewithfurniture
or up against the wall. The
dishwasheris provided withwater
supplyanddrain hoses, which can
bedirected towardstheleft orright
to facilitate appropriate
installation.
Levelling.
Once the appliance is positioned,
adjust the feet by screwing them
in or out depending on how high
you want it and level it so that it is
horizontal. Make sure that it is not
inclinedmore than 2degrees.If the
applianceis level,it willhelpensure
its correct operation.
Easy to build-in
Thisdishwashermodelcanbebuilt-
in under a single worktop easily.
The dishwasher comes with an
assembly kit complete with an
instructionssheet.
Cold water connection.
Connect the cold water supply
hose to a 3/4 gas threaded
connection,takingcare to screw it
tightly onto the tap. If the water
hosesarenew or have been out of
usefor an extendedperiodof time,
let the water run to make sure it is
clearandfree of impurities before
making the connection. If this
precaution is not taken, the water
inlet could get blocked, causing
damagetoyour dishwasher.
Your dishwasher has arrived
A
The special
plastic elbow
should be
fastened firmly
onto the wall to
prevent the drain
hose from
moving and
allowing water to
spill outside the
drain.
If the power
supply cable is
damaged, call an
authorised After-
Sales Service
Centre and have it
replaced!
Electrical connection.
First of all, check that the mains
voltage and frequency values
correspond to those stated on the
ratingplate locatedonthe stainless
steel inner door of the appliance
and that the electrical system to
whichthedishwasherisconnected
is sized for the maximum current
indicatedon said rating plate.
Earth: indispensable
safety.
Only now can you plug the
appliance into a socket provided
withan efficient earth connection
(the system's earthing is a
guaranteeof safetyprovidedfor by
law, make sure your system has
it).
All manuals and user guides at all-guides.com