Arizona SP-150 User manual

AZI Customer Service 800-528-7411 or 602-470-1414 Page 1of 21
ARIZONA INSTRUMENT LLC
SP-150 Electronic
Balance
USER MANUAL
October 2008
Arizona Instrument LLC
3375 N Delaware Street
Chandler, Arizona 85225
(602) 470-1414
(800) 528-7411
Fax (480) 804-0656
http://www.azic.com
email:
AZI P/N: 700-0014-D

AZI Customer Service 800-528-7411 or 602-470-1414 Page 2of 21
SP-150 Electronic Balance
Setup and Operation Manual
Thank you for choosing an SP-150 Electronic Balance from Arizona Instrument LLC.
AZI is pleased to provide you with a balance designed and manufactured for years of
reliable service and proudly made in the U.S.A.
Please read this manual completely before using your balance. This information will
enable you to fully utilize your balance and should be located nearby to be used as a
quick reference guide. The balance is intended to be used only in the manner outlined
in this manual. Misuse of the balance may cause product failure.
PROPRIETARY RIGHTS NOTICE
The material in this manual contains valuable information developed by Arizona
Instrument LLC for use with the Computrac®Vapor Pro®line of moisture analyzers. No
part of this manual can be reproduced or transmitted in any form or by any means,
electronic, mechanical, or otherwise. This includes photocopying and recording or in
connection with any information storage or retrieval system without the express written
permission of Arizona Instrument LLC.
ALL RIGHTS RESERVED
©Copyright 1999-2008 Arizona Instrument LLC

AZI Customer Service 800-528-7411 or 602-470-1414 Page 3of 21
Table of Contents
SP-150 Electronic Balance .................................................................................. 2
Unpacking and Setup.............................................................................................................4
The On/Off Switch.................................................................................................................6
Connecting the SP-150 to the Vapor Pro...............................................................................7
The Zero Switch.....................................................................................................................8
The Mode Switch...................................................................................................................8
The Send Switch....................................................................................................................8
The Function Switch..............................................................................................................8
CAL 1 [Auto-Calibration] - Using an external calibration weight........................................9
Capacity Tracker..................................................................................................................10
Selectable Vibration Filters and Stability Indicator.............................................................10
SP-150 Rear Panel...............................................................................................................11
RS-232 Interface Cable........................................................................................................11
RS-232 Front Panel Configuration......................................................................................12
Troubleshooting Guide ...................................................................................... 14
Environmental Requirements............................................................................. 15
SP-150 Specifications........................................................................................ 16
FCC Compliance................................................................................................ 17
Limited Warranty............................................................................................... 17
Extended Warranty ............................................................................................ 17
Returned Goods Policy ...................................................................................... 18
Appendix A - Front Panel Parts Counting......................................................... 19
Appendix B - Weight Checking........................................................................ 20
TRADEMARK AND COPYRIGHT PROTECTION....................................... 21

AZI Customer Service 800-528-7411 or 602-470-1414 Page 4of 21
Unpacking and Setup
The balance, weighing pans, remote power supply and windscreen are packed in a
foam support to protect them from shock during shipping and handling. Save and reuse
all packing material for future shipments. A null modem cable, a 100g weight and this
user’s manual are also packed with the balance.
Balance Full View

AZI Customer Service 800-528-7411 or 602-470-1414 Page 5of 21
AZI SP-150 balances are equipped with a special clamping screw that locks the balance
suspension during shipping. This screw must be loosened before the balance can be
operated (see Figure 1).
Locate the black knob, on the front center of the balance, underneath the display
area.
•Remove the paper tag.
•Turn the knob, approximately one (1) turn counter clockwise, as shown in
Figure 1, until it stops.
If the balance is shipped or moved long distances, the clamping screw should be re-
tightened by turning the knob in the clockwise direction until resistance is felt,
approximately one (1) turn.
Figure 1 - Unlocking Clamping Screw
The environment in which your balance is used is very important. Air movement,
temperature changes, vibrations, direct sunlight, etc. influence the performance of high
precision balances. Therefore, place your balance on a solid, sturdy surface that is free
of air currents and vibration. The surface should not be magnetic and should be located
away from doors, windows, heaters, air conditioners and fans.
Level the balance by turning the front feet to center the bubble in the level Indicator.
Turn a foot clockwise to raise that side or counter-clockwise to lower that side of the
balance.
Turn both feet together to raise or lower the front of the balance.

AZI Customer Service 800-528-7411 or 602-470-1414 Page 6of 21
Before making any connections, verify that the power requirement shown on the remote
power supply is compatible with the AC power outlet to which the balance will be
connected. First plug the round DIN connector into the rear panel receptacle.
Then, plug the power supply into a grounded AC outlet. Do not alter or bypass
the ground plug in any way. Doing so adversely affects the performance of the
balance.
NOTE: Your balance must be plugged in and switched on for at least one (1) hour,
then calibrated, prior to use. Please see the calibration instructions on page 9.
The On/Off Switch
Press the ON/OFF switch and observe the turn on sequence shown below.
Figure 2 - Turn On Display Sequence
During this sequence the balance is doing an automatic systems check to verify it is
functioning properly.
**NOTE: The clamping screw must be unlocked before turning the balance on or the
balance will not be able to complete the automatic systems check.

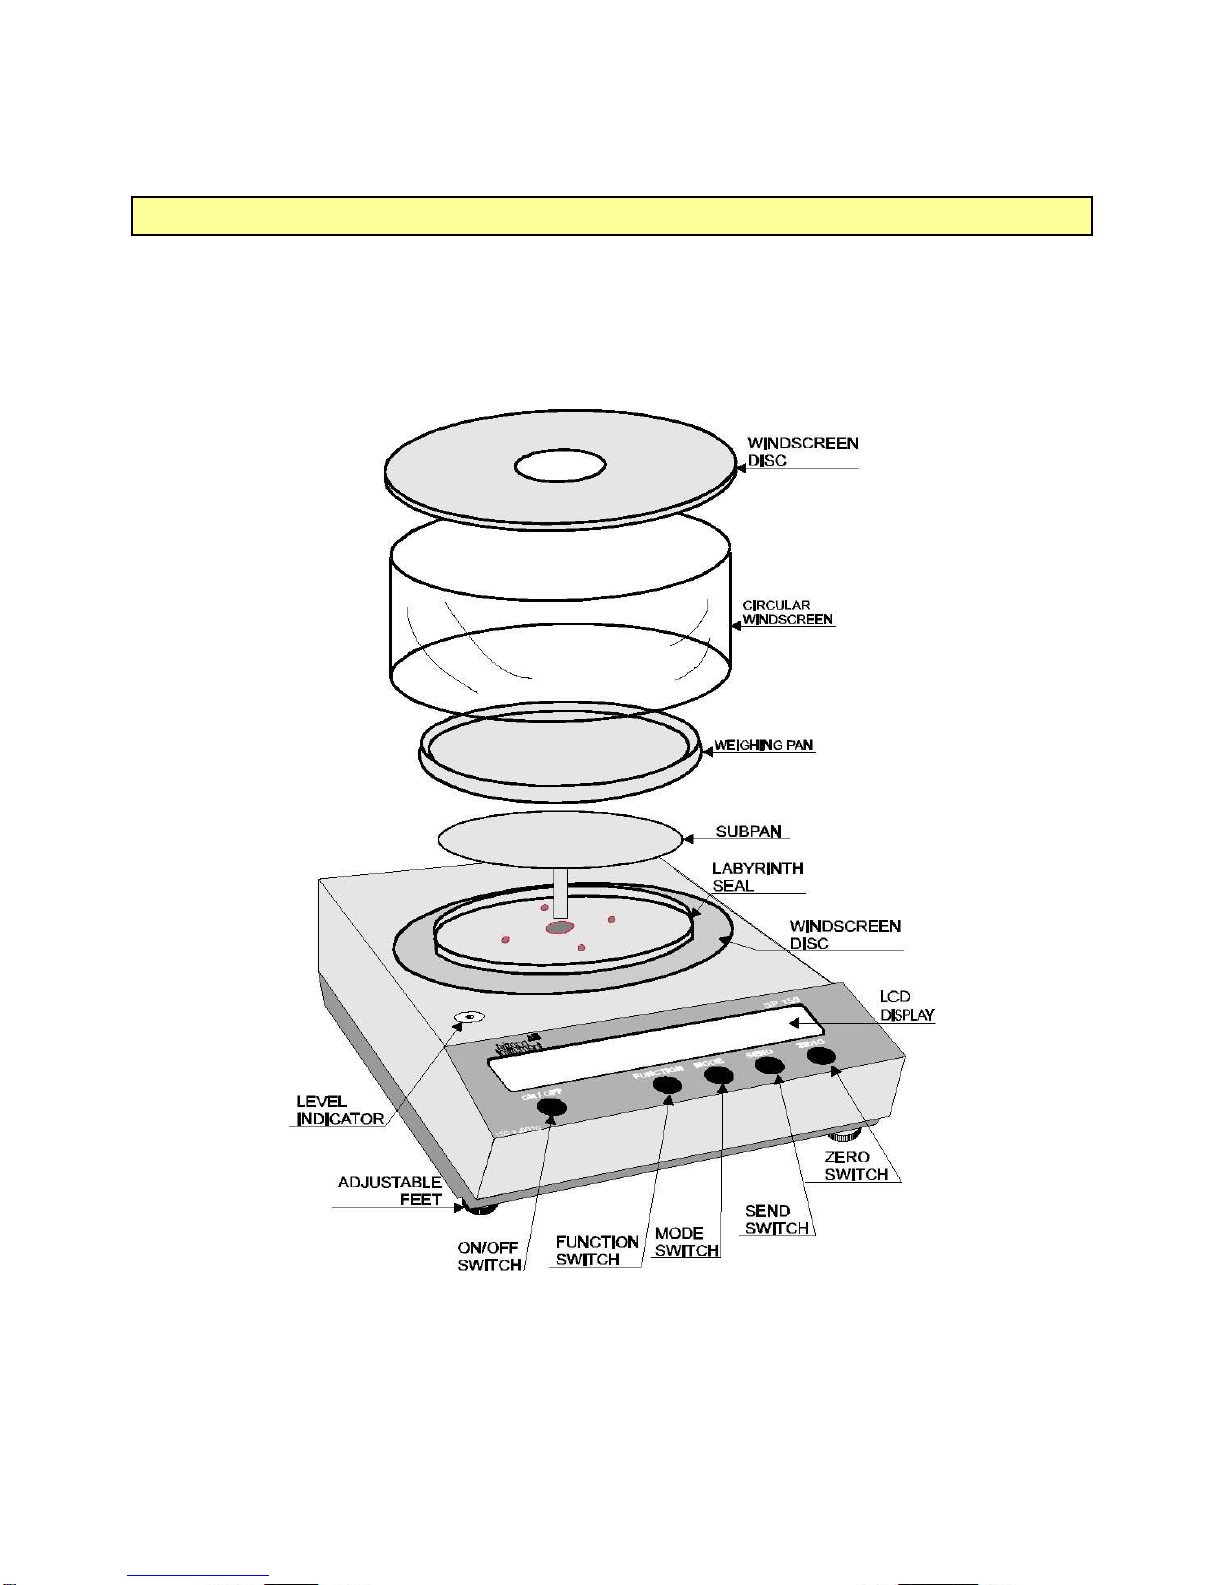
AZI Customer Service 800-528-7411 or 602-470-1414 Page 7of 21
Connecting the SP-150 to the Vapor Pro
The balance is configured to interface directly with the Vapor Pro series of Moisture
Analyzers. Weight readings at the balance can be transmitted directly to the Vapor Pro
through the null modem cable connection.
To enable this communication between the balance and the Vapor Pro:
Power to both units should be switched OFF.
Connect the null modem cable (AZI P/N 200-0069) to the RS-232 connector at
the rear of the balance. Connect the other end of the cable to the balance
connector at the rear of the Vapor Pro.
Switch the power to both units ON.
On the Vapor Pro, press the [Menu] key. Use the [Down] key to highlight the
SETUP MENU. Press the [Selct] key to access this menu. Highlight the EXT
BALANCE SETUP option and press [Selct]. Highlight and select the SELECT
BALANCE DRIVER option. Use the [Edit] key to select AZISP150 as the
external balance. Press [Quit] and then [Accpt] key to program this option.
Select the CHECK BALANCE COMM option to verify the cable is connected and
that the Vapor Pro and the balance are communicating. Use the [Esc] key to
return to the MAIN MENU.
If the Communication Check is not successful, the balance’s communication settings
need to be reset to their factory presets. Refer to RS-232 Front Panel Configuration
on page 12 for instructions on resetting the balance to the required factory presets.
From the MAIN MENU, select the MEMORY START MENU and then ADD/EDIT
MEMORY START. Access the memory start to be edited using the [Up] or
[Down] keys and the [Selct] key. At the SAMPLE WEIGHT ENTRY MODE
option, select DIGITAL BALANCE.
When a test is run using that memory start parameter, the Vapor Pro will automatically
check for data communication. The weight readings from the external balance will be
displayed on the Vapor Pro display. Follow the display prompts to proceed through the
weighing and testing sequence.

AZI Customer Service 800-528-7411 or 602-470-1414 Page 8of 21
The Zero Switch
Pressing the ZERO switch at any time returns the display to zeros. When a weighing
that has been zeroed out is removed from the pan, a negative reading is displayed. To
return to zeros, press the ZERO switch.
The Mode Switch
Pressing the MODE switch starts the unit of weight cycle as follows: grams (g), carats
(ct), pennyweights (dwt), troy ounces (ozt), and ounces (oz). Press the MODE switch a
second time when the desired unit of measure appears. For Vapor Pro operation, verify
that the balance is weighing in grams (g).
The Send Switch
The SEND button is not normally employed in everyday usage of the balance, although
it is used in certain specific configuration procedures, as detailed later in this manual.
The Function Switch
Pressing the FUNCTION switch cycles the display through four functions as follows:
PCS - front panel parts counting
HI OK LO - check weighing
CAL 1 - auto-calibration
CAL 2 - factory set - DO NOT USE
CAL 2 is set at the factory and should never require further adjustment. The procedure
for CAL1 begins on page 9. For the other two functions (PCS and HI OK LO), refer to
the appendices beginning on page 19.

AZI Customer Service 800-528-7411 or 602-470-1414 Page 9of 21
CAL 1 [Auto-Calibration] - Using an external calibration weight
Perform auto-calibration every time you move your balance. It is extremely important to
use high quality weights and verify the balance has been warmed up for at least one (1)
hour prior to calibration.
Procedure
Display Reading
Remove any containers or weights so
that only the stainless steel pan is in
place. Press the ZERO switch.
Zeros are displayed.
Press the FUNCTION switch.
Display cycles repeatedly through PCS, HI-
OK-LO, CAL1, and CAL2.
Press the MODE switch when CAL 1
appears.
CAL 1 and a flashing 0 are displayed.
Wait 10 seconds then press the ZERO
switch.
The display stops flashing. In approximately
10 seconds a weight value or two alternating
weight values flash on the display.
Place the displayed weight or one of
the alternating weights on the pan.
The display stops flashing and the selected
weight are displayed.
Wait 10 seconds then press the ZERO
switch.
The weight continues to be displayed while
the calibration takes place (approximately 10
seconds). The display blanks, then displays
"OK" and the calibration weight.
Remove the calibration weight.
The display returns to zeros and the normal
weighing mode.

AZI Customer Service 800-528-7411 or 602-470-1414 Page 10 of 21
Capacity Tracker
The capacity tracker provides a graphic display of the used and unused portions of the
weighing range. Each segment represents 5% of the balance’s capacity and is
illuminated as that portion of the capacity is used. The larger segments, representing
¼, ½, ¾ and full load, flash as they are approached and then become solid again as
they are exceeded.
Selectable Vibration Filters and Stability Indicator
All balances are equipped with three vibration filters and a stability indicator to adapt to
varying weighing conditions. The balance is delivered set in the high (Fil HI) mode,
which is the most aggressive mode. Less filtering (Fil nor or Fil Lo) can be selected for
quieter conditions and faster response.
The stability indicator “OK” is illuminated when the balance has determined that all
readings are within the filter parameters the user has selected. If the weight readings
are outside the acceptable limit, the stability indicator will not light. The stability
indicator can be disabled if desired.
To enter the vibration filter selection mode, proceed as follows:
Procedure
Display Reading
Turn balance OFF using the ON/OFF
switch.
Display blanks.
Hold the MODE switch down while turning
balance on using the ON/OFF switch.
OK and the current filer, Fil Nor, balance
Fil Lo or Fil HI is displayed.
Press the SEND switch until the desired
vibration filter is displayed. Then press
the ZERO switch.
OK SAVEd is displayed followed by the
current stability indicator setting, Si on or
Si oFF.
Press the SEND switch until the desired
stability indicator setting is displayed and
then press the ZERO switch.
OK SAVEd is displayed followed by the
vibration filter setting chosen in step 3.
Press the ON/OFF switch.
The display blanks.
Press the ON/OFF switch.
The balance returns to normal operation
with the new vibration filter and stability
indicator settings in place.

AZI Customer Service 800-528-7411 or 602-470-1414 Page 11 of 21
SP-150 Rear Panel
The rear panel of the SP-150 provides the power connector, an RS-232 connector, and
a retractable security bracket. The security bracket may be extended to provide a
convenient method of securing the balance.
SP-150 Rear Panel
RS-232 Interface Cable
Your balance is equipped with a bi-directional RS-232 compatible interface. The
included Null Modem Cable (AZI P/N 200-0069) is a custom cable manufactured to the
following diagram. Only this cable will provide the connections necessary for the SP-
150 Balance to communicate with the Vapor Pro Moisture Analyzer.
SP-150's Null Modem Cable

AZI Customer Service 800-528-7411 or 602-470-1414 Page 12 of 21
RS-232 Front Panel Configuration
The RS-232 Configuration Mode allows changes to the baud rate, front panel control,
software protocol, parity and auto send parameters. The balance is preconfigured at
Arizona Instrument to communicate with a Vapor Pro.
Any changes to the recommended configuration will affect
communication with the Vapor Pro.
It is not necessary to follow the entire configuration procedure if only one parameter is
to be changed. Follow steps 1 and 2, and then use the MODE switch to cycle through
the different parameters. When the parameter to be changed is displayed, toggle the
setting using the SEND switch until the desired setting is displayed. Save the setting
using the ZERO switch, and the balance will confirm by displaying “SAVEd”. Then,
turn the balance off and then on again with the ON/OFF switch to return to normal
operating mode.
To enter RS-232 configuration mode, proceed as follows:
Procedure
Display Reading
Turn balance off using the ON/OFF
switch
Display blanks
Hold the SEND switch down while
turning balance on using ON/OFF switch
The current baud rate is displayed
Press the SEND switch until br 9600 is
displayed.
br 9600
Press the ZERO switch to save br 9600
as the BAUD RATE.
SAVEd is displayed followed by br 9600.
Press the MODE switch to move to the
next parameter: LOCAL CONTROL
The current LOCAL CONTROL setting, LC
on or LC oFF is displayed.
Press the SEND until LC oFF is
displayed.
LC oFF
Press the ZERO switch to save LC oFF
as the LOCAL CONTROL setting.
SAVEd is displayed followed by LC oFF.
Press the MODE switch to move to the
next parameter: SOFTWARE
PROTOCOL
The current SOFTWARE PROTOCOL
setting, Pr oFF or Pr on is displayed.
Press the SEND switch until Pr oFF is
displayed.
Pr oFF
Press the ZERO switch to save Pr oFF
as the SOFTWARE PROTOCOL setting.
SAVEd is displayed followed by Pr oFF.
Press the MODE switch to move to the
next parameter: PARITY
The current parity setting, PA EVEn, PA
odd or PA none is displayed.
Press the SEND switch until PA none is
displayed.
PA none

AZI Customer Service 800-528-7411 or 602-470-1414 Page 13 of 21
Press the ZERO switch to save PA none
as the PARITY setting.
SAVEd is displayed followed by PA none.
Press the MODE switch to move to the
next parameter: AUTO SEND
The current auto send setting, AS oFF or
AS on is displayed.
Press the SEND switch until AS oFF is
displayed.
AS oFF
Press the ZERO switch to save AS oFF
as the AUTO SEND setting.
SAVEd is displayed followed by AS oFF.
Press the MODE switch to move to the
next parameter: CONTINUOUS SEND.
The current continuous send setting, CS
oFF or CS on is displayed.
Press the SEND switch until CS oFF is
displayed.
CS oFF
Press the ZERO switch to save CS oFF
as the CONTINUOUS SEND setting.
SAVEd is displayed followed by CS oFF.
Press the MODE switch to move to the
next parameter: DISPLAY BLANKING.
The current display blanking setting, bL on
or bL oFF is displayed.
Press the SEND switch until bL oFF is
displayed.
bL oFF
Press the ZERO switch to save bL oFF
as the DISPLAY BLANKING setting.
SAVEd is displayed followed by bL oFF.
Press the ON/OFF switch
The display blanks.
Press the ON/OFF switch
The balance is ready for use.
Changing any of these settings from the AZI
factory presets is NOT recommended, and
will affect communication with the
Computrac Vapor Pro.
If any of the preset values are changed, use the above
instructions to restore the balance’s ability to
communicate with the Vapor Pro by resetting the values
to the preset AZI defaults listed.
Verify the balance’s ability to communicate with the
Vapor Pro as detailed in Connecting the SP-150 to the
Vapor Pro on page 7 above.

AZI Customer Service 800-528-7411 or 602-470-1414 Page 14 of 21
Troubleshooting Guide
NOTE: Many problems such as the balance remaining in the turn-on sequence, "weird"
characters on the display or "garbage" on the display are caused by connecting the
power supply to the balance incorrectly. The proper procedure is to connect the round
DIN connector on the power supply cable to the balance then plug the power supply into
the wall outlet.
PROBLEM
POSSIBLE CAUSE
POSSIBLE SOLUTION
The display is blank
Balance not turned on
Press ON/OFF switch
Power cable not plugged in
Plug in power cable
No power from AC outlet
Turn on circuit breaker or change
AC outlets
OL appears on display
Maximum capacity exceeded
Reduce container weight
Weigh sample in smaller
increments
UL appears on display
Pan is not in place
Ensure pan is positioned properly
Balance is out of range
Press ZERO switch
Shipping clamp is on
Loosen clamp (see page 5)
Display is unstable
Drafts/air currents present
Install windscreen or relocate
balance
Vibrations present
Isolate or relocate balance
Weight readings are
incorrect
Balance is out of calibration
Re-calibrate balance
Balance is not level
Level balance
Balance was not re-zeroed
Press ZERO before weighing
Unit of weight set incorrectly
Select proper weighing mode
Sample touching windscreen
Reposition sample
Display stays in turn-on
sequence
Sub-pan and/or weighing pan
not in place
Place pan(s) on balance
Excessive draft or vibration
Isolate or relocate balance
Shipping clamp is engaged
Loosen clamp (see page 5)

AZI Customer Service 800-528-7411 or 602-470-1414 Page 15 of 21
Err 1 appears in display
Power supply connected to
wall outlet before balance
Unplug power supply from wall
then re-plug into wall
Err 2 appears in display
Calibration weight is
incorrect
Use calibration weight that
appears in display
Err 3 through 14
appears in display
Balance not warmed up
Plug in and turn on balance for 1
hour
Service is required
Call AZI Customer Service at
1-800-528-7411 or 602-470-1414
Environmental Requirements
This product is intended for indoor use at altitudes up to 2000 meters, Pollution
Degree 1 or 2 in accordance with IEC 664 and transient overvoltages according
to Installation Categories (Overvoltage Categories) I, II and III. For main supply,
the minimum and normal category is II.

AZI Customer Service 800-528-7411 or 602-470-1414 Page 16 of 21
SP-150 Specifications
Weighing Mode
Single Range
Capacity
150 g
Readability
0.001 g
Tare Range
0-150 g
Repeatability (Standard Deviation)
0.001 g
Linearity
±0.0015 g
Stabilization Time
~ 3 seconds
Weighing Speed
Adaptive
Update Interval
200 ms
Data Interface
RS-232 bidirectional interface is standard.
Baud rates are 300, 600, 1200, 2400, 4800,
9600 and 19,200
Pan Size
Circular 4.5 inch diameter
Operating Temperature
5 °C to 40 °C
Relative Humidity
80% for temperatures up to 31 °C
decreasing linearly to 50% at 40 °C
Power Supply
115 Volts/60 Hz ± 10%
230 Volts/50 Hz or 60 Hz ±10%
Windscreen
Circular 6 inch diameter x 3.25 inches high
Housing (W x D x H)
7.5" x 11.25" x 3.25"
Weight
~ 9.5 lbs

AZI Customer Service 800-528-7411 or 602-470-1414 Page 17 of 21
FCC Compliance
This equipment has been tested and found to comply with the limits for a Class A
digital device, pursuant to Part 15 of the FCC Rules. These limits are designed
to provide reasonable protection against harmful interference when the
equipment is operated in a commercial environment. The equipment generates,
uses, and can radiate radio frequency energy and, if not installed and used in
accordance with the instruction manual, may cause harmful interference to radio
communications. Operation of this equipment in a residential area is likely to
cause harmful interference in which case the user will be required to correct the
interference at their own expense.
Shielded interconnect cables and shielded power cords must be employed with
this equipment to ensure compliance with the pertinent RF emission limits
governing this device.
Changes or modifications not expressly approved by Arizona Instrument could
void the user's authority to operate the equipment.
Limited Warranty
This Arizona Instrument Electronic Balance and its accessories are warranted
against defects in materials and workmanship for one (1) year from the date of
delivery. During the warranty period, Arizona Instrument will repair or, at its
option, replace at no charge, components that prove to be defective. The
equipment must be returned, shipping prepaid, to Arizona Instrument's product
service facility. This limited warranty does not apply if the equipment is damaged
by accident or misuse or as a result of service or modification by other than an
Arizona Instrument LLC service facility. The foregoing warranty is in lieu of all
other warranties expressed or implied including but not limited any implied
warranty of merchantability, fitness, or adequacy for any particular purpose or
use. Arizona Instrument LLC shall not be liable for any special, incidental or
consequential damages whether in contract, tort or otherwise.
Extended Warranty
Extended warranty coverage can be purchased in a one, two or three year term
at the time of balance purchase. Details are included on a separate information
sheet accompanying the balance. Call Arizona Instrument at 1-800-528-7411 or
602-470-1414 for additional information.

AZI Customer Service 800-528-7411 or 602-470-1414 Page 18 of 21
Returned Goods Policy
Should it become necessary to return any item to Arizona Instrument for any
reason, please contact our Customer Service Department at (800) 235-3360 or
(602) 470-1414 to obtain a Return Materials Authorization (RMA) Number. When
you call, please be ready to provide the serial number and a description of the
problem. Frequently we can provide self-help information that will eliminate the
need for returning the unit(s). You may also obtain an RMA Number by
Home Page at http://www.azic.com.
If equipment return is required, please pack the item in the original box and
packing materials. As an alternate, place equipment in a snug-fitting box, then
pack that box in a larger box with at least four inches of packing material
between the two boxes. Arizona Instrument does not assume responsibility for
under-packed items.
Please include the RMA# and the name and phone number of the person
we should contact regarding repair question(s).

AZI Customer Service 800-528-7411 or 602-470-1414 Page 19 of 21
Appendix A - Front Panel Parts Counting
Access to the counting function via the front panel is not available if bi-directional
RS-232 communication is enabled, i.e. if the front panel local control is off, which
is the default. Turning local control on in order to use the parts counting feature
will disable communication with the Vapor Pro. Refer to RS-232 Front Panel
Configuration on page 12 for more information on setting local control on or off.
Procedure
Display Reading
Press the FUNCTION switch.
Display cycles repeatedly through PCS, HI-OK-LO,
CAL1, and CAL2.
Press the MODE switch while PCS
appears on the display.
PCS and 0 flash. This is a prompt to zero the
balance with the container you will be using to weigh
the initial sample.
Place the container on the pan, wait
10 seconds, then press the ZERO
switch.
PCS and 10 flash. This is a prompt to place 10
pieces in the container and press zero.
Place 10 pieces in the container,
wait 10 seconds, then press the
ZERO switch.
PCS continues to flash and OK appears on the
display while a stable weight is obtained. Then
10.000, or something very close to it appears on the
display. The number of decimal places depends on
the weight. PCS continues to flash. This prompts
you that you may now increase the size of the
sample if you wish. The decimal places are an aid.
When adding more samples, if the decimal part
approaches .5 you cannot be sure of the exact count.
If you need a larger sample, add
pieces (the balance will count them)
until the decimal part is near 0.7 or
0.3. Then press the ZERO switch.
The balance will round to the nearest whole number
but still show the decimal places. This step may be
repeated as many times as you wish.
When you are satisfied the sample is
large enough, press the ZERO
switch once again.
The balance rounds to the nearest whole number,
the decimal places disappear, and PCS lights
steadily.
When you wish to count something
else, press the MODE switch.
You are now back at step 2 with a flashing PCS and
0.
If you want to exit the counting
mode, press the MODE switch
again.
You are now in the weighing mode you used just
before selecting pieces.

AZI Customer Service 800-528-7411 or 602-470-1414 Page 20 of 21
Appendix B - Weight Checking
The following procedure checks the weight of individual parts against user-
programmed upper and lower weight limits.
Procedure
Display Reading
Press the FUNCTION switch.
Display cycles repeatedly through PCS, HI-OK-
LO, CAL1, and CAL2
Press the MODE switch when HI-OK-LO
appears on the display.
HI, LO and O flash.
Press the ZERO switch.
HI flashes and zeros are displayed.
Place weight on pan that represents the
upper limit of the acceptable weight span.
HI flashes and weight is displayed.
Press the ZERO switch.
LO flashes and upper limit weight is displayed.
Remove upper limit weight and place
weight on the pan that represents the
lower limit.
LO flashes and weight is displayed.
Press the ZERO switch.
HI-OK-LO briefly appears then OK and the low
limit weight are displayed.
Remove low limit weight.
LO appears and zeros are displayed.
The balance is now ready to check the weight of parts. The balance displays OK
along with the weight of the part if the part is within the selected limits. If the part
is too heavy, HI and the weight are displayed. If the part is too light, LO and the
weight are displayed. The limits are stored until the balance is turned off. To exit
weight checking, press the MODE switch and the balance will return to normal
operation.
Table of contents