ARJO HUNTLEIGH Classic Line User manual

Classic Line
...with people in mind
0086
INSTRUCTIONS FOR USE
04.CL.00_3GB October 2014


Page 1
CONTENTS
PREFACE .................................................................................................................. 3
ASSEMBLY AND INSTALLATION............................................................................ 5
SAFETY PRECAUTIONS ........................................................................................................ 5
Unpacking and Assembly............................................................................................................... 5
Plumbing Installation....................................................................................................................... 6
Electrical Installation....................................................................................................................... 7
Automatic filling of the bathtub........................................................................................................ 8
PRODUCT SPECIFICATIONS.................................................................................................. 9
SIGNS ...................................................................................................................... 10
OPERATION............................................................................................................ 11
SAFETY REQUIREMENTS.....................................................................................................11
EXPLANATION OF COMPONENTS..........................................................................................12
General ......................................................................................................................................... 12
Instrument Panel with Temperature Display................................................................................. 13
BATHING SESSION..............................................................................................................14
Comfort music............................................................................................................................... 15
Light .............................................................................................................................................. 18
CARE AND MAINTENANCE ................................................................................... 19
Preventive maintenance timetable................................................................................................ 20
TROUBLESHOOTING............................................................................................. 21
INITIALISATION OF THE CONTROL SYSTEM............................................................................23
ACCESSORIES ....................................................................................................... 24
ATTACHMENT......................................................................................................... 25

Page 2

Page 3
Preface
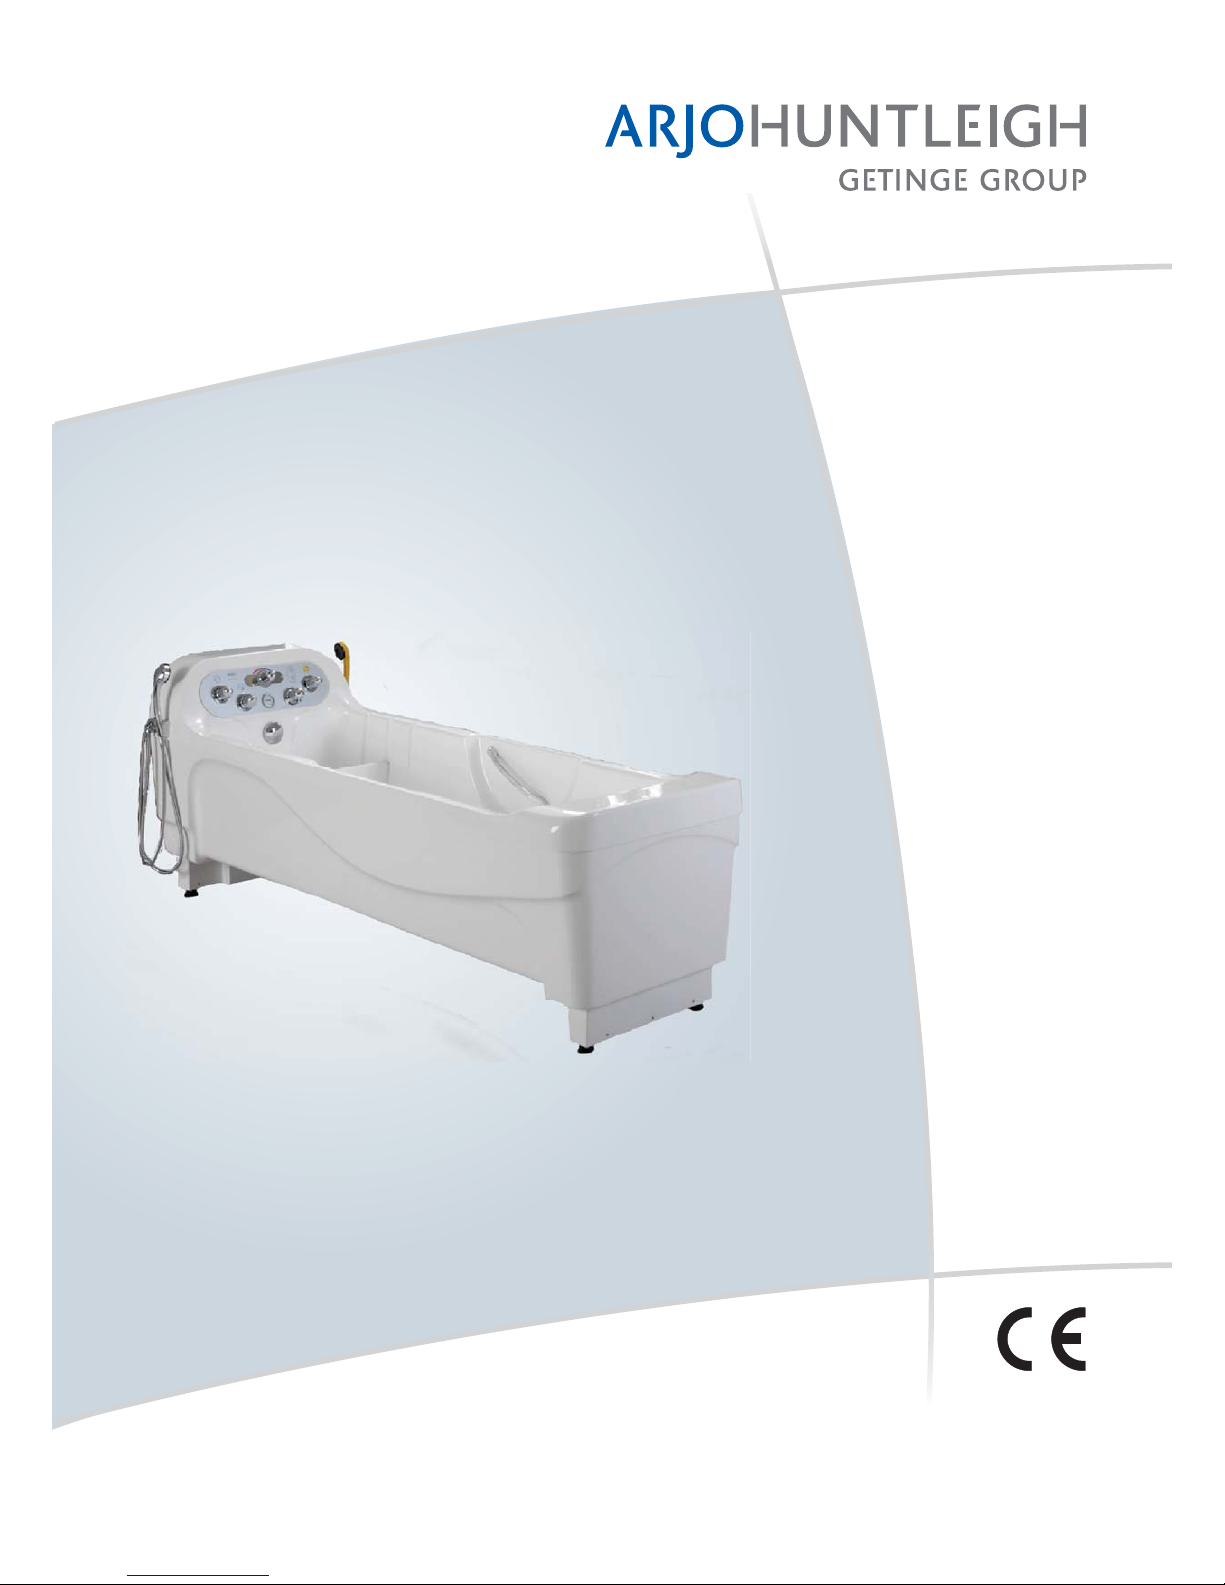
We thank you for your decision to purchase a product by ArjoHuntleigh.
Your ArjoHuntleigh bathing system is part of a series of quality products, which were
developed especially for the optimal hygiene of residents and the economics of care
taking facilities
Your wish is our command. This is why we offer you the best products and a training
programme for your employees, which will help you to utilize your ArjoHuntleigh
products fully.
If you have any questions about the operation or of the maintenance of your bathing
system, please contact us.
Please read these instructions carefully!
The information you will find in this instruction manual is crucial for the trouble-free
operation and maintenance of this equipment. Furthermore, this will hep you to
maintain your investments and will ensure that your equipment is always working to
your fullest satisfaction. Some information is very important for your safety. They
must be read very carefully and must be understood to avoid any kind of injuries.
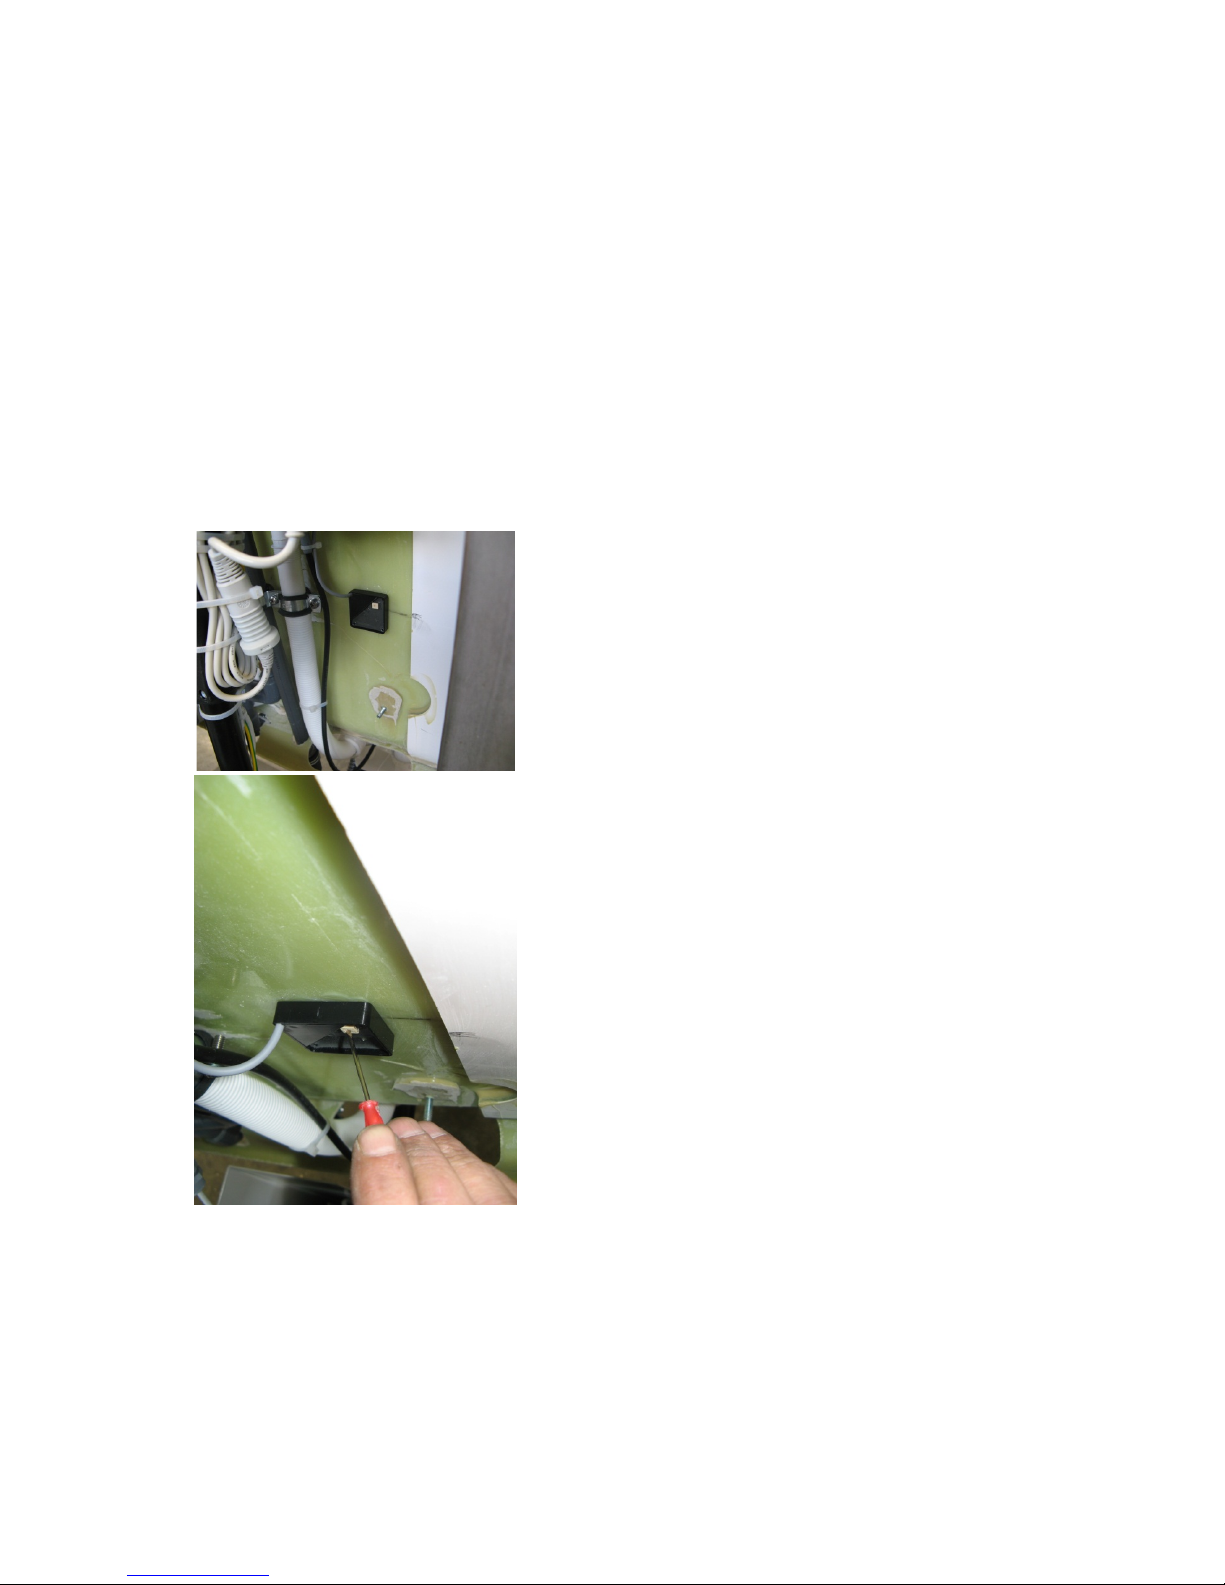
In order to prevent injuries, which may be caused by third party components, we like
to point out that only original spare parts should be used. Unauthorized modification
to any ArjoHuntleigh equipment may impair its safety. We are not responsible for any
personal injuries, malfunctions or lack of performance, which is due to unauthorized
modifications of the product.
Service and Support
A qualified technician should service your bathing system once a year (or every six
months to comply with LOLER); this will ensure the safety and trouble-free operation
of your equipment. Should you require more detailed information, please contact your
ArjoHuntleigh distributor. He will be able to offer you an extensive support and
service programme to optimize the safety, reliability and to maintain the value of your
product for a long time to come.
With respect to spare parts, please contact your ArjoHuntleigh distributor. Your
service distributor has all the necessary components you require in stock. You will
find the telephone number on the last page of this instruction manual.

Page 4
Legend of symbols used in this manual.
Definition: Safety instructions: if you do not understand or
follow these instructions, you are placing yourself or other
persons in danger.
CAUTION! Meaning: This information is important for the correct use of
this system or equipment.
Instruction manual – Instructions for using the Classic Line
bath

Page 5
Assembly and Installation
Safety Precautions
Assembly and installation:
•only through qualified personnel
•only according to the local regulations
After assembly, the following must be verified:
•All components were assembled per instructions.
•All fasteners are securely tightened.
•All parts, which can come into contact with any personnel/patient, must be free
of sharp edges, burrs, and cracks.
•All hoses and pipes must be free of any damages.
•All functions must be working trouble-free.
Load
Max. safe working load (occupant and water) 400 kg
Max. load on the floor: 1500 N per foot (of the bathtub) – 75 N / cm² or 500 N/
square inch
Transport and ambient conditions
Ambient temperature -30°C to +70°C
Relative humidity 10% to 80% incl. condensation
Range of atmospheric pressure 500 hPa to 1060 hPa
Electrical current/power consumption: See electrical installation
Unpacking and Assembly
Remove all packaging. Please ensure that the staples of the cardboard do not
damage the bathtub.
Place the lift bathtub in the desired installation location. Set the correct height, using
the four adjustable legs on the bottom of the tub and ensure that the tub is solid and
securely placed on the floor.
Ensure that the tub is securely placed on the floor.

Page 6
Plumbing Installation
Water supply connection
The scope of delivery of the bathtub includes the technical
documentation/instructions of the shut off valve manufacturer, the information
about the areas of application, technical data and notes on the installation.
A shutoff valve and filters (mesh size: 0.5 mm) must be installed in the hot- and
coldwater supply lines. Failing to install filters will null and void the warranty for the
bathtub fittings and pipe interrupters. Prior to connecting the water supply, all pipes
must be thoroughly rinsed to avoid clogging the filters, sieves, and valves.
Maximum operating pressure: 6 bar (600kPa)
Minimum operating pressure: 2 bar (200kPa)
Maximum water temperature at the hot water inlet: 80°C
Maximum operating temperature 65°C, up to 80°C – but for a short duration of max.
5 minutes
Hot water temperature at the supply connection at least 2° C higher than the
temperature of the mixed water
Connect to the cold and warm water supply lines. Check leak tightness of
connections.
Water drainage connection
Connect bathtub to drain, pipe diameter DN 40.
Check leak tightness of connections.
All hoses for the water supply and drainage must be run
in such a fashion to avoid the risk of stumbling.

Page 7
Electrical Installation
Power supply connection
All electrical installations must be performed by a certified electrician and must
comply with all local electrical safety codes. See customer installation requirements
sheet for technical details.*
Prior to installation, verify that the power supply meets the rating specified on the
type plate.
Electrical current/power consumption:
Height adjustment: max. 690 VA
Voltage: ~ 230 V
Colour light: max. 20 VA
Comfort music: max. 50 VA
Standard music (Loud speaker) 2 x 20 W rated power, 8 Ohm
Electrical fuse: T10A
The bathtub comes equipped with a 4 mm2single-phase power supply and potential
equalisation cable. The connection must be a fixed-line connection to a direct water-
proof socket which is easily accessible and mounted near the tub. The bathtub must
be permanently connected to the power supply and to a residual-current-operated
protective device (not included in the delivery). If necessary, the bathtub should be
grounded using a potential equalisation cable.
The tub is equipped with a maintenance-free motor. Repairs or replacement of
defective fuses in the motor or the motor control unit may only be performed by the
manufacturer’s service department.
*IMPORTANT NOTE:
For UK customers, please see separate datasheet ‘Customer Installation
Requirements’ which covers specific details about site preparation, drainage,
electrical supply and approvals.

Page 8
Automatic Filling of the Bathtub
(Only with the automatic bathtub filling system option)
Membrane key for basic automatic filling of the bathtub (about 24 cm). Pressing the
key again stops the filling operation. A safety switch stops the water flow after 10
minutes
After filling the bathtub, water can be refilled by pressing the operating button. This
operation stops automatically after 45 seconds or can be immediately stopped by
pressing the operating button once again.
Adjusting the sensitivity of the sensor
(only required if the water supply is not shut off once the sensor height is reached or
the water supply is shut off too early)
-
Sensor function: The LED should glow once the
water level is reached. The sensitivity can be
adjusted using the setting screw.
The sensor can be accessed after
removing the rear panel and is located on
the body of the bathtub.

Page 9
Product Specifications
All information contained in this operating manual are correct at time of printing. We
reserve the right to make changes to the product specifications without prior notice.
Operating range
This equipment is intended for the therapeutic bathing and showering of hospital
patients or nursing home residents, and only under the supervision of skilled and
trained nursing staff in accordance with the operating and maintenance manual. Any
other use should be avoided. Devices, which are equipped with disinfecting devices,
must be disinfected in accordance with the instructions in the operating and
maintenance manual. The unit must be set up according to the assembly and
installation guidelines; these can only be overruled by local regulations. Unless
otherwise stated, the service life of this equipment is at least ten years, which
presumes the adherence to all necessary preventive maintenance according to the
operating, assembly and installation manual, and the spare parts catalogue.
The electrical bathtub is classified as:
Product, Class 1
Applied component, Type B
Permanently installed product
-symbol as per regulation 93/42/EWG (guidelines for medical
devices)
It is not recommended to install the electric bathtub near electromagnetic sensitive
devices.
Product Liability
•If modifications are made to the device without the explicit permission by
ArjoHuntleigh, or if the equipment is not checked or maintained according to the
instructions in the chapter “Maintenance Guidelines” and the checklist in this
manual, all product liabilities shall be rendered null and void.
Recycling
Packaging made of wood and corrugated board can be recycled. The
product: electrical steel and synthetic parts are separated and recycled as
per the instructions on the devices. Sort the electrical and electronic
components for recycling as per the European Directive 2002/96/EG
(WEEE).

Page 10
Signs
The type plate contains the following information:
•Product and serial number, Date of manufacture
•Maximum safe working load: (total weight of the occupant and water) 400 kg
•Maximum water pressure: 6 bar
•400 mm, the height of the bathtub can be electrically adjusted (HI-LO-
SYSTEM)
•Voltage and frequency of the AC current, 230 V ~50 Hz (EU models)
•Maximum total power consumpton: 960 VA
(Adjustment motor 815 VA, light 20 VA, sound 125 VA)
•Degree of protection IP54, i.e., the product is splash water proof
•Safety class I
•Type B – Components used: Protection against electrical shock according to
IEC 60601-1
•Continuous operation, periodic load: Maximum 2 minutes ON, 18 minutes OFF
(The unit should remain switched off for 18 minutes after operating the lifting
motor for 2 minutes)
•Read the instruction manual before use
•Manufacturer
•CE label according to the EU Directive 93/42/EWG (Guidelines for
medical devices). The unit has been tested for EMC and meets all the
DIN EN 60601-1-2 requirements.
•Recycling
Water supply symbol (blue) Cold water
Water supply symbol (red) Hot water
Note on the connection position for the
potential equilisation cable

Page 11
Operation
Safety Requirements
Information contained in this manual is crucial for the proper operation and
maintenance of this equipment. Information contained herein is important for your
safety; therefore, it must be read and understood to avoid possible injuries. Should
you have any questions or you do not understand parts of this manual, please
contact our customer service department prior to the installation or operation of the
bathtub.
Legend of symbols used in this manual.
Definition: Safety instructions: if you do not understand or
do not follow these instructions, you are placing yourself or
other persons in danger.
CAUTION! Meaning:This information is important for the correct use of
this system or equipment.
The following rules should be observed:
•Only trained personnel should operate the equipment.
•The water temperature must be checked before a bath can be taken.
•Nursing staff must be present during each bathing process.
•The equipment must be disinfected after each bath according to instructions.
•Proper skin and eye protection must be worn when working with disinfectors
and/or cleaners. User’s instructions of cleansing agents should be followed.
When lowering the tub, the operator must ensure that no
obstacles in the immediate vicinity of the tub will hinder the
movement. Objects impeding the free movement may lead to
severe injuries of the operator / resident or may damage the
bathtub. When raising the tub, care must be taken to prevent
parts of the lift seat or the lift trolley touching the underside or
ledge of the bathtub. Neither the resident nor the operator
should be sitting on the ledge of the tub.

Page 12
Explanation of Components.
General
1. The vertical and horizontal handholds ensure solid support and safety.
2. The 2- or 3- positional and adjustable footrest with handhold allows for four
longitudinal settings. This ensures persons of various heights will always have
a solid support in the bathtub by bracing their feet. The footrest slides into a
groove from above and is pushed downward.
3. The drainage and overflow set is regulated using the “Excenter” rotary handle.
Turning it to the right will open the drain.
4. Controlling the amount of drained water can be done by either removing the
plug or adjusting the setscrew.
1
2
3
4

Page 13
Instrument Panel with Temperature Display
1. The hand-held showerhead (1) is used to shower the resident/patient.
2. The hand valve (2) is used to regulate the water supply to the hand-held
showerhead. The valve allows either shutting off or opening the water supply
or adjusting the water flow.
3. The hand valve (3) regulates the water supply to the bathtub. The valve allows
either shutting off or opening the water supply or adjusting the water flow.
4. A quick-response thermometer (4) displays the exact water temperature of the
water inlet and the hand-held showerhead.
5. The thermostat mixer (5) serves to regulate the inflowing water temperature
and the showerhead.
6. The height of the bathtub can be adjusted using the two foil buttons (6) [UP –
DOWN] according to the arrow symbols; the bathtub is raised when pressing
the up-button and is lowered when pressing the down-button. The travel is
automatically de-energised at the respective limits. The tub can be stopped or
adjusted at any level (dead man’s switch)
7. Bathtub faucet (7).
IMPORTANT NOTE:
Water supply to the shower and bathtub are set at a maximum of 41OC (shower) and
44OC (unassisted fill bathtub) as required by NHS Estates Guidance Note ‘Safe Hot
Water and Surface Temperatures’.
2
1
3
5
7
6
4

Page 14
Bathing Session
Warning:Never add any of the following substances to the bath:
Iodine, bromide, methyl blue, potassium permanganate etc. (discolouration!),
chlorine, heavy metal chloride, solvents based on mineral oils, trichloroethylene, citric
acids, disinfectors of the phenol group or similar solvents (can corrode surfaces
made from plastics).
Prior to using the bathtub, it must be ensured that all safety instructions at the
beginning of this chapter have been observed. The bathtub should be in its lowest
position.
1. Using the centre Excenter rotary handle close the bathtub drain.
2. If necessary, adjust the footrest by sliding it into the appropriate perforation
inside the tub. If a lift trolley is used, adjust the footrest accordingly.
3. Bathtub with:
Instrument Panel
Set the desired temperature range using the thermostat control knob (5).
Subsequently, open the water inflow by rotating valve (3).
Read the temperature of the inflowing water from the thermostat (4) and, if
necessary use temperature handle (5) to make adjustments until desired
temperature is reached.
When the tub is filled, close valve (3).
If the bathtub is not equipped with a disinfecting device, the mandatory procedures
and regulations for the disinfection of large areas of bathtubs should apply.
In this case, use ArjoHuntleigh Clean, and follow the manufacturer’s instructions
regarding dosage and reaction time.
Cleansing after each use
Clean and disinfect the bathtub. Only use cleansing and disinfecting agents, which
are suitable for polyester surfaces. Do not use any abrasive bleaching agents, which
will damage the bathtub surface. Should such cleanser be used regardless, all
warranty claims pertaining to the damage of the tub surface will be null and void.

Page 15
Comfort music
(optional)
The casing can be unscrewed at the back side
for changing the batteries.
You will need 3 AA Mignon batteries
Light, optional
Music ON: Press briefly
Music OFF: Press and hold for about 3
seconds
Next track
Volume control
Previous track
Please note:
If the bathtub is not equipped with
Comfort Music, the has to be
controlled using separate buttons on
the bathtub!

Page 16
Coding:
If there are several bathtubs with Comfort Music option under one roof, then there
could be problems with the individual systems if the same coding is used. In this
case, the coding of the Music system should be changed as follows:
1. At first, the power supply should be disconnected from all the bathtubs having
the Music option and wait for 10 seconds so that the system is completely
discharged.
2. Now re-connect the power supply to the first bathtub. The system has to be
programmed now within the next two minutes. If this is not possible, repeat
step 1.
3. Put the remote control in coding mode by simultaneously pressing the four
points A – D (C and D are not marked) on the remote control:
A B
C D
E
4. Now press any button and the button E simultaneously to program. You may
use any button, even the buttons C and D that are not marked, but you have
always to press the button E for acknowledging, so that the code is sent to the
receiver. This completes the coding process.
Please note:
The remote control has to be programmed in the immediate vicinity of the bathtub to
ensure that the code is sent properly. Before programming the next Music system,
power should be disconnected from the systems that have already been
programmed. Otherwise, these systems will receive the code that you just
programmed. A separate code has to be programmed for each bathtub.
The two lower points C and D are not
marked on the membrane but should be felt
for while pressing. If the LED flashes, then
the remote control is in programming mode,
go to step 4.

Page 17
USB – flash drive
A splash-proof socket is integrated into the body of the bathtub for accommodating a
USB flash drive (for the mp3 player).
The LED of the USB drive flashes when music is being transferred.
Data format for mp3 player (optional)
The mp3 player works only with mp3 files saved with a specific bit rate.
The playback is optimal for a bit rate of 128 Kbps with a maximum bit rate of upto
192 kbps. There is no audio playback if the bit rate is higher.
The bit rate can be checked as follows:
Insert the USB flash drive into a PC, select a music track, click on the right mouse
button, click on the „Properties“ option in the „File info“ tab, click the „Advanced“ field.
The bit rate is mentioned under „Audio“.

Page 18
Light
(optional)
Light operation if equipped with Comfort Music
Switching on:
The colour LED illumination starts with the first colour when the button
is pressed. The LED illumination changes to the next colour if the
button is pressed again. The colours change automatically after the
button is pressed for the sixth time.
Switching off:
Press and hold the button for about 2 seconds
Control element if the unit is not equipped with Comfort Music
Switching on:
The colour LED illumination starts with the first colour when the button
is pressed. The LED illumination changes to the next colour if the
button is pressed again. The colours change automatically after the
button is pressed for the sixth time.
Table of contents
Other ARJO HUNTLEIGH Bathtub manuals
Popular Bathtub manuals by other brands

JASON Hydrotherapy
JASON Hydrotherapy forma AC553 owner's manual

Teuco
Teuco Hydroline user manual

DURAVIT
DURAVIT D-Code 760137000JP1000 operating instructions

Clou
Clou Solium I CL/05.70010 installation instructions

glass 1989
glass 1989 SOFA installation guide

Excellent
Excellent MINT Installation and operating manual

Streamline
Streamline N-120-60FSWH-DM Owner's manual & installation guide

Jacuzzi
Jacuzzi Luxury Bath installation instructions

Tassili Supra
Tassili Supra 33001709 instruction manual

DURAVIT
DURAVIT Air-System operating instructions

Aquatica Digital
Aquatica Digital Relax Series Operation manual

Ella's Bubbles
Ella's Bubbles ella Solo30 installation instructions