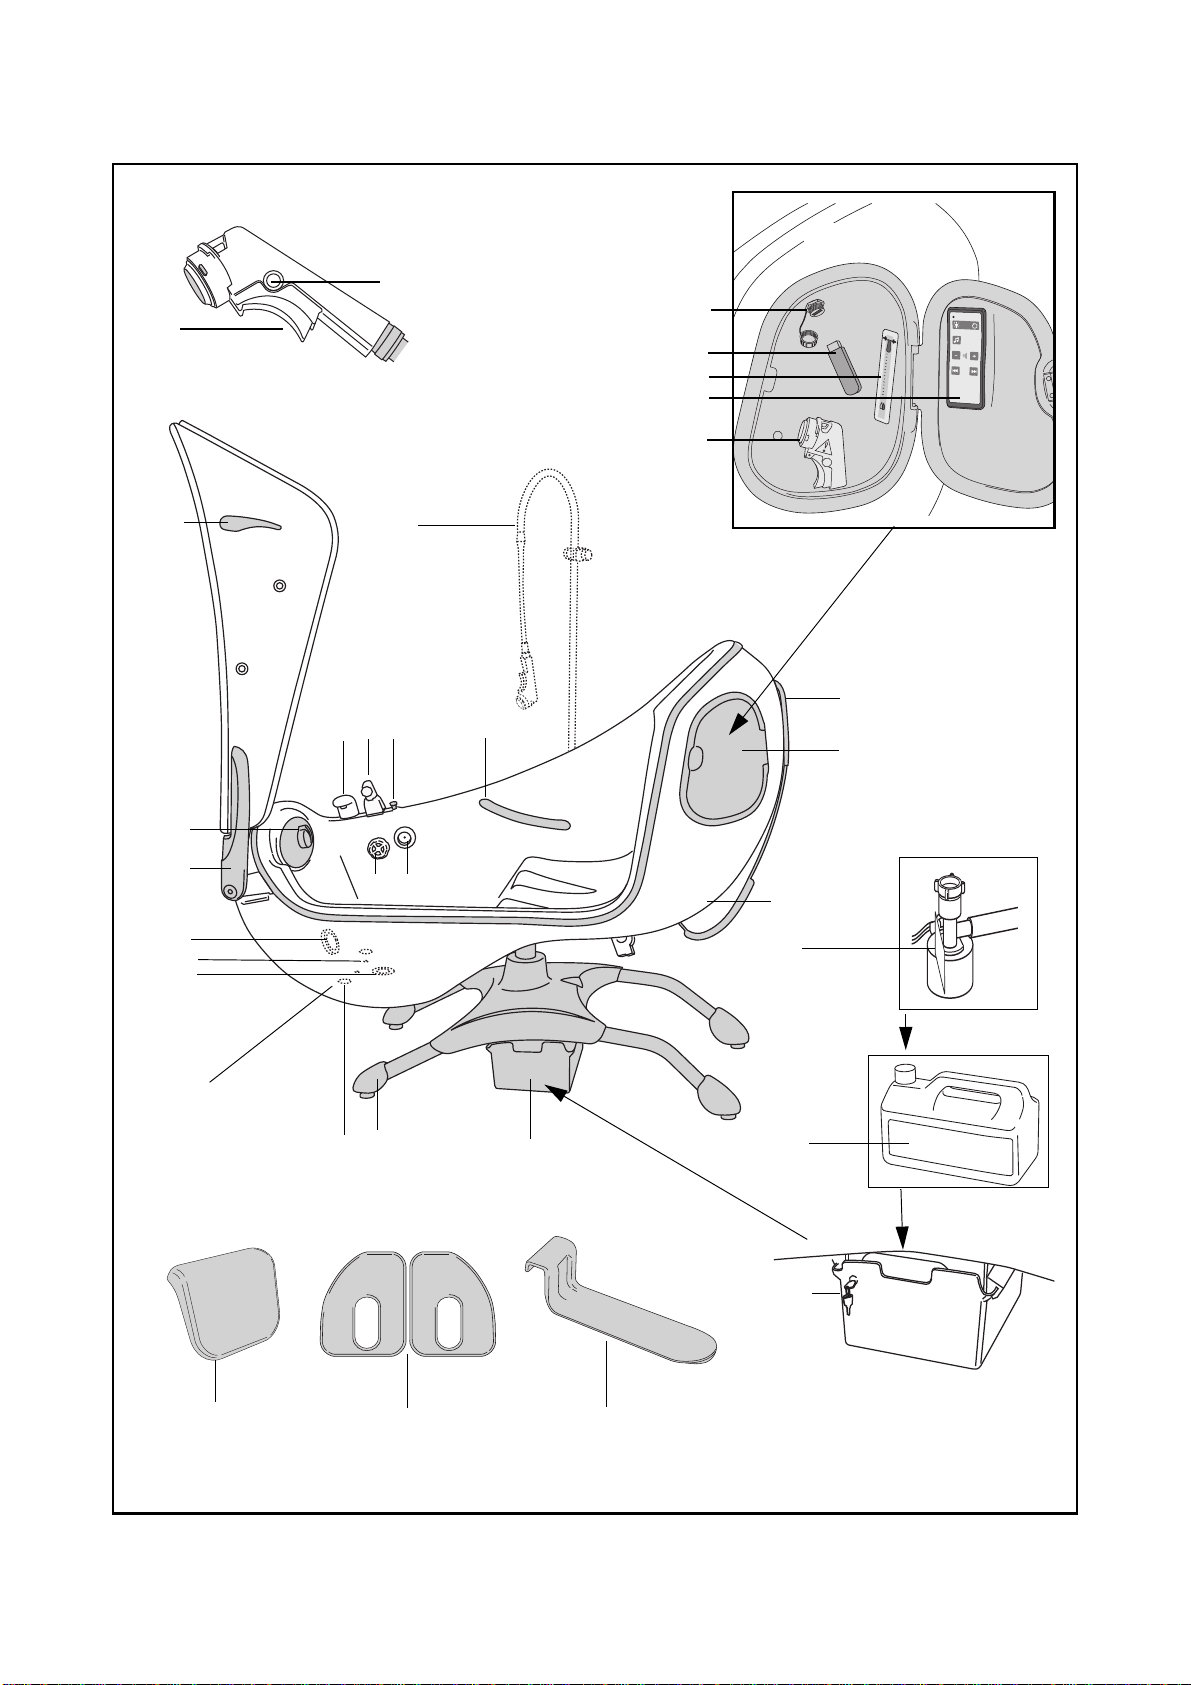
ARJO HUNTLEIGH Parker User manual

...with people in mind
0086
Parker
04.AL.01_7GB . June 2012
INSTRUCTIONS FOR USE

Design Policy and Copyright
® and ™ are trademarks belonging to the ArjoHuntleigh group of companies.
© Arjo Hospital Equipment AB 2011.
As our policy is one of continuous improvement, we reserve the right to mod-
ify designs without prior notice.The content of this publication may not be
copied either whole or in part without the consent of Arjo Hospital Equipment
AB.

3
Contents
Foreword................................................................................... 4
Intended Use............................................................................. 5
Safety Instructions .................................................................... 6
Preparations.............................................................................. 7
Parts Designation...................................................................... 8
Control Panel.......................................................................... 10
Hand Controls......................................................................... 11
Product Description/Functions................................................ 12
Drain control knob............................................................... 12
Fill function ......................................................................... 12
Auto fill function (option)...................................................... 12
Scalding protection.............................................................. 12
Temperature display............................................................ 12
Emergency stop .................................................................. 12
Shower handle .................................................................... 12
Functions lock .....................................................................14
Door lock............................................................................. 14
Air Spa™ (option)................................................................ 14
Sound & Vision® (option).....................................................14
Disinfection unit (option)...................................................... 16
Battery back-up................................................................... 16
Head cushion, Back support cushions and Leg rest
(accessories).........................................................................16
Operating Instructions............................................................. 18
Fill the foot well with water .................................................. 18
Bathing the resident ............................................................ 18
Shower the resident ............................................................20
Air Spa................................................................................. 22
Sound & Vision.................................................................... 22
Ending the bathing cycle..................................................... 24
Disinfect bath after each resident........................................ 24
Using a Standing & Raising Aid with Parker® ........................ 26
Resident transfer from Sara 3000™ to Parker.................... 26
Using a Ceiling lift with Parker ................................................ 28
Resident transfer from a ceiling lift to Parker ...................... 28
Disinfection Instructions.......................................................... 30
Care and Preventive Maintenance.......................................... 44
Troubleshooting...................................................................... 50
Technical Specifications ......................................................... 52
Labels on the Parker............................................................... 56
Approvals and List Standards................................................. 58
Electromagnetic Compatibility................................................. 59
Parts and Accessories............................................................ 63
ArjoHuntleigh Addresses .............................................Last page

4
Foreword
Thank you for purchasing
ArjoHuntleigh Equipment.
Your Parker is part of a series of quality prod-
ucts designed especially for hospitals, nursing
homes and other health care uses.
We are dedicated to serving your needs and
providing the best products available along
with training that will bring your staff maxi-
mum benefit from every ArjoHuntleigh prod-
uct.
Please read this Instructions for
Use thoroughly!
Please read this Instructions for Use (IFU) in its
entirety before using your Parker bathing sys-
tem. Information in this IFU is crucial to the
proper operation and maintenance of the equip-
ment, will help protect your product, and ensure
that the equipment performs to your satisfaction.
Some of the information in this IFU is important
for your safety and must be read and understood
to help prevent possible injury.
ArjoHuntleigh strongly advise and warn that only
ArjoHuntleigh designed parts, which are
designed for the purpose, should be used on
equipment and devices supplied by Arjo-
Huntleigh, to avoid injuries or malfunctions
caused by the use of inadequate parts.
Unauthorized modifications on any Arjo-
Huntleigh equipment may affect its safety. Arjo-
Huntleigh will not be held responsible for any
accidents, incidents or lack of performance that
occur as a result of any unauthorized modifica-
tion to its products.
Service and Support
A service routine has to be done to your Parker
to ensure the safety and operating procedures of
your product. See chapter, Care and Preventive
Maintenance.
If you require further information, please contact
ArjoHuntleigh for comprehensive support and
service programs to maximize the long-term
safety, reliability and value of the product.
Contact ArjoHuntleigh for replacement parts.
Contact information appears on the last page of
this IFU.
Definition in this IFU:
Means:
Safety warning. Failure to understand and obey
this warning may result in injury to you or to oth-
ers.
Means:
Failure to follow these instructions may cause
damage to all or parts of the system.
Means:
This is important information for the correct use
of this system or equipment.
Means:
The name and address of the manufacturer.
WARNING
CAUTION
NOTE

5
Intended Use
This equipment must be used in accor-
dance with these safety instructions.
Anyone using this equipment must also
have read and understood the instruc-
tions in this Instructions for Use (IFU).
If there is anything you do not com-
pletely understand, ask your ArjoHunt-
leigh representative.
This bath is intended for assisted bathing and
showering of adult residents in care facilities
(excluding use at home).
Parker must be used by appropriately trained
caregivers with adequate knowledge of the care
environment, its common practices and proce-
dures, and in accordance with the guidelines in
the Instructions for Use (IFU).
Any other use is prohibited. The bath should
only be used for the purpose specified here.
Resident assessment
We recommend that facilities establish regular
assessment routines.
Caregivers should assess each resident according
to the following criteria prior to use:
• Theresident'sweightshouldnotexceed 210
kg / 463 lbs (Max Patient Weight).
• Activeandsemi-activeresidents(i.e.ableto
sit upright self supported on the side of a
bed or toilet) can use the bath. Correct
transfer equipment shall be used, if needed.
• Residents with no capacity to support them
selves at all (i.e. able to sit upright with sup-
port) can use the bath, only with a ceiling
and a 2-point spreader bar with loop sling
for transfer and bath.
• The resident should have the ability to
understand and respond to instructions, or
have limited physical capacity to move, to
ensure a safe position during the bathing
procedure.
If a resident does not meet these criteria an alter-
native equipment or system shall be used.
Indication for Use
To relieve pain and itching and as an aid in the
healing process of inflamed and traumatized tis-
sue, and it serves as a setting for removal of
contaminated tissue.
Installation & Service
requirements
The Parker must be installed by appropriately
trained personnel according to the Assembly and
Installation Instructions, requirements in the
Assembly and Installation Instructions can only
be superseded by local code.
The expected life of this equipment, unless other-
wise stated, is ten (10) years, subject to preven-
tive maintenance being carried out in accordance
with the instructions for Care and Preventative
Maintenance found in this IFU.

6
Safety Instructions
WARNING
To avoid injury to both resident and
caregiver, never modify the equip-
ment or use incompatible parts.
WARNING
To avoid explosion or fire, never use
the equipment in oxygen rich environ-
ment, in presence of heat source or
flammable anaesthetic gases.
WARNING
To avoid electric shock, never use
other electrical equipment near this
device.
WARNING
To avoid injury, ensure that the resi-
dent is not left unattended at any time.

7
Preparations
Site preparations
Prior to installation of Parker bath the
floor and walls within the required area
must be finished.
Material: The floor should be made of a slip-
resistant material, free of bumps.
Floor Slope: When using a floor drain, the
slope towards the drain should not exceed 1:50.
Floor attachments: The floor construction
must be suitable for anchoring the bolts
•
Actions before first use
1 Visually check the package for damage. If
the product looks damaged due to freight,
make a complaint to the transport agency.
2 The packaging should be recycled accord-
ing to local regulations.
3 Install the Parker by qualified personnel.
See Assembly and Installation Instructions.
4 Check that all parts of the product are sup-
plied. Compare with the Parts Designation
page in this IFU. If any part is missing or
damaged - do NOT use the product.
5 Unpack the hand control(s) from the plastic.
6 Read the IFU.
7 Disinfect the product according to the
Disinfection Instructions in this IFU.
8 Perform a functionality test. See Care and
Preventive Maintenance.
9 Choose a designated area, where the IFU
should be kept and is easily accessible at all
times.
Make sure the Parker thermostatic mixer
has been calibrated according to the Assem-
bly and Installation Instructions by quali-
fied personnel or an ArjoHuntleigh
technician.
11 Make sure to have a rescue plan ready in
case of a resident emergency.
12 If you have any questions, please contact
your local ArjoHuntleigh representative for
support and service. The contact numbers
appear on the last page of this IFU.
Actions before every use
1 Checkthat all partsare in place.Compare to
the Parts Designation.
2 If any part is missing or damaged - do NOT
use the product.
10 WARNING
To prevent scalding, make sure
that the water mixer has been cali-
brated. Confirm that responsible
organization has established cali-
bration routines.
3WARNING
To prevent cross-contamination,
always follow the disinfection
instructions in this Instructions for
Use.

8
Parts Designation
1 Trigger handle
2 Lock button
3 USB connection
(with Sound & Vision option)
4 USB memory stick
(with Sound & Vision option)
5 Disinfectant flowmeter
(with Disinfection option)
6 Sound & Vision hand control
(with Sound & Vision option)
7 Disinfection spray handle
(with Disinfection option)
8 Door lock handle
9 Shower stand (for GB only)
10 Filling spout
11 Shower holder / shower handle
12 Emergency stop button
13 Grab handle
14 Hand control
15 Cover
(with Disinfection and/or Sound & Vision
option)
16 Control panel
17 Door hinge
18 Sound & Vision light
(with Sound & Vision option)
19 Water sensory knobs (3 knobs)
20 Drain
21 Drain control knob with built-in surface
overflow outlet
22 Disinfectant/Rinsing Inlet
(with Air Spa option)
23 Tub
24 Air Spa outlets (9)
(with Air Spa option)
25 Height adjustable feet
26 Compartment for disinfectant bottle
(with Disinfection option)
27 Sound & Vision speakers
(with Sound & Vision option)
28 Disinfection suction part
(with Disinfection option)
29 Disinfectant bottle (3 litre)
(with Disinfection option)
30 Lock keys for disinfectant compartment
(with Disinfection option)
31 Head cushion (Accessory)
32 Back support cushions (Accessory)
33 Leg rest (Accessory)
Type B Applied part.
Degree of Protection -
Electrical shock

9
2
19
24
26
25
16
17 21 22
10 12
11
9
13
8
20
18
23
M X
8
7
6
5
2
14
15
4
1
6
3
7
5
33
32
31
30
29
28
27

10
Control Panel
Parker
1 LED for shower indication
2 Filling water and Shower temperature dis-
play with scalding protection
3 Bath water temperature display with
scalding protection.
4 LED, lock function indicator
5 Mixing gradient
6 LED, ON/OFF disinfectant indicator
(option)
7 Disinfection ON/OFF
(option)
8 Fill ON/OFF
(Auto fill option)
9 Shower ON/OFF
10 Air Spa - whole tub ON/ Intensity/OFF
(option)
11 Air Spa - foot well ON/ Intensity/OFF
(option)
12 Function lock ON/OFF
13 Knob for water temperature adjustment
14 LED, battery back-up indicator
15 LED, mains indicator
7
5
43
8912
2
14 1513
1
11
6
10

11
1
2
3
4
5
6
Hand Controls
Parker Hand Control
1 Raise bath
2 Lower bath
3 Tilt bath to upright position
4 Tilt bath to reclined position
5Air Spa - whole tub ON/ Intensity/OFF
(option)
6Air Spa - foot well ON/ Intensity/OFF
(option)
Sound & Vision Hand Control
(option)
1 LED - activity indicator
2Sound & Vision Light - ON/OFF
3 Automatic light colour change - ON/OFF
4 MP3 player ON/PAUSE
5 Reduce (-) volume.
6 Increase (+) volume
7 MP3 track forward
8 MP3 track reverse
1
2
4
5
87
6
3

12
Product Description/Functions
Drain control knob
The drainage plug opens and closes by turning
the drain control knob in the bath tub. (See Fig. 1)
• Open - Turn Clockwise.
• Close- Turn Counter Clockwise.
The drain control knob is also equipped with a
built in surface overflow outlet to prevent water
from overflowing the tub.
Fill function
• Press the tub filling button to start fill-
ing the footwell or the whole tub.
(See Fig. 2)
• Press the tub filling button again to stop
the filling. (See Fig. 2)
Auto fill function (option)
AParker equipped with auto fill function, pre-
fills the footwell. (See Fig. 2)
• Activate it by pressing the auto fill
button.
• Once the filling level is reached it stops by
itself.
• Press the auto fill button again and fill-
ing continues for another 60 seconds.
• Stop filling at any time by pressing the
auto fill button.
Scalding protection
If a dangerous temperature level of 45°C (113°F)
is reached, the electronic scalding protection
shuts off the water after 10 seconds.
•Activated scalding protection: a yellow
flashing light and a beeping sound on both
temperature displays.
If scalding protection turns on, get the resident
out safely. Stop using the bath and contact an
ArjoHuntleigh service technician.
Temperature display
The Parker has two temperature displays:
(See Fig. 3)
•Toptemperaturedisplay:showstheactive
filling or shower temperature. If filling or
shower is not turned on, the display shows
“– –. –”
During disinfection the display shows the
temperature of the disinfectant mixture.
•The bottom temperature display: shows
the current bath tub water temperature.
Emergency stop
• Press the emergency stop button, to stop all
functions. (See Fig. 4)
• To releasetheemergencystop button,turnit
clockwise. (See Fig. 4)
If the emergency stop button was used due to an
equipment error, stop using the bath and contact
an ArjoHuntleigh technician.
Shower handle
The shower handle is located in the holder or the
stand. (See Fig. 5)
• Press the shower button to start the
shower. The green LED will turn on when
active.
• Press the trigger on the shower handle to
regulate the water. Hold the trigger in for
constant water flow.
To get continuous water flow without having to
hold in the trigger do as follows:
• Pressthe triggerandpushthe lockbutton on
the side. The water will continue to flow
without having to press the trigger.
• Unlock by pressing the handle trigger and
the lock button will pop out by itself.

13
Trigger
Lock Button
12
34
5

14
Functions lock
Press the function lock button on the control
panel and it locks all the functions except:
• scalding protection
• emergency stop
For example, if the function lock is activated
during a shower, the shower can only be turned
off after deactivating the function lock.
The function lock LED is flashing yellow when
active.
Door lock
The Parker has a door handle that works as a
door lock.The door handle needs to be aligned
with the sticker showing an open or closed lock.
(See Fig. 1)
•To unlock the door: press the door handle
down until aligned with the sticker showing
an open lock. (A)
•To lock the door: press the door handle up
until the handle is aligned with the sticker
showing a closed lock. (This may require
some physical force). (B)
Air Spa (option)
The Parker with Air Spa feature allows the res-
ident to sit comfortably and enjoy a massage
by air jets in the water.
Both the Air Spa - whole tub and the
Air Spa - footwell buttons have two adjustable
intensities that can be selected. The maximum
treatment time is 15 minutes.
The Air Spa can be activated either for the
whole bath tub or just in the footwell.
Sound and Vision (option)
The USB outlet is located behind the cover.
(See Fig. 2)
• Unscrew the black cap counter clockwise to
get to the USB outlet (A) and plug in the
Sound & Vision (S&V) memory stick (B).
• To get colored light in the tub, press the
S&V light button on the S&V hand control.
• Press the S&V light button one more
time to change light colour.
• Pressthe S&V lightbuttonfor2 seconds
to turn the light off.
• To start a rotation of different light colours
press the S&V automatic light colour
change button.
• To start the music press the MP3 button
on the S&V hand control. Only MP3 files
can be read and only files from the root (not
in “folders”).
• S&V hand control LED flashes when
active.
NOTE
Operating the Air Spa with soapy water
can cause excessive foaming.
WARNING
To avoid electric shock, only use the
USB memory stick in the connector on
the bath.
NOTE
The music function will stop automatically
30 minutes after activation. Press the
MP3 player button on the S&V hand con-
trol for continued listening.
NOTE
The S&V light will stop automatically 30
minutes after activation. Press the S&V
light ON/OFF button on the S&V hand
control for continued lighting.

15
AB
MIX
80
70
60
50
40
30
20
A
B
1
2

16
Disinfection unit (option)
The Parker has the a built in disinfection unit
as an option. (See Fig. 1)
There is a disinfectant bottle with an adjustable
top to adjust the mixing value of the disinfect-
ant concentration and water. It’s located in the
lockable compartment between the bath legs.
There is also a disinfection spray handle and
flowmeter, located behind the cover.
To use the disinfection unit:
1 Pressthe disinfectionbuttonandholdit
in for 5 seconds to activate it.
2 The LED will turn green when active.
3 If the disinfectant bottle is empty, the LED
will start flashing when pressing the disin-
fection button. A beeping sound comes on
and it is not possible to disinfect the bath.
4 Replace with a full disinfection bottle and
try again (see Disinfection Instructions -
Replacing Disinfectant Bottle).
Battery back-up
A battery will work as a back-up if there is a
power failure. It is possible to help a resident out
of a bath during that time. Everything on the bath
will work under the battery back-up except for
the auto fill function, Air Spa and Sound &
Vision.
If the battery fails to work during a power failure
contact your ArjoHuntleigh technician.
Battery charge level when the main
power supply is not connected.
Head cushion, Back support
cushions and Leg rest
(accessories)
Extra cushions are available for added comfort
for the resident. The back support cushions have
suction cups for easy attachment to the bath.
(See Fig. 2)
These accessories can be ordered from your local
ArjoHuntleigh representative.
CAUTION
Never put the resident in the bath
when the power indicator light on the
control panel is out. Ensure that the
bath is connected to a power outlet or
the battery might run out of power.
Contact your local ArjoHuntleigh tech-
nician if problem occurs.
Yellow LED on No mains
connected
Yellow LED flashing No mains con-
nected and bat-
tery is running
low.
The Battery is
automatically
charged when the
bath is connected
to the mains.
No LED light Connect the
Parker to the
mains to charge
the battery.
CAUTION
Always fit leg rest on the opposite side
of the door. If hung on the door, dam-
age to the door may occur.

17
MIX
80
0
60
50
40
30
20
1
2

18
Operating Instructions
To complete a full resident bath follow the
36 steps.
Fill the footwell with water.
1 Ensure that the bath is in a upright position.
(See Fig. 1)
2 Close the drainage plug by rotating the
drain control knob counter clockwise.
(See Fig. 2)
3Parkerwith fill: start filling the footwell by
pressing the tub filling button.
(See Fig. 3)
• Feel the water temperature with a naked
hand and let the resident feel the water.
Adjust the knob to a comfortable tempera-
ture.
• At desired footwell water level, stop the fill-
ing by pressing the tub filling button
again.
Parker with Auto fill: activate prefill by
pressing the auto fill button.
(See Fig. 3)
• Feel the water temperature with a naked
hand and let the resident feel the water.
Adjust the knob to a comfortable tempera-
ture.
• The filling stops automatically when the
footwell is filled.
Bathing the resident
4 Open the bath tub door by pressing the door
handle down. Make sure no objects are in
the path of opening the door. Raise the door
to a fully open position.
Adjust the bath height by pressing up or
down button on the hand control, in
orderto get the right residentseating height.
(See Fig. 4)
If needed, help the resident get seated in the
Parker.(Fig. 4)
Continue with the steps on the back of the next
page.
WARNING
To prevent scalding, always check the
water temperature with your naked
hand before directing the water on the
resident. Do note use gloves at it may
insulate to the extent that the water
temperature can be misjudged. Point
the flow of the water away from the
resident.
5WARNING
To avoid falling, make sure the res-
ident always remains in a seated
position.
6WARNING
To avoid falling, ensure the resi-
dent uses the grab rails for support
when entering or exiting the bath.

19
12
34

20
If needed, help the resident to place their
feet into the footwell. (See Fig. 1)
Close and lock the bath tub door by pulling
the door handle fully up (with some physi-
cal force) until aligned with the closed lock
sticker.
Recline the bath tub by pressing the tilt
back button on the hand control.
10 Position the bath to the preferred working
height by pressing up or down but-
tons on the hand control. (See Fig. 2)
11 Adjust bath water depth by pressing
fill/auto fill button.
12 Adjustthewatertemperature by rotatingthe
temperature knob on the control panel.
13 Feel the water temperature with a naked
hand and let the resident feel the water as
well. (See Fig. 3)
14 At a desired water level, turn the water off.
•Parker with fill: Press filling button
again when the water has reached desired
level to turn it off.
•Parker with Auto fill: The filling stops
automatically after 60 seconds.
To stop filling within this time frame, press
auto fill button.
If the button is pressed once again, the fill-
ing starts for another 60 seconds.
Shower the resident
15 Lift off the shower handle from the holder
or stand.
16 Hold the shower handle away from the res-
ident.
17 Press the shower button on the control
panel (the LED lights up when active).
Press the trigger on the shower handle
directing the water stream away from the
resident.
Continue with the steps on the back of the next
page.
7WARNING
To avoid falling, make sure the res-
ident always remains in a seated
position.
8WARNING
To avoid entrapment, make sure to
keep the residents hair, arms and
feet close to the body and use des-
ignated grab supports during any
movement.
9WARNING
To avoid entrapment, make sure to
keep the residents hair, arms and
feet close to the body and use des-
ignated grab supports during any
movement.
18 WARNING
To prevent scalding, always check
the water temperature with your
naked hand before directing the
water on the resident. Do note use
gloves at it may insulate to the
extent that the water temperature
can be misjudged. Point the flow of
the water away from the resident.
Table of contents
Other ARJO HUNTLEIGH Bathtub manuals
Popular Bathtub manuals by other brands

JASON Hydrotherapy
JASON Hydrotherapy forma AC553 owner's manual

Teuco
Teuco Hydroline user manual

DURAVIT
DURAVIT D-Code 760137000JP1000 operating instructions

Clou
Clou Solium I CL/05.70010 installation instructions

glass 1989
glass 1989 SOFA installation guide

Excellent
Excellent MINT Installation and operating manual

Streamline
Streamline N-120-60FSWH-DM Owner's manual & installation guide

Jacuzzi
Jacuzzi Luxury Bath installation instructions

Tassili Supra
Tassili Supra 33001709 instruction manual

DURAVIT
DURAVIT Air-System operating instructions

Aquatica Digital
Aquatica Digital Relax Series Operation manual

Ella's Bubbles
Ella's Bubbles ella Solo30 installation instructions