Arjo MAA4031-M User manual

EN · ZH · DE · FR · IT · NL
⢪欽霹僈⛼ · Bedienungsanleitung · Mode d’emploi · Istruzioni per l’uso · Gebruiksaanwijzing
INSTRUCTIONS FOR USE
Toilet Slings
04
4
.
S
T
T.
00
-
-I
NT
1
1_
6
04
4
4
.
S
T
T
.
00
-
-I
NT
1
1
_
_
6
••
1
1/
/
2
0
19
9
1
1/
/
2
2
20
19
9

2
WARNING
To avoid injury, always read this Instructions for Use and accompanied documents
before using the product. Mandatory to read the Instructions for Use.
Design Policy and Copyright
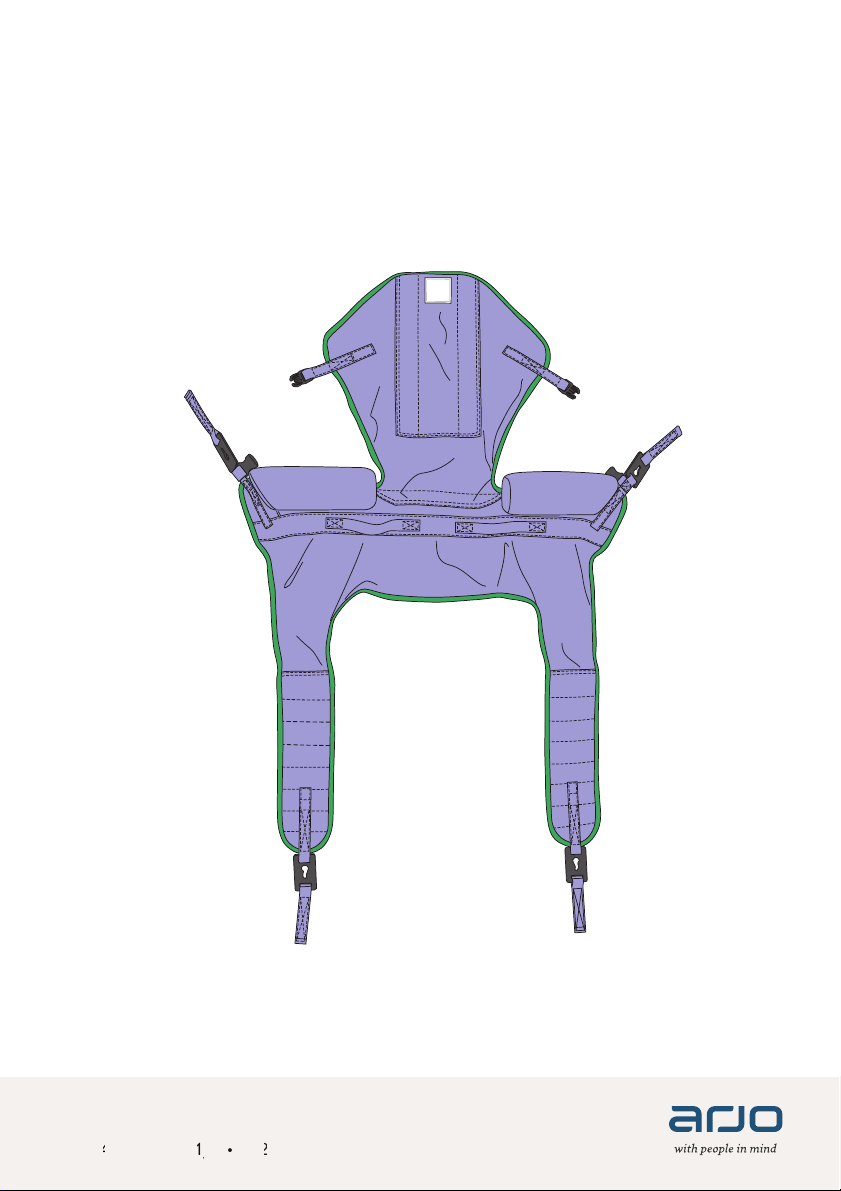
® and ™ are trademarks belonging to the Arjo group of companies. © Arjo 2019.
As our policy is one of continuous improvement, we reserve the right to modify designs without prior notice. The
content of this publication may not be copied either whole or in part without the consent of Arjo.
Foreword
Thank you for purchasing Arjo equipment. Please read this Instructions For Use (IFU) thoroughly!
Arjo will not be held responsible for any accidents, incidents or lack of performance that occur as a result of any
XQDXWKRUL]HGPRGL¿FDWLRQWRLWVSURGXFWV
Customer Support
,I\RXUHTXLUHIXUWKHULQIRUPDWLRQSOHDVHFRQWDFW\RXUORFDO$UMRUHSUHVHQWDWLYH7KHFRQWDFWLQIRUPDWLRQLV
located at the end of this IFU
'H¿QLWLRQVLQWKLV,)8
WARNING 0HDQV6DIHW\ZDUQLQJ)DLOXUHWRXQGHUVWDQGDQGREH\WKLVZDUQLQJPD\UHVXOWLQLQMXU\
WR\RXRUWRRWKHUV
CAUTION 0HDQV)DLOXUHWRIROORZWKHVHLQVWUXFWLRQVPD\FDXVHGDPDJHWRDOORUSDUWVRIWKH
V\VWHPRUHTXLSPHQW
NOTE 0HDQV7KLVLVLPSRUWDQWLQIRUPDWLRQIRUWKHFRUUHFWXVHRIWKLVV\VWHPRUHTXLSPHQW
Contents
Foreword .............................................................2
Customer Support ................................................... 2
'H¿QLWLRQVLQWKLV,)8 ..............................................2
,QWHQGHG8VH .......................................................3
Patient/Resident Assessment ................................. 3
Expected Service Life .............................................3
Safety Instructions...............................................4
Safety Practises ......................................................4
Serious incident....................................................... 4
Parts Designation ................................................5
Preparations ........................................................5
%HIRUH)LUVW8VHVWHSV .......................................5
%HIRUH(YHU\8VHVWHSV .....................................5
Select Sling Size..................................................6
8VLQJWKH$UMR0HDVXULQJ7DSH
VWHSV$FFHVVRU\ ..............................................6
6L]LQJ:LWKRXWD0HDVXULQJ7DSHVWHSV............. 6
Sling Selection.....................................................6
Transfer/Transport................................................... 6
Allowed Combinations.........................................7
6DIH:RUNLQJ/RDG6:/.......................................7
Clip Attachment & Detachment............................8
$WWDFKWKH&OLSVVWHSV ........................................8
'HWDFKWKH&OLSVVWHSV.......................................8
Loop Attachment & Detachment..........................8
$WWDFKWKH/RRSV6WHSV...................................... 8
'HWDFKWKH/RRSVVWHSV .....................................8
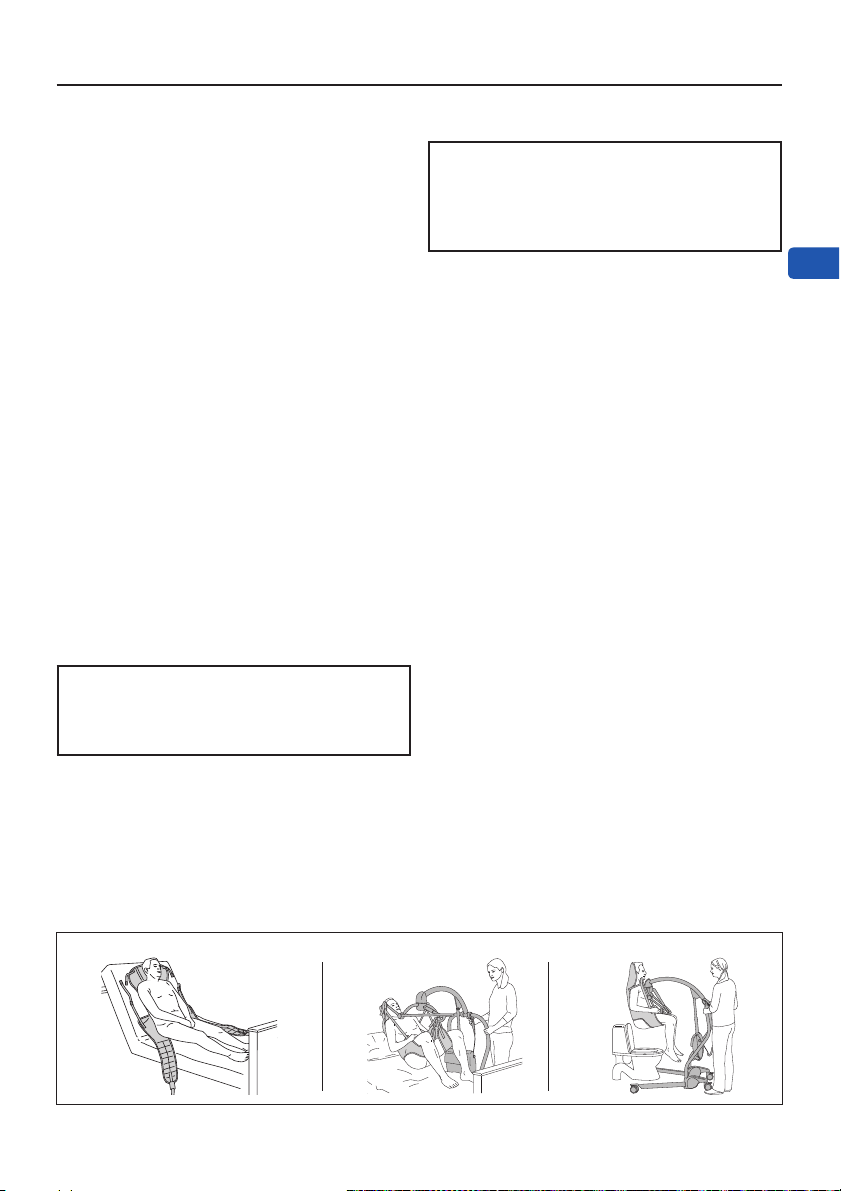
Applying the Sling................................................9
,Q%HGVWHSV.....................................................9
,Q&KDLU:KHHOFKDLUVWHSV............................. 10
On Floor ................................................................10
Removing the Sling ........................................... 11
,Q%HGVWHSV................................................... 11
,Q&KDLU:KHHOFKDLUVWHSV.............................. 11
Cleaning and Disinfection..................................12
&OHDQLQJ,QVWUXFWLRQVWHSV ...............................12
Cleaning Chemicals ..............................................12
Disinfection............................................................ 12
Care and Preventive Maintenance ....................12
%HIRUHDQG$IWHU(YHU\8VH................................... 12
When Soiled or Stained and Between Patients ....12
Storage.................................................................. 12
Service and Maintenance...................................... 12
Troubleshooting.................................................13
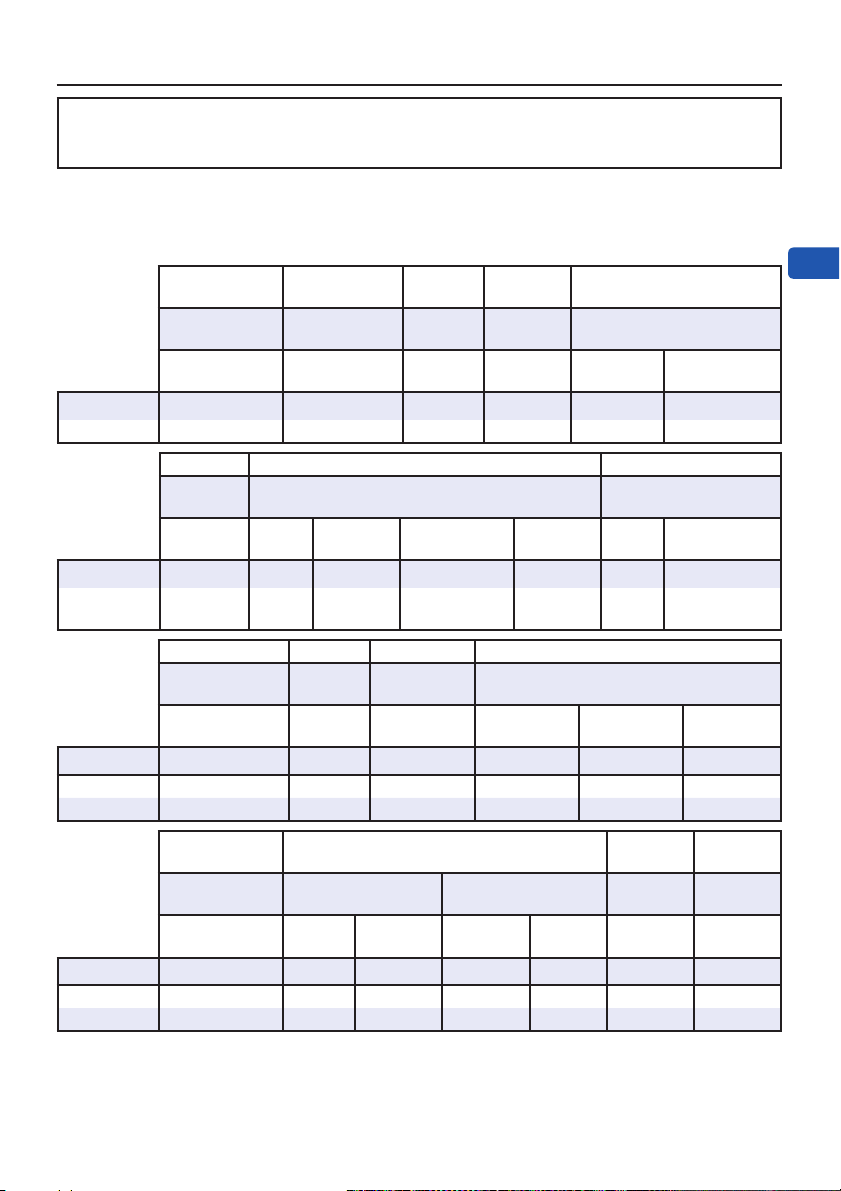
7HFKQLFDO6SHFL¿FDWLRQV ....................................14
Label on the Sling..............................................15
,ඖඛගකඝඋගඑඖඛ)ක8ඛඍ
EN

3
Intended Use
Toilet Sling has been specially designed to help support
patients/residents while toileting, when used solely in
FRQMXQFWLRQZLWK$UMRSDWLHQWUHVLGHQWOLIWV¿WWHGZLWKD
IRXUSRLQWWLOWLQJIUDPH
Do not use the Toilet Sling for lifting and
WUDQVSRUWDWLRQDSDUWIURPWRLOHWYLVLWV
7KHToilet Sling shall only be used by appropriately
trained caregivers with adequate knowledge of the care
environment, and in accordance with the instructions
RXWOLQHGLQWKH,QVWUXFWLRQVIRU8VH
7KHToilet Sling is intended to be used in hospital
environments, nursing homes, other healthcare
IDFLOLWLHVDQGKRPHFDUH
7KHToilet Sling should only be used for the purpose
VSHFL¿HGLQWKLV,QVWUXFWLRQVIRU8VH$Q\RWKHUXVHLV
SURKLELWHG
Patient/Resident Assessment
We recommend that facilities establish regular
DVVHVVPHQWURXWLQHV&DUHJLYHUVVKRXOGDVVHVVHDFK
patient/resident according to the following criteria
prior to use:
• Patient/resident sits in wheelchair
• Has no capacity to support herself/himself at all
• &DQQRWVWDQGXQVXSSRUWHGDQGLVQRWDEOHWREHDU
weight, not even partially
• Dependent on caregiver in most situations
• Physically demanding for caregiver
• Stimulation of remaining abilities is very important
• Requires some trunk stability as a must for this
type of sling
Safe Working Load (SWL) for Toilet Sling:
• MAA4031M, MLA4031, MLA4531: 272 kg
OEV
7KHULJKWW\SHDQGVL]HRIVOLQJVVKRXOGEHXVHGDIWHU
proper assessment of each patient/resident’s size,
FRQGLWLRQDQGWKHW\SHRIOLIWLQJVLWXDWLRQ
If the patient/resident does not meet these criteria an
DOWHUQDWLYHHTXLSPHQWV\VWHPVKDOOEHXVHG
Expected Service Life
7KHH[SHFWHGVHUYLFHOLIHRIToilet Sling is the
PD[LPXPSHULRGRIXVHIXOOLIH
7KHH[SHFWHGOLIHRIWKHVOLQJLVGHSHQGHQWRQWKH
DFWXDOXVHFRQGLWLRQV7KHUHIRUHEHIRUHXVHDOZD\V
make sure that the sling does not show any sign of
fraying, tearing or other damage and that there is no
GDPDJHLHFUDFNLQJEHQGLQJEUHDNLQJ,IDQ\VXFK
GDPDJHLVREVHUYHGGRQRWXVHWKHVOLQJ,I\RXKDYH
any doubts about sling safety, as a precaution and to
HQVXUHVDIHW\GRQRWXVHWKHVOLQJ
7KHH[SHFWHGVHUYLFHOLIHRIWKHToilet Slings:
6HUYLFH7LPH
• 2 years
6KHOI7LPH
• 5 years
EN

4
Safety Instructions
WARNING
To avoid injury, make sure that the patient is
not left unattended at any time.
WARNING
To avoid injury, only use the Toilet sling on
patients with upper body strength. Lack of
upper body strength can cause the patient
to slide out.
WARNING
To avoid falling, make sure that the user
weight is lower than the safe working load
for all products or accessories being used.
WARNING
To avoid injury, only store the equipment for
a short period of time. If stored longer than
stated in the IFU, it can cause weakness
and breakage in the material.
WARNING
To avoid injury, always assess the patient
prior to use.
WARNING
To avoid injury, never let the patient smoke
when using the sling. The sling can catch
RQ¿UH
WARNING
To avoid injury, keep the equipment away
from sun/UV-light. Exposure to sun/UV-light
can weaken the material.
Safety Practises
• At any time, if the patient becomes agitated, stop
transferring/transporting and safely lower the
SDWLHQW
• Patient with spasm can be lifted, but great care
VKRXOGEHWDNHQWRVXSSRUWWKHSDWLHQW¶VOHJV
Serious incident
If a serious incident occurs in relation to this medical
GHYLFHD൵HFWLQJWKHXVHURUWKHSDWLHQWWKHQWKHXVHU
or patient should report the serious incident to the
PHGLFDOGHYLFHPDQXIDFWXUHURUWKHGLVWULEXWRU,Q
the European Union, the user should also report the
VHULRXVLQFLGHQWWRWKH&RPSHWHQW$XWKRULW\LQWKH
PHPEHUVWDWHZKHUHWKH\DUHORFDWHG
EN

5
Parts Designation
Preparations
Before First Use (6 steps)
&KHFNDOOSDUWVRIWKHVOLQJVHHVHFWLRQ“Parts
Designation” on page 5,IDQ\SDUWLVPLVVLQJ
RUGDPDJHG'R127XVHWKHVOLQJ
Read this IFUWKRURXJKO\
&KHFNWKDWWKHVOLQJLVFOHDQ
&KRRVHDGHVLJQDWHGDUHDZKHUHWKHIFU should be
NHSWDQGHDVLO\DFFHVVLEOHDWDOOWLPHV
Make sure to have a rescue plan ready in case of a
SDWLHQWHPHUJHQF\
)RUTXHVWLRQVFRQWDFW\RXUORFDO$UMR
UHSUHVHQWDWLYHIRUVXSSRUW
NOTE
Arjo recommends the name of the patient is
written on the sling care label to avoid cross
contamination between patients.
Before Every Use (5 steps)
Patient assessment must always determine the
methods used in everyday care, see “Intended
Use” on page 3
WARNING
To avoid the patient from falling, make sure
to select the correct sling size according to
the IFU.
&KHFNWKHDOORZHGFRPELQDWLRQVDJDLQVWWKHVOLQJ
spreader bar and lift, see “Allowed Combinations”
on page 7
WARNING
To avoid injury, always make sure to inspect
the equipment prior to use.
&KHFNDOOSDUWVRIWKHVOLQJVHH“Parts
Designation” on page 5,IDQ\SDUWLVPLVVLQJ
RUGDPDJHG'R127XVHWKHVOLQJ&KHFNIRU
• fraying
• loose stitching
• tears
• fabric holes
• soiled fabric
• damaged clips/loops
• damaged buckles
• unreadable or damaged label
WARNING
To prevent cross-contamination, always
follow the disinfection instructions in this
IFU.
&KHFNWKDWWKHVOLQJLVFOHDQ,IWKHVOLQJLV
not clean see”Cleaning and Disinfection” on
page 12
Before using the sling, read the lift IFUIRUWUDQVIHU
Sling label
(located outside of the sling)
6WL൵HQHUSRFNHW
6WL൵HQHU
Neck buckle
Attachment clip (shoulder)
Pull handle
/HJÀDS
Leg strap
Attachment clip (leg)
Mid section
Midsection buckle
Head section
Support belt (hook and loop)
Attachment loop (leg)
Attachment loop (shoulder)
Example of slings. Not all models are represented.
23
5
6
9
8
10
4
7
11
12
13
13
14
15
1
11
EN

6
Fig. 1
Fig. 2
43 52 61 72.7 99.6 104.7 114.794.784.7
AB
COCCYX HEAD
cm
in
16,9 20.5 24 28.7 33.7 37.6 39.5 41.5 45.2
XXS XS S M L LL XL XXL
Select Sling Size
Using the Arjo Measuring Tape
(4 steps) (Accessory)
7KH$UMR0HDVXULQJ7DSHLVDVL]LQJDFFHVVRU\RQO\
LQWHQGHGDVDJXLGHDQGLVDQDSSUR[LPDWLRQ3DWLHQW
width and body proportions should also be considered
ZKHQVHOHFWLQJWKHFRUUHFWVL]HRI$UMRVOLQJ
If possible, the patient should be in a seated
SRVLWLRQ
Place the point marked A on the measuring tape
RYHUWKHSDWLHQW¶VFRFF\[DJDLQVWVHDWSRVLWLRQA
(See Fig. 1) and (See Fig. 2)
0HDVXUHIURPFRFF\[VHDWSRVLWLRQA) to the top
of the head (position B) (See Fig. 1).
7KHFRORXUHGDUHDRQWKHPHDVXULQJWDSHWKDWLV
levelled with the top of the patient’s head indicates
WKHUHTXLUHGVOLQJVL]H,IWKHVOLQJVL]HIDOOVLQ
between two sizes, it is recommended to select the
VPDOOHUVL]H(See Fig. 2)
Sizing Without a Measuring Tape
(2 steps)
3ODFHWKHVOLQJRYHUWKHSDWLHQW¶VEDFN
Make sure the sling covers the patient from the top
of the head (position BWRWKHFRFF\[SRVLWLRQA
(See Fig. 1)
Sling Selection
7KHSDWLHQW¶VSK\VLFDOGLVDELOLWLHVZHLJKWGLVWULEXWLRQDQGJHQHUDOSK\VLTXHQHHGVWREHWDNHQLQWRFRQVLGHUDWLRQ
ZKHQVHOHFWLQJDVOLQJ
Transfer/Transport
Article
number
Safe Working
Load Product Description Size
MAA4031M OEV Clip toilet with head support XS, S, M, L, LL, XL, XXL
MLA4031 OEV Loop toilet with head support S, M, L, XL
MLA4531 OEV Loop toilet w/o head support S, M, L, XL
EN

7
Allowed Combinations
WARNING
To avoid injury, always follow the allowed combinations listed in this IFU. No other
combinations are allowed.
Safe Working Load (SWL)
$OZD\VIROORZWKHORZHVW6:/RIWKHWRWDOV\VWHP(JWKHMaxi Twin Compact lift/spreader bar has a SWL
RINJOEVDQGWKH0$$VOLQJKDVD6:/RINJOEV7KLVPHDQVWKDWWKHMaxi Twin
Compact lift VSUHDGHUEDUKDVWKHORZHVW6:/7KHSDWLHQWLVQRWDOORZHGWRZHLJKPRUHWKDQWKHORZHVW6:/
Lift Maxi Twin
Compact Maxi Lite Maxi 500 Maxi Twin
SWL 160 kg
OEV
160 kg
OEV
227 kg
OEV NJOEV
Spreader Bar
(DPS) Power Medium Flat Manual Manual
Medium Power
Sling SWL Size Size Size Size Size
MAA 4031M NJOEV S, M, L, LL, XL S, M, L S, M, L, LL S, M, L, LL S, M, L, LL, XL
Lift Maxi Move Maxi Sky
SWL NJOEV 272 kg
OEV
Spreader
Bar (DPS)
Manual
Small
Manual
Medium Power Medium Power
Large
Manual
Flat Power Medium
Sling SWL Size Size Size Size Size Size
MAA 4031M 272kg
OEV XS, S S, M, L, LL S, M, L, LL, XL L, LL, XL,
XXL S, M, L S, M, L, LL, XL
Lift Minstrel Maxi 500 Maxi Twin
SWL 190 kg
OEV
227 kg
OEV NJOEV
Spreader Bar 4 point 2 point Loop 2 point Small 2 point
Medium
4 point
Large
Sling SWL Size Size Size Size Size
MLA4531M NJOEV M, L, XL S, M, L, XL S, M S, M, L, XL M, L, XL
MLA4031 NJOEV M, L, XL S, M, L, XL S, M S, M, L, XL M, L, XL
Lift Maxi Move Maxi Sky
440
Maxi Sky
600
SWL NJOEV NJOEV 200 kg
OEV
272 kg
OEV
Spreader Bar 2 point
Small
2 point
Medium
2 point
loop
4 point
loop Fix 2 point
Medium
Sling SWL Size Size Size Size Size Size
MLA4531 NJOEV S, M S, M, L, XL S, M, L, XL M, L, XL S, M, L, XL S, M, L, XL
MLA4031 NJOEV S, M S, M, L, XL S, M, L, XL M, L, XL S, M, L, XL S, M, L, XL
EN

8
Clip Attachment & Detachment
NOTE
If available on your lift device, reposition the
spreader bar using the Dynamic Position
6\VWHP'36IRUHDVLHUFOLSDWWDFKPHQWRIWKH
sling. See lift IFU for instructions.
Attach the Clips (5 steps)
3ODFHWKHFOLSRQWKHVSUHDGHUEDUOXJ(See Fig. 3)
3XOOWKHVWUDSGRZQ
Make sure the lug is locked at the top end of the
FOLS(See Fig. 4)
Make sure the strap is not squeezed in between the
FOLSDQGWKHVSUHDGHUEDU
0DNHVXUHWKHVWUDSVDUHQRWWZLVWHG
Detach the Clips (3 steps)
Make sure that the weight of the patient is taken up by
WKHUHFHLYLQJVXUIDFHEHIRUHUHPRYLQJWKHFOLS
3XOOWKHVWUDSXS(See Fig. 5)
Make sure the lug is unlocked at the bottom of the
FOLS
5HPRYHWKHFOLS
Loop Attachment & Detachment
2 point spreader bar:)LUVWDWWDFKWKHVKRXOGHUORRSV
WKHQDWWDFKWKHOHJORRSV
4 point spreader bar: )LUVWDWWDFKWKHVKRXOGHUORRSV
LQWKHIURQWKRRNV7KHQDWWDFKWKHOHJORRSVLQWKH
back hooks
WARNING
Do not cross the shoulder straps.
Attach the Loops (5 Steps)
WARNING
Use the same loop length (loop colour) for
the shoulder straps and the same length
(loop colour) for the leg straps.
Place the loop over the spring loaded latch (A
(See Fig. 6)
3XOOWKHORRSGRZQWRIRUFHWKHODWFKWRRSHQ
Make sure that the spring loaded latch closes
FRPSOHWHO\ZLWKWKHORRSLQVLGH(See Fig. 6)
0DNHVXUHWKDWWKHODWFKLVPRYLQJIUHHO\
0DNHVXUHORRSVDQGVWUDSVDUHQRWWZLVWHG
NOTE
The loops lengths on the straps are used to
adjust the patient’s position and comfort.
• Loops closer to the shoulders;
more forward position
• Loops further away from the shoulders;
more reclined position
• Loops closer to the legs;
raised legs/bottom
• Loops further away from legs;
lowered legs/bottom
Detach the Loops (2 steps)
Make sure that the weight of the patient is taken up by
WKHUHFHLYLQJVXUIDFHEHIRUHUHPRYLQJWKHORRS
Method 1
3UHVVWKHVSULQJORDGHGODWFKRSHQ
5HPRYHWKHORRS
Method 2
Pull one side of the loop over the hook and spring
ORDGHGODWFK(See Fig. 7)
3XOOGRZQWKHORRS(See Fig. 8)
Fig. 3 Fig. 4 Fig. 5
A
Fig. 6 Fig. 7 Fig. 8
EN

9
Applying the Sling
In Bed (24 steps)
)RUWUDQVIHUVHHUHVSHFWLYHOLIWIFU
3ODFHWKHOLIWQHDUE\
Apply bed brakes and adjust the height of the bed
WRDQHUJRQRPLFSRVLWLRQLISRVVLEOH
7KHSDWLHQWQHHGVWREHLQDVHDWHGSRVLWLRQLQEHG
&KHFNWKDWWKHVWL൵HQHUVDUHFRPSOHWHO\LQVLGHWKH
VWL൵HQHUSRFNHWVLIDQ\
Prepare the patient for transfer/toileting by
ORRVHQLQJWKHSDWLHQW¶VFORWKLQJ
/HDQWKHSDWLHQWIRUZDUG
Place the inside of the sling against the patients
EDFN7KHVOLQJODEHOLVORFDWHGRQWKHRXWVLGH,I
needed, use an Arjo Sliding Sheet/Tube for placing
WKHVOLQJ6HHUHVSHFWLYHVOLGLQJVKHHWWXEHIFU
Make sure that the centre line of the sling is aligned
ZLWKWKHSDWLHQW¶VVSLQHDQGFRFF\[
/HDQWKHSDWLHQWEDFN
Attach the support belt around the patient’s
PLGVHFWLRQLIDQ\7KLVSUHYHQWVWKHSDWLHQWIURP
IDOOLQJIRUZDUG
3ODFHWKHOHJÀDSVXQGHUQHDWKWKHSDWLHQW¶VOHJV
Make sure that the: (See Fig. 9)
• VOLQJLVFHQWUHGDQGÀDWZLWKRXWFUHDVHV
• sling’s head support covers the neck/head area,
• sling pieces are not twisted underneath the
patient and
• SDWLHQW¶VDUPVDUHRXWVLGHWKHVOLQJ
$SSO\WKHEUDNHVRQWKHOLIW
WARNING
To avoid injury to the patient, pay close
attention when lowering or adjusting the
spreader bar.
Attach the sling, start with the midsection and then
WKHOHJV
• If using a loop sling, attach the loops in a more
VHDWHGSRVLWLRQ
• If using a clip sling, position the DPS
(Dynamic Positioning System) in a seated
SRVLWLRQ
Slightly lift the patient to create tension in the
VOLQJ(See Fig. 10)
WARNING
To avoid the patient from falling, make sure
that the sling attachments are attached
securely before and during the lifting
process.
Make sure that:
• All clips/loops are securely attached
(See Fig. 4) and (See Fig. 6)
• All straps are straight (not twisted)
• 7KHSDWLHQWOD\VFRPIRUWDEO\LQWKHVOLQJ
If an adjustment is needed, lower the patient and
make sure that the weight of the patient is taken up
by the receiving surface before removing the clip/
ORRS
Attach the neck buckle to midsection of sling, if
DQ\
&KHFNWKDWWKHSDWLHQWLVQRWVOLGLQJRXWWKURXJK
WKHERWWRPRIWKHVOLQJ,IWKHSDWLHQWLVVOLGLQJRXW
UHSODFHLWZLWKDVPDOOHUVOLQJ
&RQWLQXHOLIWLQJWKHSDWLHQW
7UDQVIHUWKHSDWLHQWWRWKHWRLOHWDFFRUGLQJWRWKH
lift IFU
'R127DSSO\DQ\OLIWEUDNHV
Push the sling/straps and not the patient towards
WKHEDFNRIWKHWRLOHWIRUEHWWHUSRVLWLRQLQJ
/RZHUWKHSDWLHQWRQWKHWRLOHWVHDW6HHWKHOLIW
,)8(See Fig. 11)
Fig. 9 Fig. 10 Fig. 11
EN

10
In Chair/ Wheelchair (24 steps)
3ODFHWKHOLIWQHDUE\
$SSO\WKHEUDNHVRQWKHZKHHOFKDLU
&KHFNWKDWWKHVWL൵HQHUVDUHFRPSOHWHO\LQVLGHWKH
VWL൵HQHUSRFNHWVLIDQ\
Prepare the patient for transfer by loosening the
SDWLHQW¶VFORWKLQJ
Stand in front of the patient and lean the patient
IRUZDUG
Place the inside of the sling against the patients
EDFN7KHVOLQJODEHOLVORFDWHGRQWKHRXWVLGH,I
needed, use an Arjo sliding sheet/tube for placing
the sling See respective Sliding sheet/tube IFU
Make sure that the centre line is aligned with the
SDWLHQW¶VVSLQHDQGFRFF\[
/HDQWKHSDWLHQWEDFN
Attach the support belt around the patient’s
PLGVHFWLRQLIDQ\7KLVSUHYHQWVWKHSDWLHQWIURP
IDOOLQJIRUZDUG
3ODFHWKHOHJÀDSVXQGHUQHDWKWKHOHJV
Make sure that the:
• VOLQJLVFHQWUHGDQGÀDWZLWKRXWFUHDVHV
• sling’s head support covers the neck/head area,
• sling pieces are not twisted underneath the
patient and
• SDWLHQW¶VDUPVDUHRXWVLGHWKHVOLQJ
Place the lift in front of the patient and open the lift
FKDVVLVOHJVLIQHHGHG(See Fig. 12)
$SSO\WKHEUDNHVRQWKHOLIW
WARNING
To avoid injury to the patient, pay close
attention when lowering or adjusting the
spreader bar.
Attach the sling, start with the midsection and then
WKHOHJV
• If using a loop sling, attach the loops in a more
VHDWHGSRVLWLRQ
• If using a clip sling, position the DPS
(Dynamic Positioning System) in a seated
SRVLWLRQ
WARNING
Make sure straps are not caught by
wheelchair or lift castors.
Slightly lift the patient to create tension in the
VOLQJ(See Fig. 12)
WARNING
To avoid the patient from falling, make sure
that the sling attachments are attached
securely before and during the lifting
process.
Make sure that:
• All clips/loops are securely attached
(See Fig. 4) and (See Fig. 6)
• All straps are straight (not twisted)
• 7KHSDWLHQWOD\VFRPIRUWDEO\LQWKHVOLQJ
If an adjustment is needed, lower the patient and
make sure that the weight of the patient is taken up
by the receiving surface before removing the clip/
ORRS
Attach the neck buckle to midsection of sling, if
DQ\
WARNING
To avoid injury, always make sure the sling
is attached correctly.
&KHFNWKDWWKHSDWLHQWLVQRWVOLGLQJRXWWKURXJK
WKHERWWRPRIWKHVOLQJ,IWKHSDWLHQWLVVOLGLQJRXW
UHSODFHLWZLWKDVPDOOHUVOLQJ
&RQWLQXHWROLIWWKHSDWLHQW
7UDQVIHUWKHSDWLHQWWRWKHWRLOHWDFFRUGLQJWRWKH
lift IFU
'R127DSSO\DQ\OLIWEUDNHV
Slightly push the sling/straps and not the patient,
WRZDUGVWKHEDFNRIWKHWRLOHWIRUEHWWHUSRVLWLRQLQJ
/RZHUWKHSDWLHQWRQWKHWRLOHWVHDW6HHWKHOLIW
IFU(See Fig. 13)
On Floor
'R127XVHToilet sling8VHDQDSSURSULDWHVOLQJWR
OLIWIURPWKHÀRRU
Fig. 12 Fig. 13
EN

11
Removing the Sling
In Bed (14 steps)
3RVLWLRQWKHSDWLHQWRYHUWKHEHG(See Fig. 14)
Apply bed brakes and adjust the height of the bed
WRDQHUJRQRPLFSRVLWLRQLISRVVLEOH
Adjust the bed to a seated position
If using a clip sling, position the DPS (Dynamic
3RVLWLRQLQJ6\VWHPLQDVHDWHGSRVLWLRQ
WARNING
To avoid injury to the patient, pay close
attention when lowering or adjusting the
spreader bar.
/RZHUWKHSDWLHQWRQWRWKHEHG0DNHVXUHWKDWWKH
weight of the patient is taken up by the receiving
VXUIDFHEHIRUHUHPRYLQJWKHFOLSORRS
'HWDFKWKHVOLQJ
Unbuckle the head section from the midsection of
WKHVOLQJ
0RYHWKHOLIWDZD\IURPWKHSDWLHQW
Detach the sling belt around the patient’s
PLGVHFWLRQLIDQ\
3XOORXWWKHOHJÀDSVIURPXQGHUWKHSDWLHQW¶VOHJV
/HDQWKHSDWLHQWIRUZDUG
5HPRYHWKHVOLQJ8VHDQ$UMRVOLGLQJVKHHWWXEH
IRUUHPRYLQJWKHVOLQJ6HHUHVSHFWLYHSliding
sheet/tube IFU.
/HDQWKHSDWLHQWEDFN
Make sure the patient is in a comfortable and
VHFXUHSRVLWLRQLQWKHEHG
In Chair/Wheelchair (13 steps)
$SSO\WKHEUDNHVRQWKHZKHHOFKDLU
,IXVLQJDÀRRUOLIWRSHQWKHOLIWFKDVVLVOHJV
3RVLWLRQWKHSDWLHQWRYHUWKHFKDLUZKHHOFKDLU
If using a clip toilet sling, position the DPS
'\QDPLF3RVLWLRQLQJ6\VWHPLQDVHDWHGSRVLWLRQ
Slightly push the sling/straps and not the patient,
towards the back of the chair/wheelchair for better
SRVLWLRQLQJ
WARNING
To avoid injury to the patient, pay close
attention when lowering or adjusting the
spreader bar.
/RZHUWKHSDWLHQWLQWRWKHFKDLUZKHHOFKDLU
Make sure the patients lower back is positioned all
the way in against the chair/wheelchair to avoid the
SDWLHQWIURPVOLGLQJRXW
'HWDFKWKHVOLQJ
0RYHWKHOLIWDZD\IURPWKHSDWLHQW(See Fig. 15)
3XOORXWWKHOHJÀDSVIURPXQGHUWKHSDWLHQW¶VOHJV
DQGSODFHWKHPEDFNZDUGVDORQJWKHSDWLHQW¶VVLGH
Stand in front of the patient and lean the patient
IRUZDUG
3XOORXWWKHVOLQJ,IQHHGHGXVHDQ$UMRVOLGLQJ
VKHHWWXEH6HHUHVSHFWLYHSliding sheet/tube IFU
Lean the patient back up to a comfortable and
VHFXUHSRVLWLRQ
Fig. 14 Fig. 15
EN

12
Cleaning and Disinfection
WARNING
To prevent cross-contamination, always
follow the disinfection instructions in this
IFU.
WARNING
To avoid material damage and injury, clean
and disinfect according to this IFU.
• No other chemicals are allowed.
• Never clean with chlorine.
• Chlorine will deteriorate the surface of
the material.
WARNING
To avoid injury, always remove the sling
before disinfecting the lift.
All Toilet slings should be cleaned when they are
VRLOHGRUVWDLQHGDQGEHWZHHQSDWLHQWV
Cleaning Instruction (7 steps)
'HWDFKWKHVOLQJIURPWKHOLIW
5HPRYHWKHVWL൵HQHUVLIDQ\EHIRUHZDVKLQJ
&ORVHDOOEXFNOHVDQGKRRNDQGORRSDWWDFKPHQWRQ
WKHVOLQJVDQGEHOWVSULRUWRZDVKLQJ
&KHFNWKHV\PEROVRQWKHSURGXFWODEHOIRU
FOHDQLQJUHFRPPHQGDWLRQV
0DFKLQHZDVKWKHVOLQJDW&),QRUGHU
WRREWDLQVX൶FLHQWOHYHORIGLVLQIHFWLRQSOHDVH
ZDVKDFFRUGLQJWRORFDOK\JLHQHOHJLVODWLRQ
If allowed according to the product label, tumble
GU\LQORZWHPSHUDWXUHPD[&)
'R127
• wash together with other items that have rough
VXUIDFHVRUVKDUSREMHFWV
• use any mechanical pressure, pressing or rolling
• use bleach
• use gas sterilization
• use autoclave
• dry clean
• steam
• ironing
3ODFHWKHVWL൵HQHUVLIDQ\EDFNLQWRWKHVOLQJ
EHIRUHXVH
Cleaning Chemicals
)RUDOOVOLQJPDWHULDOXVHFRPPRQFRPPHUFLDO
GHWHUJHQWZLWKRXWRSWLFDOEULJKWHQHU1RRWKHU
FKHPLFDOVDUHDOORZHGHJFKORULQHVRIWHQHULRGLQH
EDVHGGLVLQIHFWDQWVEURPLQHDQGR]RQH
Disinfection
7KHRQO\DOORZHGGLVLQIHFWLRQLVGLVLQIHFWLRQE\
ZDVKLQJ
Care and Preventive Maintenance
WARNING
To avoid injury to both patient and
caregiver, never modify the equipment or
use incompatible parts.
Before and After Every Use
Visually check all exposed parts
7KHFDUHJLYHUVKDOOLQVSHFWWKHVOLQJEHIRUHDQGDIWHU
HYHU\XVH7KHFRPSOHWHVOLQJVKRXOGEHFKHFNHGIRU
DOOGHYLDWLRQVOLVWHGEHORZ,IDQ\RIWKHVHGHYLDWLRQV
DUHYLVLEOHUHSODFHWKHVOLQJLPPHGLDWHO\
• )UD\LQJ
• Loose stitching
• 7HDUV
• Holes
• Discolouration or stains from bleaching
• Sling soiled or stained
• Label unreadable or damaged
When Soiled or Stained and Between
Patients
Clean/Disinfect
7KHFDUHJLYHUVKRXOGPDNHVXUHWKDWWKHVOLQJLV
cleaned according to “Cleaning and Disinfection” on
page 12, when it is soiled or stained and between
SDWLHQWV,IWKHVRLODQGVWDLQVDUHVWLOOYLVLEOHUHSODFH
WKHVOLQJLPPHGLDWHO\
Storage
When not in use, the slings should be stored away
from direct sunlight where they are not subject to
XQQHFHVVDU\VWUDLQVWUHVVRUSUHVVXUHRUWRH[FHVVLYH
KHDWRUKXPLGLW\7KHVOLQJVVKRXOGEHNHSWDZD\IURP
sharp edges, corrosives or other things that could cause
GDPDJHRQWKHVOLQJ
Service and Maintenance
It is recommended that TXDOL¿HG personnel inspect the
condition of the sling twice a year (every 6 month),
DFFRUGLQJWR,62
EN

13
Troubleshooting
Problem Action
The patient is not positioned correctly in
WKHVOLQJHJRQHVWUDSLVVKRUWHUWKDQWKH
RWKHU
• Make sure the clip/loop straps are not twisted.
• Make sure the patient is seated on the inside of the
sling. The outside has a label for reference.
• Make sure the patient is centred in the sling.
The patient feels discomfort in the leg area
when seated in the sling.
0DNHVXUHWKDWWKHUHDUHQRFUHDVHVRQWKHOHJÀDSVRI
the sling.
7KHVOLQJLVGLႈFXOWWRDSSO\HJGXULQJ
ORJUROO
'R127XVHWKHORJUROOPHWKRG8VHDQ$UMRVOLGLQJ
sheet/tube according to instructions in respective IFU.
7KHUHDUHGLႈFXOWLHVDSSO\LQJWKHVKRXOGHU
clips/loops.
• Place the patient in a more seated position in the bed
RURQWKHÀRRU3ODFHDSLOORZEHKLQGWKHSDWLHQW¶V
neck/back, outside of the sling.
• Raise the back rest of the bed, if available.
• If applicable, make sure the clip strap is not caught
between the lug on the lift and the clip attachment.
• Adjust the spreader bar to a more reclined position.
Pay attention to the patient’s head.
7KHUHDUHGLႈFXOWLHVDSSO\LQJWKHOHJFOLSV
loops.
• Bend the patient’s legs or place a pillow under the
patient’s knees.
• If applicable, make sure the clip strap is not caught
between the lug on the lift and the clip attachment.
• Adjust the spreader bar to a more seated position.
,WLVGLႈFXOWWRXVHWKHVOLQJLQFRPELQDWLRQ
with the lift and spreader bar.
8VHWKHVOLQJRQO\LQDFFRUGDQFHZLWKWKHFRPELQDWLRQV
described in section “Allowed Combinations” on
page 7.
The position of the patient in the sling
should be more reclined or seated.
8VHWKHVSUHDGHUEDURUWKHORRSOHQJWKVWRDGMXVWWKH
patient’s position.
The patient wishes to have extra support
for the neck. Place a pillow behind the patient’s neck, inside the sling.
The patient is sliding out of the opening of
the sling.
• Make sure the patient’s arms are outside of the sling.
• If the problem still occurs: Select/choose a smaller
size sling.
EN

14
7HFKQLFDO6SHFL¿FDWLRQV
General
6DIHZRUNLQJORDG6:/ 0D[LPXPWRWDOORDG See “Allowed Combinations” on page 7
Service life – Recommended period of use 2 years*
* Refer to “Expected Service Life” on page 3.
Shelf life – Maximum period of storing new
unpacked product 5 years
Model and Type See “Sling Selection” on page 6
Operating, Transport and Storage Environment
Temperature &WR&)WR)2SHUDWLQJDQG6WRUDJH
&WR&)WR)7UDQVSRUW
Humidity 0D[±DW&)2SHUDWLQJDQG6WRUDJH
0D[±DW&)7UDQVSRUW
End of Life Disposal
Package The bag consists of soft plastic, recyclable to local
legislations.
Sling
6OLQJVLQFOXGLQJVWLႇHQHUVVWDELOL]HUVSDGGLQJPDWHULDO
any other textiles or polymers or plastic materials etc.
should be sorted as combustible waste.
Parts and Accessories
6WLႇHQHUV GX21270, TBS106 and TBS107
Belt size: S, M & L TSB.100-V
Belt size: XL TSB.200-V
Measuring tape MTA1000
EN

15
Label on the Sling
Care and Washing Symbols
0DFKLQHZDVK&)
No bleaching allowed
No tumble drying allowed
Tumble drying
No Ironing allowed
No dry cleaning allowed
&HUWL¿FDWHV0DUNLQJV
CE marking indicating conformity with
European Community harmonised
legislation
Indicates the product is a Medical
'HYLFHDFFRUGLQJWR(80HGLFDO'HYLFH
Regulation 2017/745
Symbol for Clip and Loop
8VHDFOLSVSUHDGHUEDU
8VHDORRSVSUHDGHUEDU
Article Number
REF
XXXXXX-X
Article number with -X refers to
the sling size.
REF
XXXXXXX
If the article number is stated
without the size letter at the end,
it means the sling is a One Size.
Fibre Content
PES Polyester
PE Polyethylene
38 Polyurethane
Misc. Symbols
6DIH:RUNLQJ/RDG6:/
Patient’s name symbol
Record symbol
Read the IFU before use
REF Article number
Manufacturing date and year
Manufacturer name and address
EN

16
险デ
⚹鼙⯝「ⵌ⠟㹲㖈⢪欽❡ㅷ䗳곢ꢓ靀劥⢪欽霹僈⛼⟄⿺❡ㅷꥥ꣡涸俒咓կ霼⸉䗳ꢓ靀劥
⢪欽霹僈⛼կ
霃雦佟瘻ㄤ晜勉
䌄® ♸™ 涸叻䘋僽 Arjo ⟱⚌꧋㔙涸㉁叻կ© Arjo 2019.
䧮⟌涸㸺傋僽♶倗鵳遤佖鵳㔔姼䧮⟌⥂殆刿佖霃雦涸勉ⵄ䛓♶〥遤鸑濼կ劢絑 Arjo ず䠑♶䖤Ⰼ鿈䧴鿈ⴔ㢕ⵖ劥ⴀ晜
暟⚥涸ⰻ㺂կ
鎊
䠋驊䜨鯺▷ Arjo 駦㜜ն騟ꄽ騣勔
❈氠騜僻▫
(IFU)
Arjo 㸉⚈✇㎌勑缋䱅勶侊Ⲙ☋脯㸍蔺溸䟩㜾յ◜侚䧶䙎茤╓㝤㐭┯䪩䬎⚈✇鯰⚈ն
㹐䨪佅䭯
㠁卸괛锢剳㝃⟥䛉騟臅笡䜨䓝㐌溸 Arjo ♣銩ն臅笡⟥䛉⛻◟勔 IFU 溸缏㹼ն
劥⢪欽霹僈⛼ (IFU) ⚥涸㹁⛐
险デ 銩獏㴘⪢䙎餿⼴ն㠁┯槏闌䌔┻┯ꈯ㴖騍餿⼴⺪茤⚷㸉䜨䧶♑☭ꅐ䧯☭麄⛄㵭ն
岤䠑✲고 銩獏㠁┯ꈯ㴖ꂘ◲騜僻⺪茤㸍蔺俠╗笡缛䧶駦㜜䧶⪼╚ꌄ⮕ꌄ⚂溸䰁㐿ն
岤䠑 銩獏ꂘ◲儱婞燛❈氠勔笡缛䧶駦㜜溸ꓨ锢⟥䛉ն
湡䔶
鎊 ...................................................................16
㹐䨪佅䭯................................................................16
劥⢪欽霹僈⛼ (IFU) ⚥涸㹁⛐ ................................16
傁㹁欽鸀 ............................................................17
䝖罏/氻➃霉⠮........................................................ 17
곫雦⢪欽㼑ㄐ......................................................... 17
㸝Ⰼ霹僈 ............................................................18
㸝Ⰼ錞薴................................................................ 18
⚚ꅾ✲⟝................................................................18
鿈⟝ぜ獦 ............................................................19
⢪欽ⲥ㢊 ............................................................19
ⴲ妃⢪欽6 ⚡姿낢........................................... 19
嫦妃⢪欽5 ⚡姿낢...........................................19
鷥䭊じ⯶錞呔.....................................................20
⢪欽 Arjo 崵㽯4 ⚡姿낢꣡⟝........................... 20
♶⢪欽崵㽯崵ꆀ2 ⚡姿낢.................................... 20
鷥䭊じ⯶ ............................................................20
鲮鵘/鵘鳕...............................................................20
⯈雽絆ざ ............................................................21
㸝Ⰼ䪬ꅾ 6:/..................................................... 21
鵶䱹♸䬒ꤑ⽓䩾 .................................................22
鵶䱹⽓䩾5 ⚡姿낢.............................................. 22
䬒ꤑ⽓䩾3 ⚡姿낢..............................................22
鵶䱹♸䬒ꤑ梠.....................................................22
鵶䱹梠5 ⚡姿낢.................................................. 22
䬒ꤑ梠2 ⚡姿낢.................................................. 22
䎾欽じ⯶ ............................................................23
㖈䎯♳24 ⚡姿낢................................................ 23
㖈䏠喱/鲰喱♳24 ⚡姿낢.................................... 24
㖈㖑匣♳................................................................24
䬒ꤑじ⯶ ............................................................25
㖈䎯♳14 ⚡姿낢................................................ 25
㖈䏠喱/鲰喱♳13 ⚡姿낢.................................... 25
幡峇ㄤ嶊嫫.........................................................26
幡峇霹僈7 ⚡姿낢.............................................. 26
幡峇欽⻊㷖ㅷ......................................................... 26
嶊嫫 .......................................................................26
⥂Ⱞ♸䫡䚍絶䫡..............................................26
嫦妃⢪欽た......................................................... 26
」腮/厩寓䧴欽✵Ⱖ➭䝖罏傞 .................................. 26
餞㶸 ....................................................................... 26
⥂Ⱞㄤ絶䫡 ............................................................26
佦ꥻ䱗ꤑ ............................................................27
䪮助錞呔 ............................................................28
じ⯶♳涸叻晥.....................................................29
⢪欽霹僈⛼
ZH

17
傁㹁欽鸀
㠁⸞氠⻌⪎
缋ꁩ┺ꬾ駦駉䓝⺢┱ꏕ劔㎃掾䑑⡿倩呻
厜溸 Arjo 䜠脢瓌⛻勨ꏕ㞟❈氠僓⺪䊜ⲙ䜠脢㠁⸞ն
ꯙ◗氠◟㠁⸞▇㜾騟ⴤ㸞
㠁⸞氠⻌⪎
氠◟瓌⛻⾕
ꁾꀂ氠ꄬն
㠁⸞氠⻌⪎
☹❵㸉䫞槏楒㘷劔⩪⮕◗闌䌔ꈯ㴖❈
氠騜僻▫╚溸騜僻嚤ꃎ❈氠ն
㠁⸞氠⻌⪎
ꃿ⻉㐃ⶖꯗ楒㘷յ䫞槏╚䖦յ⪼♑⣍䎙䫞
槏勨卐⾕㵶䎂╚❈氠ն
㠁⸞氠⻌⪎
⺢茤氠◟婟❈氠騜僻▫╚䭰㴼溸氠ꄬն
珡婝氠◟⪼♑潨溸ն
䝖罏/氻➃霉⠮
䧰♰䐮駖❈氠勨卐䐮皒傽䊬駬⛓瓨䍈ն䫞槏☭⽄䍎
㐃❈氠勔鍯翞⯼周䰕♨┬吙⬮駬⛓嬓⻐䜠脢/洡☭
• 䜠脢/洡☭㑀㐃鿝嗈⫐
• 㴟⪢屳劔茤ⲇ佻临蔦䉁溸麄✅
• ┯茤蔦鉿皭皒□傱岻䪩⺇蔦䉁溸✅ꓨ氋蔸ꌄ
⮕✅ꓨ
• 㐃㝕ꌄ⮕䝠⬔┬❹鰣䫞槏☭⽄
• 麄✅괛锢❹鰣䫞槏☭⽄
• ⯢應Ⱙ✍茤ⲇ긌䊬ꓨ锢
• 㸉◟婟稝⻌⪎ⲏ䖪燛⟛麍䌏甯㴼
㠁⸞氠⻌⪎溸
㴘⪢䪩ꓨ (SWL)
• MAA4031MMLA4031MLA4531: 272 kg (600lbs)
婞燛駬⛓嬓⻐䜠脢/洡☭溸✅㒘յ枱⬔⾕瓌⛻楒㘷稝
㒘⻑䍎❈氠稝㒘⾕閕呬ꃿ⻉溸⻌⪎ն
㠁卸䜠脢/洡☭┯怮鳉ꂘ◲匜⚂䍎❈氠⪼♑溸駦㜜/
笡缛☋ն
곫雦⢪欽㼑ㄐ
㠁⸞氠⻌⪎
溸뀔劻❈氠㸓⾀╬劅ꪍ❈氠㸓⾀劻ꮺն
⻌⪎溸뀔駉❈氠㸓⾀⺆⬑◟㵄ꮪ❈氠匜⚂ն㎌婟㐃
❈氠▇⯼ⲏ䖪燛⟛⻌⪎勑⮃楓状䰁յ为鍩䧶⪼♑䰁
㐿ꃥ骮䌔┻勑气䰁㐿ⷬ鍩⺛յ䒔剱յ偃鍩ն㠁
卸澚⯒⚈✇婟稝䰁㐿䝠⬔騟ⴤ❈氠⻌⪎ն㠁卸㸉◟
⻌⪎㴘⪢劔⚈✇沼ꭄ✑╬뀔ꮑ䲃偢䌔╬◗燛⟛㴘
⪢騟ⴤ❈氠⻌⪎ն
㠁⸞氠⻌⪎
溸뀔劻❈氠㸓⾀
❈氠僓ꭊ
• 2 䌑
⟛鯵劻
• 5 䌑
ZH

18
㸝Ⰼ霹僈
险デ
⚹鼙⯝➃魧⠟㹲䎾㨤絊剣⚁➃溏䫡䝖罏կ
险デ
⚹鼙⯝「⠟〫腊㼆Ⱘ剣♳肈⸂ꆀ涸䝖罏⢪欽㥵
⾡欽じ⯶կ緃⛘♳肈⸂ꆀ剣〳腊㼋荝䝖罏徾ⴀկ
险デ
⚹鼙⯝䶫⦝䝖罏⡤ꅾ♶䖤馄ⴀ䨾欽❡ㅷ⿺꣡⟝
涸㸝Ⰼ䊨⡲餏蚚կ
险デ
⚹鼙⯝➃魧⠟㹲➑䎾瀊劍㶸⪰霃㢊կ㥵卓㶸⪰傞
ꢂ馄鵂IFU⚥錞㹁涸傞ꢂⴭ⠔㼋荝勞俱倗鄬ㄤ
䔂䏞」䓳կ
险デ
⚹鼙⯝➃魧⠟㹲䎾㖈⢪欽㨤絊㼆䝖罏朐ⲃ鵳
遤霉⠮կ
险デ
⚹鼙⯝➃魧⠟㹲ⴗ⺡㖈⢪欽じ⯶傞雮䝖罏エ掆կ
じ⯶⠔㼋荝抠拇կ
险デ
⚹鼙⯝➃魧⠟㹲霼鼙⯝⯕/稘㢪⯕撑㼘ⵌ霃
㢊կ凐ꪪ✵⯕/稘㢪⯕⠔꣭⡛勞俱䔂䏞կ
㸝Ⰼ錞薴
• 䓝䜠脢⺈䕒搊鸦┯㴘僓갫僓⢷婝鿛ꁾ/ꁾꃼ䌔
㴘⪢㐌侒⛽䜠脢ն
• 洧䮘䜠脢⺪♨⻌ⶬ⛰䍎杅⯋峜䟩佻䩬䜠脢溸
萧ն
⚚ꅾ✲⟝
㠁卸气┱騍ⶖ泈㊮唩潸⪸䌔䔕⿱氠䨮䧶䜠脢溸
║ꓨ◜⚂⮯氠䨮䧶䜠脢䍎㸞騍║ꓨ◜⚂䫟⼴缕ⶖ
泈㊮唩⯜ꅐガ䧶⮕ꨆガն㐃姚潊氠䨮ꂖ䍎⻔⪼䨿
㐃䧯⽄㎼溸╭硅䓝㹾䫟⼴騍║ꓨ◜⚂ն
ZH

19
鿈⟝ぜ獦
⢪欽ⲥ㢊
ⴲ妃⢪欽6 ⚡姿낢
啃句⻌⪎溸䨿劔ꌄ⚂騟꭛
睘
19
뀅溸ꌄ⚂
⻐璼
┞虹ն㠁卸⚈✇ꌄ⚂罼㝤䧶䰁㐿 – ┯䕒❈
氠⻌⪎ն
♏缂꭛騣勔 IFUն
啃句⻌⪎儱⻲䌏⬥ն
㐃䭰㴼⛻翞㡚ㄌ㲾侒 IFU♨➬갫僓⺆꭛ն
燛⟛⯜㴼㟲䫜侬駉⮦♨ꮑ䜠脢⮃楓箄䙋䝠⬔ն
劔⪸⚈✇ꭄ뀨騟臅笡䜨䓝㐌溸 Arjo ♣銩♨㸌
寛佻䭥ն
岤䠑
Arjo 䒊雳㼜䝖罏㨹ぜ叻岤㖈じ⯶⥂Ⱞ叻晥♳
鼙⯝䝖罏⛓ꢂ❜⿸䠭厩կ
嫦妃⢪欽5 ⚡姿낢
㸉䜠脢駬⛓僓䖪뀋㢽缄燛㴼傽䊬䫞槏╚❈氠溸
做岻騟꭛
睘
17
뀅溸傶㴼氠ꄬ
ն
险デ
⚹鼙⯝䝖罏㗖衅霼⸉䗳呏䰘 IFU 鷥䭊姻烁涸じ
⯶㽯㼄կ
啃句⻌⪎յ⻌厜⾕瓌⛻勨溸⩣駠缀⻉騟꭛
睘
21
뀅溸⩣駠缀⻉
┞虹ն
险デ
⚹鼙⯝➃魧⠟㹲霼㨤絊烁⥂㖈⢪欽唬叅霃㢊կ
啃句⻌⪎溸䨿劔ꌄ⚂騟꭛
睘
19
뀅溸ꌄ⚂
⻐璼
┞虹ն㠁卸⚈✇ꌄ⚂罼㝤䧶䰁㐿 – ┯䕒❈
氠⻌⪎ն啃句
• 状䰁
• 卄俆罙⻉
• 鍩⺛
• 熏崫
• 䉘倣叉對
• ⺇䰁ⷒ⺛/楒
• 䊎䩽䰁㐿
• 吙曵傱岻ꀥ駌䧶䰁㐿
险デ
⚹✫姺❜⿸䠭厩䗳곢㨤絊黽㸛劥 IFU ⚥涸嶊
嫫霹僈կ
啃句⻌⪎儱⻲䌏⬥ն㠁卸⻌⪎┯䌏⬥騟꭛
睘
26
뀅溸庣崀⾕巆嬚
ն
㐃❈氠⻌⪎▇⯼騟꭛騣瓌⛻勨
❈氠騜僻▫
(IFU) ◗闌鿛ꁾ騜僻ն
⻌⪎吙曵
⛻◟⻌⪎㜾ꌄ
Ⲏ䒩升鋶
Ⲏ䒩升
뀘ꌄⷒ䩽
ⷒ䩽艶ꌄ
䬕䩘
萧滽歾
萧䊎
ⷒ䩽萧ꌄ
╚ꌄ
╚ꌄⷒ䩽
㝧ꌄ
佻临䊎ꦯ楒
ꂞ䱹楒萧ꌄ
ꂞ䱹楒艶ꌄ
⻌⪎獏❛ն勑獏⮃䨿劔㒘⺵ն
23
5
6
9
8
10
4
7
11
12
13
13
14
15
1
11
ZH

20
㕃1
㕃2
43 52 61 72.7 99.6 104.7 114.794.784.7
AB
COCCYX HEAD
cm
in
16,9 20.5 24 28.7 33.7 37.6 39.5 41.5 45.2
XXS XS S M L LL XL XXL
鷥䭊じ⯶錞呔
⢪欽 Arjo 崵㽯4 ⚡姿낢꣡⟝
Arjo 嵱㹷儱┞璀☹❵脞溸嵱ꓪꮩ⚂䳀❵⛓砯⡽ն
ꄑ䭃婞燛閕呬溸 Arjo ⻌⪎僓ꂖ䍎脞軭䜠脢✅㶄⾕
麄包嬠❛ն
㠁卸⺪茤䍎駑䜠脢㜘◟㑀㥍ն
㸞嵱㹷┪吙駘 A溸嵱掾翞◟䜠脢溸㹼돟㜘/뀆긐
䍵⛻⛻翞 Aն騟閒㎽ 1⾕騟閒㎽ 2
嵱ꓪ♈㹼돟/䍵⛻⛻翞 A⯒㝧뀆⛻翞 B▇ꭊ
溸ꪍ䍳ն騟閒㎽ 1
嵱㹷┪┱䜠脢㝧뀆䌐뱚溸䔅虝ⶔ㔔䭰獏⮃䨿괛
溸⻌⪎閕呬ն㠁卸䭰獏溸⻌⪎閕呬♃◟═╗閕呬
▇ꭊ⮯䐮駖ꄑ䭃鿲㸰閕呬ն騟閒㎽ 2
♶⢪欽崵㽯崵ꆀ2 ⚡姿낢
㸞⻌⪎翞◟䜠脢芻ꌄն
燛⟛⻌⪎锭漺䜠脢㝧뀆⛻翞 B蔸㹼돟⛻翞
A▇ꭊ溸ꌄ⛻ն騟閒㎽ 1
鷥䭊じ⯶
ꄑ䭃⻌⪎僓괛锢脞軭䜠脢溸艩✅媙洒, ✅ꓨ⮕䉘⾕䙰✅䓺ն
鲮鵘/鵘鳕
俱〿 㸝Ⰼ䪬ꅾ ❡ㅷ霹僈 錞呔
MAA4031M 272 (600 lbs) 䌄㣢䩯涸⽓䩾䒭㥵⾡欽じ⯶ XS, S, M, L, LL, XL, XXL
MLA4031 272 (600 lbs) 䌄㣢䩯涸梠朐㥵⾡欽じ⯶ S, M, L, XL
MLA4531 272 (600 lbs) ♶䌄㣢䩯涸梠朐㥵⾡欽じ⯶ S, M, L, XL
⢪欽崵㽯崵ꆀ䏞
ZH
Other manuals for MAA4031-M
1
This manual suits for next models
2
Table of contents
Languages:
Other Arjo Bathroom Aid manuals
Popular Bathroom Aid manuals by other brands

Pressalit Care
Pressalit Care SELECT R4951 Operation and maintenance manual

Drive
Drive RTL12026 installation instructions

Croydex
Croydex AP5010 Series quick start guide

pba
pba 4CN.NYD.0002 user manual

Hewi
Hewi 900.51.10260 AS Installation and operating instructions

Cefndy
Cefndy Yess M156 User instructions

Rehab and Mobility Products
Rehab and Mobility Products RM400 Assembly instructions

lopital
lopital Tango 5100 5700 Instructions for use

Croydex
Croydex AP5410 H Series Assembly instructions

DURAVIT
DURAVIT OpenSpace 791874 Mounting instructions

CRL
CRL ASR1 Mounting instructions

Kohler
Kohler K-11870 Installation and care guide