Armorgard siteboss chest SB16 Quick start guide

siteboss chestTM
Operational and maintenance manual
Suitable for: SB16, SB24
1-877-794-2848 [email protected]

2
Welcome
Welcome to your Armorgard SiteBoss Chest. The perfect
combination of security and safety, whether you’re on the
jobsite or in your truck. Please consult this manual for
instructions on how to get the most from the unit.
Please read this operational and maintenance manual
carefully prior to setting up the SiteBoss Chest.
Always keep this manual with the product and read
prior to use.

3
Contents
Safety information 4
Product specification 5
What’s included 6
Tools you’ll need 7
Getting to know your SiteBoss Chest 8
Padlock housing dimensions 9
How to use 10
Installing the padlock 11
Installing the rubber grommet 12
Electrical safety information 13
How to use the lock 14
Optional extras 15
Installing the casters 16
Attaching the crane lifting eye kit 17
Storing the unit 18
Transporting the unit 19
Equipment care & ongoing maintenance 20
Warranty 21
Spare parts 23

4
Safety information
Before using a SiteBoss Chest, ensure any relevant risk assessments are carried out.
Armorgard cannot be responsible for accidents that occur due to negligence.
Ensure that the SiteBoss Chest is not damaged before using it.
Always lock the box and the casters (if applicable) when not in use or out of sight. Do
NOT leave keys inside the unit while locking.
Only position the SiteBoss on stable and even ground to prevent it rolling over and
causing injury or personal harm.
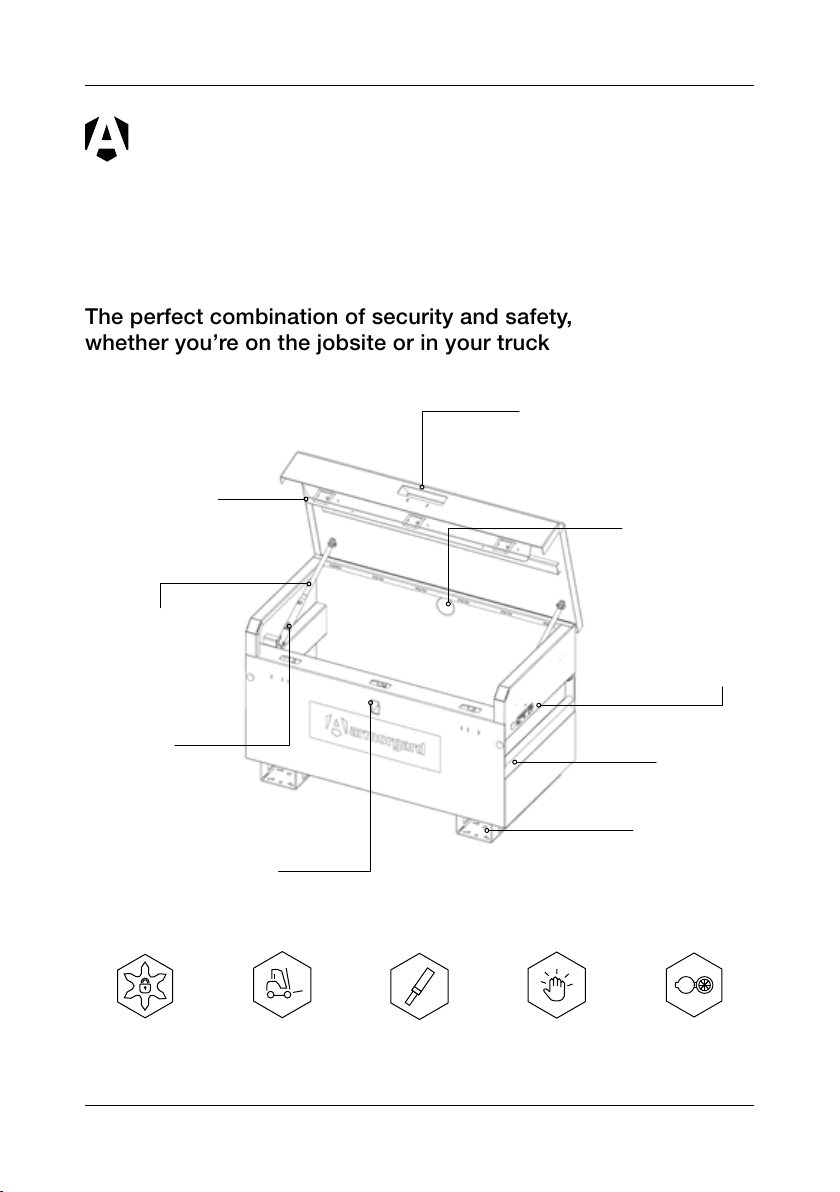
Always fully open the lid so the SlamStop engages on the gas strut. To close the lid, lift
the SlamStop with one hand and begin shutting the lid with the other. Once the gas strut
has cleared the SlamStop, ensure all limbs are fully outside of the chest before closing
the lid completely. Always check that the area is clear before closing and guide the lid
closed carefully.
Improper dangerous activities performed using the SiteBoss Chest increases the risk of
personal injury, please follow the stated instructions to prevent incidents.
Ifcastersarebeinginstalled,thesemustbeinstalledaccordingtoourspecicationand
shouldbecheckedregularlytoensuretheyarestilltforpurpose.
This product should not be used for transporting or storing explosives, hazardous
wastes,ammablesorhazardousmaterialssuchasgastanks,containersofsolvents,
dynamite, gunpowder, etc.
Any alteration to or unintended use of this product could create a danger of an explosion
or other hazardous conditions that can result in serious personal injury, property damage
or even death.
Only use UL or CSA listed electrical devices that meet the requirements of the local
jurisdiction.
Always wear the appropriate PPE for the task you are performing, as outlined in your risk
assessment or safe work practices.
The unit has an overall WLL of 2200 lbs.

5
Do Don’t
Lock the box when leaving it unattended Leave keys inside unit when locking
Lift SlamStop lid stay when closing lid Leave lid unlocked when unattended
Integrity check the box before lifting Use box to store hazardous substances
Fully unload before lifting Leave casters unlocked when in position
Product specification
Product
code
Description Weight
(lbs)
External Dimensions
W x D x H (inches)
Internal Dimensions
W x D x H (inches)
SB16 Site Chest 4’x2’x2’ 185 45.9 x 24.2 x 28.3 45.1 x 23.2 x 24.4
SB24 Site Chest 4’x2.5’x3’ 240 45.9 x 29.9 x 33.5 45.1 x 28.9 x 29.5
While every effort has been made to ensure this operational and maintenance manual
covers every aspect needed to operate your product safely, please take care when using
the product and always operate with caution. Always liaise with management personnel
on site for any additional operational restrictions that you need to be aware of.
SiteBoss™ Patent 2211899.6

6
What’s included...
1x SiteBoss Chest 1x rubber grommet 1xUltraLockxingkit
(padlock not included)

7
Tools you’ll need...
Multiple
people may
be required
to assist
with lifting
Rubber mallet
or hammer (for
adding rubber
grommet)
Adjustable
wrench or ratchet
and socket
(11/16” socket for
installing padlock
and 1/2” socket
for casters)

8
Getting to know your SiteBoss ChestTM
The perfect combination of security and safety,
whether you’re on the jobsite or in your truck
Stainless steel padlock
locking mechanism
Recessed
handles
SlamStop
lid stay
Data plate which
lists each unique
product serial
number
Anti-tamper
feature for added
security
Forklift pockets Gas struts
(300N)
SlamStop lid
stay
4-way forklift
pockets
Cable pass-
through point
Gas struts
Ergonomic easy-lift lid handle
UltraLock Cable pass
through point

9
Padlock housing dimensions
Padlock not included
This lock system is designed to be used with a Master Lock No. 1, Master Lock No. 5, ABUS
41/50 or American Lock No. 50, or an equivalent sized lock. If you are using a padlock not
listed above, it is your responsibility to make sure the lock mechanism is working correctly.
Padlocks must meet ALL requirements listed in diagram.

10
How to use
1. 2.
3.
The SiteBoss Chest arrives fully
assembled.
It is important to check that the
product is not damaged upon arrival
and all parts are intact.
You may require a forklift or
pallet truck when unloading your
SiteBoss Chest. Two or more
people may be required to assist
with lifting.

11
Installing the padlock
1. 2.
3.
Totthepadlock,locatethecavity
where it will be installed.
Inside the product, on the back of
the cavity, there will be a bolt with a
nut. Remove this nut and the bolt to
allow access for the padlock.
Insert the shackle of the padlock
inside the cavity. The keyhole
should remain accessible from
the front face. Make a note of
your padlock’s serial number.
4. Once the padlock is positioned,
insert the bolt into place and use
the nut to secure it together. Always
check that the lock is in correct
working order after installing, before
the lid is closed.
Video: how to install
the padlock

12
Installing the rubber grommet
1. 2.
3.
Locate the cut-out plate in the body
of the unit. With the help of a rubber
mallet, carefully knock the cut-out
plate from the inside.
Next, take the rubber grommet
andplaceitfromtheoutsidetot
the cut-out. Ensure it is properly
installed and no sharp edges are
exposed.
When passing cords through the
grommet, insert them from the
outside.
4. After inserting, pull 2-3” of the cord
backtomakesurerubbernsare
pointing out the box.
Video: how to install
the rubber grommet

13
Electrical safety information
All electrical work MUST be performed properly with safety precautions. To prevent
injury or damage to property, please ensure the below information is read carefully.
Only use UL or CSA listed electrical devices that meet the requirements of the local
jurisdiction.
Extension cords
Ensure that manufacturer’s instructions and safety information are always followed.
Never use a damaged cord. Always check before using.
Always insert cords after the rubber grommet is safely in place.
You must not overload the extension cord.
You must only use cords that are designed for outdoor use.
When transporting the unit, ensure that all cords have been removed from the grommet.
Extension cords must not be connected to outlet that also supplies critical safety
equipment.
Cordless battery chargers
Ensure that manufacturer’s instructions and safety information are always followed.
Chargers and batteries must be cared for properly following manufacturer’s guidelines.
Place electrical components on shelf (if applicable).
Ifelectricalcomponentsbecomewetorexposedtohazardousandammable
substances, switch off and discontinue use immediately.
Always check chargers and batteries will operate properly and are not damaged.
Do NOT come into contact with metal prongs when plugging in electrical components.
Electricalcomponentsmustbekeptawayfromammableandhazardoussubstances.
Only place suitable jobsite equipment in the unit.

14
How to use the lock
1. 2.
Once the padlock is installed, to un-
lock the box, you will need to insert
the key into the padlock. Twist it as
normal, and this will release the lid.
To lock your product, you must close
the lid and simply push the padlock
in. Always double check that the
locks are properly secured before
leaving unattended.

15
Take your SiteBoss
ChestTM to the next
level with these
optional extras
Contact the Armorgard team to find
out more about the optional extras
for your product.
Casters
To make your
SiteBoss Chest
mobile
Crane lifting eyes
To transport by crane

16
Attaching the casters
(optional extra)
2.
4. Repeat step three for the other
wheels. Once complete, check
all nuts are tight, and then ensure
the casters can swivel 360° before
lowering the SiteBoss Chest.
3.
Armorgard casters kits come with
two swivel and two swivel-braked
casters. We recommend attaching
the braked casters on opposite
corners.
1. For the SiteBoss Chests that can
be installed with casters, lift the
box on to a stable platform to
ensure it does not roll and cause
injury. The box MUST be empty
when installing casters.
Insert the caster plate and tighten
the nuts from the bottom using
the adjustable wrench. Repeat
for all.
Video: how to attach
the casters

17
Attaching the crane lifting eye kit
(optional extra)
1. 2.
For the SiteBoss Chests that can be
attached with crane lifting eyes, use
a 13/32” metal drill bit to drill out the
four pilot holes located on each side
of your SiteBoss Chest.
Thread the coach bolts through the
lifting eyes, then back through the
box. Inside the box, add a
backing plate, washers and nylocks
to each bolt as shown.
Before lifting, a risk assessment must be performed by a qualified person to ensure the
product is safe to lift.
3. Always check the working load limit
of the product before carrying out
a lift.
Video: how to attach
the crane lifting eyes

18
Storing the unit
1. 2.
3.
Theatsidesandrecessedhandles
of the SiteBoss Chest can help save
space when storing the unit.
Ensure that the lock is secured when
leaving the SiteBoss Chest unattended.
This is essential to maintain the max-
imum security of the box. Test this by
trying to pull the lid up and open.
When the SiteBoss Chest is in
position, always ensure the cast-
er brakes are used.

19
2. When transporting, ensure the box
is secured using straps or other
necessary measures.
Transporting the unit
The design of the SiteBoss Chest makes transporting the product easy.
The units come with forklift pockets for transporting using a forklift or pallet truck. Optional
casters can be installed to these boxes using the pre-drilled holes.
Please note that boxes may require more than one person to lift, and it is always advised to
lift the boxes when they are empty of contents.
1. Always secure the lock and remove
key before lifting the unit, to
ensure that the lid does not open
unexpectedly. Do not leave the key
inside the padlock.

20
Equipment care
TheSiteBossChestisweatherresistantandnishedwithadurablepowdercoating,soitis
suitable for outdoor use, however, it does not mean it is waterproof. It is always important to
note that any electrical components or equipment susceptible to water damage should be
sealed, or removed in wet conditions.
Always ensure that the product data plate remains visible and in good condition, especially
the unique serial number.
Ongoing maintenance
It is important to check that the SiteBoss Chest is not damaged before every use.
We recommend for you to check the gas struts, locks, SlamStop lid stay and hinges every
three months, to ensure that the SiteBoss Chest can operate fully. If the SiteBoss Chest will
be under rigorous use, we recommend integrity checking regularly.
Always carry out integrity checks before lifting the box.
Apply light oil to hinges for smoother operation.
This manual suits for next models
1
Table of contents
Other Armorgard Tools Storage manuals