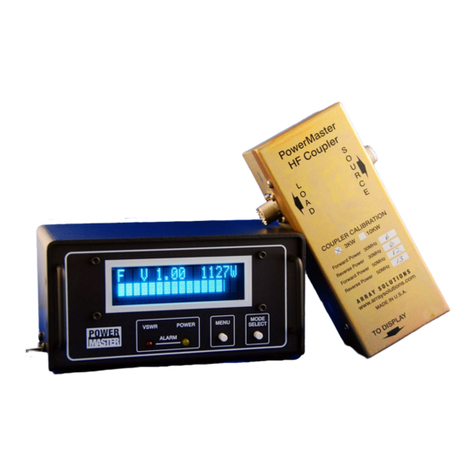
Array Solutions PowerMaster II User manual

PowerMaster II RF Wattmeter www.arraysolutions.com Rev 4.1 - February 23, 2017
1
PowerMaster II
Digital RF Power &VSWR Measurement System
Array Solutions · 2611 N Belt Line Rd · Sunnyvale, TX 75182 · USA
Manufactured in the U.S.A.

PowerMaster II RF Wattmeter www.arraysolutions.com Rev 4.1 - February 23, 2017
2
INTRODUCTION
Thank you for purchasing the Array Solutions PowerMaster II RF
Power/VSWR Indicator. The PowerMaster II represents a breakthrough
in features for measurement of the performance of your transmitting
system. Microprocessor control insures fast capture time and low power
consumption. With the ability to monitor your VSWR and power levels
at all times, you will know that your transmitter, RF source, and load, or
antenna systems are operating effectively and safely. In addition, the
power and VSWR relay alarms can quickly shut down your power
amplifier system and alert you to the alarm condition. This places an
additional layer of protection in yourtransmittingsystem to help preserve
expensive tubes and finals. The PowerMaster II also features the ability
to be monitored and controlled from a PC using the software
downloadable from our website, and the unique ability to be monitored
and controlled over a LAN or from theinternet.PowerMaster II firmware
updates will be posted for download from the Array Solutions websiteas
they become available. This means that the user can take full advantage
of features or enhancements just by installing the firmware update. No
need to return the meter to the factory for updates.
There are many features introduced in the PowerMaster II that have not
been seen before –even in the original Power Masterthat was introduced
back in 2005! We are veryproud of our latest product and are interested
in learning about your experiences with this meter. We also want to
know if you have ideas about new features we can develop for the meter.
We think you will agree that this is a totally new concept in an RF
Wattmeter, and one that should extend its lifetime for a long time to
come.
So, what’s new in the Power Master II?
The Power Master II is a refinement of the original Power Master and is not a completely new model. After 5 years of success with the original, it was
difficult to make changes since so much of the original meter is still appropriate and it works almost perfectly as it was originally envisioned. The new
capabilities of the Power Master II enhance the capabilities of the original meter and don’t remove any of the original capabilities whatsoever. There are
four key differences and they are:
1) Larger LCD Display –lower energy use, larger and therefore somewhat easier to read, newest display technology*.
2) Support for two couplers** –two coupler input jacks on the back panel (see page 11)
3) USB Connectivity
4) New Menu Options (these will be covered later in this manual)
There is no difference in performance or accuracy –these defining features of the original are retained.
* The original Power Master was intended to use an LCD display, but at that time, LCD technology was not capable of meeting the requirements for speed and
appearance. The new LCD units are fast enough and look even better than the older VFD technology in the original Power Master.
** The Power Master II can work with any type of coupler –3kW, 10kW, VHF, UHF, QRP, etc. This is a new capability.

PowerMaster II RF Wattmeter www.arraysolutions.com Rev 4.1 - February 23, 2017
3
Coupler Calibration Table
Forward Power 30MHz
Reverse Power 30 MHz
Forward Power 50 MHz
Reverse Power 50 MHz
IF YOU HAVE PROBLEMS
We want you to be satisfied with your purchase. If you have anytype of
problem, please check the Trouble Shooting section of this manual. If
your problem persists, call our Customer Service Department at
+1 214-954-7140. Please have the PowerMaster and thismanualat hand
when you call.
Write your new PowerMaster serial number and calibration data for your coupler here (see coupler cover)
Serial Number _________________
Date of purchase _________________

PowerMaster II RF Wattmeter www.arraysolutions.com Rev 4.1 - February 23, 2017
4
Note: This equipment has been tested and found to comply with the
limits for Class B digital devices, pursuant to Part 15 ofthe FCC Rules.
These limits are designed to provide reasonable protection against
harmful interference in a residential installation. This equipment
generates, uses, and can radiate radio frequency energy, and if not
installed and used in accordance with the instructions may cause
harmful interference to radio communications. However, there is no
guarantee that interference will not occur in a particular installation. If
this equipment does cause harmful interference to radio or television
reception, which can be determined by turning the equipment off and
on, the user is encouraged to try to correct the interference by one or
more of the following measures:
Reorient or relocate the receiving antenna.
Increase the separation between the equipment and receiver.
Connect the equipment into an outlet on a circuit different
from that to which the receiver is connected.
Consult a qualified radio/TV technician for help.
Properlyshielded and grounded cables and connectors must be used in
order to meet FCC emission limits. Array Solutions is not responsible
for any radio or television interference caused by using other than
recommended cables or connectors or by unauthorized changes or
modifications to this equipment. Unauthorized changes or
modifications could void the user's authorityto operate theequipment.
This device complies with Part 15 of the FCC Rules. Operation is
subject to the following two conditions: (1) this device may not cause
harmful interferences, and (2) this device must accept anyinterference
received, including interference that may cause undesired operation.
Responsible Party: Array Solutions, Telephone 1(214) 954-7140
Industry Canada Compliance Statement
This Class B digital apparatus meets the requirements of the Canadian
Interference-Causing Equipment Regulations.
Avis de conformité à la réglementation d'Industrie Canada
Cet appareil numérique de la classe B respecte toutes les exigences du Réglement
sur le matériel brouilleur du Canada.
PowerMaster RF Wattmeter Series
Federal Communications Commission
(FCC) Statement

PowerMaster II RF Wattmeter www.arraysolutions.com Rev 4.1 - February 23, 2017
5
Council Directive --- 89/336/EEC; EMC Directive
Standards: EN 55022 Class B
EN61000-4-2
EN61000-4-3
TYPE OF EQUIPMENT: ITE
EQUIPMENT CLASS: B
WE,THEUNDERSIGNED,HEREBYDECLARETHATTHEEQUIPMENTSPECIFIEDABOVE
CONFORMS TO THE ABOVE STANDARDS PER 89/336/EEC:
Array Solutions Date of testing March 1, 2012
Copyright and Trademark Disclosure
Array Solutions, Power Master, and PowerMaster II are trademarks of Array Solutions
The firmware for the PowerMaster II is copyrighted. ©2012 by Array Solutions. All rights reserved.
The Power Master Basic II application software for the PowerMaster II is copyrighted. ©2012 by S. London, All rights reserved.
European Union Declaration of Conformity

PowerMaster II RF Wattmeter www.arraysolutions.com Rev 4.1 - February 23, 2017
6
TABLE OF CONTENTS
Unpacking and Setup Page 7
Quick Setup Page 8
Installation Page 9
Using the PowerMaster –Front Panel Page 10
Rear Panel Connections Page 11
Remote Coupler Mounting Page 19
Accuracy and Calibration Page 20
Options Page 22
In Case of Trouble Page 23
Specifications Page 24
Warranty Page 25

PowerMaster II RF Wattmeter www.arraysolutions.com Rev 4.1 - February 23, 2017
7
UNPACKING AND SETUP
INITIAL SETUP
Unpack the PowerMaster II. The package should contain:
One Power Master II Display –Black enclosure
RF Coupler –Gold colored box with connectors (3 kW or 10 kW) [VHF couplers are different]
–6 feet long (attached to VHF/UHF)
–6 feet long (We recommend using a separate PS for this cable, not your TXCVR’s)
This Manual
Please note that we do not ship a software CD ROM with the PowerMaster II. Please go to the Array Solutions website and download the latest
version of the software for your PowerMaster II. .
If anything is missing, give us a call and we'll remedy the problem.
The PowerMaster consists of two major components: The Display and the RF Coupler. The RF Coupler is installed between the output of your
transmitter and your antenna (or antenna tuner input). A six-foot (1.8m) cable is provided for connection between the Display and the Directional
Coupler. You may use a longer cable if you wish (consult the Special Applications section later in this manual).
The PowerMaster uses a standard 2.1mm coaxial power plug, center pin is + V.
Make sure your power source can supply at least 500 mA of current. (800 mA min for the original Power Master)
Please do not use a cheap “wall wart”. These devices are usually not regulated and may cause RFI.

PowerMaster II RF Wattmeter www.arraysolutions.com Rev 4.1 - February 23, 2017
8
Quick Setup
If you arecurrently usinga wattmeter in your setup, you have everything
you need for a test. If you are not using a wattmeter, then you will need
a suitable coaxial jumper to connect the RF Coupler to your transmitter.
Connect the RF Coupler as follows:
SOURCE - connects to your transmitter (or amplifier output)
LOAD - connects to your antenna (or antenna tuner input)
For the 3 or 10 kW HF* PowerMaster, plug the ¼” connector into the
Directional Coupler and the opposite end into the Coupler 1 jack on the
back of the display. Supply12 V DC power byconnectingastandard2.1
mm coaxial plug to the DC jack in the back of the Display Enclosure.
The center pin is “+” 12 V DC, which is connected to the white stripe
cable. (See page 10 for display rear panel details).
Connect your 12 volt DC power source. NOTE: It is recommended
that a separate power supply is used to power the unit. Using the
same power supply connected to thetransceiver may cause RFI and
malfunction. You should observe that the display illuminates and the
firmware version number will be displayed initially, then the unit will
display the operational mode screen as in the image on the cover of this
manual. You are now ready for a test.
Simply use your normal procedure to transmit. The PowerMaster will
give you an instant indication of your power and VSWR.
If the PowerMaster is functioning with a displayof your forward power
and VSWR number with a bargraph to indicaterelative power,youmay
now proceed to program it from the front panel buttons or the control
software.
If you are having other problems, refer to the Trouble Shooting
section of this manual.
*Note: VHF and UHF Couplers have their connection cord
permanently attached to the coupler. Insert the plug from the loose
end of the coupler cord into either Coupler 1 or Coupler 2 jack on the
rear panel of the display. (See Page 10 for details).
VHF
UHF
3 kW or 10 kW HF Coupler
VHF and UHF Couplers

PowerMaster II RF Wattmeter www.arraysolutions.com Rev 4.1 - February 23, 2017
9
INSTALLATION DETAILS –DISPLAY AND
COUPLER LOCATION
The DisplayEnclosure is designed to be either table-top or 19-inch rack
mounted with the optional rack mounting plates. You can mount one or
two meters side by side in a standard 19-inch rack with the available
mounting plates in a 2U high space. If using the Display Enclosure as a
table top or shelf mount, simply place it into a position that is easily
seen, but be careful not to place it on top of an amplifier in a waythat it
blocks the cooling vents of your amplifier. Choose a suitable location
for the Directional Coupler and mount it aswell. We suggest mounting it
with a coaxial adapter right at the output of your transmitteror amplifier.
Be sure that you mount the Directional Coupler close enough to the
Display so that the supplied cable can reach. If you require a longer
cable, any shielded ¼” “Stereo” jumper cable will suffice. If you use a
longer cable, test it for accuracy and RF immunity.
Connect a 12-15 V DC power supply cable with 2.1mm plug to the
Display. The center pin is the “+” side of the DC power plug. Wire your
cable to a clean DC power source. Remember that some switch-mode
power supplies or cheap “wall warts”are RF noisy. The Display is
protected against polarity reversal with a fuse, but the fuse will need to
be replaced if you connect it wrong. Spare fuses are not supplied.
NOTE: We recommend the use of a separate power supply for the
unit and not the samePS feeding your transceiver, to avoidRFIand
potential malfunction of the PowerMaster II.
DIRECTIONAL COUPLER WIRING - Since the purpose of the
PowerMaster is to provide an indication of the match of your antenna
system to your transmitter, it is critical that the Directional Coupler be
installed as the first element after the antenna jack on your transmitter or
amplifier and before an antenna tuner. Connect from your transmitter
antenna jack to the SOURCE connector on the Directional Coupler.
The standard Directional Coupler comes with SO-239 connectors. You
can order optional “N” connectors or 7/16 DIN connectors for higher
power operation.
If you are using an amplifier, install the Directional Coupler on the
output of your amplifier. Connect the cable that goes to your antenna
system to the LOAD jack on the Coupler..
Turn on the power to the Display. You should initially see the firmware
version number displayed, and then the PowerMaster will go to its
normal operational state.
Note that the displaywill become dimmer after 2 minutes of not sensing
power, and completely dark (sleep) after 10 minutes of not sensing
power. This feature allows you to keep the meter on all the time and not
reduce the lifetime of the displayas well as save energy. Themeter uses
very little energy when in “sleep” mode but remains ready to measure
power instantly for you. If you want, you may disconnect or turn off the
DC power supply to the Power Master II to completely shut it down.
There is no harm to the Power Master II unit either way.

PowerMaster II RF Wattmeter www.arraysolutions.com Rev 4.1 - February 23, 2017
10
USING THE POWERMASTER II –Front Panel Controls - General Operation
In addition to the large (4x1”) LCD display, VSWR and Power Alarm LEDs,
there are two buttons on the front of the PowerMaster II: “Menu” and “Mode
Select.”
These buttons are used to select the operational mode and to program the
meters’ many functions such as VSWR Alarm, Power Monitor Alarm, Auto
Ranging Bar Graph Scales, etc.
The following discussion shows you how to operate the meter. As we add
more features, you will be able to download more options foryour meterfrom
the Array Solutions Website. You are invited to join the Array Solutions
User’s Group which can be found on the Array Solutions website.
Operation Menus - A tour of how to operate your Power Master II
After Power-Up the meter enters the Normal Operation Mode –see
upper left character for mode selection
Push the mode select button to scroll through the 5 modes of operation:
F –Fast release of peak hold, ~0.2 second
M –Medium retention of peak hold, ~1 second
S –Slow release of peak hold, ~2 seconds
L - Long peak hold - ~5 seconds
V –Reflected Power is displayed on the Bar Graph –see next image
Peak power in digits is always displayed in the upper right corner and SWR
is displayed in the middle of the upper line of the display (V _.__)
VSWR Bar graph Mode
Used to allow easy adjustment of a tuner for minimum VSWR. In this mode,
the bar graph is displaying reflected power. Reduce the amount of deflection
(or “dip”) for minimum VSWR. (Original Power Master Image)
Note:The VSWR is still displayed in digits herein the middle of thetoprow–
in this photo the SWR is 1.33:1, displayed as (V 1.33).
Note: Along with the image directly above, some of the illustrations in this manual are of the original Power Master and where it is not critical, we have not
used photos of the Power Master II. In these cases, the menus and displays shown are virtually identical in both the Power Master and the Power Master
II.

PowerMaster II RF Wattmeter www.arraysolutions.com Rev 4.1 - February 23, 2017
11
The Power Master II Rear Panel
From left to right the connectors are:
Coupler 1 input
Coupler 2 input
Power Monitor Alarm Connection (1/8”phone jack)
2.1 mm coaxial DC input connector (12 to 15 V DC @ 500 mA typ.)
PTT In (From your radio)
PTT Out (To your amplifier)
RS232* You may use this if you have an RS232 connector on your computer
USB* USB Mini B connector to connect to a USB port on your computer
*Note: You may not use both the RS232 and USB connections at the same time. Only connect one to your computer. The RS-232 port is
disabled by the firmware when the USB port is active.

PowerMaster II RF Wattmeter www.arraysolutions.com Rev 4.1 - February 23, 2017
12
To go from one menu to the next, push the MENU button.
.
VSWR Alarm Limit Menu (C1 –Coupler 1)
Push the mode select button to select the VSWR alarm trip
point:
Off
1.5
2.0
2.5
3.0
Push the mode select button to reset the VSWR alarm and
LED
Coupler Type (Coupler 1 shown)
Push the mode select button to select the type of coupler
connected to Coupler 1 input:
3KW
10KW
VHF-1
VHF-2
UHF
QRP-HF
Note: If Coupler 2 was active, you would see the same
options for Coupler 2. More on couplers selection later.

PowerMaster II RF Wattmeter www.arraysolutions.com Rev 4.1 - February 23, 2017
13
Alarm Polarity Menu
(This option only displays if VSWR Alarm Limit is set ON )
Select by pushing the mode select button:
ALARM OPENS Relay
ALARM CLOSES Relay
This applies to the PTT/ALC relay only –not the Power Monitor relay.
Low Power Alarm Menu
Push the mode select button to choose trip point in watts:
Off
5
50
100
250
500
1,000
2,000
Note: the 10 kW coupler
will show higher ranges;
VHF, UHF and QRP
couplers will show lower
ranges
If the peak power remains below this setting for a few seconds the
power alarm LED will light and the power monitor relay will actuate.
Push the mode select button to reset the alarm and LED

PowerMaster II RF Wattmeter www.arraysolutions.com Rev 4.1 - February 23, 2017
14
High Power Alarm Menu
Push the mode select button to choose trip point in watts*:
Off
175
225
700
1,100
1,600
2,600
3,000
Note:
The yellow
POWER
ALARM LED
will flash on and
off
*(See the note about ranges for other couplers in the Low Power Alarm
Menu on the previous page).
If the peak power exceeds this setting the power alarm LED will flash
and the power monitor relay will cycle on and off. If the “Alarm Trips
Amp”, next menu, option is selected then the VSWR alarm LED will
also flash and the PTT/ALC relay will actuate but will not cycle.
Push the mode select button to reset the alarm and LED
Auto Alarm Reset Menu
This will automatically reset the both the VSWR and Power Alarms or
if “Off” will force a manual reset only.
Select by pushing the mode select button:
Off
1 second
2 seconds
5 seconds

PowerMaster II RF Wattmeter www.arraysolutions.com Rev 4.1 - February 23, 2017
15
Bargraph Ranges Menu
Select with mode select button:
3 kW Coupler
10 kW Coupler
50
250
1000
100
500
2500
100
500
1250
200
2500
5000
200
1000
1700
400
2000
10000
1000
2000
3000
1000
5000
10000
Show Call Text Menu
Select with mode select button:
Yes
No
This will display your call letters or any other text you programmed
into the meter via the software application program. You must use the
software to program the call text.

PowerMaster II RF Wattmeter www.arraysolutions.com Rev 4.1 - February 23, 2017
16
Forward & Reverse Power Trim Menu
This is where you enter the numbers written on the coupler into the meter to make it read accurately.
Select with mode select button to scroll from:
0%, then 1% thru 15% then -15% down to -1% and back to 0 (zero)
Set the Forward Power Trim factor to the settings indicated on your coupler for HF (30 MHz setting) or if you
will be using 50 MHz, you should use the setting in the calibration table for 50 MHz.
Pushing the menu button again takes us to the next menu.
Set the Reverse Power Trim factor in the same manner as the forward power trim.
Some couplers have the same trim factor for both HF and 50 MHz.
Power Display Menu
There are new options in the Power Master II. Select with mode select button:
Net Power ( Forward Power –Reverse Power)
Forward Power only ( Reverse power is not subtracted)
Rev & Fwd (Shows both Forward and Reverse power in digits) [new!]
Select your preferred method to displaypower on the digital power readoutandbar
graph. Seethe different displayformats for 1328 W forward, 26.9 reverse and 1.33
SWR depending on the selected display mode.

PowerMaster II RF Wattmeter www.arraysolutions.com Rev 4.1 - February 23, 2017
17
Use 2 Couplers? Menu
Select with mode select button:
No –Use one coupler (Optional: with two identical couplers –see page 22 for details)
Yes –Use any two couplers.
This changes the first menu you will see when pressing the Menu Button to the “Coupler Input
Menu” where you select either Coupler 1 or Coupler 2. Press MODE SELECT to switch from
Coupler Input 1 to Coupler Input 2. The next menu resumes as normal where you can define the
coupler type (See Page 12). Note: The unique settings for each coupler are stored in the Power
Master II’s non-volatile memory.
RS232 Port / USB Virtual Port Baud Rate Menu
Select with mode select button:
9,600
19,200
38,400
It is recommended to use the highest speed available.

PowerMaster II RF Wattmeter www.arraysolutions.com Rev 4.1 - February 23, 2017
18
Mode Option Toggle / Sequential
This is a new feature of the Power Master II which is primarily of benefit to users of manual
antenna tuners.
Before implementation of this option, one would have to sequentially step throughall 5 modes
of operation each time one would want to switchfroma normalmode(forward) toVSWRmode
(reflected power bar graph) which makes the adjustment of a tuner very short work.
In operation, when in Toggle Mode, Pressing the MODE SELECT button will “toggle” directly
from your preferred forward mode to “V” mode and back again. With a manual tuner, this
feature is incredibly useful and a real time saver.
This menu is only enabled if you have the Menu Option set to “Toggle”
The Mode Option Toggle feature allows you to identify a preferred Forward Mode (Return
to Mode) in this menu. M is shown selected here. ([M]edium retention of peak hold, ~1
second)
You can select any of the four Forward Modes when in this menu: F, M, S or L (see page 10
for details).

PowerMaster II RF Wattmeter www.arraysolutions.com Rev 4.1 - February 23, 2017
19
Using two identical couplers.
With two identical couplers (3 kW & 3 kW) (10 kW & 10 kW) etc., you can connect the two couplers to the Power Master II and be able to read
the power from either one automatically without switching between them.
The Power Master II wattmeter has the ability to have two couplers connected to it, and it has provision to allow switching very
easily between the two couplers through only two button presses on the front panel.
When operating SO2R, you do not want to have to toggle from one coupler to another. We make matched couplers available for
SO2R users and due to the nature of these couplers being high impedance devices, we can actually connect the two coupler
inputs in parallel and instead of toggling between the two couplers, they will both be connected and active at the same time.
The first step is to disconnect all connections to the rear panel of your Power Master II and remove the two #6-32 philips screws
on either side of the cabinet.
Then locate JP1 on the right side of the board.

PowerMaster II RF Wattmeter www.arraysolutions.com Rev 4.1 - February 23, 2017
20
JP1 is supplied with two “dip” jumpers as shown above.
Move the two jumpers so that they match the pattern above
After moving the jumpers as shown above, carefully place the cover back on the meter and reinstall the 4 screws (2 on either side).
At this point what you have done is connected the two coupler input jacks together as if they were one. So, we need to program the meter as if you only
have one coupler –not two! This will allow you to transmit through either coupler and the meter will display that transmitter’s output instantly without
any switching. If you transmit on both at the same time, whichever one is at a higher power level will be shown.
Table of contents
Other Array Solutions Measuring Instrument manuals
Popular Measuring Instrument manuals by other brands

Kyoritsu Electrical Instruments Works, Ltd.
Kyoritsu Electrical Instruments Works, Ltd. KEW 2062 instruction manual

KStar
KStar EASTRON SDM630MCT 40mA user manual

Self Climat
Self Climat Smartbox MINI Assembly and operating instructions

Unit
Unit UT-P43 Series instruction manual

Pro-tec
Pro-tec PROTEK II PROTEK II SF user guide

Promax
Promax RANGER Neo 2 user manual