Arris Zhao Yun User manual

1
ARRIS Zhao Yun User Manual
Thank you for buying ARRIS Zhao Yun 3-Axis brushless Gimbal. Each gimbal
has been adjusted and tested before we send it out. For this gimbal, Most customers
can plug and play when you receive it (Except for some multicopters, you may need
to adjust some parameters).
Here we suggest the customers to minimize the vibrations of the multicopter, for most
of the vibration on the image of the video caused by the multicopter.
In order to get the best performance of the gimbal, please read the user manual
carefully. We will not be responsible for the damage of the gimbal or other equipment
caused by improper operation.
Content
1. ARRIS Zhao Yun Introduction
2. Important Notes
3. How to Install the Camera
4. Zhao Yun 3-Axis Gimbal Connectors
5. How to Connect the User Manual Control Wire
6. Real-Time Video Output Solutions (1)
7. Real-Time Video Output Solutions (2)
8. How to Connect the Wires with the Video TX/RX Systems
9. How toAdjust the Parameters in Software
10.How to Set the Follow Mode in SimpleBGC GUI
11.How to Set the Lock Mode in SimpleBGC GUI
12.Frequently Asked Questions
13.Product Specifications

2
1. ARRIS Zhao Yun Introduction
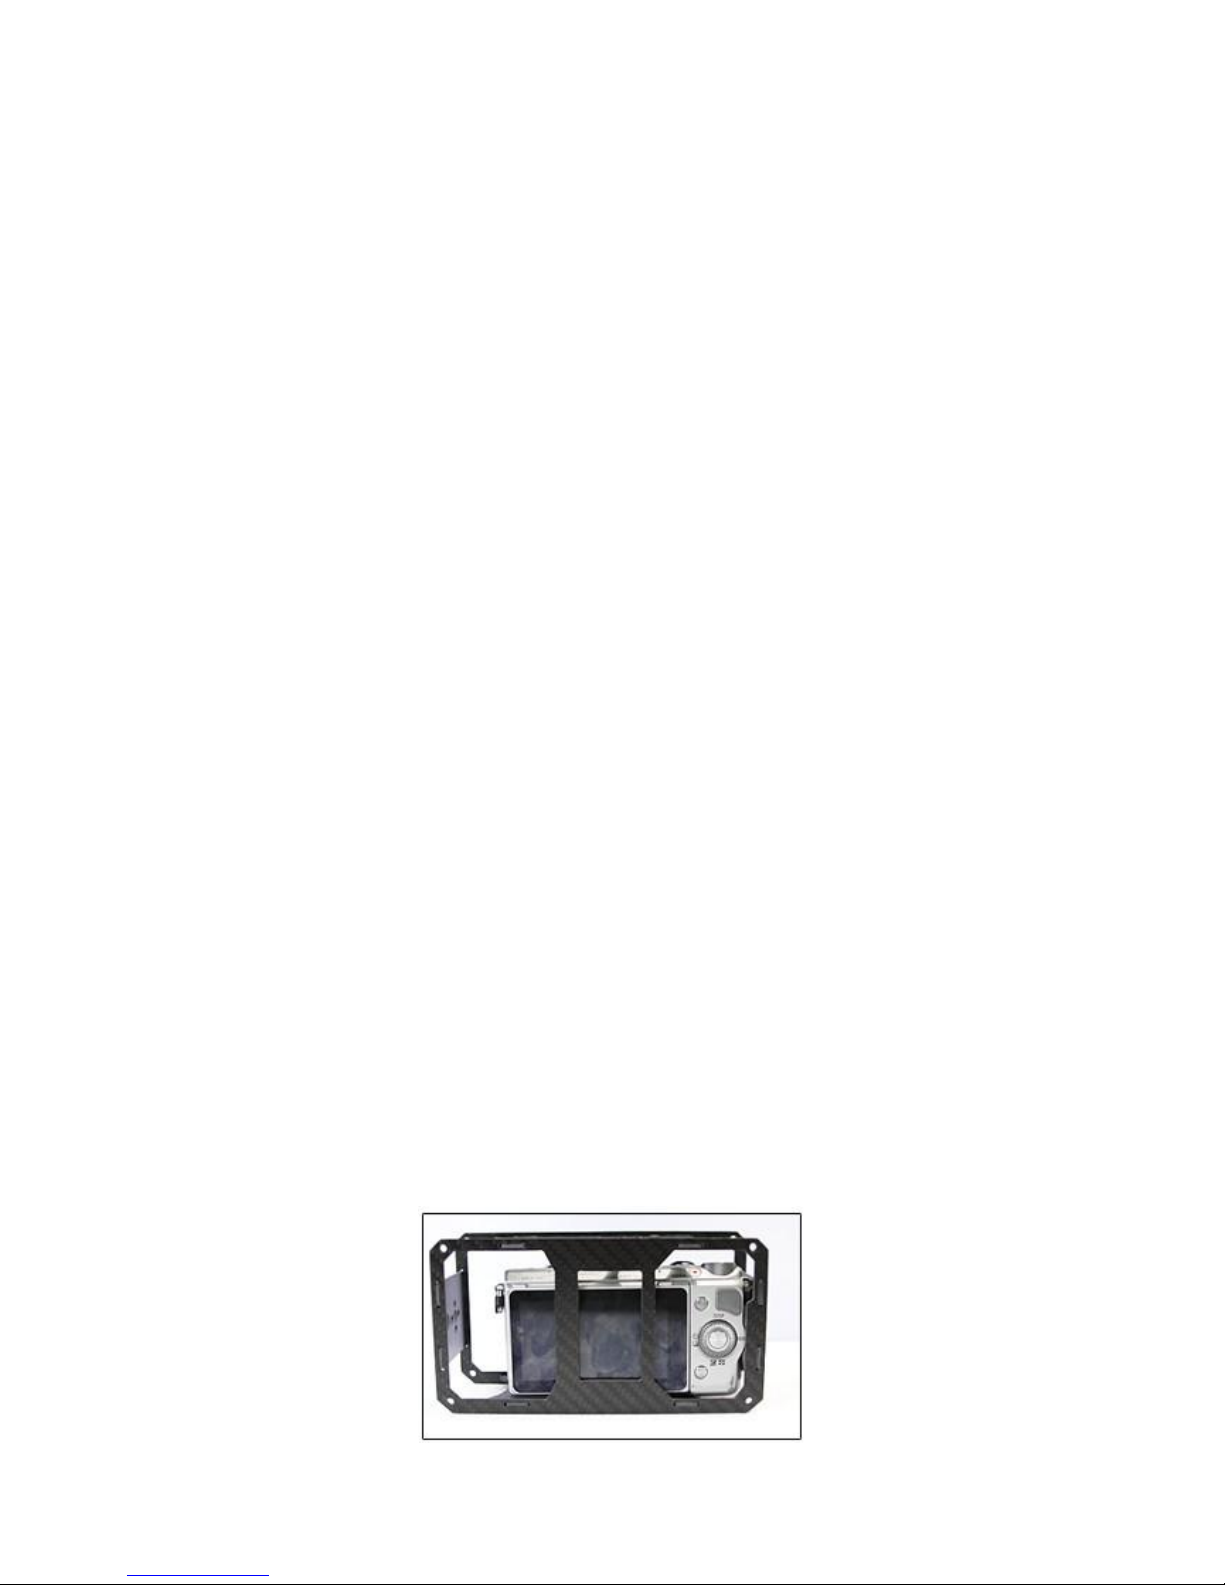
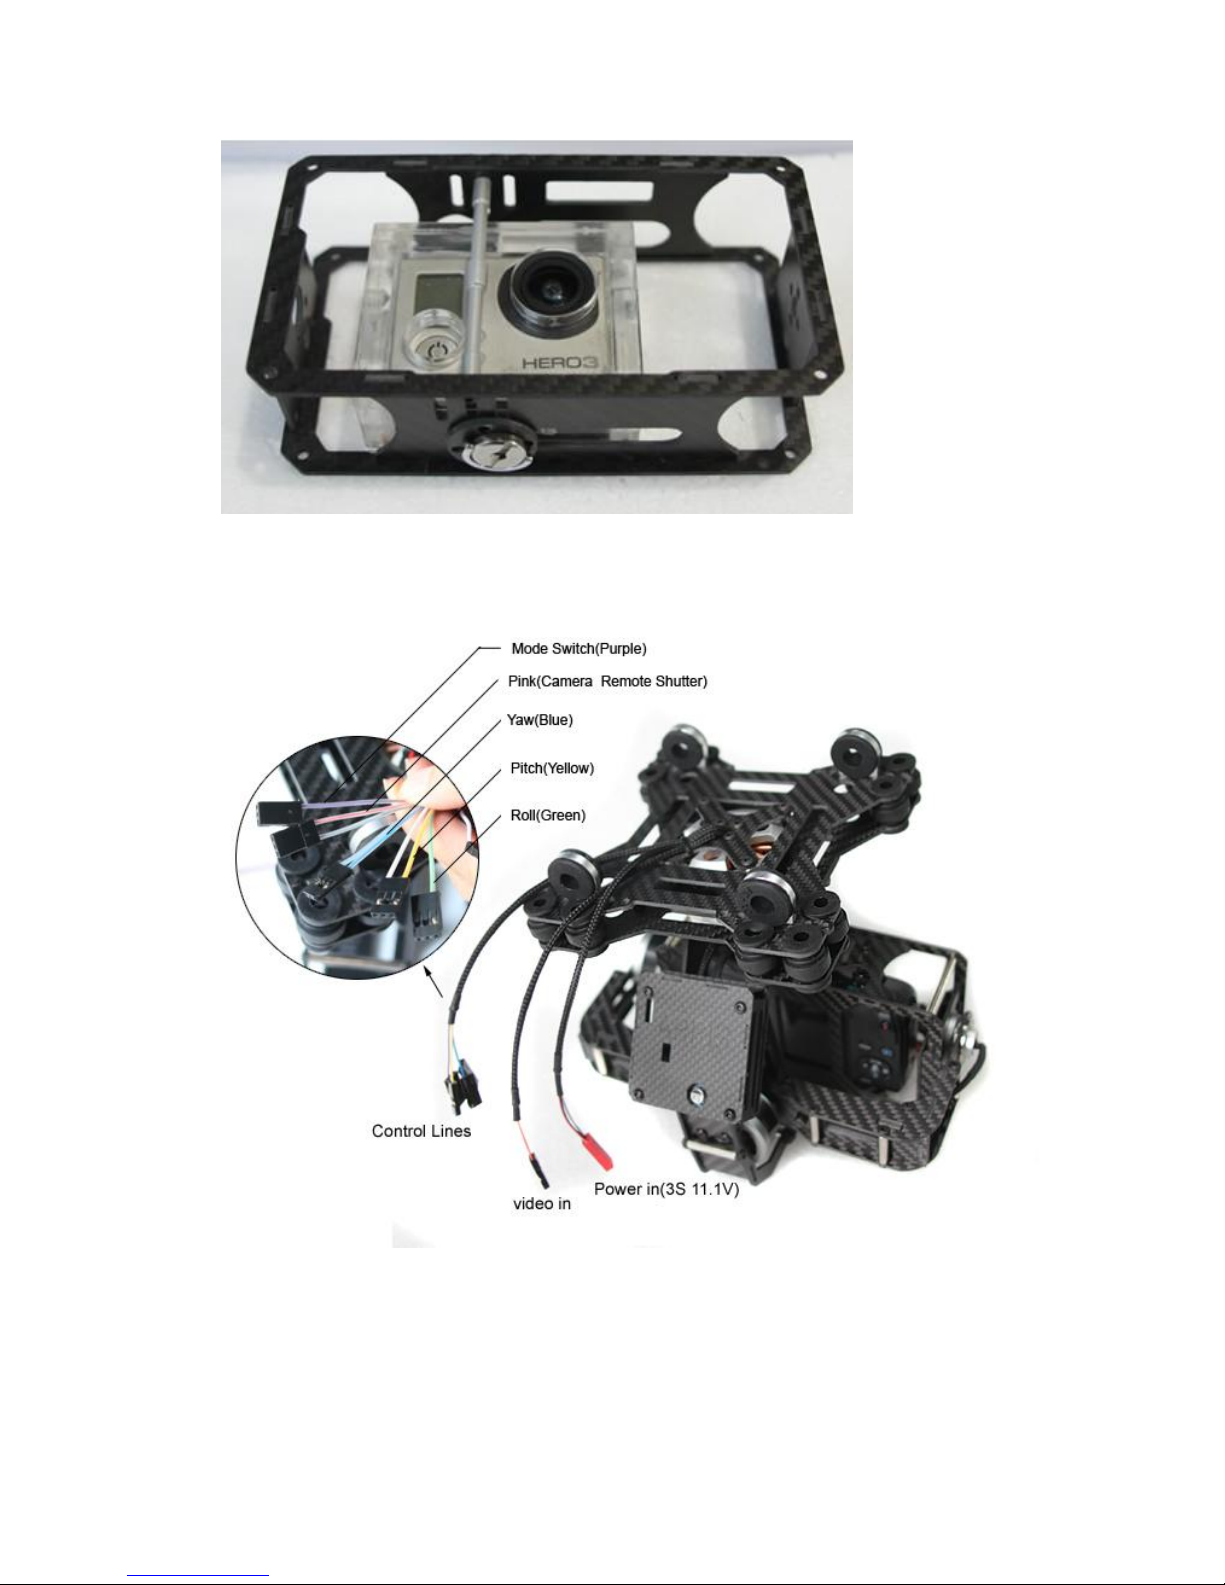
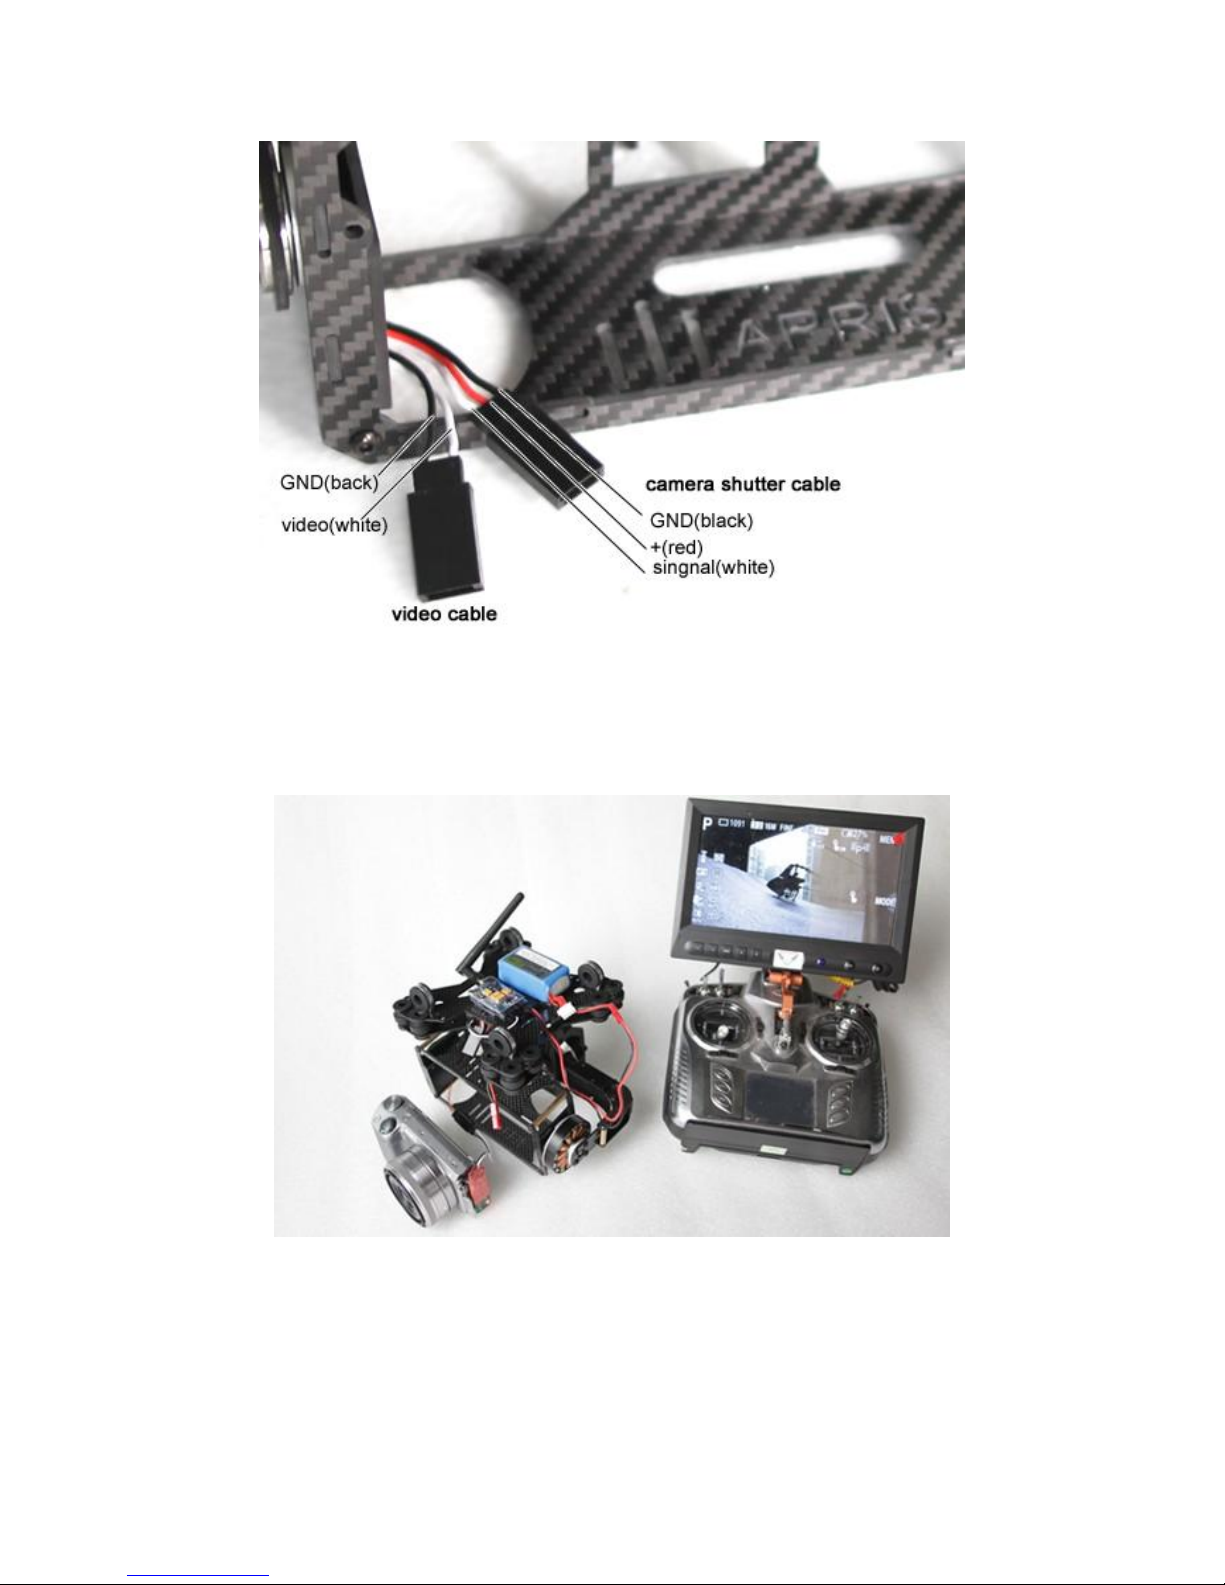
ARRIS Zhao Yun now is compatible with most of the micro DSLR cameras and
GoPro. (For GoPro, you need to purchase the mounting case separately.) For all of the
cameras, we suggest using the prime lens for aerial photography. If you use other lens,
we could not assure stable performance of the gimbal.
The main controller we use on ARRIS Zhao Yun is legitimate Alexmos
SimpleBGC brushless gimbal controller. And the firmware is the latest V2.3 version.
With this controller, it is more stable, and customer can get technician support and
firmware upgrade from the website http://www.basecamelectronics.com/downloads/
(If customers upgrade the firmware or adjust the parameter by yourselves, we could
not provide future technical support, but you can go to
http://www.basecamelectronics.com/)
Zhao Yun Brushless Gimbal is a 3-Axis brushless Gimbal, it can be used on
Hexa-copter and Octa-copters. ARRIS Zhao Yun is one great FPV equipment
designed for FPV enthusiasts.
2. Important Notes
2.1 Although we designed reasonable damping structure for ARRIS Zhao Yun, please
minimize the vibration of the multicopter before you install the Zhao Yun on it, or
the vibration may influence the performance. We provide two kinds of damping
balls for ARRIS Zhao Yun, one is hard, and the other is quite soft. The one we
install on the gimbal is the hard one, this is better for the multicopter with small
vibration. And for the soft damping balls, it is good for the multicopter with bigger
vibration. But with the soft damping ball, the performances will not as good as the
hard one when the multicopter sways a lot. We suggest the customers use the hard
damping balls if possible.
2.2 ARRIS Zhao Yun needs 12V power supply. You can power it by a separate battery
or the battery on the multicopter. Make sure it is 12V when you power it, lower or
higher than 12V, the gimbal may not work properly.
2.3 After you power it, please remain the gimbal still for several seconds,, it needs
time to do the initialization.
2.4 When the gimbal is power on, please do not plug or unplug the motor wire and
manual control wire, this may burn the main controller of the gimbal.
2.5 Try to avoid using the gimbal on dusty or sand places; those items may enter the

3
motor. If you do not notice them and run the gimbal, they may burn the motors.
2.6 When you use the gimbal, make sure you tighten the camera. If the camera is not
tightening enough, it may cause the high frequency vibration.
2.7 The connector on Zhao Yun is JST, 1 (black) is “negative electrode”, and the other
1 (red) is “positive electrode”. Pay attention to the electrode, if you connect the
wrong side, it may burn the main board.
2.8 Before you power on it, please check the wires of the gimbal. Make sure the wires
are not twined, the gimbal can move without any block.
2.9 Before you power on the gimbal, please install the camera on it.
2.10 If you want to use all the functions of ARRIS ZHAOYUN 3-Axis, you need to
make sure there are 4 extra Channel on the Radio.
2.11 In order to ensure the normal operation of ARRIS ZHAOYUN 3-Axis, YAW
should connect with radio and do some setting. Then the gimbal can adjust the
direction effectively.
2.12 Before the initialization of the ZHAOYUN 3-Axis, please make sure that the
front of the gimbal stays the same direction as the front of the multicopter. If there is
some deviation after you power the gimbal, we suggest you use the radio to adjust the
direction of the gimbal. If the gimbal does not connect with the radio, the default
mode is Follow Mode. If the gimbal connects with the radio set, the gimbal mode is
decided by the mode switch.
2.13 In any mode, you can manual control the direction of the Yaw Axis of the
gimbal.
3. How to Install the Camera
3.1 Install the camera in the frame of the gimbal, put the back of the camera close to
the back of the gimbal.

4
3.2 Screw the bottom of the camera by bolt. If the bolt is too long, you need to use the
carbon fiber shim comes in the accessories bag
3.3 Fix the camera by the metal column to the frame, here you need2 M3 X 6 screws.
Tighten it is OK.
There are 3 holes where you can install the metal column, and the column can move
from front to back. For different cameras, you can choose the proper position for it.
How to Install the Gopro3/3+
It is easy to install the GoPro on ARRIS Zhao Yun gimbal, you just need the mounting
case which is specially designed for GoPro by ARRIS. The extra weight of the
mounting case makes the gravity center of the gimbal more reasonable. When you use
the bolt to screw it, please use the carbon fiber shim comes in the accessories bag.

5
4. ARRIS Zhao Yun 3-Axis Gimbal Connectors

6
5. How to connect the Manual Control Wire
5.1 Get the manual control wires comes with the gimbal

7
5.2 Connect the manual control wire with gimbal and the receiver like the following
picture:
Notice: For Mode Switch, please use band switch, such as the A in following
picture.
And for Yaw, Roll and Pitch, please use the stick or knob which has the function of
return to central point. Such as the stick C and knob B in following picture.
The picture below is how to plug wire on Futaba T8FG receiver

8
The picture below is the settings in Futaba T8FG:

9
Here we will introduce the CH on the receiver where the wire plugged:
Function on Receiver Channel
ARRIS Zhao Yun
FutabaT8FG
Roll
1 AIL
Pitch
2 ELE
YAW
4 RUD
Mode Switch
5 GEAR
The function of ARRIS ZHAOYUN 3-Axis on Futaba T8FG:
6. Real-time Video Output Solution
(Support Sony Nex series Cameras and GoPro 3 )
To output the video from camera in real time during the aerial photography, we have
efficient solutions for Sony series cameras. Just use the video TX/RX system and the
HDMI to AV cable, then you can output the video from the camera in real time.
The relevant equipment can buy from:
http://www.hobby-wing.com/fpv-cable-connector01.html
ARRIS ZhaoYun reserved the video output cables as shown in the following picture.
This integrated design can avoid the interference to the roll rotation.

10
How to connect the wire for Nex5 (Only for Nex 5)
How to connect the wire for Nex series (Fit for Nex series cameras)

11
How to connect the wire for GoPro 3
8. How to connect the wire with Video TX/RX systems
Connect the cable with the Video TX on top of the gimbal, then power the video TX.
The camera can use the same battery as the gimbal. After you power the gimal, the
camera will work.

12
9. How to Adjust the Parameters in Software
For ARRIS Zhao Yun, we have adjusted the settings and tested it according to the
version of camera you choose, so we do not suggest you to change the settings.
However, if you need to make some adjustment, the information below may help
you. (Here we only introduce some basic parameter, for other advanced settings,
you can check them on http://www.basecamelectronics.com/)
9.1 You need to install Java, which is compatible with your computer.
9.2 Install the Driver for software
9.3 Install the Software
9.4 Give power to the gimbal, connect it to the computer through USB cable. Your
computer will detect the USB port, after the detection, open the software, you
could see the following picture:

13
9.5 Choose the right port of the USB, and then click “Connect”. After it connect with
the computer successfully, just click “READ, then you could see the settings on the
interface

14
9.6 You can adjust the settings on it now. After you change the settings, remember to
click “WRITE to save them.
For more information about the parameters in software, you can check the
simpleBGC user manual we attached in back of the user manual.
Note: A. Before you upgrade the firmware, remember to save the settings. After you
upgrade it, if the settings changed, you can load the one you saved.
B. If you click the “USE DEFAULTS” or upgrade the firmware and clear all the
settings. You can load the stock settings and set it again.
How to set the stock settings?
1. Connect the gimbal with the computer, load the stock settings comes with the
DVD of the gimbal to Profile 1, then click “Write”to save it. (If you could not
service will send it to you)
2. Click Profile 2, load the stock settings again, and save it. Then calibrate the ACC,
after this process, click write to save it. To calibrate the ACC is really important,
you need to remain the sensor horizontal.
3. Return to Profile 1, choose the Follow Mode, click “Follow Yaw”, and then click
“Write”to save it.
4. Disconnect the gimbal, the gimbal should be working again.
10.How to set the Follow Mode in SimpleBGC-GUI (profile 1)
First, you need to set the basic settings as below picture:

15
Second, set the RC Settings as below:
RC Setting
If you define the Roll, Pitch, Yaw to stick, please activate the SPEED MODE.

16
If you define the Roll, Pitch, Yaw to Knob, please activate the ANGEL MODE.
Third, set the Follow Mode as below (Check the Follow Yaw):
Follow mode Settings
11.How to set the Lock Mode in SimpleBGC_GUI (profile 2)
The first and second step is the same as Follow Mode, and the parameter is the
same.
For the third step, under the Follow Mode, do not choose Follow Yaw, just set it
as the following picture:

17
12. FrequentAsked Questions
12.1--After you power the gimbal, it does not work
1. You can check the connectors between the main controller and the sensor,
make sure they connect well without broken.
2. The parameters in the main controller might be cleared. You need to enter set
the settings again.
12.2--One of the motor is swinging
1. Please check whether the motor wire is connect well, there are 3 wires on the
motor. If one wire broke, it may cause this problem.
2. You may not choose the right direction of the motor. This can be solved in
software. Choose the swing motor, and click “invert” under motor
configuration is OK.
12.3--Motor does not move
1. You can check whether the motor is stuck by the sand, screw, dust and etc.
12.4--When you control the pitch, the gimbal swing quickly when it reach some angle
1. Generally, the sensor wire twined, so the motor could not work properly. This
will cause this problem.
12.5--High frequency vibration of the Gimbal
1. The camera is not fixed tighten enough.

18
12.6--When you control the pitch or roll, the gimbal is shaking
1. The manual control wire, video output wire or other items may block the
modification position of the gimbal.
12.7--The image of the video is not stable
1. This may caused by the vibration of the multicopter, try to reduce the vibration
of the multicopter.
2. It may cause by the soft damping balls, you can change some hard damping
balls to have a try.
12.8--There is jelly in the video
1. This may caused by the vibration of the multicopter, try to reduce the vibration
of the multicopter.
2. It may cause by the hard damping balls, you can change some soft damping
balls to have a try.
13. Product Specifications
a) Overall Features
3-Axis modifications: pitch, roll and yaw
Manual Control Angle: Pitch Angle: 360 degree
Roll Angle: <45 degree
Yaw Angle: 360 degree
Compatible cameras: most of the micro DSLR cameras and GoPro
Recommended Lens: Prime lens
b) Mechanical Features
Working Voltage: 3S battery voltage
Working Temperature: -10℃to 50℃
Weight: 800g
Dimension:190mm x 150mm x 160mm
Table of contents
Other Arris Camera Accessories manuals
Popular Camera Accessories manuals by other brands

Olympus
Olympus Quick auto 310 operating instructions

Cranium
Cranium MO-SYS L 40 Quick setup guide

Creabest
Creabest VB101 manual

Nikon
Nikon EN-EL7 instruction manual

ORION TELESCOPES & BINOCULARS
ORION TELESCOPES & BINOCULARS Tritech II-M Pro instruction manual

Elinchrom
Elinchrom Ranger Quadra EL-19295 user manual