ARTEX 8708 User manual

Y1-03-0273 Rev. D A3-06-2825 Handheld Test Set Operations Manual
Company Confidential
PROPRIETARY INFORMATION
This document contains proprietary information and such information may not be disclosed to
others for any purpose, nor used for manufacturing purposes without written permission from
ACR Electronics, Inc.
Information in this manual is subject to change without notice. ACR Electronics, Inc. makes no
warranty, expressed or implied, with regard to this manual, including but not limited to any
implied warranties of merchantability, fitness for a particular purpose, and non-infringement. In
addition, ACR Electronics, Inc. makes no warranty with regard to the documentation or data
contained herein. ACR Electronics, Inc. is not liable in the event of incidentals, special,
consequential, or any other damages in connection with or arising from furnishing, performance,
or use of this manual.
Reproduction of this publication or any portion thereof by any means is prohibited. For further
information contact Sales, ACR Electronics, Inc., 5757 Ravenswood Rd, Fort Lauderdale, FL
33312. Telephone (954) 981-3333.
COPYRIGHT NOTICE
Meazura, Meazura Compatible, MEZ1500and MZIOare all trademarks of ACEECA
International, Ltd.
Avionic Toolsis a trademark of Avionic Tools, LLC, 88 South Edgewood Rd., Bedminster, NJ
07921.
Palm, Palm/Garnet OS, HotSync, Palm Poweredlogo, and PalmPrintare registered
trademarks of PalmSource, Inc., or its affiliates; and Palm Poweredis a trademark of Palm
Trademark Holding Company, LLC. Other brands may be trademarks of their respective owners.

Y1-03-0273 Rev. D A3-06-2825 Handheld Test Set Operations Manual
Company Confidential
Revision History
REVISION
CHANGE
DATE
A
Release
12/19/13
B
ECO 16725
07/19/17
C
ECO 16785
11/6/17
D
ECO 16990
12/13/18

Y1-03-0273 Rev. D A3-06-2825 Handheld Test Set Operations Manual
Company Confidential
TABLE OF CONTENTS
1. Introduction................................................................................................. 4
1.1 Application..................................................................................................... 4
1.2 Differences .................................................................................................... 5
1.3 Features ........................................................................................................ 5
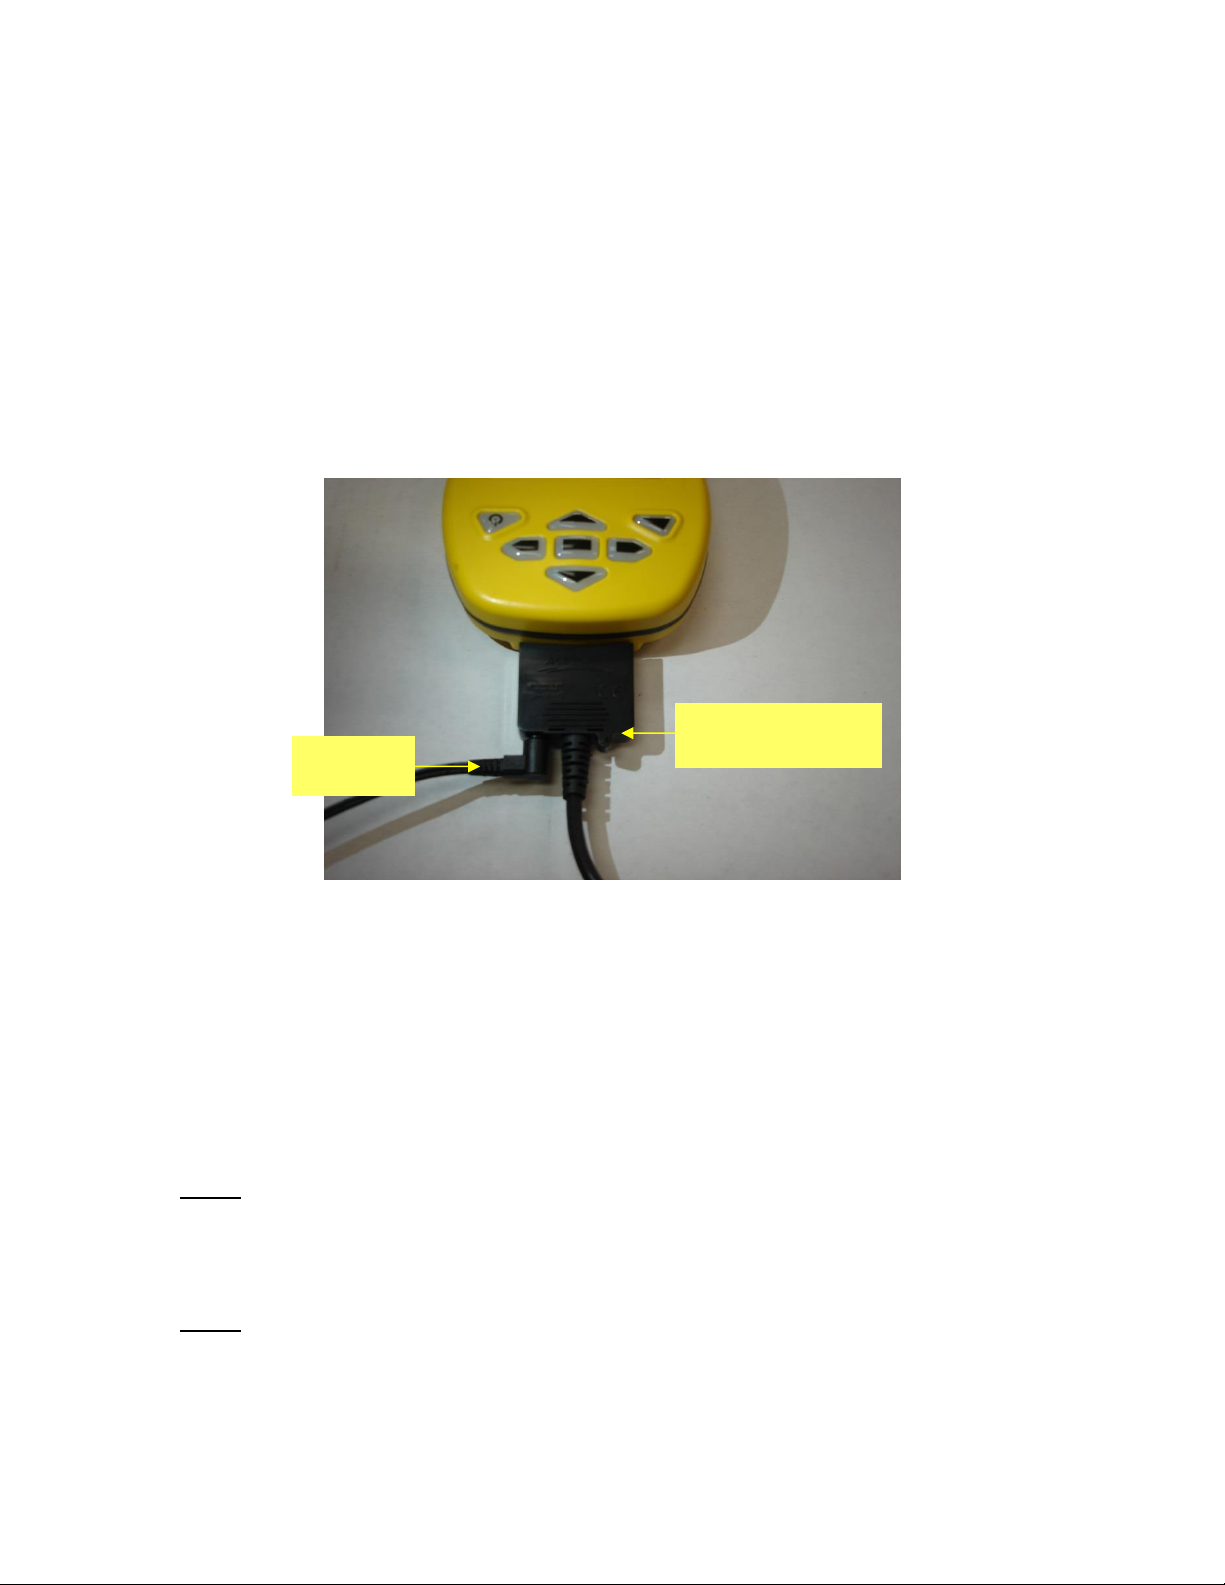
2. Hardware Operation .................................................................................... 7
3. Meazura Operation ...................................................................................... 7
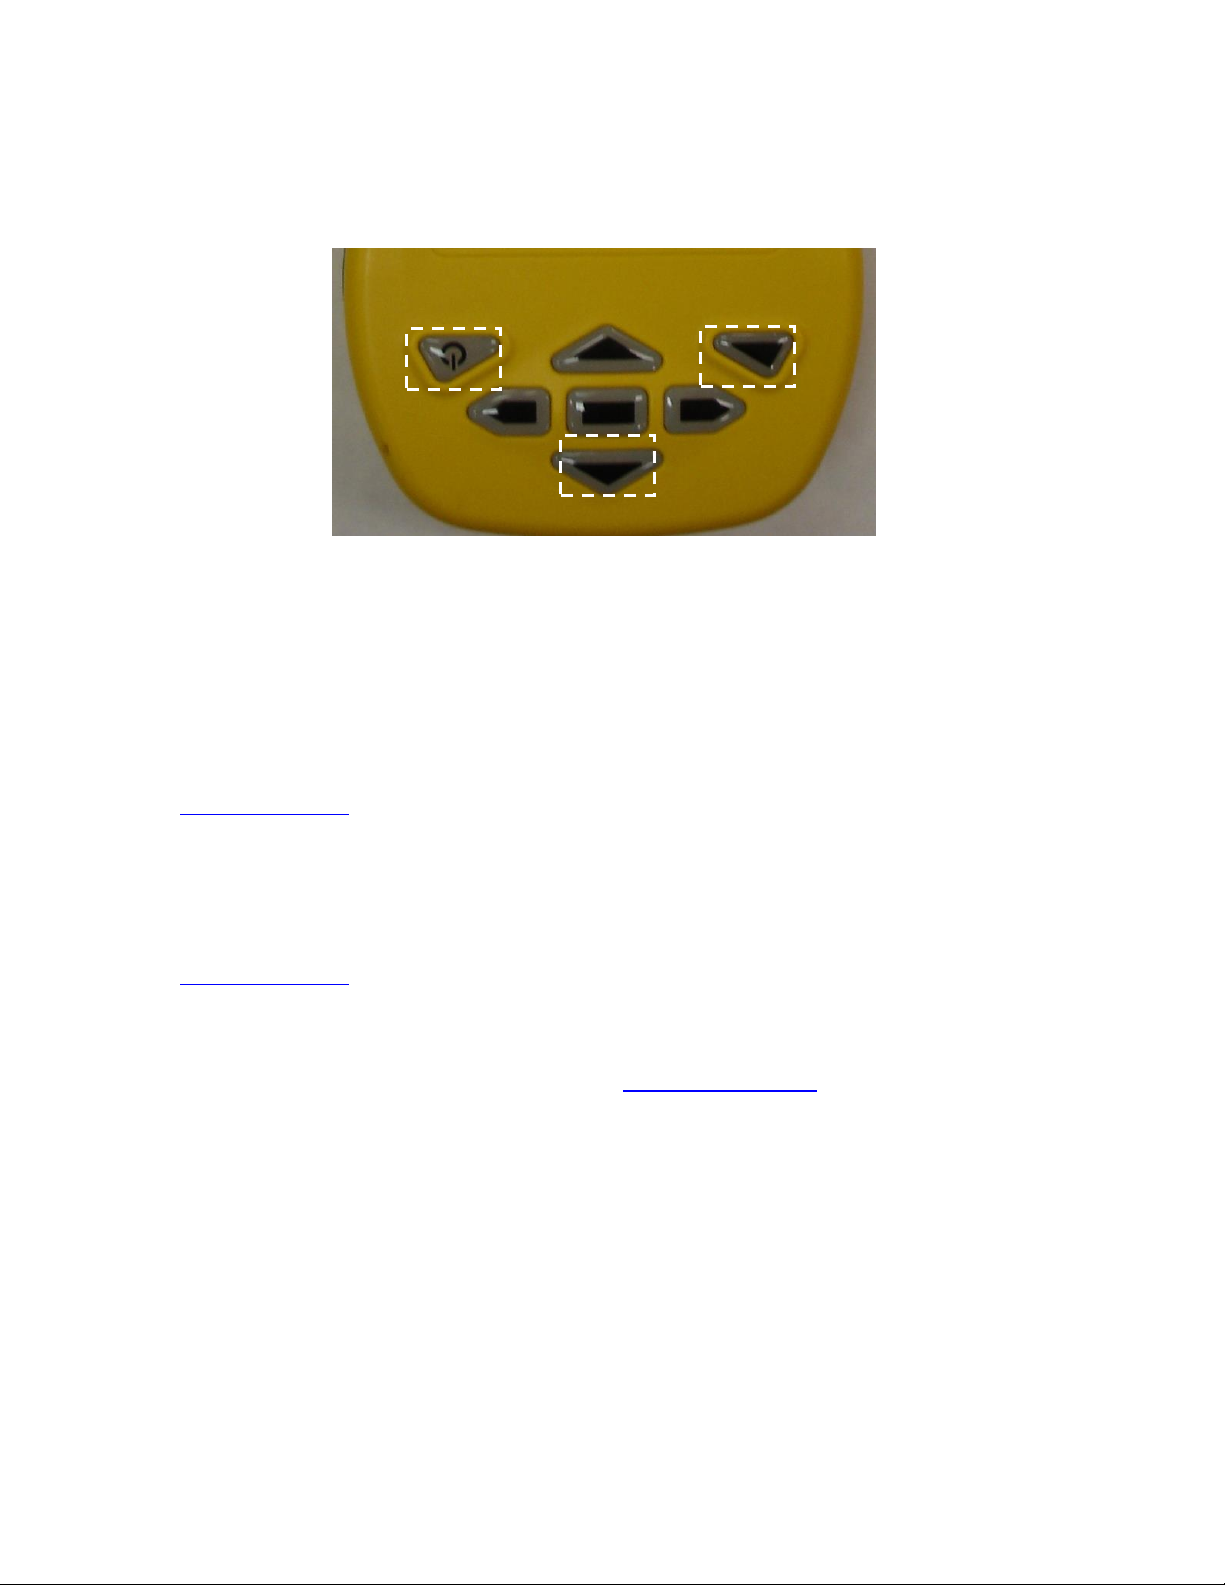
3.1 Controls......................................................................................................... 8
3.2 Palm™ Desktop Software ................................................................................ 8
3.3 Sarcalc Desktop.............................................................................................. 9
3.4 Hot Sync...................................................................................................... 10
4. Maintaining your Battery Pack................................................................... 12
4.1 Battery Usage .............................................................................................. 12
4.1.1 Battery Warnings ................................................................................... 12
4.1.2 Battery Storage...................................................................................... 12
4.1.3 Battery Charging .................................................................................... 13
4.1.4 Recycle and Disposal Methods................................................................. 13
5. Using the ELT Reader................................................................................. 14
5.1 Reader Database.......................................................................................... 17
5.2 ELT Reader Preferences ................................................................................ 18
5.3 Printing Messages......................................................................................... 19
6. ELT Test Set Unit........................................................................................ 20
6.1 Meazura MEZ1000 Specifications: .................................................................. 20
6.2 ETS Module Specifications:............................................................................ 20
6.3 Calibration ................................................................................................... 20
7. System Component Part Numbers ............................................................. 21
8. Optional Equipment ................................................................................... 21
9. Troubleshooting Guide............................................................................... 22
10. Technical Assistance................................................................................ 23
11. Warranty Information.............................................................................. 23

Y1-03-0273 Rev. D A3-06-2825 Handheld Test Set Operations Manual
Company Confidential Page 4
1. Introduction
The Artex ELT Test Set (ETS) beacon reader module, installed in an Aceeca Meazura™
MEZ1500 unit using Palm OS™, is designed to decode and display the encoded 406 MHz
message. The reader can be connected directly to the ELT or monitored “over the air”
using the supplied whip antenna (as allowed by local or national regulations). The
reader will decode any Artex 406 MHz aviation protocol for ELTs. All instructions
contained herein refer to Artex ELTs only. Familiarity with Palm devices and/or the Palm
OS™software is highly recommended. “Meazura” will be used throughout this document
to describe the base Palm unit.
NOTE: The Artex ETS does not decode PLBs or EPIRBs.
NOTE: When connecting directly to an ELT, to prevent damage to the test unit, be sure
to use the attenuator supplied as optional equipment, reference section 8.
1.1 Application
The ETS is a replacement for the Artex Sarsat Beacon Test Set P/N 453-0131 and P/N
453-1000 which are no longer available. For all references to these Test Sets (or
Sarsat Beacon Test Set) in any existing and/or previous Artex documentation,
the Artex ETS P/N A3-06-2825 may be used as a direct substitute. Follow the
general directions for testing the 406 MHz signal as directed in the applicable Artex ELT
Manual except follow the operational instructions for the ETS as outlined in this Manual.
Screen views depicted for the previous test are significantly different from the 453-0131;
refer to the views shown in this Manual and on the test set when using Artex
documentation that refers to the 453-0131.
Note: This Manual does not describe the other functions of the Meazura™ / Palm™
platform or other Palm™based applications that may be used. Contact Aceeca at
www.aceeca.com for details and user guides. This Manual is applicable only to the Artex
ELT Test Set (ETS), P/N A3-06-2825 Revision A or higher.

Y1-03-0273 Rev. D A3-06-2825 Handheld Test Set Operations Manual
Company Confidential Page 5
1.2 Differences
The primary differences between the Sartech test set (ARG 5410 or Artex P/N 453-0131)
and the ETS are as follows:
•Ease of use
•Rapid signal acquisition and processing
•Display of all ELT 406 MHz message information on one screen
•Position data (when present) displayed in degree’s, minutes, seconds
•Use of in-line attenuation not required
•Rechargeable long life battery
•Does not require periodic calibration
NOTE: The Artex ETS does not interface with the previous Artex Programming
Software (510-0406) or Level Shifter (500-0232).
1.3 Features
The A3-06-2825 Handheld Test Set (Figure 1) has the following features and
capabilities:
•All 406 MHz aircraft protocols decoded
•Reception of 406.025 MHz, 406.028 MHz, 406.037 MHz or 406.040 MHz
frequencies
•Waterproof to IP67 standards
•Ruggedized case
•Internal database of received messages and programming
•Optional printing of current or stored messages via IR or Serial links
•Desktop application for database storage and review
•Long life rechargeable battery
•Built-in RF attenuator

Y1-03-0273 Rev. D A3-06-2825 Handheld Test Set Operations Manual
Company Confidential Page 6
Figure 1: A3-06-2825 Handheld Test Set with Antenna

Y1-03-0273 Rev. D A3-06-2825 Handheld Test Set Operations Manual
Company Confidential Page 7
2. Hardware Operation
Prior to use, install battery pack into test set. To close, place the battery pack with the
top end in first. Now push down on the bottom end of the battery pack ensuring that it
is firmly in place. Now push the clip firmly towards the bottom of the test set until it
clicks into place. Charge the ETS battery using the supplied USB cable connection and
wall charger; connect as shown below (Figure 2). Charge for 2 to 3 hours. Upon power-
up, follow on screen directions for initialization and setting the time. The initialization
routine is very important to ensure proper function of the stylus on the test set screen.
Figure 2: Charging Connection
3. Meazura Operation
The heart of the ETS is the Meazura MEZ1500 manufactured by Aceeca Ltd of
Christchurch, New Zealand. The Meazura unit uses the Palm OS™ operation system.
Artex has customized the operation of the Meazura by utilizing the MZIO™ interface
inside of the Meazura unit.
NOTE: As delivered by Artex, the MZIO™ interface is not accessible by the user without
voiding the Artex warranty on the ETS. The combination of the “off the shelf” Meazura
MEZ1500 with a custom module that contains the Artex programming hardware
interface results in the Artex ETS.
NOTE: Aceeca also refers to the MEZ1500 as an “RDA” for “Rugged Digital Assistant”’
this terminology is encountered on the Aceeca web site and in their literature.
CHARGER
CABLE
COMMUNICATIONS
CONNECTOR

Y1-03-0273 Rev. D A3-06-2825 Handheld Test Set Operations Manual
Company Confidential Page 8
3.1 Controls
The Meazura is controlled with the buttons shown below (Figure 3):
Figure 3: Controls
The power button is used to turn the unit off and on and when used with the backlight
button is used for reset functions described later in this manual.
Operation of the Palm OS™functions of the Meazura unit are described in great detail in
the Aceeca “Meazura MEZ1500 User Guide” available free for download at
www.aceeca.com.
3.2 Palm™ Desktop Software
Prior to use, the Palm™Desktop Software as supplied via download from Aceeca at
www.aceeca.com which must be installed on your Windows XP SP3 or later, Windows 7
PC that will be used to interface with the ETS. Follow the on-screen instructions for
installation.
1. Open desktop browser and go to www.aceeca.com
2. Select options in the following order:
•Support
•Downloads
•Desktop Software
•Palm/Garnet Desktop for Windows PC
•Download Now
3. Unzip File Folder SFW_WINX32_PALM-
DESKTOP_V4.1_20110322.ZIP.
4. Open file folder Palm Desktop Installation.
POWER
BACKLIGHT
CENTER
BUTTON

Y1-03-0273 Rev. D A3-06-2825 Handheld Test Set Operations Manual
Company Confidential Page 9
5. Double click setup.exe and follow prompts.
•Install Shield Wizard will open. Select Next.
•Read the SOFTWARE LICENSE AGREEMENT.
•Select I accept the terms in the license agreement, then Next.
•When asked Complete or Custom, select Complete.
•Select Existing User or Create New User.
•When asked about Connections, select USB.
•Select Install, then Finish.
6. Open Palm Desktop.
NOTE: The Palm desktop software works most amiably if a single Meazura™(Palm)
device is associated with a single computer. It is possible to use more than one
Meazura™device with the same computer but attention must be given to the selection
of appropriate user names when transferring data to and from different units.
The Palm software identifies the User Name when the Palm Desktop application is
installed on a PC. Only one User Name can be used with the Artex applications.
3.3 Sarcalc Desktop
The Sarcalc Desktop application SarCalc Desktop V1.2 (or higher) may also be installed
on a PC (available free for download at www.acrartex.com). Once installed, the entire
Sarcalc or Artex database can be reviewed.
1. Open desktop browser and go to www.acrartex.com
2. Select options in the following order:
•SUPPORT
•ARTEX SUPPORT
•Under DOWNLOADS, select SARCALC DESKTOP Software
3. Open File Folder SARCALC DESKTOP Software
4. Select SarCalcInstall.exe. Setup Wizard will open.
5. Perform steps below
•Next
•Read License Agreement and Select I Agree
•Select Destination Folder and Install
•Finish
6. Open program SarCalc Desktop
7. Open Palm Desktop and perform Hotsync operation. (Refer to sections
above).
8. Open SarCalc Desktop and click on .

Y1-03-0273 Rev. D A3-06-2825 Handheld Test Set Operations Manual
Company Confidential Page 10
9. Open Computer/OS (C:)/ProgramFiles(x86)/Palm/”
Select Correct
User”
/Backup
•Example: Computer/OS (C:)/ProgramFiles(x86)/Palm/User/Backup
•NOTE: You will not see the backup folder unless you use “Salcalc
Desktop”
•Select Sarcalc.pdb and Open
10. Tests are found on left side and are listed by date then time.
11. Select test and then print icon.
NOTE: The Meazura unit must be HotSync'd with the Palm Desktop software to load the
database from the Meazura unit to the PC. Once sync'd, the database can be opened
on the PC by starting the SarCalcDesk.exe application and opening the database from
the file menu. The Palm HotSync will usually store the database file in
C:\ProgramFiles\Palm\Artex\Backup\ (where Artex is the Meazura user name. Be sure
to use the “Artex” user name whenever performing a “HotSync”. All Artex provided
software is loaded to the Meazura using this user name.) The database will be named
SarcalcDB.PDB. If the Meazura was set-up on the PC with a different User Name than
“Artex”, check the folder for that User Name to locate the Backup file to find the Sarcalc
and Artex database information.
3.4 Hot Sync
Once installed and configured, the Palm™ Desktop Software will allow installation of
additional software applications as well as performing the hot sync function to transfer
data to and from the ETS (Meazura unit). Artex provides a USB cable (452-0103) to
connect to a PC.
1. Connect test set to PC using USB Cable. Windows may not recognize the
device and will require a driver.
2. Open desktop browser and go to www.aceeca.com
3. Select options in the following order:
•Support
•Downloads
•Drivers
•64 bit USB Windows Driver for Palm/Garnet OS or 32 bit USB
Windows Driver for Pam/Garnet OS
•Download Now
4. Unzip File Folder DVR_WINX64_USB_GN4_GN5_20110322.ZIP
•Follow instructions found in 64bit USB Driver Installation Guide
20110607
5. Ensure Palm Desktop is open.

Y1-03-0273 Rev. D A3-06-2825 Handheld Test Set Operations Manual
Company Confidential Page 11
The hot sync function is accessed by tapping the Hot Sync icon on the main Meazura
screen as shown in Figure 4. The hot sync operation is described in greater detail in the
Aceeca “Hot Sync Guide” available free for download at www.aceeca.com.
Figure 4: Hot Sync Icon

Y1-03-0273 Rev. D A3-06-2825 Handheld Test Set Operations Manual
Company Confidential Page 12
4. Maintaining your Battery Pack
4.1 Battery Usage
The Meazura™ MEZ1500 RDA comes with a custom rechargeable lithium ion battery
pack that can only be purchased from Aceeca or Artex.
4.1.1 Battery Warnings
•Do not heat or throw the battery into a fire.
•Do not use or store the battery close to fire or inside a car in which the temperature
may be over 60°C.
•Do not put the battery in your pocket or in a bag together with metal objects such
as necklaces, hairpins, coins, or screws. Do not store the battery with such objects.
•Do not short circuit the (+) and (-) terminals with a metal object such as a needle,
necklace or hairpin.
•Do not pierce the battery with a sharp object such as a nail.
•Do not hit with a hammer, step on, throw, drop or allow the battery to undergo
other such strong shock.
•Do not disassemble or modify the battery.
•Do not solder the battery directly.
•Do not use a battery that is severely scarred or deformed.
4.1.2 Battery Storage
Unlike Nickel Cadmium (NiCad) batteries or Nickel-metal Hydride (NiMH) batteries,
lithium-ion (Li-on) batteries should be charged early and often. Never use battery
maintenance software to maintain your battery as this can reduce the life of your
battery. Li-ion batteries should be kept cool. They should not be subjected to freezing
temperatures. Aging will occur much faster at high temperatures (such as a hot car) and
will reduce the life of your battery.
Purchase a Li-Ion battery pack only when you need a replacement, ensuring you receive
a fresh battery pack.
•Stop using the battery if it exhibits abnormal heat, odor, color, deformation or is in
an abnormal condition.
•Keep away from fire immediately when leakage or foul odor is detected.
•If liquid leaks onto your skin or clothes, wash well with fresh water immediately.
•If liquid leaking from the battery gets into your eyes, do not rub your eyes. Wash
them well with clean water and consult a doctor immediately.
•Before using the battery, be sure to read the user's manual and cautions on handling
thoroughly.
•For information on installing and removing the battery from equipment, thoroughly
read the user's manual for the specific equipment.
•Batteries have life cycles, so if the time that the battery is powering the equipment

Y1-03-0273 Rev. D A3-06-2825 Handheld Test Set Operations Manual
Company Confidential Page 13
becomes much shorter than usual, the battery life is at an end. Replace the battery
with a new one.
•Remove a battery whose life cycle has expired from equipment immediately.
•When the battery is discarded, make it non-conducting by applying vinyl tape to the
(+) and (-) terminals. The battery must either be discarded as specified by local
regulations or put it in the recycling box of a store that is cooperating in the
recycling of rechargeable batteries.
•When not using the battery for an extended period, remove it from the equipment
and store it in a place with a low humidity and low temperature.
4.1.3 Battery Charging
Do not charge the battery for more than 2 to 3 hours, overcharging can
actually drain the battery.
The lithium-ion battery can provide between 300-500
charge/discharge cycles. The lithium-ion battery is certainly different from most other
rechargeable batteries as charging from a partially charged battery keeps the battery in
great condition whereas other batteries prefer to be fully discharged each time before
recharging again. Fully discharging the lithium-ion battery should be avoided wherever
possible. For most users, charging the battery at the end of each day would be the ideal
choice. The lithium-ion battery pack typically lasts about 2-3 years, but potentially longer
if cared for in the right way.
•When charging the battery, use dedicated chargers and follow the specified
conditions.
•Do not use or charge the battery close to fire or inside a car in which the
temperature may exceed 60°C.
•Stop charging the battery if charging is not completed within the specified time.
•Thoroughly read this manual before charging the battery.
•The battery can be charged within a 0°C to 45°C temperature range.
•Use the battery only in the specified equipment.
•Do not charge the battery in a place where static electricity is generated, or let the
battery touch something that is statically charged.
4.1.4 Recycle and Disposal Methods
Lithium ion batteries, like all rechargeable batteries are recyclable and should be
recycled.
CAUTION: If your battery is damaged, or if it no longer holds a charge, dispose of it
promptly and properly. Do not dispose of it along with general waste. Call your local
waste disposal agency or environmental agency for advice on disposing of the battery.

Y1-03-0273 Rev. D A3-06-2825 Handheld Test Set Operations Manual
Company Confidential Page 14
5. Using the ELT Reader
The supplied Sarcalc program version 3.01or higher (sarcalc.prc) is pre-installed on the
Meazura unit in ROM memory.
Select the Sarcalc program by tapping the “Sarcalc” icon shown in Figure 5.
NOTE: The exact location of your Sarcalc icon may vary depending on what other
programs or applications are loaded on your Test Set. Select “Measure” from the initial
screen. Connect the reader to the ELT directly with a coax cable (no attenuator
required for test set) or connect the whip antenna.
NOTE: The ELT read function does not detect or verify the presence of 121.5
MHz; this is a 406 MHz reader ONLY.
IMPORTANT NOTE:
PERFORM ALL ELT TESTING IN ACCORDANCE WITH LOCAL OR
NATIONAL REGULATIONS. IF REQUIRED, TERMINATE ELT INTO A 50-
OHM LOAD OR PERFORM TESTING IN AN RF SHIELDED
ENVIRONMENT.
ELTS WITH 121.5/243 MHZ TRANSMITTERS MUST BE TESTED
WITHIN 5 MINUTES AFTER THE HOUR (US/CANADA). LIVE
TRANSMISSIONS OF THE 406 MHZ SIGNAL MUST BE LIMITED TO
ELTS WHICH TRANSMIT A “SELF TEST” USING TEST FRAME
SYNCHRONIZATION. EXTENDED TESTING OF THE 406 MHZ ELT
SIGNAL MUST BE PERFORMED DIRECTLY CONNECTED TO THE
READER WITH PROPER SIGNAL ATTENUATION AND/OR RF
SHIELDING. SEE “OPTIONAL EQUIPMENT”.

Y1-03-0273 Rev. D A3-06-2825 Handheld Test Set Operations Manual
Company Confidential Page 15
Figure 5: ETS Main Screen View
The reader is now ready to receive and decode the message. Select “measure” from
“Avionic Tools” screen as in Figure 6. The screen will display “Waiting for Data” as
shown in Figure 7 until a valid ELT transmission is received. Perform a “Self-Test” of the
ELT by turning the ELT local or remote switch from “OFF/ARMED” to “ON” for no more
than 3 sweeps of the 121.5/243 MHz signal and then switch back to “OFF/ARMED”. If
the received data is invalid, then “Message Error!” will be displayed. This may indicate
excessive distance from the ELT antenna if testing externally. 0-30 feet distance from
the ELT antenna is recommended, although distances up to 50 feet are possible (as
allowed). The ELT internal 406 MHz oscillator may also need to warm-up. Repeat the
ELT test if necessary.
Figure 6: Software Screen View

Y1-03-0273 Rev. D A3-06-2825 Handheld Test Set Operations Manual
Company Confidential Page 16
Figure 7: Waiting for Data Screen view
Once a valid message is received, all encoded data is displayed on the screen as shown
in Figure 8. The first line contains the 15 digit Hex ELT ID. This ID is used to register
the ELT with the national authorities (NOAA in USA). The second line indicates the
message type: Test or Normal, and Short or Long. The third line displays the country of
registry code and the country. The fourth line will contain the ELT identifying data. The
ELT identifying data will consist of one of the following: serial number, aircraft 24 bit
ICAO address, or aircraft registration number. ELT type will be displayed (ELT) and also
any auxiliary locating device (121.5 MHz ELT). If the ELT includes a navigation function,
the position will be displayed in latitude/longitude.
NOTE: The received 406 MHz frequency is not displayed. The message will be time
stamped.
Figure 8: Example of Standard Location Data View

Y1-03-0273 Rev. D A3-06-2825 Handheld Test Set Operations Manual
Company Confidential Page 17
NOTE: A displayed message will remain on-screen until the “Clear” button is selected.
Select “Done” to save message and proceed. A new message will not over-write the old
message.
If the ELT is encoded with the 24 bit International Civil Aviation Organization (ICAO)
address and country of registry is USA, then the ICAO address will also be decoded to
an 'N' number registration as shown below.
The message will be automatically saved to a database for later review. Press “clear” or
right arrow key to clear screen for next message.
Figure 9: Example of 24-Bit Address Data View
5.1 Reader Database
All recorded messages are automatically saved to a database (up to 1000 records).
Select “Review” from the initial Sarcalc screen. The latest message will be displayed
with the date and time the message was recorded. Navigate between older and newer
saved messages by selecting “Prev” or “Next”. Any displayed message can also be
printed (if optional printer software is installed).
The number of records kept can be changed by selecting “Prefs” from the initial Sarcalc
screen (see “Preferences”). The database can be erased by deleting the database
“SarcalcDB” from the main Meazura screen as shown in Figure 10. Tap the upper left-
hand corner of the main screen to show the “App” pull-down screen, select “Delete” and
then select “SarcalcDB” to delete. Individual records cannot be erased.

Y1-03-0273 Rev. D A3-06-2825 Handheld Test Set Operations Manual
Company Confidential Page 18
Figure 10: Deleting Database Screen Views
5.2 ELT Reader Preferences
If “Prefs” is selected from the initial Sarcalc screen (Figure 11), the following items may
be selected:
•Readings to keep –10, 20, 100, 1000
Maximum number of readings to store in the database
•ICAO Format –Octal, Hex, Decimal
Format of ICAO Address display
•Display Full Address –checked, unchecked
Check for display of full ELT message, bits 9 –144 (30 Hex digits) or leave
unchecked to display only bits 26-85 (15 Hex digits)
Figure 11: Preferences Screen View

Y1-03-0273 Rev. D A3-06-2825 Handheld Test Set Operations Manual
Company Confidential Page 19
5.3 Printing Messages
The message may be printed (via serial connection) by selecting “Print” from the
Measure or Review screens. The report will print all the displayed data.
NOTE: Artex does not provide or support the optional printer software,
contact the recommended source below.
The print function relies on the Stevens Creek Software application PalmPrint or
SCSPrint. Either PalmPrint.prc or SCSPrint.prc must be installed on the base Meazura
unit for printing to function. PalmPrint or SCSPrint are available from:
Stevens Creek Software, LLC
P.O. Box 2126
Cupertino, CA 95015
Fax: 1-603-698-4777
www.stevenscreek.com
Printing preferences are selected from the main Meazura screen by selecting PalmPrint
or SCSPrint and then choosing serial connections, and choosing an appropriate printer
type. Poorly formatted or illegible text may be caused by incorrect serial port speed or
printer type selection. For more information contact the printer software vendor.
This manual suits for next models
1
Table of contents