Arturia AUDIOFUSE STUDIO User manual

USER MANUAL

Special Thanks
DIRECTION
Frederic BRUN Philippe CAVENEL
HARDWARE DEVELOPMENT
Marc ANTIGNY
Claire BOUVET
Thierry HAUSER
Jérome LAURENT
Léonard SAUGET
SOFTWARE DEVELOPMENT
Timothée BEHETY
Pierre PFISTER
Baptiste AUBRY
Simon CONAN
Corentin COMTE
DESIGN
Martin DUTASTA Morgan PERRIER Axel HARTMANN
TESTING
Arnaud BARBIER
Germain MARZIN
Matthieu COUROUBLE
Christophe TESSA
Ludovic CIALDELLA
Benoît GRELIER
BETA TESTING
Luca LEFEVRE
Terry MARSDEN
Ken Flux PIERCE
Chuck ZWICKY
Jay JANSSEN
Ben EGGEHORN
Boele GERKES
Marco CORREIA
Randall LEE
Philippe BUTTOZ
Guillaume COLLART
Grégory ROUDGÉ
AUDIOFUSE CONTROL CENTER MANUAL
Randall LEE (author)
Minoru KOIKE
Vincent LE HEN
Camille DALEMANS
Charlotte METAIS
Jose RENDON
Holger STEINBRINK
Jack VAN
AUDIOFUSE STUDIO MANUAL
Leo Der Stepanians
(author)
Minoru KOIKE
Vincent LE HEN
Camille DALEMANS
Charlotte METAIS
Jose RENDON
Holger STEINBRINK
© ARTURIA SA – 2020 – All rights reserved.
26 avenue Jean Kuntzmann
38330 Montbonnot-Saint-Martin
FRANCE
www.arturia.com
Information contained in this manual is subject to change without notice and does not
represent a commitment on the part of Arturia. The software described in this manual is
provided under the terms of a license agreement or non-disclosure agreement. The software
license agreement specifies the terms and conditions for its lawful use. No part of this
manual may be reproduced or transmitted in any form or by any purpose other than
purchaser’s personal use, without the express written permission of ARTURIA S.A.
All other products, logos or company names quoted in this manual are trademarks or
registered trademarks of their respective owners.

Product version: 1.0
Revision date: 17 March 2020

Important Safety Instructions
PRECAUTIONS INCLUDE, BUT ARE NOT LIMITED TO, THE FOLLOWING:
1. Read and understand all the instructions.
2. Always follow the instructions on the device.
3. Before cleaning the device, always remove the USB and DC cable. When
cleaning, use a soft and dry cloth. Do not use gasoline, alcohol, acetone,
turpentine or any other organic solutions; do not use a liquid cleaner, spray or
cloth that's too wet.
4. Do not use the device near water or moisture, such as a bathtub, sink, swimming
pool or similar place.
5. Do not place the device in an unstable position where it might accidentally fall
over.
6. Do not place heavy objects on the device. Do not block openings or vents of the
device; these locations are used for air circulation to prevent the device from
overheating. Do not place the device near a heat vent at any location with poor
air circulation.
7. Do not open or insert anything into the device that may cause a fire or electrical
shock.
8. Do not spill any kind of liquid onto the device.
9. Always take the device to a qualified service center. You will invalidate your
warranty if you open and remove the cover, and improper assembly may cause
electrical shock or other malfunctions.
10. Do not use the device with thunder and lightning present; it may cause electrical
shock.
11. Do not expose the device to hot sunlight.
12. Do not use the device when there is a gas leak nearby.
13. Arturia is not responsible for any damage or data loss caused by improper
operation of the device.
Specifications subject to change:
The information contained in this manual is believed to be correct at the time of printing.
However, Arturia reserves the right to change or modify any of the specifications without
notice or obligation to update the hardware that has been purchased.
IMPORTANT:
The product and its software, when used in combination with an amplifier, headphones or
speakers, may be able to produce sound levels that could cause permanent hearing loss.
DO NOT operate for long periods of time at a high level or at a level that is uncomfortable. If
you encounter any hearing loss or ringing in the ears, you should consult an audiologist.
NOTICE:
Service charges incurred due to a lack of knowledge relating to how a function or feature
works (when the product is operating as designed) are not covered by the manufacturer’s
warranty, and are therefore the owner's responsibility. Please study this manual carefully
and consult your dealer before requesting service.

Thank you for purchasing an AudioFuse!
Each member of the AudioFuse family is a cutting-edge, pro audio interface with stellar
sonic quality, an intuitive workflow, and a high return on your investment. They provide the
superior sound of high-end analog studio consoles with all of the flexibility and connectivity
you need for any recording or performance.
At the core of each device is Arturia's proprietary DiscretePRO® technology, which set
new standards in audio excellence and affordability. For the technically-minded, there's a
comprehensive description of the DiscretePRO® specifications here.
This manual covers the features and operation of Arturia’s AudioFuse Control Center,
the companion software for the AudioFuse family. For additional information about the
hardware, please read the owner's manual for your device.

Introduction
Dear musician,
We’d like to thank you for purchasing one of the members of our AudioFuse family! These
audio interfaces are anything but ordinary; they have been constructed using components
of the utmost quality so as to achieve recordings of the utmost quality. This level of crystal
clarity is unprecedented in their price range!
This manual will help you make the most of your AudioFuse device by using the AudioFuse
Control Center, the powerful companion software we designed to work with the entire
AudioFuse series.
The AudioFuse Control Center does much more than simply give you another way to tweak
the front panel controls; it also provides access to parameters and routing options that are
not available from the front panel.
If you are reading this manual and have not already downloaded the AudioFuse Control
Center, you can find it here: AudioFuse Control Center.
Be sure to visit the www.arturia.com website for information about all of our other great
hardware and software instruments. They have proven time and again to be the go-to
solutions for musicians around the world.
Musically yours,
The Arturia team

Table Of Contents
1. AudioFuse Studio.......................................................................................................................................................... 3
1.1. Overview ...................................................................................................................................................................................... 3
1.1.1. Box Contents...................................................................................................................................................................................................................... 3
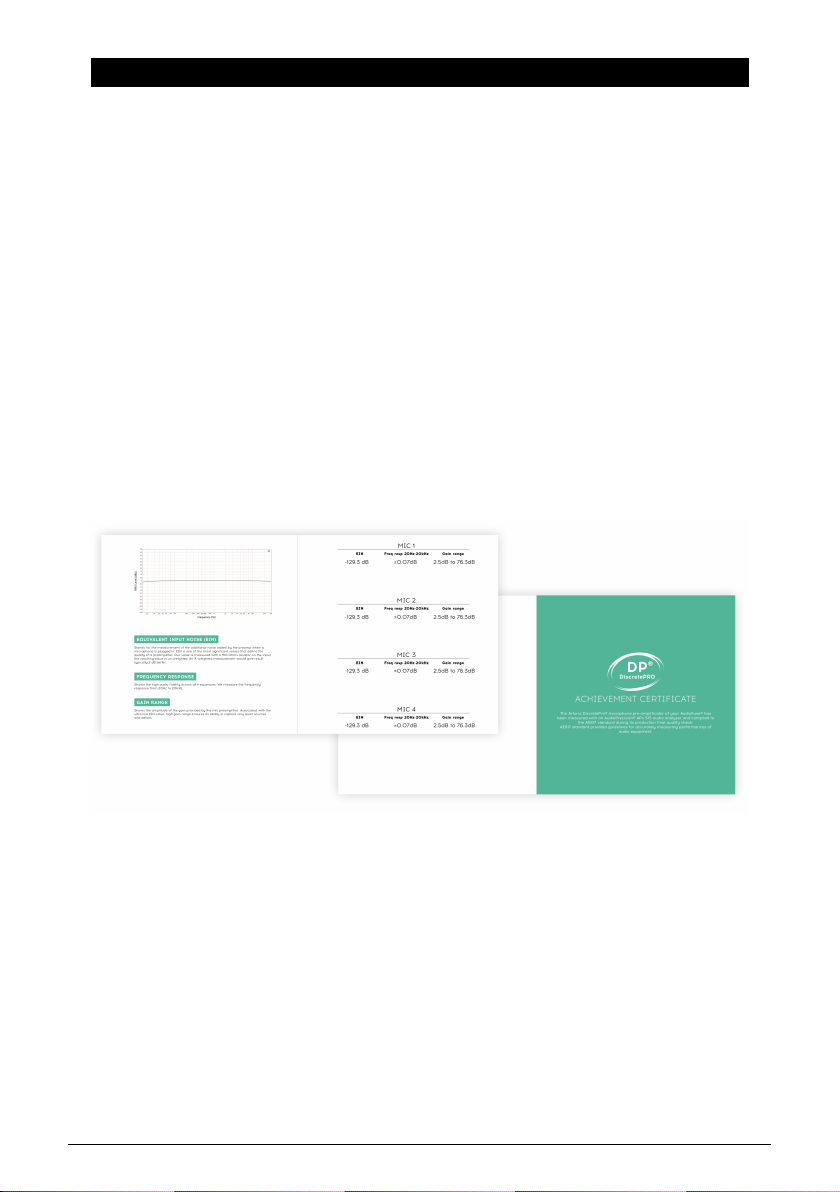
1.1.2. DiscretePRO® certificate........................................................................................................................................................................................... 3
1.1.3. Register your AudioFuse Studio .......................................................................................................................................................................... 4
1.2. Hardware Features............................................................................................................................................................... 4
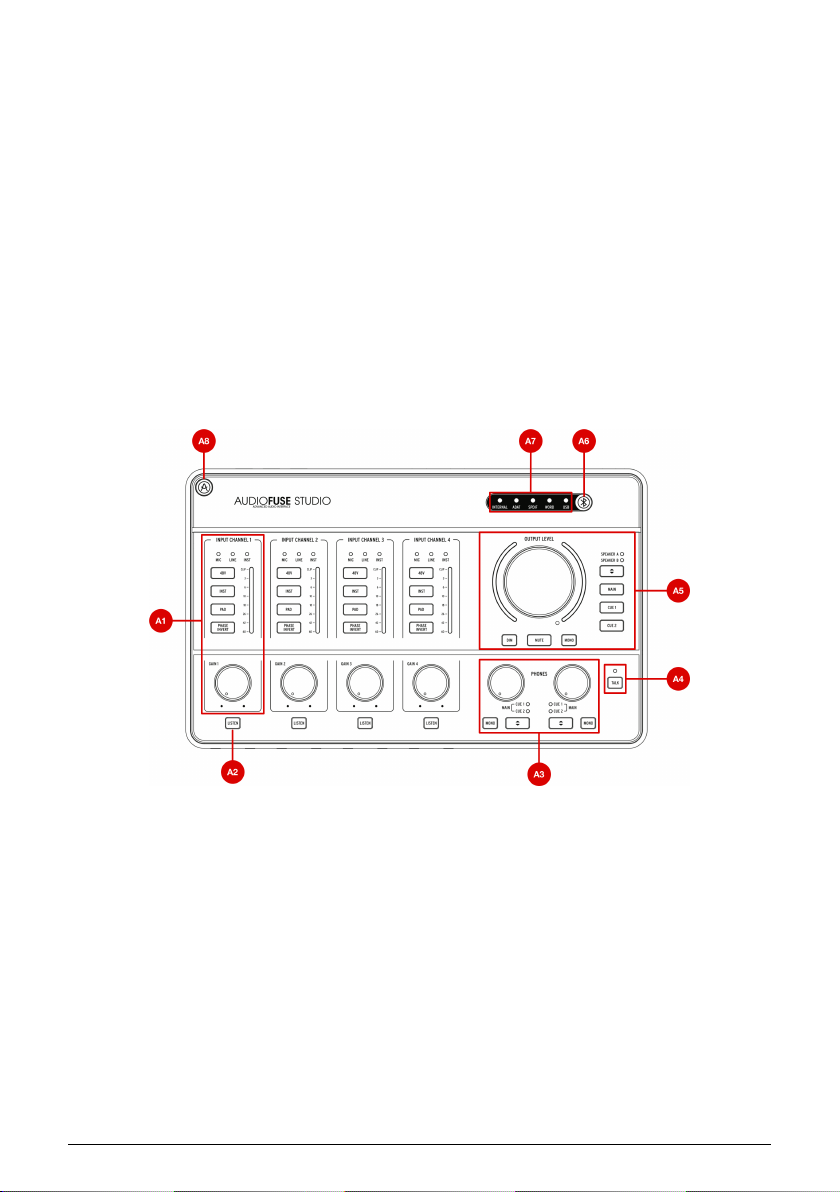
1.2.1. Top View .............................................................................................................................................................................................................................. 4
1.2.2. Front View ...................................................................................................................................................................................................................... 10
1.2.3. Back View.......................................................................................................................................................................................................................... 11
1.3. Getting started....................................................................................................................................................................... 13
1.3.1. Powering your AudioFuse Studio ..................................................................................................................................................................... 13
1.3.2. Setting your Operating System ........................................................................................................................................................................ 13
1.3.2.1. Setup on macOS ........................................................................................................................................................................................................................................................................................................ 13
1.3.2.2. Set up on Windows................................................................................................................................................................................................................................................................................................. 14
1.3.2.3. Set up on iPad/iPhone .......................................................................................................................................................................................................................................................................................... 14
1.3.2.4. Set up on Android..................................................................................................................................................................................................................................................................................................... 14
1.3.3. The AudioFuse Control Center........................................................................................................................................................................... 15
1.4. How to use AudioFuse Studio...................................................................................................................................... 16
1.4.1. How to record with a microphone................................................................................................................................................................... 16
1.4.2. How to record a synth, guitar or other instrument............................................................................................................................... 17
1.4.3. Inserting external effects into your signal path .................................................................................................................................... 18
1.4.3.1. About TRS to Dual-TS Cables.............................................................................................................................................................................................................................................................................. 18
1.4.4. Re-Amping .................................................................................................................................................................................................................... 20
1.4.5. Use one headphone for Cue, and one for Main..................................................................................................................................... 21
1.4.6. Use AudioFuse to switch between 2 sets of active speakers...................................................................................................... 22
1.4.7. Connect to AudioFuse Studio with Bluetooth .......................................................................................................................................... 23
1.4.8. Use AudioFuse Studio without a computer.............................................................................................................................................. 24
1.4.9. Using Phones 2 to Control Speaker B.......................................................................................................................................................... 24
1.4.10. Loopback Mode........................................................................................................................................................................................................ 24
1.4.11. Talkback on ADAT 1-2.............................................................................................................................................................................................. 24
1.4.12. SPDIF Out from Speaker.................................................................................................................................................................................... 25
1.4.13. AUX outputs from Inputs 1-4 (and DAW) ................................................................................................................................................. 25
1.5. An in-depth look at AudioFuse Studio................................................................................................................... 26
1.5.1. Input Paths in Detail................................................................................................................................................................................................. 26
1.5.1.1. Input Channels 1 - 4 ................................................................................................................................................................................................................................................................................................. 26
1.5.1.2. Inputs 5 - 6..................................................................................................................................................................................................................................................................................................................... 27
1.5.1.3. Inputs 7 - 8 .................................................................................................................................................................................................................................................................................................................... 28
1.5.1.4. Digital inputs ................................................................................................................................................................................................................................................................................................................ 29
1.5.2. Monitor Mixing and Routing .............................................................................................................................................................................. 30
1.5.3. Creating a Monitor Mix ......................................................................................................................................................................................... 30
1.5.4. Routing Monitor Mixes to speakers and headphones...................................................................................................................... 30
1.5.5. USB Audio mapping ................................................................................................................................................................................................. 31
1.5.5.1. Audio Mapping at 44.1 / 48 kHz sampling rates: ................................................................................................................................................................................................................................... 31
1.5.5.2. Audio Mapping at 88.2 / 96 kHz sampling rates:................................................................................................................................................................................................................................ 32
1.5.5.3. Audio Mapping at 176.4 / 192 kHz sampling rates:............................................................................................................................................................................................................................. 32
1.5.6. Clock Synchronization ........................................................................................................................................................................................... 33
1.5.6.1. Using the Internal Clock....................................................................................................................................................................................................................................................................................... 33
1.5.6.2. Using External Clock Sources.......................................................................................................................................................................................................................................................................... 34
1.6. Specifications........................................................................................................................................................................ 35
2. AudioFuse Control Center.................................................................................................................................... 38
2.1. Welcome to AudioFuse Control Center!............................................................................................................... 38
2.2. Overview................................................................................................................................................................................. 38
2.2.1. The Main window...................................................................................................................................................................................................... 38
2.2.1.1. Two-way communication ................................................................................................................................................................................................................................................................................... 38
2.2.1.2. Basic operations....................................................................................................................................................................................................................................................................................................... 39
2.2.2. The AudioFuse Studio window....................................................................................................................................................................... 40
2.2.2.1. AudioFuse Studio controls not in AFCC ................................................................................................................................................................................................................................................... 40
2.3. The Menu bar....................................................................................................................................................................... 42
2.3.1. The Arturia menu ...................................................................................................................................................................................................... 42
2.3.1.1. Resize Window........................................................................................................................................................................................................................................................................................................... 42

2.3.1.2. AFCC Manual.............................................................................................................................................................................................................................................................................................................. 43
2.3.1.3. About................................................................................................................................................................................................................................................................................................................................ 43
2.3.2. Device Selection........................................................................................................................................................................................................ 44
2.3.3. Device Status .............................................................................................................................................................................................................. 44
2.3.4. Device Settings .......................................................................................................................................................................................................... 45
2.3.4.1. Audio Settings............................................................................................................................................................................................................................................................................................................ 45
2.3.4.2. Preferences ............................................................................................................................................................................................................................................................................................................... 50
2.3.5. Firmware Updates................................................................................................................................................................................................... 52
2.4. The Main Window ............................................................................................................................................................. 53
2.4.1. Input zone...................................................................................................................................................................................................................... 53
2.4.1.1. Analog Inputs.............................................................................................................................................................................................................................................................................................................. 53
2.4.1.2. Digital Inputs .............................................................................................................................................................................................................................................................................................................. 54
2.4.2. Monitoring Mix zone ............................................................................................................................................................................................... 55
2.4.2.1. The Channel display.............................................................................................................................................................................................................................................................................................. 55
2.4.2.2. The Master level fader......................................................................................................................................................................................................................................................................................... 56
2.4.3. Output zone.................................................................................................................................................................................................................. 59
2.4.3.1. Analog Outputs ......................................................................................................................................................................................................................................................................................................... 59
2.4.3.2. Digital Outputs......................................................................................................................................................................................................................................................................................................... 60
2.4.3.3. Loopback section ..................................................................................................................................................................................................................................................................................................... 61
3. Software License Agreement............................................................................................................................ 62
4. Declaration of Conformity .................................................................................................................................. 64

1. AUDIOFUSE STUDIO
1.1. Overview
1.1.1. Box Contents
• AudioFuse Studio Advanced Audio Interface
• "Worldwide" power supply with interchangeable leads
• 2x USB cables (USB-C to USB-C, USB-C to USB-A)
• 2x MIDI Adaptors
• Quick Start Guide
• Registration card with Serial and Unlock Code
• DiscretePro® certificate
1.1.2. DiscretePRO® certificate
Your AudioFuse Studio comes with 4 preamplifiers using our DiscretePRO® technology
to ensure the best audio quality when recording. Your AudioFuse Studio is unique and
therefore it comes with its own Audio Precision certificate as a guarantee of its
performance.
A version of this certificate with more details is available after registration on
www.arturia.com/register
A tu ia - Use Manual AudioFuse Studio - AudioFuse Studio 3

1.1.3. Register your AudioFuse Studio
Be sure to register your AudioFuse Studio as soon as possible! There is a sticker in the Quick
Start Guide and on the bottom panel of the product that contains the serial number of your
unit and an unlock code. These are required during the online registration process. You may
want to record these elsewhere or take a photo of the sticker in case it becomes damaged.
Registering your AudioFuse Studio provides the following benefits:
• Free software license for the AudioFuse Creative Suite, an ever-evolving
collection of software effects and instruments that will let you add your own
unique signature to your music
• Access to the latest version of the AudioFuse Control Center software
• Special offers restricted to AudioFuse Studio owners
1.2. Hardware Features
1.2.1. Top View
A1. Input control section (Input Channel 1-4): This section contains all features relating
to AudioFuse Studio's Input Channels 1-4 with their pristine DiscretePro preamplifiers. The
controls and indicators on are identical on all four channels and are as follows:
4 A tu ia - Use Manual AudioFuse Studio - AudioFuse Studio

•Mic/Line/Inst Indicators: One of these LEDs automatically illuminates when you
plug in a sound source into AudioFuse Studio's front panel inputs.
◦If an XLR cable is plugged in,
Mic
is illuminated and all microphone-
related functions become available on the buttons below (
48V
,
Pad
,
Boost
and
Phase Invert
).
◦If a 1/4" cable is plugged in, the
Line
or
Inst
LED illuminates and
you can switch between modes by pressing the "Inst" button. Again,
only the appropriate options are made available on the buttons below
(
Inst
,
Pad
and
Phase Invert
).
•Gain: This knob sets the input gain of the channel's DiscretePro preamplifier. Use
each channel's VU-meter to ensure your gain levels are set properly.
•VU-Meter: These LEDs indicate the level of the incoming signals after the
DiscretePro preamplifier. Use this in conjunction with the Gain knob to make sure
your levels are set properly. Ideally your incoming signal should peak between
the -10 and -6dB LEDs. If you are seeing the Clip LED light up then reduce the
input gain to prevent clipping (unwanted distortion).
♪: Some high output devices may require engaging the Pad to prevent clipping (see below).
A tu ia - Use Manual AudioFuse Studio - AudioFuse Studio 5

•48V: This button engages and disengages 48V phantom power for microphones
requiring power. Note that this button only works when an XLR cable is plugged
into AudioFuse Studio. The button is ignored when 1/4" devices (Instrument or
Line-level) are plugged in, or when nothing is connected to the XLR connector.
•Inst: This button lets you toggle between Line and Instrument modes. Line
mode accepts standard line-level signals provided by most audio devices
(synthesizers, drum machines, studio and HiFi gear, etc.) Instrument mode
changes the impedance of the 1/4" instrument input to Hi-Z (high impedance).
This is designed to be used with instruments that have passive pickups, such
as electric guitars and basses, stringed instruments (mandolin, violin, etc.), and
electric pianos (reed or tine-based). If you're connecting an instrument like the
ones described, activate Inst mode for the best possible sound.
♪: If your instrument has "active" electronics or you're using an external preamp or stomp box before
recording the signal with AudioFuse Studio, you may not need to use Inst mode at all. Feel free to
experiment and see if you notice an improvement in your sound.
•Pad: This button engages and disengages input gain padding, which reduces
the incoming signal levels by 20 dB before they reach AudioFuse Studio's
preamplifier. Switch this on when recording high output instruments or
microphones that overload the AudioFuse Studio's preamplifier even at minimum
gain settings.
!: AudioFuse Studio has a hidden microphone Boost mode that can be switched on by holding
down the Pad button for one second (the button will be illuminated in red when Boost mode is active).
This is is a special mode that provides +10 dB
extra
gain to incoming microphone signals and can be
handy when using microphones with low outputs (such as the popular Shure SM7B, for example) or
when recording very faint sounds. If your microphone has a reasonable output level (most modern
microphones do) then we recommend leaving Boost off to ensure the best possible sound. Note that
this mode is only available when XLR microphones are connected and it cannot be engaged when 1/4"
devices are connected.
•Phase Invert: This button inverts the phase of the incoming signal. Phase
inversion is very useful in certain situations, such as when you are using two
or more microphones to record an instrument. For example, let's say you are
recording a guitar amp with a microphone that is close to the speaker and
another microphone that is placed further away to capture the sound of the
room. You may notice that certain frequencies are being overemphasized (or
de-emphasized) due to phase cancellation caused by the spacing between
the microphones. If so, try pressing the Phase button on just one of your
channels (not both). By inverting the signal on one of your microphones, you
may immediately resolve the phase cancellation issue. If this does not provide
satisfactory results, you will need to move the room mic to a slightly different
location.
A2. Listen Button: This button lets you listen to a specific Input Channel (or multiple Input
Channels) without distraction by muting audio coming from the computer.
6 A tu ia - Use Manual AudioFuse Studio - AudioFuse Studio

This functionality lets you really focus in and hear what is being recorded without having
to hear anything else. Press the button to switch Listen mode on and off. The button is
illuminated when the mode is active.
♪: The functionality of this button can be adjusted in the AudioFuse Control Center application under
Settings (Gear Icon) > Audio Settings > Listen button. Please refer to the AudioFuse Control Center section
for more information: here [p.45].
A3. Phones Control Section: This section contains two identical sets of controls pertaining to
the headphone outputs on the front panel (see callout B2).
•Level Knob: This knob sets the level for its associated headphone outputs.
•Mono Button: This button engages and disengages Mono mixdown mode for
its associated headphone output. When switched on, the button is lit and the
headphone mix is heard in mono. When switched off, the mix is heard in stereo
(or as recorded)
♪: Being able to quickly monitor in mono can be a very useful feature in both recording and mixing
situations. While recording, singers sometimes prefer to perform with headphones only on one ear so
that they can hear themselves better. A mono mix ensures that the singer hears everything in the mix
even if they are only using one ear to hear playback. During a mixing session, many engineers check
for spectral balance and phase problems by listening to a mono mix. In both cases, the Mono button
provides an easy way to temporarily monitor in mono.
A tu ia - Use Manual AudioFuse Studio - AudioFuse Studio 7

•Cue Select Buttons: These buttons select the audio source for the headphone
output by stepping through the three mix sources:
Cue 1
,
Cue 2
, and
Main
. These
mixes can be edited in the AudioFuse Control Center application. Please refer to
the AudioFuse Control Center User Manual to learn how to do this.
A4. Talkback: AudioFuse Studio contains a small "talkback" microphone inside its case. This
convenient feature lets you easily communicate with your performer if he/she is in another
room during the recording process. To use this feature, simply hold the Talkback button and
start talking. The built-in microphone can then send your voice to the talent's headphones
(or other destination of your choosing) so that the performer can hear your comments or
instructions from the control room. The level and routing of the talkback microphone can
be configured in the AudioFuse Control Center software under Settings (Gear Icon) > Audio
Settings > Talkback. Please refer to the AudioFuse Control Center section [p.45] for more
information.
Please note the Talkback uses Analog Input 8. It is possible to set TalkBack mode to avoid activating
the Talkback if the Input 8 is already in use. Please refer to the AudioFuse Control Center section for
more information:here [p.45].
A5. Output Section: This section contains controls pertaining to the speaker outputs. Here you
will find things like a master volume knob, VU meters, and other switching, routing, muting
and dimming functions.
•Master Volume Knob: This encoder sets the loudness of the active set of speakers.
Note that Speakers A and B can be adjusted independently or linked so that
loudness differences are maintained when switching back and forth. Linking
functionality is described in the AudioFuse Control Center application. Please
refer to that application's User Manual [p.45] to learn more.
•VU Meters: By default, these LED meters display the loudness level of incoming
mixes (Main, Cue 1, or Cue 2) or any Input channels that have "Listen" mode
engaged. When adjusting the Master Volume knob, these LEDs temporarily turn
blue to show the position of the knob from minimum (bottom) to maximum (top).
•Dim: Pressing this button reduces the speaker level and is commonly used when
having discussions or taking a phone call. By default, the sound level is reduced
by 20 dB but this can be adjusted in the AudioFuse Control Center application.
•Mute: This button mutes the output being sent to the speakers.
•Mono: This button switches on Mono mixdown mode. When switched on, the
button is lit and the mix is downmixed to mono.
8 A tu ia - Use Manual AudioFuse Studio - AudioFuse Studio

♪: During a mixing session, many engineers like to perform a "mono compatibility" check to ensure
that mixes will translate well onto mono sources (like many phones, laptops or portable Bluetooth
speakers). It is also easier to spot spectral balance problems and phase-related issues in mono. The
Mono button provides an easy way to ensure a mix will translate well.
•Speaker Selector: This button lets you easily A/B your mix on two different sets
of speakers. The currently active speaker is indicated by its corresponding LED.
•Main / Cue 1 / Cue 2 buttons: These three buttons select which mix is sent to
your speakers. The three mixes can be adjusted in the AudioFuse Control Center
software. Please refer to that application's User Manual [p.30] to learn more.
A6. Bluetooth Button: This button switches Bluetooth functionality on and off. When switched
on, the button is illuminated and the Bluetooth audio stream is decoded by the AudioFuse
Studio. The AudioFuse Studio is discoverable by Bluetooth enabled devices like your
smartphone or tablet. This allows you to wirelessly connect to AudioFuse Studio so you can
play music through the studio's sound system. The routing of incoming Bluetooth signals
can be configured in the AudioFuse Control Center software under Settings (Gear Icon) >
Audio Settings > Bluetooth. Please refer to the AudioFuse Control Center User Manual [p.45]
for more information.
!: A long press on the Bluetooth button resets the on-going connection and enables pairing with a
new device.
A7. Clock Source and USB Indicators: These LEDs indicate the source of the digital clock
(internal, ADAT, SPDIF or Word Clock) and the status of the USB connection.
The USB LED is illuminated when the connection is OK and blinks if there is either a problem
with the USB connection or there is no USB connection at all to the computer. You can
select the clock source of AudioFuse Studio in the AudioFuse Control Center software under
Settings (Gear Icon) > Audio Settings > Clocks. The selected external clock LED blinks if
lost or incorrect. In this situation, the unit automatically switches to Internal clock at the
same sample rate. Please refer to the AudioFuse Control Center User Manual [p.45] for more
information.
A8. AudioFuse Studio Button: This button opens and closes the AudioFuse Control Center on
your computer.
A tu ia - Use Manual AudioFuse Studio - AudioFuse Studio 9

It is a handy shortcut to accessing the Control Center application without having to use your
computer's mouse or trackpad.
1.2.2. Front View
B1. Input channels 1-4: Connect microphones, instruments or line-level devices to these four
inputs. The "combo" style connectors accept XLR (microphone) or 1/4” (instrument or line-
level) inputs. Each channel has its own Input Control Section directly above it on the front
panel so you can set things like input gain or monitor incoming levels. See callout A1 above
to learn more about the Input Control Section.
B2. Headphone Outputs: Connect your headphones here. AudioFuse Studio has two
independent headphone ("cue") outputs and each output has both 1/4" and 1/8" connectors
so you never have to worry about losing headphone adapters. The Phones Control Section
directly above these connectors on the front panel lets you set the output level, select the
signal source and set mono/stereo operation. Refer to callout A3 above to learn more about
the Phones Control Section.
♪: The 1/4" and 1/8" headphone outputs have different impedance values so that you can connect
virtually any kind of headphone to AudioFuse Studio. The 1/4" are optimized for high impedance
headphones (30-600 ohm) and have a 13 dBu maximum output level. The 1/8" connectors are optimized
for low impedance headphones (8-120 ohm) and have a 10 dbU maximum output level.
10 A tu ia - Use Manual AudioFuse Studio - AudioFuse Studio

1.2.3. Back View
C1. Power Section: Connect the supplied DC power adapter here and use the nearby power
button to switch the product on and off. The threaded connector can be locked into place to
avoid accidentally disconnecting the power. To make life easier for international travelers,
the "worldwide" power supply includes interchangeable leads letting you use the product
nearly anywhere in the world without having to buy adapters or power converters.
!: AudioFuse Studio is intended to be used with its supplied DC power supply. While the interface
can be "bus powered" by your computer through the USB-C connector, most of its functionality must
be switched off as USB cannot deliver enough current to power the unit. When bus powered, the
interface works as a dual headphone amplifier with reference grade digital-to-analog conversion. All
other features (USB hub, preamplifiers, speaker outputs, etc.) are switched off. It is important to note
some computer may not have the capability to provide enough power for this "bus powered" mode.
C2. USB-C Connector: Connect AudioFuse Studio to your computer with one of the provided
USB cables. AudioFuse Studio features a USB 2.0 protocol to communicate with your
computer. It can also work with many smartphone and tablets but these devices may
require specialized USB adapters to make the connection. This is detailed in the next chapter
of this guide.
C3. USB hub: AudioFuse includes a handy 3-port USB hub to connect your master keyboard,
USB memory stick or dongle. Two of the ports (labeled "1A") can deliver up to 1 amp of power
for rapid charging of devices. The third port provides up to 120mA of current is intended for
low power devices such a dongle or USB memory stick.
!: We advise only connecting products with low power requirements (such as USB dongles) to the
120mA port. Connecting devices with higher power requirements may trigger an overcurrent protection
mechanism that will temporarily deactivate the 120mA port. If you wish to connect products with more
demanding power requirements, use the 1A ports instead.
C4. Speaker Outputs A&B: Connect up to two pairs of active speakers to these balanced 1/
4” outputs for easy A/B monitoring. The Output Control Section on the top panel lets you do
things like select the active pair of speakers, set output levels, select the sound source of the
speakers and more. See callout A5 above to learn more about the Output Control Section.
C5. Aux (Reamp) Output: These multi-tasking outputs have some special features not
typically found on other interfaces. Firstly, they are DC coupled, letting you control of
modular synths directly from your DAW audio or control voltage (CV) signals. Secondly,
these outputs can change impedance and allow you to send a "dry" recorded guitar or bass
track back out to any amp for rerecording (or "reamping") later. This handy feature opens
up many interesting sound design possibilities and saves you from having to buy costly "DI"
or "reamping" boxes.
A tu ia - Use Manual AudioFuse Studio - AudioFuse Studio 11

C6. Insert Section: These connectors let you "insert" external line-level devices such as
compressors into the signal path after the AudioFuse Studio's DiscretePro preamplifiers but
before its analog-to-digital converters. To do this, you will need to use TRS "send/return"
cables. If nothing is connected here, the DiscretePro preamp's output is automatically sent
to the digital converter.
C7. Phono/Line inputs 5-8: Connect external phono or line-level devices to these RCA and
balanced 1/4” inputs. The Phono input may not be suitable for high cartridge output levels
(typically above 5-10 mV). The AudioFuse Control Center application lets you configure the
RCA inputs to accept either standard line-level signals (like the output of your smartphone,
for example) or the output of a turntable requiring RIAA-equalization. This is done on the
main screen under the Analog Inputs > Inputs 5-6 section. Please refer to the AudioFuse
Control Center User Manual [p.53] to learn more.
♪: These inputs connect directly to the AudioFuse Studio's pristine analog-to-digital converters (unless
the RIAA filter is switched on inputs 5-6, in which case the signal flows through that filter first). If you
own fancy "outboard" products like a tube preamp or a vocal strip, connect them here avoid double-
amplifying your signals (once through your preamp and again through the DiscretePro preamp). Doing
so will provide the cleanest possible signal path and also leaves the DiscretePro preamplifiers free to
capture other signals.
C8. Grounding Pin: This pin is used in conjunction with the Phono inputs to create a common
ground between a turntable and the AudioFuse Studio. Be sure to always use the grounding
pin when connecting a turntable to help you avoid ground hum loops, buzzes and other
unwanted sounds in your recordings.
C9. Optical Input/Output Section: These connectors can be used to transmit and receive
ADAT and S/PDIF signals over optical cables. ADAT is a multi-channel format that carries
up to 8 channels of audio whereas S/PDIF always carries stereo (2-channel) signals. The
exact functioning of this outut is configured in the AudioFuse Control Center software under
Settings (Gear Icon) > Audio Settings > Digital I/O. Please refer to the AudioFuse Control
Center User Manual [p.45] for more information.
♪: The ADAT standard supports up to 8 channels of audio at sampling rates of 44.1/48k. However,
when working at higher sampling rates (88.2k or 96k) each optical cable can only carry 4 channels
of audio (the format does not support 176.4k or 192k sampling rates). To overcome this limitation,
AudioFuse Studio has two separate input connectors and two separate output connectors, letting you to
transfer 8 channels of ADAT signals even if you are working at 88.2k or 96k sampling rates.
C10. WordClock & S/PDIF Section: These connectors can be used to transmit and receive
coaxial (RCA) S/PDIF signals as well as Word Clock synchronization signals. Use the
AudioFuse Control Center to define how you would like these connectors to operate. Refer
to that application's User Manual [p.45] to learn more.
C11. MIDI In/Out: Connect MIDI devices here using the supplied MIDI Adapters. The MIDI
ports are available in your computer once the AudioFuse drivers are installed (these drivers
are installed along with the AudioFuse Control Center application).
C12. Kensington Lock Port: AudioFuse Studio is portable and easy to carry. However, it
should be carried away only when you want it carried away! We’ve included a Kensington
lock slot on the rear panel so you can secure it to the surface of your choice.
12 A tu ia - Use Manual AudioFuse Studio - AudioFuse Studio

1.3. Getting started
1.3.1. Powering your AudioFuse Studio
AudioFuse Studio is a professional-grade recording interface and it has higher power
requirements than most consumer products. For this reason, it must be powered using its
included worldwide DC power supply (15V, 3A).
1.3.2. Setting your Operating System
1.3.2.1. Setup on macOS
Connect AudioFuse Studio to your computer's USB Port and switch on the unit. AudioFuse
Studio will appear in the
Audio MIDI Setup
as shown:
To set up AudioFuse Studio to work as your default audio input/output device:
• Select AudioFuse Studio in the Audio MIDI Settings left panel
• Right-click AudioFuse Studio and set it as default input device
• Right-click AudioFuse Studio again and now set it as default output device
A tu ia - Use Manual AudioFuse Studio - AudioFuse Studio 13

1.3.2.2. Set up on Windows
Low latency drivers on Windows are provided by Arturia and are automatically installed
with the AudioFuse Control Center installer. You can download AudioFuse Control Center
here:
www.arturia.com/audiofuse-start
Once AudioFuse Control Center is installed, simply connect the interface to your computer
using the supplied USB cable and switch on the unit. Windows will detect the hardware and
it will appear under your audio devices.
Open “Manage Audio Device”
Here you can configure AudioFuse Studio to be your default recording device, playback
device or both. To do so, select the interface under the
Playback
and
Recording
tabs and
press the
Set Default
button.
1.3.2.3. Set up on iPad/iPhone
First, connect AudioFuse Studio to its DC adaptor and switch on the unit. Next, connect
AudioFuse Studio to your iOS device through the camera connection kit (required).
AudioFuse Studio will appear under Settings > General > About > AudioFuse. For more
information please refer to www.arturia.com/audiofuse-start
1.3.2.4. Set up on Android
First, connect AudioFuse Studio to its DC adaptor and switch on the unit. Next, connect the
interface to an Android device through an On-The-Go cable. Android 5+ is required. For more
information please refer to www.arturia.com/audiofuse-start
14 A tu ia - Use Manual AudioFuse Studio - AudioFuse Studio
Other manuals for AUDIOFUSE STUDIO
1
Table of contents
Popular Accessories manuals by other brands

Duct-O-Wire
Duct-O-Wire CAS-2L100 DUPLEX Installation and operating instructions

Zehnder Rittling
Zehnder Rittling RF55 installation manual

Oppermann Regelgeräte
Oppermann Regelgeräte DKM 3.3 manual

Danfoss
Danfoss KPP Pulse Pickup technical information

Hama
Hama LP-1R operating instructions

Joolz
Joolz Day1 all-terrain swivel wheels instruction manual

AromaTech
AromaTech AroMini user manual

LEI Extras
LEI Extras Buss Adapter Cable installation instructions

Fishman
Fishman AG-094 - installation guide

NRG Systems
NRG Systems Hybrid XT Vane Product guide

Panasonic
Panasonic EX-10 Series Specification sheet

Serene House
Serene House Pod Archi instruction manual