Artusi CAO900X1 User manual

CAO900X1
CA0900B
OPERATION MANUAL
APPLIANCES
FOR LIVING

Congratulations, you are now the proud owner of an ARTUSI cooking appliance. Thank you for purchasing ARTUSI
and welcome to the ARTUSI Family.
This instruction manual has been specially created to inform you of the full range of features your ARTUSI appliance
has to offer and serves as an introduction to getting the very best out of your ARTUSI appliance.
We present detailed information on each of the features your ARTUSI appliance consists of. Once you have read
this section you will be able to choose the most appropriate settings for your appliance when cooking different
types of food.
We ask you to read the instructions in this booklet very carefully as this will allow you to get the best results from
using your appliance. KEEP THE DOCUMENTATION OF THIS PRODUCT FOR FUTURE REFERENCE.
TO REGISTER YOUR PRODUCT WITH ARTUSI, PLEASE FILL OUT THE WARRANTY CARD AT THE END OF
THIS BOOKLET AND POST IT TO: REPLY PAID 83617
LEICHHARDT NSW 2040

This appliance is not intended for use by persons (including children) with reduced physical, sensory or
mental capabilities, or lack of experience and knowledge, unless they have been given supervision or
instruction concerning use of the appliance by a person responsible for their safety.
Close-up View
Congratulations on choosing our appliance, which you will find is dependable and easy to use.
We recommend that you read this manual for best performance and to extend the life of your appliance.
Thank you.
A. Control Panel.
B. Knob for selecting the cooking mode.
C. Knob for selecting the cooking temperature.
D. Knob for selecting the cooking time;
E. Oven Light – When the light is on, it indicates that the oven is heating. It will turn off when the
temperature setting has been reached.
F. Glass oven door
How To Use Your Appliance
The"Maxi oven"oven combines in a single appliance the advantages of traditional convection ovens with
those of modern forced air ventilation ovens. It is an extremely versatile appliance that allows you to easily
and safely choose between 9 different cooking modes. The selection of the various functions can be obtained
by putting the programmer to the manual position or setting a beginning/end of cooking program (see
specific chapter on page 5)and successively by turning the selector (B) and thermostat (C) knobs on the
control panel.
You can select from 9 functions:

light
When the selector knob is in any position other than the “0”position, the oven light comes on.
Attention: The first time you use the oven we recommend that you set the thermostat on the highest setting
and leave the oven on for about a half an hour with nothing in it. Then, open the oven door an let the room air.
The odour that is often detected during this initial use is due to the evaporation of substances used to protect
the oven during storage and until it’s installed.
Defrost
Select this function to thaw more delicate foods. In this mode you use only the cold air circulation.
The thermostat light (E).This indicates that the oven is heating up. When the light goes out, the required
temperature has been reached. When the light alternately comes on and goes out, it means that the thermostat
is working properly to maintain the oven temperature.
Upper heating element
Set the thermostat knob (C) between 50℃ and 250℃. By turning the knob to this position. The oven light
and upper heating element comes on. This position is recommend for finishing off the cooking of food (in
baking trays) which is already inside well-cooked but still soft superficially.
Fan Forced
Set the thermostat knob (C) between 50℃ and 250℃. The circular heating element and the fan will come on.
Since the heat remains constant and uniform throughout the oven, the air cooks and browns food uniformly
over its entire surface. With this mode, you can also cook various dishes at the same time, as long as their
respective cooking temperatures are the same. A maximum of 2 rack levels can be used at the same time.
This cooking mode is ideal for au gratin dishes or those which require an extended cooking time.
Moreover, the excellent heat distribution makes it possible to use lower temperatures when cooking roasts.
This results in less loss of juices, meat which is more tender and a decrease in the loss of weigh for the roast.
The ventilated mode is especially suited for cooking fish, which can be prepared with the addition of a
limited amount of condiments, thus maintaining their flavour and appearance. The ventilated mode can also
be used to thaw white or red meat, fish and bread by setting the temperature to 80℃-100℃
Lower heating element
Set the thermostat knob (C) between 50℃ and 250℃. By turning the knob to this position. The oven light
and lower heating element come on.
This position is recommended for finishing the cooking of food (in baking trays) which is already
superficially well-cooked but still soft inside.
Convection Mode
Set the thermostat knob (c) between 50℃ and 250℃.
The outer heating elements at both the top and the bottom of the oven will come on. The heat is distributed
uniformly from top to the bottom. The convection mode is recommended for preparing meat-based dishes
featuring of liquids. It still remains the best cooking mode for dry pastries and fruit in general. When cooking
in convection mode, only use one dripping-pan or cooking rack at a time, otherwise the heat distribution with
be uneven. Select from among the various rack heights based on the whether the dish needs more or less heat
from the top or bottom.

Fan Assisted
Set the thermostat knob (c) between 50℃ and 250℃.
The outer heating elements at both the top and the bottom of the oven are activated, as well as the fan. Based
on the convection model, This combination of features increases the effectiveness of the thermal radiation of
the heating elements through forced air circulation of the air throughout the oven. This helps prevents foods
from burning on the surface, allowing the heat to penetrate into the food.
Half Fan Grill (centre element)
Important: do not set the thermostat knob (C) to over 175℃. During grilling, keep the oven door closed. the
central heating elements of the top are activated as well as the fan. This combination of features increases the
effectiveness of the thermal radiation of the heating elements through forced air circulation of the air
throughout the oven. This helps prevents foods from burning on the surface, allowing the heat to penetrate
into the food.
Fan Grill (both elements)
Important: do not set the thermostat knob (C) to over 175℃. During grilling, keep the oven door closed. Both
of the heating elements of the grill are activated, as well as the fan. This combination of features increases
the effectiveness of the thermal radiation of the heating elements through forced air circulation of the air
throughout the oven. This helps prevents foods from burning on the surface, allowing the heat to penetrate
into the food.
Fitting Oven Shelves
1. Ensure shelf orientation is correct ( refer picture below )
2. Slide into oven at an angle until raised back of shelf is past the stop on side runners.
3. Lower front of shelf and push in until stop is reached.
4. To remove oven shelves, withdraw to the stop and raise the front of shelf to clear the stop.
How to keep Your Oven in Good Condition
Important: Before cleaning your oven, or performing maintenance, disconnect it from the power supply.
To extend the life of your oven, it must be cleaned frequently, keeping in mind that:
◎ Do not use steam equipment to clean the appliance.
◎ The enamelled or stainless steel parts should be washed with lukewarm water without using any abrasive
powders or corrosive substances which could ruin them; Stainless steel could get stained. If these Stains
are difficult to remove, use special products available to rinse thoroughly and dry.
◎ The inside of the oven should preferably be cleaned shortly after use, when it is still warm, with hot
water and soap; the soap should be rinsed away and the interior dried thoroughly. Avoid using abrasive
detergents (for example cleaning powders, etc…) and abrasive sponges for dishes or acids (such as
limescale-remover, etc…) as these could damage the enamel. If the grease spots and dirt are particularly
tough to remove, use a special product for oven cleaning, following the instructions provided on the
product.

◎ If you use your oven for an extended period of time, condensation may form. Wipe it using a soft cloth.
◎ There is a rubber seal surrounding the oven opening which guarantees its perfect functioning. Check the
condition of this seal on a regular basis. When necessary, clean it and avoid using abrasive products or
objects to do so. Should it become damaged, please contact your nearest After-sales Service Centre. We
recommend you avoid using the oven until it has been repaired.
◎ Never line the oven bottom with aluminium foil, as the consequent accumulation of heat could
compromise the cooking and even damage the enamel.
◎ Clean the glass door using non-abrasive products or sponges and dry it with a soft cloth.
Do not use harsh abrasive cleaners or sharp metal scrapers to clean the oven door glass since they can
scratch the surface, which may result in shattering of the glass.
Inside the oven door:
Clean the surface with a cloth moistened with hot water and non abrasive liquid detergent, then rinse and dry
thoroughly.
Replacing the Lamp in the Oven
◎ Turn off the supply of power to the oven by turning off the omni-polar switch connecting it to the mains,
or by removing the plug if it is accessible;
◎ Unscrew the glass cover attached to the lamp holder;
◎ Unscrew the lamp and replace it with another high-temperature lamp (300 ℃) with the
following characteristics:
- Voltage: AC220V-240V
- Wattage: 15W
- Socket: E 14
◎ Remount the glass cover and reconnect the appliance to the power supply.
WARNING:Ensure that the appliance is switched off before replacing the lamp to avoid the possibility of
electric shock.
Fitting on a power supply cable
Opening the terminal board:
Using a screwdriver, prise on the side tabs of the terminal board cover;
Pull open the cover of the terminal board
To install the cable, proceed as follows:
Remove the wire clamp screw and the three contact screws L-N
Fasten the wires beneath the screwheads using the following color scheme; Blue( N) Brown( L), Yellow-
Green
Fasten the supply cable in place with the clamp and close the cover of the terminal board.

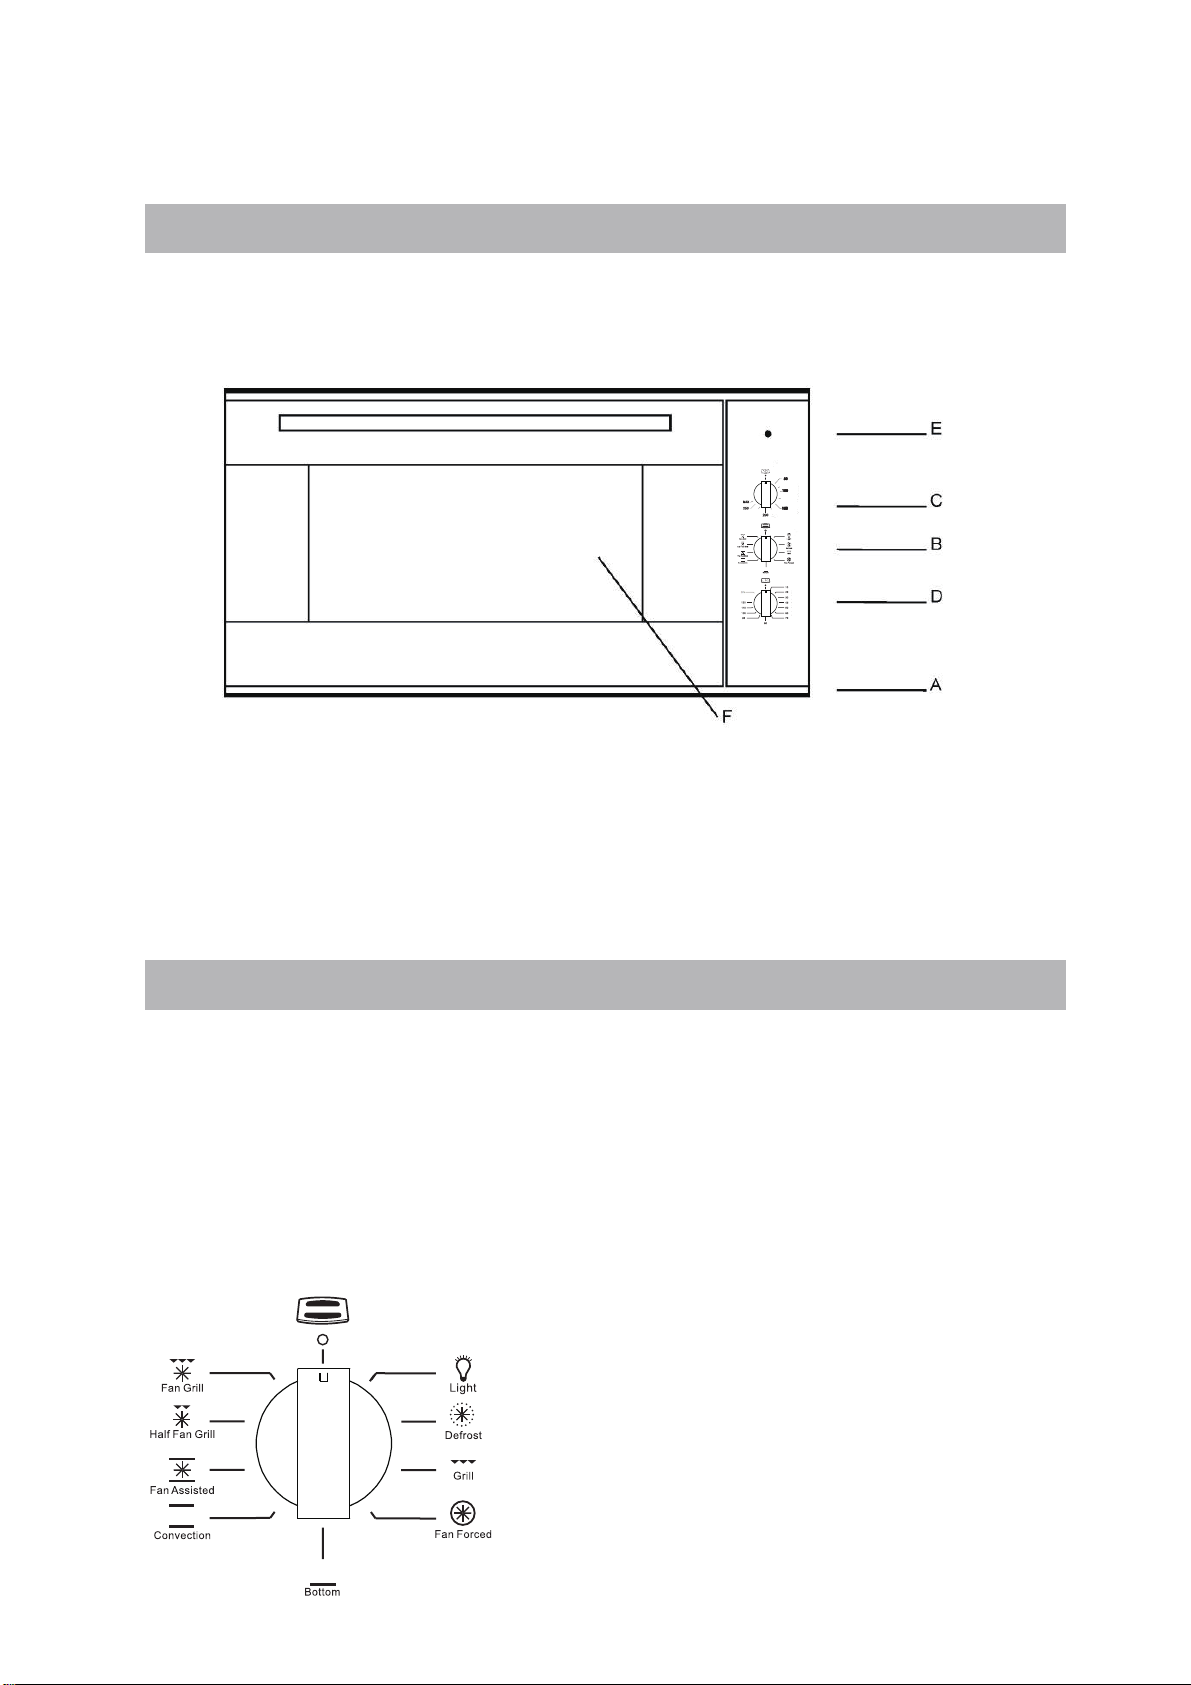
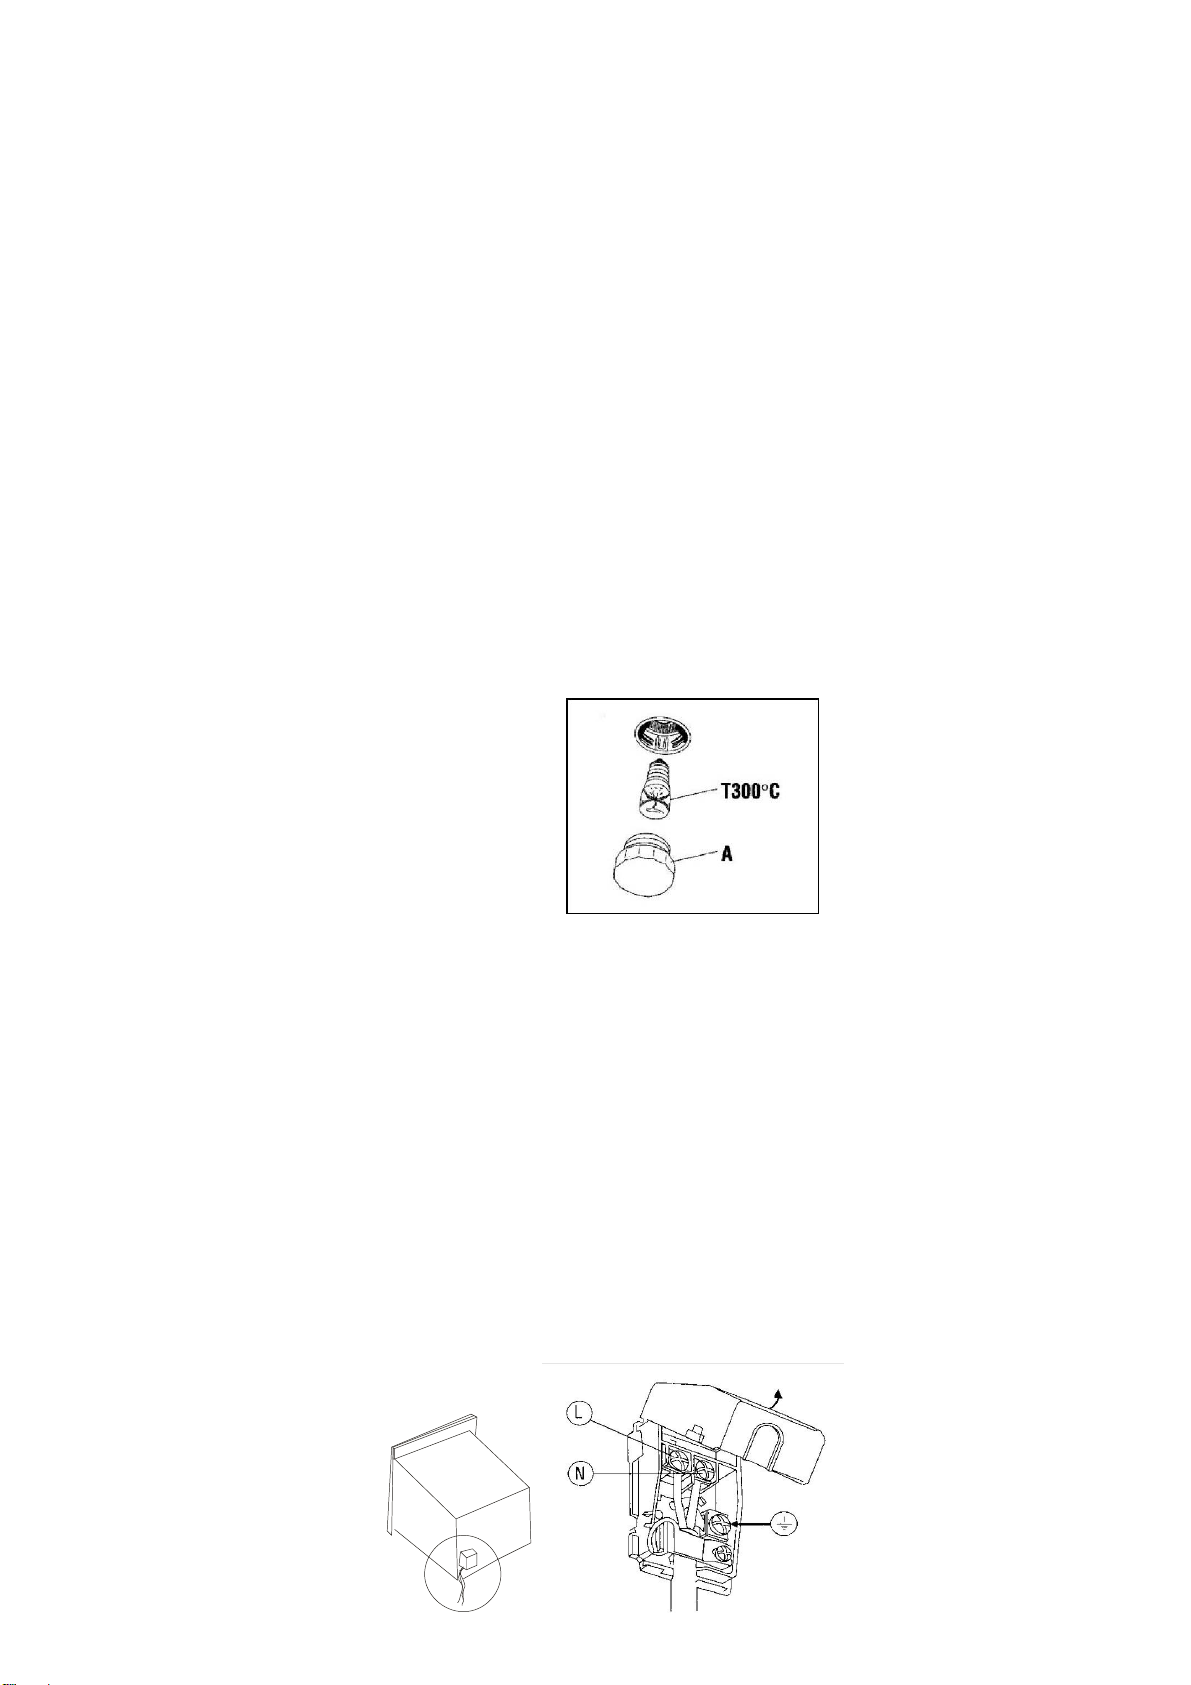
Connecting the supply cable to the mains
Install a standardized plug corresponding to the load indicated on the data plate. When connecting the cable
directly to the mains, install an omnipolar circuit-breaker with a minimum contact opening of 3 mm between
the appliance and the mains. The omipolar circuit breaker should be sized according to the load and should
comply with current regulations (the earth wire should not be interrupted by circuit breaker).
The supply cable should be positioned so that it does not reach a temperature of more than 50 with respect to
the room temperature, anywhere along its length.
Before making the connection, check that:
the electrical safety of this appliance can only be guaranteed if the cooker is correctly and efficiently
earthed, ways ensure that the earthing is efficient; if you have any doubts call in a qualified technician to
check the system. The manufacturer declines all responsibility for damage resulting from a system which
has not been earthed.
Before plugging the appliance into the mains, check that the specifications indicated on the date plate (on
the appliance and/or packaging) correspond to those of the electrical mains system of your home.
Check that the electrical capacity of the system and sockets will support the maximum power of the
appliance, as indicated on the data plate. If you have any doubts, call in a qualified technician.
If the socket and appliance plug are not compatible, have the socket replaced with a suitable model by a
qualified technician. Who will also have to ensure that the cross section of the socket cables are suitable
for the power absorbed by the appliance. The use of adapters, multiple sockets and/or extensions, is not
recommended. If their use cannot be avoided, remember to use only single or multiple adapters and
extensions which comply with current safety regulations. In these cases, never exceed the maximum
current capacity indicated on the single adapter or extension and the maximum power indicated on the
multiple adapter. The plug and socket must be easily accessible.
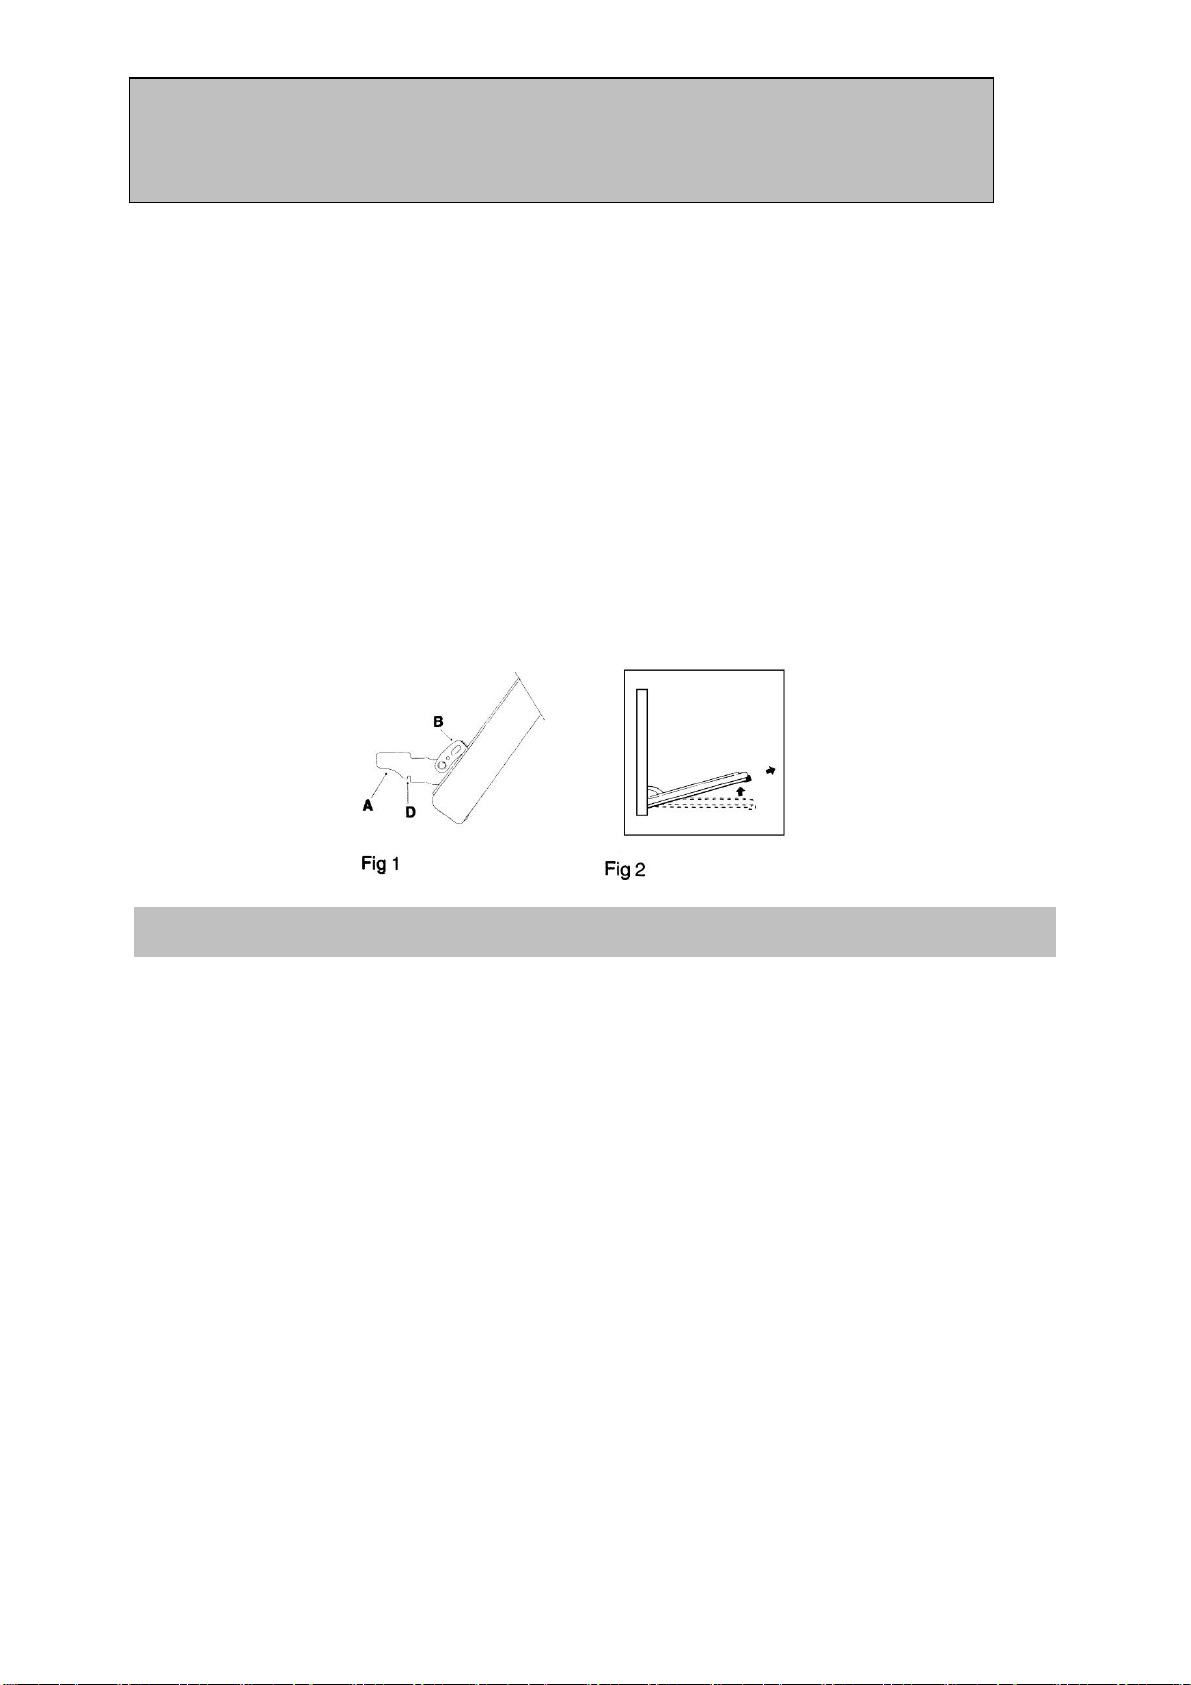
WARN IN G : It is essential to use specific soft wire or specific groupware bought from the manufacturer or
maintenance department to replace if the electrical soft wire has been broken.
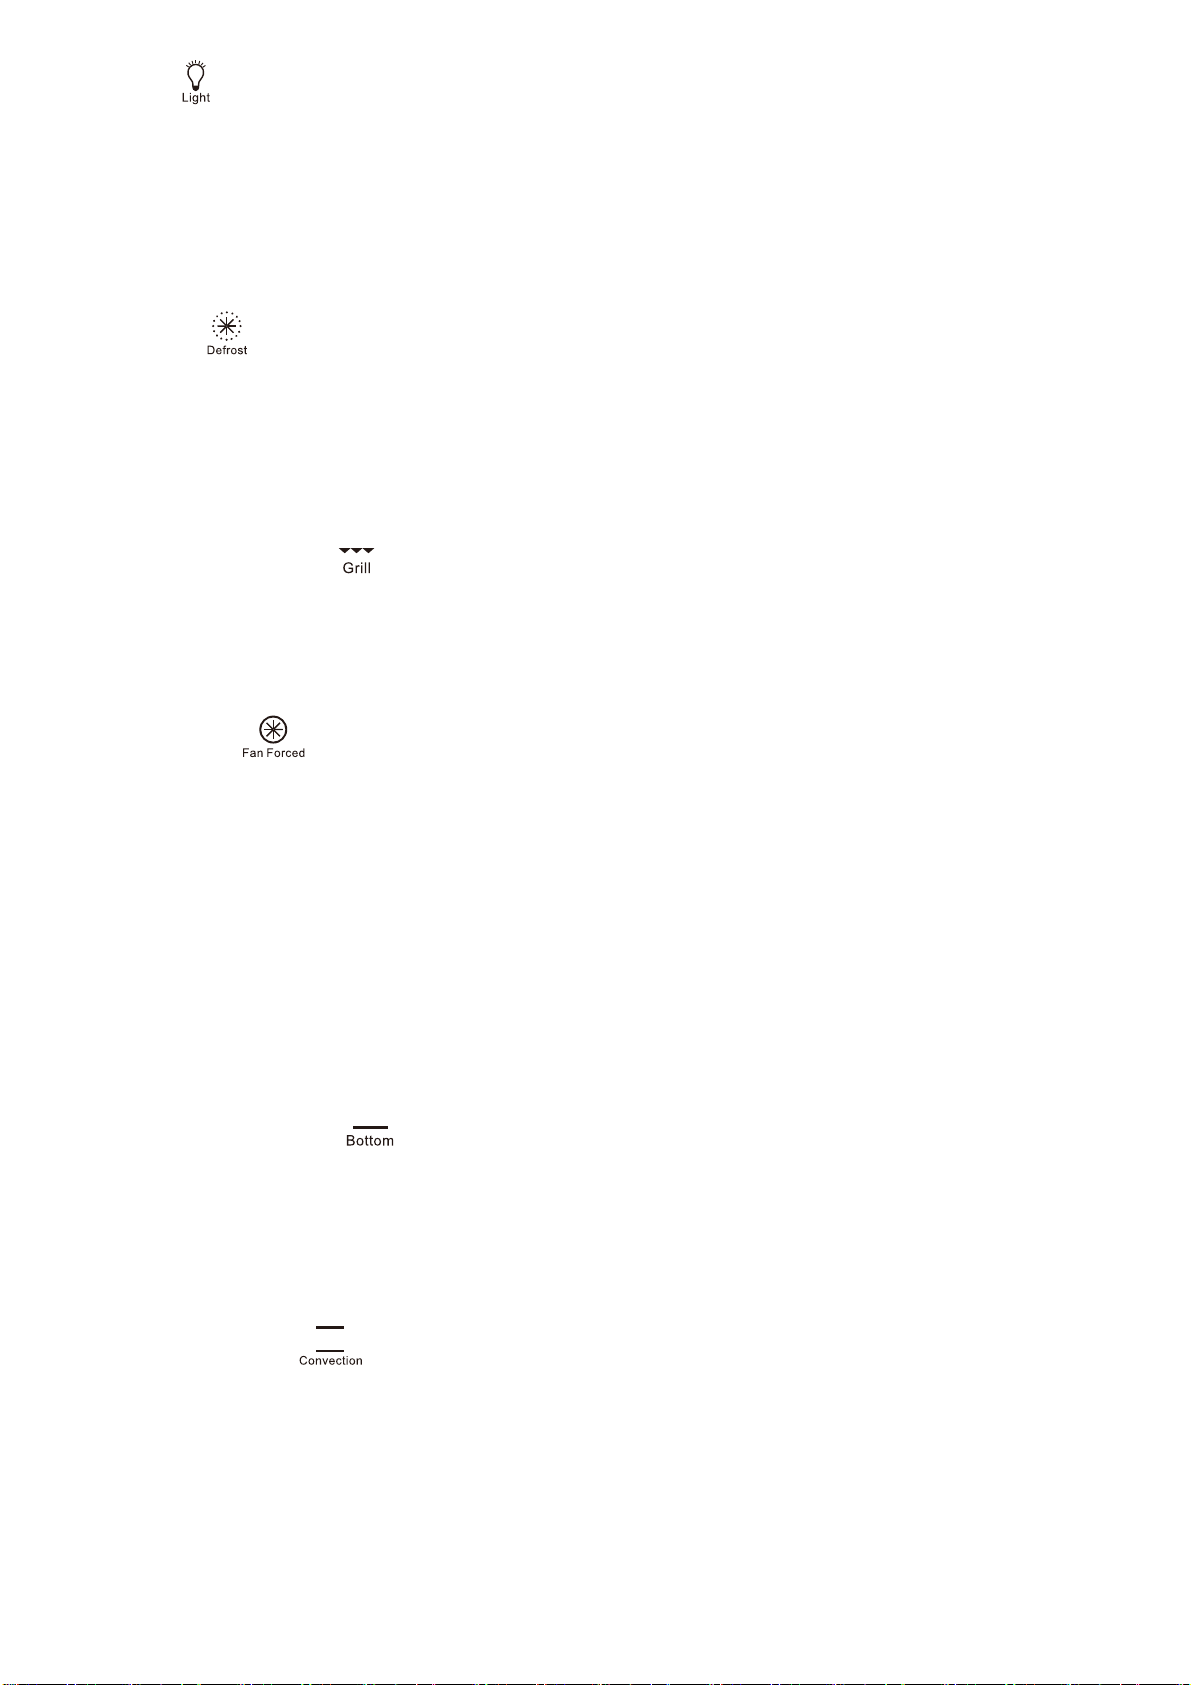
USEFUL NOTES FOR COOKING
In the following table, some indicative hints for cooking:
FAULTS CAUSES REMEDIES
The upper crust is dark
and the lower part too
pale
Not enough heat from the
bottom
- Use the natural convection position
- Use deeper cake tins
- Lower the temperature
- Put the cake on a lower shelf
The lower part is dark
and the upper crust too
pale
Excessive heat from the
bottom
- Use the natural convection position
- Use lower side tins
- Lower the temperature
- Put the cake on a higher shelf
The outside is too
cooked and the inside
not cooked enough
Too high temperature - Lower the temperature and increase
the cooking time
The outside is too dry
even though of the right
color
Too low temperature - Increase the temperature and reduce
the cooking time.
This product must not be disposed together with the domestic waste. This product has to be
disposed at an authorized place for recycling of electrical and electronic appliances.
By collecting and recycling waste, you help save natural resources, and make sure the
product is disposed in an environmental friendly and healthy way.

Important: if you decide not to use the oven any more, it should be made inoperable by cutting
the power supply cable, after unplugging it from the power supply. Disused appliances can be a
safety risk as children often play with them. For this reason it is advisable to make the oven safe.
Protective kit
During operation, the oven glass door and adjacent parts of the appliance become hot. Make sure, therefore,
that children do not touch the appliance.
Disassembling/assembling the oven door
To make it easier to clean the inside of your oven, the oven door can be removed, by proceeding as follows
(fig. 1-2):
● Open the door completely and lift the 2 levers “B” (fig.1);
● Now, shutting the door slightly, you can lift it out by pulling out the hooks “A” as shown in figure 2.
To reassemble the door:
● With the door in a vertical position, insert the two hooks “A” into the slots;
● Ensure that seat “D” is hooked perfectly onto the edge of the slot (move the oven door backwards and
forward slightly);
● Keep the oven door open fully, unhook the 2 levers “B” downwards and then shut the door again.
Practical Cooking Advice
Preheating
If the oven must be preheated (generally this is the case when cooking leavened foods) use the "Fan" in
order to save energy.
Once the food has been placed in the oven. The most appropriate cooking mode can then be selected.
Using the grill
The Multifunction oven offers you three different grilling modes
Use the "Grill"setting for grilling small portions like toasted sandwiches, hotdogs, etc., to perfection.
The "Maxigrill"position is the best for grilling foods rapidly. For a better distribution of heat, not only to
brown the surface but also to cook the bottom part, select "Fan Maxi grill"function.
This mode can slso be used for browning foods at the end of the cooking process.
Important: always use the grill with the oven door closed. This will allow you both to attain excellent results
and to save energy
When using any of the three grilling modes , it is recommended that the thermostat knob be turned to the
175℃, as it is the most efficient way to use the grill (which utilizes infrared rays).
However, the thermostat can be set to lower temperatures by simply turning the knob to the desired setting.
When utilizing the grill, place the rack at the lower levels (see cooking table). To catch grease or fat and
prevent smoke, place a dripping-pan at the bottom rack level.
Baking pastries
When baking pastries, always place them in the oven after it has been preheated. Make sure you wait until
the oven has been preheated thoroughly (the red "E"light will turn off). Do not open the door while the

pastry is cooking in order to prevent it from dropping.
Batters must not be too runny, as this will result in prolonged cooking times. In general:
Pastry is too dry
Increase the temperature by 10℃ and reduce the cooking time.
Pastry dropped
Use less liquid or lower the temperature by 10℃
Pastry is too dark on top
Place it on a lower rack, lower the temperature, and increase the cooking time.
Cooked well on the inside but sticky on the outside
Use less liquid, lower the temperature, and increase the cooking time.
The pastry sticks to the pan
Grease the pan well and sprinkle it with a dusting of flour.
I used more than one level and they are not all at the same cooking point
Use a lower temperature setting. It is not necessary to remove the food from all the racks at the
same time.
Cooking Pizza
For best results when cooking pizza use the "Fan mode":
● Preheat the oven for at least 10 minutes;
● Use a light aluminium pizza pan, placing it on the broiler supplied with the oven. If the dripping-pan is
used, this will extend the cooking time, making it difficult to get a crispy crust;
● Do not open the oven door frequently while the pizza is cooking;
● If the pizza has a lot of toppings (three to four), it is recommended that the mozzarella cheese be placed
on top halfway through the cooking process;
Cooking Fish and Meat
Meat must weigh at least 1 Kg in order to prevent it from drying out. When cooking white meat, fowl and
fish, use low temperature settings (150℃-220℃). For red meat that should be well done on the outside while
tender and juicy in the inside, it is a good idea to start with a high temperature setting (200℃-220℃) for a
short time, then turn the oven down afterwards. In general, the larger the roast, the lower the temperature
setting. Place the meat on the centre of the rack and place the dripping pan beneath it to catch the fat.
Make sure that the rack is inserted so that it is in the centre of the oven. If you would like to increase the
amount of heat from below, use the low rack heights. For savory roasts (especially duck and wild game),
dress the meat with lard or bacon on the top.

STATIC OVEN COOKING
Type of dish Temperatu
re
Cooking
time
Type of dish Temperatur
e
Cooking
time
Pastries and
cakes
(℃) minutes Meat (℃) hours
Fruit pie
Meringues
Sponge cake
Angel cake
Madeira cake
Chocolate cake
Flat sweet loaf
Puffs
Flaky pastry
biscuits
Mille feuilles
Short pastry
130
130
150
160
160
170
170
200
200
200
200
60-70
30-40
20-30
40-50
40-50
30-40
40-50
15-20
15-20
15-20
15-20
Turkey (4-8 kg)
Goose (4-5 kg)
Duck (2-4 kg)
Capon (2 1/2-3 kg)
Braised beef (1-1 1/2
kg)
Leg of lamb
Roast hare (2 kg)
Roast pheasant
Chicken(1-1 1/2 kg)
Fish 200 Minutes
15-25
Grilling
Type of dish Cooking time
(minutes)
Position
of shell
Chops (0.5 kg)
Sausages
Grilled chicken (1 kg)
Veal on the spit (0.6 kg)
Chicken on the spit (1 kg)
min. 25
min. 15
min. 60
min. 60
min. 60
3rd guide rail
2nd guide rail
1st guide
rail
-
-
Cooking times may vary according to the nature of the foods, their homogeneity and their volume. When
cooking a certain food for the first time, it is advisable to choose the lowest values in the cooking time range
given in the table and then increase them if necessary.
The 1st guide rail is understood as being the lowest position.
Safety Is A Good Habit To Get Into
◎ This appliance is designed for non-professional, household use and its functions must not be changed.
◎ The electrical system of this appliance may be used safely only when it is correctly connected to an
efficient earthing system in compliance with the safety standards currently in effect.
◎ The manufacturer will not be held liable for any damages that might arise out of incorrect installation or
improper, incorrect or unreasonable use of the appliance.
The following items are potentially dangerous, and, therefore, appropriate measures must
be taken to prevent children and the disabled from coming into contact with them:
- Controls and the appliance in general;
- Packaging (bags, polystyrene, nails, etc.);
- The appliance immediately after use of the oven or grill due to the heat generated;
- The appliance when no longer in use (potentially dangerous parts must be made safe).

Avoid the following:
- Touching the appliance with wet parts of the body;
- Using the appliance when barefoot;
- Pulling on the appliance or the supply cord to unplug it from the electrical outlet;
- Obstructing the ventilation or heat dissipation slots;
- Allowing power supply cords for small appliances to come into contact with the hot parts of the
appliance;
- Exposing the appliance to atmospheric agents (rain, sun);
- Using the oven for storage purposes;
- Using flammable liquids near the appliance;
- Using adaptors, multiple sockets and/or extension cords;
- Attempting to install or repair the appliance without the assistance of qualified personnel.
WA R N I N G - Accessible parts will become hot when in use. To avoid burns and scalds
children should be kept away
During use the appliance becomes hot, Care should be taken to avoid touching heating elements inside
the oven.
Qualified personnel must be contacted in the following cases:
- Installation (following the manufacture’s instructions);
- When in doubt about operating the appliance;
- Replacing the electrical outlet when it is not compatible with the plug for the appliance.
Service Centres authorized by the manufacturer must be contacted in the following cases:
- If in doubt about the soundness of the appliance after removing it from the packaging;
- If the power supply cord has been damaged or needs to be replaced;
- If the appliance breaks down or functions poorly; ask for original spare parts.
It is a good idea to do the following:
- Only use the appliance to cook food, nothing else;
- Check the soundness of the appliance after it has been unpacked;
- Disconnect the appliance from the electrical mains if it is not functioning properly and before
cleaning or performing maintenance;
- When the appliance is not used for an extended period of time, cut off the supply of power and
close the gas cock (it present);
- Use cooking gloves to place cookware in the oven or when removing it;
- Always grasp the oven door in the centre because the ends may be hot due to the escape of hot air;
- Make sure that the control knobs are on the “o”setting when the appliance is not in use;
- Cut the power supply chord after disconnecting it from the mains when you decide not to use the
appliance any longer.
◎ The manufacturer may not be held responsible for any damage due to: incorrect installation, improper,
incorrect and irrational use.
Installation
Important: the power supply to the appliance must be cut off before any adjustments or maintenance work is
done on it.
Installation of Built-in Ovens
To ensure the proper working order of the built-in appliance, the kitchen unit must be of a suitable size.

The sizes of the unit for installing the cooker under a worktop or in a column unit are shown below.
The unit panels next to the cooker must be heat resistant. In the case of veneered wood units, glues must be
resistant to a temperature of 120℃.
In accordance with safety standards, once the appliance has been mounted, there must be no possible contact
with electrical parts. Any protective parts must be secured so that they can only be removed with the use of
tools.
Sealing the oven
Insert the appliance into the compartment; open the oven door and fasten the oven to the cabinet using the
four screws “A”, remembering to place the special spacers provided between the hole and the screw itself.

● the limiter valve and the home system can support the appliance load(see data plate);
● the power supply system has an efficient earthing connection which complies with the provisions of
current regulations;
● the socket or omnipolar circuit-breaker is easily accessible once the cooker has been installed.
NOTE: do not use reducers, adaptors or shunts as they could cause overheating and burns.
Technical Specifications
Electric oven size: litres 100 /900mm
Oven size
Width 895mm
Depth 546mm
Height 470mm
Powers absorbed in accordance with models
Accessories according to models
Oven lower heating el. 1300Watt Medium grill hearting el. 2000 Watt synchromotor 4 Watt
Oven upper heating el. 1050Watt Total grill heating el. 1050+2000 Watt Shaded motor (back) 25 Watt
Oven light 15Watt Circle heating el. 2800Watt Shaded motor (top) 15Watt
Voltage end frequency: 220-240V/50Hz
Power supply Max: 2800W(220V) - 3400W (240V)
Connecting the power supply cable to the mains
The appliance must be directly connected to the mains using an omnipolar circuit-breaker with a minimum
contact opening of 3 mm installed between the appliance and the mains, suitable for th load indicated and
complying with current directives (the earthing wire must not be interrupted by the circuit-breaker).
The power supply cable must be positioned so that it does not exceed 50℃ more than room temperature at
any point of its length.
Before making the connection check that:
Electric connection
Cookers with a three-pole power supply cable are designed to operate with alternated current at the supply
frequency and voltage indicated on the data plate (at the bottom of the oven dashboard). The earthing
conductor of the cable is the yellow-green conductor.

Warranty Card
Worldwide Appliances Pty Limited
A.B.N. 45868077422
Oce:
48-50 Moore Street, Leichhardt N.S.W 2040
Post:
Locked Bag 3000, Annandale, N.S.W 2038
P: 1300 694 583
WARRANTY REGISTRATION
Your ongoing satisfaction with your artusi
product is important to us. We ask that you
complete the enclosed Warranty Registration
Card and return it to us so that we have a record
of the artusi product purchased by you.
PRIVACY
Worldwide Appliances respects your
privacy and is committed to handling your
personal information in accordance with the
National Privacy Principles and the Privacy
Act 1988 (Cth). A copy of the Worldwide
Appliances Privacy Policy is available at
www.artusi.com.au. Worldwide Appliances will
not disclose any personal information set out
in the Warranty Registration Card (“Personal
Information”) without your consent unless
required by:
1. law;
2. any Worldwide Appliances related company;
3. any service provider which provide services
to artusi or assist artusi in providing services
(including repair and warranty services) to
customers. Our purpose in collecting the
Personal Information is
to keep a record of the artusi product purchased
by you, in order to provide a better warranty
service to you in the unlikely event that there is
a problem with your artusi product. Worldwide
Appliances may contact you at any one or more
of the address, email address or telephone
numbers set out in the Warranty Registration
Card. Please contact artusi on 1300 694
583 should you not wish to be contacted by
Worldwide Appliances.
WARRANTY
1. Warranty
Worldwide Appliances warrants that each artusi
product will remain, for a period of either 12
months or 24 months of warranty. All Warranties
are valid from the original date of purchase, And
warranty claims must be accompanied by the
proof of purchase.
24 months warranty products:
All Built-in Appliances – Limited to Ovens,
Gas, Induction and Electric Cooktops, and All
Rangehoods
Freestanding Cookers - Gas and Electric Models
(900mm Width)
artusi.com.au
Dishwashers - Freestanding, Fully Integrated,
Semi Integrated and built-in
12 months warranty products:
Freestanding Cookers - Gas and Electric Models
in 50cm, 54cm and 60cm Widths
Portable Appliances* – Benchtop Models and
Portable Gas Models
2. What is not Covered by the Warranty.
The Warranty does not apply if an artusi product
is defective by a factor other than a defect arising
in the manufacture of the artusi product, including
but not limited to:
(a) damage through misuse (including failure
to maintain, service or use with proper care),
neglect, accident or ordinary wear and tear
(including deterioration of parts and accessories
and glass breakage);
(b) use for purpose for which the artusi product
was not sold or designed;
(c) use or installation which is not in accordance
with any specied instructions for use or
installation;
(d) use or operation after a defect has occurred or
been discovered;
(e) damage through freight, transportation or
handling in transit (other than when Worldwide
Appliances is responsible);
(f) damage through exposure to chemicals, dusts,
residues, excessive voltage, heat, atmospheric
conditions or other forces or environmental
factors outside the control or Worldwide
Appliances;
(g) repair, modication or tampering by the
purchaser or any person other than Worldwide
Appliances, an employee of Worldwide
Appliances or an authorised artusi service
contractor*;
(h) use of parts, components or accessories
which have not been supplied or specically
approved by artusi.
(i) damage to surface coatings caused by cleaning
or maintenance using products not recommended
in the artusi product handbook provided to the
purchaser upon purchase of the artusi product;
(j) damage to the base of an electric oven due to
items having been placed on the base of the oven
cavity or covering the base, such as aluminium
foil (this impedes the transfer of heat from the
element to the oven cavity and can result in
irreparable damage); or
(k) damages, dents or other cosmetic
imperfections not aecting the performance of the
artusi in respect of an artusi product purchased
as a “factory second” or from display
The Warranty does not extend to light globes
used in artusi products.
3. Domestic Use
Each artusi product is made for domestic use.
This Warranty may not extend to artusi products
used for commercial purposes.
Continued over...

4
Please complete and send to ARTUSI at: REPLY PAID 83617
LEICHHARDT NSW 2040
Last Name: First Name:
Address:
State: Postcode: Email:
Home Phone: Mobile:
Purchase Date: / / (Please attach proof of purchase to validate warranty)
MODEL NUMBER SERIAL NUMBER
(if you cannot locate the serial number please call ARTUSI on 1300 694 583)
1
2
3
4
WARRANTY REGISTRATION CARD
01052013
01032014
4. Time for Claim under the Warranty
You must make any claim under this Warranty
within twenty eight (28) days after the occurrence
of an event which gives rise to a claim pursuant
to the Warranty, by booking a service call on the
telephone number below.
5. Proof of Purchase
Customers must retain proof of purchase in order
to be eligible to make a warranty claim in respect
of an artusi product.
6. Claiming under the Warranty
Customers will bear the cost of claiming under
this Warranty unless Worldwide Appliances
determines the expenses are reasonable, in which
case the customer must claim those expenses
by providing written evidence of each expense
to Worldwide Appliances at the address on the
Warranty Registration Card.
7. Statutory Rights
(a) These terms and conditions do not aect your
statutory rights.
(b) The limitations on the Warranty set out in this
document do not exclude or limit the application
of the consumer guarantees set out in the Act or
any other equivalent or corresponding legislation
in the relevant jurisdiction where to do so would:
(i) contravene the law of the relevant jurisdiction;
or
(ii) cause any part of the Warranty to be void.
(c) Worldwide Appliances excludes indirect or
consequential loss of any kind (including, without
limitation, loss of use of the artusi product) and
(other than expressly provided for in these terms
and conditions) subject to all terms,
conditions and warranties implied by custom, the
general law, the Act or other statute.
(d) The liability of Worldwide Appliances to you
for a breach of any express or non-excludable
implied term, condition or warranty is limited at
the option of Worldwide Appliances to:
(i) replacing or repairing the defective part of the
artusi product;
(ii) paying the cost of replacing or repairing the
defective part of the artusi product;
(iii) replacing the artusi product; or
(iv) paying the cost of replacing the artusi
product.
(e) Our goods come with guarantees that cannot
be excluded under the Australian Consumer
Law. You are entitled to a replacement or refund
for a major failure and for compensation for any
other reasonably foreseeable loss or damage.
You are also entitled to have the goods repaired
or replaced if the goods fail to be of acceptable
quality and the failure does not amount to a
major failure.
8. Defects
Any part of an artusi product deemed to be
defective and replaced by Worldwide Appliances
is the property of Worldwide Appliances.
Worldwide Appliances reserves the right to
inspect and test artusi products in order to
determine the extent of any defect and the
validity of a claim under the Warranty.
*To locate your closest artusi authorised service
agent please contact us on 1300 652 100 or visit
www.artusi.com.au
ALL SERVICE CALLS MUST BE BOOKED
THROUGH AN AUTHORISED DEALER OR
WARRANTY DEPARTMENT ON 1300 652 100
OR stokesaps.com.au/artusi-service
01032014
Warranty Card continued artusi.com.au
Warranty Card tear off


ARTUSI.COM.AU
P: 1300 649 583
NSW & ACT (HEAD OFFICE)
48-50 MOORE STREET
LEICHHARDT
F 02 8569 4699
QLD
1/42 CAVENDISH ROAD
COORPAROO
F 07 3397 0850
VIC,TAS & SA
1211 TOORAK ROAD
CAMBERWELL
F 03 9809 2155
WA & NT
UNIT 10/55 HOWE STREET
OSBORNE PARK
F 08 9201 9188
NZ
PO BOX 11.160
SOCKBURN CHRISTCHURCH
F 03 344 5906
ARTUSI OFFICES ARE OPEN DAILY FROM 9AM–5PM AND SATURDAYS 10AM–4PM
DISCLAIMER
Worldwide Appliances PTY LTD, trading as ARTUSI, is continually seeking ways to improve the design specifications, aesthetics and production
techniques of its products. As a result alterations to our products and designs take place continually. Whilst every effort is made to produce
information and literature that is up to date, this brochure should not be regarded as an infallible guide to the current specifications, nor does it
constitute an offer for the sale of any particular product. Product dimensions indicated in our literature is indicative only. Actual product only
should be used to define dimension cutouts. Distributors, and retailers are not agents of ARTUSI and are not authorised to bind ARTUSI by any
express or implied undertaking or representation.
This manual suits for next models
1
Table of contents
Other Artusi Oven manuals

Artusi
Artusi AO676B User manual

Artusi
Artusi CAO610BP User manual

Artusi
Artusi AO650GG User manual

Artusi
Artusi CAMC45B User manual

Artusi
Artusi AO650X User manual

Artusi
Artusi AOS652X User manual

Artusi
Artusi AO450X User manual

Artusi
Artusi AO654XP User manual

Artusi
Artusi CAFC95X User manual

Artusi
Artusi PAO6 Series User manual
Popular Oven manuals by other brands

Electrolux
Electrolux EOB3638 operating instructions

Premium
Premium PBO6504M Service manual

Electrolux
Electrolux EKS985X user manual

Häfele
Häfele HO-K60C user manual

Range Master
Range Master RMB610BL User guide & installation & service instructions

Vulcan-Hart
Vulcan-Hart ABC7E-208 Nstallation & operation manual