ARVA NEOBT PRO User manual

NEO
USER MANUAL
MODE D’EMPLOI
INBETRIEBNAHME
GUIDA INTRODUTTIVA
GUÍA DE UTILIZACIÓN
KÄYTTÖOHJE
BRUKERMANUAL
ANVÄNDARMANUAL
取扱説明書
CONNEXION À L’APPLICATION ARVA
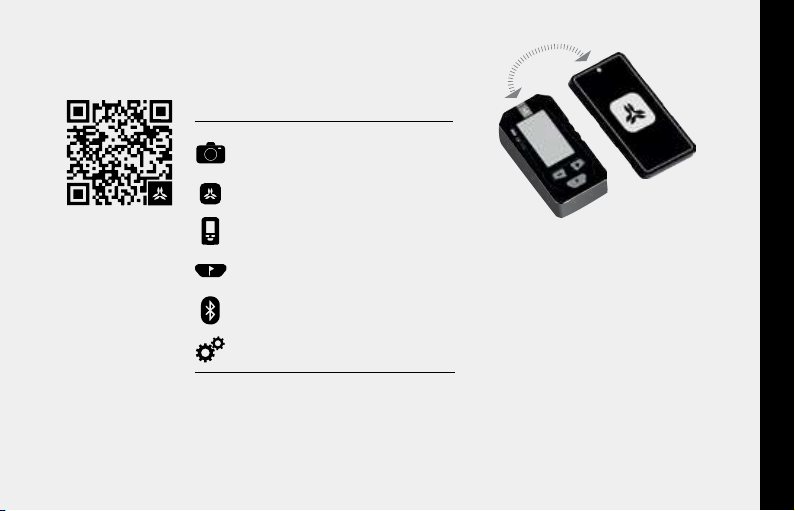
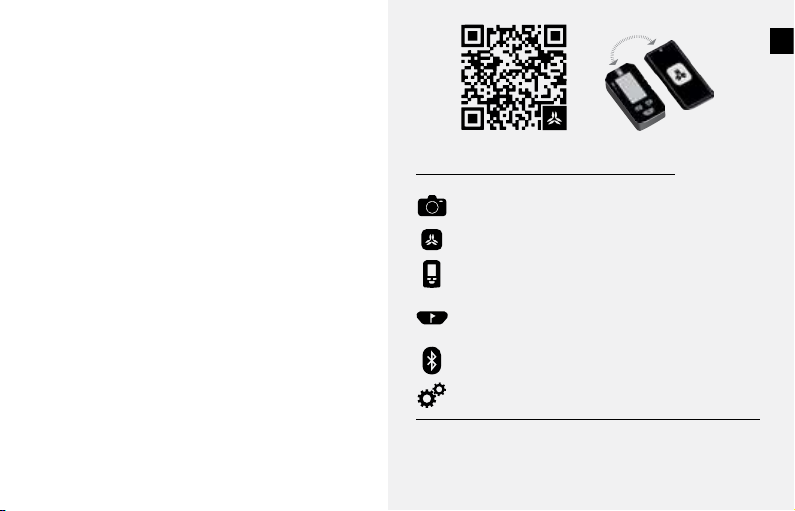
CONNECTING TO THE ARVA APP
Flash the QR code with my camera
Download the ARVA app
Register my transceiver product
Switch on the transceiver by pressing marking to activate Bluetooth
Connect my transceiver to the app
Configure my transceiver
For more information, visit:
Profile > My Registered Devices > Settings
2
FR

3
EN
Congratulations on purchasing a new ARVA
transceiver; this manual contains all the infor-
mation you need to use it. This manual is avail-
able on our website in the "downloads" section.
Register your ARVA device on our website www.
arva-equipment.com or on the ARVA app and
enjoy an additional 3 years of warranty (regis-
tration must be completed within 2 years of the
date of purchase).
1.1/ TECHNICAL CHARACTERISTICS
1/ GETTING STARTED
INSTRUCTIONS FOR USE
1/
2/
3/
4/
5/
6/
7/
GETTING STARTED
TRANSMIT MODE
SEARCH MODE
PROBING - SHOVELING
INTERFERENCE
WARRANTY - CHECKS
DECLARATION OF CONFORMITY (at the end of
the manual)
• 3-antenna digital device
• Search strip width in digital mode: 80 m
• Maximum range in analog mode: 90 m
• Dynamic interference management
• Automatic revert-to-transmit by motion detector
• Power supply: 3 AAA/LR03 alkaline or lithium batteries
• Battery life in transmit mode: 350 hrs with alkaline / 450 hrs
with lithium
• Storage temperature range: -20°C to +70°C
• Operating temperature range: -20°C to +45°C
• Maximum operating altitude: 10 000 m
• Avalanche beacon / Frequency band: 456.9 - 457.1 kHz
• Avalanche beacon / Maximum power: H-Field < 2.23 µA/m @ 10 m
• Bluetooth 2.4 GHz / Frequency band: 2.400 - 2.4835 GHz
• Bluetooth 2.4 GHz / Maximum power: ERP < 100 mW
• Weight: 214 g (batteries included)

4
EN
MARKING FUNCTION
OFF/SEND/SEARCH SELECTOR
UNLOCK BUTTON / EXIT SEND MODE
GAIN BUTTON “-” IN ANALOG MODE / NAVIGATION BETWEEN
VICTIMS SCROLLING MODE
GAIN BUTTON “+” IN ANALOG MODE / NAVIGATION BETWEEN
VICTIMS SCROLLING MODE
ELASTIC
ATTACHMENT
LANYARD
Holster

5
EN
The information in this manual is for guidance only and
is subject to change at any time. The technical features
and product specifications may be changed without no-
tice for future versions of our devices.
No liability is accepted for improper use, failure to follow the
operating instructions, unauthorised modifications to the de-
vice, continued use despite signs of wear and tear or faults
of any kind, or unauthorised or improperly performed repairs. Pictogram inviting users to take end-of-life prod-
ucts for recycling
Pictogram encouraging users to read instruc-
tions and warnings
1.2/ MEANING OF MANUAL / DEVICE PICTOGRAMS
Waste disposal for users in private households: this symbol
indicates that this product should not be dis-
posed of with your other household waste. It is
your responsibility to dispose of your waste by
taking it to a designated collection point where
electrical and electronic devices are recycled
properly. Collecting and recycling your waste
1.3/ TRAINING - RESPONSIBILITY
Training and practicing so you understand your device com-
prehensively is essential for a successful avalanche search.
Off-piste skiing/snowboarding and ski touring/splitboarding
are risky activities, and wearing a transceiver should never
affect your decision making in risky areas. Know when to
turn round and go back.
1.4/ STORAGE - BATTERIES
You must store your device in a cool, dry place away from
direct sunlight. If you plan to store it for a long period, re-
move the batteries, as the warranty does not cover damage
will help conserve natural resources and protect the envi-
ronment and people's health. For more information on the
nearest recycling centre to your home, contact your local
authority, the household waste disposal service or the shop
where you purchased the product.

6
EN
caused by battery failure (including loss of waterproofing).
We recommend that you check your device regularly, includ-
ing the operation of the OFF/SEND/SEARCH selector and the
condition of the display. Also, ensure there is no trace of cor-
rosion in the battery compartment.
The NEO BT PRO works exclusively with 3 AAA/LR03 alkaline
or lithium batteries (specify the type of batteries in the app
settings). Do not use rechargeable batteries. The label at
the bottom of the battery compartment is essential for our
after-sales service procedures; please do not remove it. You
must replace all 3 batteries at the same time. After changing
the batteries, make sure that the compartment lid is closed
properly.
Important for Switzerland: appendix 4.10 of standard
SR814.013 applies to batteries.
Disposing of a battery in a fire or furnace or
mechanically crushing or cutting a battery can
cause an explosion. Keeping a battery in a very
high-temperature environment can cause an
explosion or the escape of flammable liquid or gas. A battery
subjected to extremely low air pressure may cause an explo-
sion or leakage of flammable liquid or gas. An explosion may
result if the wrong type of battery is used.
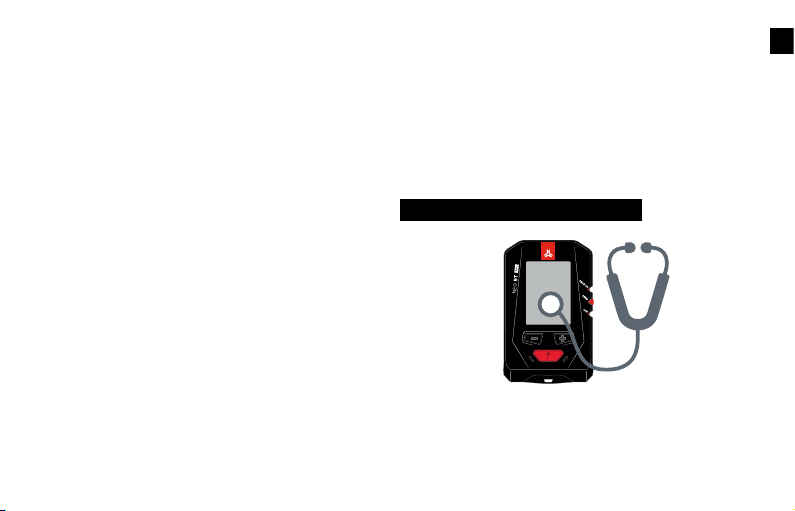
1.5/ SETTING UP YOUR DEVICE
During the start-up phase, press and hold the marking but-
ton. The Bluetooth pictogram appears. You can then connect
your transceiver to your smartphone. The ARVA application
offers a number of services, including the opportunity to
register, set up and maintain your transceiver.
2/ TRANSMIT MODE
2.1/ TURNING ON THE DEVICE
The device is off when the side selector is in the OFF posi-
tion. Move the OFF/SEND/SEARCH selector to the SEND po-
Turn on the transceiver by pressing on
marking to activate Bluetooth
Connect my transceiver to the app
Configure my transceiver

7
EN
Once the start-up phase is complete, the device prompts the
user to carry out a GROUP CHECK (see paragraph 3.1/ GROUP
AND FREQUENCY TEST) and then automatically switches to
transmit mode without any further action from the user. A
blinking arrow then appears at the top of the screen to con-
firm that the transceiver is in transmit mode.
2.2/ WEARING THE DEVICE
Make sure that the carabiner of the elastic attachment lan-
yard is properly connected to the waist belt of the holster (2
positions available left and right), then position the device in
the holster with the screen facing your body and fasten the
buckle of the holster. The NEO BT PRO should always be worn
over the base layer of clothing closest to your body.
The device then displays the remaining
battery life. We advise you to replace the
batteries as soon as the battery life indica-
tor drops below 50%. Press and hold the
marking button in transmit mode to check
the battery life at any time.
sition to turn the device on. The selector is locked properly
when you hear it click into place, indicating that the selector
has been moved to the SEND position.
The device carries out an automatic test during the start-up
phase to check the main functions. Be sure to verify that the
auto-test is running correctly and pay close attention to any
error messages appearing on the screen. The device should
display "On", then the software version installed, and finally
"OK".

8
EN
2.3/ TURNING OFF THE DEVICE
Press the unlock button and move the selector to OFF to turn
the device off.
SEND
PUSH
SEARCH
1
2
3/ SEARCH MODE
In the event of an avalanche, switch to search mode from
transmit mode. Take the device out of its holster, press the
release button and move the OFF/SEND/SEARCH selector to
the SEARCH position.
3.1/ GROUP AND FREQUENCY TEST
Before you begin your outing in the mountains, it is impor-
tant to test the group member' devices to ensure that they
are in transmit mode and working properly. The group leader
must switch their device to GROUP CHECK mode to test the
devices. When it is switched on in transmit mode, the NEO
OFF
PUSH
SEND
1
2

9
EN
BT PRO prompts you to choose GROUP CHECK mode. To en-
ter GROUP CHECK mode, press the marking button when the
GROUP CHECK pictogram is blinking on the screen.
In this mode, you can test your partners' devices one after
another by positioning your device 1 m away from each de-
vice to be checked. It is imperative you stay 1 m away for the
GROUP CHECK to work properly; if you do not, the device will
inform you that you are too close or too far away with repeat-
ed "double beeps".
In GROUP CHECK mode, the NEO BT PRO displays the status
of the transmit frequency and transmit power in a loop. If the
frequency is correct, "FY" / "OK" will be displayed. If it is not
correct, then "FY" / "ER" will appear on the screen, meaning
that the device being checked is defective and must be taken
care of by our after-sales service.
1M
To test the transmit power, you should check the distance
displayed on the screen:

10
EN
• If the displayed distance fluctuates between 0.5 m and 1.5
m and you are positioned correctly 1 m from the device be-
ing checked, the transmit power is correct, and your device
will emit a standard search "beep."
• If the distance displayed seems to be inconsistent, this
means that the transmit power may not be correct and that
the device being checked should be taken care of by the
after-sales service
When the group check is complete, press the marking button
to switch to transmit mode. Be sure to test the group leader's
device using one of the devices previously tested. GROUP
CHECK mode can be accessed again at any time from trans-
mit mode by pressing the "+" and "-" buttons simultaneously.
The device automatically switches to transmit mode after 8
minutes for safety reasons.
3.2/ RESCUE
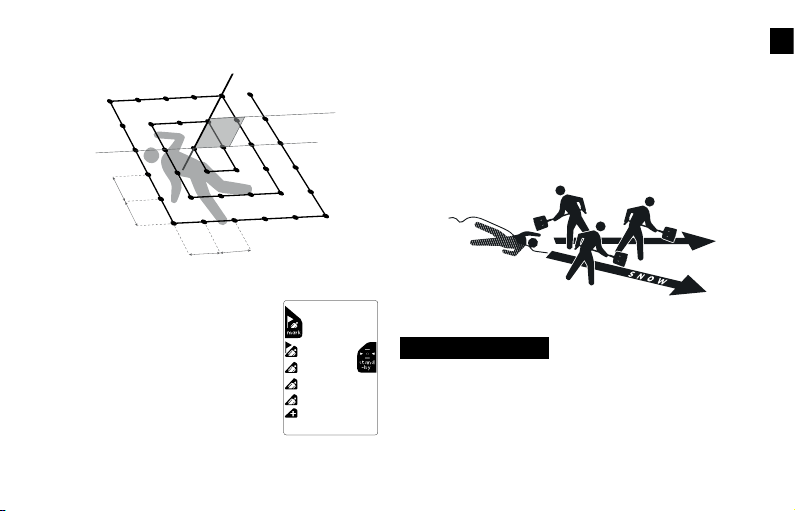
3.2.1/ STEP 1: SIGNAL SEARCH
Take your NEO BT PRO out of its holster and put it into search
mode. Then, proceed across the avalanche in search of a
signal using the techniques shown in one of the 2 diagrams
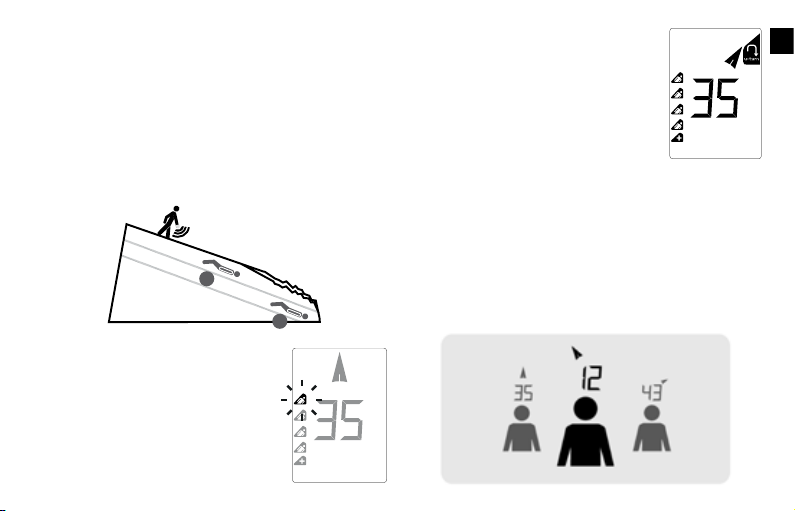
below. The screen displays the signal search icon.
It is important to point your transceiver in the direction of
the avalanche, parallel to the slope. Listen carefully for the
first signals, paying attention to external visual clues (poles,
skis, clothing) at the same time. As soon as the first signal
is detected, a "VICTIM" pictogram will appear on the screen
automatically.
The "VICTIM" pictograms are located on the left of your
screen; the "+" pictogram indicates that there are more than
4 burial victims.
11
EN
3.2.2/ STEP 2: COARSE SEARCH
When one of the "VICTIM" pictograms starts blinking, your de-
vice has locked onto the signal from this burial, and you are
in the coarse search phase. Position the device on the palm
of your hand parallel to the slope and pointing in the direction
indicated on the screen. Pay close attention to the distanc-
es and directions displayed. The signals from the victims are
ranked from the strongest to weakest (from top to bottom).
If you come closer to another burial dur-
ing your search, this burial's pictogram
will, in turn, begin to blink.
1
2
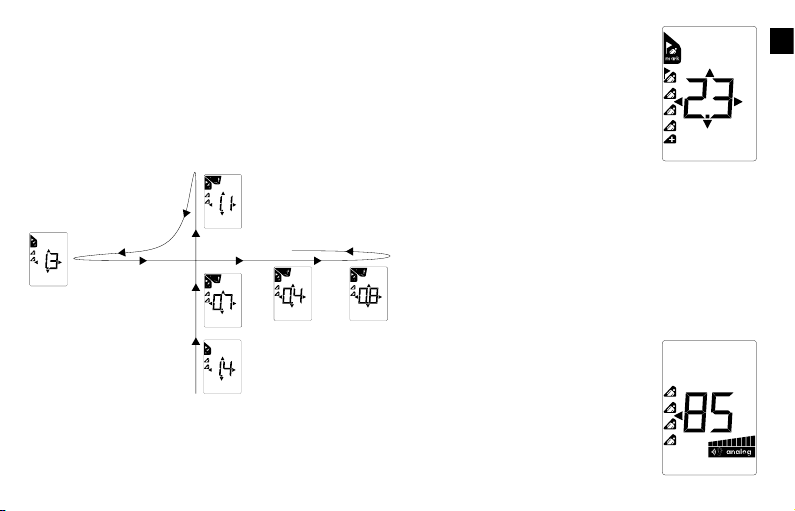
If you are not going in the right direction,
an audible alarm accompanied by the
appearance of the U-TURN pictogram will
tell you to turn around to find the fastest
route.
SCROLLING MODE: when scrolling mode is activated (see par-
agraph 1.5/ SETTING UP YOUR DEVICE), you have the option
to select the burial you want to target. Use the "+" and "-"
buttons to select the burial you want to target (the pictogram
corresponding to this burial will blink). Please note that this
mode is reserved for expert users with advanced avalanche
rescue skills.
12
EN
3.2.3/ STEP 3: FINE SEARCH
When the screen indicates you are 3 m from the burial(s) lo-
cation (or 5 m depending on the settings), your device will
no longer give any direction, and you will begin the cross-
search phase. Move your device in a criss-cross pattern until
it is vertically above the point where the distance reading is
lowest.
Marking function: when you are less than 3 m distance from
the burial(s) location (or 5 m depending on the setting), the
MARKING pictogram blinks at the top right-hand side of the
screen. Press the marking button to mark the burial. The
device then searches for the next bur-
ial without returning to the previously
marked burial(s). When you mark a
burial, a flag appears next to their pic-
togram.
3.3/ ANALOG SEARCH MODE
It may be more useful to switch your device to analog search
mode in some situations. You can activate the analog search
mode from the search mode by briefly pressing the "+" and
"-" buttons simultaneously using your left and right thumbs
(repeat the operation to return to the digital search mode).
By default, in analog mode, sensitivity calibration is per-
formed automatically. To switch to
manual mode, press either the "+" or "-"
button and then adjust the sensitivity
according to your progress using the
same buttons.
The left and right arrows blink alternate-
13
EN
ly to help the user choose the correct calibration. If you press
the marking button, you return to automatic sensitivity cali-
bration management. At sensitivity level 10 (the highest), the
screen switches itself off to limit the level of interference and
provide maximum detection performance.
Analog search mode is not recommended for novice or in-
experienced users. In analog search mode, the rescuer can
listen to the raw signals transmitted by the burial victims' de-
vices, making it easier to analyse complex situations.
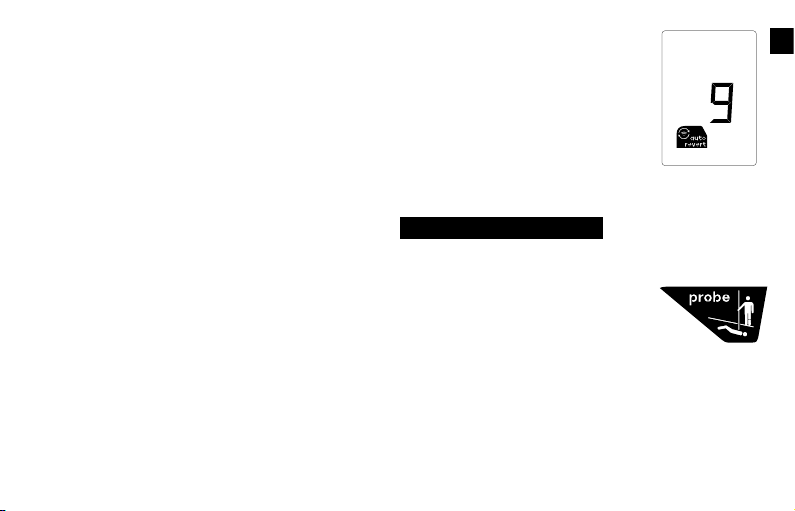
3.4/ AUTOMATIC REVERT-TO-TRANSMIT MODE
In the event of a secondary avalanche, the automatic re-
vert-to-transmit mode allows the device to switch into trans-
mit mode automatically. The NEO BT PRO has a motion sensor
that detects if the rescuer is immobilised and buried. The
automatic revert-to-transmit time can be set via the config-
uration menu to 2 mins, 4 mins, or 8 mins, or it can be de-
activated (see paragraph 1.5/ SETTING UP YOUR DEVICE). The
default automatic revert-to-transmit time is 2 minutes. If the
device does not detect any movement within 2 minutes, an
audible signal will be emitted asking the rescuer to confirm
they wish to remain in search mode. Press the marking but-
ton briefly to signal to your device that
you are not buried. If the device detects
no action on your part, it switches to
transmit mode.
4/ PROBING - SHOVELING
The probe pictogram (probing) appears
when the device is less than 1.2 m from
the burial (or 2 m if the user has set the
fine search distance to 5 m).
Before you start the probing - shoveling phase, make sure
you place your device properly in the holster, well-protected
from the cold and impacts. As soon as you have defined the
area where the victim is likely to be buried, it is quicker to
start probing. Search for the burial by probing perpendicular
14
EN
25cm 25cm
25cm 25cm
to the slope. Move out gradually in a spiral from the minimum
distance point detected by your transceiver.
STANDBY mode:
We recommend switching your device
to standby mode while you are prob-
ing-shoveling. This mode is a neutral
position (pause) in which the device is
neither in search mode nor in transmit
mode, allowing the rescuer to concen-
trate fully on extricating the burial. In
STANDBY mode, the device stays on,
ensuring the rescuer can activate au-
tomatic revert-to-transmit mode if necessary. Standby mode
can be activated from search mode by pressing and holding
the "-" button. Press and hold the "-" button again to exit
STANDBY mode.
Shoveling takes at least as long as searching with the
transceiver. A methodical approach to the shoveling phase
is essential. Using the V-shaped conveyor technique is the
most effective way of shoveling and clearing. You must turn
off the burial victim's transceiver as soon as they are un-
covered.
5/ INTERFERENCE
Some electronic devices and electrical and electromagnetic
installations can interfere significantly with the operation of
transceivers. These sources can be:
• Embedded: smartphone, digital radio, camera, heart rate
monitor, GPS
15
EN
• Fixed: relay antennas, high voltage lines, power supplies,
ski lifts
We recommend that you keep sources of electrical and elec-
tromagnetic activity away from your device as much as pos-
sible to minimise the risk of signal interference.
5.1/ RECOMMENDATIONS IN SEARCH MODE
Keep all metal and electronic devices at least 50 cm away
from the transceiver.
5.2/ RECOMMENDATIONS IN TRANSMIT MODE
Keep all metal and electronic devices at least 20 cm away
from the transceiver.
5.3/ DYNAMIC INTERFERENCE MANAGEMENT
With the proliferation of electronic devices people are car-
rying, instances of electromagnetic interference that can
disrupt a signal search are becoming more frequent. This
phenomenon has been mainly observed near resorts and
ski areas. Dynamic interference management is activated
by default on the NEO BT PRO. This allows your device to de-
tect areas of interference and reduce the search strip width
if necessary, allowing users to adapt their search strategy
accordingly.
6. WARRANTY - MAINTENANCE
Your device (excluding batteries) is guaranteed for 2 years
from the date of purchase. ARVA devices are identified by a
unique traceability number. When you register on www.ar-
va-equipement.com or on the ARVA app, we can associate
this number with your contact information and give you the
The theoretical search strip width in a normal environment is
80 m. The INTERFERENCE pictogram appears on the screen
when interference is detected, and the device reduces the
strip width to 30 m. When this happens, change your search
technique by narrowing your search strip to 30 m.
CONNECTING TO THE ARVA APP
Flash the QR code with my camera
Download the ARVA app
Register my transceiver product
Switch on the transceiver by pressing mark-
ing to activate Bluetooth
Connect my transceiver to the app
Configure my transceiver
For more information, visit:
Profile > My Registered Devices > Settings
16
EN
benefit of an additional 3 years of warranty. The warranty
does not cover damage due to misuse. The warranty is
no longer valid if the user or an unauthorised third party
has opened the device. If you require after-sales service,
please bring proof of purchase and a detailed description
of the defect observed to your point of sale. We advise an
equipment check every 3 years for individuals and every
2 years for professionals.

17
FR
Félicitations pour l’achat de votre nouvel appar-
eil ARVA, vous trouverez dans ce manuel toutes
les informations indispensables à son utilisa-
tion. Ce manuel est disponible sur notre site à la
rubrique ”téléchargements”.
Enregistrez votre appareil ARVA sur notre site
www.arva-equipment.com ou sur l’application
ARVA et bénéficiez de 3 ans de garantie sup-
plémentaire (l’enregistrement doit être effectué
dans les 2 ans suivant la date d’achat).
1.1/ CARACTÉRISTIQUES TECHNIQUES
1/ PRISE EN MAIN
MODE D’EMPLOI
1/
2/
3/
4/
5/
6/
7/
PRISE EN MAIN
MODE ÉMISSION
MODE RECHERCHE
SONDAGE - PELLETAGE
PERTURBATIONS
GARANTIE - RÉVISION
DÉCLARATION DE CONFORMITÉ (en fin de
manuel)
• Appareil numérique à 3 antennes
• Largeur de bande de recherche en mode numérique : 80 m
• Portée maximale en mode analogique : 90 m
• Gestion dynamique des interférences
• Retour automatique en émission par détecteur de mouvement
• Alimentation électrique : 3 piles AAA/LR03 alcalines ou lithium
• Autonomie en mode émission : 350 h avec alcalines / 450 h
avec lithium
• Plage de températures de stockage : -20 °C à +70 °C
• Plage de températures d’utilisation : -20 °C à +45 °C
• Altitude maximum d’utilisation : 10 000 m
• Détecteur de victimes d’avalanche / Bande de fréquences :
456.9 - 457.1 kHz
• Détecteur de victimes d’avalanche / Puissance maximum :
H-Field < 2.23 µA/m @ 10 m
• Bluetooth 2.4 GHz / Bande de fréquences : 2.400 - 2.4835 GHz
• Bluetooth 2.4 GHz / Puissance maximum : ERP < 100 mW
• Poids : 214 g (piles incluses)

18
FR
BOUTON
MARQUAGE
SÉLECTEUR OFF/SEND/SEARCH
BOUTON DE DÉVERROUILLAGE / SORTIE MODE SEND
BOUTON GAIN “-” EN MODE ANALOGIQUE / NAVIGATION
ENTRE VICTIMES MODE SCROLLING
BOUTON GAIN “+” EN MODE ANALOGIQUE / NAVIGATION
ENTRE VICTIMES MODE SCROLLING
CORDON D’ATTACHE
ÉLASTIQUE
Holster de portage

19
FR
Toutes les informations présentes dans ce manuel sont
données à titre indicatif et sous réserve de modification
à tout moment. Les caractéristiques techniques et les
spécifications du produit peuvent être modifiées sans
préavis dans les prochaines versions d’appareils.
Aucune responsabilité ne sera prise en compte en cas d’uti-
lisation incorrecte, non respect du mode d’emploi, modifica-
tions non autorisées de l’appareil, poursuite de l’utilisation
malgré la constatation de signes d’usures ou défaillances
de tout type, réparations non autorisées ou effectuées de
manière incorrecte.
Pictogramme invitant les utilisateurs à porter les
produits en fin de vie au recyclage
Pictogramme invitant les utilisateurs à lire les
instructions et avertissements
1.2/ SIGNIFICATION PICTOGRAMMES MANUEL /
APPAREIL
Élimination des déchets par les utilisateurs dans
les ménages privés: ce symbole indique que ce
produit ne doit pas être jeté avec vos autres
ordures ménagères. Il est de votre responsabil-
ité de vous débarrasser de vos déchets en les
apportant à un point de collecte désigné pour le
1.3/ ENTRAÎNEMENT - RESPONSABILITÉ
S’entraîner et bien connaître son appareil est indispensable
pour réussir une recherche en avalanche. Le ski / snowboard
hors-piste et le ski de randonnée / splitboard sont des activ-
ités à risque, le port d’un DVA ne doit en aucun cas affect-
er votre prise de décision dans les zones à risque, sachez
renoncer.
1.4/ STOCKAGE - PILES
Il est primordial de stocker votre appareil dans un endroit
tempéré, sec et à l’abri des rayons directs du soleil, enlever
les piles en cas de stockage longue durée, la garantie ne
recyclage des appareils électriques et électroniques. La col-
lecte et le recyclage de vos déchets contribuera à conserver
les ressources naturelles ainsi que favoriser le respect de
l’environnement et de la santé humaine. Pour plus d’infor-
mations sur le centre de recyclage le plus proche de votre
domicile, contactez la mairie la plus proche, le service d’élim-
ination des ordures ménagères ou le magasin où vous avez
acheté le produit.

20
FR
prend pas en compte les dommages causés par une défail-
lance des piles (incluant la perte d’étanchéité). Nous vous
recommandons de contrôler régulièrement votre appareil,
notamment le bon fonctionnement du sélecteur OFF/SEND/
SEARCH, l’état de l’écran et l’absence de traces de corrosion
dans la trappe pile.
Le NEO BT PRO fonctionne exclusivement avec 3 piles AAA/
LR03 alcalines ou lithium (type de piles à spécifier via para-
métrage application), ne pas utiliser de piles rechargeables.
L’étiquette au fond de la trappe piles est indispensable au
bon déroulement des procédures SAV, ne pas la retirer. Les
3 piles doivent être renouvelées en même temps, après un
changement de piles, veillez à ce que le couvercle de la
trappe soit correctement fermé.
Important Suisse : l’annexe 4.10 de la norme SR814.013 est
applicable aux batteries.
La mise au rebut d’une batterie dans un feu ou
dans un four chaud, ou l’écrasement mécan-
ique ou coupure d’une batterie, est suscepti-
ble de provoquer une explosion. Le maintien
d’une batterie dans un environnement à très
haute température peut provoquer une explosion ou la fuite
de liquide ou de gaz inflammables. Une batterie soumise à une
pression de l’air extrêmement faible peut provoquer une ex-
plosion ou la fuite de liquide ou de gaz inflammables. Le rem-
placement par une batterie de type incorrect peut provoquer
une explosion.
1.5/ PARAMÉTRAGE DE VOTRE APPAREIL
Durant la phase de démarrage, appuyez de manière pro-
longée sur le bouton marquage, le pictogramme Bluetooth
apparaît. Vous pouvez alors connecter votre DVA à votre
smartphone. L’application ARVA offre de nombreux services
dont la possibilité d’enregistrer son DVA, de le paramétrer et
d’en effectuer la maintenance.
2/ MODE ÉMISSION
2.1/ MISE EN SERVICE
L’appareil est éteint lorsque le sélecteur latéral est en posi-
tion OFF. Pour allumer l’appareil, translater le sélecteur OFF/
Allumer le DVA en appuyant sur
marquage pour activer le Bluetooth
Connecter mon DVA à l’application
Paramétrer mon DVA
Table of contents
Languages:


