ASAHI ASV-320D User manual

16
ASV-320D
Model:
UserManual
SaveTheseInstructions.
Thank you for purchasing this product.
Read this User’s Manual before using this
product, and make sure to use the product
correctly.
Misuse may result in malfunction or
unexpected accidents or hazards.
TableofContents page
SafetyWarning 2
AdditionalSafety
Instructions 3
Specifications 4
Accessories 4
Features 4
Cleaning 11
VacuumingTips 10
SealMode 9
Care 14
VacuumMode 6
OperatingInstructions 6
AvailableBags 5
Troubleshooting 15
Check 16
Warranty 16
Check
Toprolongtheeffectivelifeoftheappliance,pleaseperformadailyperformancecheck.
Productname:Two-in-one automatic vacuum sealer ModelNo.:ASV-320D
1-11-22, YONBAN, ATSUTA-KU, NAGOYA, AICHI, JAPAN
TEL : 81-52-671-5193 FAX : 81-52-671-5196
Warranty
Warranty period
Model No.
Manufacturing No.
(Serial No.)
Name
Address:
TEL:
Store of purchase
Date of purchase
*Fill in the required information and keep in a safe place.
: months
: ASV-320D
:
:
:
:
:
:
Weguaranteequalityonlyforuseundernormalconditionsduringthewarrantyperiod.Iftheproductmalfunctions
duringthewarrantyperiod,wewillrepairitatnochargeusingourprescribedmethods.Bringtheproductalong
withthewarrantytothestorewhereyoupurchasedtheproduct.
Inthefollowingcases,wewillchargeafeeforrepairevenduringthewarrantyperiod.
(1)Ifnowarrantyisshown
(2)Iftherequiredinformationisnotfilledinorisrewritten
(3)Ifthemalfunctionwascausedbymisuse
(4)Ifthemalfunctionwascausedbyimpactduringshipmentormovementbythecustomer
(5)Malfunctionanddamagecausedbynature,pollution,abnormalvoltage,orotheroutsidefactor
Ifitisdeterminedthatthecustomerindependentlyalteredorrepairedtheproduct,itwillnotbeacceptedfor
repairduringthewarrantyperiod.
Repairsandreplacementsofsupplies(HeatingWires,PTFTstrips)thatareconsumedordeterioratewillincura
chargeevenduringthewarrantyperiod.
Thecompanywillnotbeliablefordirectorindirectdamagecausedbymalfunctionoruseoftheproduct.
Expensesforsendingorbringingaproductforrepairaretheresponsibilityofthecustomer.
Keepthewarrantyinasafeplace.Warrantieswillnotbereissued.
1.
2.
3.
4.
5.
6.
7.
UserManual&Warranty
■Doyoudetectthefollowingsigns?
-Dustisaccumulatedontheoutlet,the
connectororelectricoutlet. Removedust.
Thepowercordorplugisextraordinarilyhot.
Thepowercordorplughasdeepscratchesor
deformation.
Thereisasmellofburning.
Movingthepowercordmayinterrupttheelectric
current.
Anelectricshockisexperiencedwhentouchingtheunit.
Otherabnormalitiesorfailuresarefound.
-
-
-
-
-
Topreventfailuresoraccidents,turn
thepowerswitchoffandunplugthe
appliancefromtheoutlet.Consult
ourcompanyorthestorewhereyou
madethepurchaseforinspection
andrepair. Two-in-one automatic vacuum sealer
-Highlyversatilemodel-
SAMPLE
2 3
SafetyPrecautions ImportantSafeguards
▼ItemsshownherearecategorizedasWarningorCaution.
EvenitemscategorizedasCautionmayleadtoseriousresultsdependingonthe
circumstances.Importantinformationaboutsafetyiswritteninallcasesandmustbeobserved
withoutfail.
WarningThisindicatesdeathorseriousinjurymayresultifthislabelisnot
heededandtheproductisusedimproperly.
Caution Thisindicatesthatinjuryorpropertydamagemayresultifthislabelis
notheededandtheproductisusedimproperly.
Warning
Avoidcontactwithwater,whichcanresultinashortorelectricshock.
Donotusetheapplianceiftapeisnotplacedonthesealstrip.
Thismaycausefire,electricshock,orburnsandinjuries.
Closesupervisionisnecessarywhenanyapplianceisusednearchildren.
Childrenshouldnotoperate.
Onlyacertifiedrepairmanshouldperformanydismantling,repairsor
modifications.
Fireorabnormaloperationmayresultininjury.
Alwaysunplugtheappliancefromtheoutletforrepair.
Usetheoutletonlyforthisappliance(3.15Aormore).
Overloadedoutletsmaycauseoverheatingorfire.
Wipeawayanydirtontheplug.
Grimemaycausefire.
Besuretogroundthegroundingterminalproperly
topreventelectricshock.
Useadesignatedpartforthesealarea.
ApplythePTFTstripafterreplacement.
Inappropriatereplacementcancauseoverheating,fireorelectricshock.
Cleanorreplacethesealingstripafterturningofftheswitchand
unpluggingtheunit.
Donotpluginorunplugelectricalequipmentwithwethands.
●
●
●
●
●
●
●
●
●
Donotholdnearflameoruseinanunstablelocation.
Thismayresultinfire,injuryordeformation.
Whenvacuumpacking,donotvacuumliquidwithoutattachingtheliquidcatch
canister.
DonotputfingersonthePTFTstrip.
Closingthesealbarmaypinchorburnfingers.
Usetheunitonlywhenthebagisplacedinposition.
Thiscancauseoverheatingorfire.
Usetheapplianceonlyforitsintendeduse.
Improperusemaycauseelectricshock,shortorfire.
Donotallowtheunittovacuumflammableliquidorgas.Firemayresult.
Qualityofvacuumpackingisnotguaranteed.
Conditionssuchaspackagedfoodshelflifeandvacuummethodmaycausefood
degradationorrot.
Graspplugtoremovethecordfromthereceptacleoutlet.
Failuretodosomayresultincorddamage,electricshock,shortorfire.
Donotuseanunstableoutletoradamagedcordorplug.
Failuretodosomayresultinelectricshock,shortorfire.
Donotplaceheavyobjectsonthepowercord,applyexcessiveforce,deformor
bundleit.Damagingthepowercordmaycauseelectricshockorfire.
Donottouchhotsurfaces,whichmaycauseburn.
Unplugtheappliancefromtheoutletwhennotinuse.
Aburn,electricshock,shortorcircuitfiremayresult.
●
●
●
●
●
●
●
●
●
●
●
●
●
●
●
●
●
●
●
Caution
Shouldyourproductnotperformproperly,restartit.
Holdthebottomoftheunitwhilecarrying.
Handlethenozzlecarefully.
Whenyouarevacuumpackingmoistfood,emptytheliquidcatch
canisterbeforefillingitmorethanhalfwithwater.
Unplugtheappliancefromtheoutletwhennotinuse.Storetheunit
withthevacuumnozzlehousedandthesealbarraised.
Donotusestrongsolventssuchasbenzeneorthinnerwhencleaning.
Donotdroporsubjecttheappliancetoastrongshock.
Donotplaceobjectsontheappliance.
AdditionalSafetyInstructions
4 5
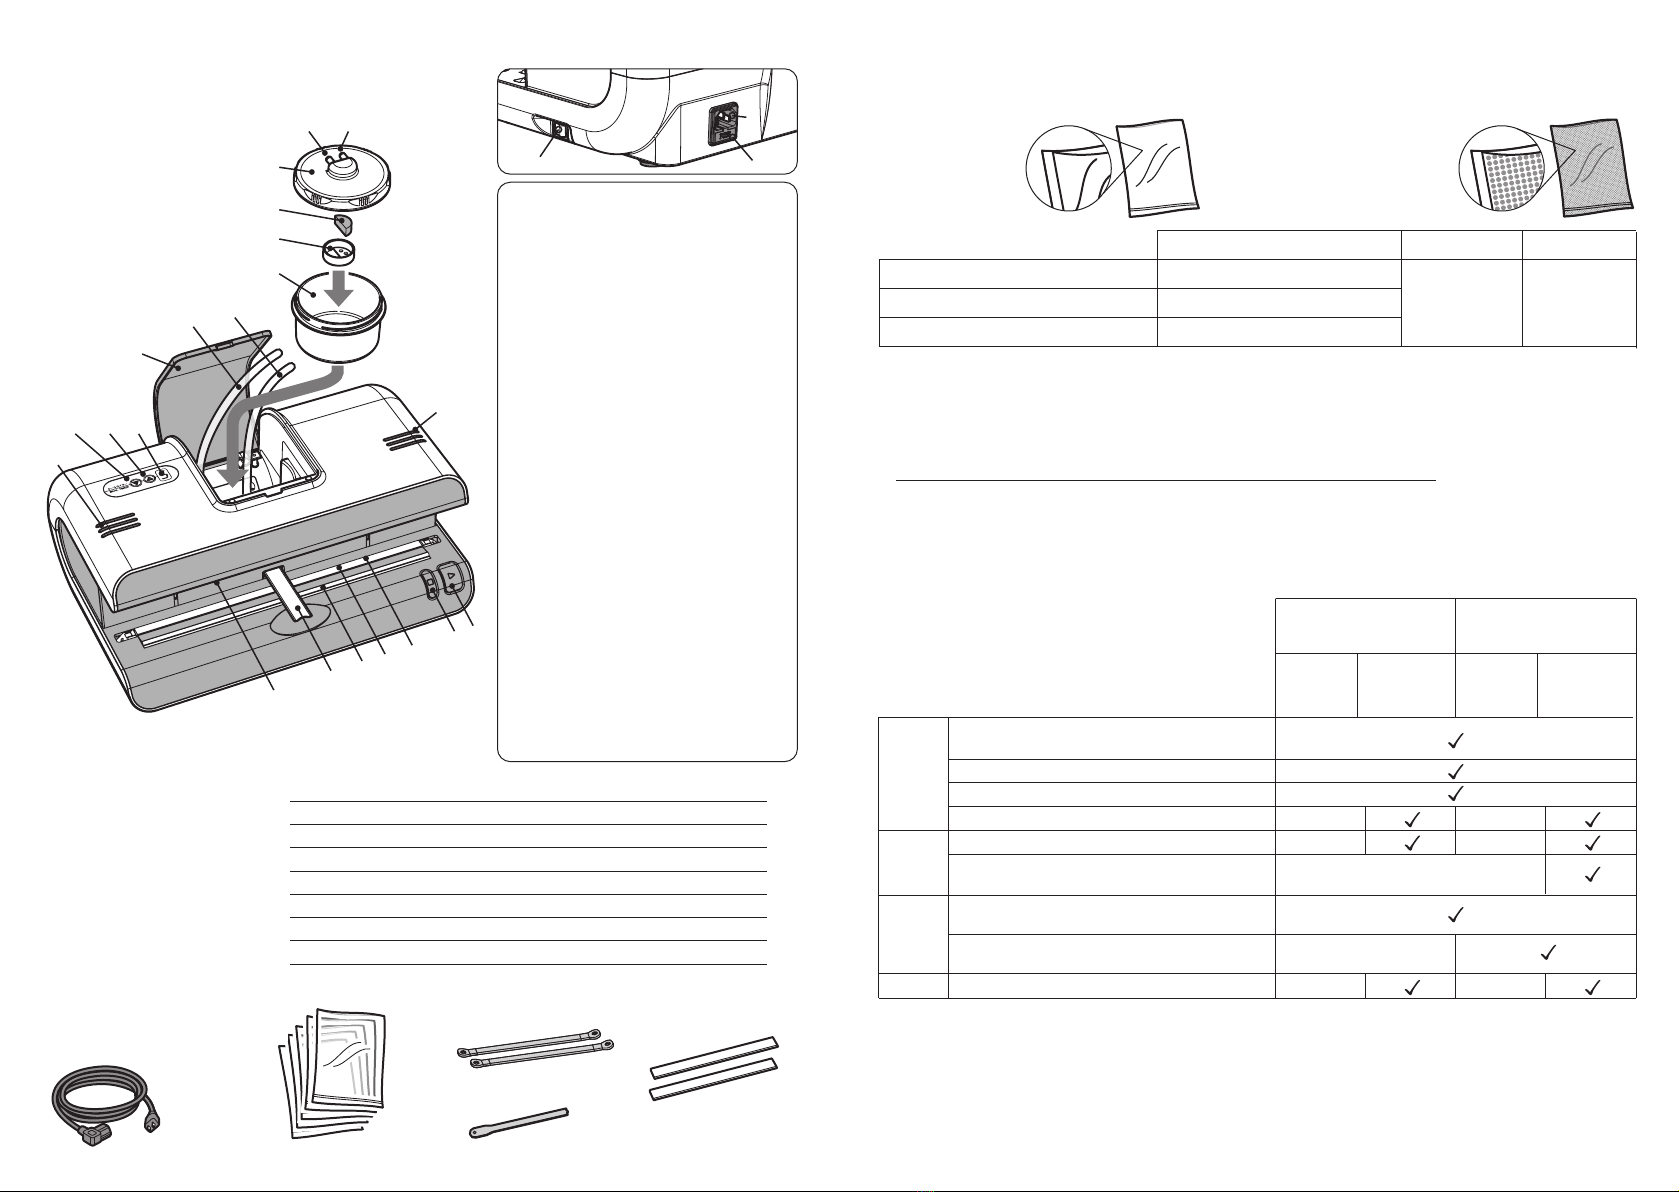
・UserManual ・SampleBags
(Clearbags)
・PowerCord
・NozzleCleaningTool
・TwoPTFEtapes・TwoHeatingWires
Accessories
Specifications
Backsideofthecontainerbody
1
2
3
4
5
6
7
8
9
10
11
12
13
14
15
16
17
18
19
20
21
22
ApplianceInlet
Fuse
Powerswitch
Startbutton
Select/PauseButton
PTFEtape
HeatingWire
(Thisislocatedunder6.)
Gaskets
Therearethreegaskets
onupperandlowersides.
Nozzle(Slidesbackandforth.)
TheSealBar
(Movesupordown.)
IndicatorLight
+TimerButton
−TimerButton
ManualVacuumModeLight
(Green)
AutomaticVacuumMode
Light(Red)
LiquidCatchCanisterCover
TubeofNozzleSide
(Connectsto19A.)
TubeofUnitSide
(Connectsto19B.)
LiquidCatchCanisterLid
Filter
ProtectionRubber
LiquidCatchCanister
Usablebags
NamesofParts
6
14
18
16
17
19
20
21
A B
22
1
23
4
5
7
8
9
10
111213
15
:ASV-320D
:100〜240V50/60Hz
:W394xD266xH175mm
:4.35kg
:200W
:-80kPa
:300mm
:1.8m
Model
Power
Dimensions
Weight
Powerconsumption
Pumpefficiency
Seallength
Lengthofcords
Usethevacuumbagwhenvacuumpackagingitems.
Thevacuumbagismadeofnylon-polyfilmoraluminum.Fordetails,checkthebag
performancesuchasair(oxygen)penetration.
Incaseofheatsterilizationorfreezingstorageaftervacuumpacking,selectasuitablebagforthese
purposes.Thecorrespondingfreezingtemperatureandboilingtimeaftervacuum-packingdiffer
dependingonthespecificationsofthevacuumbags.
Settheembossedbaginthemachinewiththeembossedsidefacingdown.
Forrolledembossedbags,cuttoanappropriatelength,sealonesideofthebaginsealmode,and
performvacuumpacking.
Therearebagsof
varioussizes,
thicknessesand
specifications,
withasmooth
surface.
−
−
−
− −
−
Whenstoringfood,choosetheusagepurposeoftheunitinconsiderationoffoodtypeorshelflife.
Avoidpackingunsanitaryitems.
Avoidusingthesameunitforfood,dailynecessitiesandindustrialparts.
Industrialoil,etc.thatmayadverselyaffecttheplasticpartscannotbesucked.
Alwayskeepthenozzleandliquidcatchcanisterclean.
〜240μ
〜180μ
〜280μ(approx.) 〜300mmFlatbags
Standardvacuumbags
Standard
vacuumbags
Standardvacuumbags
Aluminumvapordepositionbags
Embossedvacuumbags
Embossed
vacuumbags
Embossedvacuumbags
Thickness(totalthickness) Shape Width
Thefilmononesideof
thebagisembossed
withapattern,making
iteasiertovacuumthe
air.Rolledbagsarealso
usable.
Settingofbagandvacuummodesuitable
forthecontents
Variousitemscanbevacuumpacked.
Someitemsrequiretheuseofan
embossedbag.
●
●
●
●
●
●
●
●
●
●
Soup,itemsofhighviscositysuchassauce
andcurry,etc.
Solid
Liquid
Powder
Others
Foodstuffssuchasmeat,fish,vegetables,
etc.,cookedfoodstuffs,hotfoods
Industrialproducts
Water,hotwater
Grains
(Riceandsoforththatislargerthanthenozzlesuctionport)
Powders
(Powdersmallerthanthenozzlesuctionport)
− −
Softfoodssuchasbread,fragilefoods
Useofoxygenabsorbers,trays,etc.
Delicateitemssuchaselectronicparts
※Ifthereisalotofmoistureanditisdifficulttovacuum,anembossedbagisrecommended.
※Forhighlyviscousliquid,vacuum-packitaftersemi-freezing,oruseanembossedbagandsealit
beforethenozzlesuckstheliquid.
Automatic
Vacuum
Mode
Manual
Vacuum
Mode
(Adjustablemode)
Automatic
Vacuum
Mode
Manual
Vacuum
Mode
(Adjustablemode)
※
※
Setthecontentsclosetothenozzle.
76
Checkthatthecanisterortubeisnotleakingair.
Makesuretoclosethelidoftheliquidcatchcanisterandconnectthetube.
Setthesealingtime.
Setthesealtimertakingbagthicknessand
materialintoaccount.
(Sealtimernumber:1=1sec、2=2sec...)
Checkingthesealcondition,settheappropriate
sealtimeasfollows.
Placeitem(s)inthebag.
BeforePlacingItemsinBags・・・
-
-
-
-
-
※Inautomaticvacuummodeormanualvacuummode,makesurethenozzleisout.
Thickness(μm) 60μ 70μ 80μ 90μ 120μ
4 4 5 5 7Sealingtime(sec.)
Sealingtime(sec.)
+Button−Button
Select/PauseButton
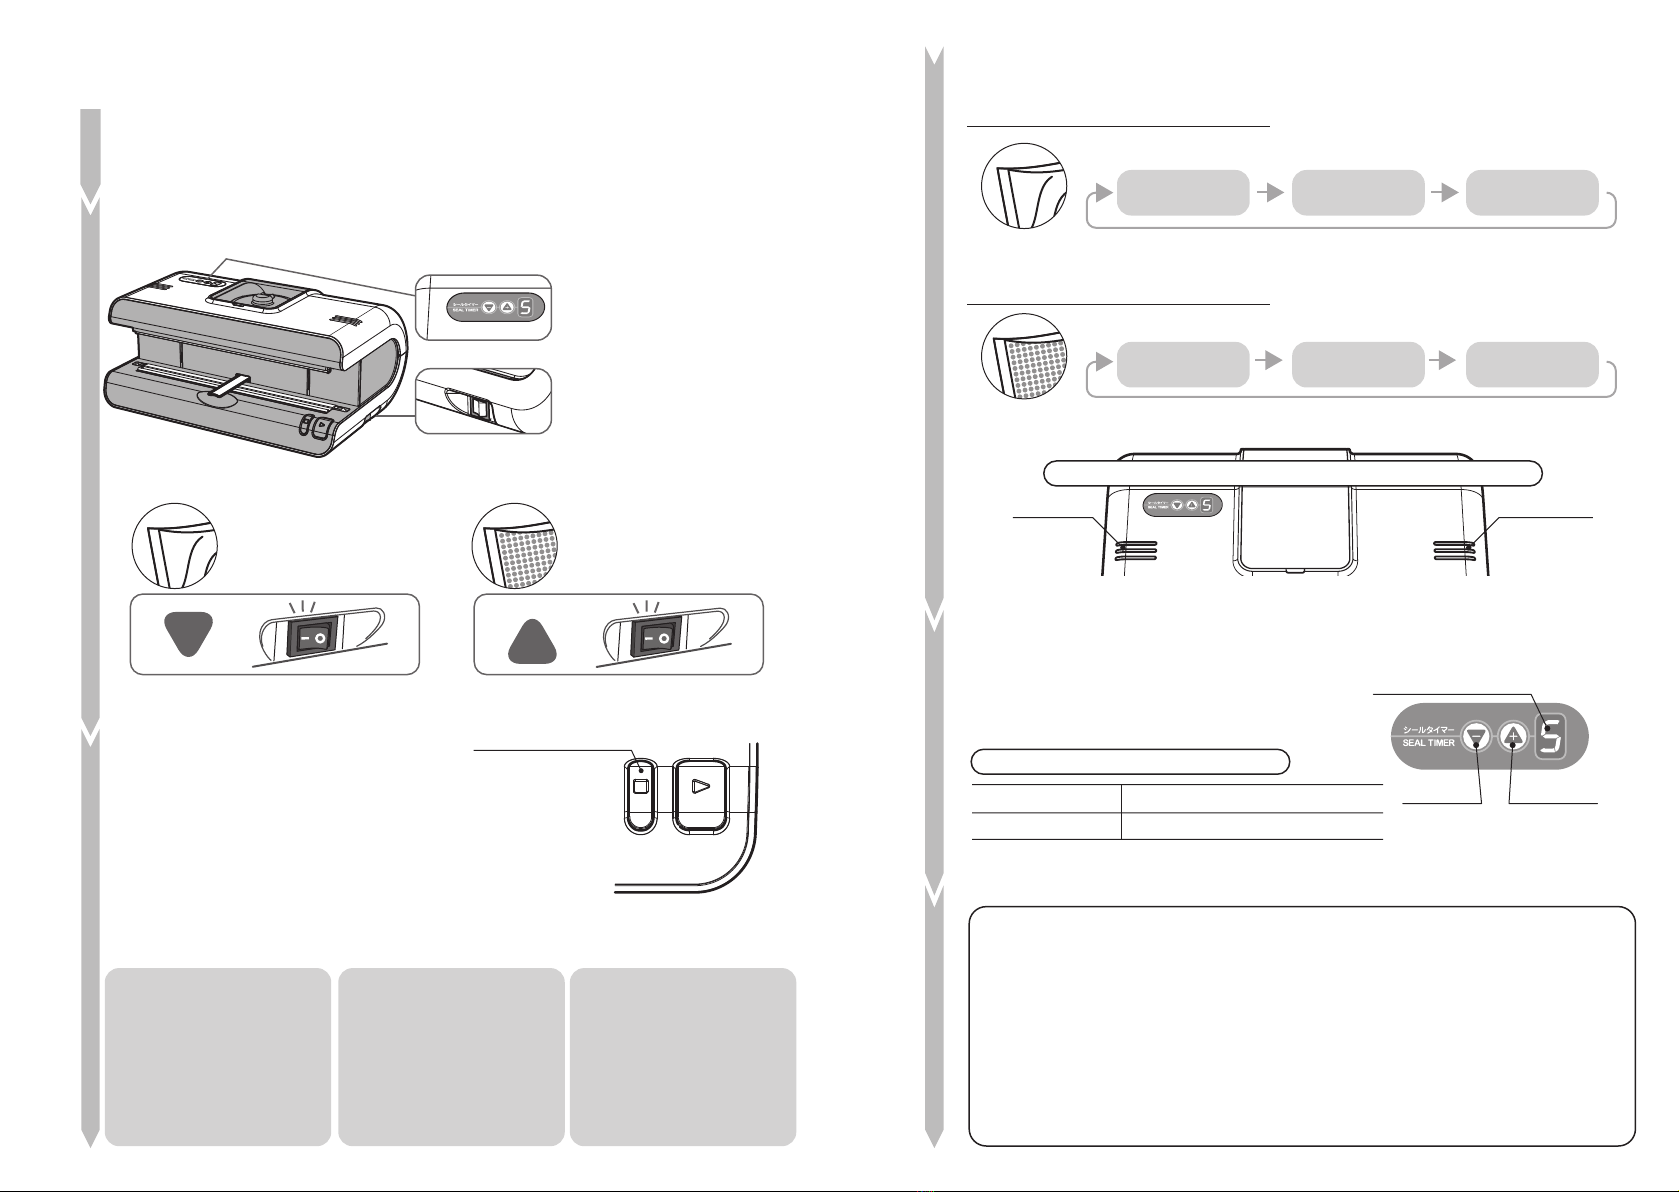
OperatingInstructions
※Ifthenozzlevacuumsthebagoritscontents,vacuummodemayautomaticallyswitch
tosealmodeevenifthebagcontainsair.(See“OperatingInstructions”,page8.)
GreenlightRedlight
Automatic
VacuumMode SealMode
Manual
VacuumMode
※Intheautomaticvacuummodeinembossedbagmode,switchingtothesealmodeispossible
bypressingthestartbutton.
Timerbutton
Powerswitch
2
1
Checktheoperationmode.
3
Whenitemvolumesaresmallforthebagsizeorbagsareremarkablythin,itmay
makethevacuumingprocessdifficult.Iftheitemvoluumeissmall,prepareabag
ofappropriatesizeoruseanembossedbag.
Pleaseuseanembossedbagforpowdersorhighlyviscousitemssuchascurry,
sauce,etc.
Whenyouplaceitem(s)inthebag,preventwatercontactwiththesealareaof
thebag.
Somevegetablesemitgasesduringstorage.Thebagmayinflateaftervacuumsealing.
Usebagswithhighpinholeresistancewhenpackingitemswithprotrusion.
5
4
6
Beginvacuumingafter
placingthebaginposition.
Aftervacuumingprocess,
sealmodewillturnon
automatically.
Checkingthedegreeof
vacuum,thismodecan
switchtotheuserʼsselected
sealmode.Afterthebagis
inserted,vacuummode
continues.Pressthestart
buttonagainandturnon
sealmode.
Thismodesealsthebag
only.Usethismodewhen
itemsdonotneedvacuum
oryouwanttoperformthe
sealingprocessmanually.
Thelightonthecovertopindicatesoperatingmodeandprogress.
Manual
VacuumMode Seal
Mode
Automatic
VacuumMode
Manual
VacuumMode Seal
Mode
Automatic
VacuumMode
-Standardvacuumbagsmode-
-Standardvacuumbagmode-
-Embossedvacuumbagsmode-
-Embossedvacuumbagmode-
Plugthepowercordintothereceptacleoutlet.
Setthebagtypeasrequiredwhenturningontheswitch.
Turnonthepowerswitch
whilepressingdownthe
mainus(−)button.
Thelightturnson.
Turnonthepowerswitch
whilepressingdownthe
plus(+)button.
Thelightblinksslowly.
Toselectthebagmode,turn
onthepowerswitchwhile
pressingdownthe+(plus)
buttonor-(minus)buttonof
thetimer.
Ifturningonthepower
withoutpressingthetimer
button,thepreviouslyused
modewillbecontinued.
−+++
Settheoperationmode.
Therearethreeoperationmodesfor
thestandardvacuumbagmodeand
embossedbagmoderespectively.
Eachtimetheselectbuttonispressed,
thelightindicatorchangesonthecover,
andthemodewillchangeasfollows.
Theredlight
turnson
Theredlight
blinksslowly
Thegreenlight
turnson
Thegreenlight
blinksslowly
TheBothlights
turnon
Thebothlights
blinkslowly
ex.Standardnylon-polyvacuumbag
98
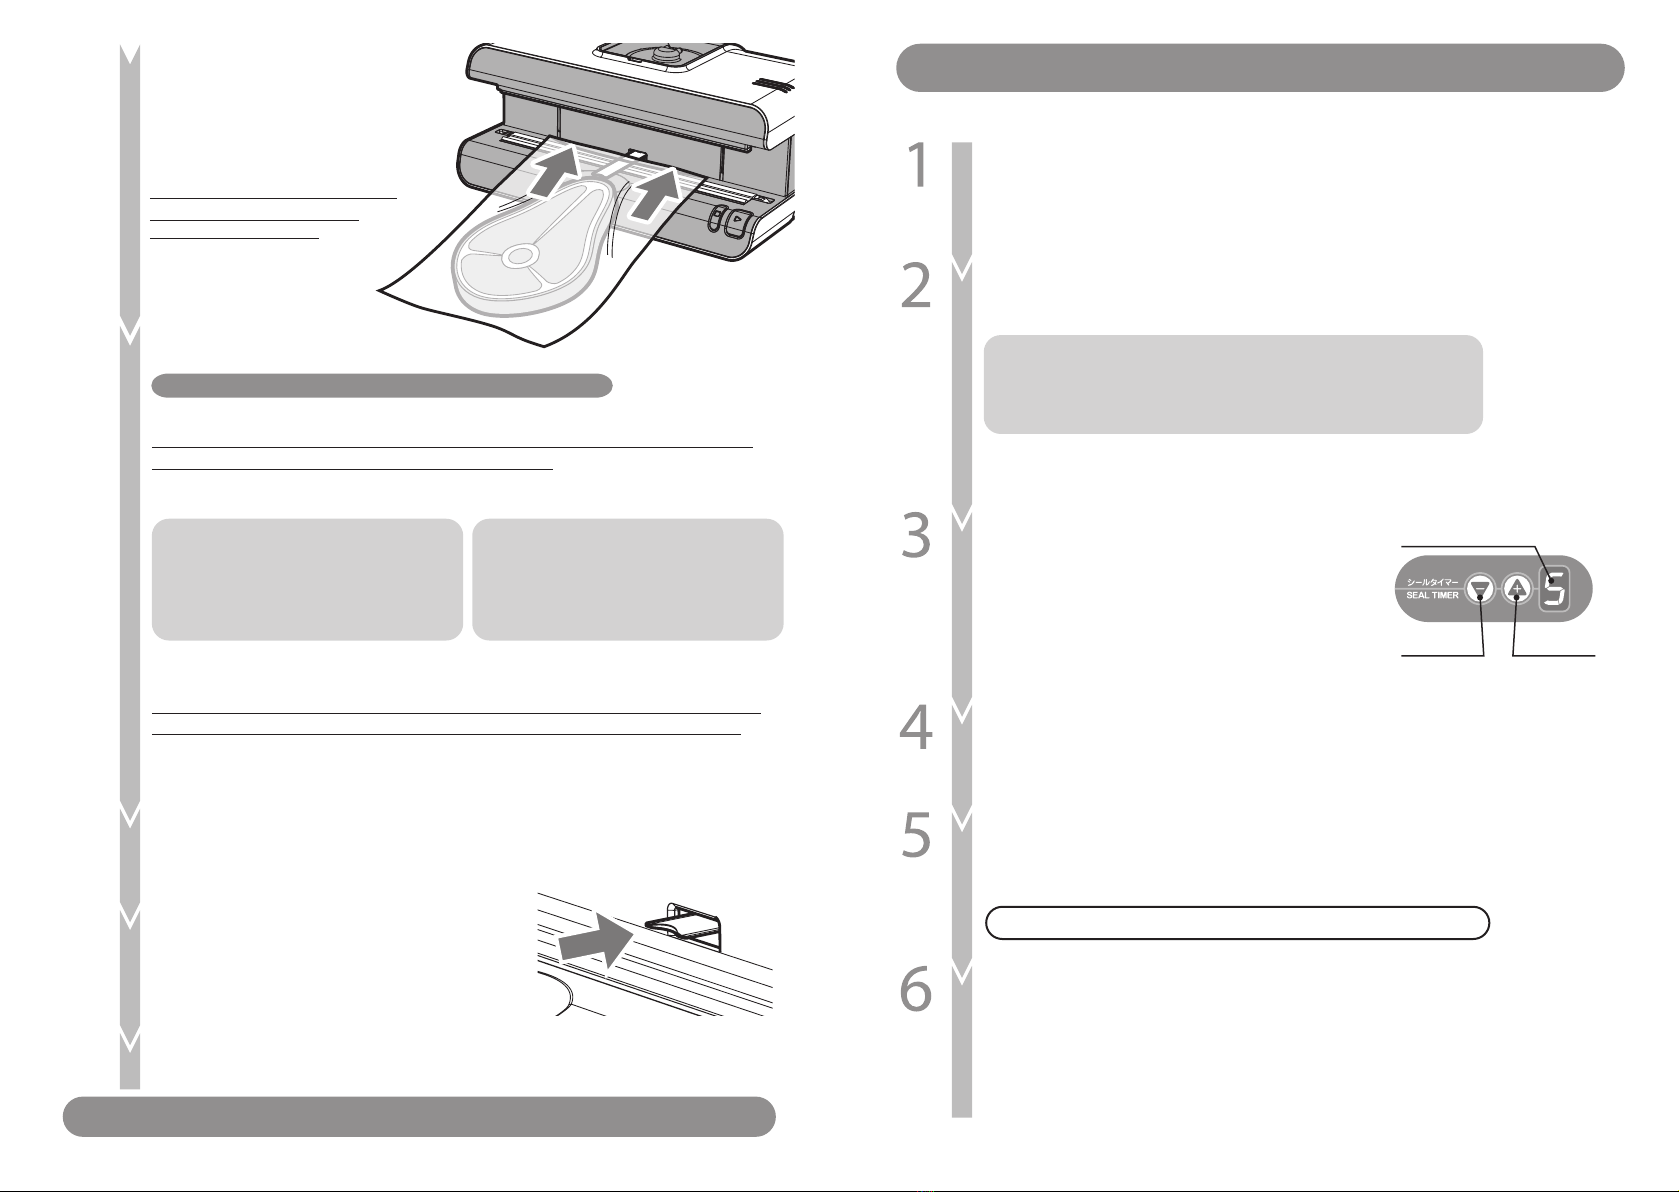
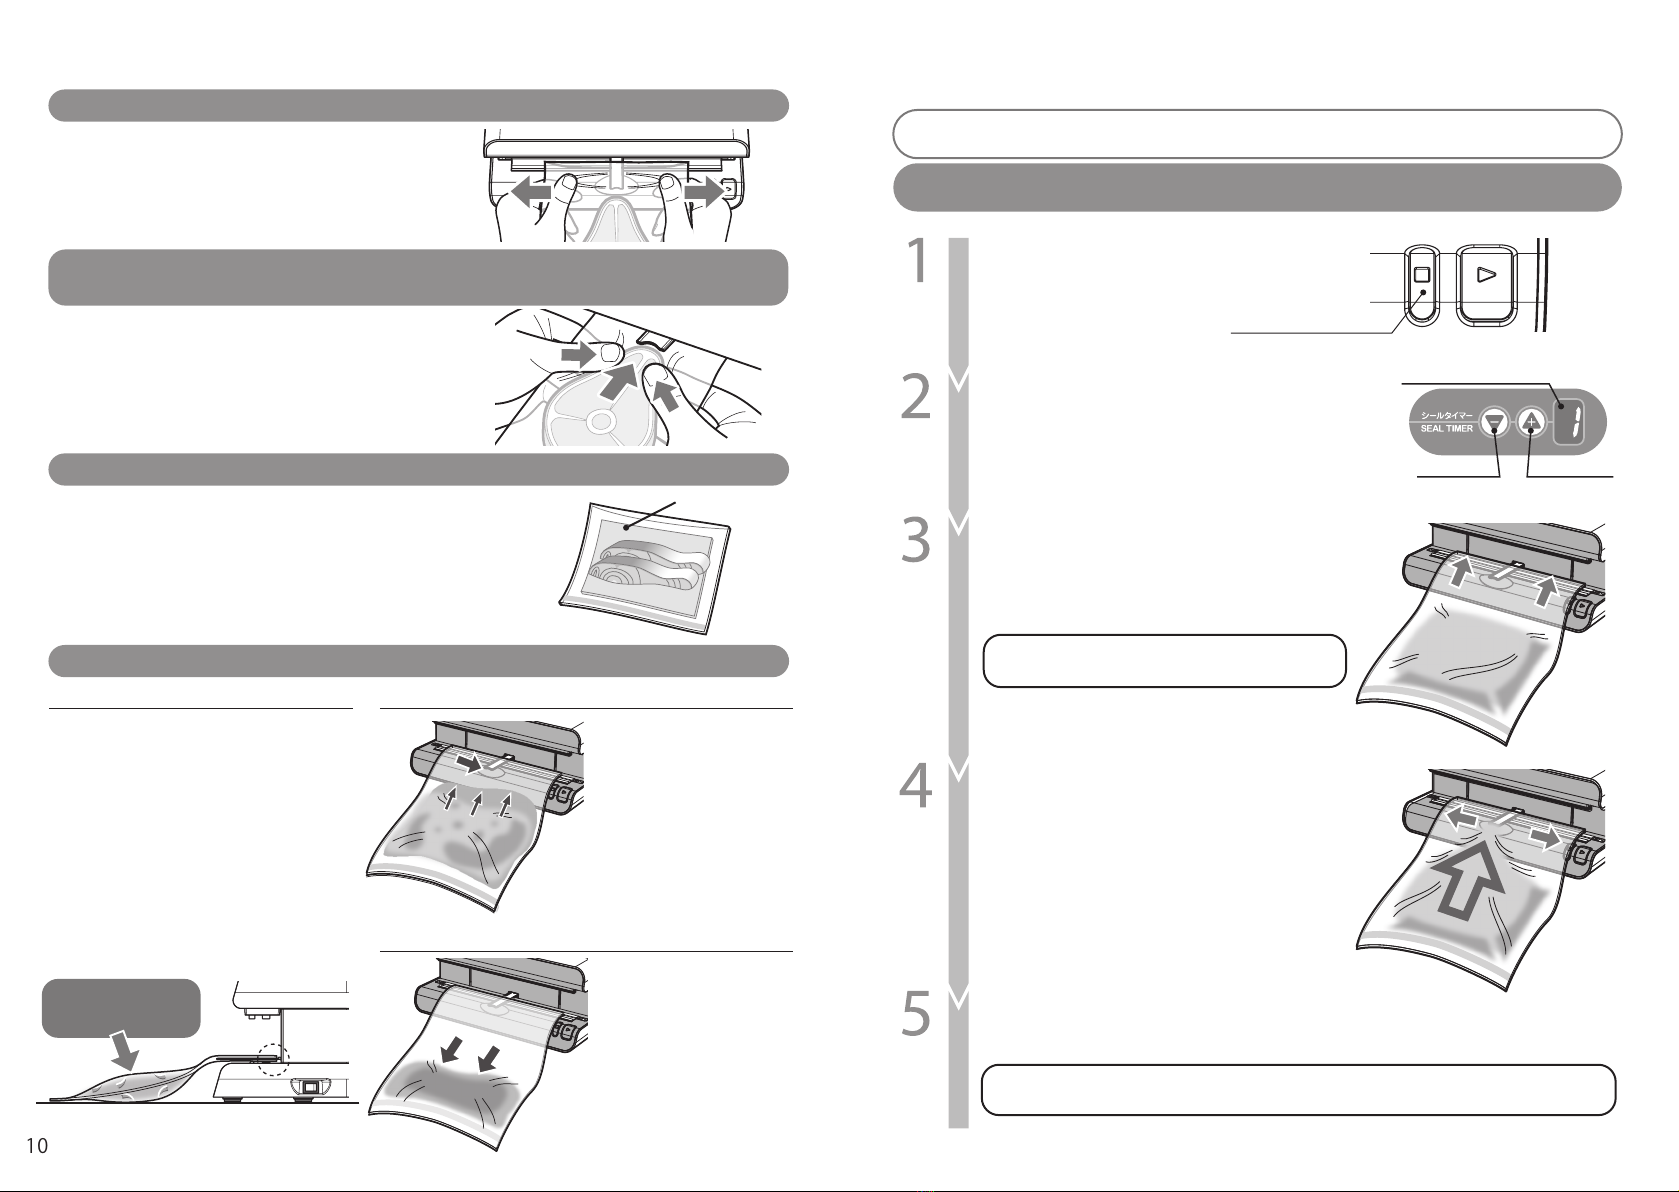
SealMode
Shouldyourproductnotperformproperly,restartit.
Checknozzleandoperatingmode.
See“BeforePlacingItemsinBags”,page7topreparethebag.
InsertthebagfartherthanthepositionofthePTFTstrip,untilthetipofthebag
contactstheendoftheunit.
Whensettinganembossedbag,besuretoplaceitwiththeembossedsidedown.
Pressthestartbuttontobeginthesealingprocess.
Pressthestartbuttonatthebottomrightoftheunit,andthesealbarmoves
downtobeginthesealingprocess.Whentheprocessiscomplete,thesealbar
movesupautomatically.
Makesureredandgreenlightsatbothsidesofthecovertopareilluminatedand
nozzlesarehoused.Inothermodes,presstheselectbuttontochangethemode.
Pluginthepowercordandturnonthepower.
Thepowerswitchisontherightsurfaceoftheunit.
Makesuretoindicatethenumberonthecover.
Redlight(Left) :AutomaticVacuumMode
Greenlight(Right) :ManualVacuumMode
Red&greenlights :SealMode
Setthesealingtime.
Setthesealtimertakingbagthicknessand
materialintoaccount.
(Sealtimernumber:1=1sec、2=2sec...)
Sealingtime(sec.)
+Button−Button
Checkingthesealcondition,settheappropriate
sealtime.
Placeitem(s)inthebag.
Placethebag.
Placethebag.
Thebagispositionedsothatit
straddlesthevacuumnozzle.
Besuretoinsertthebagasfar
aspossible.
Pressthestartbutton.
Makesurethesealingprocessiscompleteand
removethebag.
Thesealbarmovesdownandholdsthebag.
Whenthesealingprocessiscomplete,thesealbarwillmoveupautomaticallyand
theunitwillstop.
Housethenozzle.
Housethenozzlebeforeshuttingoffthe
appliance.
Presstheselectbuttonandthenozzle
willmovedown.
Turnoffthepower.
Becarefulthatthebardoesnotpinchyourfingers.
AutomaticVacuumMode ManualVacuumMode
Whentheunitvacuumsfor60secsor
thevacuumingiscomplete,the
sealingprocesswillbegin
automatically.
Pressthestartbuttonagainandturn
onsealmode.
Toavoidwrinkling,stretchthebagsidewayswhileinserting.
7
8
9
10
11
Whensettinganembossedbag,
besuretoplaceitwiththe
embossedsidedown.
Intheembossedbagmode,switchingtothesealingoperationispossibleby
pressingthestartbutton.
Intheautomaticvacuummodeofembossedbag,ifthemachinedoesnotmove
tothesealmodeeventhoughthesuctionissufficient,pressthestartbutton.
Pleaseadjustthesealtimerandusethethinnerembossedbagswhenthesealing
processwillnotbeginintheautomaticembossedbagvacuummode.
Thesealbarmovesdownandbeginsvacuumingitems.
Duringvacuuming,bringingthecontentsclosetothenozzleexpeditestheloss
ofairfromthebaginstandardvacuumbagsmode.
Intheembossedbagmode,pre-sealingbeginsfirstwhenthebarmovesdown,
thenvacuumingisperformed.
10 11
VacuumingTips HintsforBestVacuumingPerformance
Afterpressingthestartbutton,stretchthebag
sidewayswithhandstoavoidwrinkles.
Placethebagata
positionlowerthan
sealarea.
Papertowel
Sealing
position
Whenthesealbarmovesdownandgraspsthebag,
pressthepausebuttonimmediately.
Next,bringcontentsclosetothenozzlewiththeunit
stopped.Pressthepausebuttononceagaintorestartthe
vacuumprocess.
Thismakestheairvacuumingprocessfasterandeasier.
Vacuumpackagingmeatorfishmaycomplicatetheair
vacuumingprocessbecausemoisturemaycausebagstostick
instandardvacuumbagmode.
Placeapapertowelinthebagtoabsorbexcessmoistureand
juicesduringthevacuumpackagingprocessinorderto
vacuumpackageitemsneatlyorvacuum-packingwithan
embossedbagisrecommend.
Vacuumandsealliquidinmanual
vacuummode.
Afterthesealbarmovesdownand
graspsthebag,placethebagata
positionlowerthanthesealarea.
Thismakesairaccesstothenozzle
tipeasier.
Vacuumasmuchairaspossibleby
vacuumingliquidandairatthe
sametime.
Becarefulnottospillliquidduring
operation.
PlacementofBags
PreparationGuidelinesforMeatandFish
PreparationGuidelinesforLiquidsandPowderyFoods
Pausetheunitimmediatelyafterthevacuumingbeginsandbringcontents
closetothenozzleinstandardvacuumbagmode.
Cleaning
●Cleanthenozzleafterusetopreventclogging.
Cleaningwithlukewarmwater
Vacuuminglukewarmwatercleanstheinsideofthenozzleortube.
Acloggednozzlemayweakenorhaltvacuuming.
Toomuchlukewarmwatermayoverflow
theliquidcatchcanister.
Whenexcessliquidhasfilledtheliquidcatchcanister,liquidenteringthe
unitmayleakfromthebottom.
Presstheselectbuttonandcheck
thatthegreenlightflashes.
Pressthesealtimerbuttonandset
itat“1”.
Pour50°Corless,150mloflukewarm
waterandplacethevacuumnozzle
betweenthebag.
Pressthestartbuttontovacuum
lukewarmwater.
Cleantheinsideofthenozzleortube.
Whensettingthebag,stretchitsidewayswith
handstokeepthewarmwaterfromspilling.
Pressthestartbuttonagaintoraisethesealbar.
Checktheliquidcatchcanister.Ifwaterisuncleanwhenvacuumed,repeat
steps3and4untilwaterbecomesclean.
Sealingtime(sec.)
+Button−Button
Select/PauseButton
ForLiquid
ForPowder
Forhighlyviscousliquidssuchascurry
Forhighlyviscousliquids
suchascurry,etc.,
vacuum-packafter
semi-freezing,orusean
embossedbagandsealit
beforethenozzlesucks
theliquid.
Whenpackingfine
particlessuchaswheat
flour,useanembossed
bagtovacuum-packwith
thepowderatthebottom
ofthebag.
Cleanthenozzleandtube
ifthepowdergetssucked
in.
Turnmanualvacuummodeon.
Setthesealtimeat“1”(onesecond).
Pourlukewarmwaterintothebagand
insertittotheunit.

1312
2Removethenozzlefromthemainunit.
Removetherear-mountedrubbercapoftheremoved
nozzletocleantheinside.
Cleanthenozzlewiththeaccessorynozzlecleaningtoolandwashitoffwithwater.
Reinstallthenozzle.
Installtheliquidcatchcanisteran
cleaningiscomplete.
Whenremovingthenozzle,holditsbaseand
carefullyremovetherightandleft
fixedpartsinorderfromrighttoleft.
3
4Wipemoisturefromthenozzle,
replacetherubbercap,and
reinstallit.
Removethenozzlewithcautionbecause
roughtreatmentmaydamageparts.
Becarefulnottoletwaterordustintotheunit.
Removeparts
markedwith
anarrowfrom
onesideand
thentheother.
Removedustwiththenozzle
cleaningtoolandwashitwithwater.
CleaningtheFilter
Removethefilterfromthelidandwashitwithwater.
CleaningtheNozzle
CleaningtheFilter
Removethenozzlefromtheunit.
Makesuretoturntheunitoffbeforecleaning.
Makesuretoturntheunitoffbeforecleaning.
1
2
Openthecoveroftheliquid
catchcanistertoremoveit
anditslid,andremoveits
protectionrubber.
Connectionbetweentubeandlid
※Ifthereissevere
contaminationorscratches
onthefilter,itneeds
replacement.Pleasecontactthe
storewhereyoumadethepurchase.
Removethefilterfrom
thecanisterandwash
inwater.
Connectthetube
tothenozzle.
Connectthefilter-side
nozzletotheunit.
Filter
Preparingtoremovethenozzlefromtheunit.
Setoperatingmodetosealmodeandhouse
thenozzle.
Opentherearcoveroftheunitandremove
theliquidcatchcanistertorevealthenozzle
underneaththecover.
Revealingthenozzle
underneaththecover.
Removethecanister
withitslid
※Donotremovethetube.
Nozzlecleaningtool Nozzle
Rubbercap
Donotholdthemetalpartof
thenozzletoavoidbending.
Pleaseuseaflathead
screwdriveras
illustratedifitis
difficulttodetach
byhand.
Caution
Pleasehold
therootpart
andpullout
thenozzle.

15
14
MalfunctionsandCauses Problemsolving.
Problem Checkpoint Procedure
Theunitdoes
notoperate.
Makesurethepowercordis
correctlypluggedintothe
electricaloutlet.
Checkthecircuitbreakers. Checkthecircuitbreakers.
Makesurethefuseisnotblown.
Replugthepowerpluginto
theelectricoutlet.
Checkthefuseofthe
applianceinlet.
P5
P8
P14
P14
Theunit
cannotseal
thebag,or
thebagis
notsealed
sufficiently.
Makesurethebagis
appropriate.
Makesurethebagisplaced
correctly.
Makesurethefoamgasketisnot
deformed.
Useabagoftheproper
materialorsize.
Placethebagcorrectly.
ReplacethePTFTstrip.
Pleasecontactthestorewhere
youmadethepurchase.
CheckthePTFTstripforwrinkles
orcracks.
Makesuretheadjustmentofthe
sealingfunctionisproper.
Makesuretheoverheating
protectivedeviceisnotactivated.
*Ifactivated,theredandgreen
lightsflashalternately.
P7
Replacetheheatingwire.
Restarttheunit.
Setthesealtime
property.
P14
Makesuretheadjustmentofthe
sealingfunctionisproper. P7
P5
Thesealed
partmelts.
Makesurethebagis
appropriate.
Makesuretherearenoholesin
thePTFTstrip.
Useabagoftheproper
materialorsize.
Setthesealtimeproperty.
ReplacethePTFTstrip.
P5,P7
P8
P14
Theunitdoes
notvacuum,
orairisnot
completely
removed
fromthe
bag.
Makesurethebagisnottoo
largeforthevolumeofcontents.
Makesurethebagisplaced
correctly.
Checkthebottomfoamgasket
forcracks.
Cutorchangethebagtothe
appropriatesize.
Placethebagproperly.
ReplacethePTFTstrip.
Pleasecontactthestore
whereyoumadethepurchase.
CheckthePTFTstripforwrinkles
orcracks.
Makesurethenozzleorthetube
fortheliquidcatchcanisteris
connectedproperly.
Makesurethenozzleortubeis
notclogged.
Makesurethelidoftheliquid
catchcanisterisclosed.
P11,P13
Resetthelidoftheliquid
catchcanister.
Cleantheinsideofthe
nozzleortube.
Reconnecteverytube.
Care
ReplacementofthePTFTStrip ReplacethePTFTstripwhenitisdamagedandcomesoff.
RemovetheoldPTFTstripandinstalla
newone.
ReplacementofHeatingWire
Replacetheheatingwirewhenthesealingweakensorthewireisbroken.
AfterremovingthePTFTstrip,unscrew
theheatingwirefromtheelectrodesand
installanewone.
Tips
Heatingwire
ForsurfaceswherethePTFTstrip
becomessoiledwithoilordust,
cleanthesurfaceandreplacethe
strip.
Becarefulnottowrinklethestrip.
Positionthestripsothatitcovers
theelectrodes.
Setscrewsareplacedonbothsides
ofthestrip.
ReplacePTFTstripunderthe
heatingwire.
Placethestripundertheheating
wiretomakesurethattheheating
wiredoesnottouchtheunit.
Theheatingwireisfixedbythe
electrodes.Asshownintheright
illustration,adjustingtheelectrodes
inwardwithaflatheadscrewdriver
makesreplacementeasierwhen
installing.
Beforeoperatingtheapplianceunplugthepowercordfromtheoutlet.
Warning
Warning
-
-
-
-
-
-
PTFTstrip
Adjusttheterminalsinward
withaflatheadscrewdriver.
Checktheheaterforbreaks.
Whensettinganembossed
bag,besuretoplaceitwith
theembossedsidedown.
Table of contents
Other ASAHI Food Saver manuals


