manuals.online logo
Brands
  1. Home
  2. •
  3. Brands
  4. •
  5. Ashcroft
  6. •
  7. Switch
  8. •
  9. Ashcroft 1130 User manual

Ashcroft 1130 User manual

Installation Instructions for
ASHCROFT®Model 1130 & 1140
Differential Pressure Gauge/Switch
© Ashcroft Inc., 250 East Main Street, Stratford, CT 06614-5145, USA, Tel: 203-378-8281, Fax: 203-385-0357, www.ashcroft.com
All sales subject to standard terms and conditions of sale. 1130_1140_gauge_I&M_RevA_Ltr_04/19
For proper operation of your gauge, please read all
instructions carefully before installing.
CAUTION: Do not exceed maximum operating pressure given
on the gauge label. Check fluid compatibility with wetted parts
before use. Minor leakage past the Teflon seal is possible.
“High” and low media must be compatible.
LIABILITY
The liability of the manufacturer is null and void in case
of damage caused by incorrect use, failure to comply
with manufacturer’s instructions, failure to comply with
local accident prevention safety laws and the handling by
untrained personnel.
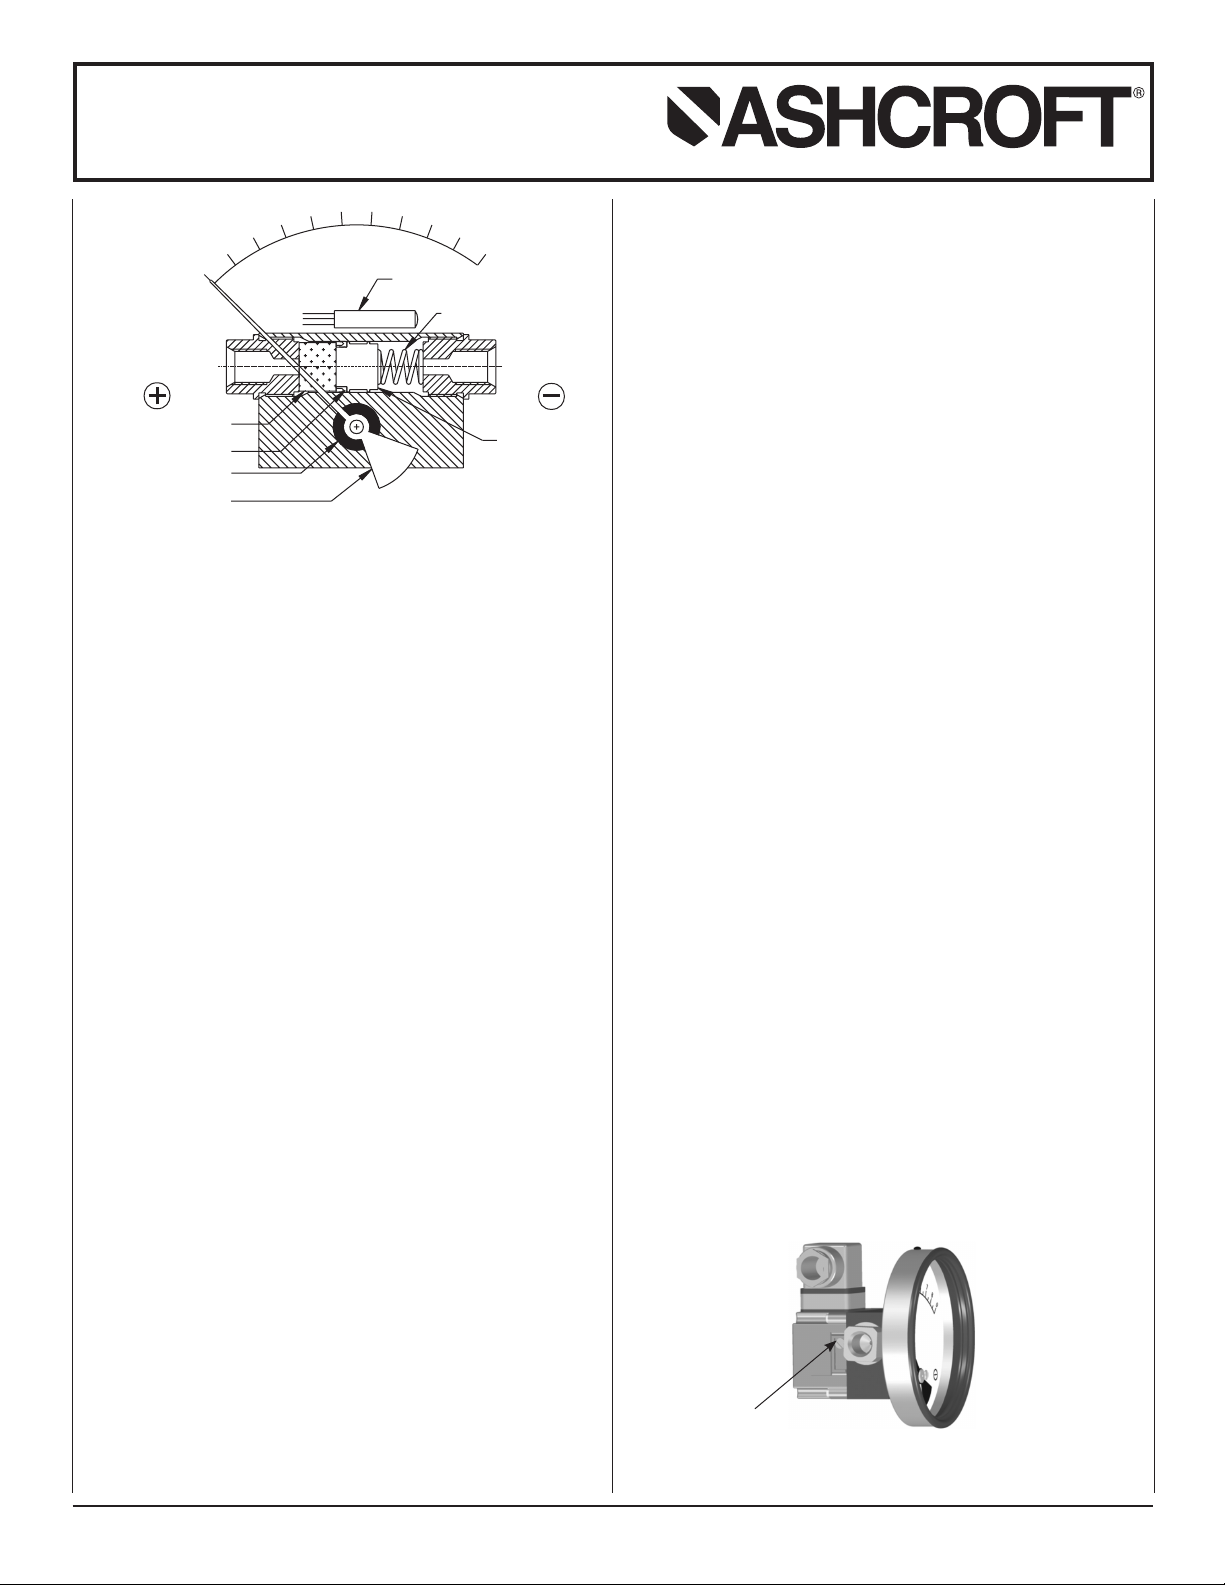
OPERATING PRINCIPLE
High and Low pressures are separated by a sensor
assembly consisting of a magnet, diaphragm and a range
spring. The difference in pressure causes the sensor
assembly to move in proportion to the change against a
range spring.
A rotary magnet, located in a separate body compartment
and isolated from the acting pressures is rotated by a
magnetic coupling following the linear movement of the
sensor assembly. A pointer attached to the rotary magnet
indicates differential pressure on the dial.
SWITCH: Reed switches (optional) are located adjacent to
the pressure chamber and are activated by the magnetic
field of the sensor assembly.
Note: The gauges are calibrated to give ±2% full scale
accuracy on ascending readings.
INSTALLATION
For better performance the gauge should be mounted
horizontally with the dial vertical. Two mounting holes
should be used for mounting (when applicable). Select
instrument location where it is not subjected to heavy
vibration or shock. Depressurize the system and connect
the high and low pressure lines of your system to the “High”
and “Low”ports of the gauge, respectively.
It is recommended for tapered threads to use thread
sealant tape and for parallel threads it is recommended
to use “O” rings with male connectors to avoid excessive
tightening and to prevent leakage. The gauge is now
0
1
3
2
4
5
HIGH PRESS.
PORT
PISTON MAGNET
ROTARY MAGNET
TEFLON®SEAL
POINTER
SWITCH
(OPTIONAL)
RANGE SPRING
LOW PRESS.
PORT
PISTON
Model 1130/1140
Piston
ready for operation. Apply “High” and “Low”pressures
simultaneously, to avoid damage to the internal parts.
Models 1130 & 1140 consists of a piston type mechanism
to sense the pressure difference. It can withstand maximum
operating pressure up to 3000 psi for all ranges (
6000
psi
for stainless steel). If pressure exceeds the rated maximum
pressure, damage will occur to “O” rings used on male
connectors, and the Teflon seal inside the pressure
chamber. If maximum operating pressure is within the
allowable limit of 3000 psi (6000 psi for stainless steel),
but the differential pressure exceeds gauge range, there
will be no damage to the gauge. The pointer will only go
to the extreme right end of the scale and will reset with a
reduction in pressure.
PRECAUTIONS
Do not connect “High” and “Low” ports incorrectly. Do
not subject the gauge to excessive vibration. The gauge
is never to be used in an area where a magnetic field is
present as it may show the wrong readings.
As the gauge works on a magnetic coupling principle, use
only non-magnetic fittings, parts, etc. in areas closer than
2˝ on all sides, otherwise calibration will be affected. Panel
mounted gauges should be installed in non-ferrous panel
material. However, gauges with 2˝ and 2.5˝ dials, mounted in
steel panels, may require pointer adjustment. This is done
by the manufacturer, upon request.
Do not try to open any part of the gauge for any reason as
calibration will be affected.
SWITCH SETTING
Please follow these instructions when your differential
pressure gauges are supplied with a switch. The switches
are normally factory set to save time the customer time.
However, they are field adjustable.
CAUTION: Supply voltage should not exceed switch rating.
For higher supply, adding a relay is recommended.
SWITCH ADJUSTMENT
The following procedure must be done by putting the
gauge on a test bench or while in actual service. The switch
adjustment screw is located on the plastic cover. Rotate
the screw counter clockwise to increase the setpoint and
clockwise to decrease the setpoint. One or two trials may
be necessary to attain the exact setpoint.
*Teflon TM of duPont
Increase setpoint
counter clockwise
View from high pressure side
See datasheet at www.ashcroft.com for basic dimensional details.
Load
NC NO
1
3
2
E
Load
L
(+)
N
(-)
N
(-)
R
RB
B
Switch #1 Switch #2
Load
L
(+)
N
(-)
RB
Switch #1
6
6
5
5
4
4
3
3
2
2
1
1
6
6
5
5
4
4
3
3
2
2
1
1
N
(-)
L
(+)
N
(-)
Load
Load
NC
NO
B
RY
6
6
5
5
4
4
3
3
2
2
1
1
N
(-)
L
(+)
N
(-)
N
(-)
Load
Load
Load
Load
N
(-)
NC
NC
NO
NO
B
RYYB
6
6
5
5
4
4
3
3
2
2
1
1
Lor (+) Lor (+)
Lor (+)
Load
Nor (-) Nor (-)
Nor (-)
Nor (-)
Nor (-)
1
3
2
E
B
R
E
1
3
2SPST
Switch
Load for
Load for
Switch #1
3
2
E
1
3
1
E
R
B
2
B
Y
R
3
12
EB
SPDT
Switch
Switch #1 Switch #1 Switch #2
Switch #2
Switch #1 Switch #2
View of plug after removing the socket View of plug after removing the socket
Installation Instructions for
ASHCROFT®Model 1130 & 1140
Differential Pressure Gauge/Switch
© Ashcroft Inc., 250 East Main Street, Stratford, CT 06614-5145, USA, Tel: 203-378-8281, Fax: 203-385-0357, www.ashcroft.com
All sales subject to standard terms and conditions of sale. 1130_1140_gauge_I&M_RevA_Ltr_04/19
Load
NC NO
1
3
2
E
Load
L
(+)
N
(-)
N
(-)
R
RB
B
Switch #1 Switch #2
Load
L
(+)
N
(-)
RB
Switch #1
6
6
5
5
4
4
3
3
2
2
1
1
6
6
5
5
4
4
3
3
2
2
1
1
N
(-)
L
(+)
N
(-)
Load
Load
NC
NO
B
RY
6
6
5
5
4
4
3
3
2
2
1
1
N
(-)
L
(+)
N
(-)
N
(-)
Load
Load
Load
Load
N
(-)
NC
NC
NO
NO
B
RYYB
6
6
5
5
4
4
3
3
2
2
1
1
Lor (+) Lor (+)
Lor (+)
Load
Nor (-) Nor (-)
Nor (-)
Nor (-)
Nor (-)
1
3
2
E
B
R
E
1
3
2SPST
Switch
Load for
Load for
Switch #1
3
2
E
1
3
1
E
R
B
2
B
Y
R
3
12
EB
SPDT
Switch
Switch #1 Switch #1 Switch #2
Switch #2
Switch #1 Switch #2
SPST SWITCH
Specifications
Contact Rating : 10 VA ac (rms) or dc (max)
Switching Current : 0.5 Amp ac (rms) or dc (max)
Switch Voltage : 100 Vac/Vdc (max)
SPDT SWITCH
Specifications
Contact Rating : 3 VA ac (rms) or dc (max)
Switching Current : 0.3 Amp ac (rms) or dc (max)
Switch Voltage : 30 Vac/Vdc (max)
ONE SPST SWITCH
Reed Switches and
Terminal Strip Connection
TWO SPST SWITCHES
Reed Switches and
Terminal Strip Connection
Reed Switches and
DIN Plug Connection
View of socket for supply connections
Reed Switches and
DIN Plug Connection
View of socket for supply connections
Reed Switches and
DIN Plug Connection
View of socket for supply connections
ONE SPDT SWITCH
Reed Switches and
Terminal Strip Connection
TWO SPDT SWITCHES
Reed Switches and
Terminal Strip Connection
View of plug after removing the socket
R = Red; B = Black; Y = Yellow; L = Live or + Supply; N = Neutral or – Supply. *Body to be suitably grounded while using gauge + switch and only switch.

This manual suits for next models

1

Other Ashcroft Switch manuals

Ashcroft 1133 User manual

Ashcroft

Ashcroft 1133 User manual

Ashcroft A Series User manual

Ashcroft

Ashcroft A Series User manual

Ashcroft B700 User manual

Ashcroft

Ashcroft B700 User manual

Ashcroft T400 Series User manual

Ashcroft

Ashcroft T400 Series User manual

Ashcroft LS ATEX Series Instruction Manual

Ashcroft

Ashcroft LS ATEX Series Instruction Manual

Ashcroft D7 series Manual

Ashcroft

Ashcroft D7 series Manual

Popular Switch manuals by other brands

IDK FDX-S Series user guide

IDK

IDK FDX-S Series user guide

D-Link DES-1018DG manual

D-Link

D-Link DES-1018DG manual

H3C S3610 Series Operation manual

H3C

H3C S3610 Series Operation manual

WTB LaserDisc Lite Hubs N/A Maintenance and service guide

WTB

WTB LaserDisc Lite Hubs N/A Maintenance and service guide

Perle IDS-108F installation guide

Perle

Perle IDS-108F installation guide

FIBARO FGS-2x3 operating manual

FIBARO

FIBARO FGS-2x3 operating manual

Eaton QSA400 Series Instruction leaflet

Eaton

Eaton QSA400 Series Instruction leaflet

Keithley S46 installation guide

Keithley

Keithley S46 installation guide

Transition Networks LAN MASTER 33022.B user manual

Transition Networks

Transition Networks LAN MASTER 33022.B user manual

Gems FS-600 Series Operating and installation instructions

Gems

Gems FS-600 Series Operating and installation instructions

Ruijie RG-S6100 Series Release notes

Ruijie

Ruijie RG-S6100 Series Release notes

ADDER ADDERView Secure AVS 2114 quick start

ADDER

ADDER ADDERView Secure AVS 2114 quick start

Battery Doctor Battery Life Preserver 20395 instruction manual

Battery Doctor

Battery Doctor Battery Life Preserver 20395 instruction manual

DirectConnect DCHS41M user manual

DirectConnect

DirectConnect DCHS41M user manual

Digital Equipment MultiSwitch 700 user guide

Digital Equipment

Digital Equipment MultiSwitch 700 user guide

Juniper EX4200-24T Hardware guide

Juniper

Juniper EX4200-24T Hardware guide

HPE LSWM1FANSC Assemblies Installation

HPE

HPE LSWM1FANSC Assemblies Installation

SmartRoom SR-ZCSWLPW-S1311-01 user manual

SmartRoom

SmartRoom SR-ZCSWLPW-S1311-01 user manual

manuals.online logo
manuals.online logoBrands
  • About & Mission
  • Contact us
  • Privacy Policy
  • Terms and Conditions

Copyright 2025 Manuals.Online. All Rights Reserved.