Askey CDR9030 User manual

-User Manual -
iDVR900
CDR9030-RoHS
Connected Car Cam+
ASKEY Computer Corp.

Revision History
Version
Number
Revision
Date
Description
1.0
January, 2021
Initial Release
Copyright©
2019, ASKEY Computer Corp. All rights reserved
Printed in Taiwan, 2019.
The information provided in this document is subject to change without notice. The
statements, configurations, technical data, and recommendations provided in this
document are believed to be accurate and reliable, but are presented without express or
implied warranty. Users must take full responsibility for their applications of any products
specified in this document.
The information provided in this document is proprietary to ASKEY Computer Corp. The
software described in this document is furnished under a license agreement and may only be
used in accordance with the terms of that license. A summary of the Software License is
included in this document.
Statement of Conditions
In the interest ofimprovinginternaldesign,operational function,and/orreliability, ASKEY
Computer Corp. reserves the right to make changes to the products described in this
document without notice.
ASKEY Computer Corp. does not assume any liability that may occur due to the incorrect use or
application of the products or circuit layouts described herein.
In addition, the program and information contained herein are licensed only pursuant to a
license agreement that contains restrictions on use and disclosure, which may incorporate by
reference certain limitations and notices imposed by third parties.

Important Notes to Read Before Use
•
Manufacturers cannot assume responsibility for inconveniences caused by not observing
the notes stated in the user manual. Incorrect usage of the product falls outside the scope
of the warranty.
•
The product operates on a voltage of 5 V DC. The CDR9030 is powered up by connecting
it to a cigarette lighter socket (or hardwired to the car’s battery) or the Driving Recorder
Power Cable. Exercise caution while using either method of connection.
•
The CDR9030 accepts SD cards formatted to EXFAT. For optimum results, always format the SD
card before initial use with the CDR9030.
•
The CDR9030 may not be able to use the Global Positioning System (GPS) in the following areas:
•
Parking lot ofbuildings
•
Tunnels
•
Two-layer highways
•
Between closely positioned high buildings and trees

Table ofContent
1. Introduction...............................................................................................1
1.1.Safety Instruction .......................................................................................................1
1.2.Intended User ............................................................................................................1
1.3.Features.....................................................................................................................1
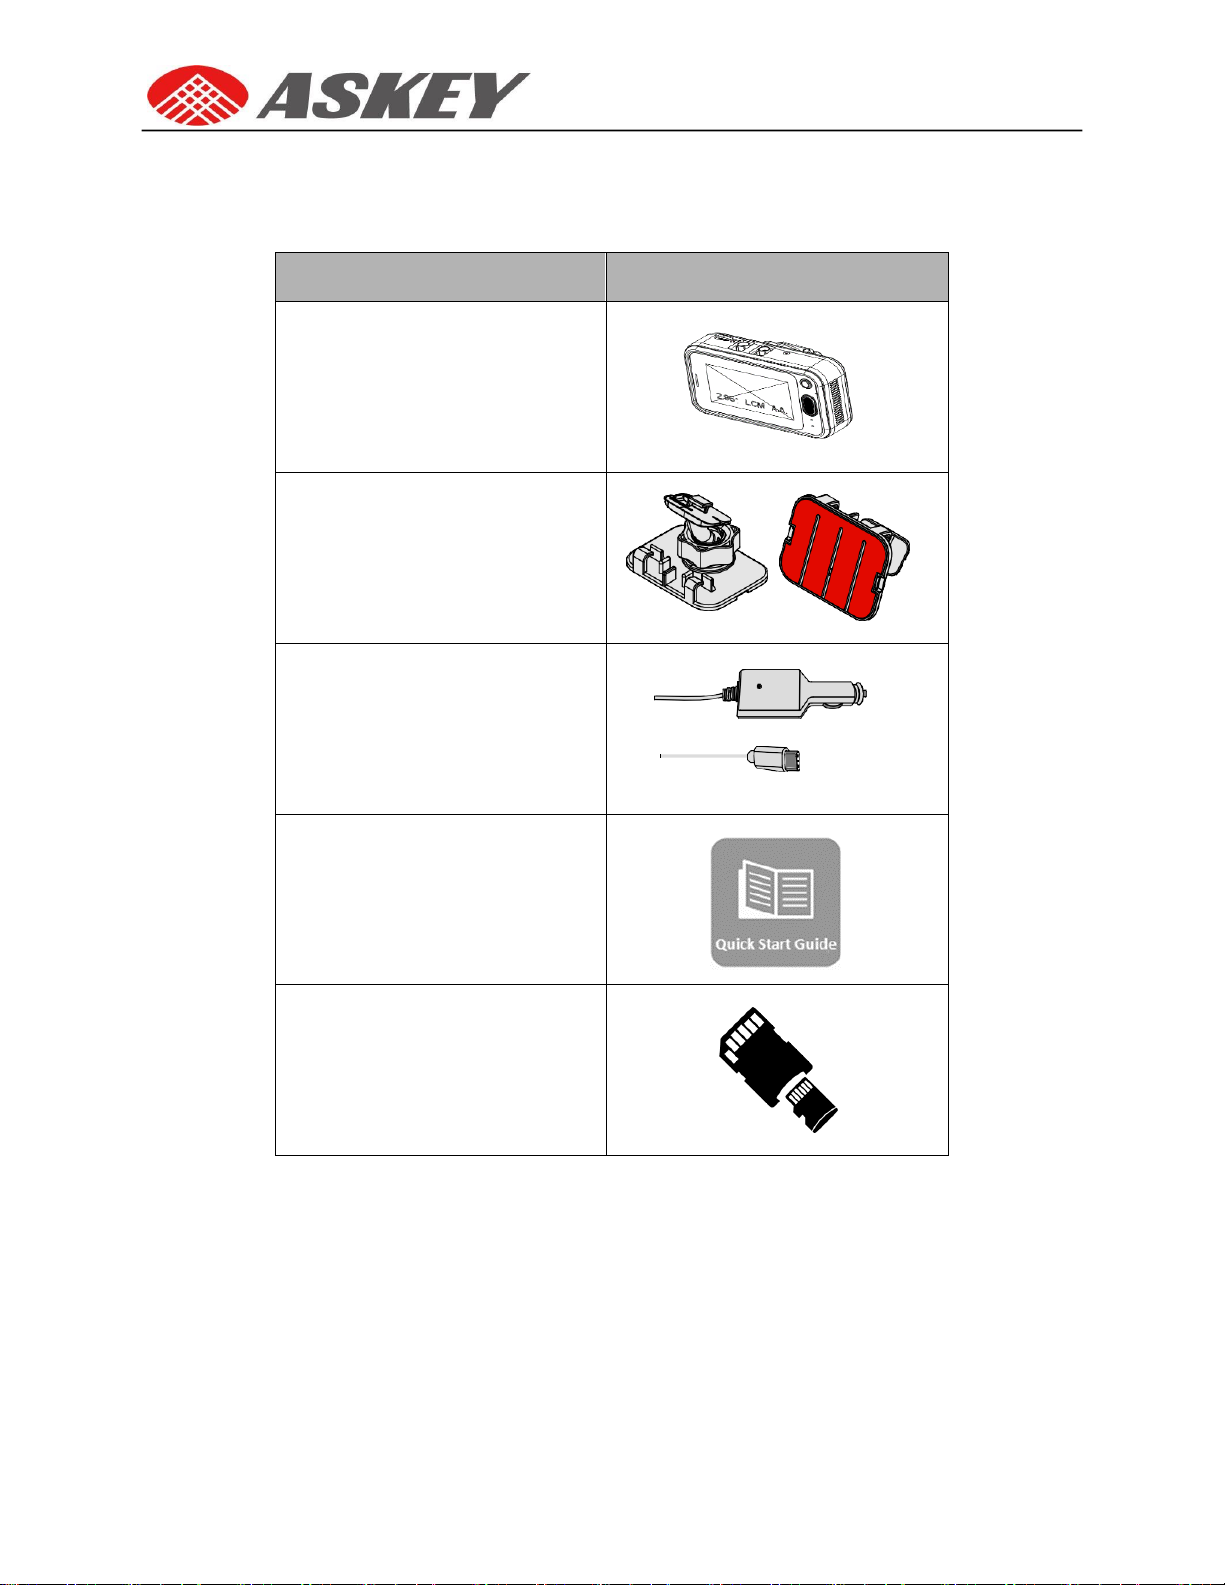
1.4.Package Content ........................................................................................................2
2. Overview ...................................................................................................3
2.1.Device Overview.........................................................................................................3
3. Getting Started...........................................................................................5
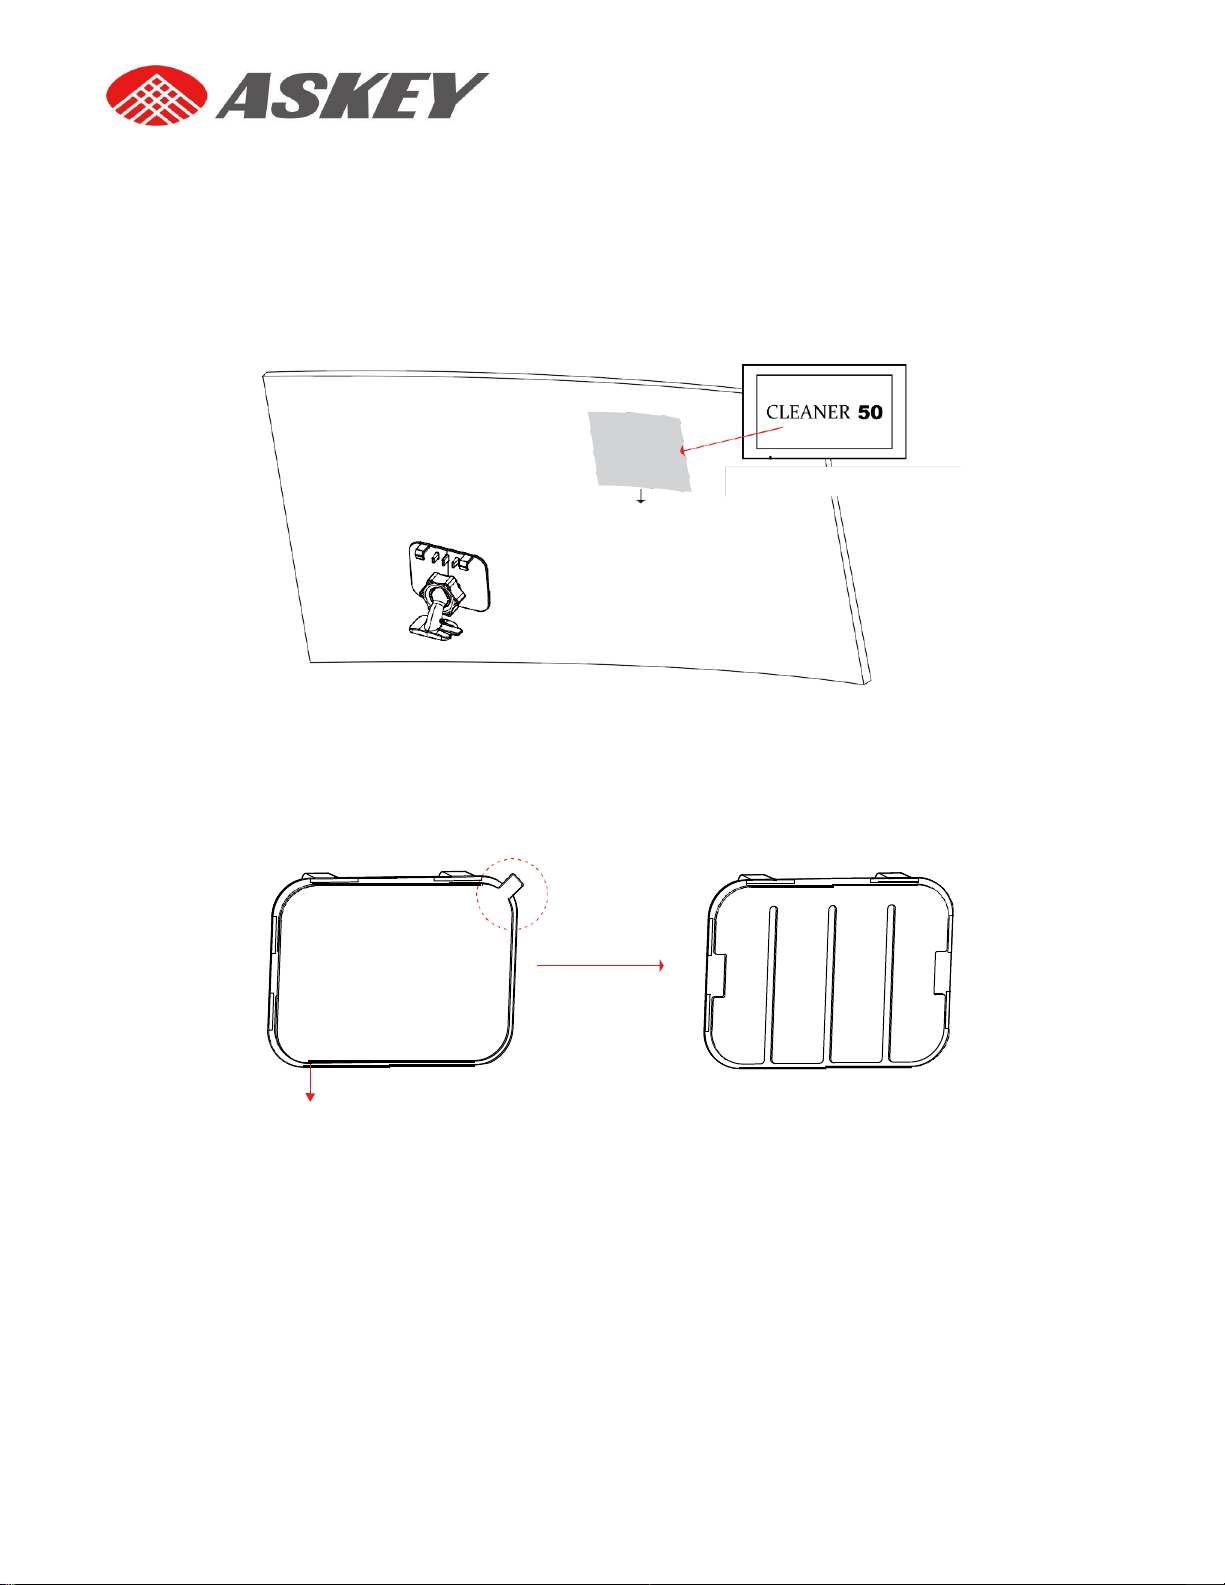
3.1.Installing the Mounting Bracket .................................................................................5
3.2.Mounting the Bracket ................................................................................................7
3.3.Insertion of SD Card and SIM Card..............................................................................8
3.3.1 Accessory for External camera………………………………………………………………………………… 8
3.4.Activation and Battery Charge..................................................................................10
3.5.Manual Power Off ....................................................................................................10
3.6.Reset and Initial Auto Calibration.............................................................................10
3.6.1 Reset:.........................................................................................................................................10
3.6.2 Initial Auto Calibration. .............................................................................................................11
3.7. Date and Time .........................................................................................................12
3.8. Screen Icons/Buttons ..............................................................................................13
3.9. Touch Screen Operations ........................................................................................14
4. Menu Operations .....................................................................................15
4.1 Connection Menu.....................................................................................................16
4.1.1. WiFi...........................................................................................................................................16
4.1.2. Bluetooth..................................................................................................................................17
4.1.3. Cellular Data (LTE/3G) ..............................................................................................................20
4.1.4. Hotspot.....................................................................................................................................21

4.1.5. APN...........................................................................................................................................22
4.2 Playback Menu .........................................................................................................22
4.2.1. Event Video ..............................................................................................................................23
4.2.2. Continuous Video.....................................................................................................................24
4.3. Settings Menu.................................................................................................24
4.3.1. Driver Assist Setup....................................................................................................................25
4.3.2. Advanced Driver-Assistant System Alerts ................................................................................26
4.3.3. System ......................................................................................................................................29
4.3.4. Recording..................................................................................................................................30
6. Network Settings......................................................................................35
6.1. Frequency Band Widths Supported.........................................................................35
7.
Emergency Call(E-Call)..............................................................................36
8.
TechnicalSpecifications.............................................................................38
9.
Troubleshooting.......................................................................................43
Contact Us
....................................................................................................44

1
Failure to follow the instructions provided under “Caution” will lead to data loss.
CAUTION
Failure to follow the instructions provided under “Warning” will lead to serious injury or death, and
property damage.
WARNING
1.Introduction
•
The Askey Connected Car Cam+ CDR9030 represents a new generation of in-car accessories that
make driving safer,smarter,and connected. This device, which can be mounted onthe windshieldof
any vehicle, enhances vehicular safety with preventive diagnostics.
•
The CDR9030 is equipped with a Full HD 1080p camera system with an F/2.0 aperture and a 136°
wide-angle lens to facilitate real-time recording and live video streaming.
•
TheCDR9030allows externalcamera to detectdrowsinessandfatigueonthedriver’sface.
This additional external camera is equipped with a face recognition detector to aware safety
driving behavior.
•
Gyro sensors help in sensing abnormal movement and trigger the emergency recording function
to eventually save and upload the recorded video on to the cloud. This video can be later used for
incident analysis.
•
TheAdvanced Driver-AssistanceSystem (ADAS),whichincludestheLaneDepartureWarning
System(LDWS)andtheForwardCollisionWarningSystem(FCWS),altersthedriveronthe
identification of a risk, thus preventing accidents.
•
SupportforLTEprovidesin-carinternetconnectivityforallpassengers,facilitatesconnectionto
service centers, and enables automatic firmware updates.
1.1.
Safety Instruction
For users' attention, scenario-specific safety instructions are provided in the following three boxes
throughoutthe document.Following theseinstructionswill help preventuntoward incidentsintheuseof
the CDR9030.
NOTE
Instructions provided under “Note” provides insights for prudent use of the product.

2
1.2.
Intended User
This manual is intended for the user of CDR9030 as well as for service center customer support staff.
1.3.
Features
1.
The CDR9030 offers the following features:
•
Touch-screen control
•
2.95-inch LCD 360 × 640 display
•
Tri-channel Full HD 1080p camera system with F/2.0 aperture and over120°wide-angle lenses
•
Edge AI
•
ADAS
•
Built-in voice assistance withAlexa
•
Emergency call (E-Call) and live video streaming
•
Fleet Management
•
API (for Integration/Customization)
•
Built-in gyro sensor (accelerometer)
•
GPS powered by Quasi-Zenith Satellite System(QZSS)
•
Support for LTE and 3G, as well as Wi-Fi, Bluetooth.
•
Wi-Fi Wireless Access Point (WAP) or Hotspot
•
Event recording
•
Firmware Over-The-Air (FOTA)
•
3.7 V, 720 mAh rechargeable Li-ion Non-Removable Battery
•
USB Type C support for powersupply
•
Supports up to 128 GB Micro SDXC Memory Card
2.
The CDR9030 offers the following optionalfeatures:
•
User Authentication(Facial/Voice)
•
Optional feature for driver for drowsiness and fatigue detection

3
1.4.
Package Content
Content
Overview
CDR9030
Mount Bracket
USB Type C to Cigarette Car Charger
Quick Start Guide
Micro SD card and SD Card Adaptor

4
2.Overview
2.1.
Device Overview

5
Windshield
Wipe windshield clean
Mount location
3.Getting Started
3.1.
InstallingtheMounting Bracket
Step1: Remove alcohol wipe from pouch. Wipe the area (of the windshield) where the mounting
rack will be mounted clean of dust or grease.
Steps2:
Remove the protective film from the mounting rack adhesive. Position the mounting rack
over the location (on the windshield) where it’s being wiped clean.
Remove protective film
Mounting bracket
Note
•
The adhesive is extremely sticky. Avoid touching the adhesive.
•
The adhesive can’t be reused if stained or removed from windshield.

6
Mount Location
Steps3: Mount the Mounting Bracket on the windshield.
Steps4: Press on the suggested pressure points with your thumbs.
Steps 5: Press the mounting rack evenly to push out the air bubble.
Leave the mounting rack on the windshield for up to 24 hoursbeforeinstallingthe DVR.

7
3.2.
Mounting theBracket
Step1: Mount the DVR onto the mounting bracket. Align the docking slot (on top of the device)
with the docking arm (extended from the mounting bracket).
Step2: Plug in the USB Type-C connector (extended from the car charger unit) to the DVR’s USB port.

8
3.3.
Insertion of SD Card and SIM Card
NOTE
•
If the SD card is not inserted, the device will show error message.
•
The CDR9030 supports only Nano sim cards (LTE/3G).
To insert the SIM card (1) or SD card (2):
1.
Open the card slotscover.
2.
Place the SIM card (1) or SDcard (2) in the slot per orientation marking.
3.
Push the SIM card (1) or SD card (2) into the slot.
4.
Close the card slots coverproperly.
3.3.1 Accessory for External camera
CDR9030 main device can support 2 external cameras in max.
1. Please find 2 Fakra connectors to connect 2 external cameras on Top side of CDR9030 main device.
2. Please insert fakra connector to CDR9030 main device.
3. Please shift left and right screen to make sure display enable.

8

10
3.4.
Activation and BatteryCharge
NOTE
•
Make sure that SD card is inserted on the CDR9030. If the SD card is not inserted, the
device will
show error message. For more information on insertion of SD card, refer to section 3.4.
•
Always use the attached car charger to activate and charge the CDR9030.
To activate and charge the CDR9030:
1.
Plug one end of the charger into device's USB Type C-Port.
2.
Plug the other end of the charger into the cigarette lighter socket of your vehicle.
3.
When the vehicle's engine is started, the CDR9030 turns on and the built-in battery begins to charge.
3.5.
Manual PowerOff
To turn off CDR9030 manually:
1.
Press the “Power Off”button and Hold for 3 seconds. The “Power off”confirmation dialog box dis-
plays on touch screen.
2.
On the confirmation dialogbox:
•
Touch “Power off” to turn off thedevice.
•
Touch other areas on the display tocancel.
3.6.
Reset and Initial Auto Calibration.
3.6.1 Reset:
1.
If the CDR9030 fails to function normally due to unknown causes, hold the Power button for
3 seconds until the “Power off” confirmation dialog box appears on the display.
2.
To turn off the device, follow the instructions provided in Section 3.4.

11
3.6.2 Initial Auto Calibration.
A. CDR9030 will auto calibration , when driving on road. Please note below road scenario limitation.
Vehicle speed must over 10 km/hr.
Lane line is mandatory to detected to CDR9030 device.
Curve lane can’t get auto calibration accurately.
Auto calibration can’t workable, when vehicle in turning status.
B. CDR9030 will finish Auto Calibration in 1 to 3 minutes, when device detect scenario accurately.
Initial Auto Calibration: 3 mins
Reload device location: 3 mins
Reset device: 1 mins
C. Auto Calibration Screen indicator:
Initial Screen and Indicator color as below:
a. LDWS- Yellow
b. Wheel Line- Light Blue
c. Front vehicle speed- Green.
Before auto calibration setting:

12
Auto Calibration Done.
3.7 Date andTime
•
The local date and time are automatically updated upon connection to an LTE/3G (or above)
network or GPS.
•
The date and time display in the recorded video as shown below.

12
Icons/Buttons/Indicato
rs
Description
Main menu
Firmware update
available (dot on Main
menu)
Recording ON icon
Recording error/OFF
icon
Recording event icon
No SIM card
No SD card
No GPS signal
3G/4G Cellular
connection
Front cam recording
icon
Back button
Icons/Buttons/Indicato
rs
Description
Pause button
Battery Charge Level,
25%, 50% and 75%
Battery Charge in
progress
Broken cameras
Impact
E-Call Answer/End
buttons
Wi-Fi connection status
with signal strength
Bluetooth on/off
Hotspot on/off
Rear cam recording icon
Play button
3.8 Screen Icons/Buttons

Getting
Started
13
3.9 Touch ScreenOperations
Description
Operation Example
Action
Volume Adjustment (from
Default RecordingScreen)
Swipe up to increase the
volume. Swipe down to
decrease the
volume.
Toggle between Cameras
(from
Default Recording
Screen)
Swipe right to use the rear
cam. Swipe left to use the
front cam.
Forward or Rewind Video
(from Playback option)
Swipe right to
forward. Swipe left
to rewind
Screen Brightness Adjustment
(from Display option)
Swipe up to increase the
brightness.
Swipe down to decrease the
brightness.

14
4. Menu Operations
NOTE
To access the Main menu:
•
Ensure the CDR9030 is activated and battery charging is in progress
•
Ensure the CDR9030 is registered on an LTE/3G or Wi-Fi network
•
Ensure the automatic video recording mode (default screen) is on.
A. Touch the Menu icon on the recording screen to access all the operational functions of the
CDR9030.
B. The Menu is displayed on as shownbelow.
The Menu contains Connection, Playback, Settings, & Legal.
C. To go back to the previous (recording) screen, touch the Back icon .
This manual suits for next models
1
Table of contents
Other Askey Dashcam manuals