Asko 1905 Operating instructions

1
1905, DW 955
Printed on paper friendly to the environment.
How to use your
dishwasher
AU/NZ
Important!
Read right through these instructions before
using your dishwasher for the first time, in
order to obtain the best performance from it.

2
How to use your
new dishwasher
Follow the steps in the strip along the
top of each page for a brief summary
of the instructions.
Further details and advice are on
the page below the strip.
The parts of the machine
Door catch
Child safety catch
Main on/off switch
Door
Kick plate
Adjustable
feet
The kick plate can be
adjusted inwards and
outwards to match the
depth of kitchen unit bases
(see page 17)
The kick plate can be
adjusted vertically to match
the height of kitchen unit
bases (see page 17)
Contents
How to use the machine 2
The parts of the machine 2
Loading the baskets 4
Detergent 5
Technical data 5
How to use the
Model 1905 6–7
Which programme
should I use? 6
Energy saving 7
Options 8
Reprogramming 9
Display window 10
Indicating lamps 11
Fault tracing program 11
Wash these items with care 12
Filling with rinse aid 12
Adjusting the rinse aid
dispenser 12
Dishwashers with
water softeners:
Filling with salt 13
Adjusting the salt dispenser 13
Care of the machine 14
If the machine won't work 15
Safety 16
Service and guarantee 16
Installation 17–19
Building-in 17
Free-standing 17
Electrical installation 18
Water supply 18
Drainage 19
Instructions summary 20

3
1
Start/Stop
Lamp
Open the door by pulling the
handle forwards and upwards.
Press the main on/off switch.
How to open the door if the child safety catch
is engaged:
Slide the safety catch to the left and then
lift the handle upwards.
Programme panel See pages 6–7
Main on/off switch
Upper basket
Lower basket
Cutlery basket
Detergent com-
partment for
main wash
(see page 5)
Filling hole for rinse aid
and adjustment of
rinse aid quantity
(see page 12)
Spray arms
Coarse
strainer
Fine
strainer
Program
1905
Knife basket
(Not all models)

4
2
.
3
Load the
baskets
Be careful when
washing items
made of certain
materials (see
page 12).
Add detergent
Pre-washand
Main wash: in the
detergentcom-
partment
Close the door
after you have
addedthe detergent.
Upper basket
Load glasses, cups, bowls, small plates,
saucers, long items of cutlery and carving
knives into the upper basket. (Take care that
sharp edges do not damage the plastic of
the baskets.)
The upper basket has two hinged racks.
The waved rack is for wine glasses.
Lower basket
Load large and small plates, serving dishes, pots and
pans and cutlery (in the cutlery basket) into the lower
tray.
The lower basket has an insert rack for plates. Rem-
ove it to provide space for casseroles and saucepans.
When the hinged rack is folded down, cups can
be placed on it and under it. There is space for
tall glasses with the rack folded up.
All used surfaces must face downwards.
NOTE: place the items so that
the detergent dispenser is not
prevented from opening.
Placing of wine
glasses
The insert rack can be
removed to provide space for
saucepans and casserole
dishes.
There is no need to rinse items before
you load the machine, although larger
food particles should be removed.

5
46
5
Technical details
Warning!
Dishwasher detergent is corrosive –
take care to keep it out of the reach of
children.
Make sure that children cannot get hold
of dishwasher detergent. If any is
accidentally swallowed, give plenty to
drink: one or two glasses of milk or
water. Do not try to induce vomiting.
Seek medical advice without delay. If
dish-washer detergent gets in the eyes,
rinse with plenty of water.
How much detergent?
The amount of detergent required depends
on the programme used and the water
hardness (see below).
Light wash
Pre-wash (5 g)
Main wash (12 g)
Main wash(12 g)
5g = ca 1 teaspoon
12 g = ca 1 tablespoon
Use only dishwasher deter-
gent
for both pre-wash and main wash. Ordinary
hand dish-washing detergent must not be
used, as the foam will interfere with proper
operation of the machine.
Water hardness varies from place to place, and
is measured in degrees of hardness (°dH). Your
water company should be able to tell you the
hardness of water in your area. The harder the
water, the more detergent you will need. Follow
the instructions on the packet.
In hard water areas, both the dishes and the
machine can develop a grey film after a while.
This can be removed by using the machine with
the pre-wash detergent replaced by two
tablespoonsful of citric acid. Use the pots and
pans programme.
If the water is very hard, use a rinse aid that
contains citric acid (acid rinse aid).
The amount of detergent depends
on the hardness of the water
Check that the spray arms
can rotate freely. Check that the
water supply is
turned on.
Close the door.
Close the door fully: if not, the
machine will
not start.
Cutlery basket
Intensive, Strong,
Normal wash
Load cutlery with the
handles downwards and
as spread out as possible.
Make sure that spoons do
not 'nest' with each other.
Avoid placing cutlery of
different metals –e.g.
silver and stainless steel –
in the same compartment.
It is also unsuitable to
place different grades of
stainless steel (check by
the surface colour) in
contact.
Knife basket
The cutlery basket has a
folding cover in the
middle. It can be used to
protect small items, but
you can also put thin
handles as electric
whisks through the
folded cover.
Height 820–890 mm
Width 596 mm
Depth 550 mm
Weight 45 kg
48 kg w. softener
Capacity 12 place settings
(IEC)
Water pressure 0,03–1,0 MPa
(0,3–10 kp/cm2)
Voltage 1-fas, 220/230 V
Max power 2 100 W
2 800 W (RSA)
Heater 1 800 W
2 500 W (RSA)
Extra accessories:
Worktop
Side panels + tip quard
Decor frames
There is a special
basket with movable
bracket for long
cutlery
and
knives.
This basket
gets an extra
water flushing.
(Not all models)

6
If you have used programme 1, 2 or 3 by the last wash, the
machine remembers it and you need only press the Start
pushbutton to get the same programme.
But if you use programme 4-6 , you must select it every
time. The reason for this is that we mean that programme
4-7 shall just be used at special occasions, when the dishes
are very slightly soiled.
How to use your
Model 1905
Your Model 1905 is a dishwasher which is particularly
convenient to use. It remembers the programme that
was last used (programme 1–3), so you need only
press the Start pushbutton to use it again.
The machine also shows when the rinse aid or salt has
run out or when you have not closed the door properly.
• Select the programme
•Press the
power switch As soon as you have pressed
the main switch, a lamp lights
above the last selected
programme ( programme 1–3).
Simply press the Start
pushbutton to use this
programme again.
To use a different programme,
press the pushbutton for the
programme required.
Which programme should I use?
The easiest way of using the machine is to select a standard
programme. Simply press one of the seven symbols for the
dishwashing programmes that you want, and the machine does
the rest. Or you can select the washing temperatures, number of
rinses, heated drying and so on yourself: read the details below
and follow the table.
1. Intensive wash
Use the Intensive wash programme for very dirty dishes, such as
pots, pans, casseroles and gratin forms mixed with normal
household wash-up.
70o
55o
55o
65o
55o
65o
55o
Intensive wash
Light wash
Quick/Delicate wash
Programmes
Strong wash
Economy
55o
Option
Rinse programme
Program
symbol Rec.
temp.
65o
Indication lamps, see page 11
2. Strong wash
Use the Strong wash programme for dirty dishes, such some pans,
mixed with normal household wash-up.
3. Normal wash
Use this programme for normal washing. It is made for plates, cups,
glasses and saucers and one or two not so dirty pans.
If the wash is not particularly heavily soiled, use the Light wash
programme. It is provided for china, which are very slightly dirty.
4. Light wash
Delicate items
Delicate items can be washed with the Light wash programme. Omit
heating if you want to be extra careful.
See also page 12: Wash these items with care.
If the wash is very little soiled, use the Quick wash programme. It is
provided for glasses and china, which are washed immediately after
being used and therefore don´t need a stronger programme.
5. Quick/Delicate wash
6. Rinse & Hold
For rinsing the dishes if you are waiting to wash-up until the
machine is full. If you select heated drying you get a rinse
programme.
7. Plate heating
Use this program to heat plates.
55o
Plate heating
Rinse & Hold
Normal wash
Economy
*** Unheated drying
*** Programme for Energydeclaration: AS 2007 - 1988 (Australien)

7
•Press the Start button
The machine will start and work through
the selected programme automatically.
• Want to change your
mind?
• If you turn off the machine
at the main on/off switch
(or if there is a power failure) before
the programme has finished, the
programme will continue when
power is restored.
If the power is turned off during
drying, and the door is open for
more than two minutes, the
programme will be terminated.
How to save
energy:
Economy wash
If you press the E-button, the
temperature will be lowered to
50°C in the pre-wash and the
main wash. To compensate the
lower temperature, the main
wash time is pro-longed by 15
minutes. Detergents with
enzymes work better by longer
washing times at low temperatu-
res.
Wash only full loads
Save energy by not using the
machine until it is full.
Wash at lower temperatu-
res
You can lower the temperature
in main wash and rinse in the
Intensive, Strong and Normal
wash programmes to 55°C. In
the Light wash programme you
can lower it to 45°C.
Is the machine connected
to a cold water supply?
If the machine is connected to a
cold water supply, running time
will be longer, as the machine
must heat the water. However,
the longer washing time means
that you can run the programme
at a lower temperature and still
get the same wash performan-
ce. You also save electricity.
Long programmes with low
temperature is suitable for
detergents with emzyms.
Select unheated drying
If you select unheated drying,
the dishes will dry a little more
slowly. You can speed up
drying by opening the door a
little to allow the moist air to
escape. You can also select fan
drying.
If you want to change programme
after you have started the machine,
press Stop for 3 seconds. Then
select a new programme by pressing
the appropriate symbol.
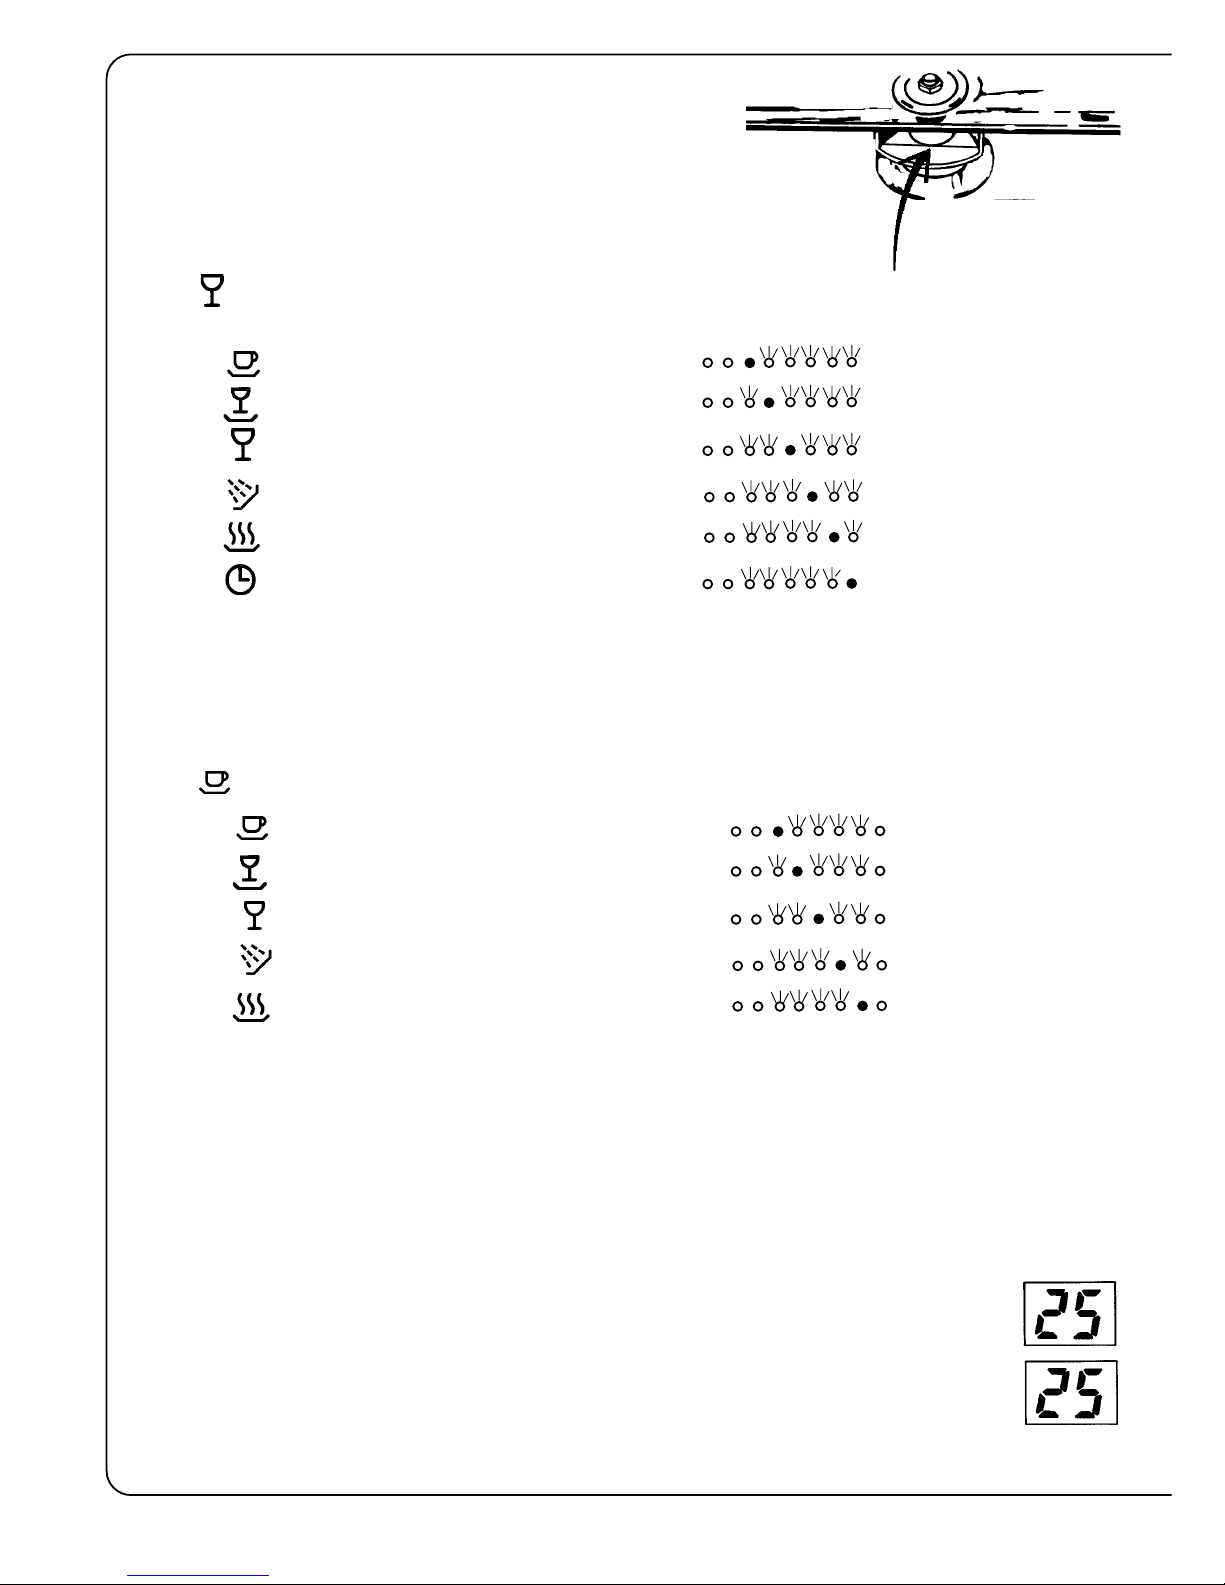
45o65o70o
45o65o65o
65o65o
50o65o
30o
55o55o
30o
50o55o
55o55o
55o55o
55o
=The dirty rinse water is emptied and the next period starts
with clean water (SCS= Super Cleaning System)
Drying
RinsesMain wash
Pre-wash
Programme features Consumption figures
Cycle time,
approx. min.**
Energy
kWh ca**
Energy
kWh ca**
Cycle time,
approx. min.**
Hot fill
ca 60°C
Cold fill
ca 15°C
Water
consump.
in litres
30o
30o
Start / Stop
see page 8
Rinse agent and salt indication,
see page 12-13
Display
see page 10
Options, see page 8
Dishwashing programmes Delayed start
see page 8
= heat and fan
= fan only
** The programme times shown in the table are
rounded-off values from actual tests by 1800 W.
In prac-tice, times may vary some-what due to
the temperature of the water supply, voltage
* For a dishwasher with water
softener the figures are about 3
litres higher.
30o
90 1,1 120 2,2 25
80 0,8 105 1,7 21,5
70 0,9 95 1,6 16,5
80 0,6 105 1,3 16,5
70 0,5 90 1,2 16,5
80 0,4 100 1,0 16,5
65 0,35 85 1,0 15
30 0,3 50 1,0 15
35 0,6 45 0,8 3,5
4 - 4 - 3,5
8 0,2 8 0,2 -
(not all models)
When the machine has stopped, it
consumes only an extremely low power.
To turn it off completely, turn off the main
on/off switch.
The indicating lamp remains on as long
as the switch is in the On position. It is a
good rule never to leave a switched-on
machine unattended.
When the programme has stoped the
lamps flash, that shows that the program
is ready.
• After washing

8
By pressing you can select
temperature in the programmes:
In The Intensive, Strong, Normal and Light wash
you can select 55, 65, 70 or 75°C.
In the other programmes you can select 45, 55 or
65°C.
Selected temperature is shown in the display for 3
seconds.
Selected temperatures remain until you alter them.
Note that 45°C will not remain.
By pressing this button you lower the
temperature in the pre-wash and main
wash to 50°C and pro-longs the main
wash by 15 minutes (programme 1–4) .
In this way you lower the energy
consumption.
Use this button, when you use detergents
with enzymes.
Eco/Bio-function
Programme options
Temperature Delayed start
If you want the machine to start after a delay
(e.g. in a cheap-rate electricity period), press
this pushbuttonthe same number of times as
you want hours´delay (1–12 hours). Then
press the Start pushbutton. The number of
hours´delay you have set, is displayed in the
window. Pressing the the pushbutton a
thirteenth time will reset the number of hours
tp zero.
Heated drying
Lights if you have selected heated
drying. Press the pushbutton again
to cancel heated drying. Then the
lamp goes out, but the fan will dry
the dishes even without any heat.
Rinse aid
This lamp lights to indicate that the
machine has run out of rinse aid.
After refilling, there may be some
delay before the lamp goes out.
(Only for machines with water
softeners)
This lamp lights to indicate that
the machine has run out of salt.
After refilling, there may be some
delay before the lamp goes out.
Salt indicator
Press this button if you want the fan to
cool down the dishes during 30 minutes
after the drying sequence.
The fan is also used to dry the dishes,
when you have selected No heated
drying.
Fan Start / Stop
The programme starts when you press this push-
button.
Stop the programme by holding the pushbutton de-
pressed for three seconds. This is to prevent children
playing with the pushbuttons and stopping the
programme.
You can also prevent children starting the machine
by playing with the pushbuttons by programming the
machine so that it will start only if the Start push-
button is pressed and held for three seconds, see
page 9.

9
If you wash-up delicate items as fine china or thin glasses, big temperature changes mean risk for cracking. If the
machine is connected to cold water, you can make the machine cool down the dishes after the first pre-wash and
the main wash (65°C), before cold water enters the machine for the next step.
1. Press 5 times within 15 seconds. Then you get into the changing programme.
2. Press and the machine cools the water down.
or
Press and you get the normal temperature.
NOTE:
When you select an option ( ), remember this:
•To activate and save an option, you must start a programme. The reason for this is to prevent children playing with
the pushbuttons and changing the temperature etc..
By re-programming (extra rinse etc.)
•The choice will remain till you change it.
Even by stopping the machine with the main on/off button or if the machine by other reason has been out of power,
all choices will remain, which were activated before the power failure.
•The choices will be shown for 2 seconds by the lamps and in the display. Then the machine will revert to the main
programme.
•A black filled symbol means a lit lamp.
Lines over a lamp means that it is blinking.
Re-programmings
1. Press 5 times, which gets you into the
protected start programme.
2. Press and you get protected start (3 sec)
or
Press to revert to normal operation.
Protected start programme
You can also prevent children starting the machine by playing with the
pushbuttons by programming the machine so that it will start only if the Start
push-button is pressed and held for three seconds.
The display shows:The indicating lamps show: 3
-
Do you want an extra rinse?
You can get an extra rinse in the programmes ,
and by doing like this:
1. Press 5 times within 15 seconds. Then you get into the
changing programme. The lamps show how many rinses the
machine last gave.
2. Press and you get an extra rinse.
or
Press and you get the normal number of rinses.
1
-
Do you want Cool down? (Not machines with water softener)
C
-

10
Too little water in the machine?
The water level is correct when it reaches up to the marking of the lower
spray pipe bearing, see picture.
If there is insufficient water in the machine, it may be because the supply pressure
is too low. This can be compensated for by altering the admission time.
1. Press five times within 15 seconds to get into the water level modification
programme.
2. Press to get the normal inlet time
to get 25 % increase
to get 50 % increase
to get 100 % increase
to get 150 % increase
to get 200 % increase
1
2
3
4
5
6
Display shows
If you have a longer outlet hose or if there by other reason is a too short time for the
machine to pump out the water, the pumping-out time can be changed. Do like this:
1. Press 5 times within 15 seconds. Then you get into the changing programme.
2. Press to get an outlet time of 20 seconds
Press " " 25 " Normal time
Press " " 35 "
Press " " 45 "
Press " " 85 "
How to set the pumping out time
20
25
35
45
85
The display window...
The displaywindow has four functions. It can show the temperature, the fault indication, the remaining
programme time and the re-programming.
...shows how much programme time remains
When a programme starts, the display shows the length of time it took when it was last run. As the
programme proceeds, the display counts down, showing the time remaining. Times can vary slightly
from one time to another, due tovariations in the incoming water temperature etc.
As the time proceeds, the time is counted down and the estimated time remaining is displayed . If the
time exceeds 60 minutes, the display alternates between the number of hours, followed by h, and the
number of minutes: e.g. 1h–25–1h–25, which says that 1 hour and 25 minutes remain of the
programme.

11
. . . assists fault-tracing
If the machine doesn't work properly, you can identify the reason. This allows you to describe the fault to service
personnel and saves repair time.
Start the fault-tracing programme by pressing the pushbutton 5 times within 15 seconds.
These lamps will respond by flashing:
(combi doser)
T indicating lamps show what a selected programme contains.
For Normal wash, for example, the following lamps would be lit:
The fan starts and air is blowing out by the lower left corner of the
door.
The indicating lamps . . .
The indicating lamps serve several purposes: besides showing the selected programme ,
they are also used if you need to trace a fault in the machine.
. . . display programme contents
. . . shows if anything is wrong
Indicates that the door is open when attempting to start a programme,
or is opened while a programme is running.
Indicates a fault in the heater.
Indicates high water level in the machine.
Indicates a thermistor fault (heater control).
Indicates a water inlet fault
( Just machines with water inlet sensor.)
Marked
symbol: Tests: If nothing is wrong, this happens:
Water softener inlet valve Water can be heard entering (only on machines with water softeners).
Water can be heard entering.
Detergent/Rinse aid solenoid
Water inlet valve
There will be a click, and detergent/rinse aid is coming out*.
Heater The element heats up. WARNING: Don't touch it!
Circulation pump The pump starts.
Outlet pump The pump starts.
Leave the test programme by pressing
Fan motor
Display shows

12
Wash these items with care:
Some items must not be machine-washed.
There are several reasons: some materials
cannot withstand the high temperature, while
others can be damaged by the detergent used.
China/porcelain marks
Modern china or porcelain may be marked
underneath with a code that indicates its
suitability for machine washing. This will be
in the form of VDN + a letter + three
figures. The last numeral indicates the
suitability:
5 = Withstands machine washing (75°C)
3 = Withstands hand washing (45°C)
1 = Risk of damage if washed
Delicate patterns
Porcelain or china having the pattern
above the glaze should not be
machine-washed. Check by running a
finger over the pattern: if it feels
rough, it is above the glaze.
Silver
Load glass items so that they do not knock
together while being washed. Use a low
temperature. Antique and very delicate
items should not be machine-washed.
Glass
Cutlery with bonded handles
Some types of adhesive cannot withstand
machine washing: cutlery handles are likely
to loosen.
Wooden items
Wooden items should be machine-washed
only if they are clearly stated as suitable for it.
Aluminium
Aluminium can be dulled by machine was-
hing. However, good quality aluminium
saucepans can be machine-washed,
although you must expect their shine
to be dulled.
Plastics
Certain plastics cannot withstand the high
temperature of machine washing.
To protect plastics:
–Select a programme at the lower
temperature, 55°C.
–Place the plastic items
in the upper basket.
*NOTE: After refilling, it may take
some time before the indicating
lamp goes out.
Silver and stainless steel items should not be
allowed to touch each other, as this can stain
the silver.
Topping up with rinse aid
Drying will be faster if you use a rinse aid.
The rinse aid indicating lamp on the panel
flashes if the machine is out of rinse aid.*
An indicator in the cap of the rinse aid
container shows whether it is empty. If the
indicator appears completely black, there is
sufficient rinse aid. If the size of the black
spot is reduced, the container requires
filling.
The first filling of rinse aid (Finish) is
included in the machine when it is delivered
from the factory.
Adjusting rinse aid metering
Rinse aid is metered automatically: the setting is adjusted before
the machine leaves the factory.
It may be necessary to alter the setting, to adjust the amount of
rinse aid metered, depending on the hardness of the water supply.
This can be done by opening the lid. Then you can see the
setting. This is normally set at 1. If the water in your area contains
lime (over 10–12 °dH), an acid rinse aid (containing citric acid)
should be used if the machine is not fitted with its own water
softener. The metering setting should be adjusted to 1–6,
depending on the hardness of the water.
Excessive use of the rinse aid can result in foam formation,
particularly when the machine is connected to a cold water supply.
If the water in your area is very soft, you can dilute the
concentrated rinse aid with an equal quantity of water.
Level indicator
Lid

13
Dishwashers with water softeners:
Salt
container
cover
The salt container in machines fitted with water softeners
must be prefilled with water then salt before the machine is
used for the first time. Use coarse salt or salt specially
intended for use in dishwasher water softeners.
The indicating lamp on the panel flashes if the machine is
out of salt. NOTE! After refilling with salt, it may take a
while before the indicating lamp goes out.
If the indication does not function, the float under the cover
may have got stuck in the salt residues. Push it upwards
and downwards to loosen it.
Unscrew the cover of the salt container, as shown in the
picture. Insert the funnel, supplied with the dishwasher, into
the top of the salt container and fill with salt. Wipe off any
spilled salt, so that the cover will seal properly, and replace
the cover.
Any salt spilled in the machine must be rinsed away
immediately. This can best be done by running a complete
programme. For this reason, it is recommended that salt be
filled into the machine just before using it to wash up.
Topping up with salt
Adjusting the salt dispenser
If the water in your area is very hard, it may be necessary to alter
the amount of salt required.
1. Press 5 times within 15 seconds. Then you get into
the changing programme. The last programmed water hardness
setting is showed by the lamps.
2. Press for a water hardness of 0–9°dH
" " " " 10–14 "
" " " " 15–19 "
" " " " 20–24 "
" " " " 25–34 "
" " " " 35–49 "
" " " " 50–70 "
The change will remain till a new change is made.
If no change is made within 2 seconds, the machine will revert to the main
programme.
The indicating
lamps show:
The display shows:
1
2
3
4
5
6
7

14
Filter
You can reach the outlet pump from the
inside of the machine. First remove the
coarse strainer and the fine strainer.
Then you can remove a small cover in
the bottom of the hole.
There you can rach the pump wing and
remove eventual dirt.
replace the cover and the strainers.
Outlet pump
Care of the machine
The interior of the machine is manu-
factured from stainless steel, which is
kept clean through normal use. It may,
however, be necessary to clean the
strainers and spray arms at intervals.
Spray arm jets and bearings
Pieces of dirt can block the spray arm jets
or interfere with smooth running of the
spray arm bearings. Undo the nut and lift
off the washer on top of the spray arm so
that the arm can be lifted off. Use a brush
or suitable pointed object to get rid of any
dirt.
Food residues caught by the
fine strainer are flushed away
automatically each time the
machine is used.
Unscrew the fine strainer
sometimes and clean it with a
brush.
When replacing the strainer,
make sure that its edges seal
properly against the bottom of
the machine.
If the filter is dirty, it can be removed
and rinsed clean. It can be removed by
unscrewing the fine strainer and then
simply pulling it straight upwards.
Make sure that it clicks into position
properly when you put it back.
The coarse strainer catches
larger particles of food that
would otherwise clog the outlet
pump. Squeeze the lugs gently
toward each other, lift out the
strainer and clean it when
necessary. Replace it in the
reverse manner.
In the bottom the coarse strainer
has openings, which let peas
and macaronis out. Toothpicks,
however, will stay in the
strainer.
Coarse strainer
Fine filter

15
If the machine does not work
If the machine does not work, check to see whether there is some simple fault that you can rectify your-
self. Follow the instructions below. Aslo check page 11, Fault-tracing programme.
Problem Response
1. You have forgotten to press the main switch.
2. The door is not properly closed.
3. A fuse has blown.
4. The power supply plug is not inserted in its socket.
The machine will not start
Water remains in the machine
If the machine should overfill
with water, the outlet pump
will start automatically. If,
however, the water does not
pump out, the fault may be
due to one of these reasons:
1. Outlet hose kinked Check that the hose is not kinked or sharply bent.
2. The strainers are blocked. Clean the coarse and fine strainer and the filter.
3.Outlet hose blocked. Check that nothing has blocked the hole where the outlet hose is
connected to the sink drain trap. Particles of food can collect as shown in the drawing.
Check, too, that the conical connecting pipe is cut so that the internal diameter is as
large as possible, but at least 18 mm.
Poor dishwashing
performance Check the following points:
1.That the spray arms are not being prevented from turning by items sticking
down from the upper basket and that the holes in the spray arms are not
blocket by dirt.
2.That the spray arms can rotate freely, and are not being slowed by grit in the
bearings. Spin the arms by hand: if they do not spin freely, lift them off and
clean the bearings and mounts.
3.That the machine is admitting sufficient water. Check the inlet hose for kinks
or sharp bends. Check that the water pressure is sufficient: 0.03–1 MPa (4–
145 PSI).
4.That the correct quantity of detergent has been used: see page 5. Do not use
old or caked detergent. Keep the detergent dry and cool in a closed pack.
Remember that it should be bought and used fresh.
5.That the strainer is properly positioned and is clean (see page 10).
6. That you have chosen a enough strong programme.
Grey film on washed items A tendency for a grey film to develop on washed items may be due to lime from hard
water. The problem can often be alleviated by using an acidic rinse aid, i.e. one
containing citric acid (low pH value, as shown on the rinse aid label). If the dishwasher
incorporates a water softener, the grey film may indicate that there is no salt left in the
softener. Refill it with salt.

16
Safety
Service and guarantee
To disengage the child safety catch
Slide the catch to the left and turn the
trace horizontal with a screwdriver. To
open the door, hold the catch with your
left hand and pull the main catch with
your right hand in the usual way.
To engage the child safety catch
Slide the catch to the left and turn the
trace vertical with a screwdriver.
Engaged Disengaged
The machine incorporates a child safety catch, preventing small children from opening the
door and being scalded by hot water or steam. The catch also prevents children from getting
at the corrosive detergent.
Door switch The machine has a door switch which turns off the
power and stops the machine if the door should be
opened while the machine is in use. The programme
will continue when the door is closed.
Note: If the door is open for more than 2 minutes during drying, the programme will be
terminated. The machine also has a child safety catch to prevent the door being opened.
Overfill protectiom The machine incorporates an overfill protection device, which automatically starts the outlet
pump and closes the inlet valve if the water level in the machine should rise to a higher
level than normal. If the machine has overfilled, all lamps will be lit.
This protection operates only if the machine is switched on. It is therefore backed up by a
further, mechanical protective device in the bottom of the machine. The bottom of the
machine is made in the form of a tray, in which water from any leak will collect, lifting a float
which electrically turns off the inlet valve and the circulation pump. It also starts the outlet
pump.If this safety device has operated, turn off the water at the main supply tap and send
for service.
Anti-tip guard If the machine is installed completely free-standing, it must be fitted with an anti-tip guard.
In order to prevent children playing with the pushbuttons from starting the machine, you can
program it so that the start pushbutton must be pressed and held for 3 seconds for the
machine to start. See page 9.
Child safety catch
Protected start
procedure
Service
Before calling for service, check to see whether the
fault is due to something that you can put right your-
self. See the checklist. Where to find service –see
information enclosed.
Guarantee
For guarantee details, see the guarantee card.

17
32
1
Choose the right programme
Do as follows
We reserve the right to make changes.
. . . and that the water
is turned on.
Load the baskets
and fill with deter-
gent.
Check that the
spray arms can
rotate freely . . .
Close the door
and select the pro-
gramme. Start the
machine.
Art nr 80 715 49
It is not permitted to make any
changes to the specifications of the
machine without the written
permission of the manufacturer.
70o
55o
55o
65o
55o
65o
55o
Intensive wash
Light wash
Quick/Delicate wash
Economy
Programmes
Strong wash
Economy
55o
Option
Rinse programme
Program Rec.
temp.
65o
55o
Plate heating
Rinse & Hold
Normal wash
Unheated drying
This manual suits for next models
1
Table of contents
Other Asko Dishwasher manuals

Asko
Asko D5554 Instruction Manual

Asko
Asko DFI644G User manual

Asko
Asko DBI3448ID W Series User manual

Asko
Asko D3122 User manual

Asko
Asko DFI666GXXL User manual

Asko
Asko D3530 User manual

Asko
Asko DFI444BXXL/1 User manual

Asko
Asko D1756 User manual

Asko
Asko DBI786IXXLSSOF.U User manual

Asko
Asko D3251 Owner's manual