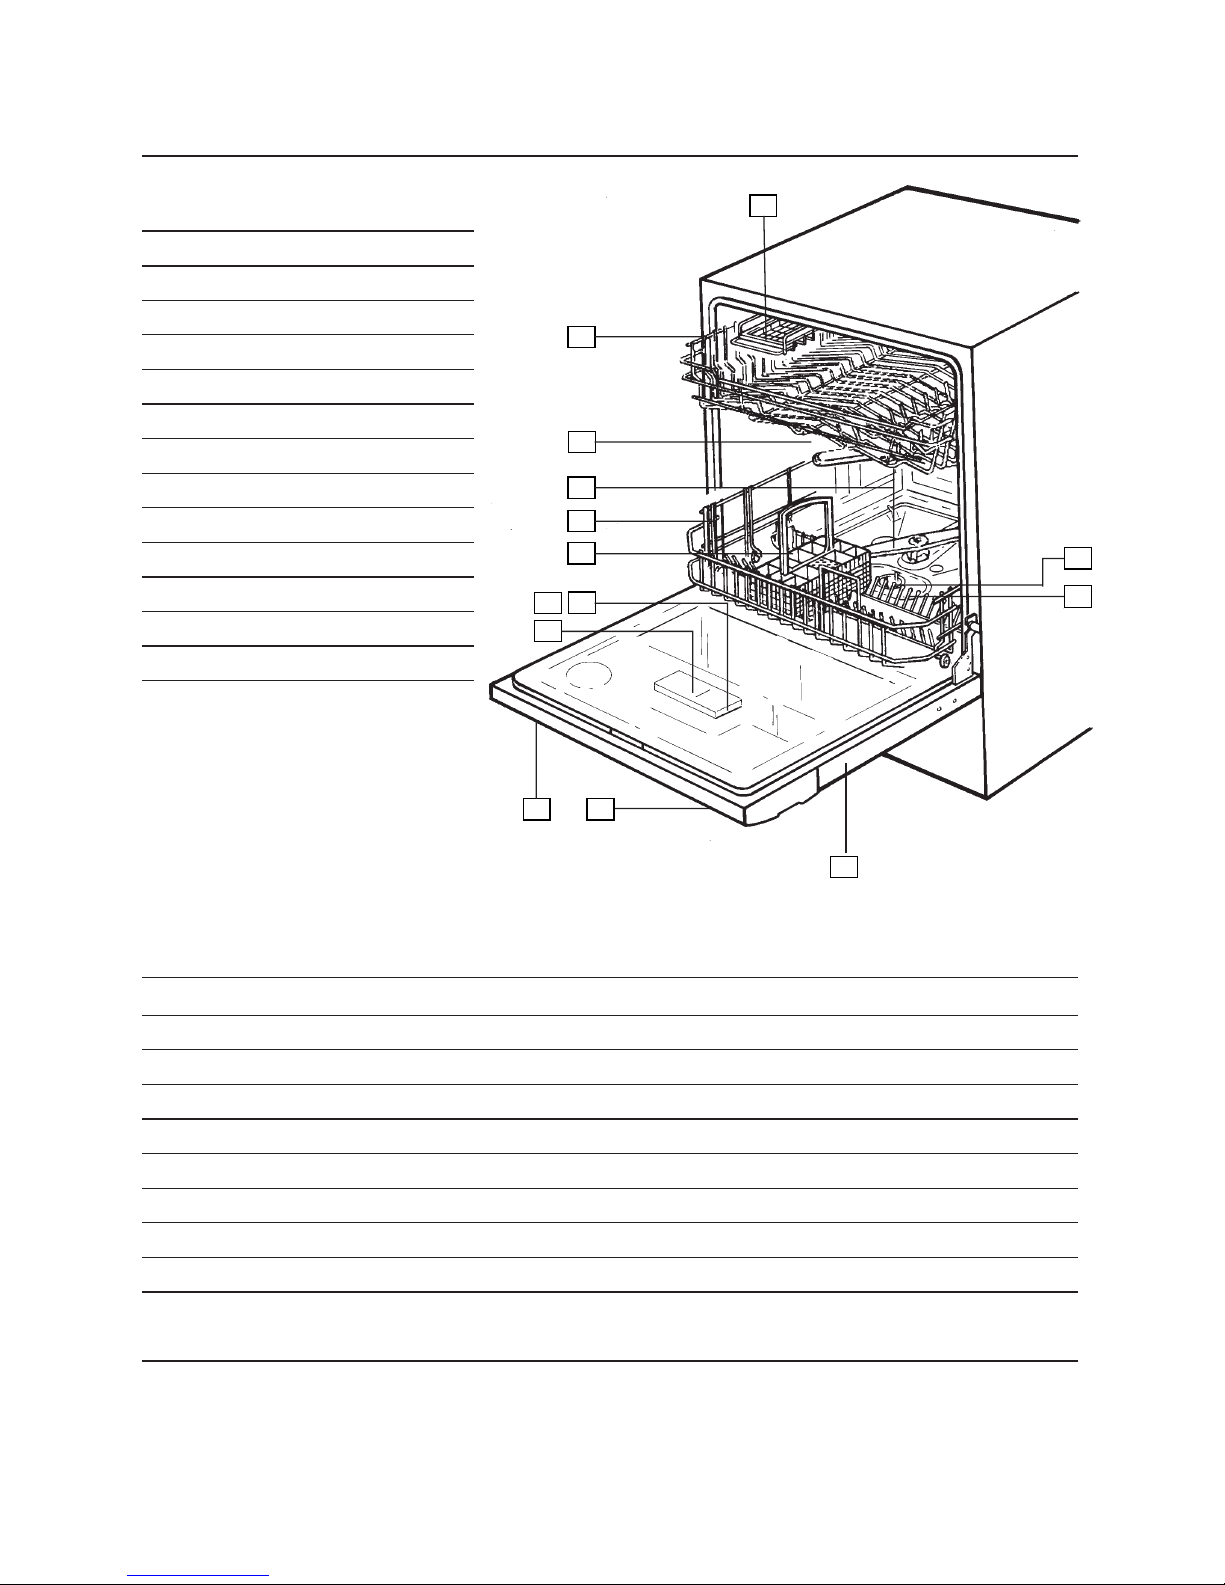
Asko D1976 User manual

ASKO Dishwasher
D1976
DEAR ASKO CUSTOMER
Welcome to the family of ASKO customers. We hope that you will get many years of good use of your
new dishwasher. The dishwasher is very sophisticated. In order to get best possible use of your
machine and all its functions we recommend you to read this Use and Care Guide before you use the
dishwasher.

2
SERVICE & GUARANTEE
SERVICE
Before calling for service, check to see whether
the faults is due to something that you can put
right yourself. See Trouble shooting
pages 28-30.
GUARANTEE
Depends on model and market.

3
CONTENTS
READ FIRST
Safety 4
Children’s safety 5
The parts of the dishwasher 6
Technical data 6
Baskets 7
Control panel, symbols 8
Dispenser 8
HOW TO USE THE DISHWASHER
Before you start 9
Basic instructions 9-12
Standard programmes 14-15
Programme options 16
Eco wash 17
Delicate and sensitive washing up 18
INDEX
CARE
Cleaning 20-21
Rinse Aid 22
Salt 23
SETTINGS
Settings 24-26
FAULTS
Fault indications 27
Trouble shooting - Dishwashingresults 28-29
Trouble shooting - Dishwasher 30
MISCELLANEOUS
Performance information 31
Quick guide 32
INSTALLATION
See instructions for installation
Children’s safety 5
Crystal glass, see Delicate wash
Degree of hardness, see water hardness
Delicate wash 18
Detergent 8, 10
Dispenser 8
Display 13
Disposal 4
Energy consumption 14-15
Energy saving 14-17
Environment 4, 14-17
Lime deposits 20
Options 16
Plastic items, see Delicate wash
Poor results 20-23, 28-29
Programmes 14-15
Quick guide 32
Rinse aid 22
Safety 4-5
Salt 23
SCS (Super Cleaning System) 9
Service
Settings 24-26
Silver, see Delicate wash
Times 14-15
Water consumption 14-15
Water setting, see Installation
Water softener 23, 26
Water hardness 9, 23, 26
Wetting agent, see Rinse aid
Winter storage 4

4
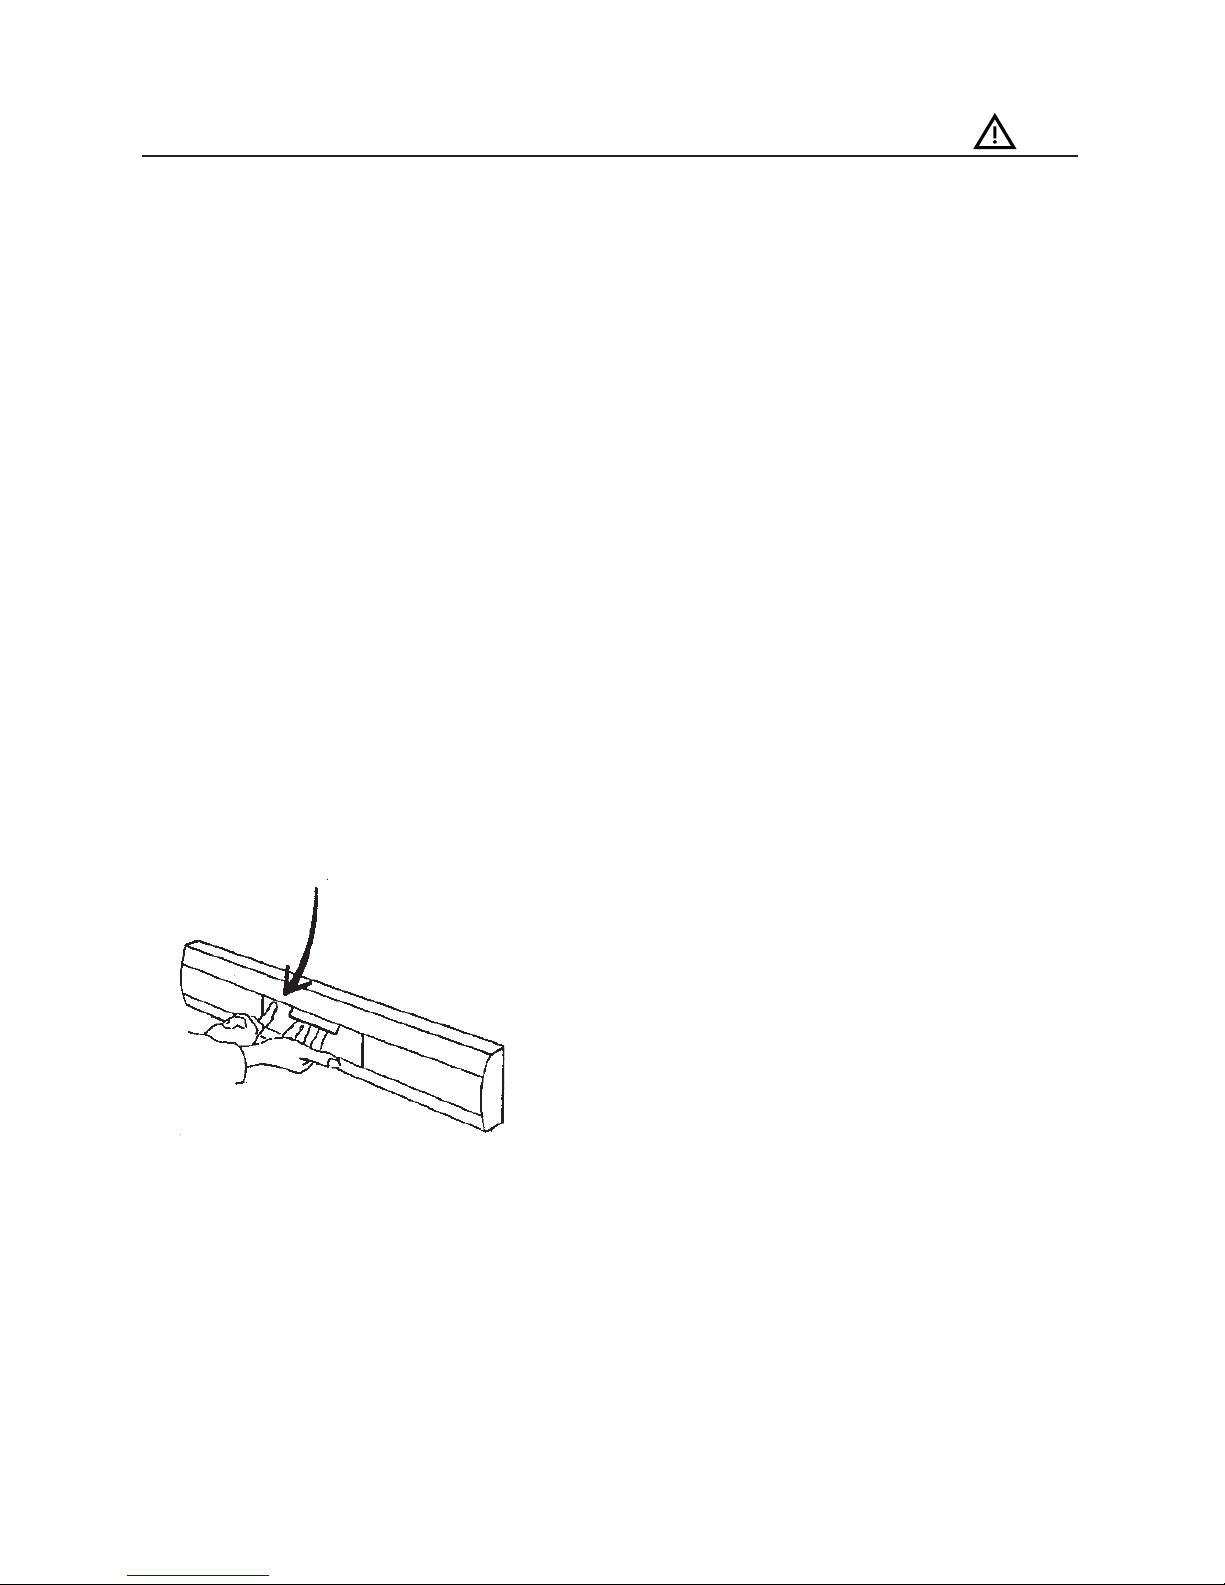
PULL-LATCH (FULLY INTEGRATED MACHINES ONLY)
The machine will stop if the door is opened
during operation. However, since the machine
is fitted with a pull-latch, splashing may occur
if the door is opened too quickly. Therefore,
unlatch the door carefully and wait until the
spray arms have stopped rotating before ope-
ning fully.
OVERFILL PROTECTION
The overfill protection starts the drain pump
and switches off the water inlet if water rises
above the normal level. If the overfill protec-
tion becomes activated, turn off the water supply
and call for service.
CLEANING
Use only a damp cloth to clean the edge around
the door. Do not use a spray. Water can enter
the lock and come into contact with the elec-
tric components.
WRAPPINGS
Sort the wrapping material according to recom-
mendations by the local authorities.
DISPOSAL
When the machine is no longer useful and is to
be scrapped it should be made unusable. Dis-
connect and cut off the electric cable close to
the machine.
Get in touch with the refuse collection service
or your local authorities for advice on how to
scrap the machine in a proper manner.
The machine is made and marked for recycling.
GENERAL
• Study and save the operating instructions for
future reference.
• Services to the dishwasher, ie, water supply,
drain, electric power, should be connected by
an authorized person.
• Do not use the dishwasher for other purposes
than those stated in the operating instructions.
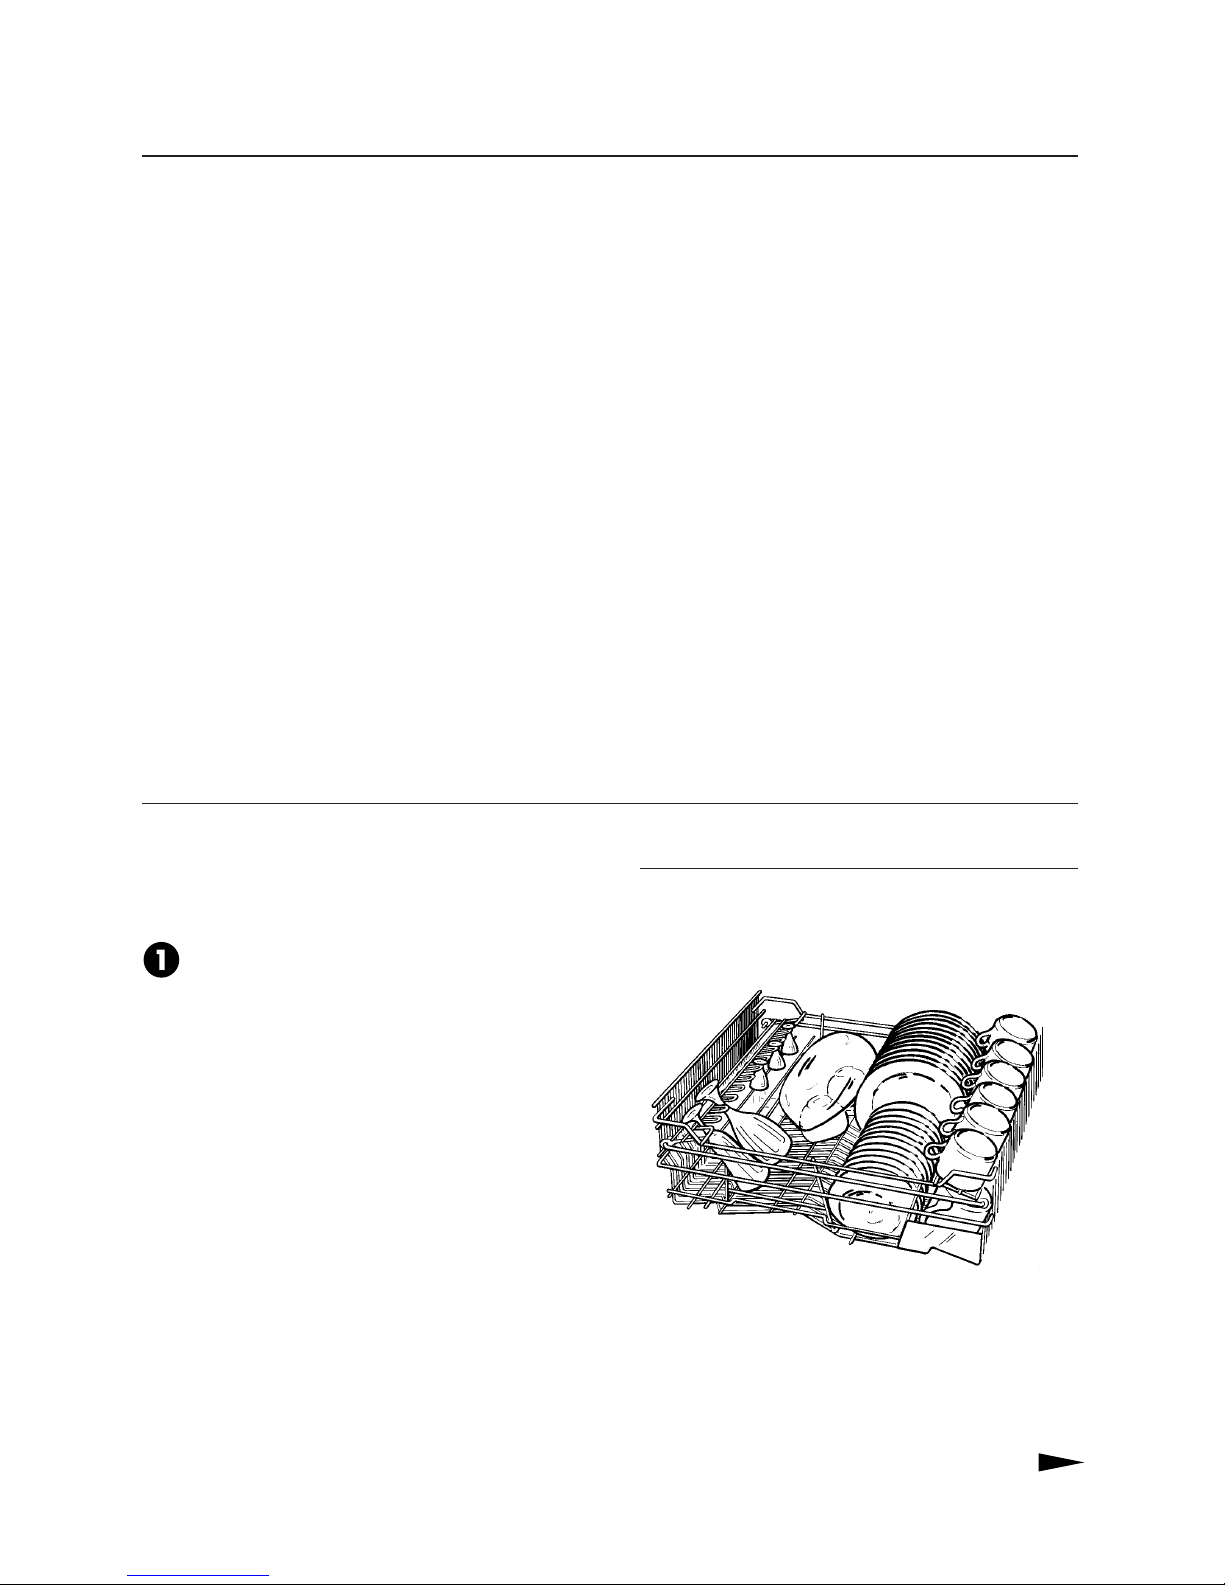
• Do not subject the dishwasher door or the
baskets to any other load in addition to the
dishware.
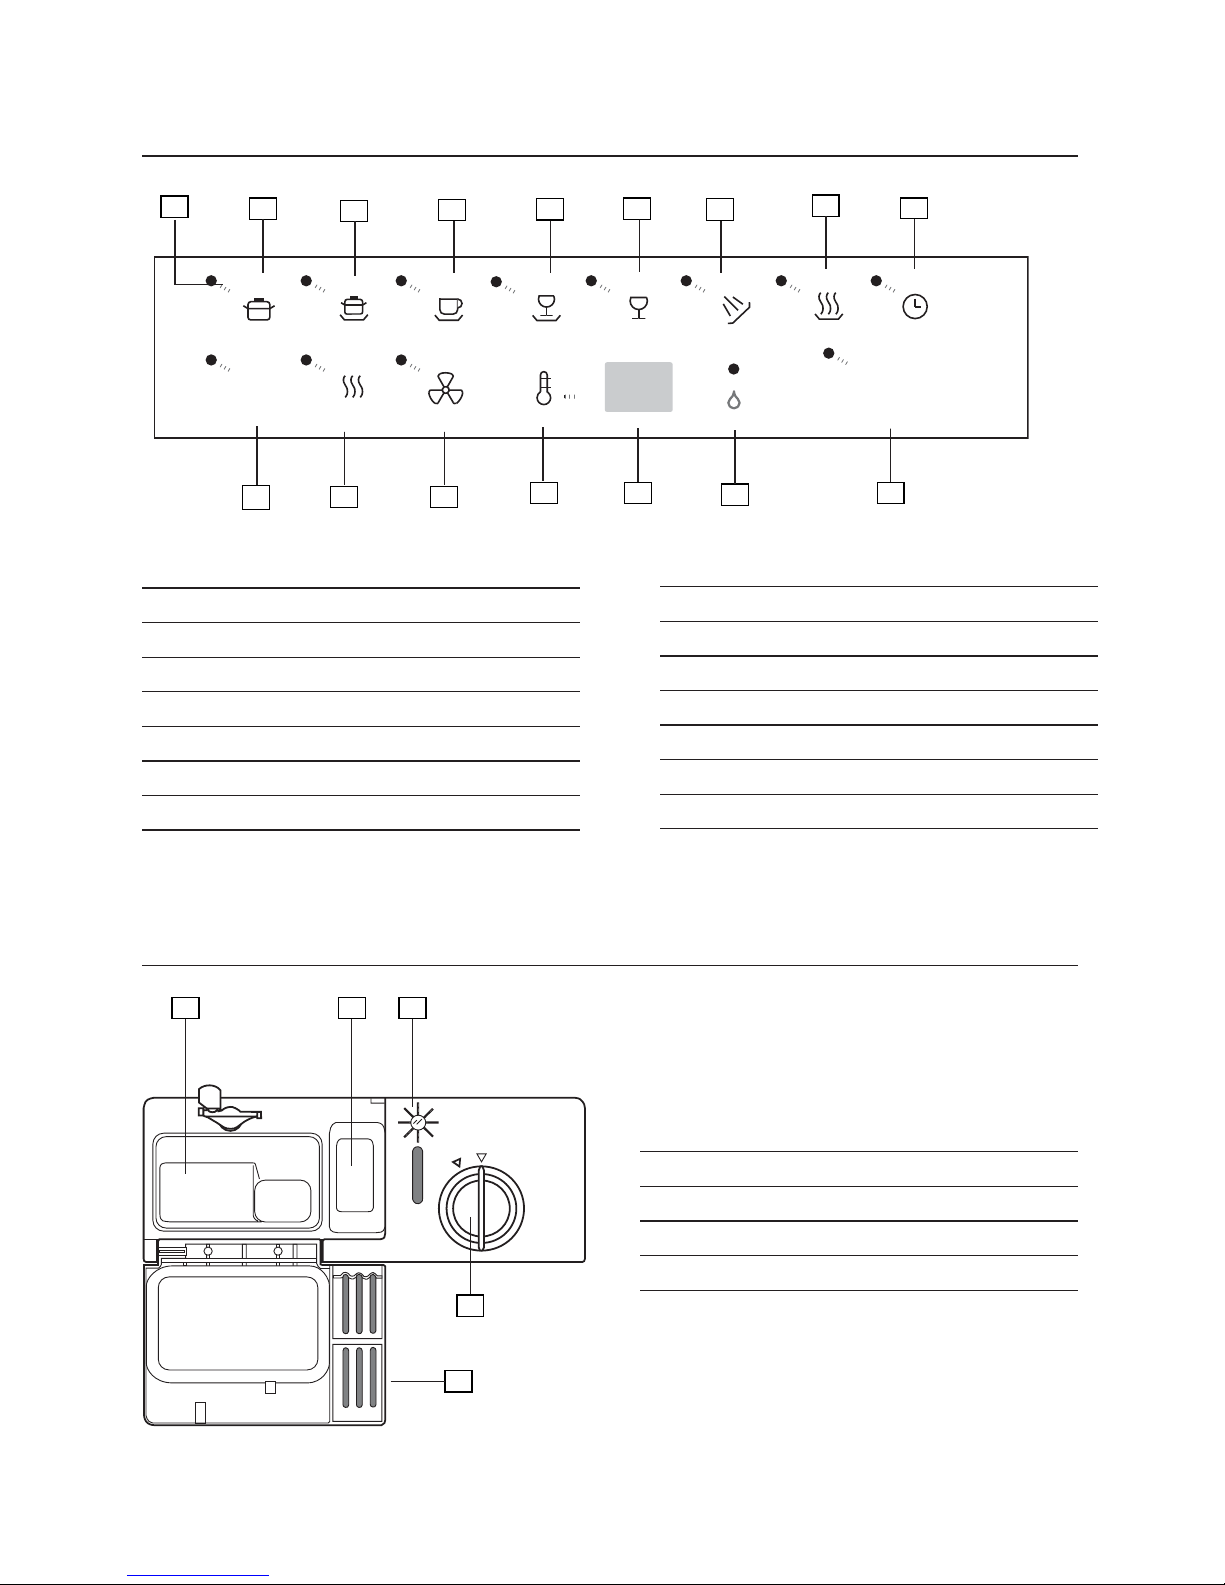
• Use only dishwasher detergent.
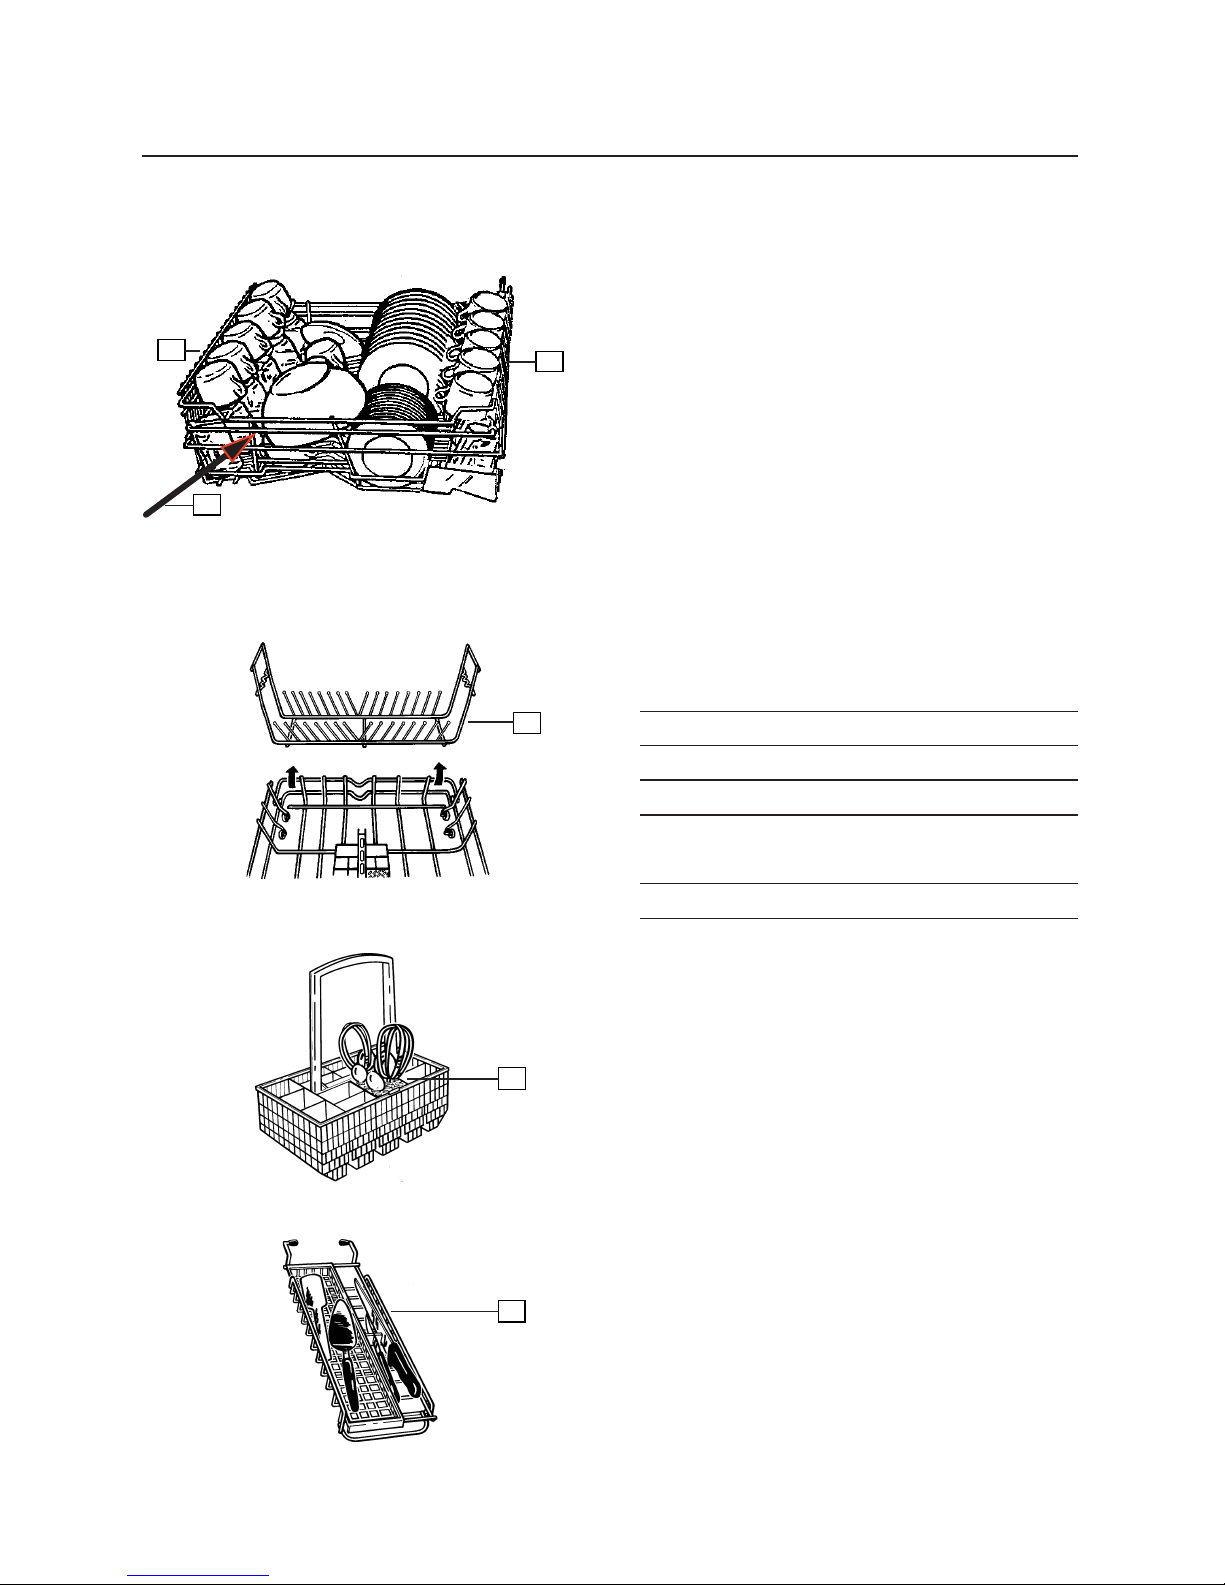
• Place cutlery and other sharp objects so that
they cannot cause injury, or damage to the app-
liance.
• Do not touch the heating element at the bot-
tom of the dishwasher - it is very hot during and
for a period following the dishwashing process.
Never place items containing remains of sol-
vents in the machine, ie, danger of explosion.
Dishware containing ashes, wax or lubricating
grease may not be washed in the machine.
Place objects made of wood or plastic in the
upper basket, ie, so that they do not fall down
onto the heating element at the bottom of the
machine (fire hazard).
INSTALLATION
See the enclosed instructions for installation.
TRANSPORT/WINTER STORAGE
Transport the machine in an upright position or
lying on its back. Drain off all water from the
drain pump and the inlet valve if the machine is
to be transported, or stored in unheated premi-
ses, in the winter - call your local dealer.
SAFETY

5
CHILD-SAFE STOPPING AND STARTING
To stop a dishwashing programme, the stop
button must be pressed for three seconds. This
delay is integrated.
To prevent the machine from being started
by mistake by a child, it is possible to program-
me a similar delay in the starting mode, see Set-
tings.
MACHINE WITH CHILD-SAFETY LOCK?
To activate the child-safety lock, if fitted, lift
and turn the screw slot with a screwdriver to a
horizontal position. The screw slot is located
to the left of the handle. Reset by turning the
slot to its vertical position.
To open the door, hold the catch with your
left hand and pull the main catch with your right
hand in the usual way.
CHILD-SAFE DISHWASHING
Use the knife basket, or the knife rack, for all
long or sharp items. If this feature is not fitted,
put such objects in the cutlery basket with the
sharp edge downwards.
Always close the door and start the program-
me as soon as you have filled with detergent.
Keep small children away from the machine
when it is open. There may be remains of deter-
gent left inside the machine.
Do not allow children to use or play with
the machine. Take particular care when the door
is open.
PROTECT CHILDREN - MACHINE DETERGENT IS
CORROSIVE
Keep detergent and rinse aid out of the reach of
children. If anyone swallows dishwasher deter-
gent, give plenty to drink immediately, ie, one
or two glasses of milk or water. Do not try to
induce vomiting. Seek medical advice without
delay. If dishwasher detergent gets in the eyes,
rinse with plenty of water for at least 15 minutes.
CHILDREN’S SAFETY

6
1. KNIFE BASKET
2. UPPER BASKET
3. LAMP
4. SPRAY ARMS
5. LOWER BASKET
6. CUTLERY BASKET
7. RINSE AID FILLING
8. RINSE AID DISPENSER
9. DETERGENT COMPARTMENT
10. MAIN POWER SWITCH
11. PROGRAMME PANEL
12. COARSE FILTER
13. FINE FILTER
14. TYPE PLATE
* Deviations may occur depending
on the model and the market con-
cerned.
THE PARTS OF THE DISHWASHER*
TECHNICAL DATA
9
10
78
3
4
5
6
1
2
13
12
11
14
HEIGHT 820–890 MM
WIDTH 596 MM
DEPTH 550 MM****
WEIGHT 48 KG/51 KG WITH SOFTENER*
CAPACITY** 14 COVERS
WATER PRESSURE 0.03–1.0 MPA (0.3–10 KP/CM2)
MAX. TEMPERATURE INLET-WATER 80° C
POWER SUPPLY SINGLE PHASE, 230 V, 50HZ 10/16A***
MAX. CONNECTING POWER 2 000 W***
ACCESSORIES WORKTOP, SIDE PLATES,
ANTI-TIP DEVICE, TRIMMING FRAMES
**According to standard, AS/NZS 2007.1
***See type plate.

7
DISHWARE BASKETS*
Upper basket
Lower basket
4
Cutlery basket
5
Knife rack
6
2
1
3
1. ADJUSTABLE AND FOLDING RACKS
2. ADJUSTABLE AND DIVIDED CUP SHELF
3. FOLDABLE GLASS THREAD
4. LOWER BASKET
5. CUTLERY BASKET WITH ADJUSTABLE AND
FOLDING COVER
6. KNIFE RACK
* Deviations may occur depending on the mo-
del and the market concerned.

8
Start
Stop
E
E
Intensive
Economy Heating Fan Temp.
Strong Normal Light Quick Rinse & hold Plate warm Delayed start
CONTROL PANEL
1. INDICATION LAMPS
2. INTENSIVE WASH
3. STRONG WASH
4. NORMAL WASH
5. LIGHT WASH
6. QUICK WASH
7. RINSING
8. PLATE HEATING
DISPENSER
1. COMPARTMENT FOR MAIN-WASH
DETERGENT
2. COMPARTMENT FOR PRE-WASH DETERGENT
3. RINSE-AID INDICATOR
4. RINSE-AID LID
5. DETERGENT COMPARTMENT LID
1 3
4
5
2
9. DELAYED START
10. ECO/BIO-FUNCTION
11. DRYING HEAT
12. FAN
13. TEMPERATURE CHOICE
14. DISPLAY
15. RINSE-AID INDICATION
16. START/STOP
123456789
10 11 12 13 14 15 16

9
BASIC INSTRUCTIONS
BEFORE USING THE DISHWASHER FOR THE FIRST TIME
READ THE OPERATING INSTRUCTIONS
Read through the operating instructions before
attempting to use the dishwasher, particularly
the sections: Safety, Children’s safety, and Basic
instructions.
BE CAUTIOUS WITH CERTAIN MATERIALS
Read the Delicate wash section before washing
any porcelain or china that has “on-glaze“ dec-
oration, or crystal glassware, or items made of
wood or plastic material.
CHECK THE DOOR SETTING
Ensure that the door of the machine is properly
balanced, ie, open it a little and release it. Does
it stop exactly where you released it? If not,
check the installation instructions or consult
the person responsible for the installation.
CHECK HARDNESS OF THE WATER
Call your local water company to find out what
degree of water hardness applies. This has signi-
ficance in relation to the amount of detergent
and rinse aid that should be dispensed.
IF YOUR MACHINE IS EQUIPPED WITH A WATER
SOFTENER
Set the softener when you know what degree of
water hardness applies, see Softener. Fill with
salt before starting the machine, see Salt.
N.B.
Position the soiled surfaces facing downwards
or inwards.
Place larger plates, dishes, pots, saucepans
and cutlery (in the cutlery basket) in the lower
The following step-by-step instructions will help
you to achieve the best possible results.
FILL THE BASKETS PROPERLY
Your dishwasher features the ASKO Super Cle-
aning System™.
After the pre-wash, the main wash is started
with clean water and a clean machine and the-
refore it is not necessary to rinse dishware befo-
re washing up.
However, remove large particles of food and
waste. This is convenient and environment
friendly.
Place glasses, cups, saucers and small plates
in the upper basket, with long-stemmed glasses
leaning against the recessed rack, and knives in
the knife rack if fitted.

10
basket. The detachable plate rack that is supp-
lied with some models can easily be lifted out to
provide space for big plates, saucepans and pots,
or be fitted in one of the three different posi-
tions.
Place cutlery with the handles downwards
and spread out as much as possible. Make cer-
tain that spoons do not “nest“ with each other.
Avoid placing cutlery made of different ma-
terials in the same compartment, eg, silver and
stainless because of the risk of discolouration.
The cutlery basket has a folding cover in the
middle, which can be used to protect small items
or in which to insert slender handles, eg, electric
whisks.
Put long cutlery and knives in the special
knife basket, if fitted, or in the upper basket.
Ensure that the spray arms can rotate freely.
See Delicate wash, if you wish to wash sensitive
items.
DOSING THE DETERGENT
The amount of detergent used should be in re-
lation to hardness of the water.
Follow the instructions on the detergent
packet. If your dishwasher is equipped with a
softener, use the dose recommended for soft
water.
Pour detergent into the detergent compart-
ment. There is one space for pre-wash and one
for main wash, see Dispenser. Call the maker of
the detergent if you have any questions concer-
ning the detergent.
WARNING!
Dishwasher detergent is corrosive - Take care
to keep it out of reach of children.
CAUTION!
Use dishwasher detergent only.
Detergents intended for washing up by hand
are unsuitable and should not be used because
the lather would obstruct the working of the
machine.
CLOSE THE DOOR AND
TURN ON THE MAINPOWER

11
SELECT A PROGRAMME
The easiest way is to choose a standard
dishwashing programme. Just press one of the
programme symbols, and the machine does the
rest. Or you can select the washing temperatu-
re, number of rinses, heated drying, etc, your-
self. See Options.
If you used one of the standard programmes
for the previous wash, ie, Intensive-/Strong or
Normal wash, the machine will remember it and
all you have to do is press the Start push button
to get the same programme.
Intensive wash
Use the Intensive wash programme for very
dirty ware, such as pots, pans, casseroles and
gratin forms mixed with normal household
wash-up.
Strong wash
Use the Strong wash programme for dirty ware,
such as pots and pans, and gratin forms. The
dishwasher can suitably be loaded with other
Normal wash
Use this programme for normal washing. It is
devised for normally soiled glasses, cups and
saucers, plates, dishes, etc.
Light wash
If the wash is not particularly heavily soiled. It
is provided for china, which are very slightly
dirty.
Quick wash
Use this programme if items are very slightly
soiled. It is intended for glasses and china that
have just been used and therefore do not requi-
re a more powerful programme.
Delicate ware
can be washed using the Quick-wash program-
me. Eliminate heated drying if you want to be
extra careful. See also, Delicate wash.
items if not completely filled.

12
Rinse and hold
For rinsing, with the intention of waiting until
the machine is full before washing.
Plate warm
Use this programme to heat plates.
PRESS THE START BUTTON AND THE MAIN
POWER SWITCH
The machine will start, and automatically car-
ry out the entire washing programme. The mach-
ine will not start if the door is not fully closed.
WANT TO CHANGE YOUR MIND?
If you want to change the programme after you
have started the machine, press Stop for three
seconds. Then select a new programme by pres-
sing the appropriate symbol and then the Start
button.
Integrated machine, first open the door and do
as above. Close the door again.
Want to put more things in the dishwasher?
Open the door, and the machine will stop auto-
matically. Put the dishes in the machine, close
the door and the machine will continue where
it left off.
If you stop the machine with the main power
switch
(or if there is a power failure) before the pro-
gramme is finished, the programme will conti-
nue from where it was interrupted when power
is restored.
N.B.
If the power is turned off, or if the door is open
for more than two minutes, during the drying
phase, the programme will be reset.
AFTER WASHING
When the machine has stopped, it consumes
extremely little power. When the programme
has stopped the indication-lamps are lightning,
this shows that the programme is ready. To
switch it off completely, turn off the main po-
wer switch. Turn off the water tap if the mach-
ine is to be left unattended for a long period, eg,
during holidays.

13
THE DISPLAY WINDOW
The display window has four functions. It can show the temperature, the fault indication, the
remaining programme time and the re-programming
SHOWS HOW MUCH PROGRAMME TIME REMAINS.
When a programme starts, the display shows the length of time it took when it was last run. As the
programme proceeds, the display counts down, showing the time remaining. Times can vary slightly
from one time to another, due to variations in the incoming water temperature etc.
NB! The programme time is not stored in the memory if you open the door, or if the machine has a
fault indication during the programme.
As the time proceeds, the time is counted down and the estimated time remaining is displayed . If the time
exceeds 60 minutes, the display alternates between the number of hours, followed by h, and the number of
minutes: e.g. 1h–25–1h–25, which says that 1 hour and 25 minutes remain of the programme.
NOTE!
If the machine is connected to a coldwater suply, the time display for remaining time will be incorrect the
first time that each programme is run. The timo on the display stops on 1 minute until the programme is
done. Do not open the door until the machine has stopped.
On subsequent runs of the respective programmes, the machine will calculate the time on the basis of how
long the programme took on the previous run. The figures are approximated.

14
STANDARD PROGRAMMES
PRESS
Programme
Options
HOW THE MACHINE WORKS
Temperature
Pre-wash with SCS* (number)
Main wash (number)
Rinsing (number)
Drying heat
Fan
CONSUMPTION FIGURES
Washing time (appr. min)**
Energy (appr. kWh)
Washing time (appr. min)**
Energy (appr. kWh)
Water (litre)***
70° 65° 65° 55° 55°
22222
11111
43222
Yes Yes Yes Yes N o
Yes Yes Yes Yes Yes
95 85 75 70 70
1.0 1.0 0.8 0.5 0.3
125 115 100 100 100
2.0 1.8 1.6 1,3 1.1
25.0 21.0 17.5 17.5 17.5
INTENSIVE WASH
STRONG WASH
NORMAL WASH 65°C
NORMAL WASH 55°
NORMAL WASH (without drying
heat)
* SCS = Super Cleaning System™.
** Washing time can vary depending on temperature of the water, variations in power, etc.
*** Water consumption is about two litres more for machine fitted with softener filter.
Connection to hot water ca. 60°C.
Connection to cold water ca. 15°C.
PROGRAMME
1
2
2
1

15
E
55° 55° 45°
12 1
11 1
22 2
No No No
Yes Yes N o
70 85 29 4 8
0.4 0.2 0.2 0.01 0.2
90 110 41 4 8
1.0 1.0 0,6 0.01 0.2
14.0 17.5 14.0 3.5 _
LIGHT WASH
ECONOMY WASH 55°
RINSING
PLATE WARM
* SCS = Super Cleaning System™.
** Washing time can vary depending on temperature of the water, variations in power, etc.
*** Water consumption is about two litres more for machine fitted with softener filter.
Connection to hot water ca. 60°C.
Connection to cold water ca. 15°C.
PROGRAMME
1
2
QUICK WASH 45°
2
1
PRESS
Programme
Options
HOW THE MACHINE WORKS
Temperature
Pre-wash with SCS* (number)
Main wash (number)
Rinsing (number)
Drying heat
Fan
CONSUMPTION FIGURES
Washing time (appr. min)**
Energy (appr. kWh)
Washing time (appr. min)**
Energy (appr. kWh)
Water (litre)***
STANDARD PROGRAMMES

16
OPTIONS
DELAYED START
If you want the machine to start after a delay
(e.g. in a cheap-rate electricity period), press
this pushbutton the same number of times as
you want hours´ delay (1–12 hours). Then press
the Start pushbutton. The number of hours´
delay you have set, is displayed in the window.
Pressing the the pushbutton a thirteenth time
will reset the number of hours to zero.
E
ECO/BIO FUNCTION
The Eco/Bio function reduces temperature of
the main wash to 50°C and extends duration of
the washing phase by 15 minutes. This saves
energy. Use the Eco/Bio function to give the
right temperature when using detergents con-
taining enzymes.
DRYING HEAT
The drying heat button lights if drying heat is
selected. Press again if you want a programme
without drying heat, and the lamp will go out.
The fan dries the dishware even if heat is not
switched on. Not in Quick wash.
FAN
Press this button if you want the fan to cool
down the dishes during thirty minutes after the
drying sequence.
TEMPERATURE OPTION
The Temperature option allows you to choose
a washing temperature, as follows:
INTENSIVE, STRONG WASH
AND NORMALWASH: 75/70/65/ 55°C
LIGHT AND QUICK WASH: 65/55/45°C
The lamp lights if you choose the higher tempe-
rature. Your choice remains in the programme
until it is altered. N.B. 45°C is not saved.

17
ECO WASH
CHOOSE ECONOMY WASH
Press the E-button to reduce temperature of
the main wash to 50°C. Duration of the main
washing phase will be extended by 15 minutes
to compensate the lower temperature. Deter-
gents that contain enzymes are more efficient
at lower temperature and in longer washing pro-
grammes.
WASH ONLY WHEN FULL
Save energy by not running the machine until it
is completely full.
WASH AT LOWER TEMPERATURE
If dishware is only lightly soiled you can suita-
bly reduce the temperature for Intensive-/
Strong and Normal wash to 55°C, and Light-/
Quick wash to 45°C.
CONNECT TO COLD WATER SUPPLY
If the machine is connected to a cold water
supply, running time will be longer because hea-
ting of the water will take longer. The longer
washing phase allows you to run a programme
at a lower washing temperature and still get the
same results.
However, if you are connected to a district
heating supply it will probably be more econo-
mical to connect the dishwasher to the hot wa-
ter supply.
SELECT A PROGRAMME WITHOUT DRYING HEAT
If you choose an Intensive-/Strong -/Normal or
Light wash programme without drying heat, the
machine will dry using the fan only. When wash-
ing is completed, leave the door ajar to speed up
the drying process by allowing moist air to escape.
AVOID RINSING BEFORE WASHING
Thanks to the Super Cleaning System™, you
do not need to rinse your dishes under running
water before putting them in the dishwasher.
The machine always starts the main wash with
clean water and a clean machine.
USE AN ENVIRONMENT-FRIENDLY DETERGENT
Study the environment information on
the packet.

18
For a variety of reasons, some articles are unsu-
itable for machine washing. Some materials can-
not withstand high temperature, others can be
damaged by dishwasher detergents.
SENSITIVE DECORATION
China that has “on-glaze“ decoration (feels a
little rough) should not be machine washed.
GLASSWARE/CRYSTAL
Position the items so that they do not knock
against one another. Use the lowest dishwash-
ing temperature and the shortest possible pro-
gramme. No drying heat. Antique objects and
very delicate items should not be machine was-
hed.
Glasses that are washed in a dishwasher at
high temperature can in time permanently loose
their lustre. Wash glasses at 45°C and a small
amount of detergent.
SILVER
Silver and stainless steel items should not be
allowed to touch each other because the silver
could otherwise become stained.
CUTLERY WITH BONDED HANDLES
Some types of adhesive cannot withstand mach-
ine washing, ie, cutlery handles are likely to
loosen.
WOODEN ITEMS
Wooden items should only be machine washed
if especially recommended.
ALUMINIUM
Aluminium can be dulled by machine washing.
However, good quality aluminium saucepans
can be machine washed, although you must ex-
pect their polished finish to be affected.
PLASTIC MATERIAL
Some plastic materials cannot withstand the
high temperature used in a dishwasher.
To protect plastic items
Select a low-temperature programme, 55°C
without heat drying. Place the objects in the
upper basket away from the heating element.
DELICATE AND SENSITIVE DISHWARE

19

20
CLEANING
CLEANING
The inside of the machine is made of stainless
steel, which is kept clean by normal use. Howe-
ver, deposits of lime can be formed inside the
machine if the water is hard. If this happens,
run a Normal wash programme with two ta-
blespoonful of citric acid in the detergent
compartment.
Coarse filter
The coarse filter catches larger particles of food
that would otherwise tend to clog the drain
pump. Lift out the coarse filter and clean as
required. Remember to put it back into place.
Fine filter
Remains caught by the fine filter are flushed
away automatically each time the machine is
used. Clean the fine filter a few times a year. To
release the fine filter, screw out the tubular part
and lift it and the coarse filter straight up. Cle-
an using a dishbrush. When replacing the fine
filter, ensure that its edges seal properly.
Drain pump
The pump can be reached from inside the mach-
ine. First remove the coarse filter, fine filter and
tubular part. Then remove the small black/yel-
low adapting piece to the left in the bottom
drain.
There you can reach the pump blade and
remove any obstruction. Fit the adapting piece,
the filters and the tubular part back into place.
WARNING
Don’t forget to fit the adapting piece.
Coarse
filter
Fine filter
Tubular
strainer
Other manuals for D1976
2
Table of contents
Other Asko Dishwasher manuals

Asko
Asko D5223 Instruction Manual

Asko
Asko D5894XXLFI User manual

Asko
Asko D3432 Owner's manual

Asko
Asko DW70 User manual

Asko
Asko D3432 User manual

Asko
Asko DBI565IXXLS U Series User manual

Asko
Asko DWCBI231 W/1 Series User manual

Asko
Asko D3252 Configuration guide

Asko
Asko D5634 User manual

Asko
Asko D5534XXLFI User manual

Asko
Asko D5459XLSOF User manual

Asko
Asko D1976 User manual

Asko
Asko DSD433B/1 User manual

Asko
Asko D5894 Assembly instructions

Asko
Asko DBI8457MXXLW/1 User manual

Asko
Asko DBI344ID.W User manual

Asko
Asko D5524 Assembly instructions

Asko
Asko DFI444B/1 User manual

Asko
Asko DFI645MBXXL/1 User manual

Asko
Asko DBI664IXXLS.U User manual