asmodus AMIGHTY 100W User manual

ASMODUS
AMIGHTY 100W

www.asmodus.com
ASMODUS
12
18
25
31
43
49
55
37
07
AMIGHTY 100W

Technical Parameters:
Safety Protections:
01
1. Turning the device on
Place batteries into the device in the proper orientation by following the “+” and “-” indicators. The ASMODUS logo will fash
on the screen when the batteries have been properly installed.With the battery properly installed, pressing the fire button 5
times in quick succession will power on the device and
Using Your Device:

enter you into “operational mode”. While in “operational mode”,pressing the fire button 3 times in quick succession will lock
the device and doing it again will unlock the device.
2.Mode selection
While in “operational mode”, setting adjustments are locked until you unlock them. To unlock setting adjustments, simply
slide your finger from the top of the screen to the bottom of the screen. You can tell the adjustment menu is unlocked by
taking a quick look at the padlock symbol on the bottom right corner of the screen. If the padlock is closed, adjustments are
locked and if the padlock is opened, adjustments are unlocked. While the padlock is unlocked, sliding left and right on the
firing mode will cycle through the available firing options:POWER, TEMP, CURVE, TCR, and TFR.
3.Setting firing mode parameters:
POWER mode:
Power settings: With the padlock unlocked, touching the wattage will allow you the change the
wattage. Use the “^” and “v” buttons to raise and lower the wattage respectively. Once you have
selected your desired wattage, press the FIRE button to confirm and return to the main screen.
Taste setting: With the padlock unlocked, sliding your finger from the bottom of the screen to
the top of the screen will cycle through different taste settings: Soft (S), Normal (N), and Hard
(H).
TEMP mode:
Wire Type Selection: With the padlock unlocked, press and hold “TEMP” to open the wire type selection
screen. Use the “^” and “v” buttons to cycle through the wire types. Once you have selected the correct
wire type of your atomizer, press the FIRE button to confirm and return to the main screen.
TEMP display swapping: With the padlock unlocked and in TEMP mode, pressing the wattage will swap
the display from showing the wattage to the maximum temperature. Pressing the maximum temperature
will swap you back to wattage display.
TEMP mode adjustments: With the padlock unlocked and in TEMP mode, pressing and holding either
option (wattage or temperature) will open the adjustment menu. Use the “^” and “v” buttons to make any
adjustments. While adjusting either option pressing the FIRE button will confirm and return you to the main screen.
CURVE mode:
Making adjustments to CURVE:
CURVE mode is a unique firing mode that allows the user to set different wattage over time presets. You can set up to 5 different
wattages with a durationof time for each. When fired, CURVE mode will cycle through and fire at the wattage for the durations that were
set for up to 10 seconds. With the padlock unlocked and in CURVE mode,pressing the wattage will swap the display to show a duration
of time in seconds. Pressing and holding either will bring you to an adjustment menu which allows you to set your wattage or time values
on an easy to read grid. Pressing any of the values allows the user to edit it by bringing up the “^” and “v” buttons. Pressing the FIRE
button enters the value and returns you to grid screen
02

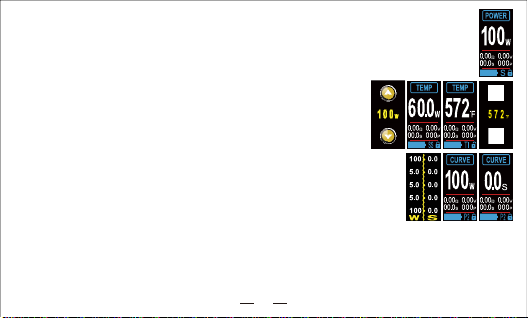
so the user can fully set the curve. Slide you finger from the bottom of the screen to the top of the screen to cycle through your 5
different presets (P1 - P5). Touching the wattage will swap the display to time and touching the time will swap the display back to wattage.
TCR mode:
TCR selection: With the padlock unlocked and in TCR mode, sliding from the top of the screen to the bottom of
the screen will cycle through 5 different memory profiles which are labeled as M1 - M5.
Setting TCR values: With the padlock unlocked and in TCR mode, press and hold TCR to enter the TCR
adjustment interface. The “^” and “v” buttons will appear to raise and lower one of the digits. Sliding your finger
from left to right will change the digit being edited. Once you have inputted your desired value press the FIRE
button to return to the main screen. A separate value can be entered for each of the 5 memory settings allowing
the user to quickly switch between TCR values.
TFR mode:
TFR selection: With the padlock unlocked and in TFR mode, sliding from the top of the screen to the bottom of the screen with cycle
through 5 different memory profiles which are labeled as M1 - M5.
Setting TFR values: With the padlock unlocked and in TFR mode, press and hold TFR to enter the TFR adjustment interface. The “^”
and “v” buttons will appear to raise and lower one of the digits. Sliding your finger from left to right will change the digit being edited.
Once you have inputted your desired value press the FIRE button to return to the main screen. A separate value can be entered for each
of the 5 memory settings allowing the user to quickly switch between TCR values.
4.System settings
While in operational mode, pressing the FIRE button 5 times in quick succession will enter the
system settings interface. While with in the system settings interface, sliding left and right will
cycle through menu options. The menu options are as follows: Shutdown, Puff limit, Puff
counter clear, ECO mode enable, Firmware updates, Screen color change, Brightness
adjustments,Screen locking options, Display timeout duration, and Resistance reading, locking,
adjustments (locking and adjusting are for TC modes only).
Shutdown: Once in the system settings interface, presss and hold the red SHUTDOWN button
to power off the device. “SYSTEM OFF” will display on the screen if the device has been shut down correctly.
Puff limit adjustments: Once in the system settings interface, press the green pencil PUFF LIMIT button. The “^” and “v” buttons will
appear so you can raise and lower the puff limit. The puff limit will limit the amount of times that the device can be fired and setting the
number to 000 will not limit your puffs. Once the limit has been reached, firing the device will show“PUFFS LIMIT” on the scrreen and
will not fire.
Clearing the puff counter: Once in the system settings interface, press the yellow broom PUFF WIPE button. This will bring up a
new menu which shows you the amount of puffs taken on the device. Pressing the yellow broom on bottom of the screen will reset
the puff counter to 000.
Setting ECO: ECO mode is an optional mode that was
03

04
implemented to save battery life by turning the screen off while still being able to fire. Once in the system
settings interface, press the green ECO button. The “^” and “v” will appear so you can switch the mode
on and off and pressing FIRE will confirm and take you back to the system settings interface and again
will take you to the main menu. Once the screen times out, it will stay off until you click the device 3 times
in quick succession to enter the main screen (operational mode) or 5 times in quick succession to access
the system settings interface.
Upgrading: Once in the system settings interface, press the light blue cloud UPGRADE button.
“Upgrade?” will appear on the screen and pressing the “YES” will confirm. “Hold down fire button” will
appear on the screen. Hold down the fire button until “Download Mode” appears on the screen.
The device is now ready to accept firmware updates.
Version number: Once in the system settings interface, press the blue VERSION button. This
will display the type of the chip in the device as well as the current firmware version running on
the device. Pressing the FIRE button will return you to the system settings interface and again
will return you to the main screen (opernational mode)interface and again will return you to the
main screen (operational mode)
Screen color settings: Once in the system settings interface, press the multicolored SCREEN
button. The “^” and “v” adjustment buttons as well as a color in the center of the screen will appear. Use the
buttons to cycle through the availabe screen color options: Blue, Green, Purple, Red, Orange, and White. Pressing
the FIRE button will return you to the system settings interface and again will return you to the main screen
(opernational mode).
Adjusting brightness: Once in the system settings interface, press the black and white BRIGHTNESS button.
The “^” and “v” adjustments buttons will appear which allow the user to set a level of brightness. The brightness
can be adjusted in levels from 0 - 10 with 10 being the brightest. Pressing the FIRE button will return you to the
system settings interface and again will return you to the main screen (operational mode).
Touch screen lock settings: Once in the system settings interface, click the dark blue LOCK button. The “^” and
“v” adjustment buttons will appear and allow the user to change how the main screen is unlocked. By default the
screen lock is set to SLIDE (sliding your finger from the top of the screen to the bottom of the screen) but can be
changed to CLICK. CLICK unlocks the screen with 3 quick taps on the screen in quick succession. Pressing the
FIRE button will return you to the system settings interface and again will return you to the main screen
(operational mode).
Display timeout: Once in the system settings interface, click the blue clock TIMEOUT buttton. The “^” and “v”
adjustment buttons will appear and will allow the user to change the duration of time before the screen times out
and goes into standby in a range of 3 - 10 seconds. Pressing the FIRE button will con..rm and will return you to the system settings

Message index:
interface and againwill return you to the main screen (operational mode)
Reading and adjusting resistance: Once in the system settings interface, click blue ohm RESISTANCE button. Pressing the button
will read your atomizers resistance and pressing the ADJ button will bring up the “^” and “v” adjustment buttons so you can raise or
lower your resistance. Pressing the FIRE button will confirm and return you to the main screen. NOTE: Any adjustments to resistance
will only apply while using a TC mode.
5.System Upgrade
1.Put the device into “Download Mode” by pressing the fire button 5 times in quick succession to enter the
system settings interface. Swipe the screen until you reach the blue cloud UPGRADE button. Pressing the
button will display “Upgrade?” on the screen and pressing “YES” will confirm. “Hold down the fire button” will
appear on the screen. Hold down the FIRE button until “Download Mode” appears on the screen.
2.Connect the device to a computer via a USB data cable.
3.Open the ASMODUS Upgrade Tool and click the “Connect” button. The grey indicator light on the updating
tool will turn from gray to green when the device has been successfully connected.
4.Once successfully connected, click the “File” button and select the firmware file that you want to apply to the device.
NOTE:
Only use
firmware files that were specifically made for your device. Applying the wrong firmware can cause your device to malfunction.
5.Once the file has been selected, click the “Upgrade” button to apply the firmware to the device.
6.After the device has been successfully updated, “Upgrade Ok” will display on the screen.
7.Reboot the device to enjoy the new update.
6. Battery handling
1. Push the negative pole of the battery into the top battery port as depicted on the battery tray and then slide the battery in.
2. To remove the battery, apply the same upwards pressure to the negative battery port and then simply pull the battery out.
1. “HIGH ATOMIZER”: This warning is displayed when the resistance of the atomizer used is too high
2.“LOW ATOMIZER”: This warning is displayed when the resistance of the atomizer us is too low
3.“ATOMIZER REMOVE”: This warning is displayed when the atomizer’s resistance is removed
4.“CHECK ATOMIZER”: This warning is displayed when you fire the device without an atomizer successfully connected to it
5.“ATOMIZER SHORT”: This warning is displayed when your atomizer short circuits
6.“HIGH BATTERY”: This warning is displayed when the battery’s voltage is too high
7.“LOW BATTERY”: This warning is displayed when the battery’s voltage is too low
8.“WORK OVERTIME”: This message is displayed when the device has been fired for longer than 10 seconds and will stop the device
from firing
9.“ASMODUS” logo: This image will display when the device is powered on
10.“SYSTEM OFF”: This message will display when the device is powered off
05

Micro USB Port
Fire Button
Output Wattage
Taste Level Indicator
(S, N, and H)
Adjustment Padlock
Puff Counter
Battery
Door
Decorative Carbon
Fiber Strip
Battery Level
Firing Mode
Output Voltage Atomizer
Resisitance
06
The micro USB port was made for firmware updates and we strongly recommend that any
battery charging be done from an external battery charger.
Firing Time

Asmodus AMIGHTY 100W TC is an ELECTRONIC NICOTINE DELIVERY SYSTEM
(ENDS). It is not suitable for persons under legal vaping age, pregnant or nursing women,
persons at risk of heart disease, persons with hypertension and / or diabetes, or persons taking
medication for depression and / or asthma.
LEGAL DISCLAIMER: Underage sale of this product is prohibited. Depending on your country /
region, legal vaping age is 21+ and 18+ elsewhere. Keep out of reach of children.
CAUTION: This product is for adult use only. Store in a cool dry place. Only for use in electronic
cigarettes. Do not ingest or apply to skin.If nicotine poisoning occurs seek immediate medical
attention.
Keep the contents of this package out of reach of children, non vapor and animals
This product contains nicotine which is a highly addictive substance.
www.asmodus.com

参数特点:
● 芯片采用GX-100UTC
● 支持电池型号:1节18650或1节20700或1节21700高倍率平头电池
● 输出功率范围 (功率模式):5.0 Watts-100.0 Watts
● 输出功率范围(温控模式):5.0 Watts-60.0 Watts
● 发热丝阻值范围:0.1 Ω-3.0 Ω
● 温度限制范围:212℉-572℉/100℃-300℃
● 支持高清晰度彩色显示屏幕
● 支持TCR、TFR模式以及多种材质发热丝
● 支持CURVE(曲线)模式
● 支持口数清零/限制功能
● 支持系统升级功能
● 充电参数:DC 5V/1A
● 最高输出电压:7.5 Volts
● 最高输出电流:35.0 Amps
● 输入电压范围:3.2 Volts-4.2 Volts
● 显示屏工作电流:25mA
● 待机工作电流:<350uA
● 待机时间:3S~60S
● 吸烟时间:10S
● 工作效率94%
安全功能设计:
● 电池反向保护 ● 电池过压保护
● 电池欠压保护 ● 低阻保护
● 高阻保护 ● 短路保护
● 过热保护(芯片过温保护)
07

一、开机
处于关机状态下,快速连按5下“Fire”按键进行开机。开机屏显示“ASMODUS”标志,进入工作界面。
二、模式选择
在触屏解锁状态下,左右滑动模式显示位置或手势左右滑动可循环选择工作模式(POWER、TEMP、CURVE、
TCR、TFR)。
三、工作参数设置
POWER模式:
功率设置:在触屏解锁状态下,点击功率显示位置,进入功率设置界面,在功率设置界
面下直接按“^”、“v”图标设置功率值,按“Fire”键确认并退出。
口感设置:在触屏解锁状态下,上下滑动触屏或手势上下滑动可循环选择口感(柔和(S)、
标准(N)、暴力(H))。
TEMP模式:
线圈材料选择:在触屏解锁状态下,长按“TEMP”模式显示位置,进入线圈材料选择
界面,按“^”、“v”图标选择线圈材料,按“Fire”键确认并退出。
温控功率、温度显示切换: 单击功率显示位置,可切换到温度显示,单击温度显示位置,可切换
到功率显示。
温控功率设置:在触屏解锁状态下,长按功率显示位置,进入功率设置界面,在功率设置界面下
直接按“^”、“v”图标设置功率值,按“Fire”键确认并退出。
温度设置:在触屏解锁状态下,长按温度显示位置,进入温度设置界面,在温度设置界面下直接
按“^”、“v”图标设置温度值,按“Fire”键确认并退出。
CURVE模式:
查看功率点:在触屏解锁状态下,上下滑屏或手势上下滑动可循环查看P1~P5点功率值或时间值。
功率值、时间显示切换: 单击功率显示位置,可切换到时间显示,单击时间显示位置,可切换到功率显示。
功率值设置:在触屏解锁状态下,长按功率/时间显示位置,进入参数设置界面,在参数设置界面下直接点击左边要修改的
参数,进入编辑界面按“^”、“v”图标设置功率值,按“Fire”键确认并退出。
时间值设置:在触屏解锁状态下,长按功率显示位置,进入参数设置界面,在参数设置界面下直接点击右边要修改的参数,
进入编辑界面按“^”、“v”图标设置功率值,按“Fire”键确认并退出。
TCR模式:
功能介绍:
08

TCR选择:在触屏解锁状态下,上下滑屏或手势上下滑动可循环选择M1~M5。温控功率设置、温度设置
参考“TEMP”模式。
TCR值设置:在触屏解锁状态下,长按“TCR”模式显示位置,进入TCR值设置界面,左右滑屏选择待编
辑数字位,按“^”、“v”图标设置值,按“Fire”键确认并退出。
TFR模式:
TFR选择:在触屏解锁状态下,上下滑屏或手势上下滑动可循环选择M1~M5。温控功率设置、温度设置
参考“TEMP”模式。
TFR值设置:在触屏解锁状态下,长按“TFR”模式显示位置,进入TFR值设置界面,上下滑屏选择待编
辑温度点,左右滑屏选择待编辑数字位,按“^”、“v”图标设置值,按“Fire”键确认并退出。
四、系统设置
在工作模式下快速连按5下“Fire”按键进入系统设置界面。在系统设置界面左右滑屏或手势左右滑动可循环选择设置项(关机、
口数设置、口数清零、ECO设置,升级,查看版本,屏幕颜色设置,亮度,触屏开锁方式设置、息屏时间设置、电阻检测)。
关机:选中“关机”项,长按图标位置系统关机。
口数限制设置:选中“口数设置”项,点击图标位置进入口数设置界面,点击“^”、“v”图
标可设置口数限制值;按“Fire”键确认并返回上级界面。
口数清零:选中“口数清零” 项,点击图标位置进入口数清零界面,点击清除图标清除口数。
按“Fire”键退出并返回上级界面。
ECO设置:选中“ECO”项,点击图标位置进入ECO设置界面,点击“^”、“v”图标可
“开”、“关” ECO;按“Fire”键确认并返回上级界面。
升级:选中“升级”项,点击图标位置进入升级确认界面,在升级确认界面点击“YES”
图标,根据提示按住“Fire”键直到屏幕显示“Download Mode”。
查看版本:选中“版本”项,点击图标位置可查看系统版本;再次按“Fire”键返回上级
界面。
屏幕颜色设置:选中“屏幕颜色设置”项,点击图标位置进入屏幕颜色设置,点
击“^”、“v”图标可切换颜色,按“Fire”键确认并返回上级界面。
触屏开锁方式设置:选中“锁图标”项,点击图标位置进入触屏开锁方式设置界面,
点击“^”、“v”图标可选择“Slide”、“Click”方式;按“Fire”键确认并返回上级
界面。
息屏时间设置:
选中“息屏时间设置”项,点击图标位置进入息屏时间设置界面,点击“^”、“v”图标可设置息屏时间;按“Fire”键确认
并返回上级界面。
09

电阻检测:在开机状态下,快速连按5下“Fire”按键进入设置界面,左右滑屏选择电阻
测试界面,点击图标即测试电阻值(注意:在温控模式下,请确认所检测的电阻值为
冷态阻值,这是设备正常工作的前提!),点击“ADJ”可对电阻值进行修改。
按“FIRE”键确认阻值并退出。
五、锁定与解锁
触屏解锁:在触屏锁定状态下,在触屏上按箭头方向滑动解锁。
触屏锁定:在工作状态下,按“Fire”键锁定。
系统锁定:在工作模式下快速连按3下“Fire”按键锁定。
系统解锁:在系统锁定状态下,快速连按3下“Fire”按键解锁。
ECO亮屏:在启用ECO后,点火时会熄屏,快速连按3下“Fire”按键可强制亮屏。
六、系统升级
1、设备进入升级模式“Download Mode”。
2、将设备通过USB线缆连接到电脑。
3、打开电脑端的升级软件,点击“Connect”按钮,按钮左边灰色方块变成绿色,表示
设备与升级软件连接成功。
4、点击“File”按钮,选择待升级的固件(如:xxx.firmware)。
5、点击“Upgrade”按钮进行升级。
6、升级成功后,设备提示“Upgrade Ok”。
7、断电重启。
1、雾化器阻值过高提示:“HIGH ATOMIZER”
2、雾化器阻值过低提示:“LOW ATOMIZER”
3、雾化器移除提示:“ATOMIZER REMOVE”
4、无雾化器提示:“CHECK ATOMIZER”
5、雾化器短路提示:“ATOMIZER SHORT”
6、电池电压过高提示:“HIGH BATTERY”
7、电池电压过低提示:“LOW BATTERY”
8、吸烟超时提示:“WORK OVERTIME”
9、开机提示:“ASMODUS”
10、关机提示:“SYSTEM OFF”
提示说明:
10
☆
七:电池装卸方式
☆
1、电池负极顶住机器负极,载入电池。
2、电池负极往机器负极施压,然后取出电池。

USB充电口
电源按钮
输出功率
状态指示
锁
吸烟口数
电池门
装饰片
电池电量
工作模式
输出电压 雾化器阻值
11
吸烟时间

www.asmodus.com
将本包装所包含的物品放在儿童,非吸烟者和动物无法接触的地方
该产品含有高度成瘾物质的尼古丁。
使用前请仔细阅读使用说明书
Asmodus AMIGHTY 100W TC是电子尼古丁传送系统(ENDS)。不适合年龄未
到法定吸烟年龄的人,不适合怀孕或哺乳期的妇女,心脏病患者,高血压和糖
尿病患者,或服用药物者用于抑郁症和哮喘。
法律声明:本产品未经授权销售,禁止使用。 取决于你的国家/地区,合法吸
烟年龄在其他地方21+和18+以上。儿童接触不到。
注意:本产品仅供成人使用。 储存在阴凉,干燥的地方。 仅用于电子烟。 不
要摄入或应用于皮肤。 如果尼古丁中毒发生,立即就医。
请将本品放在儿童不能接触的地方。

Technische Daten:
Funktionale Sicherheit:
Beschreibung der function:
12
1、Einschlatung

Legen Sie die Batterien in das Gerät und drücken Sie dauernd auf die Taste „FIRE“ 5 mal, um das Gerät
einzuschalten. Wenn der Bildschirm „ASMODUS“ anzeigt, kommt dann in den Arbeitsmodus.
2、Modusauswahl
Im entriegeln Zustand, gleitende linke und rechte Modusanzeigeposition oder Geste wischen nach links und
rechts, um Zyklus zu wählen den Betriebsmodus (ENERGIE, TEMP, KURVE, TCR, TFR).
3、Arbeitsparametrierung
POWER-modus:
Leistungseinstellungen: Im Touchscreen-Entriegelungsstatus drücken Sie lang auf die Power-Anzeige-
Position, geben Sie die Power-Einstellungen-Schnittstelle ein, in der Power-Einstellungen-
Schnittstelle drücken Sie das „∧
Geschmackseinstellung: Im Bildschirm entsperren Zustand, Gleiten nach oben und
unten auf dem Touchscreen oder Geste nach oben und unten wischen, um den Geschmack
(weich (S), Standard (N), gewalttätig (H)) zu wählen.
TEMP-modus:
Spulenmaterialauswahl: Im Touchscreen-Entriegelungsstatus drücken Sie lang auf den
∧
verlassen.
Temperaturregelung Leistung, Temperaturanzeige Schalter: Klicken Sie auf die Power-Display-
Position, können Sie auf die Temperaturanzeige wechseln, klicken Sie auf die Temperaturanzeige
Position, können Sie auf die Power-Display wechseln.
Temperaturregelung Leistungseinstellung: Im Touchscreen-Entriegelungsstatus drücken Sie lang
auf die Power-Anzeige-Position,geben Sie die Power-Einstellungen-Schnittstelle ein, in der Power-
Einstellungen-Schnittstelle drücken Sie das „∧
Bestätigung und verlassen Sie den Entriegelungsstatus.
Temperatureinstellung: Im Touchscreen Entriegelungsstatus drücken Sie lang auf die Temperaturanzeige-Position, um die
Temperatureinstellungsschnittstelle zu öffnen. Drücken Sie die Symboltaste „∧
CURVE-modus:
Kraftpunkte anzeigen: In der Bildschirmsperre Zustand, Gleiten nach oben und unten Bildschirm oder Geste nach oben und unten
gleitenden Zyklus kann P1 ~ P5 Leistungswert oder Zeitwert gesehen werden.
13

14

Begrenzung der Zahl der Absaugschlitze der Einstellungen: Wählen Sie die Position „ Zahl der
neinstellungsschnittfläche, klicken Sie auf die Symboltaste „∧
Schnittstelle zurückzukehren.
Zahl der Absaugschlitze löschen:
klicken Sie auf die Symbolposition, um die Zahl der Absaugschlitze einzugeben.Clear Interface,
-Taste, zum Beenden und zur nächsthöheren Schnittstelle zurückzukehren.
ECO Einstellen: Wählen Sie „ECO“ aus, tippen Sie auf diesem Funktionssymbol, um das
ECO Einstellungsmenü anzuzeigen. Klicken Sie auf „^” / “v” um ECO ein-/ auszuschalten.
Aktualisierung:
Ansicht Version:
Schnittstelle zurückzukehren.
Bildschirm-Farbmodus Einstellen: Wählen Sie den Punkt "Bildschirmfarbe Einstellungen",
klicken Sie auf die Symbolposition, um die Bildschirmfarbeneinstellungen einzugeben,
klicken Sie auf das "^", "v" -Symbol, um die Farbe zu wechseln, drücken Sie die "Feuer" -
Taste, um zu bestätigen und zur vorherigen Benutzeroberfläche zurückzukehren.
Helligkeit: Wählen Sie „Helligkeit“ aus, tippen Sie auf diesem Funktionssymbol, um das
Helligkeit-Einstellungsmenü anzuzeigen. Mit Klick auf „^” oder “v” können Sie die Helligkeit
verstellen. Klicken Sie auf „Fire“ um die Einstellung zu bestätigen und zum letzten Menü zurückzukehren.
Touchscreen-Sperrmoduseinstellungen: Wählen Sie das Symbol "Schlosssymbol , klicken Sie auf die
Symbolposition, um die Oberfläche für den Touchscreen-Sperrmodus zu öffnen. Klicken Sie auf „^ , das Symbol
„v ; Drücken Sie „Fire”, um zu bestätigen und zur übergeordneten Benutzeroberfläche zurückzukehren.
Automatische Sperre:Wählen Sie „automatische Sperre“ aus, gehen Sie in die Einstellung, Setzen Sie durch „^“
und „v“ die automatische Sperre; Gehen Sie zurück mit „Fire“
Widerstandserkennung:
zu öffnen, schieben Sie den Bildschirm links und rechts, um die Widerstandtest-Schnittstelle zu wählen, klicken Sie auf das Symbol des
15

Hinweis:
Testwiderstandswerts (Hinweis: Im Temperaturregelung-Modus bitte bestätigen Sie den Widerstandswert als kalten Widerstand, dies
Widerstand zu bestätigen und den Status zu verlassen.
5、Sperren und Entsperren
Touchscreen entsperren: In der Touchscreen-Verriegelung, Schieben in die Richtung des Pfeils auf dem
Touchscreen zum Entsperren.
Touchscreen-Sperre:
Systemsperre: Drücken Sie im Arbeitsmodus dreimal die Taste „Feuer”, um zu sperren.
System entsperren:
ECO Bildschirm aktivieren: Klicken Sie auf „Fire“ nach der Aktivierung des ECO Modus um den Bildschirm
auszuschalten. Mit Tripelklick auf „Fire“ können Sie den Bildschirm manuell aktivieren.
6、System Verbesserung
2.Verbinden Sie das Gerät über ein USB-Kabel mit einem Computer.
graue Seite der Taste wird grün, und zeigt an, dass das Gerät und die Aktualisierung der
Softwareverbindung erfolgreich ist. ).
7.Ausschalten und Neustart.
10. Anzeige beim Ausschalten des Gerätes:„
SYSTEM OFF
16
☆
7、Batterie-Handling
☆
1. Der Minuspol der Batterie befindet sich gegen den Minuspol der Maschine.
2. Schieben Sie den Akku in die negative Richtung und entfernen Sie den Akku.
Table of contents
Languages:
Other asmodus Vaporizer manuals