● Read and follow all instructions in the documentation before you operate your system.
● Do not use this product near water or a heated source such as a radiator.
Set up the system on a stable surface.
● Openings on the chassis are for ventilation. Do not block or cover these openings.
Make sure you leave plenty of space around the system for ventilation.
Never insert objects of any kind into the ventilation openings.
● Use this product in environments with ambient temperatures between 0°C and 40°C
● If you use an extension cord, make sure that the total ampere rating of the devices plugged into the extension cord does not ex ceed its
ampere rating.
Your system is designed and tested to meet the latest standards of safety for information technology equipment.
However, to ensure your safety, it is important that you read the following safety instructions.
Setting up your system
IMPORTANT: e warranty does not apply to products that have been disassembly by users.
No disassembly
IMPORTANT: is symbol of the crossed out wheeled bin indicates that the product
(electrical, electronic equipment, and mercury- containing button cell battery)
should not be placed in municipal waste.
Check local regulations for disposal of electronic products.
Product disposal notice
WARNING: Risk of explosion if battery is replaced by an incorrect type.
Dispose of used batteries according to local regulations.
Battery replacement and disposal
● Do not walk on the power cord or allow anything to rest on it.
● Do not spill water or any other liquids on your system.
● When the system is turned OFF, a small amount of electrical current still ow. Always unplug all power, modem,
and network cables from the power outlets before cleaning the system.
● IF you encounter the following technical problems with the product, unplug the power cord and contact a qualied service techn ician or
your retailer:
■ e power cord or plug is damaged.
■ Liquid has been spilled into the system.
■ e system does not function properly even if you follow the operating instructions.
■ e system was dropped or the cabinet is damaged.
■ e system performance changes.
Care during use
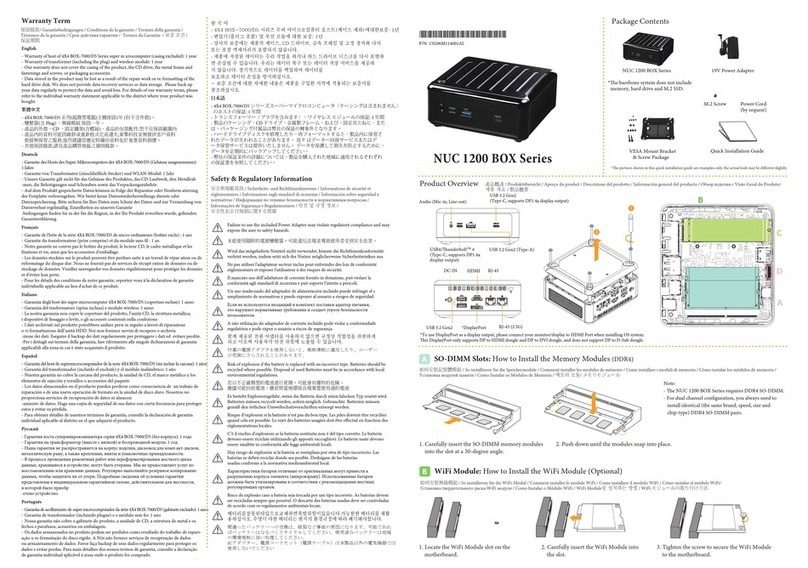
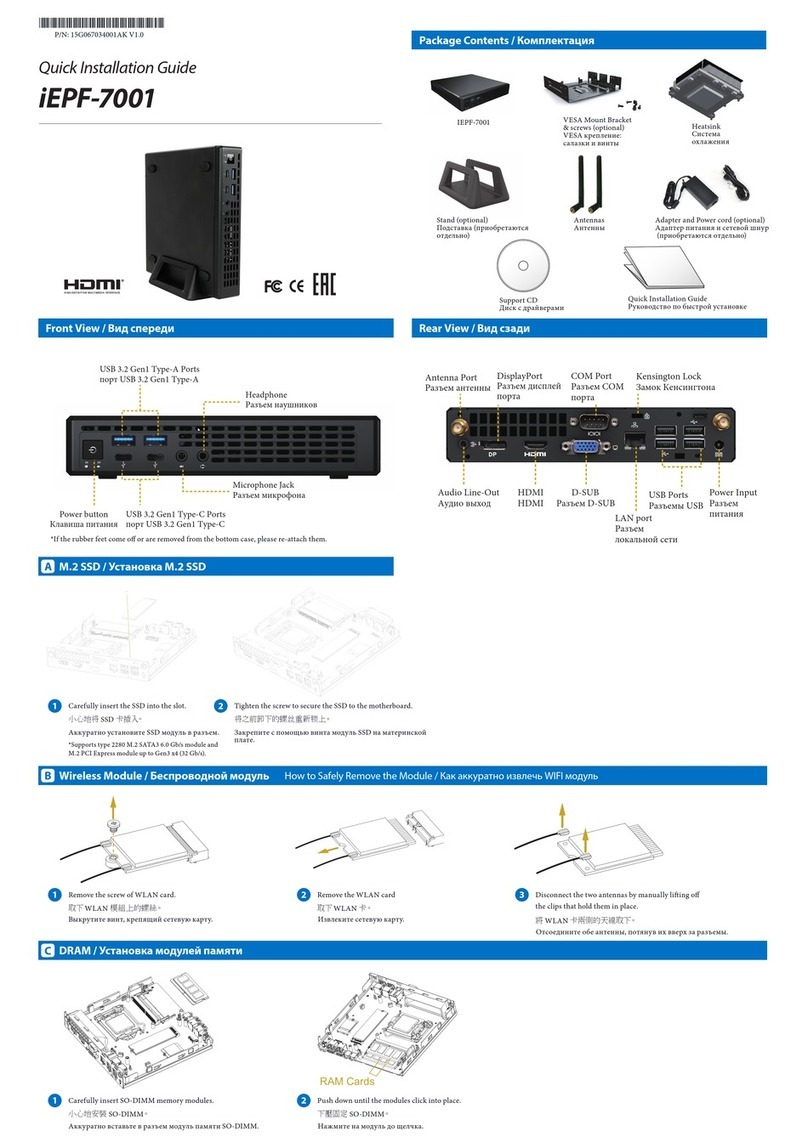
Закрутите 4 винта в корпус HDD.
Установите крышку корпуса и зафиксируйте
ее двуя винтами с рифленными головками.
Установите VESA крепление на задней крышке
совместимого с VESA дисплея, используя
приложенные винты.
Установите устройство в VESA крепление. и закрепите его винтами M2,5.
Потяните рычаг фиксации HDD в салазках. Установите 2,5"
HDD в салазк. Зафиксируйте 2,5" HDD в салазках.
Подсоедините HDD SATA кабель к HDD.
Carefully insert thermal modules.
Аккуратно вставьте модуль охлаждения. Затяните винты крепящие радиатор к материнской
плате.
Tighten the screw to secure the heatsink to the motherboard.
小 心 地 安 装 散 热 模 块。 将Heatsink 的 螺 丝 锁 上。
Heat Sink / Установка системы охлаждения
E
1 2
Подсоедините кабель термомодуля. Подсоедините кабель термомодуля.
Carefully place the thermal module. en connect the cable routing.
小 心 地 将 散 热 模 块 放 上。然 后 将 线 接 上。
1
Fan / Установка термомодуля
D
Tighten 4 screws to secure the HDD. Pull the release lever out. Place the 2.5” hard drive into the bracket
HDD. en slide the 2.5” hard drive into the bracket rmly.
Connect HDD SATA Cable to HDD.
將4个螺丝锁紧在 HDD 上。 把SATA 电缆连接到硬盘。
将HDD bracket 的 弹 片 向 外 微 扳。垂 直 放 入 HDD,
然后往前推将 HDD 卡 紧。
HDD
F
1 2 3
Tighten the two knurled thumb screws to
secure the chassis.
Attach the VESA mount plate to the rear of a compatible
display using the screws provided.
A. Jupiter can now be mounted by
sliding the device into place
B. Assemble Jupiter to Vesa Mount with M2.5
screws
将两个手转螺丝锁紧,确认机壳锁固。 将已上好 VESA 支架螺丝的 Jupiter 依照支
撑 架 的 孔 位 往 下 滑 固 定。
将随附的 VESA 支架螺丝安装于
Jupiter 底 部。
将随附的 VESA 支撑架安装于支持 VESA 支撑架的
计 算 机 屏 幕 或 后 背。
Chassis / Шасси Vesa Mount/Stand Installation / Установка VESA крепления
G
1 1 2
AB
B
Настройка системы
Это продукт класса В, в домашних условиях это устройство может вызывать радиопомехи, в этом
Предупреждающий знак CE
Замена и утилизация батарей
Этот символ означает, что
устройство не следует
выбрасывать вместе с
бытовым мусором
Предупреждение
ВНИМАНИЕ: Существует опасность взрыва, в случае если
используется батарея неправильного типа. Необходимо
утилизировать использованные батареи в соответствии
с местными правилами.
случае пользователь обязан принять соответствующие меры
Информация по технике безопасности
ƽ
Прочитайте и следуйте всем инструкциям изложенным в документации, прежде чем работать с системой.
ƽ
Не используйте этот продукт вблизи воды или источника тепла, например радиатора.
Установите систему на устойчивую поверхность.
ƽ
Отверстия на корпусе предназначены для вентиляции. Не закрывайте эти отверстия. Убедитесь, что вы
оставили достаточно места вокруг системы для вентиляции. Никогда не вставляйте какие-либо предметы
в вентиляционные отверстия.
ƽ
Если вы используете удлинитель, убедитесь, что общая нагрузка от всех устройств, подключенных к
удлинителю, не превышает его допустимые значения.
ƽ
Используйте устройство при температуре воздуха от 0
ഒ
до 40
ഒ
.
ƽ
Не наступайте на шнур питания и ничего не ставьте на него.
ƽ
Не допускайте попадания воды или любой другой жидкости на ваше устройство.
ƽ
Когда система выключена, она все равно остается под нагрузкой. Перед очисткой системы всегда
отключайте все устройства от сети.
ƽ
Если вы столкнулись со следующими проблемами с устройством, отключите кабель питания и обратитесь
к квалифицированному техническому специалисту или к продавцу:
■
Повреждены шнур питания или вилка.
■
в устройство попала жидкость
■
устройство не функционирует должным образом.
■
у устройства поврежден корпус или его уронили.
■
наблюдается изменение производительности системы.
Уход во время использования
Ваша система разработана и испытана в соответствии с последними стандартами
безопасности оборудования для информационных технологий.
Тем не менее, для обеспечения вашей безопасности, важно, чтобы вы прочитали
следующую инструкцию по технике безопасности.
is is a Class B product, in a domestic environment, this product may cause radio interference,
in which case the user may be required to take adequate measures.
CE Mark Warning

