manuals.online logo
Brands
  1. Home
  2. •
  3. Brands
  4. •
  5. Asterion
  6. •
  7. Accessories
  8. •
  9. Asterion Push-To Kit User manual

Asterion Push-To Kit User manual

Push-To Kit (GSO Classic)
Specifications:
Характеристики:
Compatible telescopes: GSO Dobsonian Classic and
analogs
Encoder Resolution: 4000 Steps Per Revolution
Connection: Wi-Fi
Compatible software: for PCs: any planetarium with
encoder support; Sky Safari, StarSeek for mobile
devices (Android or iOS)
Power: 12V 2.5x5.5mm
Package Dimensions: 16x16x16cm
Weight: 0.8 kg
Совместимые телескопы: GSO Dobsonian Classic и
аналоги
Разрешение: 4000 импульсов / оборот
Подключение: Wi-Fi
Совместимое ПО: для PC: любой планетарий с
поддержкой энкодеров; для мобильных устройств:
Sky Safari, StarSeek (Android или iOS)
Питание: 12В разъём 2,5х5,5мм
Размеры упаковки: 16х16х16см
Вес: 0,8 кг
Equipment:
Комплектация:
Set of encoders with controller and hardware kit
220V power supply
User's manual
Packaging
Комплект энкодеров с контроллером и крепеж
Блок питания от сети 220V
Руководство пользователя
Упаковка
(Eng) Setting the Vertical Axis Encoder
1. Start with a vertical axis. Remove the telescope
tube and unscrew the central screw of the mount
2. Separate the base.
Use 8mm Allen key or similar nozzle to remove the
embedded nut from the bottom side of the base
3. Install the center tube around which the mount
rotates.
Put the mount on the base
4. Then carefully put the mount on its side to install
the encoder
5. Twist the plate on the projecting part of the screw,
holding the encoder handle at the same time, and
fix the plate on the base with two screws from the
kit.
Rotate the encoder handle to ensure that the
screw is tightened to allow smooth rotation of the
mount.
After that tighten the nut (М8) on the screw and
to lock it safely from turning
6. If necessary, it is possible to re-adjust the
tightening of the central screw if the mounting will
not rotate smoothly enough about its axis. Then fix
the encoder body on the base with screws,
assuring easy access to the power socket of the
system
(Рус) Установка энкодера вертикальной оси
1. Начнём с вертикальной оси. Cняв трубу
телескопа, выкрутите центральный винт
монтировки
2. Отделите основание.
Спомощью 8мм шестигранного ключа или
аналогичной насадки выкрутите закладную
гайку с нижней стороны основания
3. Установите на место центральную трубку,
вокруг которой вращается монтировка.
Поставьте монтировку на основание
4. После этого аккуратно поставьте монтировку на
бок, чтобы установить корпус энкодера
5. На выступающую снизу часть винта следует
накрутить пластину, удерживая вороток
энкодера, и зафиксировать её на основании
двумя шурупами из комплекта. Вращая
вороток, добейтесь такой затяжки винта,
которая обеспечит плавное вращение
монтировки. После накрутите гайку М8 на винт
и затяните, чтобы надёжно зафиксировать её от
проворота
6. По необходимости можно произвести
повторную регулировку затяжки центрального
винта, если монтировка будет вращаться вокруг
своей оси недостаточно плавно. Затем
фиксируем шурупами корпус энкодера на плите
основания, обеспечивая удобный доступ к
гнезду питания системы
(Eng) Setting the Altitude Encoder
1. Now set the altitude axis encoder. Remove the
pressure spring of the telescope tube from the
mount and remove the half-axle screw
2. Install the encoder screw instead, having
previously put the spring ring on it
3. By rotating the flywheel, we tighten the screw
safely
4. Put the spring on the mount and fix the fastening
plate of bracket first with one screw and then with
another screw. The installation is completed.
To transport the telescope, you can quickly uninstall the
altitude axis encoder to remove the tube from the
mount. For transportation, it can be conveniently fixed
on the wall of the mount
(Рус) Установка энкодера горизонтальной оси
1. Теперь устанавливаем энкодер горизонтальной
оси. Снимаем прижимную пружину трубы
телескопа с монтировки и выкручиваем винт
полуоси
2. На его место закручиваем винт энкодера,
предварительно надев на него кольцо пружины
3. Вращая маховик, надёжно затягиваем винт
4. Одеваем пружину на монтировку и фиксируем
крепёжную пластину кронштейна сперва
одним, а потом и вторым шурупом. На этом
установка закончена.
Для транспортировки телескопа вы можете
быстро демонтировать энкодер горизонтальной
оси, чтобы снять трубу с монтировки. Во время
перевозки он может быть удобно зафиксирован на
стенке монтировки
(Eng) Installing Software and Connecting a
Mobile Device
To work with Android or iOS, you should use the
planetarium program SkySafari or its simpler equivalent
Orion StarSeek. These apps are available for download on
Google Play or App Store. SkySafari allows you to connect
to the telescope only in paid Plus or Pro versions. But an
earlier version of the same planetarium StarSeek from
Orion is available for free download online. Use the link on
the image or just scan the QR-code.
1. Install planetarium program, necessary updates and
stars map package
2. Connect the power cable to encoders. A beep will then
sound, meaning that the Wi-Fi module is turned on
3. Go to the Wi-Fi connection window of your device and
select the open network "DobsonDream"
*For stable working of the system, disconnect your device
from the mobile Internet and other wireless connections
**When starting observations, make sure that your device
has a battery charge of at least 50%.
Devices with low battery can independently disconnect from
a Wi-Fi network
(Рус) Установка ПО и подключение
мобильного устройства
Для работы с Android или iOS следует использовать
программу планетарий SkySafari или её аналог Orion
StarSeek. Данные приложения доступны для скачивания
на Google Play или App Store. SkySafari позволяет
осуществлять подключение к телескопу только в
платных версиях Plus или Pro. Но более ранняя версия
этого же планетария StarSeek от Orion доступна для
бесплатного скачивания. Используйте ссылку или просто
сканируйте QR-код.
1. Установите программу планетарий, необходимые
обновления и пакет карт звёздного неба
2. Подключите питание. После этого прозвучит
звуковой сигнал, означающий включение модуля
Wi-Fi
3. Зайдите в окно подключений Wi-Fi вашего
устройства и выберите открытую сеть
«DobsonDream»
*Для стабильной работы системы отключите ваше
устройство от мобильного Интернета и прочих
беспроводных соединений
**Приступая к наблюдениям, убедитесь в том, что
ваше устройство имеет заряд батареи не менее 50%.
Разряженный смартфон или планшет могут
самостоятельно отключаться от сети Wi-Fi
(Eng) Planetarium Setup
Before connecting the system, point the telescope tube
approximately to the horizon and the North.
1. Enter the «Settings» window
2. In the «Telescope» subsection go to «Setup»
3. Open the «Scope Type» menu
4. Choose the «Basic Encoder System»
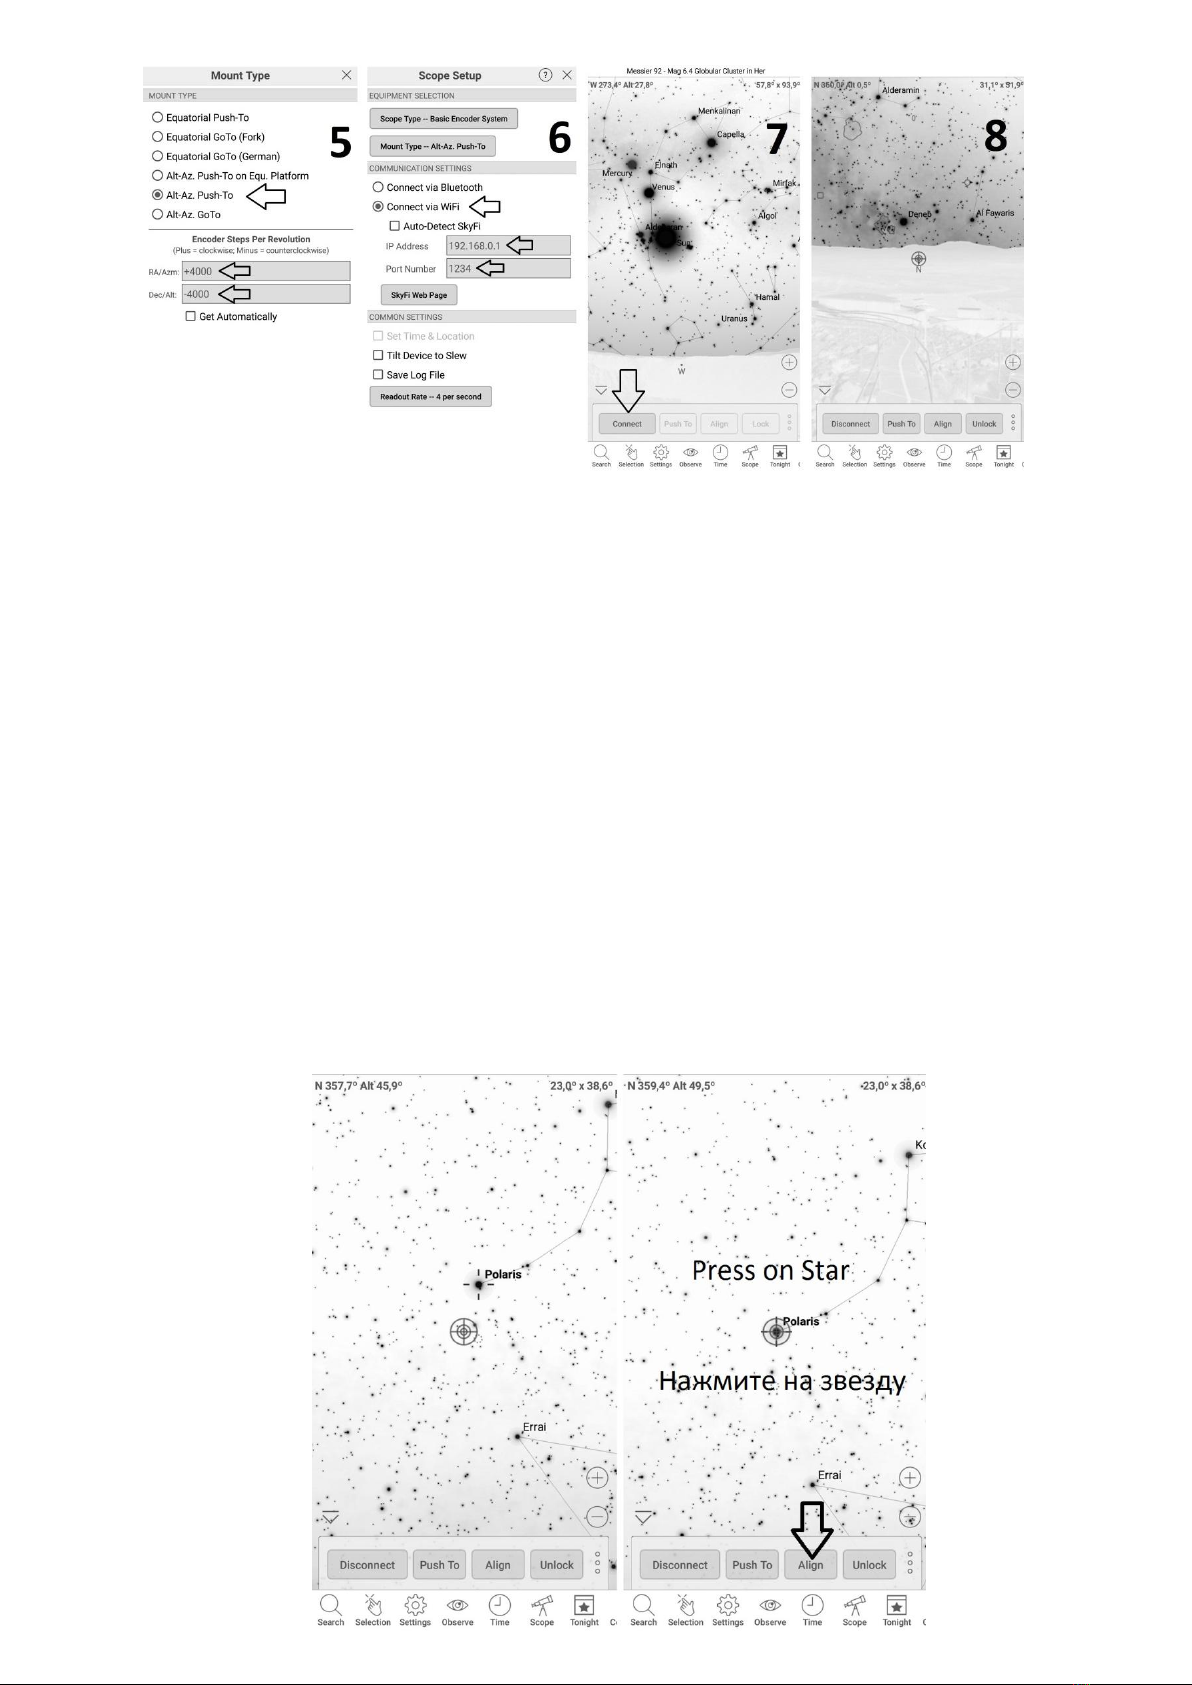
5. In the «Mount Type» menu choose «Alt-Az Push-
To». In the «Encoder Steps Per Revolution» menu
set the values «+4000» for RA/Azm and «-4000»
for Dec/Alt
* If after connecting, the crosshair on the map will move in
the opposite direction from the movement of the scope,
then you need to change the +/- sign in the corresponding
window in the settings of the encoders
** If you plan to use the system with a telescope on an
equatorial platform, then you should select "Alt-Az Push-To
on Equ. Platform”, and to align only after the platform is
turned on and its speed is precisely tuned
6. In the «Communication Settings» choose
«Connect via Wi-Fi»
In the «IP Adress» field enter: «192.168.0.1», in
the «Port Number» field enter: «1234»
7. When finished, return to the planetarium home
page and click the “Scope” button, click the
“Connect” button in the pop-up window
8. If the connection is successful, there will be a
crosshair on the planetarium maps that will shift
synchronously when the telescope tube moves.
The entered settings will be saved in the
application, and to start the following observations
you will need only to click the “Connect” button
(Рус) Настройка планетария
Перед подключением системы направьте трубу
телескопа ориентировочно на горизонт и на Север.
1. Войдите в окно настроек программы «Settings»
2. В подразделе «Telescope» зайдите в «Setup»
3. Откройте меню «Scope Type»
4. Установите «Basic Encoder System»
5. Вменю «Mount Type» установите «Alt-Az Push-To».
Вокне «Encoder Steps Per Revolution» установите
значения «+4000» для RA/Azm и«-4000» для
Dec/Alt
*Если после подключения, перекрестие на картах
будет двигаться в противоположную сторону от
движения трубы, значит в настройках энкодеров
нужно изменить знак +/- в соответствующем окне
**Если планируется использование системы с
телескопом на экваториальной платформе, значит,
следует выбрать «Alt-Az Push-To on Equ. Platform», а
привязку производить только после того как
платформа включена и скорость её ведения точно
настроена
6. Вподразделе «Communication Settings» выберите
«Connect via Wi-Fi».
В окне «IP Adress» введите: «192.168.0.1», а в «Port
Number» введите: «1234»
7. Завершив это, вернитесь на главную страницу
планетария и нажмите кнопку «Scope», во
всплывающем окне нажмите кнопку «Connect»
8. Если подключение прошло успешно, на картах
планетария появится перекрестие, и при движении
трубы телескопа вы также увидите его синхронное
перемещение. Введённые настройки сохранятся в
приложении, и при следующих наблюдениях
достаточно будет нажать кнопку «Connect» для
подключения системы
(Eng) Telescope alignment
Next, you need to align the telescope over two stars so that
the planetarium detects where the telescope is actually
directed.
To do this, point the telescope at a pre-known and
bright object (star or a planet). Find the same light
on your maps and click «Align». Do it to another
star, too. The second object for alignment should
be as far as possible from the first. This will
improve the accuracy of directing
After a successful alignment, you can start
observations. Planetarium maps will accurately
display the direction of the telescope tube. You
can find the object in the planetarium and press
the "Push-To" button, the program will show with
the arrow the direction for the telescope tube to
move towards this object
(Rus) Привязка телескопа
Далее необходимо выполнить привязку телескопа по
двум звёздам, чтобы планетарий «понимал» куда на
самом деле направлен телескоп.
Для этого наведите телескоп на заранее
известное и яркое светило (звезду или планету).
Найдите это же светило на картах и нажмите
кнопку «Align». Тоже проделайте со второй
звездой. Второй объект для выравнивания
должен быть максимально удалён от первого.
Это повысит точность наведения
После удачной привязки можно приступать к
наблюдениям. На картах планетария будет
точно отображаться направление трубы
телескопа. Вы можете найти объект в
планетарии и нажать кнопку «Push-To»,
программа стрелкой будет оказывать
направление для движения трубы телескопа к
этому объекту
(Eng) Change connection settings
If other observers are using the Asterion Push-To system
nearby, open networks may conflict with each other.
Therefore, it is necessary to make individual system
settings and protect the connection with a password. This
can be done through the WEB interface in any browser. To
do this, in the address bar, enter the IP address:
"192.168.0.1"
In the settings window, you can change the connection
channel, network name, IP address and password.
(Rus) Изменение настроек подключения
Если вместе с вами на наблюдениях присутствуют
другие обладатели системы Asterion Push-To, открытые
сети могут конфликтовать между собой. Поэтому
необходимо внести индивидуальные настройки
системы и защитить соединение паролем. Сделать это
можно через WEB-интерфейс в любом браузере. Для
этого в адресной строке введите IP-адрес: «192.168.0.1»
В окне настроек вы сможете изменить канал
подключения, наименование сети IP-адрес и пароль.
(Eng) Warranty
The manufacturer «Asterion» provides a warranty on all
products for 24 months from the date of purchase. In case
of any node failure in the process of intended use, the
manufacturer provides a free repair or replaces the
product. Warranty service shall be performed according to
the effective legislation.
In cases where a product failed due to the unintended use
or excessive loads, the buyer shall be responsible for repair
costs.
If faults occur after the warranty period, we will also be
happy to help you correct them and make our products
even better. You can inform about warranty event by
contacting your dealer or by using the feedback page on
our website
Thank you for having chosen us,
We wish you a clear sky and great observations with
Asterion equipment!
Contact Information:
Website: asterion-ag.blogspot.com
E-mail: asterion.kharkov@gmail.com
Location: Kharkov, Ukraine
Individual Entrepreneur "Ratushniy"
Tax Number 3290603711
Phone number:
+38 (066) 181-56-09 Yuri Ratushniy
(Rus) Гарантия
Производитель предоставляет гарантию на всю
продукцию в течение 24 месяцев с момента покупки. В
случае выхода из строя каких-либо узлов в процессе
естественного использования, производитель
обеспечивает бесплатный ремонт или замену изделия.
Гарантийное обслуживание производится в
соответствии с действующим законодательством.
В тех случаях, когда изделие вышло из строя вследствие
использования не по прямому назначению либо из-за
чрезмерных нагрузок, расходы на ремонт ложатся на
покупателя.
Если неисправности возникают по истечении срока
гарантии, мы также будем рады помочь вам устранить
их и сделать наши товары ещё лучше. Сообщить о
гарантийном случае вы можете, обратившись к
ближайшему дилеру или воспользовавшись страницей
обратной связи на нашем сайте
Благодарим за ваш выбор,
ясного неба и хороших наблюдений с оборудованием
от Asterion!
Контактная информация:
Веб-сайт: asterion-ag.blogspot.com
E-mail: asterion.kharkov@gmail.com
Местонахождение: Харьков, Украина
ФЛП «Ратушный»
ИНН 3290603711
Номер телефона:
+38 (066) 181-56-09 Юрий Ратушный

This manual suits for next models

1

Other Asterion Accessories manuals

Asterion EQ5 Drive Kit User manual

Asterion

Asterion EQ5 Drive Kit User manual

Asterion Push-To Kit User manual

Asterion

Asterion Push-To Kit User manual

Asterion EQ3 User manual

Asterion

Asterion EQ3 User manual

Popular Accessories manuals by other brands

rivacase VA2582 user manual

rivacase

rivacase VA2582 user manual

Moshi ionbank 10K Important Notes & Instructions

Moshi

Moshi ionbank 10K Important Notes & Instructions

Atlantic Ultraviolet Sanidyne 40-0634A owner's manual

Atlantic Ultraviolet

Atlantic Ultraviolet Sanidyne 40-0634A owner's manual

hager WS250 quick start guide

hager

hager WS250 quick start guide

Romoss sense 8P+ user manual

Romoss

Romoss sense 8P+ user manual

Master BCM 191AB User and Maintenance Book

Master

Master BCM 191AB User and Maintenance Book

EcoxGear GDI-EXSPCH260 user guide

EcoxGear

EcoxGear GDI-EXSPCH260 user guide

Gira KNX 5011 00 operating instructions

Gira

Gira KNX 5011 00 operating instructions

S+S Regeltechnik THERMASGARD RPTF Operating Instructions, Mounting & Installation

S+S Regeltechnik

S+S Regeltechnik THERMASGARD RPTF Operating Instructions, Mounting & Installation

sauter EGQ11OF931 Operating Instructions, Mounting & Installation

sauter

sauter EGQ11OF931 Operating Instructions, Mounting & Installation

Eurotops 44115 instruction manual

Eurotops

Eurotops 44115 instruction manual

Eaton iProx Series Technical data

Eaton

Eaton iProx Series Technical data

Dreamland LUXURY F2010 operating instructions

Dreamland

Dreamland LUXURY F2010 operating instructions

Dedrone RF-100 manual

Dedrone

Dedrone RF-100 manual

Alogic P10QC10P18-BK quick start guide

Alogic

Alogic P10QC10P18-BK quick start guide

Zamel sundi SUITA manual

Zamel

Zamel sundi SUITA manual

S+S Regeltechnik AERASGARD KLQ-CO2 Operating Instructions, Mounting & Installation

S+S Regeltechnik

S+S Regeltechnik AERASGARD KLQ-CO2 Operating Instructions, Mounting & Installation

Bumble Bee 92752 Assembly and operating instructions

Bumble Bee

Bumble Bee 92752 Assembly and operating instructions

manuals.online logo
manuals.online logoBrands
  • About & Mission
  • Contact us
  • Privacy Policy
  • Terms and Conditions

Copyright 2025 Manuals.Online. All Rights Reserved.