manuals.online logo
Brands
  1. Home
  2. •
  3. Brands
  4. •
  5. Asterion
  6. •
  7. Accessories
  8. •
  9. Asterion EQ3 User manual

Asterion EQ3 User manual

EQ3 Drive Kit
Specifications:
Характеристики:
Compatible Mounts: Sky-Watcher EQ3, Celestron CG-4, Orion
AstroView and equivalents
Type of motors: bipolar 1.8°/step (1/64 micro-step)
Accuracy: RA - 0.78 arc seconds, Dec - 0.52 arc seconds
Power supply: 12V, at least 3A
Power Socket: 2.5x5.5mm ("+" per center pin)
Package dimensions: 16x16x16cm
Weight: 2 kg
Совместимые монтировки: Sky-Watcher EQ3, Celestron CG-4, Orion
AstroView и аналоги
Тип двигателей: шаговые биполярные 1.8°/шаг (микрошаг 1/64)
Точность: RA - 0.78 угл. сек, Dec - 0.52 угл. сек
Питание: 12В, не менее 3А
Гнездо питания: 2,5х5,5мм ("+" по центру)
Размеры упаковки: 16х16х16см
Вес: 2 кг
Equipment:
Комплектация:
Drives for RA and Dec
EQ Star Controller
Set of pulleys and belts, screws and keys for mounting drives
Hand remote control
DB9-USB cable for PC connection
Drive cables
Wi-Fi module for control with mobile devices
Software CD or USB disc
AC adapter for power from 220V
User's manual
Packaging
Приводы осей RA и Dec
Контроллер EQ Star
Набор шкивов и ремней, винты и ключи для монтажа приводов
Пульт для автономного управления
Кабель DB9-USB для подключения к ПК
Кабели подключения приводов
Модуль Wi-Fi для использования с мобильными устройствами
Компакт диск или USB накопитель с ПО
Сетевой адаптер для питания от 220V
Руководство пользователя
Упаковка
(Eng) Setting the drives on the mount
1. Remove both standard slow-motion knobs from the
mount
2. Using the key included in EQ3 Drive Kit remove the
standard screw for the drive fastening from the DEC axle
housing
3. Install the smaller pulley from the package on the RA
axle as it is shown in Picture 3. The pulley is fixed on the
shaft using two small screws, which need to be tightened
using the smallest of the three Allen keys from the
package. Make sure that the pulley does not touch fixed
parts of the mount during rotation
4. Next, install the bracket of the RA axle drive. For
convenience, you can put a smaller belt from the kit on
the drive pulley and, holding it with your finger, install
the drive
5. Install the bracket as it is shown in picture 5 by putting
the belt on the pulley of the RA axle worm screw, and
put the fastening screw М5 with the washer through the
hole of the bracket
6. Before tightening the screw, make sure that the sidewall
of the bracket fits tightly to the projecting part of the
mount and the drive belt is tight enough. After that, you
can readily tighten the fastening screw
(Рус) Установка приводов на монтировку
1. Снимите обе штатные ручки тонких движений с
монтировки
2. На корпусе оси DEC необходимо выкрутить штатный
винт для крепления привода, в комплекте поставки EQ3
Drive Kit содержится необходимый ключ
3. На ось RA следует установить меньший шкив из
комплекта поставки так, как это изображено на фото
№3. Шкив фиксируется на валу с помощью двух
небольших винтов, которые необходимо затянуть,
используя наименьший из трёх комплектных
шестигранных ключей. При этом стоит проследить,
чтобы при вращении шкив не касался неподвижных
частей монтировки
4. Далее необходимо установить кронштейн привода оси
RA. Для удобства можно сразу надеть меньший ремень
из комплекта на шкив двигателя и, придерживая его
пальцем, перейти к установке самого привода
5. Установите кронштейн как на картинке №5, надев
ремень на шкив червячного винта оси RA, и проденьте
крепёжный винт М5 с шайбой сквозь отверстие
кронштейна
6. Прежде чем туго затянуть винт, убедитесь, что боковая
стенка кронштейна плотно прилегает к выступающей
части монтировки, а приводной ремень достаточно
туго натянут. После этого можно уверенно затянуть
крепёжный винт
7. Next move on to the DEC axle. Install a big pulley from
the kit as it is shown in picture 7. Ensure that it is
installed as close to the housing as possible, but does
not block up the rotation
8. Put a bigger belt from the kit on the main pulley of the
DEC axle drive and install the drive on the mount
9. Using an included M6 screw fix firmly the drive on the
mount
10. To adjust the belt tension, loosen the four fastening
screws of the drive and pull it aside, assuring the
appropriate tension and tightening the screws at the
same time
11. Now connect the cables to both drives
12. Connect the drives with the control box. The drive of
the RA axle shall be connected to the RA connector of
the control box, the drive of the declination axle –to
the DEC connector.
On the front panel of the controller you will find the
connection port for the ST4 remote control and the DB9
port for connecting to the computer via the supplied
USB cable. The DB9 port is also used for the Wi-Fi
module connection if it is planned to make control from
mobile devices.
7. Переходим к оси DEC и устанавливаем на вал
большой шкив из комплекта, как это указано на фото
№7. Также следим за тем, чтобы он был установлен
как можно ближе к корпусу, но не затирал его при
вращении
8. Надеваем больший ремень из комплекта на
ведущий шкив привода оси DEC и устанавливаем
привод на корпус монтировки
9. С помощью комплектного винта М6 нужно надёжно
зафиксировать привод на корпусе
10. Для регулировки натяжения ремня следует ослабить
четыре крепёжных винта двигателя и оттянуть его в
сторону, обеспечивая нужную натяжку, и
параллельно затянуть винты
11. Теперь можно подключить кабели к обоим
приводам
12. И соединить их с блоком управления. Привод оси
прямого восхождения нужно подсоединить к
разъёму RA на корпусе контроллера, привод оси
склонений к разъёму DEC.
На лицевой панели контроллера вы найдёте порт
подключения пульта ST4 и порт DB9 для
подключения к компьютеру через комплектный USB
кабель. Порт DB9 также используется для
подключения Wi-Fi модуля, если планируется
управления с мобильных устройств.
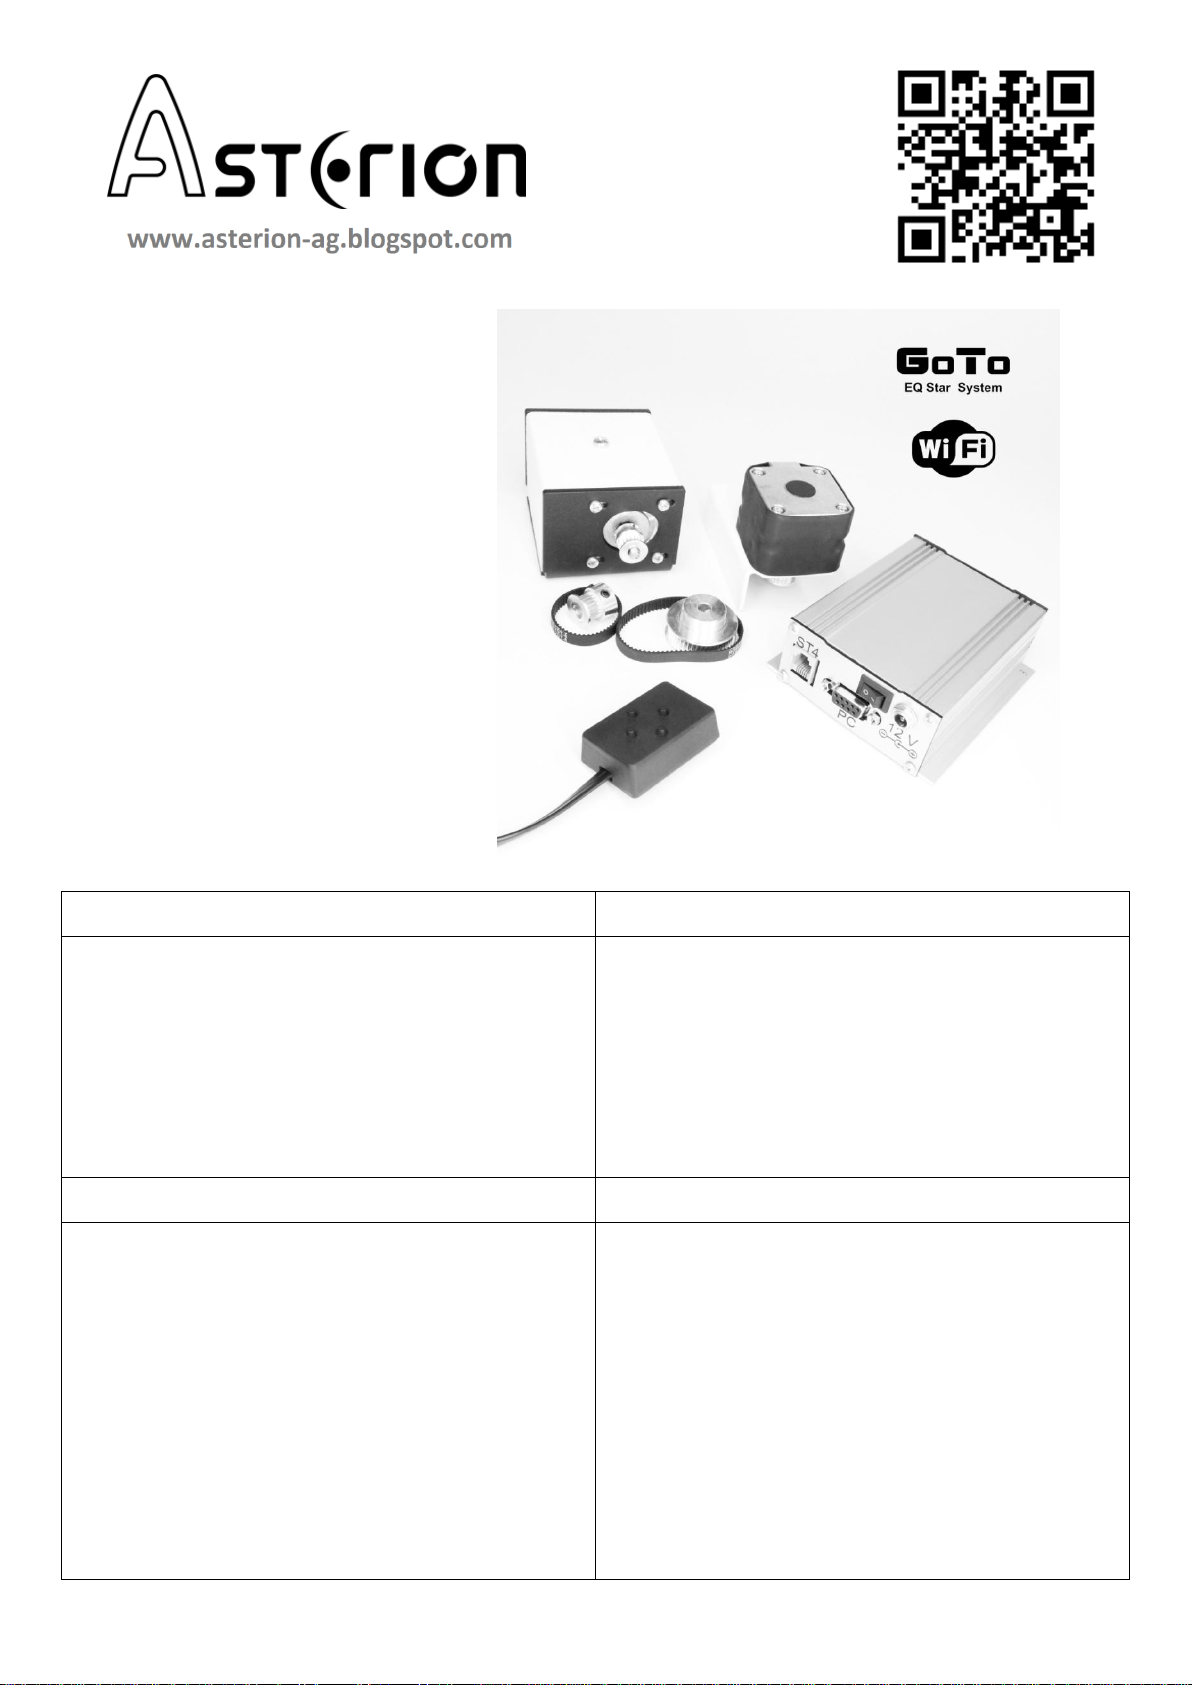
(Eng) Control system capabilities
EQ Star control system is designed to automate the control of equatorial
mounts, and can be used in autonomic mode and in a control mode using a
computer or mobile device (phone, tablet, etc.). On a PC, the system works
with any astronomical software that supports the ASCOM platform:
http://www.ascom-standards.org/
For example, the following software could be used: planetarium Stellarium,
Cartes de Ciel, StarCalc and others. From the software for astrophotography
and guiding, EQ Star supports MaximDL, Guidemaster, PHDGuiding and
others. When you work with a PC, EQ Star can find sky objects and track
them automatically (guide) during the astrophotography with long
exposure. To work from a PC, you have to install EQMOD ASCOM-
application:
http://eq-mod.sourceforge.net/
Telescope control from mobile devices helps to automatically find sky
objects. In this case in the planetarium software on a mobile device as a
control telescope shall be selected Celestron or SynScan, and as a mount -
German equatorial mount. EQ Star works with SkySafari, Orion StarSeek,
DSOPlaner, etc.
The control system connects to a PC with a cable from the package or with
the Wi-Fi interface. The interoperability of the EQ Star system with a variety
of platforms, drivers and applications provides a user with especially
comfortable conditions for mounting control depending on the assigned
tasks.
For example, an astrophotographer usually uses a laptop or a PC to search,
targeting and guiding the object during a long exposure. Such capabilities
are available mostly in software running in Windows. But for a visual
astronomy amateur prefers to control a mount with a compact smartphone
or tablet, rather than using a PC or laptop.
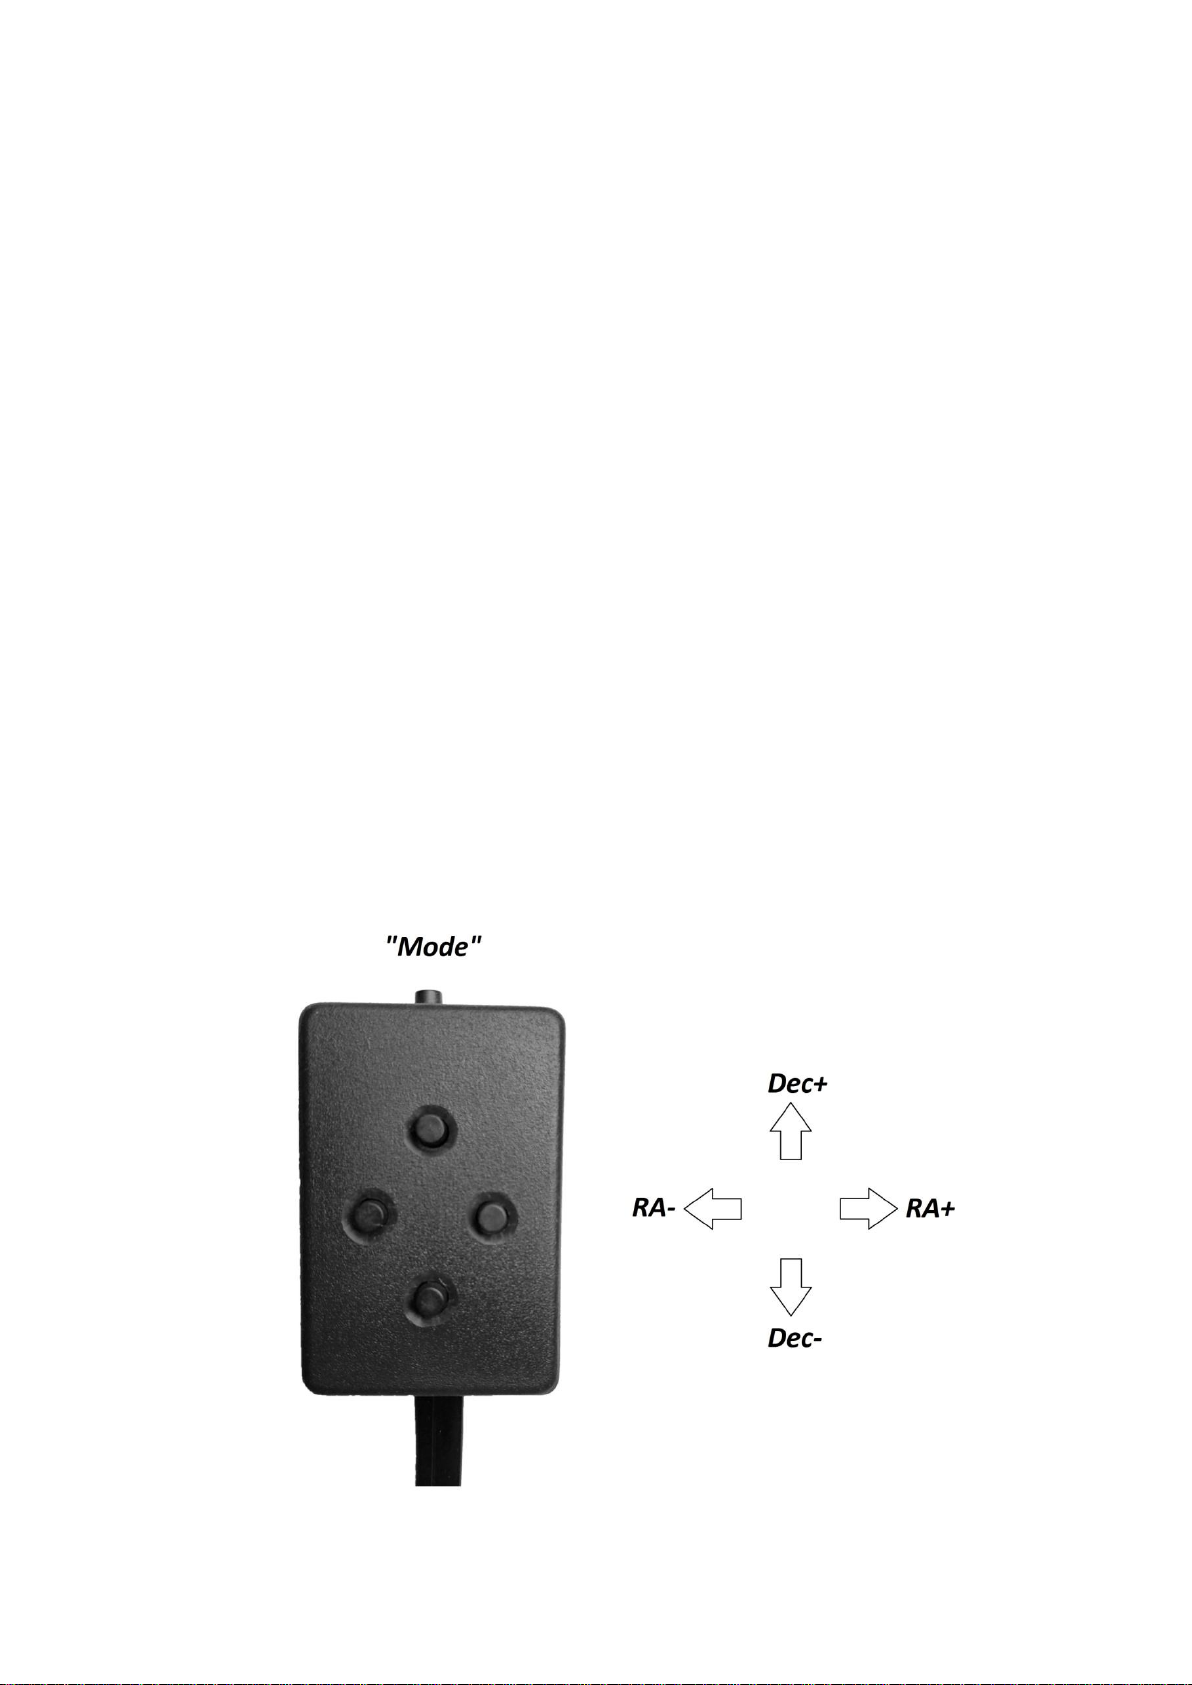
EQ Star is also supplied with a universal joystick for manual control. It
allows you to manage mount autonomously without a computer,
smartphone or tablet.
(Рус) Возможности системы управления
Система управления EQ Star предназначена для автоматизации
управления экваториальными монтировками, и может использоваться
как в автономном режиме, так и в режиме управления с помощью
компьютера или мобильного устройства (смартфона, планшета и т.д.).
На персональном компьютере (далее ПК) система работает с любыми
астрономическими программами, которые поддерживают ASCOM
платформу: http://www.ascom-standards.org/
Например, с планетариями Stellarium, Cartes de Ciel, StarCalc и др. Из
программ для астрофотографии и гидирования EQ Star поддерживает
работу с MaximDL, Guidemaster, PHD Guiding и др. При работе с ПК, он
позволяет находить объекты космоса и автоматически сопровождать
их (гидировать) во время астро фотосъемки с длительными
выдержками. Для работы с ПК необходимо установить ASCOM-
приложение EQMOD: http://eq-mod.sourceforge.net/
Управление телескопом с мобильных устройств позволяет
автоматически находить объекты космоса. При этом в программе
планетарии в качестве телескопа управления должен быть выбран
Сelestron или SynScan, а в качестве монтировки - немецкая
экваториальная монтировка. Система работает со SkySafari, Orion
StarSeek, DSOPlaner и др.
Связь с ПК осуществляется по кабелю из штатной комплектации или по
Wi-Fi интерфейсу. Разнообразие платформ, драйверов и приложений, с
которыми способна работать система, предоставляет пользователю
особо комфортные условия управления монтировкой в зависимости от
поставленных задач.
Например, астрофотограф обычно использует ноутбук или ПК для
поиска, наведения или гидирования объекта во время длительной
экспозиции. Такими возможностями в основном обладают программы,
работающие под Windows. Но для любителя визуальной астрономии
гораздо удобнее управлять монтировкой с помощью компактного
смартфона или планшета, нежели с помощью ПК или ноутбука.
EQ Star также поставляется с универсальным джойстиком для ручного
управления. Он позволяет автономно управлять монтировкой без
сторонних устройств.
(Eng) Autonomous mode
Connecting the drives to the controller, plug the hand
controller to the ST4 port and connect the power supply to
the controller power socket. After the power key is turned
on, three short and one long beep will sound, indicating that
the system is ready for use. At this time the mount will
automatically start tracking the object with star speed.
Switching the mounting speed is performed using the
joystick items Ra+ and Ra- holding the “Mode” button. Each
speed selection is accompanied by a short beep according to
the following scheme: one signal - Stop, two signals - Star
speed, three - Moon speed, four - Solar speed.
To switch the speed of correction/guiding of the mount, use
the items Dec+ and Dec- holding the “Mode” button. Each
speed selection is accompanied by a long beep according to
the following scheme: one signal - x20, two signals - x65,
three - x200, four - x500.
ATTENTION!
After the system is connected and started, it is strictly
forbidden to connect/disconnect drives or other devices.
All manipulations shall be performed only when the power
button is off. Otherwise, the controller electronics may fail.
(Рус) Автономный режим
Соединив приводы с контроллером, подключаем пульт
управления в разъём ST4 и подсоединяем блок питания к
гнезду питания контроллера. После включения клавиши
питания прозвучат три коротких и один длинный
сигналы, свидетельствующие о готовности системы к
работе. При этом монтировка автоматически начнёт
слежение за объектом со звёздной скоростью.
Переключение скорости ведения монтировки
производится с помощью позиций джойстика Ra+ и Ra-
при удержании кнопки «Mode». Каждый выбор скорости
подтверждается коротким звуковым сигналом по
следующей схеме: 1 сигнал-остановка, 2-звездная, 3-
лунная, 4-солнечная скорости.
Переключение скорости коррекции/наведения
монтировки производится с помощью позиций
джойстика Dec+ и Dec- при удержании кнопки «Mode».
Каждый выбор скорости подтверждается длинным
звуковым сигналом по следующей схеме: 1 сигнал - x20,
2- x65, 3- x200, 4- x500.
ВНИМАНИЕ!
После подключения и запуска системы категорически
запрещено подключение/отключение приводов или
прочих устройств. Все манипуляции следует
производить только после выключения клавиши
питания. В противном случае это может привести к
выходу из строя электроники контроллера.
(Eng) Control from Mobile Device
Copy the SynScan Pro application from the supplied soft set to the mobile
device and install it on it. The application is also available on the website
http://skywatcher.com/ or Google Play / AppStore.
Connect the Wi-Fi module to the DB9 port and turn on the power. The
telescope mount shall be horizontally aligned and its polar axis shall be
pointed towards the Pole. The telescope tube shall be directed toward the
North Star.
1. Open the device’s WiFi connection and select the EQStar network. For
a stable connection, turn off the mobile Internet and other wireless
networks. Open the SynScan Pro application on the device. To connect
to the system, click the Connect button.
2. After connecting, the mount type shall be displayed on the screen -
EQ6. In the Settings / Location menu, check the coordinates of the
observation point
3. When the device’s GPS sensor is turned on, the application will read
the coordinates automatically
4. In the Alignment section, align to sky objects. The application will offer
several ways to configure
5. Having selected a well-known object from the list, press GoTo and the
mount will start pointing at it
6. Next, center the object in the field of view of the eyepiece and press
the button with the icon in the center of the screen. This completes the
alignment to one object. If you want to adjust as accurately as possible,
it’s worth choosing several objects
The application simulates all the functionality of a standard GoTo remote
control for Sky-Watcher or Celestron mounts. You can search for objects or
manage the mount in the same way as you might using a remote control
(Рус) Управление с Мобильного Устройства
Скопируйте приложение SynScan Pro из комплектного набора ПО на
мобильное устройство и установите его на нём. Приложение также
доступно на официальном сайте http://skywatcher.com/ или на Google
Play / AppStore.
Подключите Wi-Fi модуль в разъем DB9 и включите питание.
Монтировка телескопа должна быть горизонтально выставлена по
уровню, а её полярная ось направлена на Полюс. Труба телескопа
должна быть направлена в область Полярной звезды.
1. Откройте WiFi подключения устройства и выберите сеть EQStar. Для
стабильной работы соединения отключите мобильный Интернет и
прочие беспроводные сети. Откройте на устройстве приложение
SynScan Pro. Для подключения к системы нажмите кнопку Connect
2. После подключения на экране должен отобразиться тип монтировки
- EQ6. В меню Settings / Location проверьте правильность координат
точки наблюдений
3. При включенном GPS датчике устройства приложение должно
считать координаты самостоятельно
4. Вразделе Alignment сделайте привязку к объектам звёздного неба.
Приложение предложит несколько способов настройки
5. Выбрав из списка хорошо известный вам объект, нажмите GoTo и
монтировка начнёт наведение на это светило
6. Далее следует отцентрировать объект в поле зрения окуляра и
нажать кнопку с пиктограммой по центру экрана. На этом привязка
по одному объекту закончена. Если вы хотите провести настройку как
можно точнее, стоит выбрать несколько объектов привязки
Приложение имитирует весь функционал стандартного пульта GoTo
монтировок Sky-Watcher или Celestron. Вы можете выполнять поиск
объектов или управлять монтировкой так же, как это делает пульт.
(Eng) Control from SkySafari
SkySafari is one of the most modern and convenient planetariums.
If you wish more functions than ones provided by SynScan Pro, you
should try to use SkySafari. The application is available for
download on the Google Play / App Store or from the official site at
the link:
https://skysafariastronomy.com/
SkySafari allows you to connect to the telescope only in paid Plus or
Pro versions
1. Without leaving the SynScan Pro application, launch the
SkySafari planetarium. In this way, the telescope’s alignment to
the celestial coordinates will be saved. Go to Settings window
2. In the menu, select the subsection Telescope / Setup
3. Fill in the following items:
Scope Type - Sky-Watcher SynScan
Mount Type - Equatorial GoTo (German)
Select a connection type Connect via WiFi
Enter the IP address - 127.0.0.1
Port number –11882
4. Returning to the main program window, click the Connect
button. After a successful connection, the GoTo button will
appear on the bottom panel. Now you can select the object of
interest on the maps by simply clicking on it. Having made a
choice, press GoTo and the mount will start pointing to this
object. After viewing, click the Stop button and select the next
object
Remember that after alignment of the telescope and GoTo
adjustment, all manipulations with the mount should be performed
only by the hand control or control software. If you release the axle
brakes and manually direct the telescope, all GoTo settings will
reset.
(Rus) Управление с помощью SkySafari
SkySafari представляет собой один из наиболее современных
и удобных планетариев. Если вам недостаточно
возможностей, которые предоставляет система SynScan
Pro, то непременно стоит попробовать использовать этот
планетарий. Приложение доступно для скачивания на Google
Play / App Store или с официального сайта по ссылке:
https://skysafariastronomy.com/
SkySafari позволяет осуществлять подключение к телескопу
только в платных версиях Plus или Pro.
1. Не выходя из приложения SynScan Pro, запустите
планетарий SkySafari. Таким образом, уже сделанная
привязка телескопа к небесным координатам сохранится.
Зайдите в окно настроек Settings
2. В меню выберите подраздел Telescope/Setup
3. Заполните следующие пункты:
Scope Type –Sky-Watcher SynScan
Mount Type –Equatorial GoTo (German)
Выберите тип подключение Connect via WiFi
Введите IP-адрес - 127.0.0.1
Номер порта –11882
4. Вернувшись в главное окно программы, нажмите кнопку
Connect. После успешного подключения на нижней панели
появится кнопка GoTo. Теперь вы можете выбрать
интересуемый объект на картах простым нажатием на него.
Сделав выбор, нажимаете GoTo и монтировка начнёт
наведение на этот объект. После просмотра, нажмите
кнопку Stop и выберите следующий объект
Помните, что после привязки телескопа и настройки GoTo, все
манипуляции с монтировкой следует производить
исключительно с помощью пульта управления или
управляющих программ. Если отпустить тормоза осей и навести
телескоп вручную, все настройки GoTo будут утеряны.
(Eng) Connection to a PC
Open the software CD or USB drive.
1. Install the virtual COM port driver. After installing the
equipment, a new device will appear in the system:
Silicon Labs CP210x USB to UART Bridge (COMx)
Go to the Windows Device Manager and make sure that
the device uses the COM2 port in the Ports (COM and
LPT) section. If the port is different, you need to change it
in the settings
2. Install the ASCOM Platform
3. Install the Ascom EQMOD driver
4. Connect the DB9-USB cable to the USB port of your
computer. After turning on the power, you will hear a
sound signal indicating that the system is ready for PC
control
5. Read the control unit settings using the EQStar settings
application. If they differ from the setting you need,
change and save the correct ones
(Рус) Подключение к ПК
Откройте CD-диск или USB накопитель с комплектом
программного обеспечения.
1. Установите драйвер виртуального COM-порта. После
установки оборудования в системе появится новое
устройство:
Silicon Labs CP210x USB to UART Bridge (COMx)
Зайдите в Диспетчер Устройств Windows и
убедитесь в том, что в разделе Порты (COM и LPT)
устройство использует порт COM2. Если порт
отличается, необходимо заменить его в
настройках
2. Установите платформу ASCOM Platform
3. Установите драйвер EQMOD Ascom
4. Подключите кабель DB9-USB к USB-порту вашего
компьютера. После включения питания вы услышите
звуковой сигнал, показывающий готовность системы
к управлению с ПК.
5. Считайте настройки блока управления с помощью
приложения EQStar settings. Если они не
соответствуют требуемым, измените и сохраните
правильные настройки
(Eng) Control from a PC
In the planetarium software on your PC, select the EQMOD
telescope in the ASCOM menu, and in its settings select the
COM-2 port.
Now you can connect to the planetarium. After a successful
connection, it is necessary to configure the telescope
according to the EQMOD instructions:
http://eq-mod.sourceforge.net/tutindex.html
After aligning the telescope with sky objects, you can point
it. To do this, right-click on the desired object in the
planetarium maps and select the GoTo menu item. The
mount will start pointing, and after completing the
movement, a beep will sound.
(Eng) Guiding for astrophotography
To take photos of sky objects with a long exposure,
compensation for telescope tracking errors is required. For
this, EQStar supports two control options:
Via the ST-4 auto guide port
Via ASCOM PulseGuide from EQMOD
Direction parameters in both modes are set from the
EQMOD application panel:
http://eq-mod.sourceforge.net/docs/EQASCOM_Guiding.pdf
ASCOM PulseGuide does not require additional units or
cables. It is enough to use the ASCOM EQMOD application as
an automatic guiding. Further instructions can be found in
the documentation for EQMOD.
It is also possible to control autonomously via the ST-4 port
without using a PC. For example, if you use a DSLR camera
for photography, then a laptop or PC is not needed. Photos
can be saved to the camera’s flash memory. In this case,
Skywatcher SynGuider or an analog (Standalone
AutoGuider) can be conveniently used as an auto guide.
(Рус)Управление с ПК
В программе планетарии на вашем ПК выберите в меню
ASCOM телескопа EQMOD, а в его установках выберите
COM-2 порт.
Теперь вы можете подключиться к планетарию. После
успешного подключения необходимо выполнить
настройку телескопа в соответствии с инструкциями
EQMOD:
http://eq-mod.sourceforge.net/tutindex.html
После выравнивания телескопа по небесным объектам
можно выполнить наведение. Для этого необходимо
щелкнуть правой кнопкой мыши на нужном объекте в
картах планетария и выбрать пункт меню GoTo.
Монтировка начнёт наведение, а после окончания
движения последует звуковой сигнал.
(Рус)Гидирование для астрофотографии
Для фотографирования космических объектов с
длинными выдержками требуется компенсация ошибок
отслеживания телескопа. Для этого EQStar поддерживает
два варианта управления:
Через порт автогида ST-4
Через импульсный проводник ASCOM PulseGuide
от EQMOD
Параметры направления в обоих режимах задаются с
панели приложения EQMOD:
http://eq-mod.sourceforge.net/docs/EQASCOM_Guiding.pdf
Для режима ASCOM PulseGuide не требуются
дополнительные блоки и кабели. Достаточно в качестве
автоматического гидирования использовать приложение
ASCOM EQMOD. Дальнейшие инструкции можно изучить
в документации для EQMOD.
Также возможно автономное управление через порт ST-4
без использования ПК. Например, если для съёмок
используется зеркальная камера, то ноутбук или ПК не
нужны. Фотографии могут быть сохранены на флэш-
память камеры. В этом случае Skywatcher SynGuider или
аналог (Автономный Автогидер) может быть удобно
использован в качестве автогида.
(Eng) Warranty
The manufacturer «Asterion» provides a warranty on all
products for 24 months from the date of purchase. In case
of any node failure in the process of intended use, the
manufacturer provides a free repair or replaces the product.
Warranty service shall be performed according to the
effective legislation.
In cases where a product failed due to the unintended use
or excessive loads, the buyer shall be responsible for repair
costs.
If faults occur after the warranty period, we will also be
happy to help you correct them and make our products even
better. You can inform about warranty event by contacting
your dealer or by using the feedback page on our website
Thank you for having chosen us,
We wish you a clear sky and great observations with
Asterion equipment!
Contact Information:
Website: asterion-ag.blogspot.com
E-mail: asterion.kharkov@gmail.com
Location: Kharkov, Ukraine
Individual Entrepreneur "Ratushniy"
Tax Number 3290603711
Phone number:
+38 (066) 181-56-09 Yuri Ratushniy
(Rus) Гарантия
Производитель предоставляет гарантию на всю
продукцию в течение 24 месяцев с момента покупки. В
случае выхода из строя каких-либо узлов в процессе
естественного использования, производитель
обеспечивает бесплатный ремонт или замену изделия.
Гарантийное обслуживание производится в соответствии
с действующим законодательством.
В тех случаях, когда изделие вышло из строя вследствие
использования не по прямому назначению либо из-за
чрезмерных нагрузок, расходы на ремонт ложатся на
покупателя.
Если неисправности возникают по истечении срока
гарантии, мы также будем рады помочь вам устранить их
и сделать наши товары ещё лучше. Сообщить о
гарантийном случае вы можете, обратившись к
ближайшему дилеру или воспользовавшись страницей
обратной связи на нашем сайте
Благодарим за ваш выбор,
ясного неба и хороших наблюдений с оборудованием от
Asterion!
Контактная информация:
Веб-сайт: asterion-ag.blogspot.com
E-mail: asterion.kharkov@gmail.com
Местонахождение: Харьков, Украина
ФЛП «Ратушный»
ИНН 3290603711
Номер телефона:
+38 (066) 181-56-09 Юрий Ратушный

Other Asterion Accessories manuals

Asterion Push-To Kit User manual

Asterion

Asterion Push-To Kit User manual

Asterion Push-To Kit User manual

Asterion

Asterion Push-To Kit User manual

Asterion EQ5 Drive Kit User manual

Asterion

Asterion EQ5 Drive Kit User manual

Popular Accessories manuals by other brands

Douglas D-Pro Max Series Assembly instructions and owner's manual

Douglas

Douglas D-Pro Max Series Assembly instructions and owner's manual

VERIS INDUSTRIES, INC. GWN Series installation guide

VERIS INDUSTRIES, INC.

VERIS INDUSTRIES, INC. GWN Series installation guide

Data Industrial 200 Series owner's manual

Data Industrial

Data Industrial 200 Series owner's manual

steute RF 96 LT SW868 Mounting and wiring instructions

steute

steute RF 96 LT SW868 Mounting and wiring instructions

Mizuho osi 5803 owner's manual

Mizuho osi

Mizuho osi 5803 owner's manual

GF Signet 3-2630 Series manual

GF

GF Signet 3-2630 Series manual

Genius Media Pointer T905 user manual

Genius

Genius Media Pointer T905 user manual

Simrad PI GEOMETRY datasheet

Simrad

Simrad PI GEOMETRY datasheet

Gogen G2 instructions

Gogen

Gogen G2 instructions

ehang GHOSTDRONE 2.0 operating manual

ehang

ehang GHOSTDRONE 2.0 operating manual

Pioneer SGY-PM910H2 installation manual

Pioneer

Pioneer SGY-PM910H2 installation manual

Teledyne Everywhereyoulook CCD261-04 quick start guide

Teledyne

Teledyne Everywhereyoulook CCD261-04 quick start guide

ekwb EK-Vector Strix RTX 2070 RGB installation manual

ekwb

ekwb EK-Vector Strix RTX 2070 RGB installation manual

Baumer UNDK 20N6914/S35A manual

Baumer

Baumer UNDK 20N6914/S35A manual

Crown PIP-ISO reference guide

Crown

Crown PIP-ISO reference guide

Pantone PTPB50Y user guide

Pantone

Pantone PTPB50Y user guide

Kemo M152K Assembly instructions

Kemo

Kemo M152K Assembly instructions

Lika SME1 user manual

Lika

Lika SME1 user manual

manuals.online logo
manuals.online logoBrands
  • About & Mission
  • Contact us
  • Privacy Policy
  • Terms and Conditions

Copyright 2025 Manuals.Online. All Rights Reserved.