Hyco Sapphire SAP02HC Specification sheet

Product Instruction Manual
Sapphire
AP02HC
Hot and cold floor standing cooler
Version 3.2 Jan 2015
V16.5/1

2
Thank you for purcha ing the SAP02HC from our Sapphire range of
chilled water product . The SAP02HC provide in tant high quality
chilled water together with filtered hot water for tea and coffee making.
Plea e read and follow the e in truction carefully to en ure that
in tallation and operation i imple and afe.
1. Important safety points
•nly connect the unit to a single phase supply as specified on the rating plate
•Do not carry the appliance by the supply cord
•The supply cord cannot be replaced by the user. If the cord is damaged the
appliance should be returned to the manufacturer or an authorised service
agent for replacement
•The unit should be installed with easy access to the electrical plug
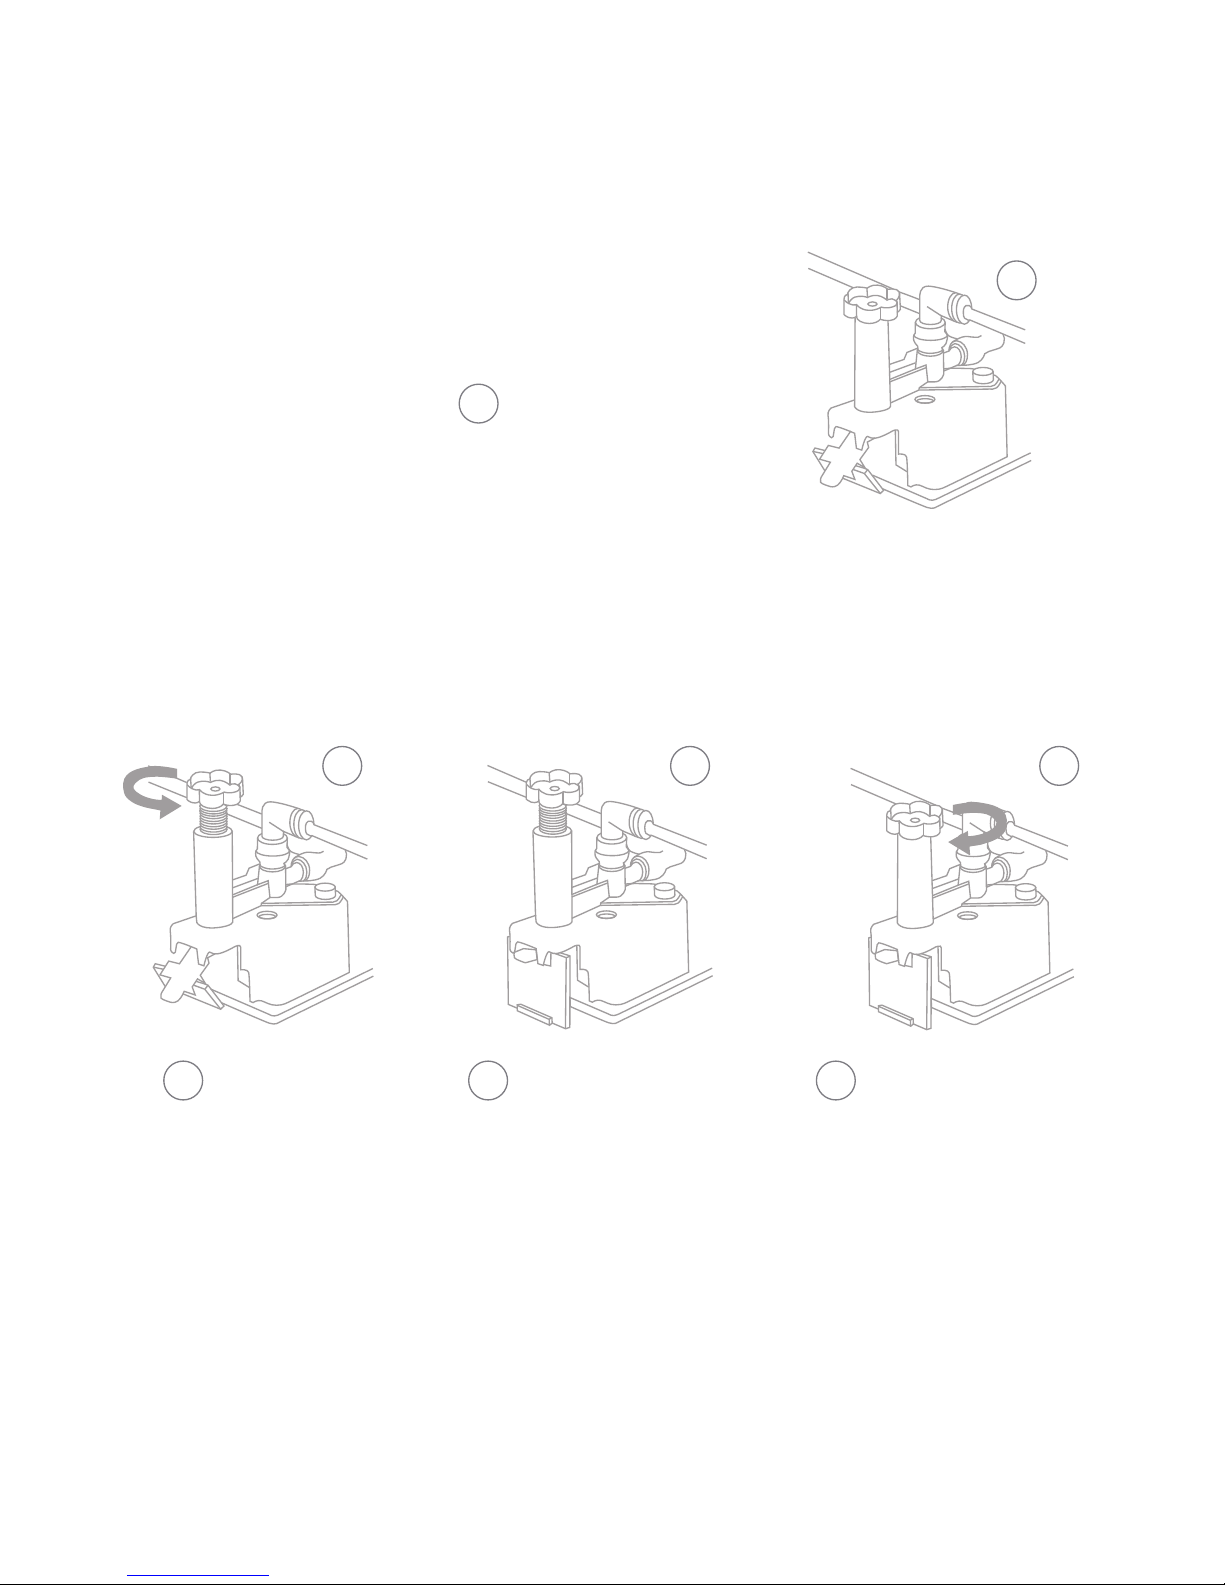
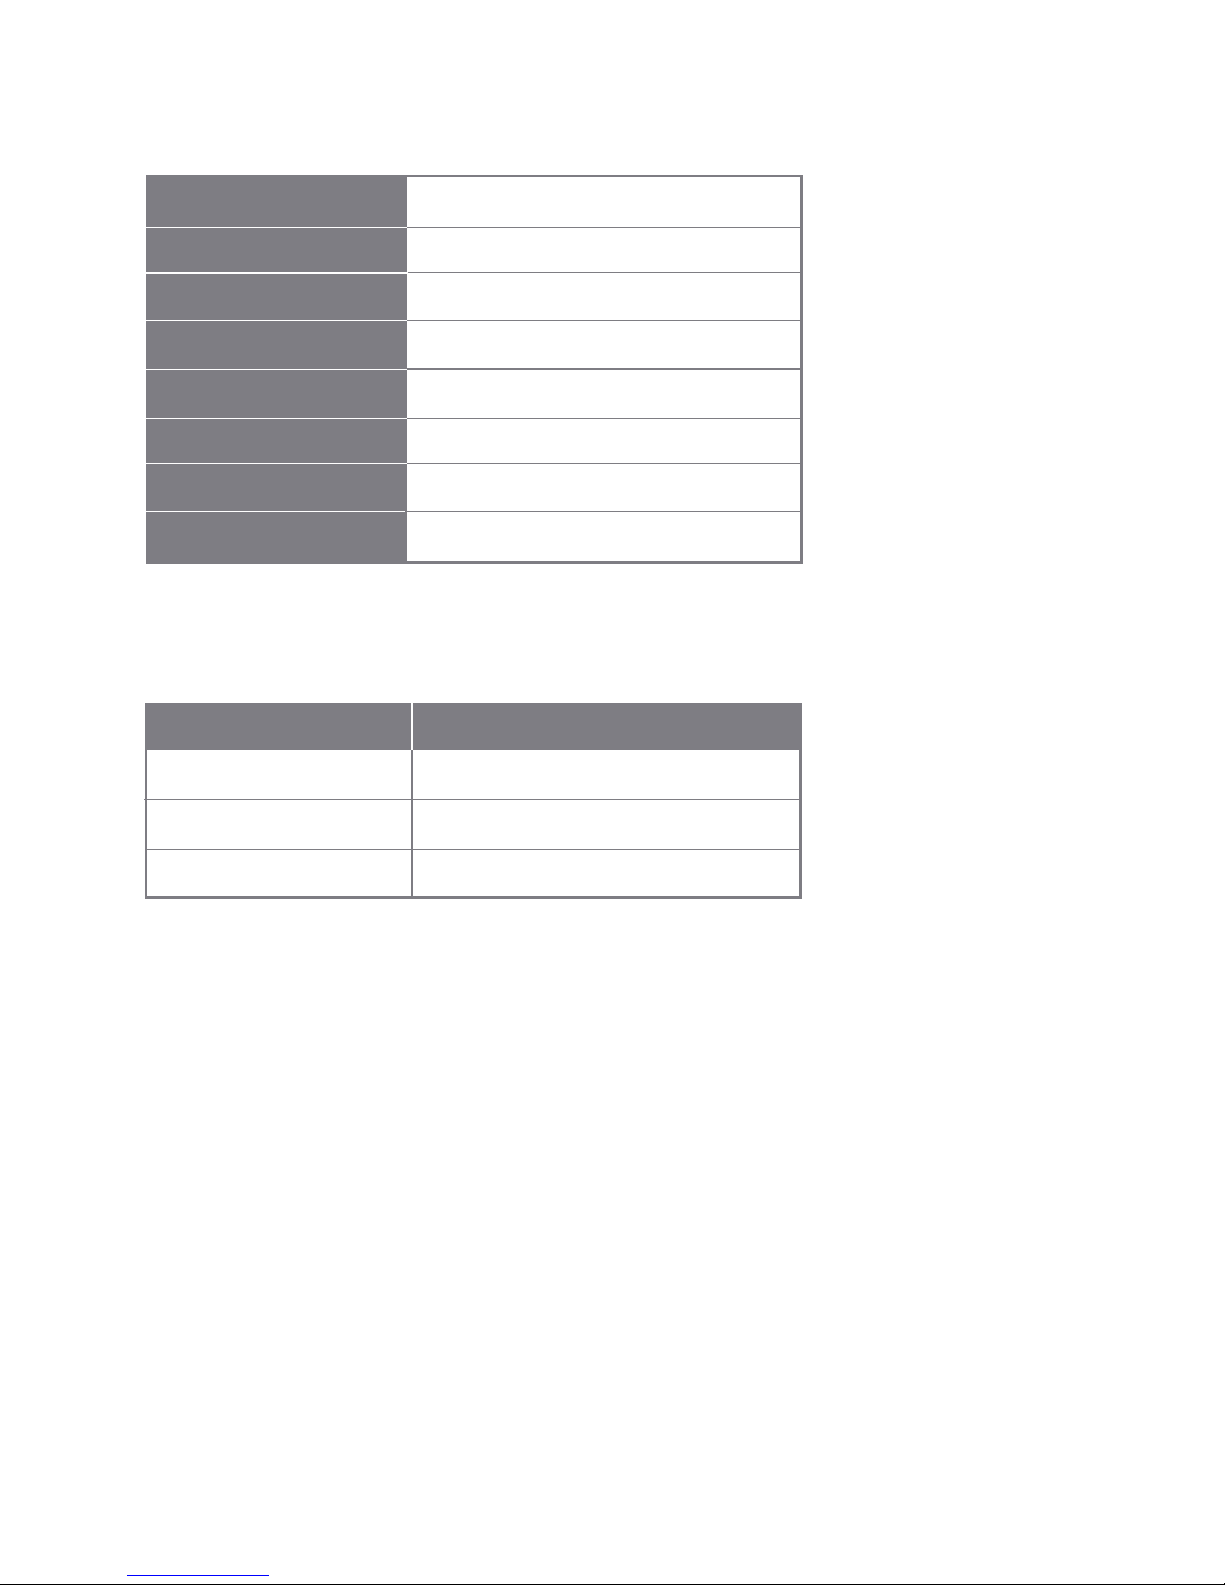
•Ensure that water has flowed from the hot water faucet before plugging and
switching the appliance on to heat. If the dispenser is turned on with an empty
tank it can be damaged
•This appliance should be installed indoors, on a flat surface no less than 15cm
from the back wall
•Install the appliance in a dry, well ventilated area; keep the ventilation openings
at the back of the unit uncovered and unobstructed
•Do not damage the refrigerant circuit
•This appliance can be used by children aged from 8 years and above and
persons with reduced physical, sensory or mental capabilities or lack of experience
and knowledge if they have been given supervision or instruction concerning use
of the appliance in a safe way and understand the hazards involved. Children
shall not play with the appliance. Cleaning and user maintenance shall not be
made by children without supervision

3
•Children should not use the hot tap when unsupervised
•This appliance is intended to be used in household and similar applications such as:
• staff kitchens areas in shops, offices and other working environments
• farm houses and by clients in hotels
• bed and breakfast type environments
• catering and similar nonretail applications
•If the appliance is not going to be used for a long period of time, unplug it and drain
•Before first use and after a long period of no use, the water tank and pipes should
be sanitised
•Connect the unit NLY to potable drinking water.

4
N . NAME N . NAME
1 Heating indicator light 7 Access panel
2 Cooling indicator light 8 Heating switch
3 Safety lock 9 Cooling switch
4 Cold water tap 10 Power cord
5 Hot water tap 11 Water drainage
6 Drip tray 12 Water inlet
1
2
3
4
5
6
7
8
9
10
11
12

5
2. Installation
•The unit should be installed with easy access to the electrical plug
•This appliance should be installed indoors, on a flat surface no less than 15cm
from the back wall
•Install the appliance in a dry, well ventilated area; keep the ventilation openings
at the back of the unit uncovered and unobstructed
•Do not install the heater where the consequences of a leak could be unusually
severe
•When choosing a location for the heater, consider the visibility of any leak that
might arise. This is particularly important when locating in a concealed area such
as a cupboard.
Plumbing
1. Install the supplied filter and valve kit as shown as per the installation kit
instruction sheet provided.
2. A length of tubing (approx. 5m) is provided and can be found inside the unit.
To access the tubing you will need to remove the front panel. More tubing can
be purchased on request.
switch as required
1
2. Pull the door outwards
1. Hold the door and press it down
1

6
To replace the front
3. Connect the ¼” plastic tubing provided to the water inlet at the rear of the
cooler and connect to the installation kit as per instructions provided.
switch as required
1
the door and press it down
1. Ensure locating pins are
lined up at base of unit
2. Push the door
downwards and close
3
switch as required
1
the door and press it down
3. The door should “snap”
back into place
switch as required
1
the door and press it down
1

4. Turn on water supply to the unit and check all connections
(including the installation kit) for leaks.
5. BEF RE switching power onto the unit hold down the hot water lock button
whilst operating the hot water tap until water flows.
En ure that water ha flowed from the hot water faucet before plugging
and witching the appliance on to heat. If the di pen er i turned on with
an empty tank it can be damaged.
Electrical
•nly connect the unit to a single phase supply as specified on the rating plate
•The unit should be installed with easy access to the electrical plug
7
ON
OFF
ON
OFF
2. Turn on the hot and cold
switch as required
1. Plug the unit in
2
the door and press it down
1
switch as required
1
2
1
the door and press it down
1
1
2

3. Operation
Hot water
Turn on the heating switch (red) on the
back of the unit. The heating circuit will be
switched on and heating power light will
illuminate as per Fig 1. When the hot water
set point is reached the hot water ready
light will illuminate as per Fig 2.
Chilled water
Turn on the cooling switch (green) on the
back of the unit. The cooling circuit will be
switched on and the cooling power light
will illuminate as per Fig 3. When the cold
water set point is reached the chilled water
ready light will illuminate as per Fig 4.
4. Maintenance
•Before first use and after a long period of no use, the water tank and pipes
should be sanitised
•Clean the outside of the unit with a soft damp cloth only, do not use harsh or
abrasive chemicals
•To replace the filter in the installation kit, follow the filter instructions provided.
•To remove the drip tray simply pull the drip tray straight up and off, empty
and refit the drip tray using the locating pegs
Fig 1.
Heating
Fig 2.
Hot water ready
Fig 3.
Cooling
Fig 4.
Chilled water ready
O
switch as required
1
the door and press it down
1
8

Leak proof valve
If there are any internal leaks that cause water to pool in the base of the unit, the leak
proof valve fitted on the water inlet will operate, closing the water inlet valve and
stopping the leak.
•Softened tate of ab orbent paper of leak-proof valve
If machine is leaking, the absorbent paper on the
leak-proof valve will be softened, causing it to bend,
this will cut the water off .
You will needed to change the absorbent paper.
•Replacement of oftened ab orbent paper of leak-proof valve
Before replacing new absorbent paper, please check each pipe joint to avoid
the possibility of leaking. Then clean the water on the bottom plate and follow
below steps to replace absorbent paper.
Note: A spare replacement absorbent paper should be provided with unit but are
available to order on request.
switch as required
1
the door and press it down
1
switch as required
1
the door and press it down
1
Turn off the
pressing knob
in anticlockwise
direction to the
middle place of
knob.
Take out the old
absorbent paper and
take off the paperclip.
Put two new absorbent
paper into the clamp,
then put it back (th
new paper should be
between bottom plate
slot and handle).
Take out the old
absorbent paper and
take off the paperclip.
Put two new absorbent
paper into the clamp,
then put it back (th new
paper should be
between bottom plate
slot and handle).
1
2 43
2 43
1
9

5. pecifications
Voltage / Frequency V~Hz
Heating Power 500W
Cooling Power 85W
Heating capacity 5L/h >90°C
Cooling capacity 2L/h<10°C
Ambient temperature 18-38°C
Pure Water flowrate >0.5L/min
Working pressure 0.2Mpa-0.35Mpa
Product Code Description
AP02_PAPER Replacement absorbent paper
AP02_TAP Replacement Hot & Cold taps
PERT_TUBE ¼” plastic tubing (per metre)
10

395mm
300mm
1110mm
F
switch as required
1
the door and press it down
1
11

hyco.co.uk
Hyco Manufacturing Ltd
Normandy Court
Express Way
Castleford, WF10 5NR
T 01924 225 200
F 01924 225 210
INF RMATI N F R C RRECT DISP SAL F THE PR DUCT IN ACC RDANCE WITH THE
EUR PEAN DIRECTIVE 2002/96/E.
At the end of its working life this equipment must not be disposed of as household
waste. It must be taken to a local authority waste collection centre or to a dealer
providing this service. Disposing of electrical and electronic equipment separately
enables its components to be recovered and recycled to obtain significant savings in
energy and resources. In order to underline the duty to dispose of this equipment
separately, the product is marked with a crossed out dustbin.
6. Guarantee and service policy
This product is guaranteed against faulty materials and manufacture for a period of one
year from the date of purchase. Hyo will in its sole discretion replace, repair or refund
any faulty unit. Incorrect installation, consequences of lime scale deposits and failure to
follow correct operating instructions are excluded. Consequential costs such as labour
charges or damage to surroundings are expressly excluded.
Table of contents
Popular Accessories manuals by other brands

Conrad Electronic
Conrad Electronic 61 08 99 operating instructions

LMI
LMI Selcom SLS 5000 user manual

SECO-LARM
SECO-LARM ENFORCER E-9626-2B190Q manual

Inxpect
Inxpect MSK-101 Advanced configuration manual

Delta Electronics
Delta Electronics Delphi ND Series Specification sheet

Ronde & Schwarz
Ronde & Schwarz R&S NRP18S Series user manual

Lightolier
Lightolier Lytecaster 2027 specification

Johnson Controls
Johnson Controls TEC-6-PIR installation instructions

Gotessons
Gotessons 691226 Mounting instructions

DAVIS
DAVIS Vantage Vue ISS installation manual

APLIC
APLIC 303485 user manual

Auto Companion
Auto Companion Hot & Cold Portable Electric Cool Box instructions