ASTi Telestra User manual

ASTi
Telestra Remote Management System
User Guide
Document: DOC-01-RMS-UG-1
Advanced Simulation Technology inc. 441-A Carlisle Drive, Herndon, Virginia, 20170 USA
Revision A (August 2001)


Product Name: Telestra Remote Management System
ASTi ASTi Telestra Remote Management System User Guide
© Copyright ASTi 2001.
Restricted Rights: Use, duplication, or disclosure by the Government is subject to restrictions as set forth in sub-
paragraph (c)(1)(ii) of the Rights in Technical Data and Computer Software clause at DFARS 252.227-7013.
This material may be reproduced by or for the U.S. Government pursuant to the copyright license under the
clause at DFARS 252.227-7013 (1994).
ASTi
441-A Carlisle Drive
Herndon, VA 20170


TABLE OF CONTENTS
INTRODUCTION . . . . . . . . . . . . . . . . . . . . . . . . . . . . . . . . . . . . . . . . . . . . . . . . . . . . . . 1
SYSTEM INSTALLATION . . . . . . . . . . . . . . . . . . . . . . . . . . . . . . . . . . . . . . . . . . . . . . . 3
INITIAL NETWORK CONFIGURATION . . . . . . . . . . . . . . . . . . . . . . . . . . . . . . . . . . . . 4
Default IP Addresses . . . . . . . . . . . . . . . . . . . . . . . . . . . . . . . . . . . . . . . . . . . . . . . . . . . . . . . . 4
WEB BROWSER INTERFACE . . . . . . . . . . . . . . . . . . . . . . . . . . . . . . . . . . . . . . . . . . . 8
Browser Compatibility & System Configuration Tips . . . . . . . . . . . . . . . . . . . . . . . . . . . . . . 8
Web Technology Security Issues . . . . . . . . . . . . . . . . . . . . . . . . . . . . . . . . . . . . . . . . . . . . . . . 9
Pointing the Browser to RMS . . . . . . . . . . . . . . . . . . . . . . . . . . . . . . . . . . . . . . . . . . . . . . . . 11
Standard RMS Operation . . . . . . . . . . . . . . . . . . . . . . . . . . . . . . . . . . . . . . . . . . . . . . . . . . . . 11
System Login: Factory Default User ID & Password . . . . . . . . . . . . . . . . . . . . . . . . . . . . . . 12
DACS SYSTEM REQUIREMENTS . . . . . . . . . . . . . . . . . . . . . . . . . . . . . . . . . . . . . . . 13
Model Builder Software . . . . . . . . . . . . . . . . . . . . . . . . . . . . . . . . . . . . . . . . . . . . . . . . . . . . . 13
The “default.cfg” File . . . . . . . . . . . . . . . . . . . . . . . . . . . . . . . . . . . . . . . . . . . . . . . . . . . . . . 14
The “config.sys” File . . . . . . . . . . . . . . . . . . . . . . . . . . . . . . . . . . . . . . . . . . . . . . . . . . . . . . . 15
GETTING STARTED WITH RMS . . . . . . . . . . . . . . . . . . . . . . . . . . . . . . . . . . . . . . . . . 18
A Tour of the RMS Layout . . . . . . . . . . . . . . . . . . . . . . . . . . . . . . . . . . . . . . . . . . . . . . . . . . 18
RMS Setup Tutorial . . . . . . . . . . . . . . . . . . . . . . . . . . . . . . . . . . . . . . . . . . . . . . . . . . . . . . . . 24
RMS CONFIGURATION . . . . . . . . . . . . . . . . . . . . . . . . . . . . . . . . . . . . . . . . . . . . . . . . 50
Basic Settings . . . . . . . . . . . . . . . . . . . . . . . . . . . . . . . . . . . . . . . . . . . . . . . . . . . . . . . . . . . . . 50
DACS Settings . . . . . . . . . . . . . . . . . . . . . . . . . . . . . . . . . . . . . . . . . . . . . . . . . . . . . . . . . . . . 51
Network Settings . . . . . . . . . . . . . . . . . . . . . . . . . . . . . . . . . . . . . . . . . . . . . . . . . . . . . . . . . . 52
PROCEDURAL WARNINGS . . . . . . . . . . . . . . . . . . . . . . . . . . . . . . . . . . . . . . . . . . . . 56
General Guidelines . . . . . . . . . . . . . . . . . . . . . . . . . . . . . . . . . . . . . . . . . . . . . . . . . . . . . . . . . 56
Uploading Files . . . . . . . . . . . . . . . . . . . . . . . . . . . . . . . . . . . . . . . . . . . . . . . . . . . . . . . . . . . 56
DACS Backup . . . . . . . . . . . . . . . . . . . . . . . . . . . . . . . . . . . . . . . . . . . . . . . . . . . . . . . . . . . . 57
DACS Restoration . . . . . . . . . . . . . . . . . . . . . . . . . . . . . . . . . . . . . . . . . . . . . . . . . . . . . . . . . 57
Changing DACS “config.sys” File . . . . . . . . . . . . . . . . . . . . . . . . . . . . . . . . . . . . . . . . . . . . 58
Model Builder Virtual Screen Utility . . . . . . . . . . . . . . . . . . . . . . . . . . . . . . . . . . . . . . . . . . 58
LINUX NETWORK SERVICES . . . . . . . . . . . . . . . . . . . . . . . . . . . . . . . . . . . . . . . . . . 59
File Transfer Protocol (FTP) . . . . . . . . . . . . . . . . . . . . . . . . . . . . . . . . . . . . . . . . . . . . . . . . . 59
Telnet . . . . . . . . . . . . . . . . . . . . . . . . . . . . . . . . . . . . . . . . . . . . . . . . . . . . . . . . . . . . . . . . . . . 59
TROUBLESHOOTING . . . . . . . . . . . . . . . . . . . . . . . . . . . . . . . . . . . . . . . . . . . . . . . . . 60
APPENDIX A: COLD START PROCEDURE . . . . . . . . . . . . . . . . . . . . . . . . . . . . . . . . 64
Overview . . . . . . . . . . . . . . . . . . . . . . . . . . . . . . . . . . . . . . . . . . . . . . . . . . . . . . . . . . . . . . . . 64
Requirements . . . . . . . . . . . . . . . . . . . . . . . . . . . . . . . . . . . . . . . . . . . . . . . . . . . . . . . . . . . . . 64
Cold Start Procedure: Built-In CD-ROM Drive . . . . . . . . . . . . . . . . . . . . . . . . . . . . . . . . . . 65
Cold Start Procedure: USB CD-ROM Drive . . . . . . . . . . . . . . . . . . . . . . . . . . . . . . . . . . . . . 66
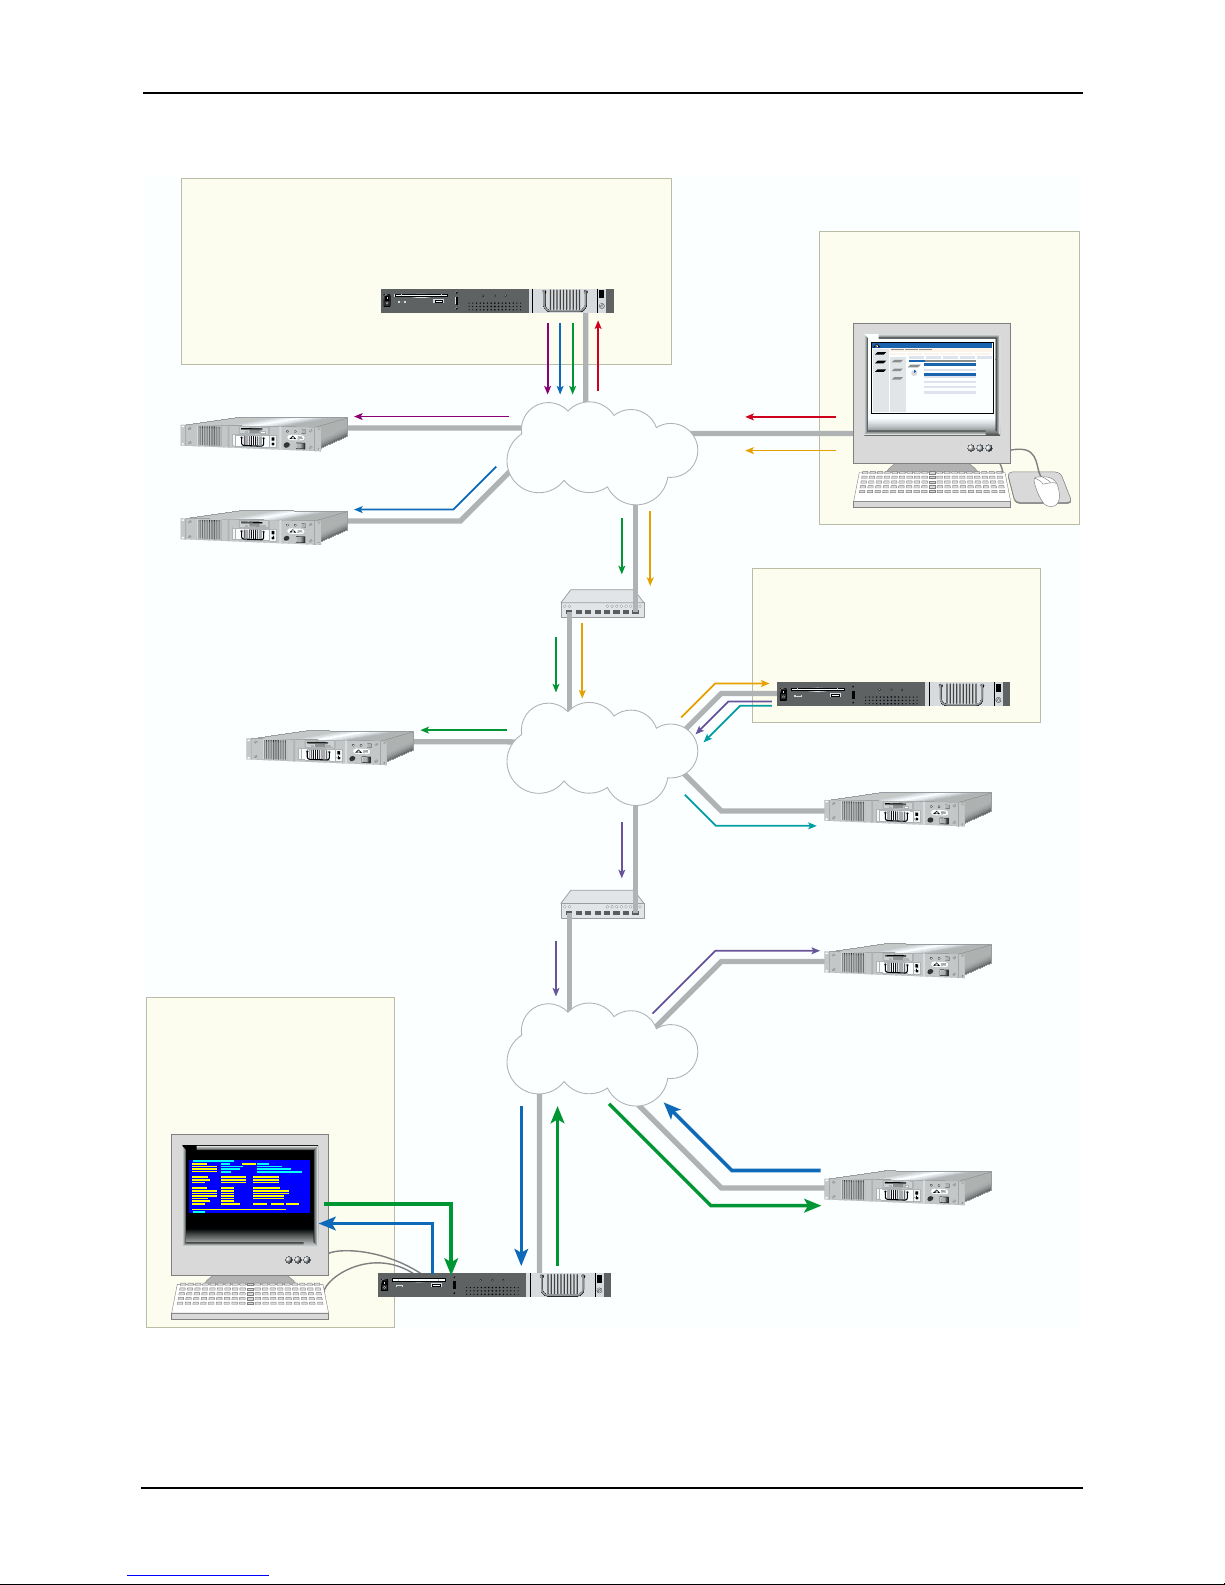
APPENDIX B: EXAMPLE NETWORK CONFIGURATION . . . . . . . . . . . . . . . . . . . . . 67
NOTES & ERRATA . . . . . . . . . . . . . . . . . . . . . . . . . . . . . . . . . . . . . . . . . . . . . . . . . . . 69


ASTi Telestra RMS User Guide (Ver. 1, Rev. A)
Copyright © 2000-2001 Advanced Simulation Technology inc. 1
1. INTRODUCTION
ASTi’s Telestra Remote Management System (RMS) provides complete sight and control of all
ASTi devices on the network. With Telestra RMS and a simple web browser, one can monitor and
manage all ASTi resources, ranging from stand-alone to multi-site, exercise-wide configurations.
The familiar point-and-click, web-based interface makes RMS easy to use.
RMS allows the user to:
• Quickly ascertain status of DACS systems and their models on the network
• View and load Model Builder configuration files over the network
• Backup and Restore all DACS system files, with access to backup files via FTP
• Monitor Model Builder, DSP and RIU performance, status and configuration
• Manage remote DACS network configuration
• Restart/Reboot remote DACS systems
• View online DACS error and status reports
• View Model Builder version, total system credits, credits used, etc.
• Monitor and control Telestra multicast routing
RMS also features:
• Password protection for DACS administration
• Online Telestra system configuration including restart, reboot, and shutdown
• Searchable, contextual Help System with troubleshooting suggestions
• Seven-step “Getting Started” tutorial
Model Builder Virtual Screen Utility
• Access Model Builder software on any DACS over the network

ASTi Telestra RMS User Guide (Ver. 1, Rev. A)
2 Copyright © 2000-2001 Advanced Simulation Technology inc.
Any RMS server can deliver
command and control capability
to all web browsers on the network.
Using a standard web browser,
you have access to any DACS
on the network, local or remote.
RMS provides monitoring and configuration features for all
associated DACS systems on the network, and supports both
local- and wide-area network (LAN/WAN) architectures.
Web Browser
Telestra Monitor
USB RESET POWER HDD
USB RESET POWER HDD
USB RESET POWER HDD
Load New Configuration
Get System Status Report
Display Model Builder Statistics
Command
RMS #1
Command
RMS #2
Backup DACS Files
DACS Command
Signals from RMS
RMS #1
RMS #2
RMS #3
Find DSPs, Display RIU Statistics
MB Screen
User Input
MB
Commands
MB Commands
Display Information
Display
Information
Router
Router
NETWORK
NETWORK
NETWORK
Model Builder Virtual Screen
utility enables remote sound
and comms model creation
and manipulation for any
DACS on the network.
TELESTRA REMOTE MANAGEMENT SYSTEM

ASTi Telestra RMS User Guide (Ver. 1, Rev. A)
Copyright © 2000-2001 Advanced Simulation Technology inc. 3
2. SYSTEM INSTALLATION
After unpacking the ASTi Telestra unit, connect power, network, keyboard and monitor to the sys-
tem as shown in Figure 1. For systems with a built-in CD-ROM drive, reference the “Initial Net-
work Configuration” section for details on how to connect your network.
Figure 1: Telestra Connections Diagram
Make sure the main power switch on the rear of CD-ROM-equipped Telestra systems (indicated
above) is switched on. Systems without built-in CD-ROM drives have only one power switch on
the front of the chassis.
Telestra RMS systems arrive with all necessary software pre-loaded. To re-build the system’s hard
disk, please see Appendix A (pg. 64) of this document for the Telestra Cold Start Procedure.
Turn on the Telestra system via the power switch on the front of the chassis. The system will then
boot into the Linux operating system.
Keyboard
Keyboard
Monitor
Monitor
Power Cord
Power Cord
Network Cable
Main Power Switch
Telestra with Built-In CD-ROM Drive
Telestra without Built-In CD-ROM

ASTi Telestra RMS User Guide (Ver. 1, Rev. A)
4 Copyright © 2000-2001 Advanced Simulation Technology inc.
3. INITIAL NETWORK CONFIGURATION
Default IP Addresses
After initial system installation or system cold start, each of Telestra’s three ethernet interfaces is
assigned a default IP address.
Figure 2: Ethernet Interface Locations & Default IP Addresses
The RMS web server can be accessed via any of these ethernet interfaces, provided that the
browsing computer is on the same network segment. If you have questions about your network
setup, please contact your network administrator.
Before RMS can be made available via the web-browser interface, network settings that are valid
for your environment must be specified. This procedure is only required after initial system instal-
lation or system cold start, and requires a keyboard and monitor connected directly to the Telestra
chassis. Following system boot-up, the Telestra Configuration Utility screen will be displayed, as
shown in Figure 3 below.
eth0: 192.42.172.60eth2: 10.1.1.1
eth1: 192.168.100.254

ASTi Telestra RMS User Guide (Ver. 1, Rev. A)
Copyright © 2000-2001 Advanced Simulation Technology inc. 5
Figure 3: Telestra Configuration Utility
Press the <TAB> key to move between elements (the current selection will be highlighted), or
hold down the <ALT> key, and press <TAB> to reverse the toggle order.
NOTE
: The Telestra system can be restarted or shut down from this screen, although these options
are also available from the web-browser interface after initial network configuration.
Highlight the “Settings” option and press the <SPACE> bar or <ENTER> key to view the sys-
tem’s current IP address, network gateway, and subnet mask (netmask) settings. An example is
shown in Figure 4.

ASTi Telestra RMS User Guide (Ver. 1, Rev. A)
6 Copyright © 2000-2001 Advanced Simulation Technology inc.
Figure 4: Telestra Settings Screen
Immediately after initial system installation or cold start, these settings represent factory defaults
for ethernet interface
eth0
, which may or may not be valid for the simulation network.
Press the <SPACE> bar or <ENTER> key to select “OK”, or press the <ESC> key to return to the
main menu.
From the main screen (Figure 3 above), <TAB> or <ALT>+<TAB> to highlight the “Setup” ele-
ment, and press the <SPACE> bar or <ENTER> key. This will display the “Change IP Settings”
screen, shown in Figure 5.

ASTi Telestra RMS User Guide (Ver. 1, Rev. A)
Copyright © 2000-2001 Advanced Simulation Technology inc. 7
Figure 5: Change IP Settings Screen
Note that this will only affect settings for ethernet card
eth0
. To change settings for eth1 or eth2,
you must use RMS’ web-browser interface.
Specify the desired IP address, netmask, and gateway for the simulation network, pressing the
<ENTER> key after each element. If you are unsure of these settings, contact your network
administrator for more information. Use the <TAB> key to highlight “OK”, and press the
<SPACE> bar or <ENTER> to write the settings to Telestra’s hard disk; the system will then
reboot. After reboot, RMS can be accessed via its web-browser interface.
IMPORTANT
: Using the Telestra Configuration Utility to assign network settings will delete the
RMS Configuration File! If RMS is being configured for the first time, disregard this notice. Oth-
erwise, network settings should be configured via the web-browser interface only.

ASTi Telestra RMS User Guide (Ver. 1, Rev. A)
8 Copyright © 2000-2001 Advanced Simulation Technology inc.
4. WEB BROWSER INTERFACE
After RMS is configured to the proper network settings, the system can be accessed via any stan-
dard web browser on the network.
Browser Compatibility & System Configuration Tips
ASTi has designed and extensively tested RMS on a number of different operating systems, using
various popular web browsers to ensure compatibility. RMS works best with the following:
• Netscape Navigator/Communicator
Versions 4.7 through 4.75 (see note below)
Linux (KDE or Gnome), Windows 95/98/2000/ME, MacOS 8 & 9
• Internet Explorer
Versions 4.5 & 5.x or higher
Windows 95/98/2000/ME, MacOS 8 & 9
NOTE
: ASTi recommends against using the Mozilla web browser (or Mozilla-based browsers like
Netscape 4.77 and 6.0) on any platform, due to unsatisfactory JavaScript support.
Browser Settings
These are usually referred to as “Preferences” or “Internet Settings”.
In order to take full advantage of RMS’s features, you may have to change some of the settings for
your web browser. Many of these are default settings, but ASTi recommends that you verify or
configure your browser to perform the following functions:
• Automatically Load Images
• Enable Frames
• Enable JavaScript for web pages
(enabling JavaScript for email is unnecessary, not to mention dangerous)
• Enable Style Sheets
• Accept Cookies
(all cookies or those which are returned to originating servers)
• Disable Full Caching
(set the browser to “compare page in cache to page on network” every time)
Please refer to your browser’s documentation or help system for information regarding these set-
tings.
If you are concerned about the information stored by RMS “cookies”, or the nature of JavaScript
code used by RMS, please consult the “Web Technology Security Issues” section on the next page
for more information.
Screen Resolution
RMS supports 640 x 480 screen resolution.
800 x 600 resolution or higher is recommended.

ASTi Telestra RMS User Guide (Ver. 1, Rev. A)
Copyright © 2000-2001 Advanced Simulation Technology inc. 9
Web Technology Security Issues
The Telestra Remote Management System uses modern Internet client/server technology (like
cookies and JavaScript) to extend its functionality, and enhance the quality of features offered to
ASTi’s customers.
Unfortunately, due to less-than-well-meaning Internet users (and the media exposure their
exploits elicit), much of the Internet’s “general public” has rightfully become wary, if not com-
pletely paranoid, about these technologies. Here, ASTi will attempt to allay any concerns you may
have about the use of these technologies in RMS.
Cookies
What are “cookies”?
They are small bits of text that come from a web server, and are handled by your web browser.
There are two types of cookies: “session” and “persistent”.
“Session” cookies only live as long as your web browser program is running. When you close the
application, or shut down your computer, the information contained in the session cookie is then
lost. “Persistent” cookies are stored on your local computer’s hard disk, in a “cookie list”. The
information contained in persistent cookies will remain available to the web browser and web
server, until it expires, or is deleted.
How does RMS use cookies?
There are only three ways that RMS employs cookie technology.
• Is this your first time?
When you first access an RMS server, the system checks to see if you’ve ever visited that
server before. If you have not, you are automatically transported to the “Getting Started”
section, and a persistent cookie is placed on your hard disk. The next time you visit the
RMS server using that same browser, the system by-passes sending you to this introduc-
tory section.
• Are you logged into the system?
The first time you attempt to access administrator-level information in the RMS system
(like the RMS Configuration section), you are asked to log in with a user ID and password.
Once you have successfully provided these two bits of information, a session cookie is
passed back to your browser from the RMS server, allowing you to access any administra-
tor-level information without having to log in again.
Please note
: ASTi recommends shut-
ting down your browser application when you’ve finished accessing an RMS server. This
will clear the session cookie, and RMS will force another log-in the next time someone
(even you) tries to access administrator-level information.
• Setting your “Automatic Refresh Rate” preference
The majority of web pages generated by the RMS server will automatically refresh them-
selves after a given period of time (our attempt to ensure that you get the most up-to-date
information). The first time you access an RMS server, a persistent cookie is placed on
your hard disk which specifies that the refresh rate is 300 seconds (5 minutes). After
you’ve logged into the system, you can change this setting in the “Preferences” section.

ASTi Telestra RMS User Guide (Ver. 1, Rev. A)
10 Copyright © 2000-2001 Advanced Simulation Technology inc.
When you specify your preferred refresh rate (in seconds), the RMS server will replace the
previous cookie with another persistent cookie reflecting the new waiting period.
The two persistent cookies mentioned above are the only bits of information that RMS writes to
your computer’s hard disk, and are the only pieces of information that RMS can access on your
computer. No information whatsoever is transmitted to ASTi, or anywhere else.
JavaScript
What is “JavaScript”?
It is a simple programming language that extends a web browser’s capabilities beyond that which
is possible using only HTML (the standard language for generating web pages).
How does RMS use JavaScript?
There are only a few ways that RMS employs JavaScript.
• Launching Remote Windows
At times, RMS will open remote windows to keep information separate from the “main
window”. For example, when you access the online RMS Help system, a new window will
pop up containing the information you requested.
• Window & Frame Navigation
RMS uses JavaScript for simple operations like closing remote windows, and telling a cer-
tain frame in the main window to load a specific page.
• Pop-up Notes
In the RMS Servers frame, if you move your mouse pointer over any of the RMS icons, a
small note pops up to display some basic information about that server.
• Image Roll-Overs
JavaScript is also used to display different graphics when your mouse pointer moves over
certain images.
That’s it. There is NO JavaScript code in RMS that will attempt to access, change or manipulate
any information on your local computer at any time. Again, no information whatsoever is trans-
mitted to ASTi, or anywhere else.

ASTi Telestra RMS User Guide (Ver. 1, Rev. A)
Copyright © 2000-2001 Advanced Simulation Technology inc. 11
Pointing the Browser to RMS
In order to access RMS using a web browser, the computer you use must be on the same network
segment (LAN or WAN) as the RMS server itself. Contact your network administrator if you have
any questions.
Launch your web browser application. In the “Address” or “Location” field of the web browser’s
display, type:
http://xxx.xxx.xxx.xxx/
... where “xxx.xxx.xxx.xxx” is the IP address previously assigned to
eth0
using the Telestra Con-
figuration Utility, described on page 7.
If this is the first time you are accessing this particular RMS server with the computer and web
browser, RMS will automatically redirect you to the online “Getting Started” section. The “Get-
ting Started” information is also included in this document, starting on page 18.
If you have visited this RMS server before, then you will be taken directly to the standard display.
Standard RMS Operation
Most of the features available through RMS are reserved for authorized users, and system login
(User ID & Password) is required. System login is
not required
to:
• View the “Getting Started” presentation.
• View software version information.
• View RMS servers on the network & their basic information.
• View Installation and Contact information for RMS servers.
• Access the RMS Help system.
• View DACS systems, including:
Basic information
Model Builder version & credits
Running models
DSPs (not DSP-specific information or statistics)
If applicable, RIUs connected to DSPs (again, no specific information)
Everything else is administrator-level information, and requires system login.

ASTi Telestra RMS User Guide (Ver. 1, Rev. A)
12 Copyright © 2000-2001 Advanced Simulation Technology inc.
System Login: Factory Default User ID & Password
The factory default user ID is:
rmsuser
The user ID is case-sensitive, and you cannot change it.
The factory default password is:
astirules
The password is also case-sensitive, but you can change it through RMS’s “Preferences” interface.
This procedure is outlined in Step 2 of the Setup Tutorial (pg. 27, or available online in RMS).
Change your password!
Since each RMS is shipped with the same default password, this affords
virtually no security for your system. Changing your login password immediately after installa-
tion will prevent the possibility of another RMS user accessing your system.
Remember your password!
If you forget your new password, the only way to recover the system
(i.e., restore the factory default) is to reinstall the RMS software via the Cold Start Procedure (pg.
64).

ASTi Telestra RMS User Guide (Ver. 1, Rev. A)
Copyright © 2000-2001 Advanced Simulation Technology inc. 13
5. DACS SYSTEM REQUIREMENTS
To enable a DACS system for remote management via RMS, a few DACS configuration proce-
dures must first be followed.
Model Builder Software
DACS systems must be running Model Builder version 4.07 or higher for remote management.
DACS systems must be running in “Normal Mode - RMS control”, which is the default mode
(choice #1 in the DACS Startup Menu) for version 4.07 or higher on DACS system boot.
The introduction of remote DACS management has introduced some changes to the location of
various DACS configuration settings.
For use with RMS, we are concerned with two ASCII text files on the DACS where various set-
tings can be specified:
• System Configuration File
This file is located at
C:\config.sys
and will hereafter be referred to as “config.sys” for clarity.
• Model Builder Application Configuration File
By default*, this file is located at
C:\mbuilder\user\models\default.cfg
and will hereafter be referred to as “default.cfg” for clarity.
*Although users can force the Model Builder software to load different Model Builder Application Configu-
ration Files (all of which end in the “.cfg” file extension), that procedure will not be covered here, and all of
the changes presented here in reference to “default.cfg” also apply.
Also, for the sake of clarity, ethernet network interfaces will hereafter be referred to as “ethernet
cards”, since the majority of network parameters discussed in this section refer to hardware set-
tings; “network interface” is a little too esoteric for this discussion.

ASTi Telestra RMS User Guide (Ver. 1, Rev. A)
14 Copyright © 2000-2001 Advanced Simulation Technology inc.
The “default.cfg” File
To allow remote management, the “default.cfg” file loaded by the Model Builder software
must
contain the following line:
CELL=ON
Network settings that specify the following
hardware parameters
should be removed from the
“default.cfg” file:
• DIS/HLA ethernet card
• local IP address
• subnet mask
• gateway IP address
• Host ethernet card
• local IP address
• subnet mask
• gateway IP address
These settings should now be specified in the “config.sys” file, described in the next section.
IMPORTANT: Specifying the above hardware parameters in the “default.cfg” file will override
similar settings in the “config.sys” file.
All other network commands (port settings, DIS or HLA settings, etc.) should continue to reside
in “default.cfg”; this has not changed.
See Appendix B on page 67 for an example installation.
Other manuals for Telestra
4
Table of contents
Popular Network Hardware manuals by other brands

Sonoff
Sonoff ZBBridge user manual

Lucent Technologies
Lucent Technologies Stinger Administration guide

Vivotek
Vivotek NR8201 Technical specifications

Biotector
Biotector Network Control Unit user manual

Videoswitch
Videoswitch Vi-R5216L Quick operation guide

Mirapoint
Mirapoint RazorSafe 170 Getting started guide

SimpleComTools
SimpleComTools COM1000 User manual & command reference guide

Freedom9
Freedom9 freeStor 4020 user manual

Iomega
Iomega StorCenter px4-300d Product release information

Fujitsu
Fujitsu ETERNUS AB Series Hardware maintenance guide

Bosch
Bosch D9210C Program entry guide

TRENDnet
TRENDnet TEG-MGBSX - SFP Transceiver Module Quick installation guide