Aston Global Wamba User manual

Ihr Satellitenempfänger
Your satellite receiver
Su receptor satelite
Il vostro ricevitore da satellite
Bedienungsanleitung
User manual
Manual del usuario
Istruzioni per l’uso

Kurzübersicht / Brief presentation / Presentacion breve / Breve panoramica
In wenigen Schritten zum ersten Bild 1
Get an image in a few steps 1
Su primera imagen en pocos pasos 1
In pocchi passi si otterra la prima immagine 1
1. Ihr Satellitenempfänger 12
Your satellite receiver 26
Su receptor satelite 38
Il vostro ricevitore satellite 52
2. Anschlüsse 13
Connections 27
Conexiones 39
Allacciamenti 53
3. Allgemeines 13
Global considerations 27
Considerationes generales 39
Considerazioni generali 53
4. Parametereinstellungen 14
Local parameters 27
Parametros locales 40
Parametri locali 53
5. Installation 14
Installation 28
Instalacion 40
Installazione 54
6. kanalinstallation 19
Channels installation 32
Instalacion de los canales 45
Installazione dei canali 58
7. Verwendung Ihres receiver 20
Using your receiver 34
Uso de su receptor 46
Utilizzazione del Vostro ricevitore 60
8. Verwendung von SetEdit und Aston mail 22
Using Setedit and Aston mail 35
Uso de SetEdit y Aston mail 48
Uso del Setedit e Aston mail 61
1
In wenigen schritten zum ersten Bild
Get an image in a few steps
Su primera imagen paso a paso
La prima immagine in pochi passi
Welchen Installationstyp möchten Sie wählen?
Which installation setting do you want?
¿Cual es el tipo de instalación que desea?
Che tipo d'installazione vuole scegliere?
Mit einer fixen Antenne bzw. 1 LNB
Individual installation with 1 LNB
Instalación individual con 1 LNB
Installazione individuale fissa con 1 LNB
Mit zwei fixen Antennen bzw. 2 LNB’s
Individual installation with 2 LNB
Instalación individual con 2 LNB
Installazione individuale fissa con 2 LNB
B
AC
Mit einer motorisierten Anlage
Motorized installation
Instalación individual motorizada
Installazione individuale motorizzata

2
B
A C
3
B
A C

4
B
A C
5
B
A C

6
B
A C
7
B
A C

C
8 9
C

10
Deutsch
11
Inhaltsverzeichnis
1. Ihr Satellitenreceiver 12
1.1 Die Vorderseite Ihres Receivers 12
1.2 Die Rückseite Ihres Receivers 12
1.3 Ihre Fernbedienung 12
2 Anschlüsse 13
3 Allgemeines 13
4 Parametereinstellungen 14
5 Installation 14
5.1 Installation mit Festantennen 14
5.2 Installation mit motorbetriebener Antenne 16
5.3 Gemeinschaftsinstallation im FI/FI-Modus 18
6 Kanalinstallation 19
6.1 Suchkriterien 19
6.2 Automatische Kanalinstallation 19
6.3 Aktualisierung der Kanäle 19
7 Verwendung Ihres Receivers 20
7.1 Verwendung der Kanallisten 21
7.2 Verwendung Ihrer Favoritenlisten 21
7.3 Verwendung Ihres Programmführers 21
7.4 Verwendung der Teletextfunktion 22
8 Verwendung von SetEdit und Aston mail 22
8.1 Setedit 22
8.2 Aston mail 23

12
1. Ihr Satellitenreceiver
1.1 Die Vorderseite Ihres Receivers (siehe Seite 65)
1VFD-Display : Zeigt den Namen des gewählten Kanals und sämtliche Menüoptionen an. Ist der Receiver
ausgeschaltet (OFF), zeigt das Display die aktuelle Uhrzeit an.
2Status-LED-Anzeige : Zeigt Signal-und Decoderstatus an.
3Kanal + / - : Zur Eingabe einer höheren oder niedrigeren Kanalnummer
4Power : Mit diesem Schalter können Sie Ihren Receiver einschalten (ON) oder in Bereitschaftsstellung
(Stand-by) bringen
5Smartcard-Leser : Zur bedienung mit Satelliten-Zugangskontrolle.
6Common Interface : Sie haben die Möglichkeit, ein Modul Ihrer Wahl.
1.2 Die Rückseite Ihres Receivers (siehe Seite 65)
1IF-Eingang (950-2150 MHz) und Loop-through
2L&R Audio Ausgänge : Zum Anschluss Ihres Receivers an jede beliebige HiFi-Stereoanlage
3Composite Video Ausgang : Zum Anschluss Ihres Receivers an Ihren Fernsehapparat oder
Videorecorder
4Video-Scartbuchse : Zum Anschluss Ihres Receivers an Ihren Videorecorder
5TV-Scartbuchse : Zum Anschluss Ihres Receivers an Ihren Fernsehapparat
6Serial Port : Kann zur Datenübertragung zwischen 2 Aston Decodern oder einem PC (mit SetEdit-
Software) verwendet werden
7Power : Zum Ein- und Ausschalten Ihres Receivers (ON/OFF).
8Optischer Audioausgang : Zum Anschluss an einen separaten Verstärker oder jedes beliebige andere
Produkt mit einem optischen SPDIF Audioeingang
9Antenne IN / OUT : Verbinden Sie diesen Ausgang mit dem UHF/VHF-Eingang Ihres
Fernsehapparats. Kann ebenfalls verwendet werden, um einen zweiten Fernsehapparat an Ihren WAMBA
anzuschließen. IN, Erdantennen-Eingang
10 Stecker Y / C : S-VHS Ausgänge
1.3 Ihre Fernbedienung (siehe Seite 65)
1Stand-by : Hier drücken, um das Gerät einzuschalten (ON) oder zurück in die Bereitschaftsstellung
(Stand-by-Modus) zu schalten.
2Numerische Eingabetasten : Zum Eintippen einer Nummer und direkten Zugriff auf einen Kanal oder
zum Eingeben alphanumerischer Daten in spezifische Menüs.
3OK / Menü : Zum Aufrufen des Hauptmenüs oder Bestätigen einer Wahl innerhalb eines Menüs.
4Tasten Lautstärke / Pfeiltasten links, rechts : Ermöglichen es, die Lautstärke während der
Fernsehbild-Wiedergabe zu regeln und den Cursor innerhalb der Menüs nach links oder rechts zu bewegen.
5CH+ / Page up : Zum Aufrufen des nächsten Kanals in der Hauptkanalliste, zum Springen auf die nächste
Seite einer Liste und zum Ändern von Daten im Menü-Modus.
6FAV : Zum Aufrufen der zuletzt verwendeten Favoritenlisten, zum Springen in das Fenster der Favoritenliste
beim Erstellen des Favoritenlistenmenüs.
7Tv Guide : Zum Aufrufen des aktuellen und folgenden Programmführers und Fuhrung Suche.
8Zoom : Ermöglicht es, das Bild im Menü zur Neugliederung der Listen zu zoomen. Im Fernsehbild-Modus
kann damit ein Teil des Bildes ausgewählt und gezoomt werden (mit OK bestätigen). Die Lupe kann mit
den Pfeiltasten hin und her bewegt werden. Zoom im Liste Modus.
9Radio : Durch Drücken dieser Taste kann die Radioliste direkt aufgerufen werden.
10 West (blau) : Beim Anschluss an eine motorbetriebene Antenne wird durch Betätigen dieser Taste die
Schüssel nach Westen gedreht.
11 Taste Delete / AutoFocus : Ermöglicht es, vom Menü zur Neugliederung eines Programmpakets oder
Kanals aus ein Programmpaket oder einen Kanal zu löschen oder bei Anschluss an ein motorbetriebenes
System die Antenne mit Hilfe der Autofokusfunktion optimal auszurichten.
13
12 LANG(grün) / LocSat : Ermöglicht es, bei mehrsprachig ausgestrahlten Programmen eine Sprache
auszuwählen, oder für Festantennen oder motorbetriebene Antennen die Ausrichtungsparameter im
Installationsmenü zu ändern.
13 ADD / EAST :
Ermöglicht es, bei der Aktualisierung eines Kanals oder innerhalb des Neugliederungsmenüs
ein Programmpaket oder einen Kanal manuell hinzuzufügen oder bei einer motorbetriebenen Anlage die
Schüssel nach Osten zu drehen.
14 Mute : Durch Betätigen dieser Taste wird der Ton ausgeschaltet und durch nochmaliges Drücken wieder
eingeschaltet.
15 V+ / V- : Zum Erhöhen / Verringern der Lautstärke
16 LIST : Zum Aufrufen der Hauptliste von Programmpaketen und Kanälen
17 I+ / Timer :
Durch Betätigen dieser Taste im Programmführer-Modus erhalten Sie zusätzliche Informationen
zur laufenden und zur nachfolgenden Sendung. Verwenden Sie diese Taste, um im Videolisten-Modus
ein Fenster zu öffnen und technische Einzelheiten zu einem Kanal zu erhalten. Verwenden Sie diese Taste
darüber hinaus zum Einstellen der Zeit, die bis zur Aktivierung des Stand-by-Modus verstreichen soll.
18 CH- / Page down : Zum Aufrufen des vorhergehenden Kanals der Hauptliste, zum Springen auf die
vorhergehende Seite einer Liste und zum Ändern von Daten im Menü-Modus.
19 NAVIGATION / Fav : Ermöglicht es, sich innerhalb eines Menüs oder einer Liste hin-und herzubewegen
und Favoriten von der zuvor verwendeten Favoritenliste direkt aufzurufen.
20 ESC / TXT : Ermöglicht es, eine Funktion zu verlassen, zum vorhergehenden Menü zurückzugehen oder
im Fernsehbild-Modus die Teletextfunktion aufzurufen.
21 TV / SAT : Verwenden Sie diese Taste, um zwischen Satelliten- und terrestrischem Empfang hin- und
herzuschalten.
22 FREEZE / Help : Durch Betätigen dieser Taste wird das Fernsehbild zum Standbild, der Ton läuft jedoch
weiter.
2. Anschlüsse
Bevor Sie Ihren Receiver anschließen, beachten Sie bitte die folgenden Sicherheitshinweise :
• Versuchen Sie niemals, Ihren Receiver zu öffnen, wenn er an das Stromnetz angeschlossen ist. Lagern
oder verwenden Sie Ihren Receiver nicht in einer feuchten Umgebung.
• Vergewissern Sie sich, dass Ihr Receiver ringsum über ausreichend Belüftung verfügt.
• Stellen Sie Ihren Receiver auf eine feste und stabile Unterlage.
• Vergewissern Sie sich, dass die Netzspannung mit der Spannung Ihres Receivers übereinstimmt.
• Verwenden Sie keine Mehrfachsteckdosen.
• Reinigen Sie Ihren Receiver niemals, solange er noch an das Stromnetz angeschlossen ist. Unterbrechen
Sie die Stromzufuhr und verwenden Sie ein weiches, trockenes Tuch. Verwenden Sie zur Reinigung Ihres
Receivers niemals ein feuchtes Tuch oder Reinigungsmittel.
• Sollten Sie Ihren Receiver für längere Zeit nicht verwenden, empfehlen wir Ihnen, ihn vom Stromnetz zu
trennen.
3. Allgemeines
Um die technischen Neuerungen Ihres neuen Satellitenreceivers voll auszunutzen, sollte Ihre Anlage (Antenne
und Zubehör) von guter Qualität sein.
Ihr Receiver muss vor jeder weiteren Verwendung konfiguriert und komplett installiert werden.
Anderenfalls zeigt der Receiver beim ersten Einschalten das Hauptmenü an.
Später springt er auf den zuletzt gewählten Kanal.
Deutsch

14
4. Parametereinstellungen
• Drücken Sie die Taste MENU/OK auf der Fernbedienung, um das Hauptmenü aufzurufen.
• Wählen Sie über die Tasten 쒀und 쑽das Menü OPTIONEN und bestätigen Sie Ihre Eingabe mit OK.
•
Wählen Sie über die Tasten 쒀und 쑽REGIONALE PARAMETER und bestätigen Sie Ihre Eingabe mit OK.
Diese Einstellungen sind erforderlich, damit der Programmführer und die LocSat-Funktionen (bei
Verwendung eines motorbetriebenen Systems) korrekt funktionieren!
• Verwenden Sie die Pfeiltasten 쒀und 쑽, um den Parameter zu wählen und verändern Sie die Werte mit
den Tasten CH+/CH-.
• Gehen Sie mit dem Cursor auf STADT und geben Sie über die alphanumerische Tastatur Ihrer
Fernbedienung den Namen Ihres Standortes an (optional).
• Gehen Sie auf BREITE und geben Sie Ihren Wert ein. Um diesen in Erfahrung zu bringen, sehen Sie bitte
in einem Atlas oder einer Landkarte mit genauer Angabe der Breitengrade nach (1).
• Gehen Sie auf LÄNGE und geben Sie Ihren Wert ein. Um diesen in Erfahrung zu bringen, sehen Sie bitte
in einem Atlas oder einer Landkarte mit genauer Angabe der Längengrade nach (1).
Bei einer Festantenneninstallation sind BREITE UND LÄNGE optional, da sie die genaue Berechnung
von Azimut und Elevation jedes einzelnen Satelliten ermöglichen.
Bei einem motorbetriebenen System hingegen ist diese Angabe für die automatische Lokalisierung von
Satelliten (LocSat-Funktion) von größter Wichtigkeit.
• Gehen Sie auf die Menüoption ORTSDATUM und geben Sie über das Zahlenfeld Ihrer Fernbedienung
das örtliche Datum ein.
• Gehen Sie auf die Menüoption ORTSZEIT und geben Sie über das Zahlenfeld Ihrer Fernbedienung die
örtliche Uhrzeit ein.
Möglicherweise müssen Sie Tag und Uhrzeit jedes Mal neu eingeben, wenn Sie den Receiver vom
Stromnetz trennen, weil sonst der Programmführer nicht richtig funktionieren kann.
• Gehen Sie auf MENÜSPRACHE und wählen Sie mit den CH+/CH- Tasten die OSD-Sprachen.
• Gehen Sie auf AUDIOSPRACHE und wählen Sie mit den CH+/CH- Tasten die Sprache, die als
Grundeinstellung für den Ton verwendet werden soll (2)(3).
• Gehen Sie auf UNTERTITELSPRACHE und wählen Sie mit den CH+/CH- Tasten die Sprache, in der
die Untertitel angezeigt werden sollen.
• Gehen Sie auf EPG SPRACHE und wählen Sie mit den CH+/CH- Tasten die EPG-Sprache.
• Gehen Sie auf UNTERTITEL und wählen Sie mit den CH+/CH- Tasten, ob Sie automatische Untertitel
wünschen oder nicht.
• Drücken Sie OK, um Ihre Eingaben zu bestätigen und zum vorhergehenden Menü zurückzukehren.
Hinweis : Sie können dieses Menü verlassen, ohne die Änderungen zu speichern, indem Sie auf die Taste
ESC auf Ihrer Fernbedienung drücken.
(1) Wenn Ihnen dieser Wert nicht bekannt ist, lassen Sie dieses Feld leer.
(2) Das bedeutet nicht, dass jede Sendung in der ausgewählten Sprache zu sehen sein wird. Diese ist
jedoch -falls verfügbar- die Grundeinstellung.
(3) Während einer Fernsehsendung können Sie eine andere Sprache wählen, indem Sie die LANG-Taste
auf Ihrer Fernbedienung betätigen.
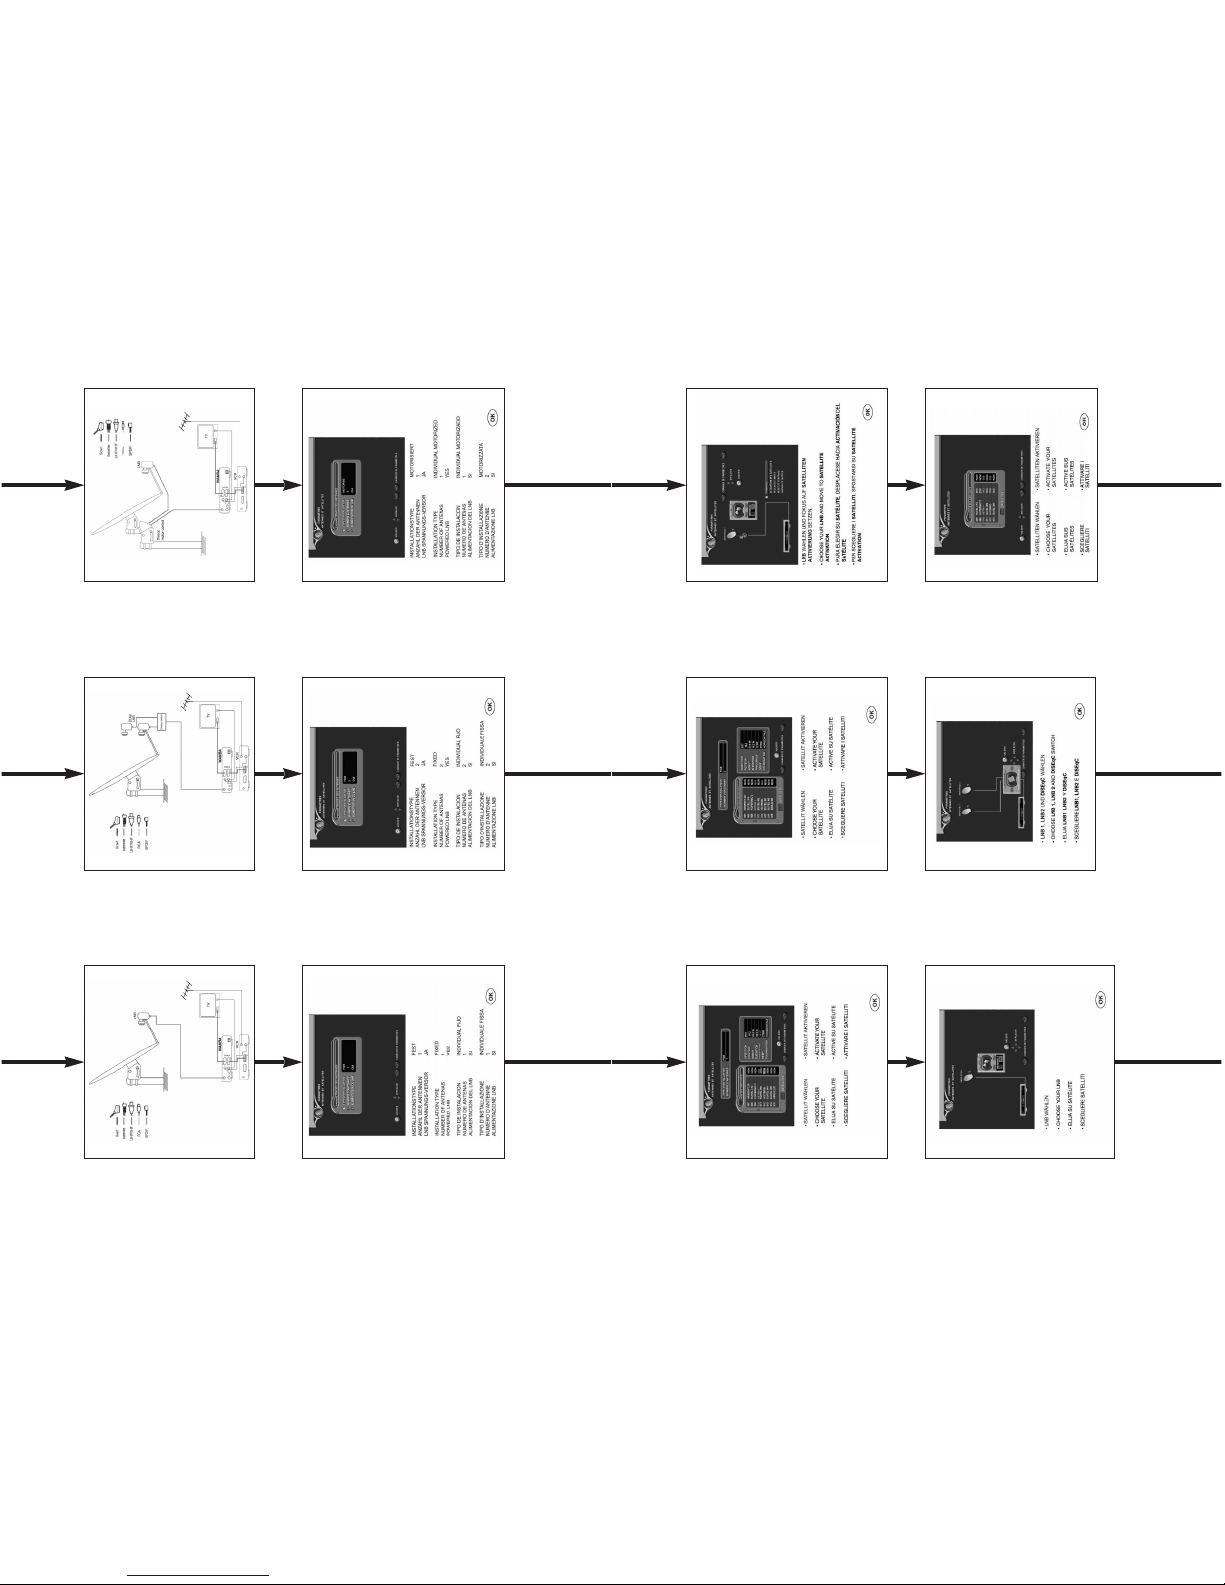
5. Installation
5.1 Installation mit Festantenne
• Drücken Sie MENU auf Ihrer Fernbedienung.
15
• Wählen Sie INSTALLATION (쒀und 쑽) und bestätigen Sie Ihre Eingabe mit OK.
• Wählen Sie ANTENNEN UND SATELLITEN PARAMETER (쒀und 쑽) und bestätigen Sie Ihre Eingabe
mit OK.
• Gehen Sie mit dem Cursor auf INSTALLATIONSTYP (쒀und 쑽) und wählen Sie FEST, indem Sie auf
CH+/CH- drücken.
• Gehen Sie auf ANZAHL DER ANTENNEN (쒀und 쑽) und wählen Sie je nach Ihrer Anlage die Anzahl
an LNB oder Antennen, indem Sie auf CH+/CH- drücken (zulässig sind höchstens 4 Antennen oder 4 LNB).
Im Fall einer Installation mit mehreren Empfangsstellen (Multi-Switch SMATV oder FI/FI-Modus) verfügt Ihr LNB
möglicherweise über externe Stromversorgung. Dann ist wie folgt zu verfahren :
• Gehen Sie auf LNB VERSORGUNG (쒀und 쑽) und wählen Sie JA über die Tasten CH+/CH-.
• Drücken Sie OK, um Ihren Installationstyp, Anzahl an Antennen oder LNB Ihrer externen Konfiguration
zu bestätigen.
Daraufhin erscheint eine neue Bildschirmanzeige. In diesem neuen Menü geben Sie an, welche Satelliten
Sie empfangen möchten.
• Wählen Sie mit 쒀und 쑽, welche Satelliten Sie empfangen möchten und bestätigen Sie Ihre Auswahl mit
CH+/CH- (für jeden gewählten Satelliten sollte dann JA angezeigt werden). Im rechten Fenster können
Sie zu Ihrer Information die Parameter (Richtung, Azimut, Elevation etc.) jedes ausgewählten Satelliten
ablesen.
Die Anzahl der gewählten Satelliten kann die Anzahl an Antennen oder externen LNB nicht überschreiten.
• Sobald Sie die Satelliten, die Sie empfangen möchten, gewählt haben, drücken Sie auf OK, um Ihre
Eingabe zu bestätigen und zum nächsten Schritt zu gelangen.
Daraufhin erscheint ein neues Menü, in dem Sie sowohl den LNB-Typ als auch das bei Ihrer
Außeninstallation verwendete Anschlusszubehör spezifizieren müssen.
• Wählen Sie über 쑸und 쑺die Antenne, die Sie einstellen möchten (im Falle einer Mehrfach-Installation) und
über die CH+/CH- Tasten den LNB-Typ (UNIVERSAL 1, UNIVERSAL 2, C-BAND).
• Bei Mehrfachantennen oder im Fall einer LNB-Installation gehen Sie mit (쒀und 쑽) zum Switch und wählen
über die Tasten CH+/CH- den Zubehörtyp, der bei Ihrer Antenneninstallation verwendet wird (Einzelkabel,
Typ DiSEqC, Switch etc.....)
• Drücken Sie OK, um Ihre Konfiguration zu bestätigen und zum nächsten Schritt zu gelangen.
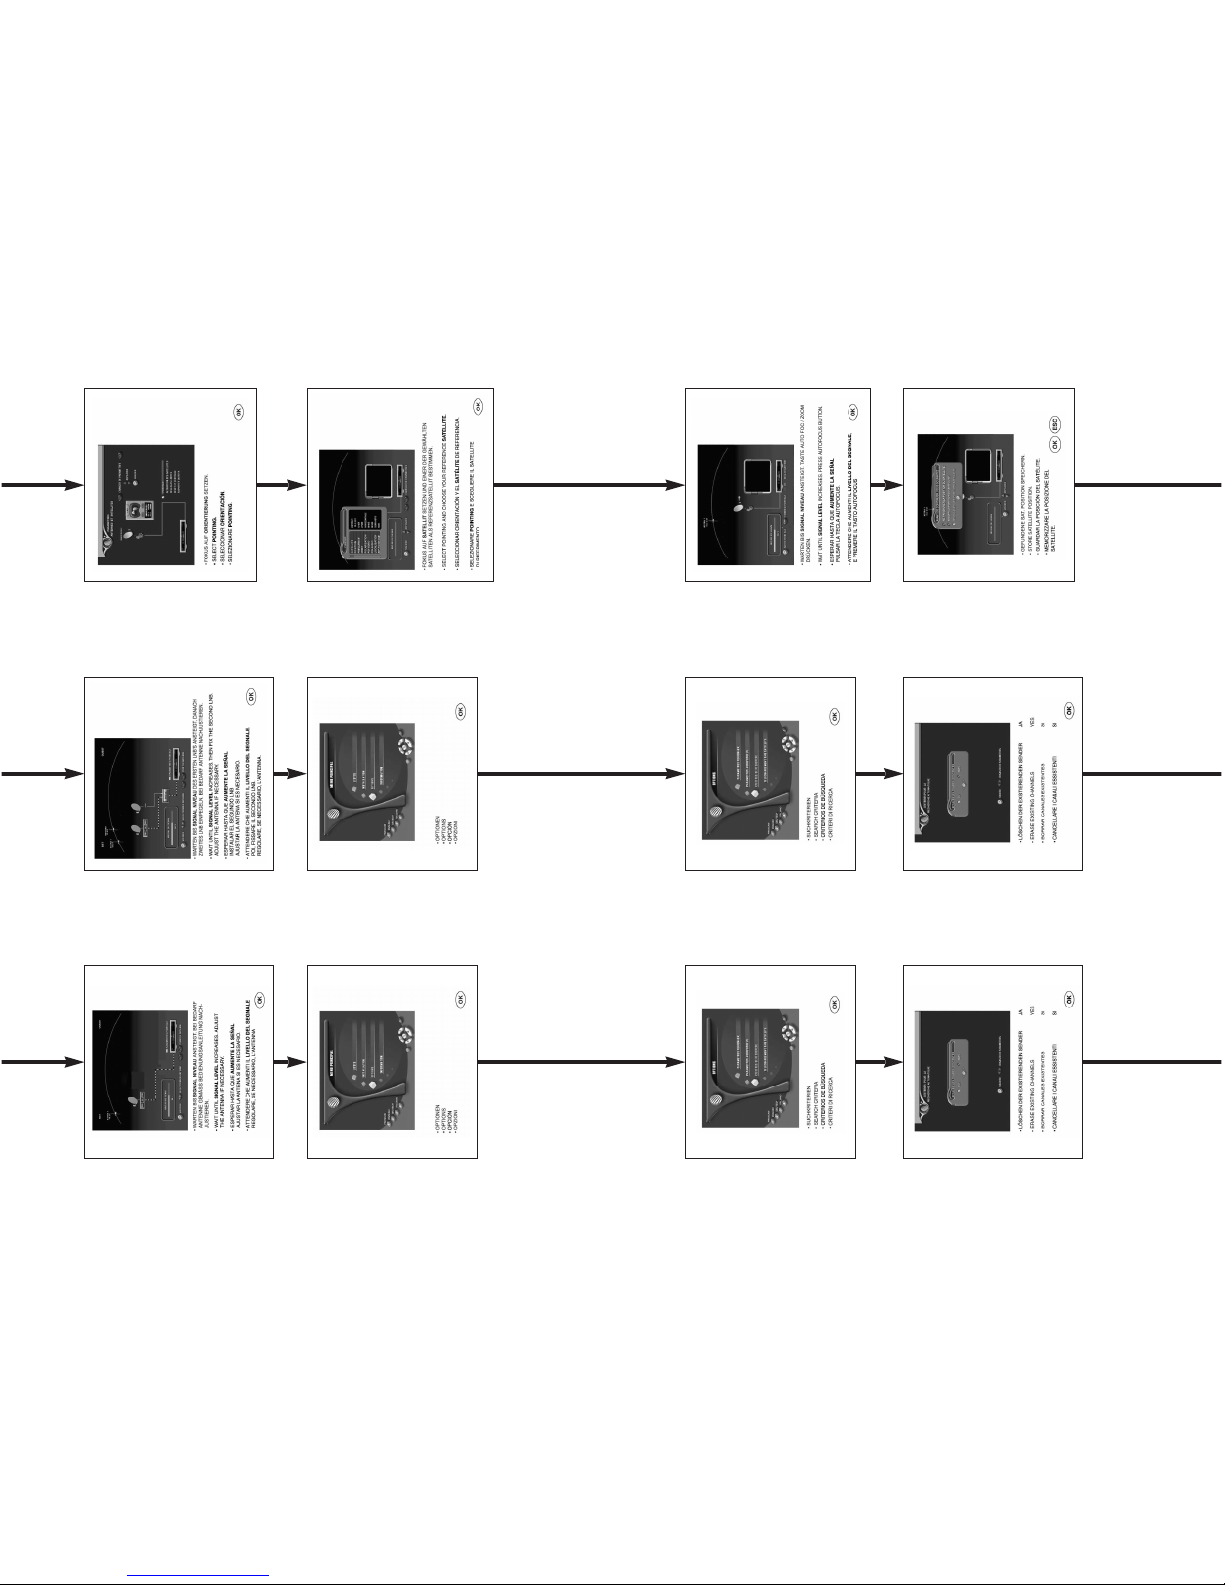
Sie gelangen dann in ein neues Menü, mit dessen Hilfe Sie unter Verwendung eines Signalpegelanzeigers
den von jeder Antenne und LNB empfangenen Signalpegel empfangen können.
• Verwenden Sie die Tasten 쑸und 쑺, um die Antenne zu wählen, von der aus Sie den Signalpegel überprüfen
wollen und wählen Sie den entsprechenden Satelliten mit den Tasten CH+/CH-. Die Antenne wird sich
drehen, um jeden zuvor ausgewählten und für aktiv erklärten Satelliten anzupeilen.
Sobald alle Parameter eingestellt worden sind, zeigt ein Signalpegelanzeiger die Qualität des
empfangenen Signals an (1).
• Drücken Sie OK, um Ihre Einstellungen für jede einzelne Antenne und den dazu gehörigen Satelliten zu
bestätigen und zum vorhergehenden Menü zurückzukehren.
(1) Werkseitig erfolgt die Einstellung einer Referenzfrequenz für die Messung der Signalstärke (diese Frequenz
wird in Ihrer Gegend möglicherweise nicht empfangen). Zum Modifizieren dieser Referenzfrequenz gehen
Sie bitte wie folgt vor :
- Drücken Sie die LOCSAT-Taste.
- Wählen Sie FREQUENZ (쒀und 쑽) und geben Sie dann die entsprechende Frequenz ein.
- Wählen Sie DATENFLUSSMENGE (쒀und 쑽) und geben Sie dann die entsprechende Bitrate ein.
- Wählen Sie POLARISATION (쒀und 쑽) und wählen Sie dann die korrekte Polarisierung, indem Sie
die Tasten CH+/CH- verwenden.
- Drücken Sie OK, um die neuen Parameter zu bestätigen.
Sie können nun die automatische Installation fortsetzen.
Deutsch

16
5.2 Installation mit motorbetriebener Antenne
Mit Ihrem Receiver können alle DiSEqC-Motoren (wie der ASTON TracSat) und der 24-36 V Standard Actuator
oder Motoren mit Horizont zu Horizont Halterung gesteuert werden, und zwar jeweils unter Verwendung der
SatSeeker Schnittstelle von ASTON.
Verwendung des DiSEqC-Motorantriebs
Zum besseren Verständnis des DiSEqC-Standards lesen Sie bitte die Bedienungsanleitung Ihres TracSat®
DH 12 oder DH 23 Motors.
Wenn Sie die Aston SatSeeker® DS100 oder DS200 DiSEqC kompatible Schnittstelle verwenden, schlagen
Sie bitte zur erforderlichen Initialisierung und korrekten Voreinstellung in deren Bedienungsanleitung nach,
bevor Sie sie mit dem Wamba einsetzen.
Bevor Sie den Motor verwenden, vergewissern Sie sich bitte, dass dieser richtig installiert und korrekt
konfiguriert ist.
Wir empfehlen Ihnen, wenn möglich auf die Dienste eines qualifizierten Fachtechnikers zurückzugreifen.
Verwendung des DiSEqC-Motors
• Drücken Sie MENÜ auf Ihrer Fernbedienung.
• Wählen Sie INSTALLATION (쒀und 쑽). Drücken Sie OK, um Ihre Eingabe zu bestätigen.
• Wählen Sie ANTENNEN UND SATELLITEN PARAMETER (쒀und 쑽). Drücken Sie OK, um Ihre
Eingabe zu bestätigen.
• Wählen Sie INSTALLATIONSTYP. Drücken Sie CH+/CH-, um MOTORBETRIEBEN zu wählen.
Drücken Sie OK, um Ihre Eingabe zu bestätigen und zum nächsten Schritt zu gelangen.
• Drücken Sie CH+/CH-, um den LNB-Typ zu wählen.
• Verwenden Sie (쒀und 쑽) für die Auswahl und um zu den folgenden Optionen zu gelangen und
gegebenenfalls die entsprechenden Parameter zu modifizieren.
-ORIENTIERUNG
-AKTIVIERUNG VON SATELLITEN
-BEGRENZUNGSEINSTELLUNG
-RESET UND ZENTRIEREN
-SPEICHERN UND VERLASSEN
BEGRENZUNGSEINSTELLUNG
Die Einstellung der Begrenzungen Ihres Motors ist notwendig und wird dringend empfohlen, um eine
Beschädigung von Antenne und Motor zu vermeiden. Vergewissern Sie sich, dass die vollständige Ost/West-
Drehung Ihrer Antenne (+60/-60 Grad) nicht von physischen Hindernissen beeinträchtigt wird.
Wir empfehlen Ihnen nachdrücklich, Ihr motorbetriebenes System von einem qualifizierten Satellitentechniker
installieren zu lassen.
Hinweis : Falls Ihr Motor keine Begrenzungseinstellungen benötigt oder diese bereits erfolgt sind, lesen Sie
weiter in Abschnitt 4.2.2.
• Wählen Sie BEGRENZUNGSEINSTELLUNG (쒀und 쑽) und drücken Sie dann OK, um Ihre Eingabe
zu bestätigen.
• Wählen Sie ON über die Tasten 쑸und 쑺, wenn Sie die Begrenzungen aktivieren möchten und drücken
Sie dann OK.
• Drücken Sie OK, um die BEGRENZUNG NACH OSTEN festzusetzen und drücken Sie dann die Taste
EAST (rot), bis Sie die gewünschte Begrenzung erreichen.
Drücken Sie OK, um Ihre Eingabe zu bestätigen.
• Drücken Sie OK, um die BEGRENZUNG NACH WESTEN festzusetzen und drücken Sie dann die Taste
WEST (blau), bis Sie die gewünschte Begrenzung erreichen.
Drücken Sie OK, um Ihre Eingabe zu bestätigen.
• Drücken Sie ESC, um zu den vorhergehenden Menüs zurückzukehren und die neuen Parameter zu
speichern.
17
RESET UND ZENTRIEREN
ACHTUNG!
Die folgenden Eingriffe dürfen ausschließlich von einem qualifizierten Satellitenfernsehtechniker vorgenommen
werden. Die falsche Verwendung dieser Funktionen würde die Beschädigung Ihres Motors zur Folge haben.
Die Zentrierfunktion ermöglicht es Ihnen, den Motor auf eine neue 0°-Satellit-Position einzustellen oder ihn auf
die werkseitig eingestellten Werte rückzustellen.
• Gehen Sie über die Tasten (쒀und 쑽) zu RESET UND ZENTRIEREN und drücken Sie dann OK.
• Wählen Sie ZENTRIEREN (쒀und 쑽), wenn Sie den Motor in die 0°-Satellit-Position bringen möchten
und drücken Sie dann OK, um Ihre Eingabe zu bestätigen.
• Wählen Sie AUTOMATISCHES RESET (쒀und 쑽), wenn Sie den Motor in die 0°-Motor-Position bringen
möchten und die herkömmlichen Satellitenpositionen umprogrammieren möchten. Drücken Sie dannOK,
um Ihre Eingabe zu bestätigen.
• Wählen Sie MANUELLES RESET (쒀und 쑽), wenn Sie den Motor manuell in die 0°-Motor-Position
bringen möchten und drücken Sie dann OK.
• Drücken Sie die Tasten EAST (rot) /WEST (blau), bis Sie die gewünschte Position erreicht haben. Drücken
Sie dann OK, um die neue 0°-Motor-Position zu bestätigen.
• Drücken Sie ESC, um die Änderungen zu speichern und wieder zum vorhergehenden Menü zu gelangen.
ORIENTIERUNG
• Wählen Sie ORIENTIERUNG (쒀und 쑽) und drücken Sie dann OK.
Von nun an ist die LocSat-Funktion aktiviert. Sie übernimmt das automatische Ausrichten Ihrer Antenne
(wenn diese mit einem TracSat-Motor ausgerüstet ist).
(1) Es erscheint dann ein neues Menü, in dem Sie den Satelliten wählen müssen, der als Referenzsatellit für
das Ausrichten Ihres Motors dienen soll. Jeder der folgenden Parameter kann gegebenenfalls verändert
werden, siehe Abschnitt 4.1.
Satellit, Position, Frequenz, Datenflussmenge, Polarisierung, PID Video, PID Audio, Lokalisierung.
• Drücken Sie CH+/CH- und wählen Sie dann den Satelliten, der als Referenz verwendet werden soll.
• Sie können die verschiedenen mit diesem Satelliten verbundenen Parameter modifizieren, indem Sie dazu
die aktuelle Ausgabe einer Fachzeitschrift mit diesen Parametern heranziehen. Verwenden Sie (쒀und
쑽), um sich innerhalb der Parameter hin und her zu bewegen und geben Sie den neuen Wert ein.
• Handelt es sich bei Ihrem Motor um einen ASTON DH12 oder DH23, wählen Sie für die
LOKALISIERUNG Automatisch, indem Sie CH+/CH- und dann OK drücken, um Ihre Eingabe zu
bestätigen. In diesem Modus erfolgt die Suche nach dem Satelliten vollautomatisch. Sollte die Suche
erfolglos bleiben, überprüfen Sie zunächst alle Voreinstellungen Ihres Motors oder verwenden Sie den
Halbautomatischen Modus.
• Handelt es sich bei Ihrem DiSEqC-Motor nicht um einen ASTON, wählen Sie den Halbautomatischen
Modus und drücken Sie OK, um Ihre Eingabe zu bestätigen. In diesem Modus müssen Sie den Satelliten
manuell suchen. Der Motor wird sich dann in eine Richtung drehen. Warten Sie, bis der Motor stoppt und
verwenden Sie die Tasten EAST und WEST, um den Referenzsatelliten zu finden.
• Sobald Sie den gewünschten Satelliten gefunden haben, erscheint ein Signalpegel auf der Anzeigeleiste
und ein Kanal auf dem kleinen Fernsehmonitor (falls nicht verschlüsselt). Um die optimale Satellitenrichtung
zu finden, verwenden Sie die Tasten EAST oder WEST, um Ihre Antenne auszurichten. Sie können
ebenfalls die Auto-Fokus-Funktion verwenden, indem Sie auf die Taste A/FOCUS drücken, damit dies
automatisch erfolgt.
(2) Drücken Sie OK, wenn Sie einen anderen Satelliten wählen möchten und die neue Ausrichtungsposition
überprüfen möchten.
Deutsch

18
(3) Oder drücken Sie auf Esc, um fortzufahren.
Von diesem Moment an sind viele Operationen möglich: Zuallererst DIE SATELLITENPOSITIONEN NEU
BERECHNEN. Verwenden Sie EINE SATELLITENPOSITION SPEICHERN, falls nach der Neuberechnung
der Positionen an einem bestimmten Satelliten bei der Einstellung das Signal besser wird, und
VERLASSEN OHNE ABZUSPEICHERN, wenn Sie lediglich eine Kontrollausrichtung an einem bestimmten
Satelliten vornehmen möchten.
A - Neuberechnung aller Satellitenpositionen
• Wenn Sie den Receiver zum ersten Mal einstellen, müssen Sie die SATELLITENPOSITIONEN gleich
nach dem Ausrichten der Antenne (ORIENTIERUNG) NEU BERECHNEN. Dadurch werden
automatisch alle anderen Satellitenpositionen nach dem von Ihnen gewählten Referenzsatelliten neu
berechnet, eingestellt und deren optimale Richtung gespeichert.
•
Wählen Sie NEUBERECHNUNG DER SATELLITENPOSITIONEN (쒀und 쑽) und drücken Sie dann OK.
B - Eine Satellitenposition speichern
• Wenn die Position eines einzelnen Satelliten korrigiert werden und einzeln gespeichert werden soll, ohne
dass die anderen gespeicherten Satelliten davon betroffen sind, dann gehen Sie auf AKTUELLE
SATELLITENPOSITION speichern und drücken Sie OK.
Hinweis : Alle anderen Satellitenpositionen werden nicht modifiziert.
C - Verlassen ohne abzuspeichern
• Gehen Sie beim Vornehmen einer Kontrollausrichtung auf einer bereits gespeicherten Position zu
SATELLITENPOSITION NICHT SPEICHERN und drücken Sie OK.
Haben Sie in Abschnitt (2) OK gewählt, können Sie zu (1) desselben Abschnitts zurückgehen, um eine
weitere Ausrichtung vorzunehmen.
Haben Sie in Abschnitt (3) ESC gewählt, müssen Sie nur noch die Satelliten wählen, über die Sie Kanäle
empfangen wollen.
• Gehen Sie mit (쒀und 쑽) zu AKTIVIERUNG DER SATELLITEN und drücken Sie dann OK.
Bewegen Sie sich in der Satellitenliste mit (쒀und 쑽) auf und ab. Wählen Sie den gewünschten Satelliten
und drücken Sie CH+/CH-, um Ihre Eingabe zu bestätigen (mit JA markiert). Alle mit "JA" markierten
Satelliten werden dann bei der Kanalsuche verwendet.
• Drücken Sie OK, um alle gewählten Satelliten zu bestätigen.
•
Gehen Sie zu SPEICHERN UND VERLASSEN und drücken Sie dann auf OK, um alle zuvor vorgenommenen
Einstellungen zu bestätigen.
5.3 INSTALLATION IM FI/FI-MODUS (Gemeinschaftsinstallation)
• Drücken Sie MENU.
• Wählen Sie INSTALLATION (쒀und 쑽) und drücken Sie dann OK.
• Wählen Sie PARAMETER ANTENNEN UND SATELLITEN und drücken Sie dann OK.
• Gehen Sie zu INSTALLATIONSTYP und wählen Sie unter Verwendung der Tasten CH+/CH- die Option
KOLLEKTIV FI/FI
• Gehen Sie zu LNB VERSORGUNG und wählen Sie unter Verwendung von CH+/CH- je nach den
Einstellungen Ihrer Installation JA oder NEIN (wählen Sie NEIN, wenn Ihr LNB extern mit Strom versorgt
wird).
• Drücken Sie OK.
Sie können nun mit der automatischen Installation fortfahren.
19
6. Kanalinstallation
6.1 Aktualisierung der Bitraten
• Drücken Sie MENU auf der Fernbedienung.
• Wählen Sie INSTALLATION (쒀und 쑽) und drücken Sie dann OK.
• Wählen Sie AKTUALISIERUNG DER SUCHRATEN (쒀und 쑽) und drücken Sie OK, um Ihre Eingabe
zu bestätigen.
• Wählen Sie den entsprechenden Satelliten (쒀und 쑽) .
• Drücken Sie 쑺, um auf RATEN FÜR DIE SUCHE zu gelangen. Sie haben die Wahl zwischen 1 und 8
Bitraten pro Satellit. Jede BITRATE kann für aktiv oder inaktiv erklärt werden (mit Ausnahme der ersten,
die immer aktiv ist). Wird eine BITRATE für aktiv erklärt, wird sie bei der automatischen Kanalinstallation
verwendet.
• Drücken Sie 쑸, um zurück zur Satellitenliste zu gelangen.
• Wiederholen Sie diese Operation für jeden Satelliten, den Sie erfassen möchten.
• Drücken Sie OK, um die Daten zu speichern und zum vorhergehenden Menü zu gelangen.
Nun sind alle erforderlichen Einstellungen für Ihren Receiver und die Konfiguration der Installation
abgeschlossen. Sie können nun mit der automatischen Kanalsuche und -installation fortfahren.
6.2 Automatische Kanalinstallation
• Drücken Sie MENU auf der Fernbedienung.
• Wählen Sie INSTALLATION (쒀und 쑽) und drücken Sie OK, um Ihre Eingabe zu bestätigen.
• Wählen Sie AUTOMATISCHE KANALSUCHE (쒀und 쑽) und drücken Sie OK, um Ihre Eingabe zu
bestätigen.
• Drücken Sie OK, um die Kanalsuche zu starten.
Sie können die automatische Suche jederzeit unterbrechen, indem Sie ESC drücken. Mit OK können Sie
die Suche wieder aufnehmen und fortsetzen und mit ESC unterbrechen und verlassen. Alle bereits
gefundenen Kanäle werden gespeichert.
•
Sobald die Suche abgeschlossen ist, drücken Sie ESC, um die Daten zu speichern und zum vorhergehenden
Menü zurückzukehren.
Hinweis : Ihr Receiver kann bis zu 4000 Programme (einschließlich TV,RADIO und DATEN) empfangen.
6.3 Aktualisierung der Kanäle
Dieses Menü ermöglicht es Ihnen, Kanäle oder Programmpakete hinzuzufügen, zu verschieben, umzubenennen
oder zu löschen.
• Drücken Sie MENU auf der Fernbedienung.
• Wählen Sie INSTALLATION (쒀und 쑽) und drücken Sie OK, um Ihre Eingabe zu bestätigen.
• Wählen Sie PAKET ODER KANAL HINZUFÜGEN (쒀und 쑽) und drücken Sie OK, um Ihre Eingabe zu
bestätigen.
Hinweis : Nun haben Sie die Möglichkeit, TV-, Radio- und Datenkanäle manuell hinzuzufügen.
• Wählen Sie IN DER FERNSEHLISTE (쒀und 쑽) und drücken Sie OK, um Ihre Eingabe zu bestätigen.
Dieses Menü zeigt eine Liste mit Programmpaketen und die entsprechenden Kanäle an sowie ein
Informationsfenster, in dem alle Parameter des jeweils gelb markierten Kanals zu sehen sind.
Sie können den unverschlüsselten oder -wenn Sie die Zugangsrechte haben-den verschlüsselten Kanal
sehen (1)(2).
• Drücken Sie 쑸und 쑺, um sich zwischen den Programmpaketen und Kanalfenstern hin und her zu
bewegen.
Deutsch

20
• Zum Löschen eines Kanals oder Programmpakets wählen Sie ein Programmpaket oder einen Kanal (쒀
und 쑽). Drücken Sie zum Löschen die Taste DELETE. Wiederholen Sie den Vorgang für jedes
Programmpaket bzw. jeden Kanal. Drücken Sie ESC, um die Änderungen zu speichern und zum
vorhergehenden Menü zurückzukehren.
• Zum Hinzufügen eines neuen Programmpakets wählen Sie das Programmpaketfenster (쑸und 쑺), drücken
die Taste ADD (rot), geben die entsprechenden Parameter ein und drücken OK. Falls es gefunden wird,
wird das neue Programmpaket mit in die Liste aufgenommen. Existiert das Programmpaket bereits,
werden nur neue Kanäle hinzugefügt.
• Zum Hinzufügen eines neuen Kanals wählen Sie das Fenster mit der Kanalliste (쑸und 쑺), drücken die
Taste ADD (rot), geben die entsprechenden Parameter ein und drücken dann auf OK. Falls er gefunden
wird, wird der neue Kanal mit in die Liste aufgenommen.
• Um einen Kanal oder ein Programmpaket zu verschieben, wählen Sie einen Kanal oder ein
Programmpaket (쑸und 쑺) und drücken OK. Das gewählte Programmpaket bzw. Der gewählte Kanal wird
in grün angezeigt.
Gehen Sie mit dem Cursor (쒀und 쑽) auf die neue Position. Drücken Sie zum Einfügen auf OK.
Wiederholen Sie den Vorgang für alle Kanäle oder Programmpakete, die Sie verschieben wollen.
Drücken Sie ESC, um die Änderungen zu speichern und zum vorhergehenden Menü zurückzukehren.
Hinweis : Kanäle können nur innerhalb eines Programmpakets verschoben werden. Um einen Kanal auf eine
gewünschte Positionsnummer zu verschieben, verschieben Sie zunächst das Programmpaket und dann den
Kanal.
• Zum Umbenennen eines Kanals wählen Sie das Kanalfenster (쑸und 쑺) und wählen Sie den Kanal (쒀und
쑽), tippen Sie den neuen Namen direkt in die alphanumerische Tastatur Ihrer Fernbedienung ein und
drücken Sie OK, um Ihre Eingabe zu bestätigen oder ESC, wenn Sie den Namen nicht ändern wollen.
• Gehen Sie in der gleichen Weise mit den RADIO-und DATENLISTEN vor.
(1) Drücken Sie ZOOM, um das Bild zu vergrößern.
(2) Drücken Sie LANG, um die Sprache zu ändern, falls verfügbar.
(3) Wird ein Programmpaket in eine neue Position geschoben, werden alle dazu gehörigen Kanäle
automatisch mit verschoben.
7. Verwendung Ihres Receiver
Wenn Sie Ihren Receiver über die Taste STANDBY an Ihrer Fernbedienung oder an der Vorderseite des Geräts
einschalten, startet er auf dem Kanal, den Sie zuletzt gesehen haben. Bei der ersten Benutzung startet der
Receiver mit dem Hauptmenü.
Wenn das Fernsehbild angezeigt wird, können Sie
•CH+/CH- drücken, um innerhalb der Hauptliste von einem Kanal auf den anderen umzuschalten;
•쒀und 쑽drücken, um innerhalb der zuletzt verwendeten Favoritenliste von einem Kanal auf den
anderen umzuschalten;
•쑸und 쑺drücken, um die Lautstärke zu erhöhen oder zu verringern;
• die Taste MUTE drücken, um den Ton auszuschalten ; MUTE wieder drücken, um den Ton wieder
einzuschalten ;
•FREEZE drücken, um ein Standbild zu erhalten ; die Taste erneut drücken, um zur normalen
Übertragung zurückzukehren.
21
7.1 Verwendung der Kanalliste
• Drücken Sie LIST, um die Hauptkanalliste aufzurufen.
• Wählen Sie über die Tasten 쒀und 쑽einen Kanal und drücken Sie dann OK, um den Kanal aufzurufen.
• Verwenden Sie CH+/CH-, um sich in der Liste auf und ab zu bewegen (10-kanalweise).
• Verwenden Sie die Tasten (쑸und 쑺), um von einem Programmpaket ins andere zu wechseln. Der Cursor
wird automatisch auf den ersten Kanals des gewählten Programmpakets gesetzt.
• Drücken Sie I+, damit die Parameter des Kanals angezeigt werden. Drücken Sie I+ nochmals, um das
Informationsfenster wieder zu schließen.
• Drücken Sie ESC oder LIST immer, wenn Sie die Kanalliste verschwinden lassen wollen.
• Drücken Sie ZOOM innerhalb der Kanalliste, um den gewählten Kanal zu vergrößern.
• Drücken Sie TV GUIDE, um über die alphanumerische Tastatur nach einem Kanal zu suchen.
7.2 Verwendung der Favoritenlisten
• Drücken Sie FAV, um die zuletzt verwendete Favoritenliste aufzurufen.
• Wählen Sie einen Kanal über die Tasten 쒀und 쑽und drücken Sie dann OK, um den Favoritenkanal
aufzurufen.
• Verwenden Sie CH+/CH-, um sich innerhalb der Liste auf und ab zu bewegen (10-kanalweise).
• Drücken Sie I+ damit die Parameter des Kanals angezeigt werden. Drücken Sie I+ nochmals, damit das
Feld wieder verschwindet.
• Drücken Sie 쑸und 쑺, um die Favoritenliste zu ändern.
• Drücken Sie ESC oder FAV immer, wenn Sie die Favoritenliste verschwinden lassen wollen.
• Verwenden Sie die Tasten 쑸und 쑺, um einen anderen Favoriten aufzurufen.
• Drücken Sie I+, damit die Parameter des Kanals angezeigt werden. Drücken Sie I+ nochmals, um das
Informationsfenster wieder schließen.
• Drücken Sie ESC oder FAV immer, wenn Sie die Favoritenliste verschwinden lassen wollen.
Hinweis : Die zuletzt verwendete Favoritenliste wird vom Wamba Receiver als Grundeinstellungsliste
verwendet. Um die Favoritenliste zu ändern, drücken Sie FAV und 쑸und 쑺, um eine andere Liste zu wählen.
7.3 Verwendung des Programmführers ( EPG )
Ihr Receiver ist in der Lage, die Programmführer der meisten (auf den Satelliten vertretenen) Betreiber zu
nutzen, wenn dieser Programmführer ausgestrahlt wird.
Drücken Sie während der Wiedergabe des Fernsehbildes auf die Taste TV GUIDE.
•
Es erscheint ein Menü, in dem die folgenden Informationen zu dem gesehenen Kanal angezeigt werden :
Ortszeit
Name des Programms
Anfangszeit
Endzeit
Programmtyp
• Drücken Sie 쑸und 쑺, um Informationen zu der nachfolgenden Sendung auf demselben Kanal zu erhalten.
• Drücken Sie CH+/CH-, um Informationen zu den anderen Kanälen (desselben Programmpakets) zu
erhalten.
• Drücken Sie immer OK, wenn Sie Ihren Receiver auf den gewählten Kanal einstellen wollen.
• Wenn das "i"-Zeichen blinkt, bedeutet das, dass zusätzliche Informationen zur Verfügung stehen (z. B.
Zusammenfassung des Films....). Drücken Sie I+, um diese Informationen zu lesen. Verwenden Sie 쒀
und 쑽, um an das Ende der Seite zu gelangen.
• Drücken Sie I+ erneut, um das Fenster zu schließen.
• Drücken Sie TV GUIDE, um den Programmführer zu verlassen.
Deutsch

23
Datenübertragung mit einem PC
Wie bereits erwähnt, erfordert diese Art der Übertragung ein Software-Programm, das über die ASTON Web-
Site www.aston-france.com erhältlich ist. Schließen Sie Ihren Decoder (Stecker RJ 45) über das erforderliche
Adapterkabel an einen der Serial Ports Ihres PC an. Lesen Sie die auf der Web-Site erhältliche Hilfsdatei zur
Verwendung des Programms SetEdit aufmerksam durch. So können Sie zum Beispiel
• eine komplette Konfiguration (Installation, Kanal-, Radio- und Datenlisten) auf den PC übertragen; folgen
Sie dazu den Anweisungen des Programms.
• zuvor abgespeicherte Listen vom PC herunterladen ; gehen Sie einfach ins HAUPTMENÜ Ihres Decoders
und geben Sie den Code 0000 ein.
• Ihre heruntergeladenen Listen neu gliedern.
(1) ASTON KANN NICHT FÜR SCHÄDEN AN PC ODER DECODER HAFTBAR GEMACHT WERDEN,
DIE AUF DIE VERWENDUNG EINES FALSCHEN KABELS ZURÜCKZUFÜHREN SIND. WENDEN
SIE SICH IM ZWEIFELSFALL AN DEN NÄCHSTEN ASTON-VERTRAGSHÄNDLER.
(2) BEI DIESER SOFTWARE HANDELT ES SICH UM EINE AUF 20 VORGÄNGE BESCHRÄNKTE
SHAREWARE. AUF DER WEB-SITE FINDEN SIE SÄMTLICHE INFORMATIONEN, DIE
ERFORDERLICH SIND, UM DIE SOFTWARE ZU ERWERBEN ODER EIN DOKUMENT IN BEZUG
AUF IHRE VERWENDUNG ZU ERHALTEN.
8.2 Aston Mail
Mit der sogenannten Aston Mail können Sie Informationen über Ihren Wamba oder Ihren Programmpaket-
Service erhalten, wie zum Beispiel :
• Informationen bezüglich bereits verfügbarer oder zukünftiger Software-Aktualisierungen
• Werbeangebote wie Sonderaktionen Ihres Digitalfernseh-Providers.
8.2.1 Wie es funktioniert
Sobald Sie Ihren Decoder in Bereitschaftsstellung (Stand-by) gebracht haben, sieht das Programm nach, ob
Sie eine Nachricht erhalten haben.
Wenn Sie Ihren Decoder wieder einschalten, wird in derselben Sprache, die Sie für den elektronischen
Programmführer (EPG) gewählt haben, gegebenenfalls eine neue Nachricht in der Mitte des Bildschirms
angezeigt.
Diese Nachricht kann ganz einfach vom Bildschirm entfernt werden, indem Sie die Taste OK betätigen.
Sollten Sie die Nachricht noch einmal sehen wollen, können Sie sie aufrufen, indem Sie im Fernsehbildmodus
auf die Taste (I+) drücken.
Deutsch
22
7.4 Verwendung des Teletexts
Ihr Receiver unterstützt alle Arten von Teletext, auch wenn Ihr Fernsehapparat sie nicht unterstützt.
Ihr Fernsehapparat unterstützt den Teletext
Verwenden Sie in diesem Fall einfach die Fernbedienung Ihres Fernsehapparats.
Ihr Fernsehapparat unterstützt den Teletext nicht
• Drücken Sie TXT auf der Fernbedienung Ihres Receivers.
• Drücken Sie CH+/CH-, um in den Teletextseiten vor- oder zurückzublättern.
• Geben Sie eine Teletextseite über die alphanumerische Tastatur ein, um sie direkt aufzurufen.
• Verwenden Sie die farbig gekennzeichneten Tasten, um Themen oder Blöcke direkt aufzurufen.
• Drücken Sie erneut auf TXT, um den Teletext-Modus zu verlassen.
8. Verwendung des SetEdit und Aston Mail
8.1 Setedit
Ihr Wamba Receiver ist mit einem Programm ausgestattet, das es ermöglicht, Datenübertragungen mit einem
anderen Aston-Receiver desselben Typs oder einem PC vorzunehmen. Um dieses Programm zu verwenden,
ist je nach dem benutzten Receiver ein spezielles Anschlusskit erforderlich. Sie können dieses Kabel bei Ihrem
ASTON (1) Vertriebshändler erhalten.
Wenn Sie Ihren Decoder an einen PC anschließen möchten, benötigen Sie unter Umständen das Software-
Programm SetEdit, das von der ASTON Web-Site www.aston-france.com (2) heruntergeladen werden kann.
Datenübertragung zwischen zwei Endgeräten
Dies ermöglicht es Ihnen, Daten in der nachfolgend beschriebenen Weise von einem "Transmitter”-Terminal
(das Endgerät, das die Daten überträgt) auf ein “Receiver”-Terminal (das Endgerät, das die Daten empfängt)
zu übertragen :
• die Installationskonfiguration
• die Kanal-, Radio- und Datenlisten
• die Favoritenlisten und ihre Namen
Verwenden Sie das entsprechende Kabel, um beide Decoder miteinander zu verbinden. Gehen Sie dann zum
HAUPTMENÜ der zwei Decoder :
• Senden Sie den Code 0000 an das “Transmitter”-Terminal, das Display zeigt dann die Meldung SENDER
an der Vorderseite. Sie haben dann 30 Sekunden Zeit, um den anderen Decoder in den “Receiver”-Modus
zu bringen.
• Nachdem der Code 8888 an das “Receiver”-Terminal gesandt wurde, wird im Display auf der Vorderseite
die Meldung RECEIVER angezeigt. Falls die Verbindung nicht innerhalb der gegebenen Zeit aufgebaut
oder hergestellt wird, erscheint die Meldung NO RECEIVER im Display auf der Vorderseite des
“Transmitter”-Terminals.
Wenn alles reibungslos verlaufen ist, wird im Display am “Transmitter”-Terminal am Ende der Übertragung
TRANSMIT OK angezeigt, während am “Receiver”-Terminal RECEIVE OK erscheint.
Falls die Übertragung nicht gelingt, erscheint im Display des "Receiver"-Terminals die Meldung TRANSMIT
KO. Versuchen Sie es dann nochmals.

25
Table of contents
1. Your satellite receiver 26
1.1 Your receiver’s front panel 26
1.2 Your receiver’s back panel 26
1.3 Your remote control 26
2 Connections 27
3 Global considerations 27
4 Local parameters 27
5 Installation 28
5.1 Installation with fixed antennas 28
5.2 Installation with motorized antenna 29
5.3 IF-IF installation 32
6 Channels installation 32
6.1 Search criteria 32
6.2 Channels automatic installation 32
6.3 Channels update 33
7 Using your receiver 34
7.1 Using the channels list 34
7.2 Using your favorite lists 34
7.3 Using your program guide 34
7.4 Using the teletext function 35
8 Using Setedit and Aston mail 35
8.1 Setedit 35
8.2 Aston mail 36
English
24

26
1. Your satellite receiver
1.1 Your receiver’s front panel (see page 65)
1VFD display : will show channel’s name when selected and all menu options. When the receiver is OFF,
display will show the current time.
2Status LEDs : indicates the signal and decoder status.
3Channel + / - : To increase or decrease channel number
4Power : This button allows you to turn your receiver ON or to Standby mode
5Smart card readers : For use with embedded conditional access system.
6Common interface slot : you can use CI of your choice.
1.2 Your receiver’s rear panel (see page 65)
1IF input (950-2150MHz) and Loop through
2L&R audio outputs : to connect your receiver to any HiFi equipment
3Composite video output : To connect your receiver to your TV set or VCR
4VCR scart : To connect your receiver to your VCR
5TV scart : To connect your receiver to your TV set.
6Serial port : Can be used to transfer data between 2 Aston decoders or a PC ( using Setedit software)
7Power : To switch your receiver ON or OFF
8Optical audio output : Connects to an external amplifier or any other product with an SPDIF optical
audio input
9Antenne IN / OUT : Connect this output to the UHF/VHF input of your television. This also is used to
connect to a second television set to your WAMBA. IN, Ground antenna input
10 Y / C Connector : S-VHS format video output
1.3 Your remote control (see page 65)
1Standby : press here to switch ON or switch back to Stand-by mode
2Numerical keys : type a number to directly access a channel or to enter alphanumerical data into
specific menus.
3OK/Menu : To access to the main menu or to confirm a choice in a menu.
4Volume / left, right Navigation keys : Allows you to control the volume up or down during video and
to move the cursor left or right within the menus.
5CH+ / Page up : To access to the next channel in the main channel list, to go to the next page of a list
and to change data menu mode.
6
FAV : To call the last used favorite list, to move into the favorite list window during favorite list creation menu.
7P.Guide : To access to present and following program guide, as well as the channel search.
8Zoom : allows you to zoom on the picture during “reorganization menu”, allows you to choose and zoom
on a part of the picture during video mode (confirm by O.K). You can move the magnifier using the
navigation keys. In list mode this enlarges the selected channel text.
9Radio : Press to access directly the radio list.
10 West (blue) : When connected to a motorized antenna press to move the dish to the west.
11 Delete / A.Focus key : Allows you to delete a bouquet or a channel when in Bouquet and Channel
reorganization menu or to optimally position the antenna using autofocus function if connected to a
motorized system.
12 LANG(green) / LocSat : Allows you to select a language when the program offers multi-languages option
or to modify a satellite positioning parameters in the installation menu, for fixed or motorized installation.
13 ADD / EAST : allows you to manually add a bouquet or a channel when in Channel updating or
reorganization menus and to move the dish East when using motorized installation.
14 Mute : Press to turn off the sound, press again to turn on.
15 V+ / V- : To Increase / Decrease the volume
27
16 LIST : Press to access to the main list of bouquets and channels
17 I+ / Timer : When on programme guide mode, press here to obtain additional information on current and
next program. Use this key to open a window and get technical details of a channel during video list
mode. Also use this key to set up the "enter into standby mode" time delay period.
18 CH- / Page down : To access to the previous channel of the main list, to go to the previous page of a
list and to change data on menu mode.
19 NAVIGATION / Fav : Allows you to navigate within a menu or a list and to directly access the favorites
up and down from the previously used favorite list.
20 ESC / TXT : Allows you to exit a function, to go back to the previous menu or to access to the teletext
function in video mode.
21 TV / SAT : Use this key to switch between satellite/terrestrial reception.
22 FREEZE / Help : Pressing this key freezes the video, however you will continue to hear the sound.
2. Connections
Before connecting up your receiver, you are kindly asked to observe the following safety instructions.
• Never try to open up the receiver whilst it is plugged into the mains. Do not store or use your receiver in
a humid environment.
• Make sure that your receiver has sufficient ventilation space around it.
• Place your receiver on a solid and stable place.
• Verify that the mains voltage corresponds to that of your receiver.
• Do not use multiple mains socket adaptors
• Never clean your receiver while it is still connected to the mains supply. Disconnect it and use a soft, dry
cloth. Never use a damp cloth or detergents to clean your receiver.
• If you do not use your receiver for a long period, we recommend you disconnect it from the mains.
3. General Information
In order to benefit fully from the advanced technology of your new satellite receiver, it is important for your
equipment (dish and accessories) to be of a high quality.
Your receiver must be configured and then fully installed before any further use.
If this not the case then your receiver will display the main menu on power up. Afterwards, it will go to the last
selected channel.
4. Parameters
• Press MENU/OK on the remote control to access to the main menu.
• Select the OPTIONS menu, using 쒀and 쑽and then press OK.
• Select LOCAL PARAMETERS, using 쒀and 쑽and then press OK.
These settings are required so that the program guide and the LocSat functions (when using a motorized
system) work properly!
•
Use the navigation keys (쒀and 쑽) to select the parameter and use the CH+/CH- keys to change the values.
• Move the cursor to CITY and enter the name of your location (this is optional) using the alphanumerical
keys of your remote control.
English

28
• Move to LATITUDE and enter your value. In order to know it, consult an atlas or a map, which
shows the exact latitude. (1)
• Move to LONGITUDE and enter your value. To get this value, please consult an atlas or a map,
which shows the exact longitude. (1)
For a fixed dish setting, LATITUDE and LONGITUDE are optional as it allows exact calculation of the
Azimuth and Elevation for each satellite. However ,in case of a motorized system this data is very important
for the automatic satellite location (LocSat function).
• Move to LOCAL DATE item and enter it using the numerical keypad on your remote control.
• Move to LOCAL TIME item and enter it using the numerical keypad on your remote control.
You may need to set the time and date each time you unplug the receiver from the mains, otherwise the
Program guide will not work properly.
• Go to MENUS LANGUAGE and choose using CH+/CH- keys, the OSD languages.
• Go to AUDIO LANGUAGE and choose using CH+/CH- keys, the audio language by default. (2)(3).
• Go to SUB TITLE LANGUAGE and choose using CH+/CH- keys, the subtitle language.
• Go to EPG LANGUAGE and choose using CH+/CH- keys, the EPG language.
• Go to SUB TITLE and choose using CH+/CH- keys, whether you want automatic subtitles or not.
• Press OK to confirm your choices and go back to the previous menu.
N.B : You can leave this menu without saving the modifications by pressing ESC on your remote control.
(1) If you do not know this value, leave this field empty.
(2) This does not mean that every programme will be in the selected language but the default one if
available.
(3) While watching a TV program you can select a different language pressing the LANG key on the
remote control.
5. Installation
5.1 Installation with a fixed antenna
• Press MENU on your remote control.
• Select INSTALLATION (쒀and 쑽) and press OK to confirm.
• Select ANTENNAS AND SATELLITES PARAMETERS (쒀and 쑽) and press OK to confirm.
• Move the cursor to TYPE OF INSTALLATION (쒀and 쑽) and select FIXED by pressing CH+/CH-.
• Go to NUMBER OF ANTENNAS (쒀and 쑽) and select the numbers of LNBs or antennas according to
your installation by pressing CH+/CH- (a maximum of 4 antennas or 4 LNB are allowed).
In case of multiple reception points installation (multi-switch SMATV or IF to IF type) your LNB might be
externally powered then :
• Move to LNB POWER SUPPLY (쒀and 쑽) and select YES using CH+/CH-.
• Press OK to confirm your installation type, number of antennas or LNB of your external configuration.
A new screen will appear. In this new menu, you should select which satellites you want to receive.
29
•
Select the satellite(s) (using
쒀and 쑽
) you want to receiver and confirm the selection by using CH+/CH- (YES
should then be displayed for each selected satellite). On the right window you can see the parameters
(Direction, Azimuth, Elevation etc..... ) for each selected satellite for information purposes.
The number of selected satellites can not exceed the number of antennas or the external LNB.
•
Once you have selected the satellites you wish to receive, press OK to confirm and go back to the next step.
A new menu will appear, you must specify the LNB type as well as the connection accessories that are used
in your outdoor installation.
• Select the dish you want to set up (in the case of a multiple installation) using 쑸and 쑺and choose the
type of LNB (UNIVERSAL 1, UNIVERSAL 2, C BAND) using CH+/CH- keys.
• In the case of multiple antennas or LNB installation move to the switch (쒀and 쑽) and use CH+/CH- to
choose the type of accessory you are using in your antenna installation (Single Cable, DiSEqC type
switch etc.....)
• Press OK to confirm your configuration and go to the next step.
You will be taken to a new menu that allows you to check the signal level received by each antenna and
LNB by using a signal level indicator.
• Use 쑸and 쑺keys to select the dish from which you want to check the signal level and use CH+/CH- keys
to choose the corresponding satellite. The antenna will rotate to aim to each satellite that has been
previously selected and declared as active
Once all parameters are set, a signal level indicator displays the quality of the received signal (1).
•
Press OK to confirm your setting for each antenna and corresponding satellite and return to the previous menu.
(1) A reference frequency for each satellite is factory preset to measure the signal strength (this frequency
may not be received in your region), to modify it, please follow the instructions below :
- Press the LOCSAT key.
- Select FREQUENCY (쒀and 쑽) then enter the corresponding frequency.
- Select RATE (쒀and 쑽) and enter the corresponding SYMBOL RATE.
- Select POLARIZATION (쒀and 쑽), then choose the correct polarization by pressing CH+/CH-.
- Press OK to confirm the new parameters.
You can now proceed with automatic installation.
5.2 Installation with motorized antenna
Your receiver allows you to control all DiSEqC motors (like the ASTON TracSat) as well as the 24-36 V standard
actuator or Horizon to Horizon motor using the SatSeeker Interface from ASTON.
For a better understanding of the DiSEqC standard, please refer to the user manual of your TracSat®
DH 12 or DH 23 motor.
If you are using the Aston SatSeeker® DS100 or DS200 DiSEqC Compatible interface, please refer to the
user manual for the required initialisation and correct settings before use with the Wamba.
Before using the motor, make sure that your motor is properly installed and correctly configured.
We recommend that you use the service of a qualified installer if possible.
Using the DiSEqC motor
• Press MENU on your remote control.
English

30
• Select INSTALLATION (쒀and 쑽) Press OK to confirm.
• Select ANTENNAS AND SATELLITES PARAMETERS (쒀and 쑽). Press OK to confirm.
• Select TYPE OF INSTALLATION press CH+/CH- to choose MOTORIZED . Press OK to confirm and
go to the next step.
• Press CH+/CH- to choose the LNB type.
• Use (쒀and 쑽) to select and access the following options and modify the corresponding parameters if
needed.
-POINTING
-SATELLITES ACTIVATION
-ADJUSTING LIMITS
-RESET AND CENTERING
-SAVE AND QUIT
ADJUSTING LIMITS
It is necessary and highly recommended to set the limits of your motor in order to avoid any deterioration of
your antenna and motor. Make sure that no physcal obstacles can interrupt the complete East/West rotation
of the antenna (+60/-60 degrees).
We strongly recommend, that your motorized system be installed by a qualified satellite engineer.
NB : If your motor does not require setting of limits or if the limits are already set, refer to chapter 4.2.2.
• Select ADJUSTING LIMITS (쒀and 쑽) and then press OK to confirm.
• Select ON using 쑸and 쑺if you wish to activate the limits, and then press OK.
• Press OK to set the EAST LIMIT and then press the EAST key (red) until you reach the desired limit.
Press OK to confirm.
• Press OK to set the WEST LIMIT and then press the WEST key (blue) until you reach the desired limit.
Press OK to confirm.
• Press ESC to return to the previous menus and save the new parameters.
RESET AND CENTERING
WARNING !
Only a qualified satellite TV installation engineer can proceed with the following operations. Any misuse of
these functions may result in the damage of your motor.
The centering function allows you to set the motor on a new 0° satellite position or to go back to the factory
preset values.
• Move to RESET AND CENTERING using (쒀and 쑽) and then press OK.
• Select CENTERING (쒀and 쑽) if you want to adjust and set the motor to the 0° satellite position, then
press OK to confirm.
• Select AUTOMATIC RESET (쒀and 쑽) if you want to adjust and set the motor to the 0° motor positionand
reprogram the usual satellites positions. Then press OK to confirm.
• Select MANUAL RESET (쒀and 쑽) if you want to adjust your motor manually to the 0° motor position,
then press OK.
• Press EAST (red) / WEST (blue) keys, until you reach the desired position, then press OK to confirm the
new 0° motor position.
• Press ESC to save the modifications and go back to the previous menu.
31
POINTING
• Select POINTING (쒀and 쑽) then press OK.
From now on the LocSat function is activated. It takes care of the automatic pointing of you’re antenna (if it
has a TracSat motor).
(1) A new menu will appear, you must select the desired satellite that will be considered as a reference
satellite to adjust your motor. Each of the following parameters can be modified if necessary, please refer
to chapter 4.1.
Satellite, Position, Frequency, Rate, Polarisation, PID video, PID audio, Location.
• Press CH+/CH- to select the desired satellite to be set as the reference,
• You can modify the different associated parameters, please refer to a recent specialist magazine giving
these parameters. Use (쒀and 쑽) to move within the parameters and enter the new value.
• If your motor is an ASTON DH12 or DH23, select Automatic for the LOCATION by pressing CH+/CH-
and then OK to confirm. In this mode satellite localisation is fully automatic. In case of no success, check
all previous settings of the motor first, or use the Semi Auto mode.
• If your DiSEqC motor is not an ASTON, select Semi Auto mode and press OK to confirm. In this mode,
you need to manually locate the satellite. The motor will start moving in one direction. Wait until the motor
stops and use the EAST and WEST keys to find the reference satellite.
• Once you have found the desired satellite, a signal appears on the level indicator and a channel on the
small TV (if not scrambled). To find the optimum satellite direction, use EAST or WEST keys to adjust
your antenna. You can also use the Auto-Focus function by pressing the A/FOCUS key to do it
automatically.
(2) Press OK if you wish to choose another satellite and verify the new pointing position.
(3) Or press Esc to proceed.
From that moment, many operations are possible, RECALCULATING THE SATELLITES POSITIONS first
of all use SAVE A SATELLITE POSITION, if after recalculating positions the signal improves on a given
satellite when adjusting it and QUIT WITHOUT SAVING if you only want to check the aiming to a specific
satellite.
A - Recalculating all satellite positions
• If you are setting up the receiver for the first time, you need to RECALCULATE THE SATELLITE
POSITIONS just after the antenna dish adjustment (POINTING). It will automatically recalculate all the
other satellite positions in accordance with the reference satellite you have just selected, adjusted and
validated its optimum direction.
• Select RECALCULATE SATELLITES POSITIONS (쒀and 쑽) then press OK.
B - Save a satellite position
• When the positioning to a single satellite needs to be modified and saved separately without affecting the
other satellites in memory, then go to SAVE CURRENT SATELLITE POSITION and press OK.
NB : All other satellite positions will not be modified.
C - Quit without saving
•
When proceeding with a check adjustment on an already saved position, go to DO NOT SAVE SATELLITE
POSITION and press OK.
English

32
If in paragraph (2) you selected OK you can then refer to (1) of the same paragraph to set another pointing position.
If in the paragraph (3) you selected ESC, you only need to select the satellites from which you want to receive
channels.
• Move to SATELLITES ACTIVATION using (쒀and 쑽) and then press OK.
Move within the list of satellites using (쒀and 쑽) to select the required satellites and press CH+/CH- to confirm
your choice (marked YES).
All satellites marked “YES” will be used during channel scanning.
• Press OK to confirm all the selected satellites.
• Move to SAVE AND QUIT then press OK to confirm all previous settings.
5.3 INSTALLATION IN IF - IF MODE (Collective installation)
• Press MENU.
• Select INSTALLATION (쒀and 쑽) and then press OK.
• Select ANTENNAS AND SATELLITES PARAMETERS and then press OK.
• Move to INSTALLATION TYPE and press CH+/CH- to select COLLECTIVE IF-IF
• Move to LNB POWER SUPPLY and press CH+/CH- to select YES or NO depending on your installation
settings (select NO if your LNB is externally powered).
• Press OK.
You can now proceed with automatic installation.
6. Automatic channels installation
6.1 Symbol rate update
• Press MENU on the remote control.
• Select INSTALLATION (쒀and 쑽) and then press OK.
• Select SEARCH RATE UPDATE (쒀and 쑽) press OK to confirm.
• Select the corresponding satellite (쒀and 쑽).
• Press 쑺to move to SYMBOL RATE FOR SEARCH. You have the choice between 1 and 8 symbol
rates per satellite. Each SYMBOL RATE can be declared active or non-active (except for the first one
which is always active). Each time a SYMBOL RATE is declared active for the selected satellite, it will
be used in the automatic channel installation.
• Press 쑸to go back to the list of satellites.
• Repeat this operation for each satellite you want to scan.
• Press OK to save data and go back to the previous menu.
All the necessary settings for your receiver and installation configuration are now complete. You can now
proceed with an automatic channels scan and installation.
6.2 Automatic channels installation
• Press MENU on the remote control.
• Select INSTALLATION (쒀and 쑽) and press OK to confirm.
• Select AUTOMATIC CHANNEL SEARCH (쒀and 쑽) and press OK to confirm.
• Press OK to start the channel scanning.
33
You can at any time interrupt the automatic scanning by pressing ESC. You can resume and carry on the
scanning by pressing OK or ESC to stop and quit. All the channels already found will be saved.
• When the scanning is completed, press on ESC to save data and return to the previous menu.
N.B : Your receiver can receive a maximum of 4000 programs (TV,RADIO and DATA included)
6.3 Channels update
This menu allows you to add, move, rename or delete channels or bouquets.
• Press MENU on the remote control.
• Select INSTALLATION (쒀and 쑽) press OK to confirm.
• Select ADD A CHANNEL OR BOUQUET (쒀and 쑽) press OK to confirm.
NB : You have the possibility to add TV, Radio and Data channels manually.
• Select TO THE TELEVISION LIST (쒀and 쑽) press OK to confirm.
This menu shows a list of bouquets and the corresponding channels as well as an information window giving
all the parameters of the channel highlighted in yellow.
You can view the selected channel, free to air or scrambled if you have the subscription rights. (1)(2)
• To move between the bouquets and channels windows, press 쑸and 쑺
• To delete a channel or a bouquet, select a bouquet or a channel (쒀and 쑽), press DELETE to erase.
Repeat for each bouquet or channel. Press ESC to save the modification and return to the previous menu.
• To add a new bouquet, select bouquet window (쑸and 쑺) , press ADD (red key), enter the corresponding
parameters and press OK. The new bouquet will be added to the list if found. If the bouquet already
exist only new channels will be added.
• To add a new channel, select the channel list window (쑸and 쑺), press ADD (red key), enter the
corresponding parameters and then press OK. The new channel will added to the list if found.
• To move a channel or a bouquet, select a channel or a bouquet (쑸and 쑺), press OK. The selected bouquet
or channel will be displayed in green.
Move the cursor (쒀and 쑽) to the new position, press OK to insert.
Repeat for each channel or bouquet you want to move.
Press ESC to save modifications and return to the previous menu.
NB : Channels can only be moved within a bouquet. To move a channel to a desired position number, move
the bouquet first and then the channel.
• To rename a channel, select the channel window (쑸and 쑺) select the channel (쒀and 쑽), enter the new
name by typing directly into the alphanumeric keys of your remote control and confirm by pressing OK
or ESC if you do not wish to modify it.
• Proceed in the same fashion with the RADIO and DATA lists.
(1) Press ZOOM, to increase the picture size.
(2) Press LANG, to change the language when available.
(3) When moving a bouquet to a new position, all corresponding channels are automatically moved.
English

34
7. Day to day use of your Wamba
When you switch on your receiver by pressing the STANDBY key on your remote or on the front panel,
it will start on the last viewed channel. If you are using your receiver for the first time, it will start on the main
menu.
While watching TV you can do the following :
- Press CH+/CH- to change channels within the main list.
- Press 쒀and 쑽to change channels within the last used favorite list.
- Press 쑸and 쑺to increase or decrease the volume.
- Press MUTE to turn off the audio, press MUTE again to switch back on.
- Press FREEZE to freeze a picture, press it again to go back to normal transmission.
7.1 Use of channel list
• Press LIST to call the main channel list.
• Select a channel, by using 쒀and 쑽then press OK to access to the channel.
• Use CH+/CH- to move by page up or down within the list (10 channels by 10 channels ).
• Use the (쑸and 쑺) keys to change bouquets. The cursor is automatically positioned on the first channel of
the selected bouquet.
• Press I+ to obtain the channel’s parameters. Press I+ again to hide the information window.
• Press ESC or LIST at any time to hide away the channel list.
• Press ZOOM whilst in the channel list to magnify the selected channel
• Press P.GUIDE to search for for a channel using the alphanumeric keypad.
7.2 Use of favorites list
• Press FAV to call up the last used favorites list.
• Select a channel by using 쒀and 쑽then press OK to access to the favorite channel.
• Use CH+/CH- to move by page up or down within the list (In steps of 10 channels ).
• Press I+ to obtain the channel’s parameters. Press I+ again to make this box disappear.
• Press 쑸and 쑺to change favorite list.
• Press ESC or FAV at any time to make the list of favorites disappear.
• Use the 쑸and 쑺keys to access to a different favorite.
• Press I+ to obtain the channel’s parameters. Press I+ again to remove the information window.
• Press ESC or FAV key at any time to remove the favorites list.
NB : The last used favorite list, will be used by the Wamba receiver as the list by default. To change the favorite
list, press FAV and 쑸and 쑺to select another list.
7.3 Use of program guide ( EPG )
Your receiver is able to exploit the EPG available from the main operators, when broadcasted.
While watching TV press P.GUIDE :
• A menu will appear giving you the following information on the viewed channel :
35
Local time
Name of the program
Starting time
Finishing time
Program type
• Press 쑸and 쑺to get information on the next program of the same channel.
• Press CH+/CH- to get information on the other channels (on the same bouquet)
• At any time, press OK to tune your receiver to the selected channel.
• When the "i" icon is blinking, this means that extra information is available (ex : film summary .... ), press
I+ to read this information. Use 쒀and 쑽to scroll down the page.
• Press I+ again to close the window.
• Press P.GUIDE to escape the program guide.
7.4 Use of teletext
Your receiver supports all teletext modes, even if your TV set does not support them.
Your TV supports teletext
In this case use your TV remote control.
Your TV does not support teletext
• Press TXT on your receiver’s remote control.
• Press CH+/CH- to increment or decrement teletext pages.
• Enter a Teletext page with alphanumerical keys to access it directly.
• Use the keys marked with colors to directly access subjects or paragraph.
• Press once again on TXT to quit the teletext mode.
8. Using Setedit and Aston mail
8.1 Setedit
Your Wamba receiver has an embedded program allowing you to transfer data with another Aston receiver
of the same type or a PC. To use this program, a special connection kit is required according to the type of
receiver used. You can obtain this from your nearest ASTON (1) distributor.
If you wish to connect your decoder to a PC, you will require the software program called SetEdit which can
be downloaded via the ASTON website www.aston-france.com (2)
Transferring data between 2 terminals
This allows you to transmit data from one “transmitter” terminal ( the one which transmits the data ) to a
“receiver” terminal ( the one that receives the data) in the following way :
• The installation configuration.
• The channel, radio and data lists.
• The favorites lists and their names.
Use the respective cable to connect the 2 decoders the go to the MAIN MENU of the 2 decoders :
• Send the code 0000 to the “transmitter” terminal, the display will then show the message SENDER on
the front panel. You have then 30 seconds to put the other decoder in to “receiver” mode.
English

37
Índice
1. Su receptor de satélite 38
1.1 Panel frontal de su receptor 38
1.2 Panel posterior de su receptor 38
1.3 Su mando a distancia 38
2 Conexiones 39
3 Consideraciones globales 39
4 Parámetros locales 40
5 Instalación 40
5.1 Instalación con antenas fijas 40
5.2 Instalación con antena motorizada 42
5.3 Instalación "IF-IF" 44
6 Instalación de los canales 45
6.1 Críterio de búsqueda 45
6.2 Instalación automática de los canales 45
6.3 Actualización de los canales 45
7 Uso de su receptor 46
7.1 Uso de la lista de canales 46
7.2 Uso de su lista de favoritos 47
7.3 Uso de su guía de programas 47
7.4 Uso del teletexto 47
8 Uso de SetEdit y Aston mail 48
8.1 Setedit 48
8.2 Aston mail 49
Español
36
• Send the code 8888 to the “receiver” terminal, the display will then show the message RECEIVER on
the front panel. If the connection is not established or not done within the given delay, the message NO
RECEIVER will be displayed on the front panel of the “transmitter” terminal.
At the end of the transfer, if everything has gone OK, the “transmitter” terminal will display TRANSMIT OK
whereas the “receiver” terminal will display RECEIVE OK.
If the transfer fails, the latter will display TRANSMIT KO and then try again.
Data transfer with a PC
As mentioned earlier, this type of transfer requires a software program available via the ASTON website
www.aston-france.com. Connect your decoder (RJ 45 Connector) to one of the serial ports of your PC using the
required adaptor cable. Read carefully the help file available on the web site concerning the use of the program
Setedit. You can for example :
• Transfer to the PC, a complete configuration (installation, channel, radio and data lists) : follow the
instructions of the program.
• Download previous stored lists from the PC, just go to the MAIN MENU of your decoder and enter the
code 0000.
• Re-organise the lists downloaded.
(1) ASTON CANNOT BE HELD RESPONSIBLE FOR ANY DAMAGE TO THE PC OR THE DECODER
IF THE CORRECT ADAPTOR CABLE IS NOT USED. IF YOU ARE IN ANY DOUBT THE PLEASE
CONTACT YOUR NEAREST ASTON APPROVED DISTRIBUTOR.
(2) THIS SOFTWARE IS A SHAREWARE LIMITED TO 20 OPERATIONS. YOU WILL FIND ON THE
WEB SITE ALL THE INFORMATION REQUIRED TO BUY THE SOFTWARE OR OBTAIN A
DOCUMENT CONCERNING ITS USE.
8.2 Aston mail
Your Wamba contains a feature called Aston mail which allows you receive information concerning your
Wamba or your digital bouquet services, for example :
• Information on current and future software upgrades
• Promotional information such as special offers from your digital TV service provider.
8.2.1 How it works
Once you have put your decoder in Standby mode, it will then check to see if you have a message.
When you switch on your decoder again, a new message ( if there is one ) will be displayed in the middle of
the screen in the same language as chosen for the electronic program guide (EPG).
This message can then be removed from the screen simply by pressing OK.
Should you wish to consult the message again, it can be displayed by pressing the info button (I+) whilst in
video mode.
This manual suits for next models
1
Table of contents
Languages:
Popular Satellite TV System manuals by other brands

Hitachi
Hitachi DSS SYSTEM owner's manual

King-Dome
King-Dome 9754 Installation and operating instructions

KVH Industries
KVH Industries TracVision L3 owner's manual

Sailor
Sailor 100 Training, installation & service manual

FTE Maximal
FTE Maximal MAX IPS100 user manual

Kathrein
Kathrein MobiSet 3 Twin CAP 750 operating manual