Astra Peel-a-ton User manual

Contents
1. Introduction ・・・・・・・・・・・・・・・・・・・・・・・・・・・・・・・・ P. 1
2. Safety Precautions ・・・・・・・・・・・・・・・・・・・・・・・・・ P. 1
3. Speci cations ・・・・・・・・・・・・・・・・・・・・・・・・・・・・・・ P. 4
4. Names and Functions of Parts ・・・・・・・・・・・・・・・・ P. 5
5. Correct Use of the KA-700H ・・・・・・・・・・・・・・・・・・ P. 7
6. How to Operate the KA-700H ・・・・・・・・・・・・・・・・・ P. 8
7. How to Remove and Attach Parts ・・・・・・・・・・・・・ P.10
8. Cleaning and Maintenance ・・・・・・・・・・・・・・・・・・ P.13
9. Holding Prongs ・・・・・・・・・・・・・・・・・・・・・・・・・・・・ P.15
10. Peeler Blade ・・・・・・・・・・・・・・・・・・・・・・・・・・・・・・・ P.18
11. Item Selection ・・・・・・・・・・・・・・・・・・・・・・・・・・・・・・ P.20
12. Settings for Various Fruits and Vegetables ・・・・・ P.27
13. Troubleshooting ・・・・・・・・・・・・・・・・・・・・・・・・・・・・ P.36
14. In Conclusion ・・・・・・・・・・・・・・・・・・・・・・・・・・・・・・ P.39
Remarks
● Thank you very much for purchasing the KA-700H Fruit Peeler.
● To ensure safe and correct operation of this unit, please read and understand the contents
of this manual before use.
● After reading this manual, keep it in a safe and accessible place for other users of the KA-
700H.
● In order to improve the performance of this product, the speci cations of the product or
this manual may be modi ed without prior noti cation.
Operation Manual
Fast, clean removal of peels
Electric Peeler
KA-700H
Peel-a-ton
AAM-K7H-01Rev.2001-EN

1
1. Introduction
● This appliance is specically designed to peel round and oval fruits and vegetables.
● Improper use of the unit may result in a breakdown or an accident.
● Before using the unit, read this manual carefully, and pay careful attention to inspection and maintenance
and also safety.
2. Safety Precautions
● Please read these instructions carefully before operating the peeler, and be sure to operate it correctly.
● Important safety items are set out on the following pages, so be sure and follow them.
● The following expressions are used in this manual:
This expression indicates a situation in which death or injury may re-
sult from improper use of equipment.
Warning!
Caution!
This expression indicates a situation in which injury and/or material
damage* may occur due to improper use of the equipment.
* Material damage may refer to any or all of the following: house and property, home furnishings, do-
mestic animals and pets.
1) This unit may only be operated by someone who has read and understood this operating
manual, and who can assume full responsibility for the safety of those nearby.
2) Use common sense. Do not operate the unit when fatigued, ill or physically impaired.
3) Do not operate the unit in a poorly lit (dark) or cluttered workspace.
4) Do not operate this unit while under the inuence of alcohol, medication or any other sub-
stance that might impair judgment and motor skills.
5) Wear proper work clothes when operating this unit.
Warning!
Failure to do so may result in an accident or injury.
An injury may result.
Do not wear baggy or loose clothing, gloves, a necklace or other accessories because these
items can become entangled in moving parts of the unit, resulting in possible injury.
A person with long hair must wear a hat or hair net when operating this equipment.

2
6) Do not allow children near this unit. Do not allow children to operate this unit.
7) Do not disassemble or attempt to repair or modify this unit.
8) If you detect anything unusual in the operation of the unit, do not continue to use it.
9) Always operate the unit on a level, stable surface.
10) Never move the unit while it is in operation.
11) Never allow water to contact the base of the unit.
12) Use ample care when touching the base of the unit.
13) Do not touch the stainless surfaces on the front of the unit.
14) Never touch any part (arm, holding prong) while the unit is in operation.
15) Handle the holding prong with adequate care.
Warning!
An accident may result.
An accident may result. Immediately have the machine inspected and repaired.
Operating the unit on an unstable surface may result in a breakdown or injury.
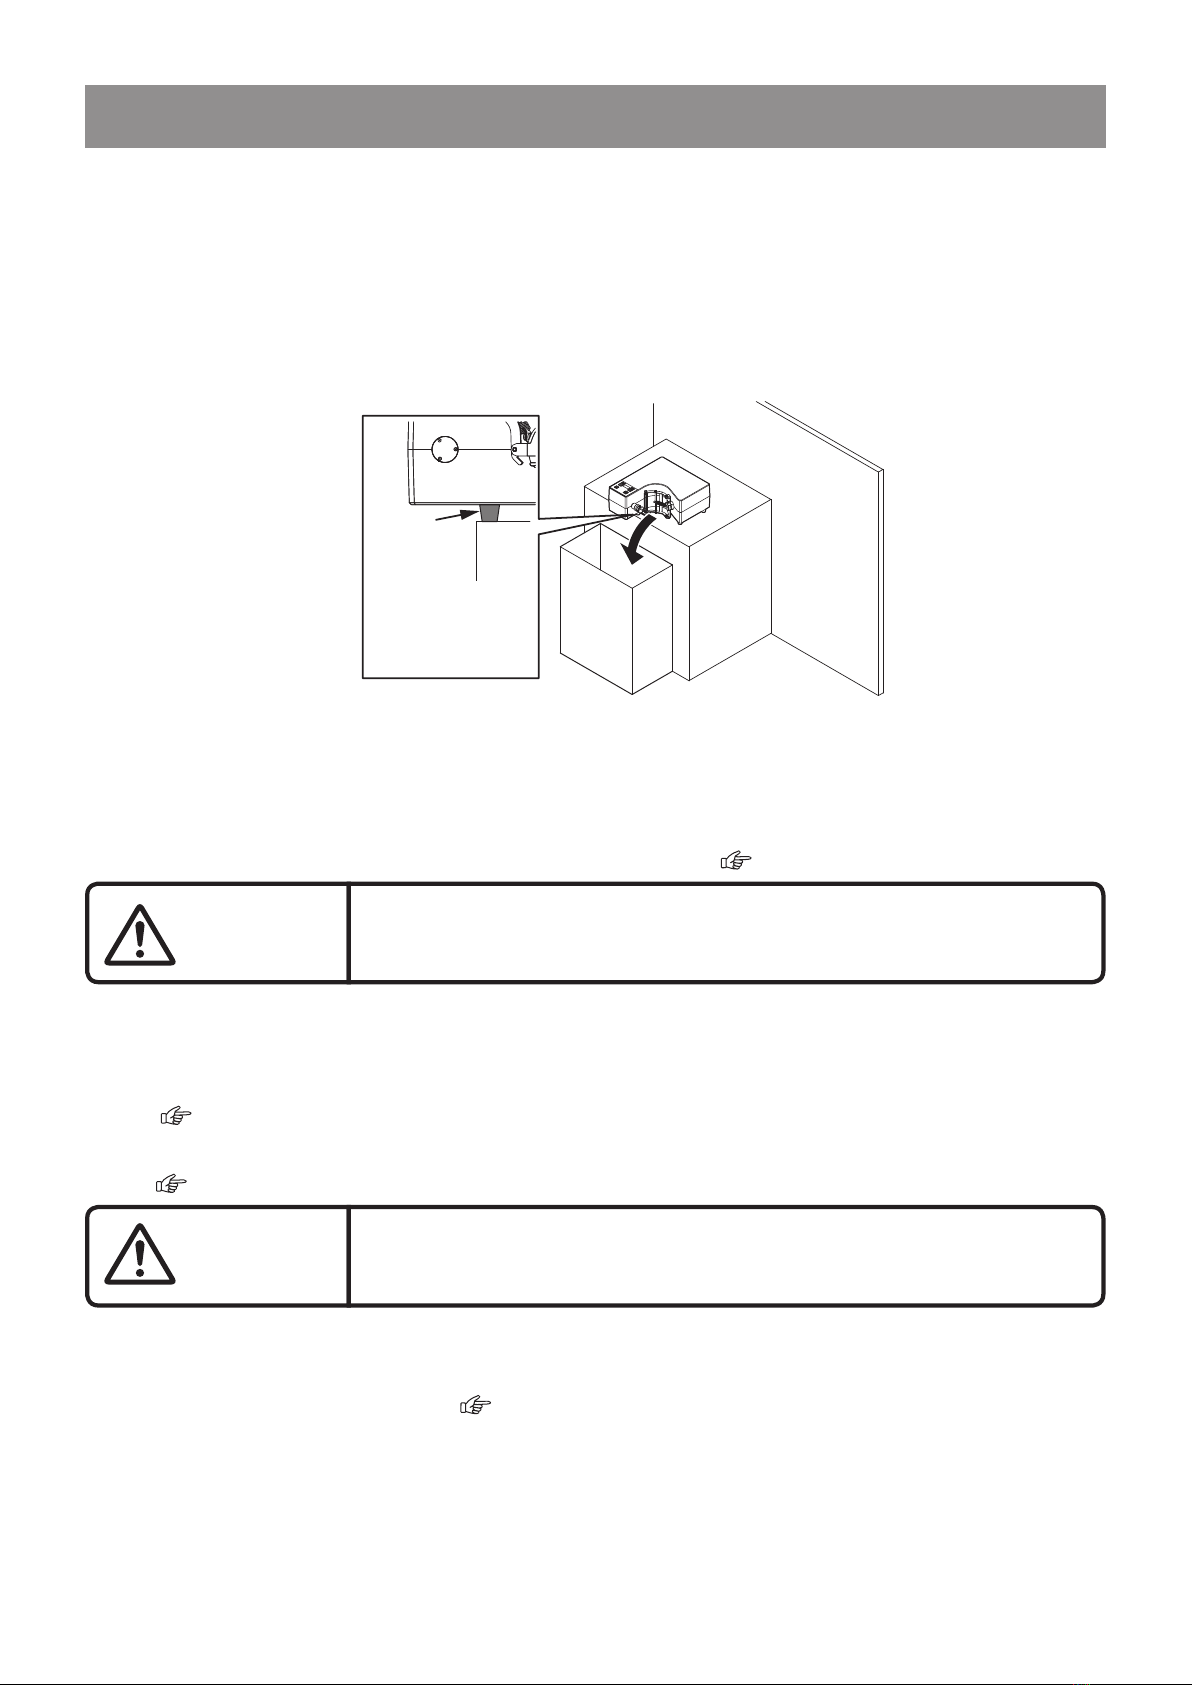
Always turn the power button “o” and unplug the power cord before relocating
the unit. Failure to do this may result in a breakdown or injury.
The base of the unit is NOT water resistant. Contact with water may result in an electric shock,
re or breakdown.
Always conrm that the unit is completely powered o before touching any part
of it. Failure to do so may result in injury.
The unit will be hot, and may cause an injury.
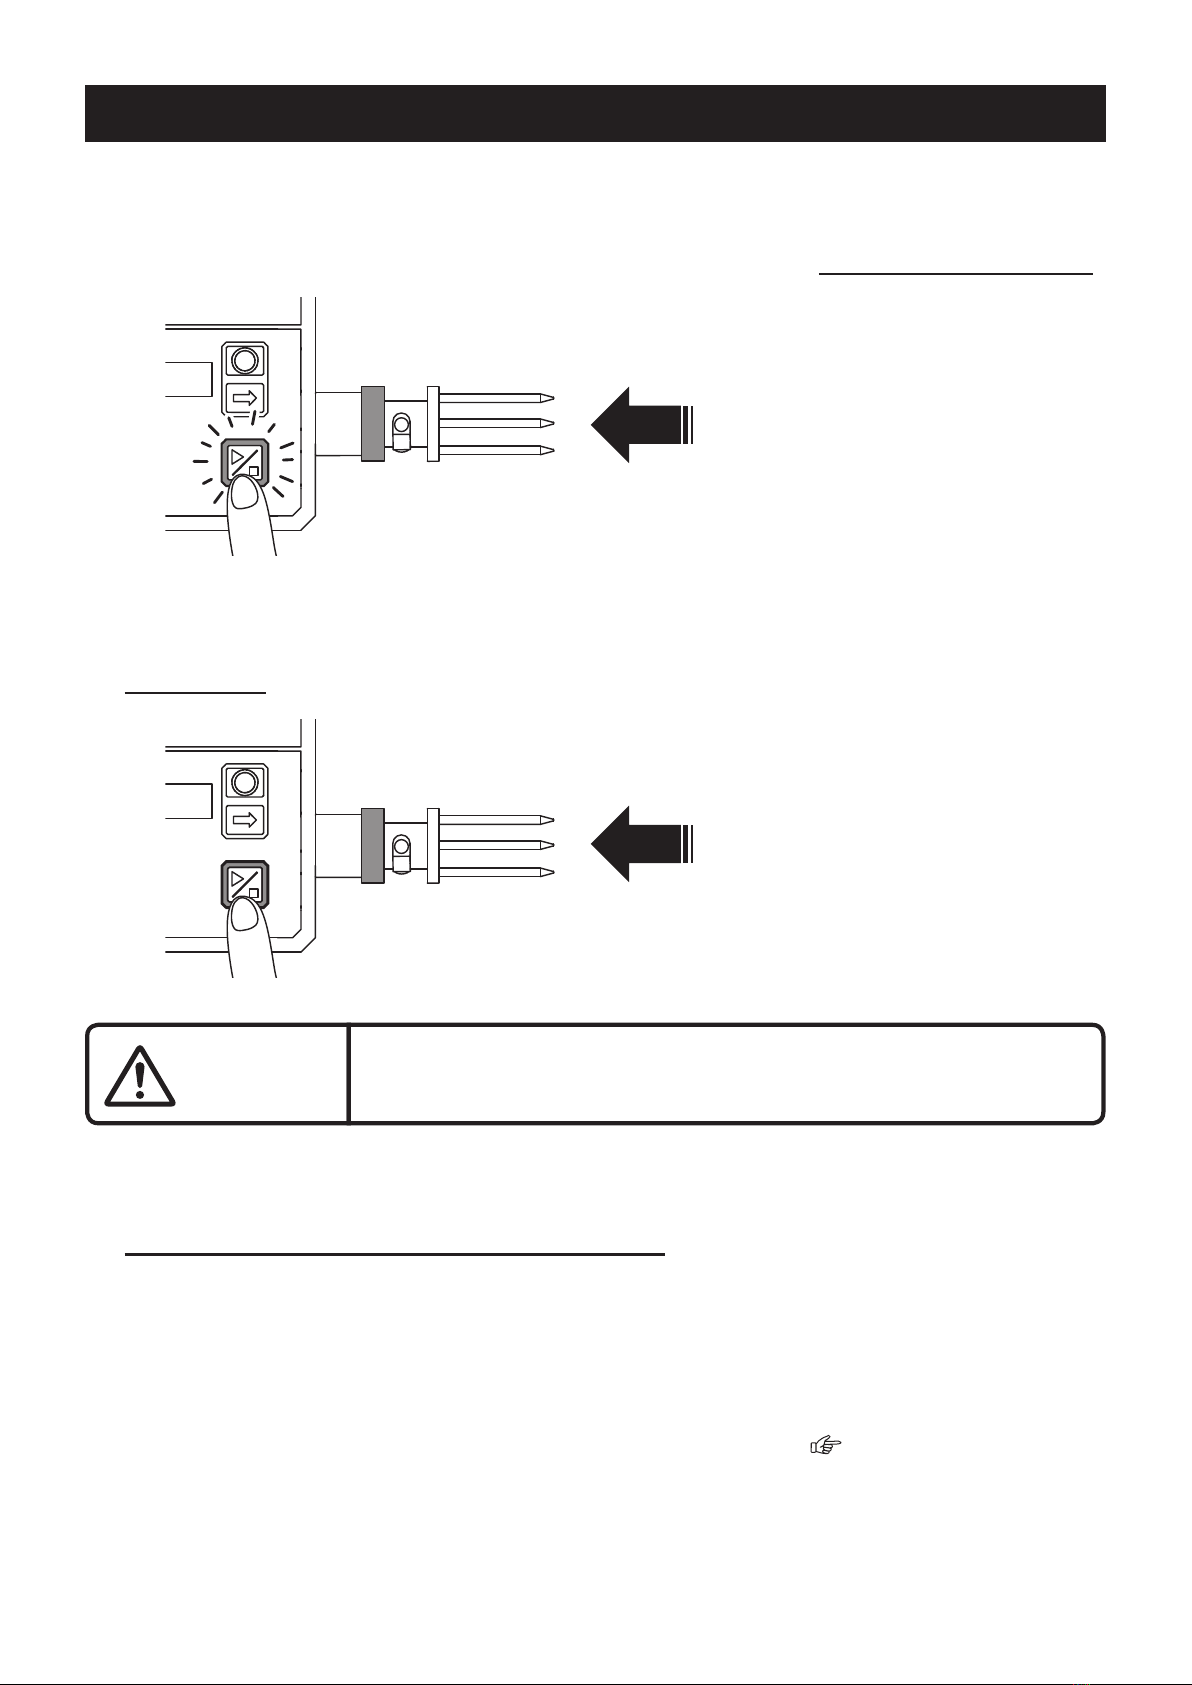
Never touch the mounting prong while the peeler is in operation. Turn the main switch to
“OFF” before touching the prong. Failure to do so may result in serious injury.
The prong is very sharp. Use care when setting or replacing it.
Failure to exercise care may result in serious injury.
When xing the prong to the shaft, be sure to follow the instructions in this manual.
Failure to do so may result in injury and/or damage to the unit.
Always inspect the mounting prong before, during, and after using the unit, and ensure
that it is not broken or missing. If the prong or a part of it is found to be missing, all of the
peeled fruit must be inspected, or thrown out. If the prong is damaged in any way, do not
use it. Replace it.
Immediately after operation, the unit will be hot, and if touched may cause an injury.
Do not touch parts of the unit where there are protruding screws. This may result in an injury.

3
1) Use the power supply within the range of specications.
2) Handle the power cord with care.
3) Take care when plugging or unplugging the power cord.
4) Do not place an object on the unit, or lean or stand on it.
5) Upon taking delivery of the unit, check to see that no damage has occurred, and
no parts (screws, nuts, etc.) have come loose or separated in transit.
Injury or damage may result.
Operating the unit from a power source of other than the intended voltage, or using it
near a dierent voltage source or a source of electrical noise, may result in injury or dam-
age to the unit.
Caution!
Do not unplug the power cord using unreasonable force, damage it, shape it, bend it with
unreasonable force, or bunch it. Keep the cord away from a source of heat or oil, and do
not place anything heavy on it. Any of the above can result in an electrical shock, re, or
damage to the unit.
Never plug or unplug the power cord with wet hands. Before plugging or unplugging the
power cord, make sure that the power is switched “OFF.” Always unplug the power cord
by pulling the plug, not the cord. Failure to do so may result in an electrical shock, re or
damage to the equipment.
16) Use adequate caution when attaching and operating the peeler blade.
Warning!
Never touch the peeling blade while the unit is operating. Always turn the switch to “OFF”
before handling the peeling blade. Failure to do so may result in serious injury.
The peeling blade is extremely sharp. Use adequate care when replacing it.
Failure to do so may result in injury.
Always inspect the peeling blade before, during and after using the equipment to ensure
that it is not broken. If the blade is found to be broken, all peeled fruit must be inspected,
or thrown out. If the peeling blade is damaged in any way, do not use it. Replace it.
Failure to do so may result in injury or damage to the unit.

4
6) When storing or operating the unit, observe the following precautions.
1. Temperature and humidity: Store at 0 – 30°C, and relative humidity below 85%.
2. Place the unit on a rm, level oor.
3. Keep away from salt air, ammable or corrosive gases, radiation, high heat or humidity, sulfur
smoke, and other pollutants.
4. Keep away from oil and oil smoke.
5. Keep away from mist or moisture.
6. Keep away from direct sunlight.
7. Take steps to prevent the entry of insects, rodents, etc.
8. Install in a well-ventilated indoor location.
Caution!
Failure to observe the below precautions may result in damage to the unit.
3. Specications
Power 100 V~130 VAC/200 V~240 VAC (50Hz/60Hz)
Power consumption 150 W
External Dimensions W270 mm D300 mm H127 mm
Total weight 6 kg
External case material ABS plastic
●Conrm that the following standard attachments have been provided.
To obtain replacement parts, contact your retailer or ASTRA.
No. Name Check
1. Holding prong x 3 (HP–M3, HP–MB, HP–MO)
2. Holding prong clips x 3 (CP–P)
3. Arm x 1
4. Peeler blades x 4 (F–3, S–1, S–2, S–3)
5. Spring x 1 (SP–S)
6. Spring holder x 1
7. Spring holder clip x 1 (CP–S)
* The holding prongs (1) and peeler blades (4) are provided for dierent sizes and types of
fruit skins.

5
4. Names and Functions of Parts
1) Control Panel
1.
4.
2.
3.
* When a button is in the ready mode, the border around it will light up in blue.
No. Name Function Reference page(s)
1. Start/stop button
The operation of the start/stop button di ers according to the following
conditions.
Pressing and holding down the button will power up the unit, and
initiate the reset mode.
Press and hold down the button (for more than 2 seconds) in the item
selection mode to enter the specify setting mode.
Press the start/stop button to select a preferred setting.
Ready mode: Press the start/stop button to commence peeling. Note:
operation changes depending on the peeling mode.
During peeling: Press to stop peeling, and place in the “Ready” mode.
Reference pages:
7~10, 20~22
2. Menu button Holding down the standby cancel button for more than two seconds will
return the operating status to the item selection screen.
Reference pages:
8, 20
3. Peeling thickness
adjustment buttons
These buttons adjust the peeling action according to the thickness of
the peel. These buttons are used to perform adjustment in ten steps (0
to 9) which are displayed as bars on the screen.
Press the “ ” button to reduce the number of passes and increase
the peeling thickness.
Press the “ ” button to increase the number of passes and reduce
the peeling thickness.
Reference pages:
20~22
4. Spin speed adjust-
ment buttons
These buttons adjust the speed of item rotation (holding prong spin
speed.) Six available speeds are indicated by bars on the display.
The small arrow “ ” reduces the spin speed; the large arrow “ ”
increases the spin speed.
Reference pages:
20, 23~26

6
2) Mechanical parts
1.
4.
2.
3.
No. Name of part Function Reference page
1. Peeler blade Replaceable parts Select according to the item to be peeled. Reference pages:
11, 18, 19, 27~35
2. Arm The arm is shown above in the “start” position. (A “Click” sound indi-
cates that the arm has settled in the correct position.)
Reference page:
10
3. Spring Replaceable part. Reference pages:
10, 11
4. Holding prong Replaceable part. Select the type according to the item to be peeled.
Fixes and rotates the fruit or vegetable to be peeled.
Reference pages:
12, 15~17, 21~35
3) Back of unit
1.
2.
3.
No. Name of part Function Reference page
1. Power switch Powers the unit on or o .
2. Power connection Built-in cord (2.5m)
3. Fuse 250 VAC, 3 A

7
5. Correct Use of the KA-700H
1) Pre-operation preparation
• In order to prevent a possible electric shock please connect a ground fault interrupter to this unit.
• Install the unit in a well-lit area free of clutter or obstacles.
• When using an extension cord, conrm that the cord is undamaged. Use a 1500W rated extension
cord. The cord should be as short as possible.
• Place the machine on a stable, level surface, with a container below to collect the peelings.
Install the unit as
far forward on the
supporting surface
as possible.
Rubber foot
• After conrming that the power switch is “o”, plug the power cord into a power outlet.
2) Pre-operation inspection
● Check to see that the holding prong is properly attached. ( See page 12)
Caution!
If the prong is not properly tted to the unit, there is a danger
that it will come into contact with the peeler blade, damaging
both of these parts.
• Check that the holding prong is free of damage. If it is bent, or makes a rattling noise, it must be
repaired or replaced.
• Check that the peeling blade is free of damage. If the blade is dented or bent, it must be replaced.
( See page 11)
• Check to see that the arm is correctly attached. If it is not, the peeler will not function properly.
( See page 10)
Caution!
If the arm is not attached correctly, it may contact the holding
prong, causing damage to these parts.
• Be sure that the arm is in the correct starting position. If the arm is not in the correct starting posi-
tion, the peeler will not start when the start button is pressed. Always start the peeler with the arm
in the correct starting position. ( See page 10)

8
6. How to Operate the KA-700H
1) Turn the power switch “On.” ( See page 6)
• “Astra KA-700H” will be displayed on the operation screen, followed by the Settings Menu.
• Pressing and holding down the start/stop button while all buttons on the display are o will put
the unit in the reset mode. ( See page 21)
2)
Use the start/stop button to choose the settings for the type of item to be peeled. (See page 20)
• Pressing the button and holding it down changes the display screen to the detailed settings.
( See page 22)
• If “Arm position wrong – correct” is displayed, return the arm to the correct starting position, and
press the start/stop button again.
3) Ax the item to be peeled (fruit or vegetable) to the holding prong.
• Ax the item so that the prong penetrates the center (core) of the fruit.
• Ax the item so that it touches the base of the prong.
Caution!
If a peeling operation is started when no item is axed to the
holding prong, contact will occur between peeler blade and
prong, damaging both of these parts.
4) Press the start/stop button.
• Method of operation changes depending on the start mode. ( See page 9)
• Starts the peeling. Light of the menu button will turn o. During the peeling, start/stop button
ashes.
• If the start/stop button is pressed during peeling, the peeling operation will stop.
5) Remove the item from the holding prong.
If you continue peeling with the same type of item, go back to 3) and repeat.
* If you wish to change the type of peeling item, press down the menu button two seconds to get back to
the item selection screen.

9
Change of peeling operation
1) Safety Mode (Default)
Safety Mode avoids unexpected misoperation.
Start button will ash on the rst push, then the peeling starts on second push.
Two push
Flash ① Insert fruit
② Press Start Two times
(returns to standby mode when the second push is delayed)
2) One-Push Mode
Immidiately starts the peeling. Start button always lighting.
① Insert fruit
② Press Start
One push
Light
Caution!
Please be careful of starting with nothing inserted.
3) Changing Mode
Press the start button for three seconds.The mode switches.
"SAFETY MODE" or "ONE-PUSH MODE" will be displayed.
Press start one more time to go back to standby.
(Peeling Mode will be shown after item choosing too.)
* “All Reset” in the reset settings makes the unit back to safety mode. ( See page 21)

10
7. How to Remove and Attach Parts
1) The Arm
• The Arm holds the peeling blade. It can be removed and fully immersed for washing. When remov-
ing the arm it is recommended that the holding prong also be removed.
The peeler blades are extremely sharp.
Take adequate precautions to avoid injuring your hands.
Warning!
(1) (2) (3)
Turn the arm clockwise 90° by
hand.
Remove the spring hook at the
upper end from the arm.
Lift the arm up to remove it.
• To attach the arm, place the two holes at the base of the arm over the two pins on the arm holder,
then attach the hooked end(s) of the spring(s) to the groove(s) on the arm shaft.
If the arm is not installed properly, peeling will not take place correctly.
Arm base
Arm holder
Pins (two)
Standard spring
(SP-S)
Arm shaft
(4) Return the arm counterclockwise 90° to the original position by hand. Listen for the “click” to verify that the arm
is in the correct position.
● If the arm does not return to the correct start position, peeling will not commence when the start/
stop button is pressed. “Arm position wrong - correct” will be displayed on the display screen. Ad-
just the arm to the correct start position, and press the start/stop button.

11
2) The Spring
• To replace the spring, it is best to remove the arm rst.
Arm holder
Spring holder
Clip
Spring holder
Remove the clip by pulling it away. The
spring holder can now be removed.
Use a Phillips screwdriver to remove
the spring from the holder.
• Align the nipple on the inside of the spring holder with the corresponding concave part on the in-
side of the arm holder, and then install the arm holder. Insert the clip in the correct direction as
shown in the image below, deeply enough to prevent falling out.
Arm holder
Concave
part of shaft
Clip
Spring holder
Protruding
part of screw
3) Peeler blade
• When replacing the peeler blade it is easiest to rst remove the arm from the unit.
The peeler blades are extremely sharp. Handle with care to
avoid injuring your hands.
Warning!
Peeler replacement procedure
1. 2.
Loosen the roller screw. Loosen the screw until the blade can be turned 360°.
3. 4.
Rotate the peeler to the shown direction. Rotate the peeler so the hole cut of the arm matches
the peeler, then remove it.
• When replacing the blade, make sure that of the unit’s orientation of the unit is the same,
and then carry out the reverse the procedure.
• Please watch the instruction videos from our homepage.

12
4) Holding prong
• You can remove the prong and immerse it for washing.
• The prong is xed to the drive shaft axle with a clip. Remove the clip, then remove the prong.
• If the clip (with holding prong) is left attached for an extended period, it may become stuck due to
fruit juice residue, etc.
Clip
Holding prong
Drive shaft
The holding prongs are extremely sharp. Take adequate precau-
tions to avoid injuring your hands.
Warning!
• To ax the prong to the drive shaft axle, carry out the reverse the procedure.
Line up the holes in the holding prong base and the drive shaft axle, and then insert the clip. Be
sure that the clip is fully inserted, so that it does not fall out.
If the peeler blades are improperly installed, they are likely to y o to-
gether with the item being peeled, or they may come into contact with
the peeler (arm), resulting in injury or a breakdown.
Warning!

13
8. Cleaning and Maintenance
When inspecting or cleaning the unit, always switch the power
“O” and unplug the power cord from the wall outlet.
Failure to do this may result in injury.
Warning!
1) When using the unit be sure to carry out the following on a daily basis.
1. Check for unusual noise.
2. Ensure that the unit does not become abnormally hot.
2) Keep the unit clean.
• Rinse o dirt from the upper portion of the unit. Never spray the base. Wipe the unit with a cloth
that has been immersed in water and then wrung hard. Never use thinners or petroleum-based
cleaning uids on the unit.
The base of the unit is NOT water resistant. Do not pour water directly on the
base, or immerse the unit. Failure to prevent water from coming into contact
with the base may result in an electrical shock, re, or other damage.
Warning!
Do not stand it upside down.
Keep it horizontally and use low pressured water.
Do not use high pressured water. Do not dip it in water.
Do not stand it vertically. Do not stand it diagonally.

14
● The base of the unit has a hole to let the water escape (*①). Periodically clean the inside of the
hole (Once or more each day.)
● The base of the unit also has a hole for the cooling fan (*②). Be careful not to let in water or an
any object.
①
①
②
● Please clean the Holding prong(s), peeler arm, peeler blade(s) and spring frequently. All parts
can be removed for immersive cleaning. Please clean the unit and all parts more than once a day
when in regular use.
The holding prong(s) and peeler blade(s) are extremely sharp.
Take adequate precautions to avoid injury to the hands, etc.
Warning!
3) Inspect regularly
• The unit should be inspected regularly to ensure that screws and other items have not loosened,
and that no cracks or fractures are visible.
4) When storing the unit for long periods, clean the unit thoroughly and
store it in a place with low humidity.
Caution!
● Leave the power on for 2 hours after use, and keep the inside
dry.
● While storing the unit, take steps to prevent rodents, insects,
or other living organisms, from getting inside it, because this
may cause damage to the unit.

15
9. Holding Prongs
1) Types of holding prongs
• The prongs come in XS, S, M and L sizes, with di erent colored bases to distinguish them from
each other.
• Prongs come in four di erent shapes.
• There are a total of twelve individual prongs available. Each is designed for speci c varieties of
fruits/vegetables, consistencies and sizes.
Base color
Citrus prong Peach prongFlat prongRound prong
Shape of prong
White: Small (S) and Extra Small (XS)
Black: Medium (M)
Blue: Large (L)
Size (color coded) S (White) M (Black) L (Blue)
Prong length 30mm 40mm 50mm
Roung prongs
Prong thickness
2 mm
Part Name Round Prong S2 Round Prong M2
No speci cations
Part No. HP−S2 HP−M2
Easy to insert
and remove.
Little damage
to fruit.
Best for small
quantities and
light use.
<Best for small quantities and
light use>
Small item
<Best for small quantities and
light use>
For use with harder items and
lower volume production.
Lemons, turnips, carrots, rad-
ishes, persimmons, potatoes,
apples and Asian pears.
3 mm
Part Name Round Prong S3 Round Prong M3 Round prong L3
Part No. HP−S3 HP−M3 HP−L3
Harder to
insert Harder
to remove.
More damage
to fruit.
Better for con-
tinuous work,
and heavy
use.
<Better for continuous work,
and heavy use>
Small item
<Better for continuous work,
and heavy use>
For use with harder items and
lower volume production.
Turnips, carrots, radishes,
persimmons, potatoes,
apples, Asian pears and
onions
<Better for continuous
work, and heavy use>
Large items

16
Size (color coded)
XS (White) S (White) M (Black) L (Blue)
Prong length 25mm 30mm 40mm 50mm
Part Name Flat Prong XS Flat Prong S Flat Prong M Flat Prong L
Part No. HP-XSB HP-SB HP-MB HP-LB
Flat Prongs
For very small fruits For soft kiwi fruit,
lemons, and yuzu
For soft kiwi fruit, and
lemons
For soft items, and
those with no core
Size (color coded)
XS (White) S (White) M (Black) L (Blue)
Prong length 25mm 30mm 40mm 50mm
Part Name
No speci cations No speci cations No speci cations
PeachProngL
Part No. HP−LP
Peach Prong
For items with pits or
stones; soft items
Size (color coded)
No speci cations
S (White) M (Black)
No speci cations
Prong length 30mm 40mm
Part Name CitrusProngS CitrusProngM
Part No. HP-SO HP-MO
Citrus Prongs
Yuzu, oranges Oranges, grapefruit

17
2) Selecting a Holding Prong
Length of the prong (size)
Select a prong that is over half the vertical height of the
item to be peeled.
However, if the item has a rm core, a shorter prong
may be used, and will be easier to insert and remove.
On the other hand, if the item is soft, and the volume of
peeling is large, it is better to use a thicker prong.
• If a prong protrudes from the top of the item after it is axed, use a shorter prong.
Caution!
Avoid the peeling with the prong penetrating the item.
Prong and peeler will hit and cause damage.
● Round prong
• Round prongs come in 2 mm and 3 mm types.
• A 2 mm prong leaves very small holes, but is not durable enough for heavy production.
• A 3 mm prong leaves visible marks, but is durable enough for heavy production.
● Flat Prong
• Flat prongs use L-shaped pins which do not leave large marks, but are not durable enough for
heavy production.
● Peach Prong
• The peach prong is designed to grip the sides of a peach stone.
● Citrus Prong
• Citrus prongs are specially designed for peeling fruit with no core, such as oranges, small pomelos,
grapefruits, hassaku oranges, yuzu and other citrons.
The prongs are very sharp. Always exercise caution to avoid
cutting or stabbing your hand when placing an item on the
prong.
Warning!

18
10. Peeler Blade
1) Types of peeler blades
• The peeling thickness is divided into thin peel, normal peel, thick peel, and very thick peel. The yield is
determined by adjusting the blade and the peeling thickness.
• Blade types are categorized as follows: at and saw. The selection depends on the type of item to be peeled.
• There are a total of seven di erent blades. Select the blade based on the skin type of the item to be peeled,
the condition of the item, and the desired peeling characteristics.
• The peeler blade part number is engraved on the front of the blade. Please quote this number when ordering
a replacement.
Blade shape Flat (F) Saw (S)
Part Name Peeler blade Flat Extra-Thick Peeler blade Saw Extra-Thick
Part No. F-1 S-1
Extra-Thick
(1)
Part Name
No setting
Peeler blade Saw Thick Peel
Part No. S-2
Thick Peel
(2)
Part Name Peeler blade Flat Medium Peeler blade Saw Medium
Part No. F-3 S-3
Medium (3)
Part Name Peeler blade Flat Thin Peel Peeler blade Saw Thin Peel
Part No. F-4 S-4
Thin Peel (4)

19
2) Yield eects of dierent peeling blades vs. peel thickness adjustments.
Adjusting for thicker (deeper) peeling
Skin
Flesh
Thick
Cross-sectional drawing of the flesh and skin
Adjusting the unit to take a thicker peel increases the
number of overlapping passes of the blade, thereby
increasing the amount of peel removed. The peeler
blade passes over the fruit more slowly, leaving less
peel.
The result is a smoothly peeled surface, but less fruit
yield.
Adjusting the unit to take a thinner (less) peeling
Cross-sectional drawing of the flesh and skin
Flesh
Thin
Skin
Adjusting the peeler to take a thinner peel decreases
the number of overlapping passes of the blade, thus
taking o less skin. Because there is greater resistance
against the skin on each pass, the blade leaves more
skin on the surface of the fruit.
The surface of the fruit will therefore have more residu-
al skin and angles, but the yield of fruit will be greater.
*
To avoid reducing the fruit yield while achieving the best possible surface nish, choose a thin-
ner peeling blade, and adjust the unit for thicker peeling.
* To improve the peeling nish (leave less skin on the item), select a thicker peeling blade,
and adjust the unit for thinner peeling.
This manual suits for next models
1
Table of contents
Other Astra Industrial Equipment manuals
Popular Industrial Equipment manuals by other brands

Trinity Highway
Trinity Highway QuadGuard 2 Product description manual

morse
morse 15 Operator's manual

Frick
Frick IDSC Installation operation & maintenance

Mitsubishi
Mitsubishi GOT MELSEC A975GOT-TBA-B user manual

Emerson
Emerson Rosemount Model 500 Retrofit Instructions

BVA Hydraulics
BVA Hydraulics HD15002 instruction manual