Astra OTX2400A User manual

Magnification
Objective Lens Diameter
Close Focus
Eye Relief
Exit Pupil
Field of View
Water-Resistance Rating
Lens Coating
Housing Material
Dimensions
Total Wt. (including battery)
Laser Type
Display Type
Range Response Time
Battery Type
Battery Life
Laser Range (Reflective)
Laser Range (Tree)
Laser Range (Deer)
Horizontal (Angle Corrected) Mode
Angle with Line of Sight Mode
Archery Mode
Gun Mode with Ballistics
Golf Mode
SCAN Mode
Bluetooth®
6X
21 mm
6 yards
16 mm
3.5 mm
31.50 ft. at 100 yds.
IPX4 (Water-Resistant)
Fully Multi Coated with Rain Repellent
Composite with Rubber Armoring
4"x 1.44"x 3.11"
4.25 oz.
905 nm Class 1 Eye-Safe
Red Reflective OLED
0.1 seconds
CR-2 3-volt Lithium
Approximately 10,000 Readings
6-2,400 yds.
6-1,400 yds.
6-950 yds.
Yes
Yes
Yes
Yes (Applied Ballistics Ultralight®)
Yes
Yes
Yes
OTX2400A Laser Rangefinder
Quick Start Guide
Specifications & Features

What’s in the Box?
◆6 Power x 21mm Laser Rangefinder Monocular
◆Soft Premium Carry Case
◆Microfiber Lens Cleaning Cloth
◆Adjustable Neck-style Lanyard
◆Astra Optix™ Decal Sticker
◆CR-2 3-volt Lithium Battery (Battery Pre-Installed)
◆Quick Start Guide

MOA
MIL
TH
Your Rangefinder at a Glance
Red Reflective OLED
Objective
Lens
(21 mm)
Rubber
Grip (Top)
Rubber
Grip
(Bottom)
Mode
Button
Power
(Range)
Button Eyepiece
Diopter
Focus
Battery
Cover
Lanyard
Attachment
Circle Dot
Aiming
Reticle
Holdover
Direction
Arrows
Line of
Sight (LOS)
Value Y = Yards
M = Meters
(Defaults
to Yards)
Degree
Symbol
for Angle
Value.
Ballistic Unit of
Measurement
(Defaults to MOA)
Y = Yards
M = Meters
(Defaults
to Yards)
Horizontal Distance
(Angle Corrected)
Value
Low Battery
Indicator
T = Angle with
LOS Mode
H = Horizontal
Distance (Angle
Corrected) Mode
pp
R
R
R
R
u
u
b
b
b
b
b
b
e
r
G
rip
()
M
o
d
e
B
utton
F
o
c
us
Class 1
(905 nm)
Eye-Safe
Laser Lens
Laser
Receiving
Lens
Bluetooth®
Connection
Symbol

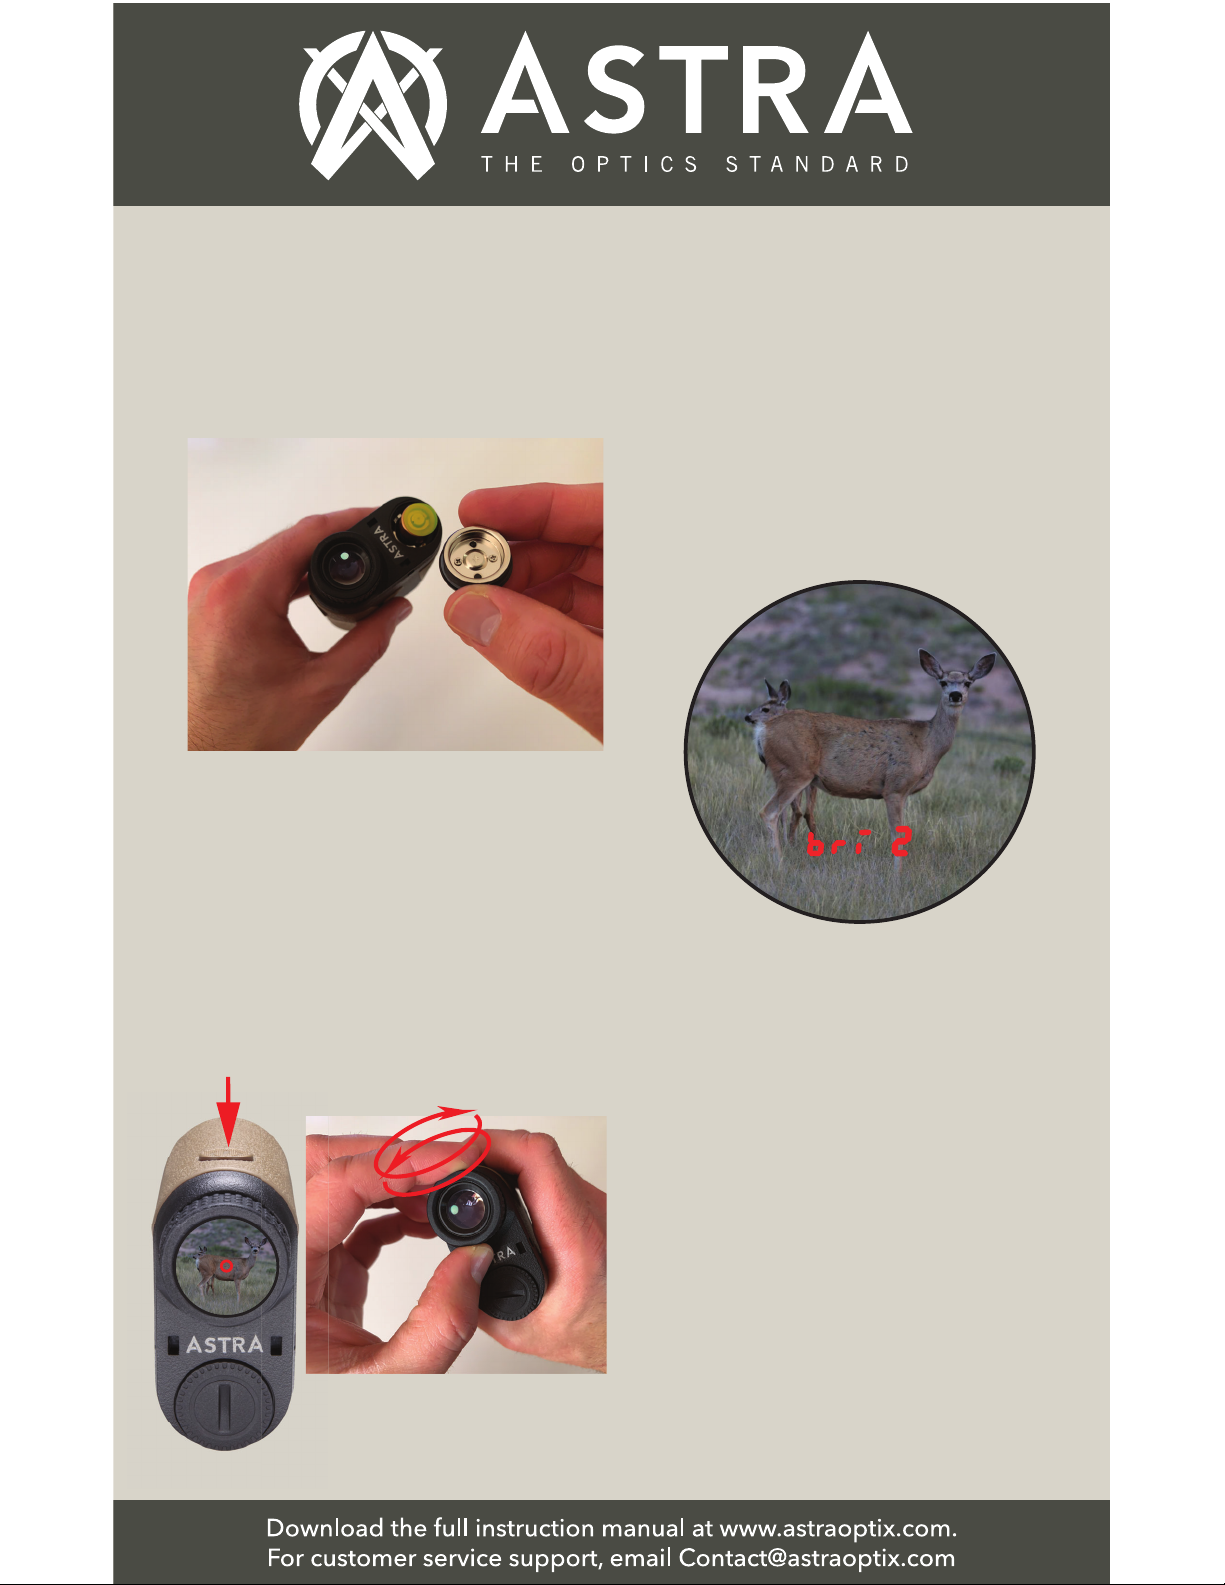
1. Connect the Battery: Open the
Battery Cover and remove the plastic
insert from the top of the battery.
Quick Start
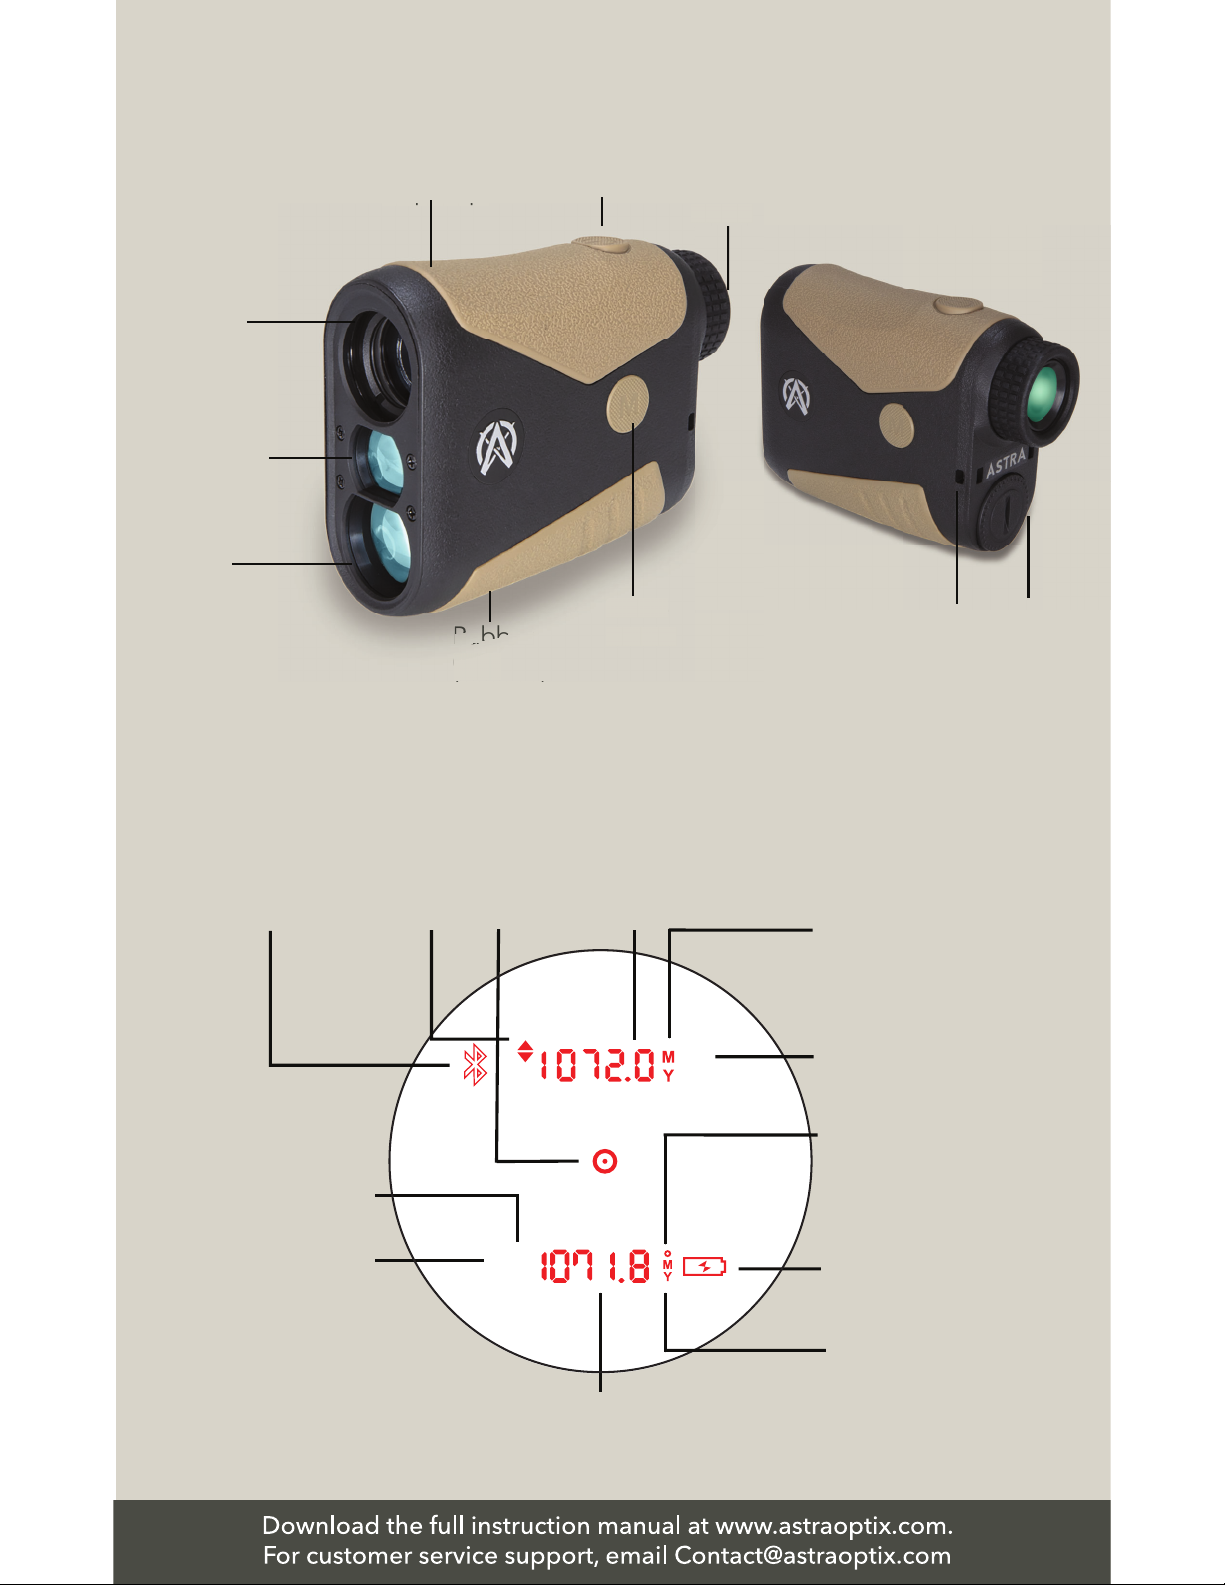
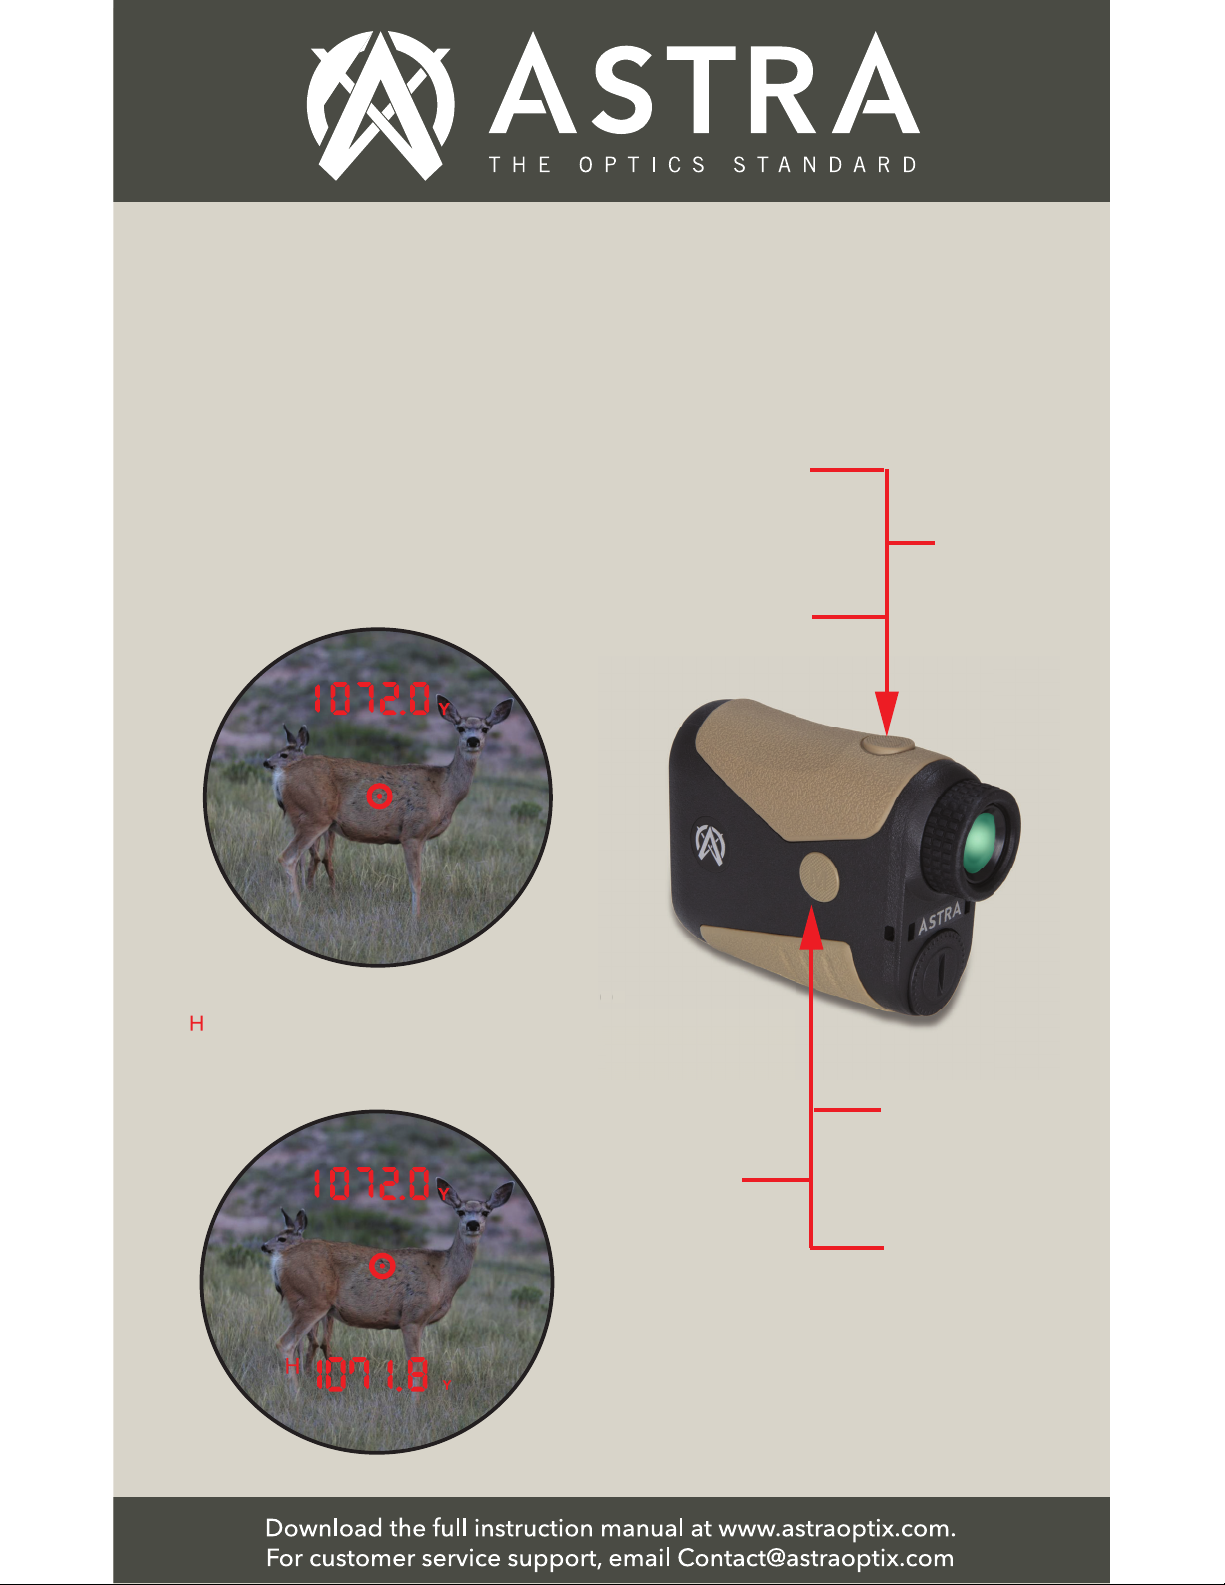
2. Turn on unit and Adjust Eyepiece
Diopter Focus: Press the Power (Range)
Button to turn on the rangefinder Red
Reflective OLED display.
Turn the Eyepiece Diopter Focus until
both the image in the field of view and
Aiming Reticle are clear and focused.
Press the
Power Button Rotate Eyepiece
3. Adjusting the Red OLED Display
Brightness: Hold the Mode Button to
enter the menu setting, Press the
Power Button to cycle between 5
different brightness levels. Press the
Mode Button to select.
Brightness Setting
◆1 = Lowest brightness setting
◆5 = Highest brightness setting
NOTE: For some Astra Optix models,
the display brightness setting is the
last item in the menu. If the
brightness setting is not the first
item in the menu, then press the
Mode Button to advance through all
the menu items until you see the
brightness setting.

Quick Start
4. Measuring Distance: Aim the Aiming
Reticle on the object you want to range
and press the Power Button to display
the distance. Your unit factory default
setting is the Horizontal (Angle
Corrected) Mode.
The Line of Sight (LOS) value is
displayed at the top of the display for
2 seconds.
The angle-corrected Horizontal Distance
( ) value is displayed at the bottom of
the display for up to 8 seconds or until
you take a new measurement.
5. Menu Settings - Button Operation
Summary
c
e
f
l
Press Power
Button to turn
on and to measure
the distance. Hold Power
Button to
SCAN.
Press Power
Button to cycle
between menu
items when in
the menu.
Hold Mode
Button to
enter menu.
Hold Mode
Button to
exit menu.
Press Mode
Button to
confirm
selections in
the menu.

Quick Start
5.4. Sub-Modes under Standard Mode:
Press the Power Button to cycle
between each sub-mode. Press the
Mode Button to select.
5.2. Yards & Meters Selection: In the
menu press the Power (Range) Button
to cycle between Yards (Y) and
Meters (M) . Press the Mode Button to
select.
5.3. Select the Operation Mode:
Press the Power Button to cycle
between Standard Mode (Std), Archery
Mode (ArCH),Golf Mode or Gun Mode.
When the selection you want to use is
blinking, press the Mode Button to
select your preferred mode.
5.1. Menu Settings - Menu Operation
Summary
◆Brightness Setting
-1 thru 5
◆Distance Units Selection
- Y / M
◆Standard Mode (Std)
- Horizontal (Angle Corrected)
with Line of Sight
- Angle with Line of Sight
- OFF (Only Line of Sight)
◆Archery Mode (ArCH)
◆Golf Mode (GOLF)
◆Gun Mode with Ballistics
- abi (Applied Ballistics®Internal)
- abe (Applied Ballistics®External)
- Bullet Drop Units Selection:
MOA OR MIL (Milliradians)
Horizontal
Distance
(Angle
Corrected)
with Line
of Sight
Angle with
Line of Sight
OFF (Only
Line of Sight)

Quick Start
5.5. Gun Mode with Ballistics Selection:
◆Applied Ballistics®Operation Mode:
First select Gun mode. Next, choose
between ABI (Applied Ballistics® Internal
Mode) or ABE (Applied Ballistics®
External Mode).
Use ABI mode to calculate and display
your ballistics solutions using your
rangefinder’s internal Applied Ballistics
Ultralight® solver.
Use ABE mode if you are using an
external Applied Ballistics® equipped
Kestrel® Weather Meter or Garmin®
Watch (not included) to provide the
ballistics solutions to your rangefinder.
Press the Power Button to cycle through
these selections and press the Mode
Button to select.
◆Holdover Units Selection: MOA or
MIL - Press the Power Button to cycle
through these selections and press the
Mode Button to select.

Quick Start
5.6. How to set up your rangefinder with the Applied Ballistics® Phone App:
◆Download the App:
Download the App from
the Apple App Store or
Google Play (if Android
device). Search for the
“AB Synapse - SORD”
App in the App store as
shown below.
Next download the App
and install the App.
Open the “SORD” App
on your phone.
◆Pair the Rangefinder
Device with the App:
The Applied Ballistics®
start-up screen will
appear. Press the power
button to turn on your
rangefinder, and press
PAIR DEVICE.
NOTE: Turn on your
phone’s Bluetooth in
your iOS or Android
phone Settings menu
if it is not turned on.
◆Pair the Rangefinder
Device with the App:
The device name in this
example: OTX2400A-0001
will appear just below
“Select Device.” Press on
the device name, and it will
display a message:
“Connecting to
OTX2400A-0001.”

Quick Start
5.6. How to set up your rangefinder with the Applied Ballistics® Phone App:
◆Pair the Rangefinder
Device with the App:
Look in your rangefinder
at the same time as it is
connecting. A 2-digit
pin code will appear.
Enter the pin number in
the space as shown.
Note: After 6 seconds,
the Pin number will
dissapear. Press on the
device name again to
display the pin number
in the rangefinder.
◆Setting up in the App -
Set up your 5 most often
used load profiles:
Click the edit icon
to set up up to 5 different
load profiles.
◆Setting up in the App -
Choose your 5 most often
used load profiles:
Choose the “Bullet
Library” to locate your
ammunition and/or you
can manually enter your
bullet’s ballistics infor-
mation directly into the
App.

Quick Start
5.6. How to set up your rangefinder with the Applied Ballistics® Phone App:
◆Setting up in the App -
Choose your 5 most often
used load profiles:
Select the Caliber.
◆Setting up in the App -
Choose your 5 most often
used load profiles:
Select the
Manufacturer.
◆Setting up in the App -
Choose your 5 most often
used load profiles:
Select the Bullet.

Quick Start
5.6. How to set up your rangefinder with the Applied Ballistics® Phone App:
◆Setting up in the App -
Select active profile:
Select one of the 5
available profiles to be
the active profile that
will be stored in your
rangefinder.
Note: Your phone and
your App do not need
to be on to obtain the
ballistics solutions for the
active profile saved in
your rangefinder.
◆Setting up in the App -
Go back to your HUD
screen:
Now, you can start using
your rangefinder to
measure distances and to
see the ballistics adjust-
ments both in your laser
rangefinder display or on
your App as shown below.
◆Setting up in the App -
Choose your 5 most often
used load profiles:
Select your Drag
Model (G1 or G7).
Repeat these steps to
set up each load
profile. Set up to 5
different profiles.

Tips for Using Your Rangefinder
◆Your laser rangefinder comes defaulted to the Horizontal (Angle Corrected)
with Line of Sight distance mode. For archery or shooting, this mode will give you
the angle-corrected shoot-at distance to use. For Archery only, use the Archery
Mode (ArCH).
◆If you turn off your rangefinder, it will keep the last settings used.
◆This rangefinder also has Angle with Line of Sight mode. In this mode, it will
display the Line of Sight (LOS) value for 2 seconds at the top of the display
followed by the Angle value at the bottom of the screen. Shooters can use this
information to manually calculate long range holdover using a ballistics calculator.
◆If using this rangefinder on the golf course, choose the Golf Mode (GOLF). The
Golf Mode will display the nearest distance value (Golf Flagstick) of a group of
targets that are within your field of view.
◆Under ideal conditions, your Astra Optix™ Laser Rangefinder can measure the
distance of reflective objects out to 2,400 yds. It can also measure a deer out to
950 yds. The type of target you are ranging strongly impacts the maximum
ranging distance.
◆Shiny reflective objects such as metal buildings will range much better than
less-reflective objects such as trees, animal fur, bushes or grass. Objects that are
more dense, such as trees or rock, will range better than bushes or grass. Bright-
colored objects normally range better than dark-colored objects. Rain, fog, snow,
bright sunny days and dusty days will all reduce the overall ranging performance.
Cloudy days without fog, and without snow, rain or dust blowing in the air provide
the best ranging conditions. Targets that have a flat surface 90° to the laser
emitting from the laser rangefinder range better than targets that have a curved
surface, or are positioned at an angle in relation to the emitted laser.
◆IMPORTANT: The embedded Applied Ballistics®solver in your rangefinder
will calculate windage and elevation adjustment values up to 875 yards when in
the ABI (Applied Ballistics®Internal Mode). To take longer-range shots at distances
over 875 yards, press the “Upgrade” button in your App to upgrade to either the
Applied Ballistics®Sportsman®solver (up to 1,750 yards) or the Applied
Ballistics®Elite®solver (up to 5,500 yards). *The Elite® solver max yardage is
limited by your Astra Optix OTX-2400A rangefinder’s maximum distance of 1,760
yards. If you already have an Applied Ballistics® Elite® solver equipped external
device, then you can use the ABE (Applied Ballistics®External Mode) and the
external device will provide the ballistics solutions to the rangefinder.

◆Only use a CR2 3-volt battery and do not use any outside power source.
◆Do not attempt to open or take apart your laser rangefinder, as this will void your
lifetime warranty, may damage your product and could cause electric shock.
◆Class 1 Laser Product. Product complies with IEC60825-1: Ed. 3: 2014-05
and 21CFR1040. 10/11.
Register your Product
Warning
◆Do not look directly at the sun with your rangefinder, as it could cause serious
damage to your eyes.
◆Do not aim the rangefinder at a person's eyes and do not look into the
objective-lens side of the product when you are pressing the power button.
◆Keep out of reach of small children.
◆The Gun mode displayed ballistics adjustment values and displayed elevation
adjustment values are accurate from 15 to 875 yards. If shooting at distances farther
than 875 yards, we suggest upgrading to the Applied Ballistics Sportsman solver or
using the Angle with Line of Sight mode. Shooters can use the Line of Sight distance
value and the Angle value information to calculate holdover using a ballistics
calculator.
Follow us on
Instagram to see
our product photos
and videos.
Scan our warranty QR code to go directly
to our Handshake Warranty registration page.
Please register your product to activate our Handshake Warranty online at
www.astraoptix.com so it is covered in case anything happens to your product.
Like us on Facebook
to see the latest news
for our Astra
Optix rangefinders!
Subscribe to our
YouTube channel to
have a chance for
promotions and
giveaways.
Don't hesitate to reach out to us if you have any questions or concerns about your
product. On behalf of the Astra Optix family, we want to thank you for your purchase
and support.
We are here to help!

Table of contents
Other Astra Measuring Instrument manuals
Popular Measuring Instrument manuals by other brands

Topcon
Topcon UVR-T2 instruction manual

YOKOGAWA
YOKOGAWA SC24V instruction manual

Startec S.R.L.
Startec S.R.L. Rain Speed 060 User instructions

MICRO-EPSILON
MICRO-EPSILON optoControl 1200 operating instructions

Kensington
Kensington KS-PH-220-BASIC user manual

International Light Technologies
International Light Technologies ILT1700 instruction manual