Astronergy CHSM6610M User manual

Crystalline Silicon PV Module Installation Manual
1. Introduction
1.1 Purpose
1.2 Limitation of Liability
1.3 Precautions for Installation
2. Safety
2.1 General Safety
2.2 Installation Safety
3. Mechanical Installation
3.1 Installation Condition
3.2 Installation Methods
4. Electrical Installation
4.1 Installation Condition
4.2 Grounding
5. Maintenance

1. Introduction
1.1 Purpose
This document provides detailed instructions and valuable safety information regarding the
installation, electrical connection, and maintenance of following Chint Solar Crystalline Photovoltaic
modules:
CHSM6610M CHSM6610M(BL) CHSM6610M/HV CHSM60M-HC
CHSM6610P CHSM6610P(BL) CHSM6610P/HV CHSM60P-HC
CHSM6612M CHSM6612M/HV CHSM72M-HC
CHSM6612P CHSM6612P/HV CHSM72P-HC
All the instructions should be read and understood before installation. The installers should
be trained and conform to all safety precautions in this guide when installing the module. Keep
this guide in a safe place for further reference.
1.2 Limitation of Liability
Because the use of this manual and the conditions or methods of installation, operation, use
and maintenance of photovoltaic (PV) products are beyond Chint Solar control, Chint Solar
does not afford the responsibility and expressly disclaims liability for loss, damage, or expense
arising out of or in any way connected with such installation, operation, use or maintenance.
Chint Solar reserves the right to change the manual without prior notice.
1.3 Precautions of Installation
1.3.1
a) When the whole pallet of modules are delivered to the site and unloaded, make sure the
safety of the module especially if it needs to be lifted in the roof projects. Put it into the
protect device and then lift it to the roof in case of bumping against the wall during the lifting
process.
b) Firstly, tear the stretch film, then move away the top cover after cutting off each module
packing strip while unpacking. Two operators work as a group, grasp the module frame
tightly in the same direction and take out the module one by one. It is a must that the
operators rive the adhesive tape of the fixed module one by one, rive one piece and then
adhesive tape one time in case
that the whole pack topples and falls down. The whole process must be taken very gently.
ide with any hard object or let any parts of the frame touch and drag on the ground.

c)
recommended to take the right amount of modules according to the progress of the project
every day. Due to the modules piling on the ground after unpacking, in case of heavy rain
and other inclement weather which has the potential risk to be a long soak in water can
affect product reliability, such as typhoons and other modules in case of inclement weather
is not installed which may be torn away. If the users need to store modules before
installation, do not open the package, the goods should be stored in a room temperature,
dark, dry and ventilated place.
1.3.2 Module Stack
a) When a module is taken out of the box, cardboard bedding below should be applied, in
order to avoid contacting cement surface / ground hard metal or steel tile shocked collision
friction scratch.
b) When stacking modules, it needs to be stacked neatly in the horizontal plane, under the
condition of the glass facing down and the back way piled up, while the cardboard bedding
need to be underside the modules. If the modules will be installed on the rooftop, the
number of each stack is suggested no more than 20. In case of the poor load-bearing
process, the installation tools and other objects are avoided to be on the module surface.
c) If the modules are requested to be classified by current, the handling personnel are required
to carry out of the level of the current and make a mark separately according to the power
on the list. (e.g. 275W-L, identifies the modules of the packaging according to the power on
the list, indicating a low current position; 275W-H, compared to high current position).
Usually, the same series of modules in the same current position are required in
accordance with the system design requirements.
d) If the modules are color-coded and marked the corresponding logo on the carton due to the
customer requirements, when modules are taken out and stacked, they should be labeled to
avoid confusion. Usually the same row or the same square have the same color according
to the system design requirements.
e) Due to the complexity and difference of the construction site, these precautions may not
cover all items, please refer to the specific construction standards.

2. Safety
2.1 General Safety
2.1.1 Consult and follow local codes and other applicable laws concerning required permitting
as well as installation & inspection requirements, rules, and regulations.
2.1.2 PV modules should be installed and maintained by qualified personnel.
2.1.3 Use the same performance modules within a given series.
2.1.4 Follow all safety precautions of all components used in the system.
2.1.5 Do not shade portions of the PV module surface from the sun for a long period of time.
The shaded cell may become hot (hot spot phenomenon), which can result in solder joints
peeling off.
2.1.6 Do not clean the glass surface with chemicals.
2.1.7 Do not drop the PV module or drop objects onto the PV module.
2.1.8 Do not concentrate sunlight on the modules or panels.
2.1.9 Do not attempt to disassemble the modules, and do not remove any attached components
from the modules.
2.1.10 Do not scratch or hit at the back sheet, the glass, the terminal box. Do not pull the cables
or touch them with bare hands.
2.1.11 Do not drill holes in the frame or scratch the insulating coating of the frame.
2.1.12 Keep the PV module packed in the carton until installation.
2.1.13 Do not use modules near equipment or in places where flammable gases may be
generated.
2.1.14 Do not use modules in an environment with aliphatic, aromatic, phenols, ketones,
halogenated substance or mineral oil, which may corrode the junction box by chemical
attack.
2.2 Installation Safety
2.2.1 Wear protective head gear, insulating gloves, safety shoes, and insulated tools when
installing the modules.
2.2.2 Do not install the modules in rain, snow, or otherwise wet or windy conditions.
2.2.3 Completely cover the PV module surface with an opaque material during PV module
installation and wiring to prevent accidental charge buildup.
2.2.4 Plug in connectors tightly when working on wiring.
2.2.5 Due to the risk of electrical shock, do not perform any work if the terminals of PV module
are wet.
2.2.6 Do not touch the terminal box and the end of output cables (connectors) with bare hands.

2.2.7 Do not unplug the connector under load.
2.2.8 Do not work alone.
2.2.9 Wear a safety belt if working far above the ground.
2.2.10 Do not wear metallic jewelry, which can cause electric shock, while installing or
troubleshooting the PV system.
2.2.11 Follow the safety regulations for any and all other system components, including wires,
connectors, charging regulators, batteries, inverters, etc.
2.2.12 Do not expose wires to direct sunlight. Use UV-resistant cable.
2.2.13 Do not damage the surrounding PV modules or mounting structure when replacing a PV
module.
2.2.14 Do not change any PV module components (diode, junction box, plug connectors, etc.).
2.2.15 Maximum reverse current is 20.25A for module with 6 inch cells. Application of the
blocking diode and fuse in the combiner box are recommended for reverse current
protection when more than two strings are connected in parallel.
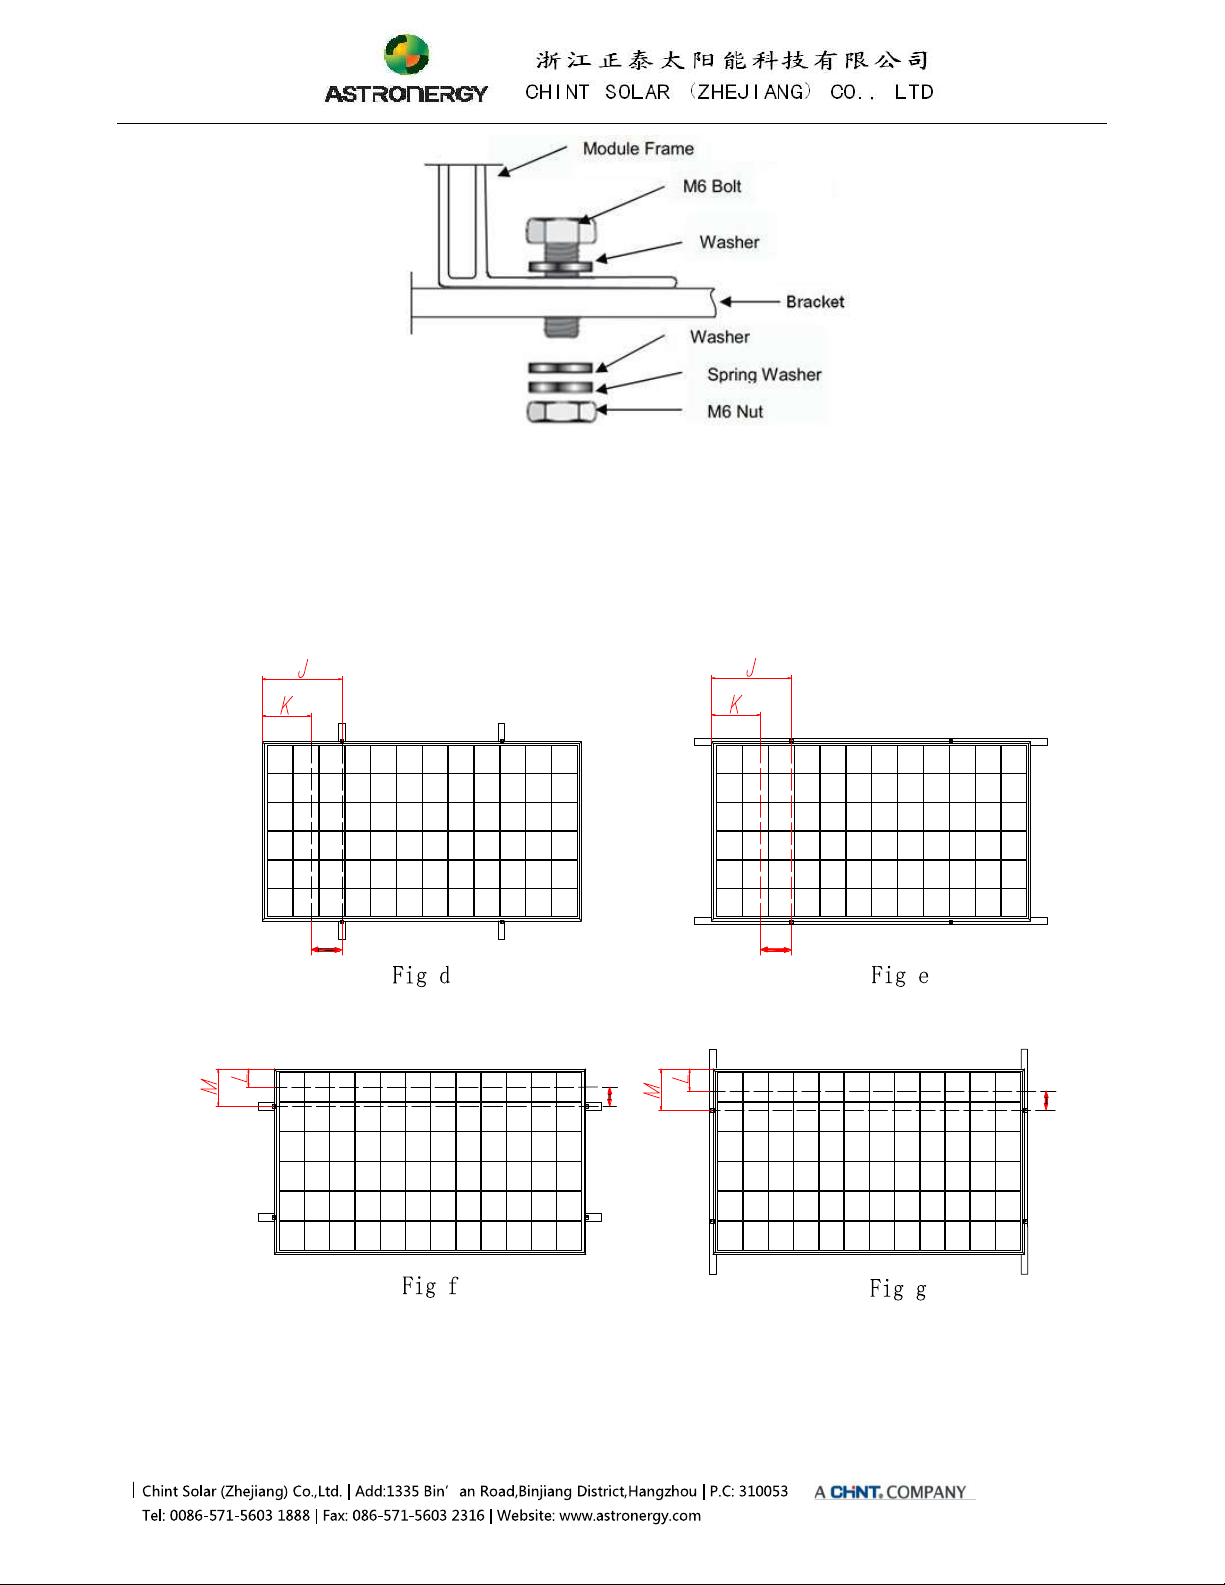
2.2.16 A certain gap is maintained between the PV module and the mounting surface to prevent
the mounting surface touching the junction box.
2.2.17 Standing on the solar PV module is forbidden and also prohibit installation tools or other
objects hitting surface of the solar PV module.
2.2.18 The solar modules are recommended to be installed over a fireproof and insulating roof
covering when installed on a roof.
2.2.19 PV cable connection cannot be too tight, it is recommended that the connector and the
backsheet have a certain gap.
2.2.20 Region for sand blown, in order to avoid the sand into the connector, we suggest to short
circuit module connectors before installation; If into the grains of sand, may cause internal
live parts wear and tear, so there are some electrical safety hidden trouble.
3 Mechanical Installation
3.1 Installation Conditions
3.1.1 Extreme environment temperature -40 to +85
3.1.2 Operating temperature -40 to +85
3.1.3 Mechanical load on panels (e.g., snow/wind): The max tested snow/wind load is
6000Pa/3600Pa, and the design load is 4000Pa/2400Pa with a safety factor 1.5 under
standard mounting system. Please refer to the detailed mounting instructions as Chapter
3.2.
3.1.4 Tilt Angle selection: The installation should be facing north in the southern hemisphere
and facing south in the northern hemisphere.
3.1.5 the fire class of the roof and building

materials should be higher than Class C.
3.1.6
achieve the Class A system fire rating, with the Class A class racking system.
3.2 Installation Methods
3.2.1 Bolting through the mounting holes
All modules (excluding the double glass module) must be securely fastened with at least 4
bolts ( Figure a and Figure b). For maximum security against strong winds or heavy snow falls, all
of the mounting holes are recommended to be used.
Fig a Fig b
Remark: As for above diagram, the solid red arrows indicate primary bolt positions; dashed
blue arrows indicate positions where bolts can be added for additional support.
Bolts are inserted as described in the process below (Figure c).
a) Place the module on the supporting bars underneath.
b) Insert the four stainless-steel bolts (M6) through the holes (7x11.5mm) in the frame
according to the Figure a & Figure b. For maximum security against strong winds and heavy
snow, all available mounting holes should be used.
c) Secure each bolt to the frame with stainless-steel washers, one for each side of the
mounting structure; and screw on either a stainless-steel spring washer or a toothed lock
washer. Finally, secure with a stainless steel nut (M6).
d) The torque for tightening the nut and bolts recommended 13Nm when the property class of
bolts and screws is Class 8.8.

Fig c
3.2.2 Clamping on the frame surface
3.2.2.1 Single glass module
Modules can be laid either across the supporting bars (Figure d & f) or parallel to the edge of
frame (Figure e & g) .
Remark:
1) The length of supporting bars must be longer than the length of module frame, otherwise
please confirm with our product team to get approval.

2) As for above figure d, the solid red rectangles indicate primary clamp installation positions
and the center positions of long frames where clamps can be added for additional support.
3) Illustrations (figure d e f g) of the four different methods for clamping modules on the frame
with aluminum clamps. means the clamping range. The
recommended installation position shows as below table. Note: --- means Fig f &Fig g methods
will be not suitable for the module type.
Module Series Dimension
A*B*C J K L M Note
CHSM6610M, CHSM6610M/HV,
CHSM6610P, CHSM6610P/HV,
CHSM6610M(BL)
CHSM6610P(BL)
1648*990*35 408 198 --- --- 3.2mm glass
1648*990*40 408 198 --- --- 3.2mm glass
CHSM60M-HC, CHSM60P-HC 1666*992*35 408 207 --- --- 3.2mm glass
CHSM6612M, CHSM6612M/HV
CHSM6612P, CHSM6612P/HV
1954*990*45 489 299 50 200 3.2mm glass
1954*990*40 489 299 --- --- 3.2mm glass
1954*990*40 489 299 --- --- 4.0mm glass
CHSM72M-HC, CHSM72P-HC 1986*992*40 505 315 --- --- 3.2mm glass
To fasten the module:
a) Place the module on the two supporting bars (not provided). The bars should be made with
stainless material and treated with an anti-corrosion process (e.g., anodic oxidation
treatment) or aluminum profile. Each solar PV module needs at least four clamps to fix. Do
not make the clamp contact the glass directly or make the aluminum frame deformation in
the installation process, and avoid the shadow of solar PV components.
b) module frame should come with grooves compatible
with an M8 bolt.
c) If the bars do not come with grooves, holes of a suitable diameter may need to be drilled to
allow bolts to be attached to the bars at the same locations as mentioned above.
d) Secure each clamp by attaching plain washer, spring washer, and nut, in that order.
e) Both of close-ups of Figure h, indicating the middle clamps and Figure i, indicating the side
clamps for reference. Suggest the dimensions for middle clamps are: a 40 mm, b 26 mm,
c = 8 mm, d 28 mm, and = 9 mm. The torque for tightening the nut and bolts are
recommended 28Nm when the property class of bolts and screws is Class 8.8.

Figure h
Figure i
f) Especially for Figure e & Figure g mounting method, the modules may be mounted using
clamps designed for solar modules refer to Figure j, the modules must be supported along
the length of the edge, and should overlap the array rail by 10mm 14mm
Figure j
g) Especially for Figure f & Figure g mounting method: the recommended mechanical load on
panels is less than 2400Pa, and this method is only suitable for 45mm frame module series.
Figure k
4 Electrical Installation
4.1 Installation Condition
4.1.1 The electrical characteristics are
Pmpp under the standard test conditions (irradiance of 1000 W/m2, AM1.5 spectrum, cell

temperature of 25 .
4.1.2 The maximum system voltage of all the IEC & UL standard module series is 1000V. The
1500V standard products are also available according to the requirements .
4.1.3 Connect quantity of modules that match the voltage specifications of the inverters used in
system. Modules must not be connected together to create a voltage higher than the
permitted maximum system voltage under the lowest local temperature conditions.
4.1.4 Under normal conditions, a photovoltaic module is likely to experience conditions that
produce more current and/or voltage than reported at standard test conditions.
Accordingly, the values of Isc and Voc marked on this module should be multiplied by a
factor of 1.25 when determining component voltage ratings, conductor ampacities, fuse
sizes, and size of controls connected to the PV output.
4.1.5 Refer to Section 690-8 of the National Electrical Code for an additional multiplying factor
of 125% 80% derating which may be applicable.
4.1.6 Each module (or series-connected string of modules) shall be provided with the maximum
series fuse, specified 15A for the 6 inch cell module series.
4.1.7 Use a special solar cable and plugs for installing the PV system and make sure that all
connections are safe and tight. The cable should be 4 mm2 (12AWG), and able to
withstand the maximum possible system open-circuit voltage.
4.1.8 Bypass diodes are included in module junction boxes to avoid decreased module
performance in the event of shade or shelter. Please check the relevant product datasheet
for the specific diodes of J-box.
4.2 Grounding
(n) Grounding the aluminum frame with copper wire
4.2.1 The grounding requirements must be checked in accordance with the applicable

regulations and standards before work is started.
4.2.2 Use the marked 5.5 mm grounding holes to ground the anodized frame. Use one M5 nut,
two M5 cut washers, one M5 plain washer, one M5 spring washer, and one M5 bolt and
the copper wire. All nuts, bolts, and washers are type M5 and should be made of
stainless steel (Fig. (n) ).
4.2.3 Put the bolt through the cup washer and wrap the copper wire around the bolt. (Note that
the copper wire cannot be attached directly to the aluminum.)
4.2.4 Put the bolt through the cut washer and then through the hole in the aluminum frame.
4.2.5 Add the spring washer and nut on the other side of the bolt and tighten to secure all parts.
The tightenin
4.2.6 Approve the use of UL-467 certified bonding and grounding devices, including Burndy
(formerly Wiley Electronics) Washer Electrical Equipment Bonding (WEEB) and similar
devices, such as barbed washers, that meet the requirements of UL-467 as suitable for
electrical bonding and grounding PV modules to PV mounting systems.
5 Maintenance
5.1 Regularly carry out a visual inspection for dirt, dust, bird dropping, leaves, and other
detritus covering the modules.
5.2 If snow is present, a soft-bristled brush with soft bristles may be used to clean the surface of
the modules.
5.3 Regular electrical and mechanical inspection by a licensed professional will keep the
system safe and operating at maximum efficiency.
5.4 Recommended PV module Cleaned-up period
To get high output performance, PV module needs to be cleaned-up periodically as below:
Normal: Minimum one time per every month; Dust wind: Right away after the dust wind;
The period of the PV module cleaning shall be determined by the condition of the
weather & pollution. O&M operator shall keep record of weather condition everyday with
photo and data.
5.5 Condition of Cleaning
5.5.1 Use clean water or filtered water with soft type material (a sponge) to wipe the PV
module. Never use chemicals on the surface of the module.
5.5.2 Cleaning after sunset or before sunrise is recommended for safety of O&M operator
shock from heat stroke.
5.5.3 Do not use abrasive powder, abrasive cleaners, scrubber cleaners, polishers, sodium
hydroxide, benzene, nitro-thinners, acid or alkali and other chemical substances.

5.5.4 Do not clean broken glass or modules with broken lines or exposed wires, as it may
cause the electric shock.
CHINT SOLAR (ZHEJIANG) Co., Ltd.
Add: 1335 Bin an Rd, Binjiang District, Hangzhou, China 310053
Tel: 86-571-5603 1888
Fax: 86-571-5603 2333
http://www.astronergy.com
Other manuals for CHSM6610M
5
This manual suits for next models
11
Table of contents
Popular Control Unit manuals by other brands

KIESELMANN
KIESELMANN 567 Series Operating instruction

Telit Wireless Solutions
Telit Wireless Solutions GC864 Series Hardware user's guide

AMOT
AMOT 4103D manual

Texas Instruments
Texas Instruments DAC8771EVM user guide

Gan Systems
Gan Systems GS-EVB-HB-66508B-RN Technical manual

NextLight
NextLight Pro Series user manual