AstroNova DDX100 User manual

DDX100Smartcorder
QUICK START GUIDE
AstroNova, Incorporated: Test & Measurement Product Group
AstroNova, Inc., 600 East Greenwich Avenue, West Warwick, RI 02893
Toll-Free Phone: 877-867-9783 Fax: 401-822-2430
Part # 22834668 Version 1.0

2
1. Introduction
Thank you for choosing the DDX100 Multi-Channel Data Acquisition System from AstroNova. This
Quick Start Guide was prepared to help the user become acquainted with the recorder as quickly as
possible. Exercises are also included to assist in familiarizing the user with the basic functions that
most customers use.
You will see some references to the Daxus. This is because the Daxus is a similar product that can
be linked to the DDX100 in order to add channels.
The DDX100 is a powerful and versatile data acquisition recording system that provides the capability
to display, record, and analyze waveform data. The DDX100 uses optional input modules for signal
conditioning of various types of signals based on the application. The channels sample up to 200 Kilo
samples/second/channel. The data is streamed directly to the 500GB hard drive.
ISEV-4 Module
250 VRMS or DC, Isolated Cat II
1 Megohm minimum input impedance
200 kHz maximum sample rate per channel
40 KHz (-3db ) bandwidth
Univ-4 Module
Single Ended
250 VRMS or DC, Isolated Cat II
1 Megohm minimum input impedance
200 kHz maximum sample rate per channel
40 KHz (-3db ) bandwidth
Differential (green mating connector)
1000 mv (20V maximum Transient)
300 KOhm minimum input impedance (150KOhms Balanced to isolated common)
200 kHz maximum sample rate per channel
35 KHz (-3db ) bandwidth
IHVM-4 Isolated High Voltage Module
600 VRMS or DC, Cat III, 1000V DC, Cat II
10 Megohm input impedance
200 kHz maximum sample rate per channel
35 KHz (-3db ) bandwidth
Please see section A in the back of the DDX100 Operations Manual for all the specifications.

3
2. Getting Started
Start-Up Kit: The DDX100 comes with a free startup kit. It includes the power cord, utility connector,
and a crossover Ethernet cable.
Connect Power to the DDX100: The DDX100 can be connected to between 100 and 264VAC @ 47
to 63 Hz.
Power on the DDX100: The DDX100 is powered on by using the On/Off power switch, which is
located on the left side near the fans. It will take about 30-40 seconds to initialize. In the event of an
unexpected loss of power, the DDX100 contains an internal battery that will last about 40 minutes.
The internal battery charges with the DDX100 on or off, as long as the cord is connected.
3. Display Area
Once the DDX100 has powered up, you will see that the display is divided into three main areas: the
Waveform Display Area (shows the waveform signals typically drawn onto a grid pattern), the Menu
bar at the top (drop-down menu commands), and the Control Panel area on the right of the display
(rows of control Icons for one touch operation commands).
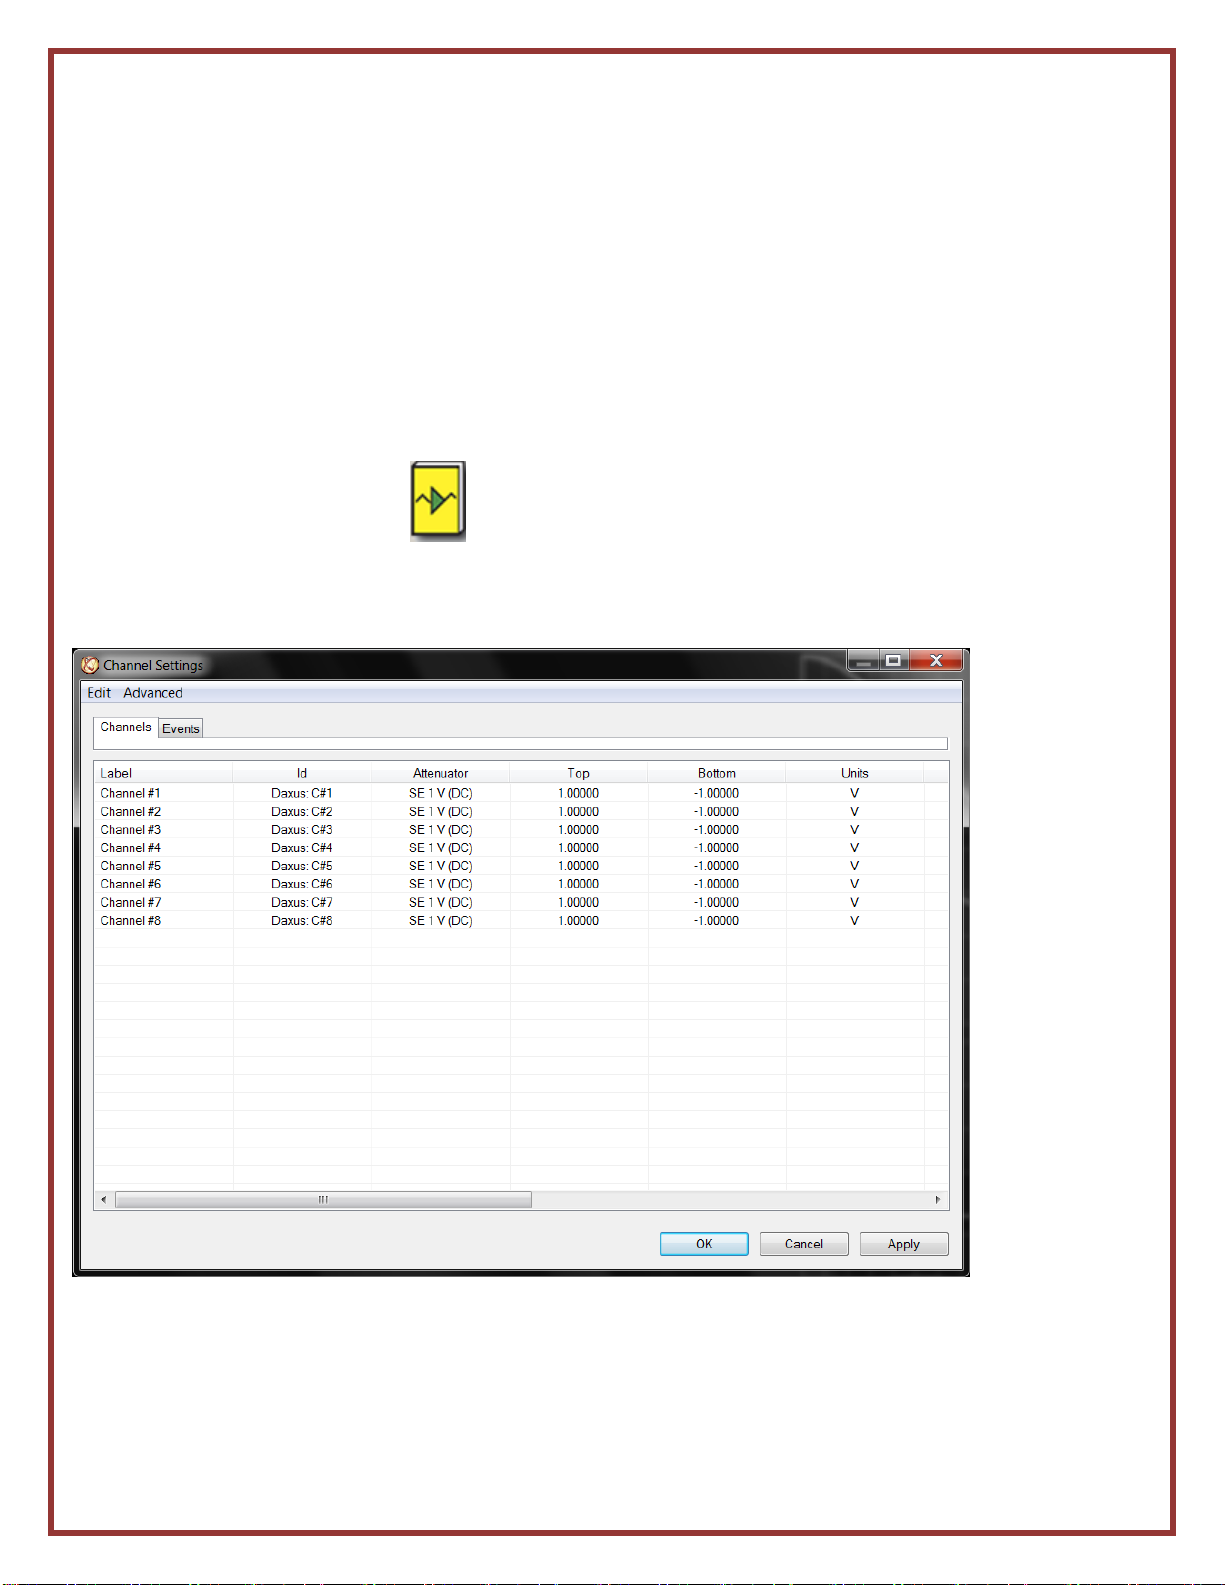
4. Menu Bar Summary
Menu Bar: The menu bar, located across the top of the display, allows access to a group of drop-
down menus. All the DDX100 modes and features are accessible from this menu. Features available
from the menu bar will vary based on the mode of operation (Configuration > Realtime, Scope, or
Review) used. Adding icons to each configuration control panel will make your often-used choices
easier to find and activate rather than searching the menu bar for what you want to accomplish.
File: Depending on the Configuration chosen, the File menu when in Realtime is used to save and
load a View or when in Review, to load captured files. You can do a screen print to a connected
printer or create a pdf of the screen.
Configuration: The Configuration menu is used to select the mode of operation (Realtime, Scope, or
Review) 1. Realtime Mode: This mode provides Realtime waveform scrolling, monitoring, and data
capture capabilities. The traces seen on the display now are not being saved. A data
capture must be set up and armed before data is saved. This screen is used for setting
up each channel and for monitoring your signals as they are happening Realtime.
2. Scope Mode: Scope mode provides time-base resolution for viewing high frequency
signals along with waveform scrolling, monitoring, and data capture capabilities. The
scope data is only saved if you stop it and save what is on the screen by archiving it as a
dcr (data capture record). Unless, you choose to auto save with an ongoing capture.

4
3. Review Mode: This mode provides the capability to review and analyze saved data and
scope captures.
View: The View menu is used to make changes to the way your signals are displayed. This includes
placing IDs on the signals.
Analysis: The Analysis menu provides a way to add meters to each channel. There are more tools
available when you are reviewing a saved data capture file.
Settings: The Setup menu is used to configure the Channel settings on the DDX100.
Cursors: Cursors are used in conjunction with the Channel Information window to view
measurements.
Capture: This menu sets the data capture parameters.
Help: Utility port pin out, operations manual, unit information including software version and serial
number, and the software version of the software on your computer.
DDX100 User Help: The operations manual is available to help the user operate the DDX100.
4A. Operations Manual:
It is handy to have the manual on your computer also, because you can use a better search
function. Hit Shift, Control, and F simultaneously and a side panel will come up. Enter a key
word or two on any subject into the search block and this side panel will show you a brief
description of each area. You can make this panel wider/narrower by grabbing the right side.
This panel information allows you to do a quick visual scan of each section to see what might
answer your question the quickest. Clicking on any description will bring you to that section in
the manual. Clicking on the manual moves the Search window to the bottom. Just click on
Search at the bottom of your screen again to bring the Search window back up.
Call us at 877-867-9783 if you cannot find it and we will email the pdf manual to you.
4B. Icon Help: For help knowing what any Icon is, just scroll to and hold your cursor over it or
hold your finger on it.

5
5. Adding Icons to the Control Panel
In Configuration > Realtime > click on Settings >Control Panel. Here you can add Icons to make
setup and operation easier, if your Basic setup doesn’t already include them. Below their purpose is
also explained.
Move the green outline where you would like the next Icon, by clicking on that space. You can
remove any Icons you do not use in one of 3 ways; by clicking on it and then select Edit > Clear, you
can put the green outline around it, by clicking on it and putting a new Icon over it, or by clicking on it
and hitting the Delete key, if you have a keyboard attached. You can click and drag the Icons to place
them where you want them within the 4 available columns.
Add these Icons in the below order underneath the display speed keys you wish to keep. Adding
these in this order will help you know what order to set the recorder up in. You can always remove
some of the speed keys and add other Icons, but this is a good Basic panel.
Channels to be displayed – View > Wizard
Voltage going to channels and location of zero – Settings > Channel
How you want data stored – Capture > Settings
What trigger do you want the capture to start storing data on –
Capture > Trigger/Abort Settings
Trigger test – Capture > Trigger Indicator

6
Start storing data – Capture > Arm
Is capture still ongoing – Capture > Capture Indicator
When you wish to stop storing data – Capture > Manual Abort
When you wish to review a capture file – Configuration > Review
Your control panel will now look like the one on the Realtime screen example below.

7
IMPORTANT: Add Icons for any other functions that you do on a regular basis during your testing.
You can have up to 4 columns. This will make using the DDX100 easier, rather than searching the
menu bar choices each time you go to look for a function. Just like you have added Icons to the
Realtime Control Panel, you can also add Icons to the screen when you are reviewing a stored Data
Capture file or to the Scope screen. Each Configuration already has some Icons, but you can add the
Icons you want or delete the Icons that you do not use for that configuration.
Note: When you click on OK, these Icons will be now seen on your Realtime screen. However, you
will notice that now both the Trigger indicator and the Capture Indicator are gray instead of being in
color. They will only turn to color when a trigger condition is met (for the Trigger Indicator) and a
capture is in progress (for the Capture Indicator).
6. Channel Choices
Configuration > Realtime (this is the default configuration when the DDX100
comes up)
First choose the number of channels that you wish to see on the display by
clicking on the Wizard Icon.
1. The Display Wizard window will open.
When selecting channels and events in this window, you can select multiple items
in a list by choosing them individually or by using the following method using an
attached keyboard.

8
•To select multiple consecutive items, press and hold the Shift key. Then
click the first and last items in the range you want to select.
2. Select the channels to display by choosing them from the Channels list block.
3. Select the events to display by choosing them from the Events list block.
4. Choose OK
7. Channel Setup
Note: This section will use the ISEV-4 or Univ-4 PCB for the following setup explanations.
1. Click on the yellow book Icon or on the menu bar Choose Settings > Channels. The Channel
Settings window will open.
2. Choose the Channels tab.
3. Select a channel.
4. To edit a channel label right now it is necessary to have a USB mouse and keyboard
attached. If the channel is already highlighted, just left click once. If not, double left click on the
channel. You will now be able to place your cursor and change the label. If you start typing

9
immediately, it will delete all that is highlighted. You may want to leave at least the number of the
channel, so you know which channel that input is going into.
5. To set the channel up for your signal (Note: you can do this for more than one channel if you
have several signals that are the same.) first choose a channel or channels.
Then choose the Attenuator column heading to specify the attenuator type. This determines your
Span choices and limits the input signal to the selected maximum voltage. For some modules, it
also determines what input connections you would use on the side of the module.
You will see below the choices you will see when clicking on a channel and then on the
Attenuator heading. These are the choices for the UNIV-4, since it is also for differential, bridge,
thermocouple, plus other choices. The ISEV-4 has just the upper SE choices. The SE DC choices
will allow you to see both the DC and AC components of your signal. The AC choices will allow
you to see only the AC component of your signal.
Choose the best attenuator for your signal. The closer the attenuator the better the specs will be,
because the accuracy spec is a percentage of the Attenuator. If your signal is 5V, then choose the
10V attenuator. Then you can set your Span or Top to 5V.
6. Choose whether to define the channel in terms of top/bottom or span/center. Use the
Advanced (up on the top menu bar) > Range Display menu to switch methods.
• Top/Bottom - If you select this method, choose the Top and Bottom column headings to enter
the highest and lowest channel values. This is good if your signals are DC and they only go in a
positive direction or RMS, which goes only in a positive direction.

10
As an example: you could set your top to 5V and your bottom to Zero.
• Span/Center - If you select this method, choose the Span and Center column headings to
enter the total span of the channel and the center value. The center value would usually be zero,
unless you require some offset. This is a good choice if your signal is AC or your DC signal goes
positive and negative.
As an example: you could set your Span to 5V and center to zero, it would show +/-2.5V each
side of zero.
8. Engineering Units
Note: It isn’t necessary to set up Engineering Units if you just want to see a voltage reading.
Engineering units provide the capability to display user-selected units instead of voltage.
All signal information enters the recorder as voltage. However, converting the voltage unit to an
alternative unit of measure may be desirable in applications that measure pressure, strain, or any
other non-voltage unit.
Note: The relationship between the voltage and the engineering unit is assumed to be linear,
characterized by a slope and offset (y = mx + b).
After engineering units are defined and enabled, all appropriate menus will be displayed in the
designated engineering unit values. For example, if pounds per square inch (PSI) are used as the
engineering units, the PSI label and value will be displayed instead of voltage.
Setting up engineering units.
Always set up your channel first for the actual voltage level that you will be inputting to the
channel. This will help you know fairly easily if your scaling makes sense, once you go back to the
Channel Settings screen from the User Units setup window.
1. Click on the Channel Settings Icon or on the menu bar and choose Settings >
Channels. The Channel Settings window will open.
2. Select a channel.
3. Choose the Units column heading. The Units window will open. Choose the User Enable
button to activate engineering units. Other engineering units options will be displayed now.

11
4. Choose the Engineering Units field to the right of the User Enable block and enter your Units
label. For example, PSI would be an appropriate label denoting pounds per square inch.
5. Enter a Scale for the engineering units by using one of the 2 Scale blocks. Scale can be
specified as either of the following:
• The waveform change in engineering units that is equal to one voltage unit.
• The waveform change in voltage units that is equal to one engineering unit. Only one scale
entry is required; the other is derived automatically.
6. ONLY if Necessary > enter an offset for the engineering units by using one of the Offset
fields. Offset can be specified as either of the following:
•The number of engineering units equivalent to zero voltage units.
• The number of voltage units equivalent to zero engineering units. Only one offset entry is
required; the other is derived automatically.
7. Enter the number of decimals that you wish to see in the User Precision field.
8. Choose OK.
9. Verify that your Top and Bottom or Span and Center PSI numbers (or whatever units you
use) make sense. If not, your scaling could be off. If your scaling is correct, do not change it.
However if your signal is smaller or larger than expected, you can always adjust your Top and
Bottom or Span and Center settings.

12
9. Data Capture Setup and 9V Battery Exercise
Note: If you are going to be there to start and stop the capture, you do not have to set up a trigger. If
you choose to do a capture without a Trigger, you can choose No Trigger. Then hit the Arm Icon after,
setting up everything else in the Capture Settings window shown below. When you hit ARM you will
see the Progress Window will show you are capturing Post Trigger Data immediately. This is because
there is no Trigger involved.
This exercise will use a trigger. Set up a single data capture on all 8 channels for only 30 seconds and
50% Pre-Trigger Percent. Of the total capture time, fifteen seconds of the capture will be the pre-
trigger time, because the pre-trigger time is part of the total time. The pre-trigger data will show what
the signal looked like before the trigger condition happened (before the 9V was applied). The sample
rate will be 100 samples per second, which is more than enough for a low frequency signal like this
battery test.
1. Click on Capture Settings Icon
2. Highlight Waveform 1. Be sure the Status for Waveform 1 is Rate 1. If not, click on
Channel#1 the Rate heading and select Rate 1.
Note: To reduce the size of the data capture, it is recommended that unused channels be turned
off. This makes a smaller file that will save room on your drive. We will capture all the channels
for this Example. Here are some instructions if you ever wish to shut off some channels and the events:
To turn off unused channels in the Capture Setup window, click on all the unwanted
channels, including the Events. All channels should be highlighted with the exception of
the wanted channels now. Click the Rate heading and select Off. The Rate of channels
being saved should be Rate 1 in most cases unless some of the channels are a much
lower frequency, while the remaining not required waveforms and events should have a
Rate of Off.
3. In the Storage area, Click on the top white block where DCR is probably there now. Type
over the name DCR (stands for Data Capture Record) and type in > 9V Battery Test.
4. Then click on the No Trigger box pull down underneath the name and choose Pre-Trigger
Percent. Click to the right of the Pre-trigger Percent box and a keypad will come up. Enter 50
and press OK.
5. In the Storage area of the Capture Setup window, press the Units pull-down box and select
Seconds. (Other choices are minutes and hours). Press the value box located to the left of the
units pull down menu to open the Seconds Window. Enter 30 seconds and press OK.
6. In the Sample Rates (Hz) section, press the down menu beside 1 (for Rate1) and choose
1000. You will be saving 1000 samples per second, per channel.

13
10. Trigger Setup
In the Data Capture Settings section above, a thirty-second capture was set up with 15
seconds of pre-trigger (data before the trigger). In this section, a trigger level of 8 Volts will be
set with a rising edge type trigger, so as the signal rises and reaches 8 Volts, the data capture
will be triggered. While this is not a real life test, this does simulate a real voltage and it does
show how to set up a real life test. It is just a matter of setting different levels in these same
screens
7. In the Automation Box be sure that Rearm and Review are not checked. At this point, your
Capture Settings Window should look like the below image. (Except you will see that the DDX
that was used for this screen shot has extra channels, because it has the GPB/IRIG option).
You will probably see just 8 channels.
8. Press OK

14
1. Click on Trigger Setup Icon
2. Click on the Main Or Tab and click on Trigger OR. You can leave Manual and External On
and the bottom two Abort choices. The manual abort is necessary, so you can stop a capture
using the abort Icon, especially if you ever choose Rearm under automation. Your Main Or
screen will look like the screen below.
3. Click on the Channels Tab.
4. Click on Channel #1, for this test.

15
5. Click on Type and choose Rising Edge.
Note: You can trigger off several channels and have each type and or trigger level different.
6. Click on Trigger Or and choose Include and it will look like the next screen.
7. Click and drag the light blue scroll bar at the bottom to the right. Click on High Level and set
the High Level to 8 Volts. The Low Level will not be a choice for a level trigger.
Note: If your battery is less than 8 volts (use either a DVM or this DDX to determine the actual
battery voltage), then set this to less than your battery voltage. It is important to know your
trigger level. The new trigger settings will look like the next screen.
8. Click on OK.

16
11. Trigger Check
Input the battery voltage into channel one. If all is set up correctly, the trigger indicator Icon will turn
yellow just for a second as it passes 8V. It will stay on if your voltage is exactly 8V. If not, check your
settings and make sure your battery voltage is equal or greater than your trigger level. If it is yellow all
the time, it will be triggering all the time, so again you should check your trigger setup.
This Trigger Icon is strictly a visual check to make sure your trigger is set up properly before you
start a data capture.
Note: Always do this to verify your trigger is working the way it should in order to capture your data. If
your trigger indicator is yellow all the time you will capture too much data. However, if it never turns
yellow, when you cause or simulate a trigger condition; you will never capture any data. This trigger
indicator is the best way to visually test your trigger without actually doing a data capture.

17
12. Start Data Capture and trigger using 9V Battery
Click on the Arm Capture Icon.
A Capture Progress window will come up showing the Pre-Trigger data progress. It will take 15
seconds for the progress window to fill. This is the initial 15 seconds only. It is a circular buffer that
will keep overwriting itself until a trigger is seen. Then once the trigger condition occurs, just the last
15 seconds will be saved as the Pre-Trigger data for this data capture.
Input the 9V battery voltage into channel A01. Once the trigger is seen, the Capture Progress window
will now go from Pre-Trigger to Post Trigger and it will take 15 seconds to finish the capture. The post
capture screen will look like the below screen.

18
13. Data Capture Indicator
You can tell a capture is going on by the Progress window. You can always minimize this window if
you wish. If you do, there are 2 other ways to tell a Capture is still going on in the background. One is
that the Capture Arm Icon is dimmer, after you click on it to start a capture. The other way is the
Capture Indicator is now in color. If you want to hide the progress window, just click off to the side of
it. If hidden, you can bring the Progress window back by clicking on the Arm Capture Icon again.
Capture Indicator when capture is in progress
14. Stop Data Capture
If you know you that you have captured all the data you need, before the capture time is up, you can
stop the capture. Just click on the Capture Abort Icon.
Capture Abort
15. Data Review
Data capture records can be reviewed on the DDX100 display. DVD-like control icons allow for
convenient scrolling through the data. Cursors can be placed on the data for measurements.
Choose Configuration > Review from the menu bar to enter Review Mode or click on the Review
Icon.
Click on the file that you just created by date and time. It may be at the bottom or the top.
You may have several files with the same file name, but each will have a different date and time
beside the file name. The file name will remain 9V Battery Test until it is changed.

19
Click on the file and then press OK and the chosen file will automatically open for review.

20
If you had captured 8 channels you would see 8 equal grids, like seen on page 17. However, if you
only want to see one channel, you can do that by bringing it up by itself, so it takes up the full screen.
Choose View > Wizard > highlight only Channel #1 from the menu bar and click on OK. You will now
see only Channel #1, as in the above screen shot.
Click on the show Trigger Line Icon
Note: The trigger point is just a white triangle in the lower Cursor letter area until the trigger line is
shown. If the trigger line is already shown, a check mark will be next to the Show Trigger Line
choice in the View pull-down menu.
Click on Display > choose Compression or Expansion and enter a number using the keypad that
comes up. Note: The Compression number is located in the lower left hand corner of the review
screen shown above (Compression 38 is shown). Display > Show All File was used, so the entire file
is in that screen shot. To spread the data out, choose a lower compression rate. In this case a
compression rate of only 10 is used. To spread it out even more, choose a lower number or an
expansion rate. Be aware, that you can also click on that Compression block in the lower left hand
corner, to bring up the choices of either Compression or Expansion.
Change the compression rate to 10 for the following instructions.
Then use the Scroll icons to move through the file slow or fast. (These are grayed out if the
entire file is on the display).
You can scroll forward or backwards through the data. You can stop at any point of interest.
Experiment scrolling forwards and backwards. Continue to scroll and stop the display when you have
the trigger point (white vertical line) in the middle of the display. Then Scroll to the end of this file.
Click on Display > Go to > Trigger (Note the other choices also). This will bring you back to the
trigger point easily if you ever lose its location.
Put down both cursors.
Press the Acursor icon. Slide the cursor just to the left of the trigger point, by clicking and dragging
the letter Ablock at the bottom.
Press the Bcursor icon. Click on the B block and slide the cursor just to the right of the trigger point.
Table of contents