Sealey BT2012.V2 User manual

INSTRUCTIONS FOR
DIGITAL BATTERY & ALTERNATOR TESTER
WITH PRINTER 12V
MODEL NO: BT2012.V2
Thank you for purchasing a Sealey product. Manufactured to a high standard, this product will, if used according to these
instructions, and properly maintained, give you years of trouble free performance.
IMPORTANT: PLEASE READ THESE INSTRUCTIONS CAREFULLY. NOTE THE SAFE OPERATIONAL REQUIREMENTS, WARNINGS & CAUTIONS. USE
THE PRODUCT CORRECTLY AND WITH CARE FOR THE PURPOSE FOR WHICH IT IS INTENDED. FAILURE TO DO SO MAY CAUSE DAMAGE AND/OR
PERSONAL INJURY AND WILL INVALIDATE THE WARRANTY. KEEP THESE INSTRUCTIONS SAFE FOR FUTURE USE.
1. SAFETY
1.1. PERSONAL PRECAUTIONS
9Ensure that there is another person within hearing range and close enough to come to your aid, should a problem arise when working near
a lead-acid battery.
9Wear safety eye protection and protective clothing. Avoid touching eyes while working near battery.
9Have fresh water and soap nearby in case battery acid contacts skin, clothing, or eyes.
9Wash immediately with soap and water if battery acid contacts skin or clothing. If acid enters eye, flush eye immediately with cool, clean
running water for at least 15 minutes and seek immediate medical attention.
9Remove personal metallic items such as rings, bracelets, necklaces and watches. A lead-acid battery can produce a short-circuit current
which is high enough to weld such items to the vehicle and cause severe burns.
9Ensure that hands, clothing (especially belts) are clear of fan blades and other moving or hot parts of engine. Remove ties and contain
long hair.
8DO NOT smoke or allow a spark or flame in the vicinity of the battery or engine.
1.2. GENERAL SAFETY INSTRUCTIONS
9Familiarise yourself with the application, limitations and potential hazards of the tester. Also refer to the vehicle manufacturer’s hand book.
IF IN ANY DOUBT CONSULT A QUALIFIED ELECTRICIAN.
9Ensure that the tester is in good condition before use. If in any doubt DO NOT use the unit and contact a qualified electrician.
9Only use recommended attachments and parts. To use unapproved items may be dangerous and will invalidate your warranty.
9Keep tools and other items away from the engine and ensure that you can see the battery and working parts of the engine clearly.
9Determine the system voltage before using the tester.
9If the tester receives a sharp knock or blow the unit must be checked by a qualified service agent before using.
9If the battery terminals are corroded or dirty: clean them before using the tester.
9Keep children and unauthorised persons away from the work area.
8DO NOT dismantle the tester for any reason. The tester must only be checked by qualified service personnel.
WARNING! To prevent the risk of sparking, short circuit and possible explosion DO NOT drop metal tools in the battery area, or allow them
to touch the battery terminals.
8DO NOT cross-connect tester to battery. Ensure positive (RED) clamp is to positive terminal and negative (BLACK) clamp is to negative
terminal. If battery symbols cannot be distinguished: the negative terminal is the one directly connected to the vehicle bodywork.
8DO NOT use the tester outdoors, or in damp, or wet locations and DO NOT use in the vicinity of flammable liquids or gases.
8Ensure there is effective ventilation to prevent a build-up of explosive gases.
8DO NOT use the tester for a task for which it is not designed.
9When not in use, store the tester carefully in a safe, dry, childproof location.
2. INTRODUCTION
Fast and accurate diagnosis of battery and alternator faults with facility to print the results. Large LCD display shows charging and starting
system status and returns decision making information in seconds. Results need no interpretation and the tester will work on batteries with as
little as 1.5V of residual charge.
3. SPECIFICATION
Model No: ...................................................................BT2012.V2
Rated battery Voltage: ............................................................... 12V
Rating Systems: ....................................................... DIN, EN, IEC, SAE
Test Range: ...................................................50-1400 Cold Cranking Amps
...................................................................... 50-800 CCA* DIN
......................................................................50-1400 CCA* EN
...................................................................... 50-800 CCA* IEC
.....................................................................50-1400 CCA* SAE
.....................................................................By Battery Type JIS
Voltage Range: ................................................................. 1.5-17V
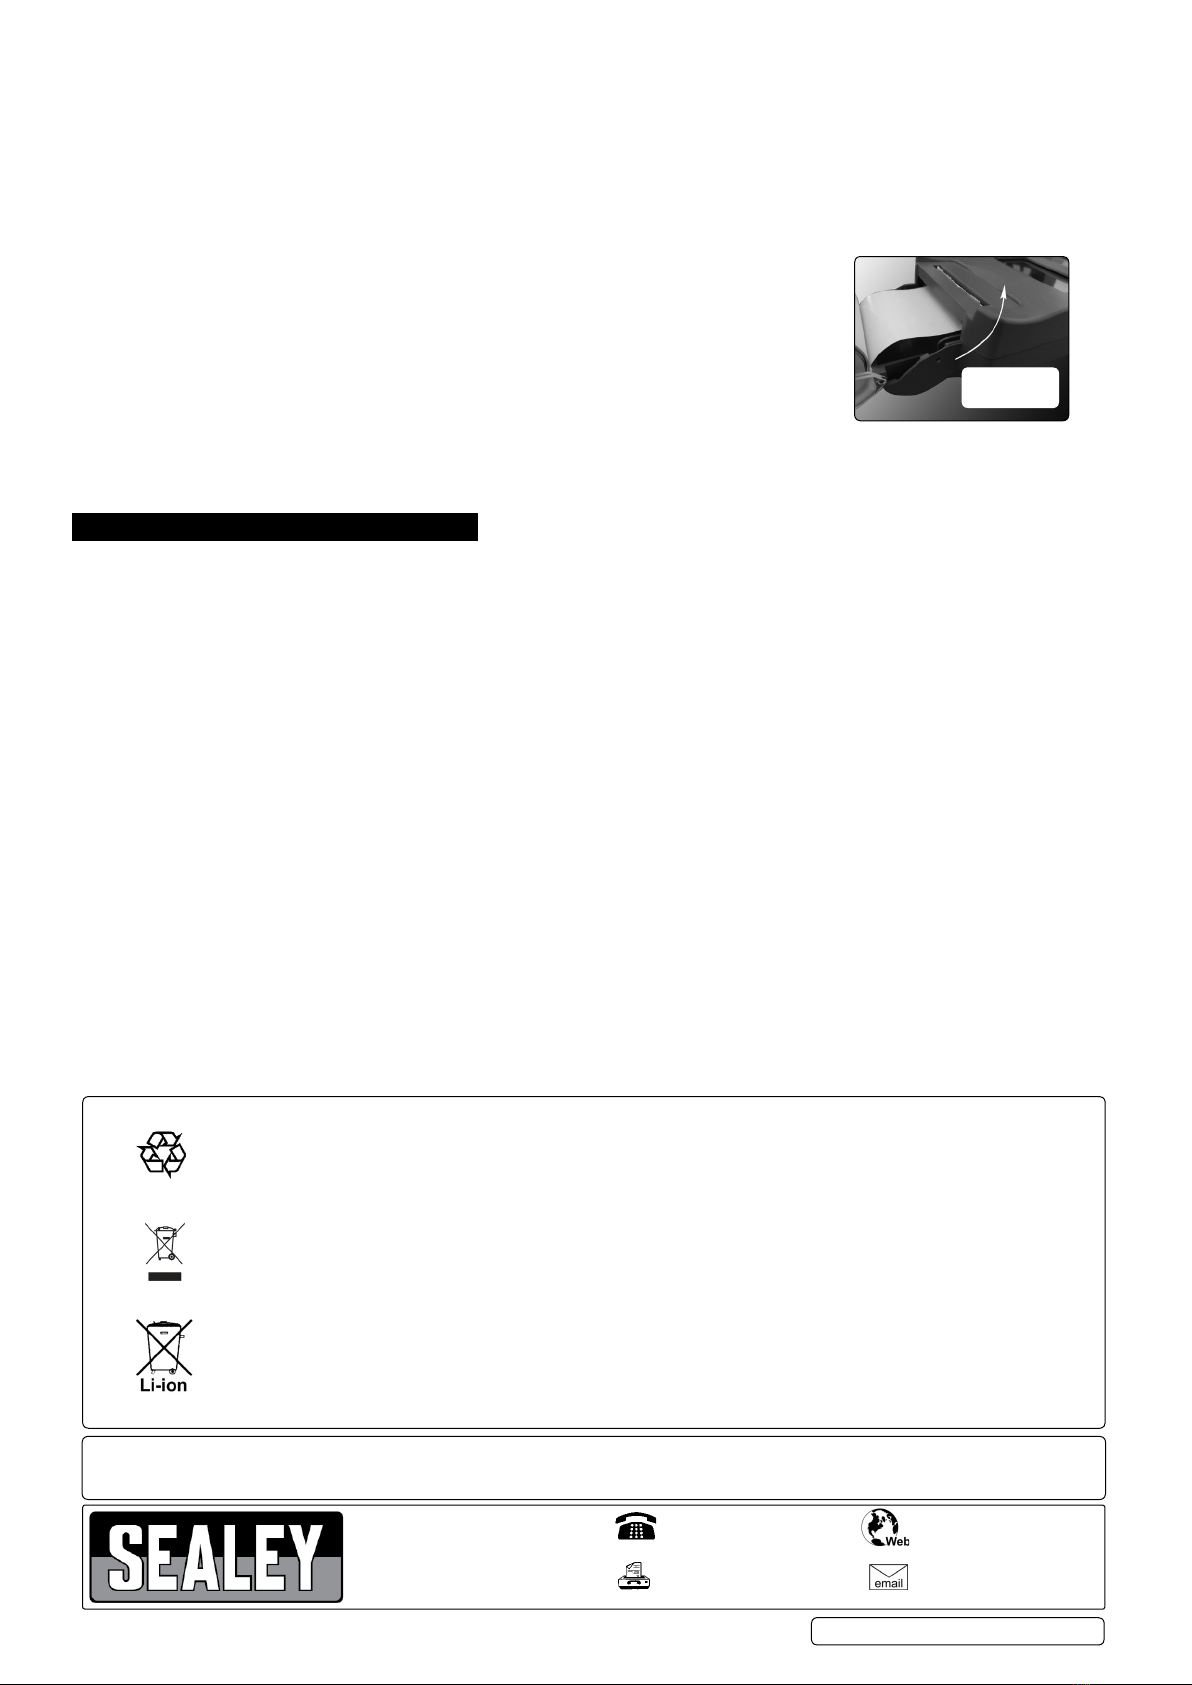
Replacement Printer Rolls: ..........................................BT2003.V2-01 (Pack of 2)
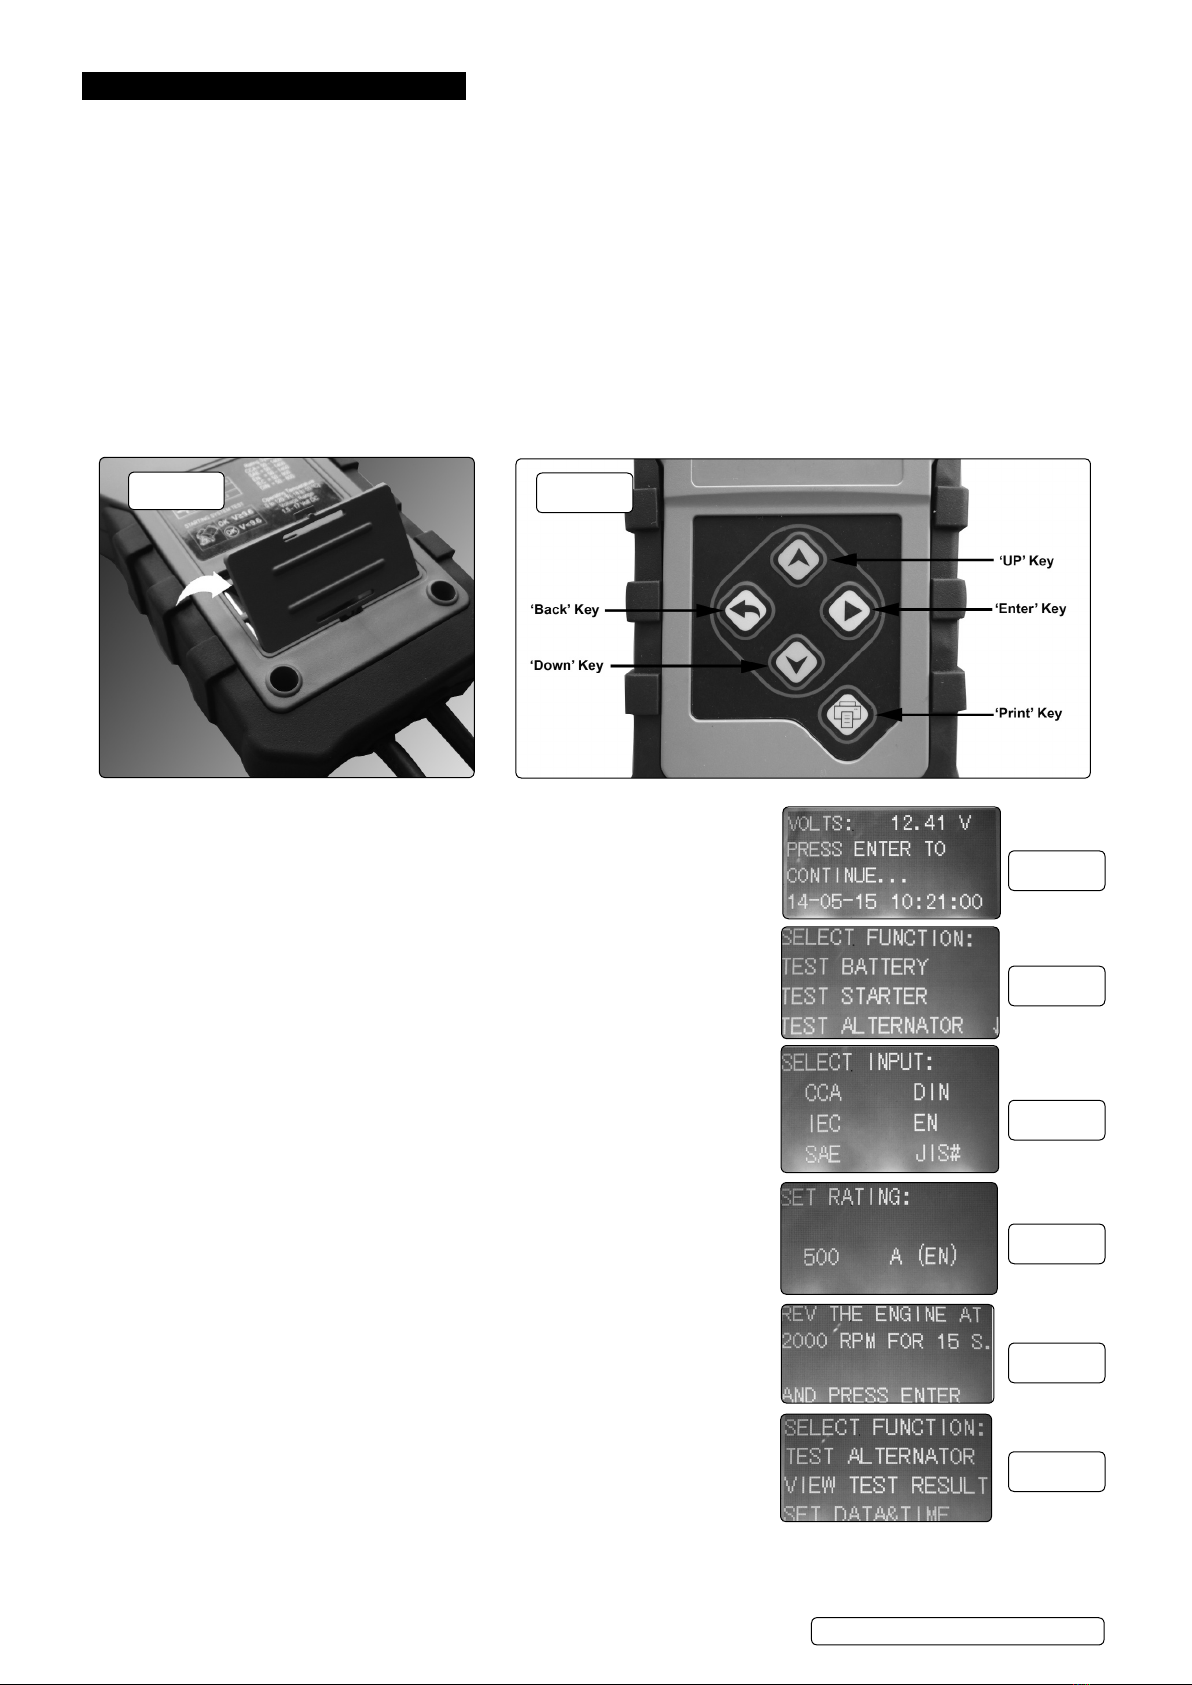
Battery: .............................................................1 x 9V (not supplied)
BT2012.V2 | Issue 4 (3) 17/01/18
Original Language Version
© Jack Sealey Limited
Refer to
instructions
Wear eye
protection
Warning
corrosive
substance

4. OPERATION
WARNING! Ensure that you read, understand and apply the safety and operational instructions before applying the tester clamps to
the battery. Only when you are sure that you understand the procedures is it safe to proceed with the testing process.
4.1. Preparation
WARNING! Ensure that the vehicle, or battery, is in a well ventilated area before starting to test.
4.1.1. Check battery casing for cracks or leakage. If damage is found DO NOT test and replace battery.
4.1.2. Clean battery terminals.
4.1.3. If possible, check electrolyte levels and top-up with distilled water as necessary.
4.1.4. When testing on the vehicle, unless otherwise specified, tests are carried out with all electrical items switched off. Leaving any items
on (boot light, interior light, etc.) can result in expensive mis-diagnosis. If the vehicle was running prior to testing, turn on the
headlights for 30 seconds to remove surface charge. Switch off the lights, let the battery recover for 60 seconds before testing.
4.1.5. Confirm that the 9V battery (not supplied) is fitted correctly in the compartment in the rear of the tester (fig.1). The batteries
power the printer and enables storage of test data after test and disconnection. DO NOT operate the printer without the print paper
loaded and ready for printing.
4.2. Connecting to Battery
4.2.1. Connect the positive (red) clip to the positive (+) terminal of the battery. Ensure a good connection to the terminal.
4.2.2. Connect the negative (black) clip to the negative (-) battery terminal, again ensuring a good connection.
4.3. Display
4.3.1. The initial screen display shows: (g.3)
4.3.2. Which includes the battery voltage.
4.4. Battery Test
4.4.1. Pressing ‘ENTER’ shows: (fig.4)
with ‘TEST BATTERY’ flashing.
4.4.2. Press ‘ENTER’ to select the battery test function.
4.4.3. The display will show input selection view: (fig.5)
Enter the input standard by means of the ‘DOWN’ or ‘UP’ key and pressing ‘Enter’ on
the appropriate standard. The input standard should be shown on the battery
specification label, after the amperage.
4.4.4. When the input standard is selected the amperage screen is displayed: (fig.6)
4.4.5. The required amperage (from the battery label) should be entered using ‘UP’ or ‘DOWN’
key, pressing the ‘ENTER’ key to set.
4.4.6. The battery state will be displayed showing:
Battery Condition
Voltage
Resistance
Cold Cranking Amps
Percentage of Cold Cranking Amps
4.4.7. Press the ‘BACK’ button to return to the main menu when the test is complete.
4.5. Starting System Test
4.5.1. From the screen shown at 4.4.1., select ‘TEST STARTER’.
4.5.2. Start the vehicle.
4.5.3. The starter test results appear automatically on the display.
4.5.4. Press the ‘BACK’ button to return to the main menu when the test is complete.
4.6. Charging System Test
4.6.1. From the screen shown at 4.4.1., select ‘TEST ALTERNATOR’.
4.6.2. The display will show: (fig.7)
4.6.3. Pressing ‘ENTER’ will display the test result.
4.7. Other Functions
4.7.1. Scrolling down from 4.4.1. will show: (fig.8)
4.8. View Test Result
4.8.1. Press ‘VIEW TEST RESULT’ to review the test.
Press ‘ENTER’ to scroll from battery test to starting system
to charging system.
BT2012.V2 | Issue 4 (3) 17/01/18
Original Language Version
© Jack Sealey Limited
fig.2
fig.1
fig.4
fig.3
fig.5
fig.6
fig.7
fig.8

NOTE: It is our policy to continually improve products and as such we reserve the right to alter data, specications and component parts without prior notice.
IMPORTANT: No liability is accepted for incorrect use of this product.
WARRANTY: Guarantee is 12 months from purchase date, proof of which will be required for any claim.
Sole UK Distributor, Sealey Group.
Kempson Way, Suffolk Business Park,
Bury St. Edmunds, Suffolk.
IP32 7AR
www.sealey.co.uk
sales@sealey.co.uk
01284 757500
01284 703534
Environmental Protection
Recycle unwanted materials instead of disposing of them as waste. All tools, accessories and packaging should be
sorted, taken to a recycling centre and disposed of in a manner which is compatible with the environment.
When the product becomes completely unserviceable and requires disposal, drain off any fluids (if applicable)
into approved containers and dispose of the product and the fluids according to local regulations.
WEEE Regulations
Dispose of this product at the end of its working life in compliance with the EU Directive on
Waste Electrical and Electronic Equipment (WEEE). When the product is no longer required, it must be disposed
of in an environmentally protective way. Contact your local solid waste authority for recycling information.
Battery Removal
See Section 4.15
Under the Waste Batteries and Accumulators Regulations 2009, Jack Sealey Ltd are required to inform potential
purchasers of products containing batteries (as dened within these regulations), that they are registered wih Valpak’s
registered compliance scheme. Jack Sealey Ltd’s Batteries Producer Registration Number (BPRN) is BPRN00705.
BT2012.V2 | Issue 4 (3) 17/01/18
Original Language Version
© Jack Sealey Limited
4.9. Set Date & Time
4.9.1. Press ‘SET DATA & TIME’ key.
4.9.2. Press ‘UP’ or ‘DOWN’ key to add or subtract from the setting.
4.9.3. Press ‘ENTER’ to scroll right; entering yy-mm-dd.
4.9.4. When complete, press ‘ENTER’ for 2 seconds to store the set values.
4.10. Printer
8DO NOT operate the printer without rst loading the paper strip under the print head (g.9)
4.10.1. To thread the print roll: connect the tester to a vehicle battery, thread the cleanly cut beginning
of the roll under the print head until resistance is felt and press the ‘PRINT’ button to feed
through.
4.10.2. At the end of a test procedure, pressing ‘PRINT’ will print the last set of results.
4.10.3. Alternatively, selecting ‘VIEW TEST RESULT’ (section 4.8.) and then pressing ‘PRINT’ will
print the entire test cycle.
4.10.4. Printing Roll spares are available. Part no. BT2012.V2-01 (pack of 2).
Please log on to www.sealey.co.uk, email sales@sealey.co.uk or telephone 01284 757500.
5. TROUBLESHOOTING
5.1. In the event of a poor connection, or a battery voltage in excess of 18V, the display will revert to the main menu.
5.2. The printer will not function if the vehicle battery has a charge of less than 10V.
5.3. If the display shows ‘CHECK PRINT PAPER’, replace printer paper or check the feed.
5.4. If the printer exceeds temperature 75°, ‘TEMP OVER’ will display. Allow the unit to cool down before continuing.
fig.9
Table of contents
Other Sealey Test Equipment manuals

Sealey
Sealey TA4000 User manual

Sealey
Sealey VS2030.V2 User manual

Sealey
Sealey VS4021 User manual

Sealey
Sealey VS2030.V2 User manual

Sealey
Sealey VS2058.V2 User manual

Sealey
Sealey VSE300D User manual

Sealey
Sealey VS8193 User manual

Sealey
Sealey VS402 User manual

Sealey
Sealey BT91/1.V2 User manual

Sealey
Sealey AUTO SERVICE VS401 User manual

Sealey
Sealey VS925 User manual

Sealey
Sealey BT2101.V2 User manual

Sealey
Sealey VS027.V3 User manual

Sealey
Sealey Auto Service Line VS2030 User manual

Sealey
Sealey VSE952 User manual

Sealey
Sealey VSE211.V3 User manual

Sealey
Sealey GT117 User manual

Sealey
Sealey CT955 V3 User manual

Sealey
Sealey TA113 User manual

Sealey
Sealey PP100.V2 User manual