Asus ROG STRIX B760 Series User manual

ROG STRIX
B760 Series
BIOS Manual
Motherboard

E21631
First Edition
February 2023
Copyright© 2023 ASUSTeK COMPUTER INC. All Rights Reserved.
No part of this manual, including the products and software described in it, may be reproduced,
transmitted, transcribed, stored in a retrieval system, or translated into any language in any form or by any
means, except documentation kept by the purchaser for backup purposes, without the express written
permission of ASUSTeK COMPUTER INC. (“ASUS”).
Product warranty or service will not be extended if: (1) the product is repaired, modied or altered, unless
such repair, modication of alteration is authorized in writing by ASUS; or (2) the serial number of the
product is defaced or missing.
ASUS PROVIDES THIS MANUAL “AS IS” WITHOUT WARRANTY OF ANY KIND, EITHER EXPRESS
OR IMPLIED, INCLUDING BUT NOT LIMITED TO THE IMPLIED WARRANTIES OR CONDITIONS OF
MERCHANTABILITY OR FITNESS FOR A PARTICULAR PURPOSE. IN NO EVENT SHALL ASUS, ITS
DIRECTORS, OFFICERS, EMPLOYEES OR AGENTS BE LIABLE FOR ANY INDIRECT, SPECIAL,
INCIDENTAL, OR CONSEQUENTIAL DAMAGES (INCLUDING DAMAGES FOR LOSS OF PROFITS,
LOSS OF BUSINESS, LOSS OF USE OR DATA, INTERRUPTION OF BUSINESS AND THE LIKE),
EVEN IF ASUS HAS BEEN ADVISED OF THE POSSIBILITY OF SUCH DAMAGES ARISING FROM ANY
DEFECT OR ERROR IN THIS MANUAL OR PRODUCT.
SPECIFICATIONS AND INFORMATION CONTAINED IN THIS MANUAL ARE FURNISHED FOR
INFORMATIONAL USE ONLY, AND ARE SUBJECT TO CHANGE AT ANY TIME WITHOUT NOTICE,
AND SHOULD NOT BE CONSTRUED AS A COMMITMENT BY ASUS. ASUS ASSUMES NO
RESPONSIBILITY OR LIABILITY FOR ANY ERRORS OR INACCURACIES THAT MAY APPEAR IN THIS
MANUAL, INCLUDING THE PRODUCTS AND SOFTWARE DESCRIBED IN IT.
Products and corporate names appearing in this manual may or may not be registered trademarks or
copyrights of their respective companies, and are used only for identication or explanation and to the
owners’ benet, without intent to infringe.

Contents
1 Knowing BIOS ............................................................................................... 4
2 BIOS setup program ..................................................................................... 5
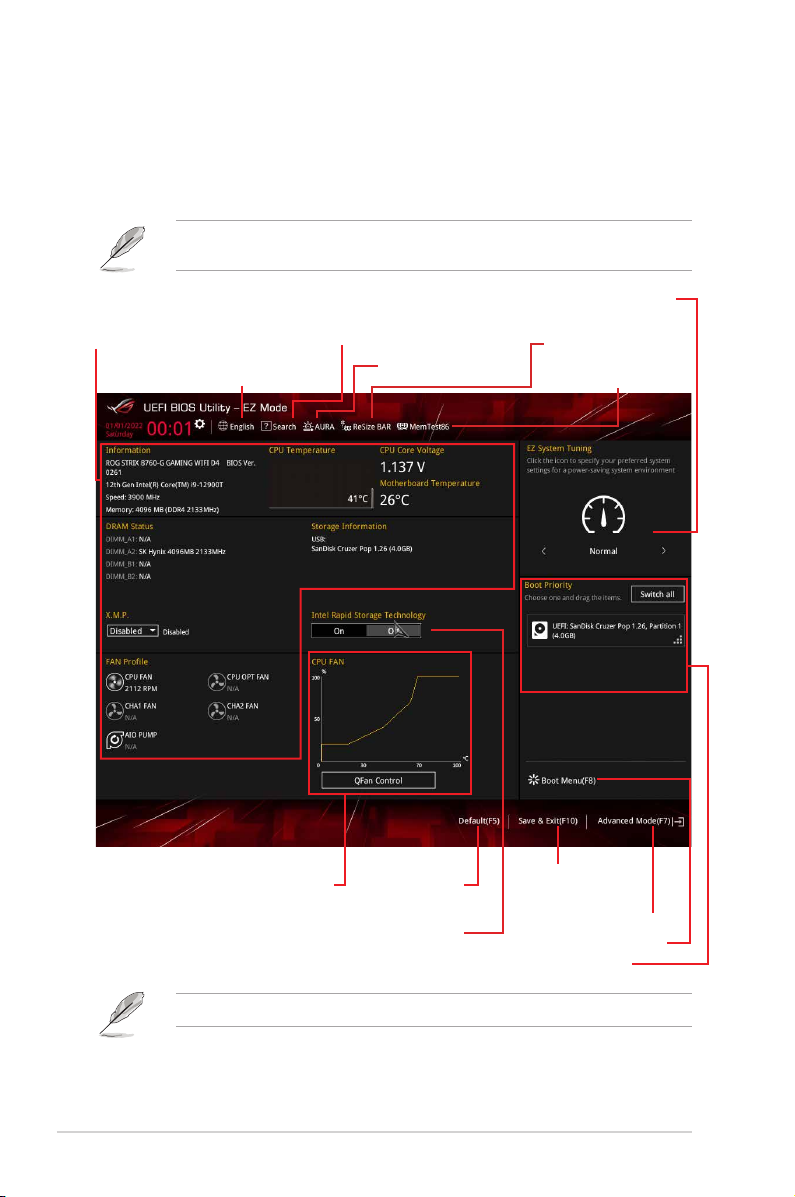
2.1 EZ Mode......................................................................................... 6
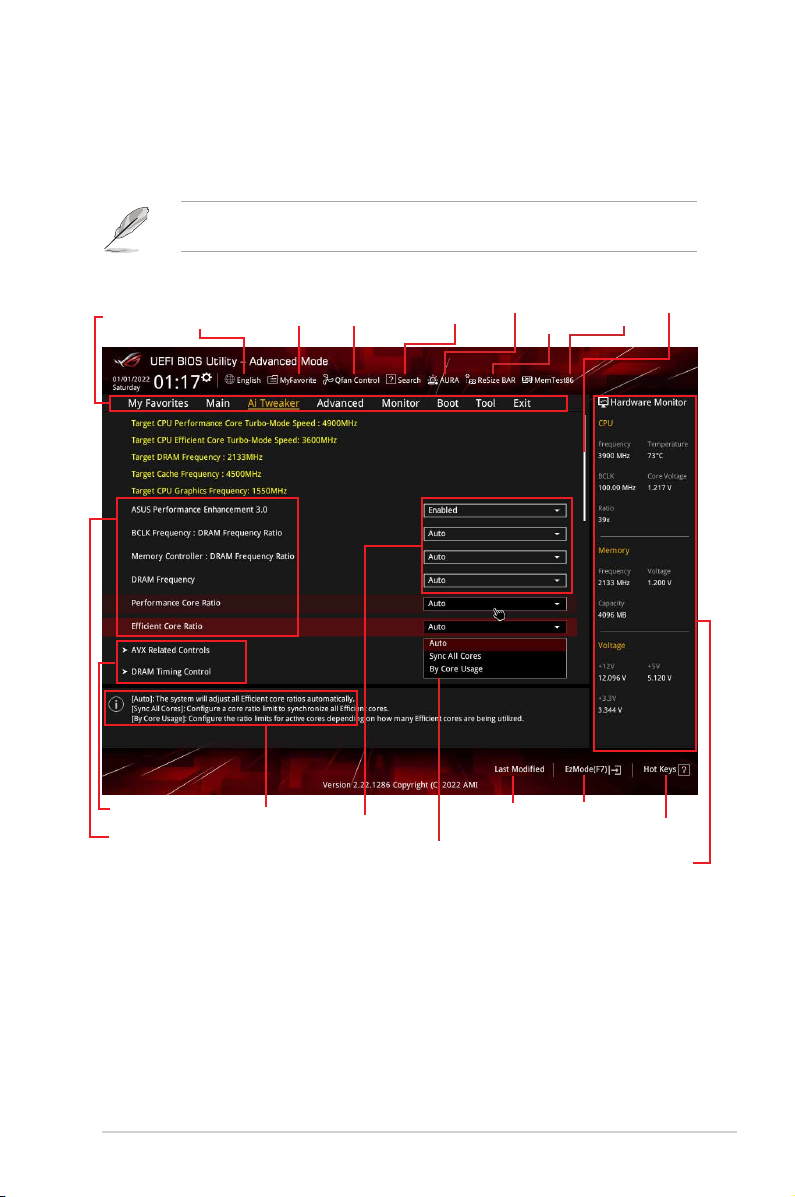
2.2 Advanced Mode ............................................................................. 7
3 QFan Control ............................................................................................... 10
4 My Favorites ................................................................................................ 12
5 Main menu ................................................................................................... 14
6 Ai Tweaker menu......................................................................................... 16
7 Advanced menu .......................................................................................... 33
7.1 Platform Misc Conguration......................................................... 34
7.2 CPU Conguration ....................................................................... 35
7.3 System Agent (SA) Conguration ................................................ 38
7.4 PCH Conguration ....................................................................... 39
7.5 PCH Storage Conguration.......................................................... 39
7.6 PCH-FW Conguration ................................................................ 41
7.7 Thunderbolt(TM) Conguration.................................................... 41
7.8 UEFI Variables Protection............................................................ 43
7.9 PCI Subsystem Settings .............................................................. 43
7.10 USB Conguration ....................................................................... 44
7.11 Network Stack Conguration........................................................ 45
7.12 NVMe Conguration..................................................................... 45
7.13 HDD/SSD SMART Information .................................................... 46
7.14 APM Conguration....................................................................... 46
7.15 Onboard Devices Conguration................................................... 47
8 Monitor menu .............................................................................................. 49
8.1 Temperature Monitor.................................................................... 49
8.2 Fan Speed Monitor....................................................................... 50
8.3 Voltage Monitor............................................................................ 50
8.4 Q-Fan Conguration..................................................................... 51
9 Boot menu ................................................................................................... 57
9.1 CSM (Compatibility Support Module)........................................... 57
9.2 Secure Boot ................................................................................. 58
9.3 Boot Conguration ....................................................................... 61
10 Tool menu.................................................................................................... 64
11 Exit menu..................................................................................................... 67
12 Updating BIOS............................................................................................. 68
12.1 EZ Update.................................................................................... 68
12.2 ASUS EZ Flash 3......................................................................... 69
12.3 ASUS CrashFree BIOS 3............................................................. 70

4ROG STRIX B760 Series BIOS Manual
The new ASUS UEFI BIOS is a Unied Extensible Interface that complies with UEFI
architecture, offering a user-friendly interface that goes beyond the traditional keyboard-
only BIOS controls to enable a more flexible and convenient mouse input. You can easily
navigate the new UEFI BIOS with the same smoothness as your operating system. The
term “BIOS” in this user manual refers to “UEFI BIOS” unless otherwise specied.
BIOS (Basic Input and Output System) stores system hardware settings such as storage
device conguration, overclocking settings, advanced power management, and boot
device conguration that are needed for system startup in the motherboard CMOS. In
normal circumstances, the default BIOS settings apply to most conditions to ensure
optimal performance. DO NOT change the default BIOS settings except in the following
circumstances:
• An error message appears on the screen during the system bootup and requests you
to run the BIOS Setup.
• You have installed a new system component that requires further BIOS settings or
update.
Inappropriate BIOS settings may result to instability or boot failure. We strongly
recommend that you change the BIOS settings only with the help of a trained service
personnel.
• When downloading or updating the BIOS le for your motherboard, rename it as
XXXXX.CAP. The name of the CAP le varies depending on models. Refer to the user
manual that came with your motherboard for the name.
• BIOS settings and options may vary due to different BIOS release versions. Please
refer to the latest BIOS version for settings and options.
BIOS Setup
1 Knowing BIOS

ROG STRIX B760 Series BIOS Manual 5
• The BIOS setup screens shown in this section are for reference purposes only, and
may not exactly match what you see on your screen.
• Ensure that a USB mouse is connected to your motherboard if you want to use the
mouse to control the BIOS setup program.
• If the system becomes unstable after changing any BIOS setting, load the default
settings to ensure system compatibility and stability. Select the Load Optimized
Defaults item under the Exit menu or press hotkey <F5>.
• If the system fails to boot after changing any BIOS setting, try to clear the CMOS
and reset the motherboard to the default value. See your motherboard manual for
information on how to erase the RTC RAM.
• The BIOS setup program does not support Bluetooth devices.
BIOS menu screen
The BIOS Setup program can be used under two modes: EZ Mode and Advanced Mode.
You can change modes from Setup Mode in Boot menu or by pressing the <F7> hotkey.
2 BIOS setup program
Use the BIOS Setup to update the BIOS or congure its parameters. The BIOS screen
includes navigation keys and brief onscreen help to guide you in using the BIOS Setup
program.
Entering BIOS at startup
To enter BIOS Setup at startup, press <Delete> or <F2> during the Power-On Self Test
(POST). If you do not press <Delete> or <F2>, POST continues with its routines.
Entering BIOS Setup after POST
To enter BIOS Setup after POST:
• Press <Ctrl>+<Alt>+<Delete> simultaneously.
• Press the reset button on the system chassis.
• Press the power button to turn the system off then back on. Do this option only if you
failed to enter BIOS Setup using the rst two options.
After doing any of the three options, press <Delete> key to enter BIOS.

6ROG STRIX B760 Series BIOS Manual
2.1 EZ Mode
The EZ Mode provides you an overview of the basic system information, and allows you to
select the display language, system performance, mode and boot device priority. To access
the Advanced Mode, select Advanced Mode or press the <F7> hotkey for the advanced
BIOS settings.
The default screen for entering the BIOS setup program can be changed. Refer to the
Setup Mode item in section Boot menu for details.
The boot device options vary depending on the devices you installed to the system.
Selects the display language
of the BIOS setup program
Displays the CPU/motherboard
temperature, CPU voltage output,
CPU/chassis/AIO PUMP/CPU OPT
fan speed, and SATA information
Displays the system properties of
the selected mode. Click < or > to
switch EZ System Tuning modes
Loads optimized
default settings
Displays the CPU Fan’s speed. Click
the button to manually tune the fans
Saves the changes
and resets the system
Click to display boot devices
Selects the boot device priority
Click to go to Advanced mode
Turns the RGB LED lighting
or functional LED on or off
Searches by BIOS item
name, enter the item name to
nd the related item listing Turns the Re-Size BAR
Support on or off
Activates MemTest86
Enables Intel Rapid Storage
Technology operation conguration

ROG STRIX B760 Series BIOS Manual 7
2.2 Advanced Mode
The Advanced Mode provides advanced options for experienced end-users to congure
the BIOS settings. The gure below shows an example of the Advanced Mode. Refer to the
following sections for the detailed congurations.
To switch from EZ Mode to Advanced Mode, click Advanced Mode(F7) or press the <F7>
hotkey.
Menu items
General help
Menu bar Language
AURA ON/OFF(F4)
Qfan Control(F6)
MyFavorite(F3)
Scroll bar
Pop-up Menu
Conguration elds Last modied
settings
Go back to EZ
Mode
Displays a quick overview
of the system status
Submenu items
Search(F9)
Hot keys
MemTest86
ReSize BAR

8ROG STRIX B760 Series BIOS Manual
Menu items
The highlighted item on the menu bar displays the specic items for that menu. For example,
selecting Main shows the Main menu items.
The other items (My Favorites, Ai Tweaker, Advanced, Monitor, Boot, Tool, and Exit) on the
menu bar have their respective menu items.
Submenu items
An arrow sign (>) before each item on any menu screen means that the item has a submenu.
To display the submenu, select the item and press <Enter>.
Language
This button above the menu bar contains the languages that you can select for your BIOS.
Click this button to select the language that you want to display in your BIOS screen.
My Favorites (F3)
This button above the menu bar shows all BIOS items in a Tree Map setup. Select frequently-
used BIOS settings and save it to MyFavorites menu.
Refer to section 4 My Favorites for more information.
QFan Control (F6)
This button above the menu bar displays the current settings of your fans. Use this button to
manually tweak the fans to your desired settings.
Refer to section 3 QFan Control for more information.
Search(F9)
This button allows you to search for BIOS items by entering its name, enter the item name to
nd the related item listing.
Menu bar
The menu bar on top of the screen has the following main items:
My Favorites For saving the frequently-used system settings and conguration
Main For changing the basic system conguration
Ai Tweaker For changing the overclocking settings
Advanced For changing the advanced system settings
Monitor For displaying the system temperature, power status, and changing
the fan settings
Boot For changing the system boot conguration
Tool For conguring options for special functions
Exit For selecting the exit options and loading default settings

ROG STRIX B760 Series BIOS Manual 9
AURA(F4)
This button allows you to turn the RGB LED lighting or functional LED on or off.
[All On] All LEDs (Aura or Functional) will be enabled.
[Stealth Mode] All LEDs (Aura and Functional) will be disabled.
[Aura Only] Aura LEDs will be enabled and functional LEDs will be disabled.
[Aura Off] Aura LEDs will be disabled, however functional LEDs will still be enabled.
ReSize BAR
This button allows you to enable or disable the Re-Size BAR Support.
[OFF] Re-Size BAR Support will be disabled.
[ON] Enable Re-Size BAR Support for harnessing full GPU memory, and CSM
(Compatibility Support Module) will be disabled.
MemTest86
This button allows you to activate MemTest86.
• Please save the changes before applying this option.
• There will be a little loading period for a few seconds after you click this button.
Hot keys
This button above the menu bar contains the navigation keys for the BIOS setup program.
Use the navigation keys to select items in the menu and change the settings.
Scroll bar
A scroll bar appears on the right side of a menu screen when there are items that do not t
on the screen. Press the Up/Down arrow keys or <Page Up> / <Page Down> keys to display
the other items on the screen.
General help
At the bottom of the menu screen is a brief description of the selected item. Use <F12> key
to capture the BIOS screen and save it to the removable storage device.
Conguration elds
These elds show the values for the menu items. If an item is user-congurable, you can
change the value of the eld opposite the item. You cannot select an item that is not
user-congurable.
A congurable eld is highlighted when selected. To change the value of a eld, select it and
press <Enter> to display a list of options.
Last Modied button
This button shows the items that you last modied and saved in BIOS Setup.

10 ROG STRIX B760 Series BIOS Manual
3 QFan Control
The QFan Control allows you to set a fan prole or manually congure the operating speed of
your CPU and chassis fans.
Click to select a fan to be
congured Click to activate
PWM Mode or
DC Mode
Click to undo the
changes
Click to apply the fan setting
Click to go back to main menu
Select a prole to
apply to your fans
Select to manually congure
your fans

ROG STRIX B760 Series BIOS Manual 11
Speed points Select to manually
congure your fans
Conguring fans manually
Select Manual from the list of proles to manually congure your fans’ operating speed.
To congure your fans:
1. Select the fan that you want to congure and to view its current status.
2. Click and drag the speed points to adjust the fans’ operating speed.
3. Click Apply to save the changes then click Exit (ESC).

12 ROG STRIX B760 Series BIOS Manual
4 My Favorites
My Favorites is your personal space where you can easily save and access your favorite
BIOS items. You can personalize this screen by adding or removing items.

ROG STRIX B760 Series BIOS Manual 13
Adding items to My Favorites
To add BIOS items:
1. Press <F3> on your keyboard or click MyFavorites(F3) from the BIOS screen to open
Setup Tree Map screen.
2. On the Setup Tree Map screen, select the BIOS items that you want to save in My
Favorites screen.
3. Select an item from main menu panel, then click the submenu that you want to save as
favorite from the submenu panel and click or press <Enter> on your keyboard.
You cannot add the following items to My Favorite items:
• Items with submenu options.
• User-managed items such as language and boot order.
• Conguration items such as Memory SPD Information, system time and date.
4. Click Exit (ESC) or press <Esc> key to close Setup Tree Map screen.
5. Go to My Favorites menu to view the saved BIOS items.
Main menu panel
Submenu panel
Selected shortcut
items
Delete all favorite
items
Recover to default
favorite items

14 ROG STRIX B760 Series BIOS Manual
5 Main menu
The Main menu screen appears when you enter the Advanced Mode of the BIOS Setup
program. The Main menu provides you an overview of the basic system information, and
allows you to set the system date, time, language, and security settings.
Security
The Security menu items allow you to change the system security settings.
• If you have forgotten your BIOS password, erase the CMOS Real Time Clock (RTC)
RAM to clear the BIOS password. See the motherboard for information on how to
erase the RTC RAM via the Clear CMOS jumper.
• The Administrator or User Password items on top of the screen show the default [Not
Installed]. After you set a password, these items show [Installed].

ROG STRIX B760 Series BIOS Manual 15
Administrator Password
If you have set an administrator password, we recommend that you enter the administrator
password for accessing the system. Otherwise, you might be able to see or change only
selected elds in the BIOS setup program.
To set an administrator password:
1. Select the Administrator Password item and press <Enter>.
2. From the Create New Password box, key in a password, then press <Enter>.
3. Re-type to conrm the password then select OK.
To change an administrator password:
1. Select the Administrator Password item and press <Enter>.
2. From the Enter Current Password box, key in the current password, then press
<Enter>.
3. From the Create New Password box, key in a new password, then press <Enter>.
4. Re-type to conrm the password then select OK.
To clear the administrator password, follow the same steps as in changing an administrator
password, but leave other elds blank then select OK to continue. After you clear the
password, the Administrator Password item on top of the screen shows [Not Installed].
User Password
If you have set a user password, you must enter the user password for accessing the system.
The User Password item on top of the screen shows the default [Not Installed]. After you set
a password, this item shows [Installed].
To set a user password:
1. Select the User Password item and press <Enter>.
2. From the Create New Password box, key in a password, then press <Enter>.
3. Re-type to conrm the password then select OK.
To change a user password:
1. Select the User Password item and press <Enter>.
2. From the Enter Current Password box, key in the current password, then press
<Enter>.
3. From the Create New Password box, key in a new password, then press <Enter>.
4. Re-type to conrm the password then select OK.
To clear the user password, follow the same steps as in changing a user password, but
leave other elds blank then select OK to continue. After you clear the password, the User
Password item on top of the screen shows [Not Installed].

16 ROG STRIX B760 Series BIOS Manual
6 Ai Tweaker menu
The Ai Tweaker menu items allow you to congure overclocking-related items.
Be cautious when changing the settings of the Ai Tweaker menu items. Incorrect eld
values can cause the system to malfunction.
The conguration options for this section vary depending on the CPU and DIMM model you
installed on the motherboard.
Scroll down to display other BIOS items.
ASUS Performance Enhancement 3.0
Allows you to unlock power limits to increase CPU performance.
[Disabled] Allows you to keep Intel’s default CPU settings.
[Enabled] Allows you to enable ASUS optimized CPU settings.
Actual settings may vary depending on different models.
BCLK Frequency : DRAM Frequency Ratio
This item allows you to set the ratio of BCLK frequency and DRAM frequency. Select the auto
mode to apply the optimized setting. Conguration options: [Auto] [100:133] [100:100]
BCLK Frequency : DRAM Frequency Ratio of 100:133 tends to overclock better.
Memory Controller : DRAM Frequency Ratio
This item allows you to set the ratio of memory controller and DRAM frequency. Select the
auto mode to apply the optimized setting. Conguration options: [Auto] [1:1] [1:2] [1:4]
Memory Controller : DRAM Frequency Ratio of 1:2 only works with even numbered DRAM
ratios, not odd numbered ratios.

ROG STRIX B760 Series BIOS Manual 17
DRAM Frequency
Allows you to select the DRAM operating frequency or select [Auto] to apply the optimized
setting. Conguration options: [Auto] [DDR4-800MHz] – [DDR4-8400MHz]
• The conguration options vary with the BCLK frequency setting.
• The frequency ratios in grey are not recommended. Use BCLK + ratios in white to
reach your target frequency if needed.
Selecting a very high memory frequency may cause the system to become unstable! If this
happens, revert to the default setting.
Performance Core Ratio
[Auto] The system will adjust all performance core ratios automatically.
[Sync All Cores] Allows you to congure a core ratio limit to synchronize all Performance
cores.
[By Core Usage] Allows you to congure the ratio limits for active cores depending on how
many Performance cores are being utilized.
Efcient Core Ratio
[Auto] The system will adjust all efcient core ratios automatically.
[Sync All Cores] Allows you to congure a core ratio limit to synchronize all Efcient cores.
[By Core Usage] Allows you to congure the ratio limits for active cores depending on how
many Efcient cores are being utilized.
AVX Related Controls
AVX2
This item allows you to enable or disable the AVX 2 instructions. Conguration options:
[Auto] [Disabled] [Enabled]
DRAM Timing Control
The sub-items in this menu allow you to set the DRAM timing control features. Use the
<+> and <-> keys to adjust the value. To restore the default setting, type [auto] using the
keyboard and press the <Enter> key.
Changing the values in this menu may cause the system to become unstable! If this
happens, revert to the default settings.
DRAM CAS# Latency
Conguration options: [Auto] [1] – [127]
DRAM RAS# to CAS# Delay
Conguration options: [Auto] [0] – [255]
DRAM RAS# PRE Time
Conguration options: [Auto] [0] – [255]
DRAM RAS# ACT Time
Conguration options: [Auto] [1] – [511]

18 ROG STRIX B760 Series BIOS Manual
DRAM Command Rate
Conguration options: [Auto] [1N] [2N] [3N] [N:1]
The following item appears only when you set DRAM Command Rate to [N:1].
N to 1 ratio
Conguration options: [1] – [7]
Secondary Timings
DRAM RAS# to RAS# Delay L / DRAM RAS# to RAS# Delay S
Conguration options: [Auto] [1] – [15]
DRAM REF Cycle Time / DRAM REF Cycle Time 2 / DRAM REF Cycle Time 4
Conguration options: [Auto] [1] – [1023]
DRAM Refresh Interval
Conguration options: [Auto] [1] – [65535]
DRAM WRITE Recovery Time
Conguration options: [Auto] [1] – [31]
DRAM READ to PRE Time
Conguration options: [Auto] [1] – [15]
DRAM FOUR ACT WIN Time
Conguration options: [Auto] [1] – [63]
DRAM WRITE to READ Delay / DRAM WRITE to READ Delay L /
DRAM WRITE to READ Delay S
Conguration options: [Auto] [1] – [15]
DRAM CAS to CAS Delay L
Conguration options: [Auto] [1] – [15]
DRAM CKE Minimum Pulse Width
Conguration options: [Auto] [0] – [15]
DRAM Write Latency
Conguration options: [Auto] [1] – [31]
Skew Control
DDRCRCOMPCTL0/1/2
Ctl0 dqvrefup
Conguration options: [Auto] [0] – [255]
Ctl0 dqvrefdn
Conguration options: [Auto] [0] – [255]
Ctl0 dqodtvrefup
Conguration options: [Auto] [0] – [255]
Ctl0 dqodtvrefdn
Conguration options: [Auto] [0] – [255]
Ctl1 cmdvrefup
Conguration options: [Auto] [0] – [255]

ROG STRIX B760 Series BIOS Manual 19
Ctl1 ctlvrefup
Conguration options: [Auto] [0] – [255]
Ctl1 clkvrefup
Conguration options: [Auto] [0] – [255]
Ctl1 ckecsvrefup
Conguration options: [Auto] [0] – [255]
Ctl2 cmdvrefdn
Conguration options: [Auto] [0] – [255]
Ctl2 ctlvrefdn
Conguration options: [Auto] [0] – [255]
Ctl2 clkvrefdn
Conguration options: [Auto] [0] – [255]
ODT RTT WR (CHA) / ODT RTT WR (CHB)
Conguration options: [Auto] [0 DRAM Clock] [80 DRAM Clock]
[120 DRAM Clock] [240 DRAM Clock] [255 DRAM Clock]
ODT RTT PARK (CHA) / ODT RTT NOM (CHA) / ODT RTT PARK (CHB) /
ODT RTT NOM (CHB)
Conguration options: [Auto] [0 DRAM Clock] [34 DRAM Clock]
[40 DRAM Clock] [48 DRAM Clock] [60 DRAM Clock]
[80 DRAM Clock] [120 DRAM Clock] [240 DRAM Clock]
ODT_READ_DURATION / ODT_READ_DELAY / ODT_WRITE_DURATION /
ODT_WRITE_DELAY
Conguration options: [Auto] [0] – [7]
RTL IOL Control
Round Trip Latency Init Value MC0 CHA / Round Trip Latency Init Value
MC1 CHA
Conguration options: [Auto] [0] – [255]
Round Trip Latency Max Value MC0 CHA / Round Trip Latency Max Value
MC1 CHA
Conguration options: [Auto] [0] – [255]
Round Trip Latency Offset Value Mode Sign MC0 CHA / Round Trip
Latency Offset Value Mode Sign MC1 CHA
Conguration options: [-] [+]
Round Trip Latency Offset Value MC0 CHA / Round Trip Latency Offset
Value MC1 CHA
Conguration options: [Auto] [0] – [255]
Round Trip Latency MC0 CHA R0~R7 / Round Trip Latency MC1 CHA
R0~R7
Conguration options: [Auto] [0] – [255]
Memory Training Algorithms
Early Command Training
Conguration options: [Auto] [Disabled] [Enabled]

20 ROG STRIX B760 Series BIOS Manual
SenseAmp Offset Training
Conguration options: [Auto] [Disabled] [Enabled]
Early ReadMPR Timing Centering 2D
Conguration options: [Auto] [Disabled] [Enabled]
Read MPR Training
Conguration options: [Auto] [Disabled] [Enabled]
Receive Enable Training
Conguration options: [Auto] [Disabled] [Enabled]
Jedec Write Leveling
Conguration options: [Auto] [Disabled] [Enabled]
Early Write Time Centering 2D
Conguration options: [Auto] [Disabled] [Enabled]
Early Read Time Centering 2D
Conguration options: [Auto] [Disabled] [Enabled]
Write Timing Centering 1D
Conguration options: [Auto] [Disabled] [Enabled]
Write Voltage Centering 1D
Conguration options: [Auto] [Disabled] [Enabled]
Read Timing Centering 1D
Conguration options: [Auto] [Disabled] [Enabled]
Dimm ODT Training*
Allows you to enable or disable DIMM On-Die Termination Training.
Conguration options: [Auto] [Disabled] [Enabled]
The following item will be inaccessible if you set Dimm ODT Training to [Disabled].
Max RTT_WR
Conguration options: [ODT Off] [120 Ohms]
DIMM RON Training*
Conguration options: [Auto] [Disabled] [Enabled]
Write Drive Strength/Equalization 2D*
Conguration options: [Auto] [Disabled] [Enabled]
Write Slew Rate Training*
Conguration options: [Auto] [Disabled] [Enabled]
Read ODT Training*
Conguration options: [Auto] [Disabled] [Enabled]
Comp Optimization Training
Conguration options: [Auto] [Disabled] [Enabled]
Read Equalization Training*
Conguration options: [Auto] [Disabled] [Enabled]
Table of contents
Other Asus Motherboard manuals

Asus
Asus F1A75-M PRO R2.0 User manual

Asus
Asus P9X79-E WS User manual

Asus
Asus Motherboard P5PL2 Quick start guide

Asus
Asus P8H61-I LX R2.0 RM SI User manual

Asus
Asus ROG STRIX B450-I User manual

Asus
Asus VX97 User manual

Asus
Asus P8H61 User manual

Asus
Asus P3B-F User manual

Asus
Asus P8P67 LE User manual

Asus
Asus H81M-A User manual

Asus
Asus P8H61-M LE/CSM R2.0 User manual

Asus
Asus SP98-N User manual

Asus
Asus AT5NM10-I User manual

Asus
Asus PRIME Z690-P WIFI D4 User manual

Asus
Asus STRIX Z270G GAMING User manual

Asus
Asus TUF B450-PLUS GAMING User manual

Asus
Asus P5P41C User manual

Asus
Asus P2B-D User manual

Asus
Asus P4B-LA User manual

Asus
Asus P7Q57-M DO/CSM User manual