Atag VA6111LT User manual

instructions for use
dishwasher
VA6111LT
COP04

Safety instructions 3
Disposal 3
Economical and ecological dishwashing 3
Installation instructions 4
Building-in 4
Levelling 4
Fixing to the adjacent units 4
Water supply connections 4
Water inlet hose ith safety valve 4
Water outlet hose connection 5
Electrical connection 5
Description of the appliance 6
The control panel 7
Audible signals 7
Prior to using for the first time 8
The ater softener 8
Filling ith dish asher salt 9
Rinse aid 9
In daily use 10
Loading cutlery and dishes 10
The lo er basket 10
The cutlery basket 11
The upper basket 11
Adjusting the height of the upper basket 12
Use of detergent 12
Different kinds of detergent 13
Washing programmes 14
Starting a washing programme 15
Maintenance and cleaning 16
Cleaning the filters 16
Prolonged periods of non-operation 16
Frost precautions 16
Moving the machine 16
Something not working 17
Service and spare parts 18
Hints for test centres 19
Contents
2
This appliance complies with the following E E C Directives:
- 73/23 or 19 2 73 (Low Voltage Directive) and subsequent modifications;
- 89/336 or 3 5 89 (Electromagnetic Compatibility Directive) and subsequent modifications
Dimensions Width 59.6 cm
Height 81.8 - 87.8 cm
Max depth 55.5 cm
Max depth ith open door 114 cm
Electrical connection: Information on the electrical connection is given on the rating plate on the
Voltage inner edge of the dish asher’s door.
Overall po er
Fuse
Water supply pressure Minimum 0.05 MPa
Maximum 0.8 MPa
Capacity 12 place settings
Max. eight 39 kg
Noise level 49 dB (A)
Technical specifications

Installation
●Check your dish asher for any transport damage. Never
connect a damaged machine. If your dish asher is
damaged, you should contact your supplier.
●For safety reasons it is dangerous to alter the specifications
or attempt to modify this product in any ay.
●Any electrical and plumbing ork required to install this
appliance should be carried out by a qualified and
competent person.
●Care must be taken to ensure that the appliance does not
stand on the electrical supply cable.
●The sides of the dish asher must never be drilled to
prevent damage to hydraulic components.
Child safety
●This appliance is designed to be operated by adults.
●Children should not be allo ed to tamper ith the controls
or play ith the product.
●Ensure the packaging materials for this appliance are kept
a ay from children so as to prevent the risk of injury or
suffocation.
●The ater in your dish asher is not for drinking. Detergent
residues may still be present in your machine. Keep
children ell a ay from your dish asher hen the door is
open.
●Keep all detergents in a safe place out of children's reach.
Your dishwasher in day-to-day use
●Items that are contaminated by petrol, paint, steel or iron
debris, corrosive, acidic or alkaline chemicals must not be
ashed in this dish asher.
●Under no circumstances should you open the door hilst
the appliance is in operation, especially during the ashing
phase, hot ater may escape. Ho ever, if the door is
opened, a safety device ensures that the machine stops.
●Only use products (detergent, salt and rinse aid) specifically
designed for use in dish ashers.
●Long bladed knives stored in an upright position are a
potential hazard.
●Long and/or sharp items of cutlery such as carving knives
must be positioned horizontally in the upper basket.
●Ensure that the door of the dish asher is al ays closed
hen it is not being loaded or unloaded. In this ay you ill
avoid anybody tripping over the open door and hurting
themselves.
●When finishing loading or unloading close the door, as an
open door can be a hazard.
●Do not sit or stand on the open door.
●Isolate the appliance from the po er supply and turn off the
ater supply after use.
●This product should be serviced by an authorised service
engineer, and only genuine spare parts should be used.
●Under no circumstances should you attempt to repair the
machine yourself. Repairs carried out by inexperienced
persons may cause injury or serious malfunctioning.
Contact your local Service Force Centre. Al ays insist on
genuine spare parts.
Disposal
Dispose of the dish asher packaging material correctly.
All packaging materials can be recycled.
Plastic parts are marked ith standard international
abbreviations:
>PE< for polyethylene, e.g. sheet rapping material.
>PS< for polystyrene, e.g. padding material (al ays CFC-
free).
>POM< for polyoxymethylene, e.g. plastic clips.
Cardboard packaging is manufactured from recycled paper
and should be deposited in the aste paper collection for
recycling.
As and hen you cease to use your dish asher and ithdra
it from service, your should render it unserviceable before
having it disposed of.
Warning! Children at play could lock themselves in your
dish asher or other ise endanger their lives. Therefore cut off
the po er supply cable and make the door closing device
unusable to prevent children from being trapped inside.
For the disposing of the appliance please take it to a recycling
centre or to your dealer ho may, for a small contribution to
the costs, dispose it for you.
The symbol on the product or on its packaging indicates
that this product may not be treated as household aste.
Instead it shall be handed over to the applicable collection
point for the recycling of electrical and electronic equipment.
By ensuring this product is disposed of correctly, you ill help
prevent potential negative consequences for the environment
and human health, hich could other ise be caused by
inappropriate aste handling of this product.
For more detailed information about recycling of this product,
please contact your local city office, your household aste
disposal service or the shop here you purchased the
product.
Economical and
ecological dishwashing
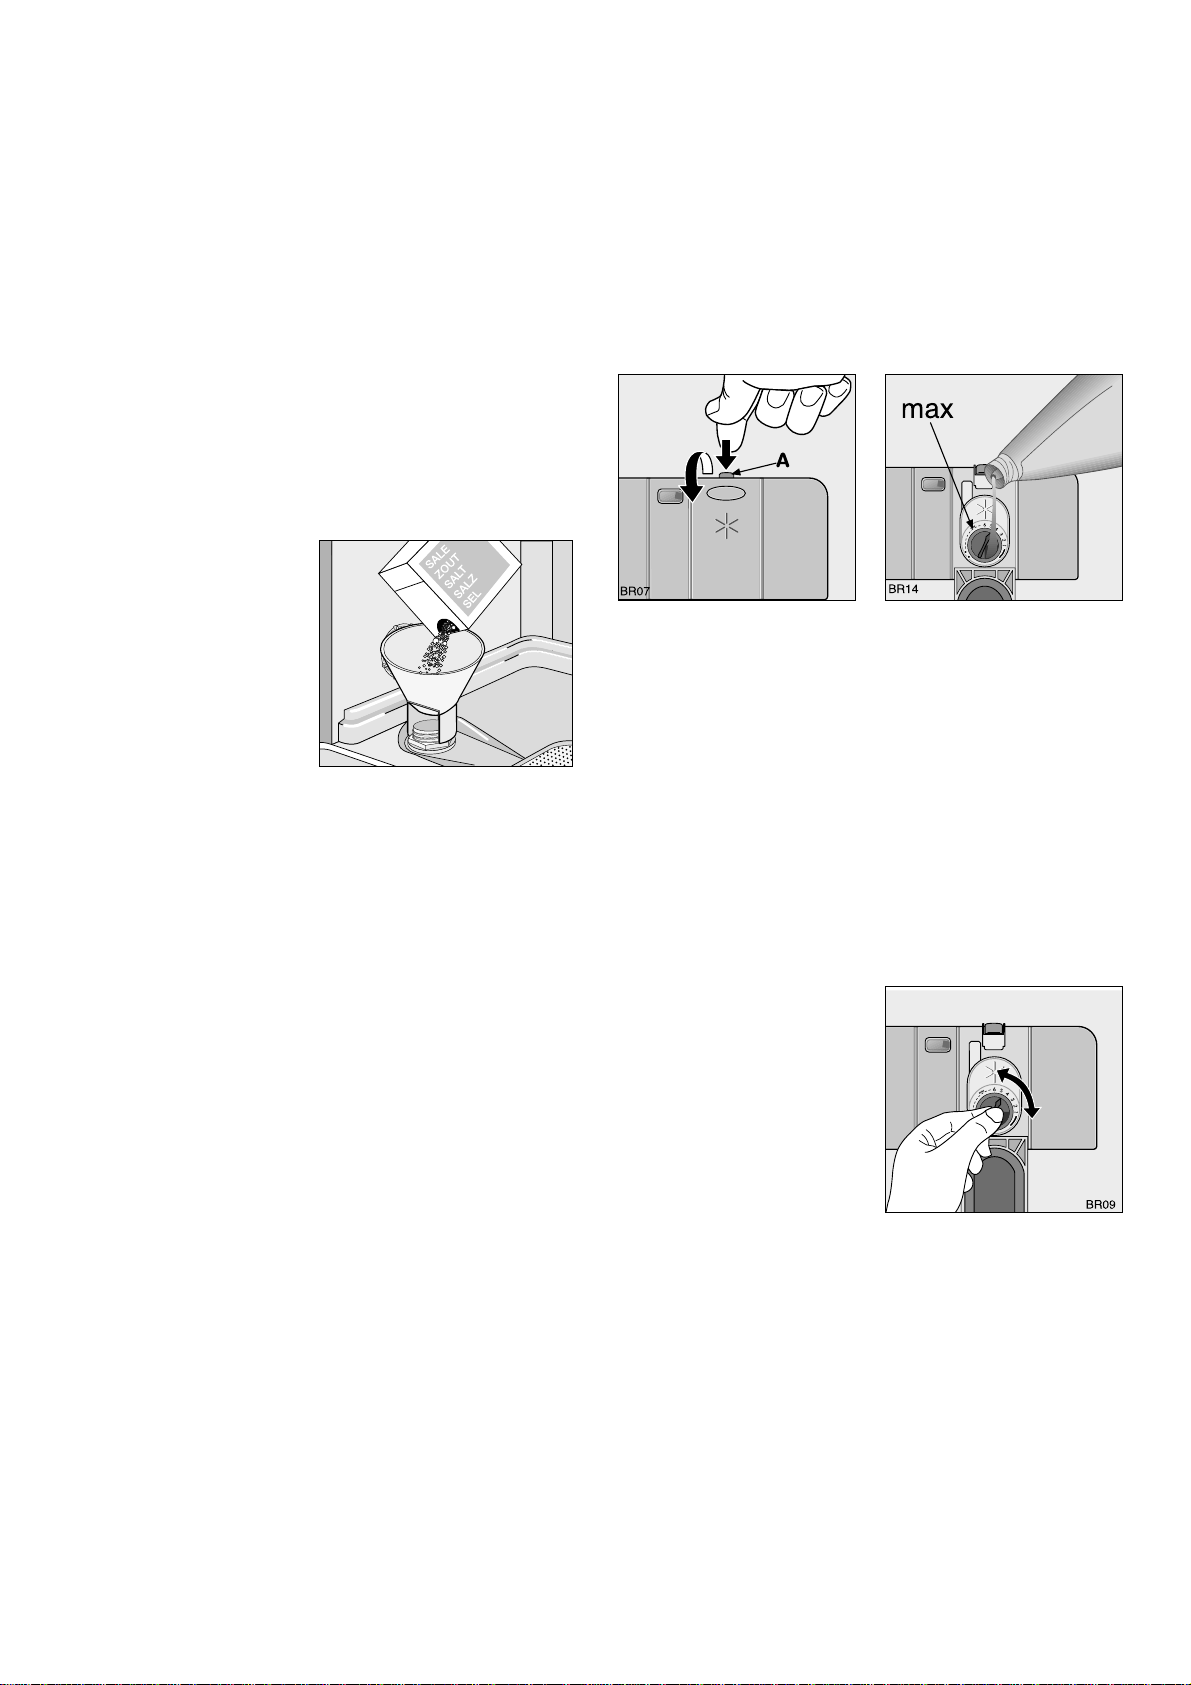
●Ensure that the ater softener is correctly adjusted.
●Do not pre- ash under running ater.
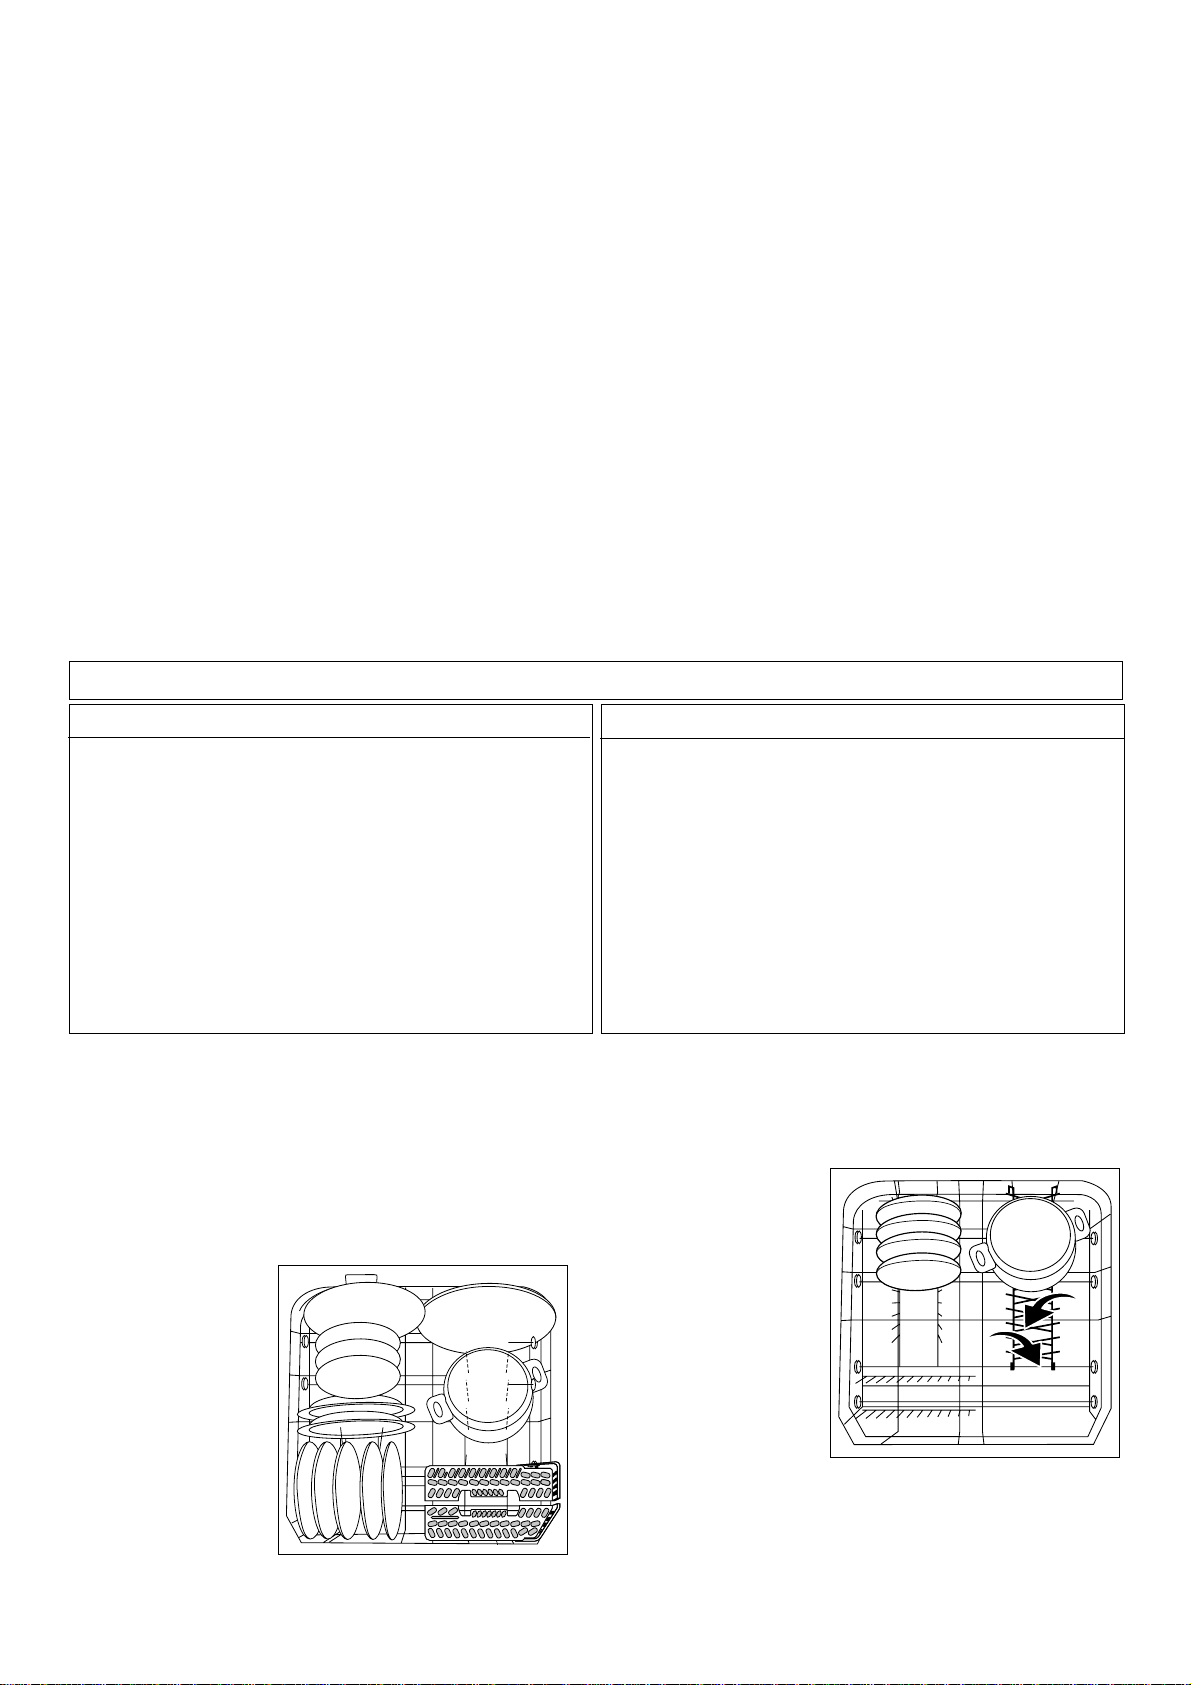
●Select the ash programme to suit the nature and degree of
the soiling on the dishes.
●Do not use more detergent, dish asher salt and rinse aid
than is recommended in these operating instructions and by
the manufacturer of the respective product.
Safety instructions
It is most important that this instruction book should be retained with the appliance for future reference Should the
appliance be sold or transferred to another owner, or should you move house and leave the appliance, always ensure that
the book is left with the appliance in order that the new owner can get to know the functioning of the appliance and the
relevant safety information
This information has been provided in the interest of your safety You MUST read it carefully before installing or using the
appliance
3

Any electrical and/or plumbing work required to install
this appliance should be carried out by a qualified
electrician and/or plumber or competent person
Remove all packaging before positioning the machine.
If possible, position the machine next to a ater tap and a
drain.
Building-in
This dish asher is designed to be fitted under a kitchen
counter or orksurface.
Attention!
Carefully follow the instructions on the enclosed template for
building in the dishwasher and fitting the furniture panel.
No further openings for the venting of the dish asher are
required, but only to let the ater fill and drain hose and po er
supply cable pass through.
The dish asher incorporates adjustable feet to allo the
adjustment of the height.
During all operations that involve accessibility to internal
components the dish asher has to be unplugged.
When inserting the machine, ensure that the ater inlet hose,
the drain hose and the supply cable are not kinked or
squashed.
Levelling
Good levelling is essential for correct closure and sealing of
the door.
When the appliance is correctly levelled, the door ill not catch
on either side of the cabinet.
If the door does not close correctly, loosen or tighten the
adjustable feet until the machine is perfectly level.
Fixing to the adjacent units
The dish asher must be secured against tilting.
Therefore make sure that the counter it is fixed under, is
suitably secured to a fixed structure (adjacent kitchen units
cabinets, all).
Water supply connections
This dish asher may be fed ith either hot (max. 60°) or cold
ater. Nevertheless e advise you a cold ater supply.
A hot ater supply is not al ays efficient ith very soiled
crockery as it shortens the ashing programmes a lot.
For making the connection itself, the coupling nut fitted to the
machine’s supply hose is designed to scre onto a 3/4" inch
gas thread spout or to a purpose made quick-coupling tap
such as the Press-block.
The ater pressure must be ithin the limits given in the
"Technical specifications". Your local Water Authority ill
advise you on the average mains pressure in your area.
The ater inlet hose must not be kinked, crushed, or entangled
hen it is being connected.
The dish asher features fill and drain hoses hich can be
turned either to the left or the right to suit the installation by
means of the locknut. The locknut must be correctly fitted
to avoid water leaks. (Attention! NOT all models of
dishwashers have fill and drain hoses provided with locknut. In
this case, this kind of facility is not possible).
If the machine is connected to ne pipes or pipes hich have
not been used for a long time, you should run the ater for a
fe minutes before connecting the inlet hose.
DO NOT use connection hoses which have previously
been used for an old appliance
This appliance has been fitted ith safety features hich ill
prevent the ater used in the appliance from returning back
into the drinking ater system. This appliance complies ith
the applicable plumbing regulations.
Water inlet hose with safety valve
After connecting the double- alled ater inlet hose, the safety
valve is next to the tap. Therefore the ater inlet hose is only
under pressure hile the ater is running. If the ater inlet
hose starts to leak during this operation, the safety valve cuts
off the running ater.
Please take care when installing the water inlet hose:
- The electrical cable for the safety valve is in the double-
alled ater inlet hose. Do not immerse the ater inlet hose
or the safety valve in ater.
- If ater inlet hose or the safety valve is damaged, remove
the mains plug immediately.
- A ater inlet hose ith safety valve must only be replaced by
a specialist or by the Service Force Centre.
- Place the ater inlet hose in such a ay that it is never
higher than the bottom edge of the safety valve.
Installation instructions
4
W
WARNING!
ARNING!
Dangerous voltage

Water outlet hose connection
The end of the drain hose can be connected in the follo ing
ays:
1 To the sink outlet spigot, securing it to the underside of the
ork surface. This ill prevent aste ater from the sink
running into the machine.
2 To a stand pipe provided ith vent-hole, minimum internal
diameter 4 cm.
The aste connection must be at a height of bet een 30 cm
(minimum) and 100 cm (maximum) from the bottom of the
dish asher.
The drain hose can face either to the right or left of the
dish asher
Ensure the hose is not bent or squashed as this could prevent
or slo do n the discharge of ater.
The sink plug must not be in place hen the machine is
draining as this could cause the ater to syphon back into the
machine.
If you use a drain hose extension it must be no longer than 2
metres and its internal diameter must be no smaller than the
diameter of the hose provided.
Like ise the internal diameter of the couplings used for
connections to the aste outlet must be no smaller than the
diameter of the hose provided.
Attention!
Our appliances are supplied with a security device to protect
against the return of dirty water back into the machine.
If the spigot of your sink has a "no return valve" incorporated
this can prevent the correct draining of your dishwasher.
We therefore advise you to remove it.
Electrical connection
Information concerning the electrical connection is given on the
rating plate on the edge of the dish asher’s door.
Before plugging the appliance into the all socket, make sure
that:
1 The mains voltage and current rating at the site of
installation match the nominal voltage and current rating
given on the rating plate.
2 The meter, fuses, mains po er supply and all socket can
all take the maximum load required. Make sure that the
socket and plug are compatible ithout having to use any
type of adaptor. If necessary, have the domestic iring
system socket replaced.
To isolate the dish asher from mains, remove the mains plug.
Important!
The plug must still be accessible after the appliance
has been installed
In case that the electrical cable has to be replaced,
please contact your local Service Force Centre
The appliance should not be connected to the
electrical supply by means of an extension cable
Safety standards require the appliance to be
earthed
The manufacturer accepts no liability for failure to
observe the above safety precautions
5

Description of the appliance
6
Upper basket spray arm
and lo er spray arm
Water hardness dial
Salt container
Detergent dispenser
Rinse aid dispenser
Rating plate
Filters

Programme selection/cancel button (RESET):
the selection of a ashing programme occurs by the means of
this button, press it until the indicator light corresponding to the
desired ashing programme illuminates (see "Washing
programmes" chart). The end of programme indicator light
flashes.
Once the ashing programme has been set, close the
dish asher’s door, the programme ill start automatically.
With this button it is also possible to:
- cancel a ashing programme in progress,
- set the level of the ater softener (see specific paragraph),
- deactivate/activate the audible signals.
Delay start button: this option allo s the start of the
ashing programme to be delayed by 3 hours; the
corresponding indicator light illuminates.
Indicator lights: have the follo ing meanings
Audible signals
Audible signals have been introduced to help indicate hich
operations the dish asher is performing.
- end of ashing programme,
- malfunction of the machine.
Deactivation/activation of the audible signals
Factory setting: audible signals activated
1 With the dish asher s itched off, press the On/Off button.
The end of programme indicator light flashes (setting
mode).
In case salt and/or rinse aid refilling is necessary the
corresponding indicator lights illuminate.
If one of the washing programme indicator lights is on, this
means that a washing programme has been set.
The setting must be cancelled: press for about 3 seconds
the programme selection/cancel button; the indicator
light of the set programme turns off and the end of
programme indicator light flashes, indicating that the set
programme has been cancelled and that the machine is
now in setting mode.
2 Press and keep pressed the programme selection/cancel
button until programme indicator light 1flashes and
programme indicator light 2 illuminates ith a fixed light.
Press the programme selection/cancel button again,
programme indicator light 1illuminates ith a fixed light and
programme indicator light 2starts flashing.
Wait until programme indicator light 1turns off, programme
indicator light 2goes on flashing and the end of
programme indicator light illuminates ith a fixed light.
This indicates that you have activated the function for the
deactivation/activation of the audible signals.
The constant illumination of the end of programme
indicator light means that the audible signals are activated.
3 To deactivate the audible signals, press the programme
selection/cancel button again, the end of programme
indicator light turns off indicating that the audible signals are
deactivated.
4 To memorise the operation, s itch off the machine by
pressing the On/Off button or ait for about 60 seconds,
after hich the machine ill automatically return to setting
mode.
To activate again the audible signals simply follo the above
operations until the end of programme indicator light
illuminates.
7
Salt refilling indicator light, illuminates hen the salt
has run out.
Rinse aid refilling indicator light, illuminates hen
the rinse aid has run out.
End of programme: illuminates hen the
ashing programme has ended.
It also has added functions of visual signalling as:
- the setting of the ater softener,
- deactivation/activation of the audible signals,
- intervention of an alarm due to the malfunction of
the machine.
The control panel
Indicator lights
Programme selection/cancel button
Washing programmes
On/Off button
Delay start button
Programme indicator lights

8
Before using your dish asher for the first time:
1 Ensure that the electrical and ater connections comply
ith the installation instructions
2 Remove all packaging from inside the appliance
3 Set the ater softener
4 Pour 1 litre of ater inside the salt container and then fill
ith dish asher salt
5 Fill the rinse aid dispenser
NOTE:
If you want to use the "3 in 1" combi detergents, carefully
read the information given in "Different kinds of
detergents"
The water softener
The dish asher is equipped ith a ater softener designed to
remove minerals and salts from the ater supply, hich ould
have a detrimental or adverse effect on the operation of the
appliance.
The higher the content of these minerals and salts, the harder
your ater is.
Water hardness is measured in equivalent scales, German
degrees (°dH), French degrees (°TH) and mmol/l (millimol per
litre - international unit for the hardness of ater).
The softener should be adjusted according to the hardness of
the ater in your area. Your local Water Authority can advise
you on the hardness of the ater in your area.
The ater softener must be set in both ays: manually, using
the ater hardness dial and electronically, by the means of the
programme selection/cancel button.
a) Setting manually
1 Open the dish asher door.
2 Remove the lo er basket from the dish asher.
3. Turn the ater hardness dial to position 1 or 2 (see table).
4 Replace the lo er
basket.
The dish asher is factory
set at position 2.
b) Setting electronically
The dish asher is factory set at level 5.
1 With the dish asher s itched off, press the On/Off button.
The end of programme indicator light flashes (setting
mode).
In case salt and/or rinse aid refilling is necessary the
corresponding indicator lights illuminate.
If one of the washing programme indicator lights is on, this
means that a washing programme has been set.
The setting must be cancelled: press for about 3 seconds
the programme selection/cancel button; the indicator
light of the set programme turns off and the end of
programme indicator light flashes, indicating that the set
programme has been cancelled and that the machine is
now in setting mode.
2 Press and keep pressed the programme selection/cancel
button until programme indicator light 1flashes and
programme indicator light 2 illuminates ith a fixed light.
Wait until programme indicator light 2turns off, programme
indicator light 1goes on flashing and simultaneously the
end of programme indicator light starts flashing.
This indicates that you have activated the electronic setting
function of the ater softener.
The current level is indicated by a sequence of flashes of
the end of programme indicator light, a sequence of
intermittent audible signals and a pause of a fe seconds
(see chart).
Example: 5 flashes + pause +5 flashes + pause etc...=
level 5
3 To change the level, press the programme
selection/cancel button.
Each time the button is pressed the level changes. (For the
selection of the ne level, see chart).
Examples:
if the current level is 5, by pressing the programme
selection/cancel button once, level 6 is selected.
if the current level is 10, by pressing the programme
selection/cancel button once, level 1 is selected.
The end of programme indicator light remains off for a fe
seconds and then starts flashing indicating the ne
selection is set.
4 To memorise the operation, s itch off the machine by
pressing the On/Off button or ait for about 60 seconds,
after hich the machine ill automatically return to setting
mode.
Prior to using for the first time
°dH °TH mmol/l manually electronically
51 - 70
43 - 50
37 - 42
29 - 36
23 - 28
19 - 22
15 - 18
11 - 14
4 - 10
< 4
9,0 - 12,5
7,6 - 8,9
6,5 - 7,5
5,1 - 6,4
4,0 - 5,0
3,3 - 3,9
2,6 - 3,2
1,9 - 2,5
0,7 - 1,8
< 0,7
91 - 125
76 - 90
65 - 75
51 - 64
40 - 50
33 - 39
26 - 32
19 - 25
7 - 18
< 7
2
2
2
2
2
2
1
1
1
1
level 10
level 9
level 8
level 7
level 6
level 5
level 4
level 3
level 2
level 1
yes
yes
yes
yes
yes
yes
yes
yes
yes
no
10
9
8
7
6
5
4
3
2
1
Water hardness Adjusting the water
hardness setting Number of flashes of the
"end of programme"
indicator light
Use of
salt

Filling with dishwasher salt
Only use salt specifically designed for use in
dishwashers
All other types of salt not specifically designed for use in
a dishwasher, especially table salt, will damage the water
softener
Only fill with salt just before starting one of the complete
washing programmes
This will prevent any grains of salt or salty water, which
may have been spilt, remaining on the bottom of the
machine for any period of time, which may cause
corrosion
To fill:
1 Open the door, remove the lo er basket and unscre the
cap of the salt container by turning it anticlock ise.
2 Pour 1 litre of ater inside the container (this is necessary
only before filling with salt for the first time).
3 Using the funnel provided,
pour in the salt until the
container is full.
4 Replace the cap making
sure that there is no trace
of salt on the scre
thread or on the gasket.
5 Replace the cap tightly
turning it clock ise until it
stops ith a click.
The salt container ill require topping up periodically. You are
reminded of this by the salt indicator light on the control panel
hich comes on hen the salt has finished.
The salt indicator light on the control panel can remain
illuminated for 2-6 hours after the salt has been
replenished, assuming the dishwasher remains switched
on If you are using salts that take longer to dissolve then
this can take longer The function of the machine is not
affected
Do not orry if ater overflo s from the unit hen filling ith
salt, this is quite normal.
Rinse aid
Rinse aid is automatically added during the last rinse, ensuring
thorough rinsing, and spot and streak free drying.
The dispenser, hich is positioned inside the door, holds about
110 ml of rinse aid, hich is sufficient for bet een 16 and 40
dish ashing cycles, depending upon the dosage setting.
Filling with rinse aid
1 Open the container by pressing the release button (A).
2 Add the rinse aid until the container is completely full. The
maximum level for filling is indicated by "max".
Ensure that the lid is closed after every refill
Clean up any rinse aid spilt during filling with an
absorbent cloth to avoid excess foaming during the next
wash
Only use branded rinse aid for dishwashers Never fill the
rinse aid dispenser with any other substances (e g
dishwasher cleaning agent, liquid detergent) This would
damage the appliance
Adjusting the dose
According to the finish and drying results obtained, adjust the
dose of rinse aid by means of the 6 position selector (position
1 minimum dosage, position 6 maximum dosage).
The dose is factory set in
position 4.
Increase the dose if there are
drops of ater or lime spots
on the dishes after ashing.
Reduce it if there are sticky
hitish streaks on the dishes
or a bluish film on glass are
or knife blades.
Top up the rinse aid when the indicator light on the control
panel illuminates
9

Open the door and slide out the baskets to load the dishes.
The lower basket
Load larger and heavily soiled dishes and pans in the lo er
basket. (Max. diameter for plates 29 cm).
To make it easier to load larger dishes, the t o plate racks on
the right in the lo er basket can be folded do n.
●Check if it’s necessary to refill ith dish asher salt or rinse
aid
●Load cutlery and dishes into the dish asher.
●Fill ith dish asher detergent .
●Select a ash programme suitable for the cutlery and
dishes.
●Start the ash programme.
Loading cutlery and dishes
Sponges, household cloths and any object that can
absorb water may not be washed in the dishwasher
●Before loading the dishes, you should:
- Remove all left over food and debris.
- Soften remnants of burnt food in pans
●When loading the dishes and cutlery, please note:
- Dishes and cutlery must not impede the rotation of the
spray arms .
- Load hollo items such as cups, glasses, pans, etc. ith
the opening do n ards so that ater cannot collect in the
container or a deep base.
- Dishes and items of cutlery must not lie inside one
another, or cover each other.
- To avoid damage to glasses, they must not touch.
- Lay small objects in the cutlery basket.
●Plastic items and pans with teflon have a tendency to
retain water drops; these items will not dry as well as
porcelain and steel items
In daily use
10
For washing in the dishwasher the following cutlery/dishes
are of limited suitability:
- Only ash stone are in the dish asher if it is specifically
marked as being dish asher-safe by the manufacturer.
- Glazed patterns may fade if machine ashed frequently
- Silver and aluminium parts have a tendency to discolour
during ashing. Residues, e.g. egg hite, egg yolk and
mustard often cause discolouring and staining on silver.
Therefore al ays clean left-overs from silver immediately, if
it is not to be ashed straight after use.
- Some types of glass can become dull after a large number
of ashes
are not suitable:
- Cutlery ith ooden, horn, china or
mother-of-pearl handles
- Plastic items that are not heat resistant
- Older cutlery ith glued parts that are not temperature
resistant
- Bonded cutlery items or dishes
- Pe ter or copper items
- Lead crystal glass
- Steel items prone to rusting
- Wooden platters
- Items made from synthetic fibres

The cutlery basket
Sharp knives and other items of cutlery with sharp edges
must be laid in the cutlery rack or in the upper basket to
avoid the risk of injury
To ensure that all items of cutlery in the cutlery basket can be
reached by the ater, you should:
1 Place the grid insert on the cutlery basket.
2 Place forks and spoons in the cutlery basket’s grid insert
ith their handles pointing do n ards.
For larger utensils, such as hisks, leave off one half of the
cutlery grid.
The upper basket
Load smaller, fragile crockery and long, sharp cutlery in the
upper basket.
●Arrange items of
crockery on and
under the folding
cup racks so that
they are offset from
each other and
ater can reach all
items.
●The cup racks can
be folded up out of
the ay for tall
crockery items.
●Lay or hang ine
and brandy glasses
in the slots in the
cup racks.
11

Adjusting the height of the upper basket
The height of the baskets can also be adjusted hen they are
loaded.
To move to the higher position proceed as
follows:
1 Pull out the upper basket completely.
2 Holding the upper basket by the handle, raise it as far as it
ill go and then lo er it vertically.
The upper basket ill latch into the lo er or the upper
position.
Use of detergent
Only use detergents specifically designed for use in
dishwashers
Using no more than the correct amount of detergent
contributes to reducing pollution
Please observe the manufacturer’s dosing and storage
recommendations as stated on the detergent packaging
Fill with detergent
1 If the lid is closed: press release button (1). The lid springs
open.
2 Fill the detergent dispenser (2) ith detergent.
The marking indicates the dosing levels:
20 = approximately 20 g of detergent
30 = approximately 30 g of detergent
3 All programmes ith pre ash need an additional detergent
dose (5/10 g) that must be placed in the pre ash detergent
chamber (3). This detergent ill take effect during the
pre ash phase.
4 Close the lid and press until it locks in place.
12
With upper basket raised 22 cm 30 cm
With upper basket lo ered 24 cm 29 cm
Maximum height of the dishes in
upper basket lower basket

Detergent tablets
Detergent tablets from different manufactures dissolve at
different rates. For this reason, some detergent tablets do not
attain their full cleaning po er during short ashing
programmes. Therefore please use long ashing programmes
hen using detergent tablets, to ensure the complete removal
of detergent residuals.
Concentrated detergent
Modern detergents for dish ashers are almost exclusively lo -
alkaline concentrated detergents ith natural enzymes in tablet
form.
Using 50°C ashing programmes in conjunction ith these
concentrated detergents reduces pollution and is good for your
dishes, as these ashing programmes are specially matched
to the dirt-dissolving properties of the enzymes in concentrated
detergents. It is for this reason that using 50°C ashing
programmes in conjunction ith concentrated detergents can
achieve the same cleaning results that can other ise only be
achieved using 65°C ashing programmes.
Use of "3 in 1" combi detergents
These products are detergents ith a combined cleaning,
rinsing and salt function.
1 Check hether these detergents are suitable for your ater
hardness. Follo the manufacturers instructions.
NOTE: the refilling of the salt container and the rinse aid
dispenser are no longer necessary.
In this case the rinse aid indicator light ill al ays remain
illuminated hen the machine is s itched on.
2 Select the lo est setting for ater hardness.
3 Before the start of the ashing programme put the "3 in 1"
detergent in the detergent dispenser.
NOTE: If the drying results are not satisfactory e recommend
that you:
1 Fill up the rinse aid dispenser ith rinse aid.
2 Set the rinse aid dosage to position 2.
If you decide to turn back to the use of the standard
detergent system we advise that you:
●Fill up the dispensers for salt and rinse aid again.
●Adjust the ater hardness setting to the highest setting
perform up to 3 normal ashing programmes ithout
loading any dishes.
●Adjust the ater hardness setting according to the
hardness of the ater in your area.
●Adjust the rinse aid dosage.
NOTE: When using 4 in 1 detergents that integrate also anti-
glass corrosion agent into "3 in 1" formula, please follo the
same instruction as given for "3 in 1" detergents above.
13
Different kinds of detergent

14
(1) Testing programme for EN 50242 (see "Hints for Test Centres"). This programme, developed for the use of detergents ith
enzymes, allo s you to achieve, ith reduced consumption of energy the same cleaning results that ould other ise be
obtained only ith the 65°C programmes and conventional detergents. To compensate the lo er temperature, the duration of
ashing and drying have been extended.
(2) The consumption values are intended as a guide and depends on the pressure and the temperature of the ater and also by
the variations of the po er supply.
Washing programmes
Degree of soil
and
type of load
Normal soil.
Crockery, cutlery, pots
and pans
Programme
Normal 65°
Cycle description (2) Consumption values
Cold pre ash
Main ash up to 65°C
2 arm rinses
1 hot rinse
Drying
Programme
duration
(in minutes)
Energy
consumption
(in kWh)
Water
consumption
(in litres)
108 - 118 1,7 - 1,8 24 - 26
Heavy soil.
Crockery, cutlery, pots
and pans
Intensive 70° Hot pre ash
Main ash up to 70°C
2 arm rinses
1 hot rinse
Drying
120 - 130 1,7 - 1,9 23 - 25
Any.
Partial load (to be
completed later in the
day).
Rinse and Hold 1 cold rinse (to avoid food
scraps from sticking together).
This programme does not
require the use of detergent.
12 < 0,1 4
Normal soil.
Crockery and cutlery
(1)
Eco 50°
Cold pre ash
Main ash up to 50°C
1 cold rinse
1 hot rinse
Drying
160 1,05 18
Light soil.
Crockery and cutlery
Quick 60° Main ash up to 60°C
1 hot rinse 25 - 35 0,7 - 0,8 8

15
In this fully integrated appliance the controls are located on the
top of the door. When selecting a ashing programme, the
door needs to be slightly open.
1 Check that the baskets have been
loaded correctly and that the spray
arms can rotate freely
2 Turn on the water tap
3 Setting and starting the washing
programme
Press the On/Off button.
The end of programme indicator light flashes.
Press the programme selection/cancel button and select
the desired ashing programme. To choose the right
ashing programme see "Washing programmes" chart.
Close the dish asher’s door, the programme ill start
automatically.
Setting the "delay start" of a washing
programme
Once the setting of the desired ashing programme has
occurred, press the delay start button.
The corresponding indicator light turns on.
Close the dish asher’s door, the countdo n for the delay
start begins automatically.
The opening of the door ill interrupt the countdo n.
Close the door; the countdo n ill continue from the point
at hich it as interrupted.
Once the delay start has elapsed the programme ill start
automatically.
To cancel a "delay start" in progress
Open the dish asher’s door and press the delay start
button, the corresponding indicator light turns off.
Close the door, the set programme ill start automatically.
NOTE: the start of the ashing programme or the
countdo n of the delay start ill occur only after the
closure of the door. Until this moment it is possible to
modify the selection made.
4 To interrupt or cancel a washing
programme in progress
Interrupt or cancel a washing programme in progress
ONLY if it’s absolutely necessary
Attention! Hot steam may escape hen the door is
opened. Open the door carefully
Interrupt a washing programme in progress
Open the dish asher’s door; the programme ill stop.
Close the door; the programme ill start from the
point at hich it as interrupted.
Cancel a washing programme in progress
Open the dish asher’s door. Press the programme
selection/cancel button for about 3 seconds, until the
indicator light of the running programme turns off and the
end of programme indicator light flashes, indicating that
the running programme has been cancelled and that the
machine has returned to setting mode.
It is no possible to select another ashing programme.
If a new washing programme is to be selected, check that
there is detergent in the detergent dispenser.
NOTE: only during the drying phase, if the dish asher’s
door ill be opened and remains open for more then 30
seconds, the running programme ill be automatically
cancelled and the machine ill return to setting mode.
This ill happen, al ays only during the drying phase,
also hen the machine is s itched off by pressing the
On/Off button and remains s itched off for more then 30
seconds.
5 End of the washing programme
The dish asher ill automatically stop. An audible signal
informs you of the end of the ashing programme.
Open the dish asher’s door, leave it ajar and ait a fe
minutes before removing the dishes; in this ay they ill
be cooler and the drying ill be improved.
The end of programme indicator light is on.
The indicator light of the programme just ended is on.
S itch off the dish asher by pressing the On/Off button.
6 Unloading the dishwasher
Hot dishes are sensitive to knocks. The dishes should
therefore be allo ed to cool do n before removing from
the appliance.
Empty the lo er basket first and then the upper one; this
ill avoid ater dripping from the upper basket onto the
dishes in the lo er one.
Water may appear on the sides and the door of the
dish asher as the stainless steel ill eventually become
cooler than the dishes.
When the washing programme has finished, it is
recommended that the dishwasher is unplugged and the
water tap turned off
Starting a washing programme

Clean the external surfaces of the machine and control panel
ith a damp soft cloth. If necessary use only neutral
detergents. Never use abrasive products, scouring pads or
solvent (acetone, trichloroethylene etc....).
Ensure that the seals around the door, the detergent and rinse
aid dispensers are cleaned regularly ith a damp cloth.
We recommend every 3 months to run a 65°C ash
programme ithout dishes using detergent.
Cleaning the filters
The filters must be checked and cleaned from time to time.
Dirty filters ill degrade the ashing result.
Important! Before cleaning the filters ensure that the
machine is switched off
1 Open the door, remove the lo er basket.
2 The dish asher filter system comprises a coarse filter (1),
a microfilter (2) and a flat filter (3).
Unlock the filter system using the handle on the microfilter,
and remove.
3 Turn the handle about 1/4a turn anticlock ise and remove.
4 Take hold of the coarse filter (1) by the handle ith
the hole and remove from the microfilter (2).
5 Clean all filters thoroughly under running ater.
6 Remove the flat filter (3) from the base of the ashing
compartment and clean both faces thoroughly.
7 Put the flat filter (3) back in the base of the ashing
compartment.
8 Place the coarse filter (1) in the microfilter (2) and press
together.
9 Put the filter combination in place and lock by turning the
handle clock ise to the stop. During this process ensure
that the flat filter does not protrude above the base of the
ashing compartment.
Attention!
Under no circumstances may the dishwasher be used without
filters.
Incorrect repositioning and fitting of the filters will produce
poor washing results.
NEVER try to remove the spray arms
If residues of soil have clogged the holes in the spray arms,
remove them ith a cocktail stick.
Prolonged periods of non-operation
If you are not using the machine for any period of time you are
advised to:
1 Unplug the appliance and then turn off the ater.
2 Leave the door ajar to prevent the formation of any
unpleasant smells.
3 Leave the inside of the machine clean.
Frost precautions
Avoid placing the machine in a location here the temperature
is belo 0°C. If this is unavoidable, empty the machine, close
the appliance door, disconnect the ater inlet pipe and empty
it.
Moving the machine
If you have to move the machine (moving house etc....):
1. Unplug it.
2 Turn the ater tap off.
3 Remove the ater inlet and discharge hoses.
4 Pull the machine out together ith the hoses.
Avoid over tilting the machine during transportation.
Maintenance and cleaning
16

17
Something not working
Certain problems are due to the lack of simple maintenance or oversights, hich can be solved ith the help of the instructions
given here, ithout calling out an engineer.
a fault code appears
The dish asher ill not start or stops during operation and a sequence of intermittent audible signals are heard.
Open the dish asher’s door.
The intervention of an alarm is indicated by:
- continuous flashing of the indicator light of the running programme,
- a combination of flashes and pauses of the end of programme indicator light and by intermittent audible signals (as described in
the chart).
Carry out the follo ing suggested corrective actions.
Once the checks have been carried out, press the programme selection/cancel button and close the dish asher’s door. The
programme ill continue from the point at hich it as interrupted. If the fault code reappears contact your local Service Force
Centre.
For other combinations of fault codes not described in the above chart, please contact your local Service Force Centre.
- continuous flashing of the
indicator light of the running
programme
- 1 intermittent audible signal
- 1 flash of the "end of
programme" indicator light
The machine does not fill ith
ater.
- continuous flashing of the
indicator light of the running
programme
- 2 intermittent audible signals
- 2 flashes of the "end of
programme" indicator light
The dish asher ill not drain.
- continuous flashing of the
indicator light of the running
programme
- 3 intermittent audible signals
- 3 flashes of the "end of
programme" indicator light
Fault code / malfunction Possible cause Solution
The ater tap is blocked or furred ith
limescale.
The ater tap is turned off.
The filter ( here present) in the threaded hose
fitting at the ater inlet valve is blocked.
The ater inlet hose has not been correctly laid
or it is bent or squashed.
Clean the ater tap.
Turn the ater tap on.
Clean the filter in the threaded hose
fitting.
Check the ater inlet hose connection.
The sink spigot is blocked. Clean out the sink spigot.
The ater drain hose has not been correctly laid
or it is bent or squashed. Check the ater drain hose connection.
Anti-flood device is activated. Close the ater tap and contact your
Service Force Centre.
there are problems when operating the dishwasher
The programme does not start
There is a histling noise during
ashing
Malfunction Possible cause Solution
The dish asher door has not been properly
closed.
The main plug is not plugged in.
The fuse has blo n in the household fuse box.
Close the door.
Insert the mains plug.
Replace the fuse.
For dishwasher models with delay start
option:
Delay start has been selected.
If dishes are to be ashed immediately,
cancel the delay start
Use a different brand of detergent.The histling is not a cause for concern.

If after all these checks, the problem persists, contact your
local Service Force Centre, quoting the model (Mod.), product
number (PNC) and serial number (S.N.).
This information can be found on the rating plate located on
the side of the dish asher door (see picture).
So that you al ays have these numbers at hand, e
recommend you to make a note of them here:
Mod. : . . . . . . . . . . . . . . . . . .
PNC : . . . . . . . . . . . . . . . . . .
S.N. : . . . . . . . . . . . . . . . . . .
Service and spare parts
This product should be serviced by an authorised service
engineer, and only genuine spare parts should be used.
Under no circumstances should you attempt to repair the
machine yourself.
Repairs carried out by inexperienced persons may cause injury
or serious malfunctioning. Contact your local Service Force
Centre.
Al ays insist on genuine spare parts.
the wash results are not satisfactory
The dishes are not clean
●The rong ashing programme has been selected.
●The dishes ere arranged in such a ay as to stop ater reaching all parts of the surface. The baskets must not be overloaded.
●The spray arms do not rotate freely due to rong arrangement of the load.
●The filters in the base of the ashing compartment are dirty or incorrectly positioned.
●Too little or no detergent has been used.
●Where there are limescale deposits on the dishes; the salt container is empty or the rong level of the ater softener has been
selected.
●The drain hose connection is not correct.
●The salt container cap is not properly closed.
The dishes are wet and dull
●Rinse aid as not used.
●The rinse aid dispenser is empty.
There are streaks, milky spots or a bluish coating on glasses and dishes
●Decrease rinse aid dosing.
Water drops have dried onto glasses and dishes
●Increase rinse aid dosing.
●The detergent may be the cause. Contact the detergent manufacturer’s consumer care line.
18

Testing in accordance ith EN 60704 must be carried out ith appliance fully loaded and using the test programme (see "Washing
programmes" chart).
Test in accordance ith EN 50242 must be carried out hen the salt container and rinse aid dispenser have been filled ith salt and
rinse aid respectively and using the test programme (see "Washing programmes" chart).
Hints for test centres
19
Load: 12 standard place settings
Rinse aid setting: position 4 (Type III)
Detergent dosage : 5 g + 25 g (Type B)
Lo er basket ith cutlery basket *)
Upper basket *)
*) If there are cup racks in place on the left-hand side or the cutlery tray is in place, remove them.
*)If necessary, you can remove the cup racks on the left-hand side and/or the beer glass holder.
Cutlery basket

Postbus 1033 • 6920 BA Duiven • Nederland
Nederland
Home Product Service (ATAG)
Postbus 249
6920 AE DUIVEN
tel: 0900 - 5550001
fax: 026 - 8821444
België
ATAG België NV
9420 Erpe-Mere
tel: 053 - 806208
fax: 053 - 806057
Subject to change without notice 117993 49/0
11/06
Other manuals for VA6111LT
1
Table of contents
Other Atag Dishwasher manuals

Atag
Atag VA68211RT User manual

Atag
Atag VA6711RT User manual

Atag
Atag VA98211QT/A08 User manual

Atag
Atag VA61211KT User manual

Atag
Atag VA6611QT User manual

Atag
Atag DW8114XB User manual

Atag
Atag VA7214LR/A02 User manual

Atag
Atag VA9811RT User manual

Atag
Atag VA3113QT User manual

Atag
Atag VA 6411QT/A01 User manual