Atec ROD-L M25 Operation manual

OPERATION AND SERVlCE
MANUAL
ROD-L
M25
25
AMP
GROUND CONTINUITY
TESTER
JULY,
1984
Advanced Test Equipment Rentals
www.atecorp.com 800-404-ATEC (2832)
®
E
s
t
a
b
l
i
s
h
e
d
1
9
8
1

TABLE OF CONTENTS
-
SECTION
I
INTRODUCTION
1-1
General
1-6 General Description
1-11
Equipment Supplied
1-15 Identification
1-17 Specification
I1 INSTALLATION AND OPERATION
General 2-1
Unpacking and Inspection 2-1
Installation 2-1
Rack Mounting 2-1
Power Requirements 2-3
Power Cable 2-3
Initial Installation and Turn On 2-3
Storage 2-3
Repackaging for Shipment 2-3
Operating Controls 2-4
Operational Check 2-8
Test Time Adjustment Procedure 2-1 0
Automatic Test Procedures 2-1 0
25AMP Ground Tester with M488 Tester
Set
Up 2-10
ill
THEORY OFOPERATION
3-1 Theory of High Current Ground Testing 3-1
3-2 Ground Continuity 3-1
3-3 Instrument Functional Diagram 3-3
3-6 Instrument Assembly Diagram 3-4
3-7 Power Supply Circuit (A101 3-4
3-9 A22 Control Logic Board 3-4
IV MAINTENANCE AND SERVICE
Introduction
Calibration
Set Up
Meter Mechanical Zero
Ammeter Calibration
Fail Pots Calibration
Test Time Calibration
Resistance Calibration
Troubleshooting

SECTION
TABLES, SPECIFICATION CHAR'TS
AND
DIAGRAMS
Table
1-1
Figure 2-1
Table 2-1
Figure 2-2
Figure 2-3
Figure 3-1
Figure 3-2
Figure 3-3
Table 4-1
Figure 4-1
V
PARTS LIST
Specifications
Rack Mounting Kit Installation
Control And Indicators
M25 Hipot Interface
Functional Diagram
Assembly Diagram
Detail Functional Diagram
Calibration Equipment
Test Set-Up
A10 Power Supply
A22 Control Logic
VI
SCHEMATICS
Wiring Diagram
Assembly Drawing, Mother Board
A10 Power Supply
A10 Power Supply Assembly
A22 Control Logic
A22 Control Logic Assembly
W
OPTIONS
PAGE
1-2
2-2
2-5
2-7
2-1
1
3-3
3-4
3-5
4-1
4-3
5-2
5-3
A8 Remote Control
Parts List
Schematics

lNTRODUCrI'lON
SECTION
I
1-1
GENERAL
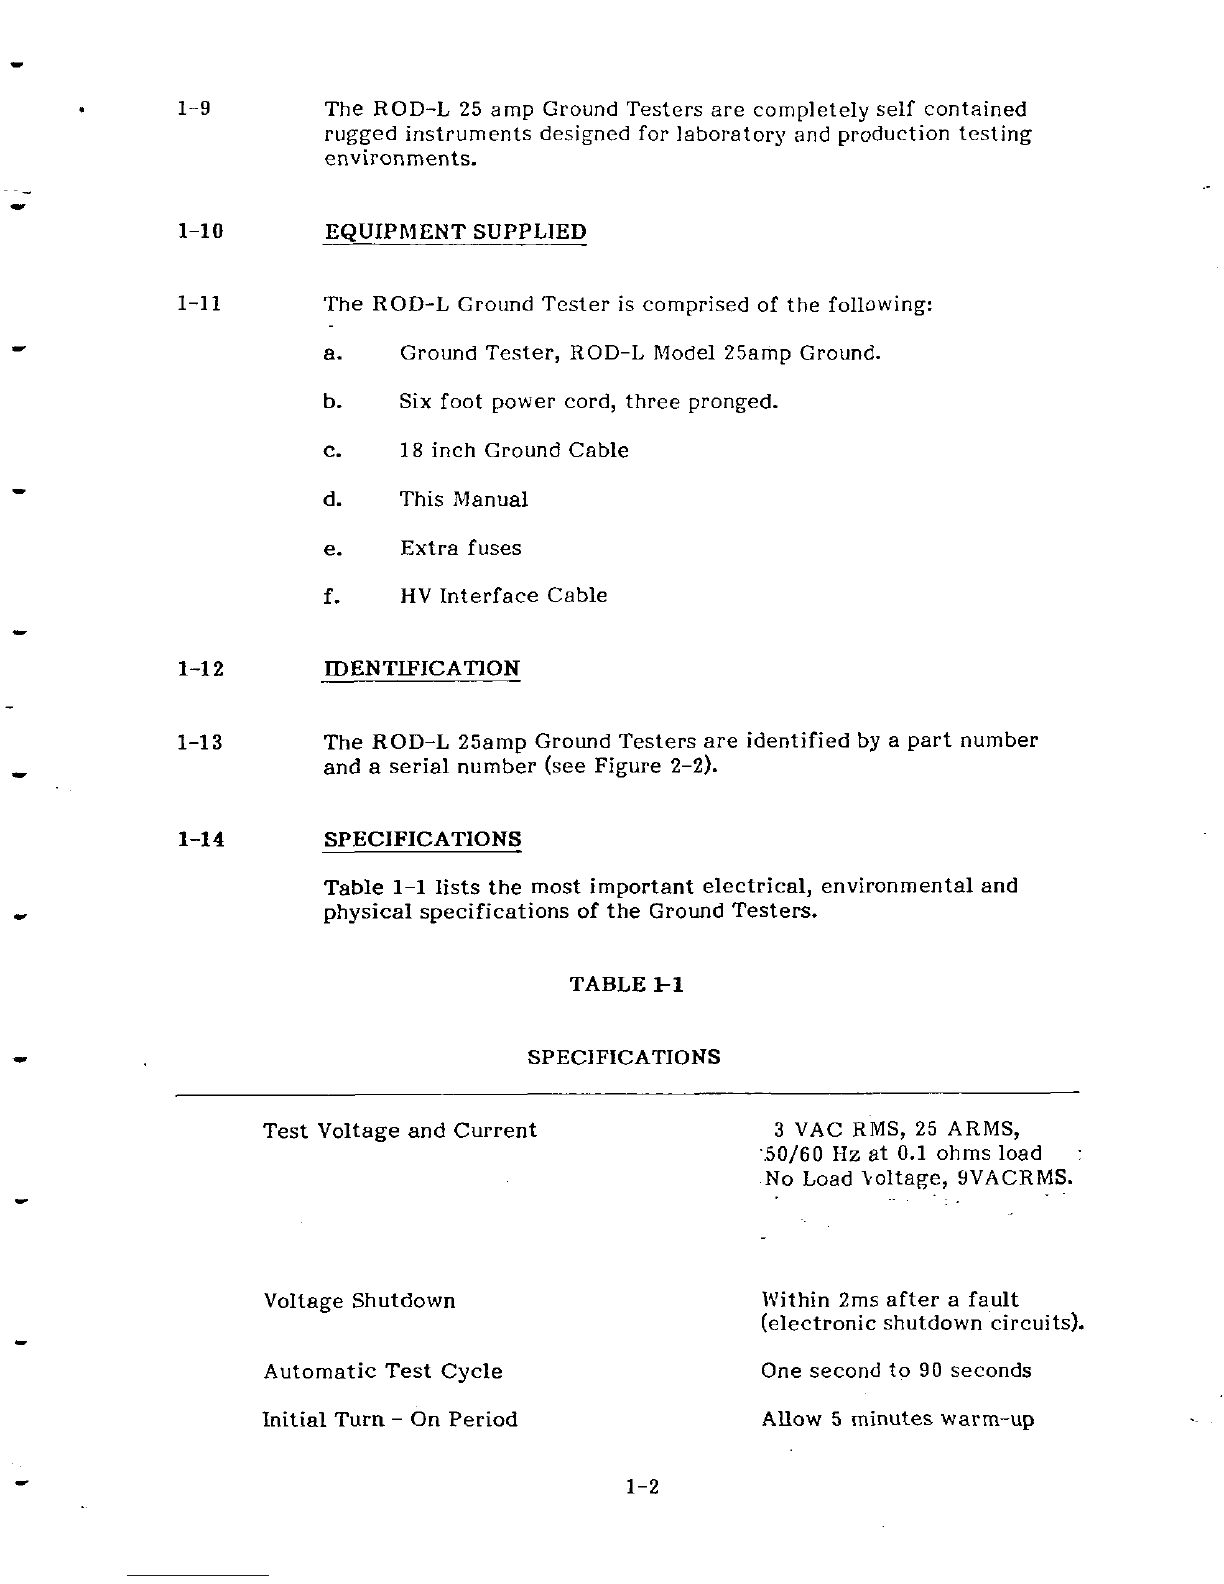
1-2 This publication, which provides operating and servicinginstructions for
the ROD-L Electronics 25 amp Ground Testers is divided into five sections.
sections I describes the Instrument and list its specifications. Section
II
contains Installation Instructions and Operating Procedures. Section 111
contains Theory of Operation. Section IV contains Service and Calibration
Instructions. Section
V
contains Replacement Parts Information, Parts
Location Diagrams and Schematics.
1-3 25amp Ground Testers are Low Voltage testers with ground continuity
test capability for performance of ground tests in accordance with
applicable B.S.I., V.D.E. and I.E.C. standards.
1-4 The 25 amp ground test is one of many tests required by certification
agencies
as
proof of an instrument's ability to withstand power line
spikes without becoming a hazard to itself or the user. For example,
lighting, drastic load changes or power line outages can place short
duration spikes on power lines of many times nominal line voltage. The
gnd should be able todivert any leakage to the chassis without getting
damaged.
1-5 GENERAL DESCRIPTION
1-6 The ROD-L Model 25amp Ground Testers apply low voltage tothe device
under
test
for a duration of time preset from one second to
90
seconds.
The device under test is plugged into the front panel receptacle (or special
rear panel connector on some models). Test limits for total resistance
are preset by the user via a rear panel control. When the device under
test is defective, automatic circuitry turns off the low voltage and meter,
lights the FAIL lamp and activates an audible alarm. These audible and
visual alarms must be manually reset atfront panel or can be reset by
remote control (see options).
1-7 All Models incorporate a rapid, automatic electronic shutdown circuit to
turn off the low voltage within two milliseconds after a fault.
1-8 For operator use, the test cycle is fully automatic; accidental test
initiation is prevented by use of a recessed start switch. If ground fails
during the test, the Tester automatically activates failure operation, i.e.,
voltage is shut down and there is a visual and audible alarm.

1-9 The ROD-L 25 amp Ground Testers are completely self contained
rugged instruments designed for laboratory and production testing
environments.
1-1
0
EQUIPMENT SUPPLIED
1-11 The ROD-L Ground Tester is comprised of the following:
a.
Ground Tester, ROD-L Model 25amp Ground.
b. Six foot power cord, three pronged.
c.
18inch Ground Cable
d. This Manual
e.
Extra fuses
f. HV Interface Cable
1-1
3
The ROD-L 25amp Ground Testers are identified by
a
part number
and
a
serial number (see Figure 2-2).
Table
1-1
lists the most important electrical, environmental and
physical specifications of the Ground Testers.
TABLE
1-1
SPECIFICATIONS
Test Voltage and Current
Voltage Shutdown
Automatic Test Cycle
Initial Turn
-
On Period
3
VAC RMS, 25 ARMS,
33/60
Hz
at
0.1 ohms load
.
No Load boltage, YVACRMS.
Within 2ms after a fault
(electronicshutdown circuits).
One second to 90 seconds
Allow
5
minutes warm-up

Ohm Meter
Ammeter
SPECIFICATIONS (CONTINUED)
0-0.1 5 ohms Accurate to
+5%
F.S.
Up
to 30amps accuracy
to
+5%
F.S.
Input Power lZOVAC, 50160
Hz,
280
W
max
Environmental Operating Condition O"to 50% (32Oto 122*~)
Physical Color Mint greyIOlive grey
Weight 35 ibs Net (13.5 Kg)
Dimensions
SAFETY FEATURES
16 3/4x54x13i inches
(43
x
13x 34 cm)
Sequenced design of operation. Loss of ground terminates
test
cycle.
Recessed
START
button. Visual and audible alarm
at
failure. Voltage
lockout requiring manual reset.

INSTALLATJON AND OPERATJON
SECTION
I1
2-1 GENERAL
2-2 This section contains
the
recommended procedure for unpacking and
inspection, installation, operation, storage and reshipment.
2-3 UNPACKING AND INSPECTION
2-4
Any shipping carton that appears damaged should be unpacked with
carrier's agent present. Inspect the instrument for damage (scratches,
dents, broken knobs or meters, etc). If the instrument is damaged
or
fails to meet specifications (see Performance Test, Section IV), notify
ROD-L Electronics immediately, retain the shipping carton and the
padding material for the carrier's inspection.
2-5 LNSTALLATION
2-6 The ROD-L Model 25amp Ground Testers
are
suitable for either bench
or rack mounting. To rack mount the instrument, use Rack Mounting
Kit, part #M100-5001.
Rack Mounting Kits may be ordered from factory.
2-7
RACK
MOUNTING
2-8 The procedure for installing Rack Mounting Kit, M100-5001 on the
Tester
is
as
follows:
a.
Place the instrument on edge of bench
as
shown in Figure
2-1
b.
Remove Trim Strip (#2) from both sides of instrument
c.
Place L-Bracket
(#3)
and secure to chassis with two machine
screws
(#4)
furnished with Mounting Kit.
d.
Rotate Instrument on work bench and repeat steps "b" and
nC~~
.
Check that screws and brackets are firmly secure

Figure
2-1
-
Rack
Mounting Kit Installation
-

2-9 POWER REQUIREMENTS
2-10 The Model 25amp Ground Tester requires a power source of 120 or 240
volts AC, single phase, 50 to 60
Hz.
Insure that the power socket to
which the instrument connects has a functioning safety ground.
2-11 POWER CABLE
2-12 To protect operating personnel, the National Electrical Nanufacturers
Association (NEMA) recommends that the instrument panel and cabinet
be grounded. This instrument is equipped with a three-conductor Dower
cable which when plugged into an appropriate.rcceptacle grounds the
instrument. The offset pin on the three-prong connector is the ground
pin.
2-13
INITIAL INSTALLATION AND TURNqN
2-14 CAUTION
Prior to applying power to the instrument perform the following:
a. Turn-Off Power Switch on ROD-L Tester,
set
the rear panel
AC Line 115/230V voltage switch to indicate the number that
corresponds to the line voltage range being used. The number
visible on the slide switch indicates the line voltage range for
which the primary circuit is connected.
Set the OHMS TRIP control tofull clockwise position.
With and AC voltmeter, check the primary power line for normal
line voltage conditions.
Set VOLTAGE ADJ switch on rear panel to appropriate position
ke.
if input low line conditions exist, set to normal,8% low line,
or 16%low line asappropriate).
e.
With power switch off, check tobe sure that the proper fuses are
installed in accordance with markings on rear panel and in accor-
ance with 115/230V line switch.
f.
Connect the six foot power cord between instrument and power
source. Operational Check procedure per paragraph 2-23.
2-15 STORAGE
2-16 It is strongly recommended that the equipment be packed asif for

reshipment. Environmental conditions during storage and reshipment
should be as follows:
a.
Maximum temperature 167 degrees F(75 degrees
C)
b. Minimum temperature
-40
degrees F
(-40
degrees
C)
2-17 REPACKAGING FOR SHIPMENT
2-18
If possible, use the original shipping container and packing materials,
or:
a. Wrap the instrument in heavy paper or plastic before placing
it
in the shipping container.
b. Use plenty of packing material around the instrument and
protect the front panel with cardboard or plastic bubble
packing. Protect the instrument with two inch rubberized
foam pads placed along
all
surfaces of instruments, or with
a
layer of excelsior about six inches thick packed firmly against
all
surfaces of instrument.
c.
Use
a
strong, well-sealed shipping container (350 lb/sq in.
bursting test).
d. Mark the container "FRAGILE
-
DELICATE INSTRUMENT!'
2-19 Attach
a
tag tothe instrument giving the following information:
a.
Type of service required.
b.
'
Return address
c.
Instrument Model number
d. Full Serial Number
In any correspondence refer to the instrument by Model number and
full serial number.
2-20 OPERATING CONTROLS
2-21 Figure 2-2 illustrates the front and rear panel controls for the Model
25amp Ground Testers Table 2-1 describes the functions of all the controls
and indicators.

FIG. 2-2
INDEX
NO
TABLE 2-1 CONTROLS AND INDICATORS
CONTROL
LlNE POWER ON (Sl)
ON LAMP (1
1)
START Pushbutton (S2)
RESET Pushbutton (S3)
FUNCTION Select Switch
64)
CHASSIS GROUND
Voltage Connector (52)
~-
-
FUNCTION
This switch applies or
removes,power from the
instrument.
When lit, indicates power
is applied to the
instrument
When depressed,
the
test
sequence begins
if the instrument is
grounded properly and
not already indicating a
grounded test failure.
Resets
a
failure
indication when de-
pressed; also terrni-
nates
a
test early.
Selects Ground Test
only or ground
test
and Hipot Test
sequence.
Connect the chassis
of the device under
test
tothis terminal.
The lead used should
be of low resistance
and preferably
as
short aspossible.
An
instrument tobe
tested for ground
resistance is tobe
plugged into this
outlet. Only three
pronged AC line
plugs for three-wire
cords areto be
inserted (unless
adapter is required).

TABLE 2-1 CONTROLS AND INDICATORS (continued)
FIG.
2-2
INDEX NO CONTROL FUNCTION
Ohms Meter (RMeter)
Total Current Meter
(
I
METER)
FAIL Indicator
(14)
TESTING Indicator (I
3)
READY Indicator (I 2)
Audible Warning (SP1)
AC Line Voltage (A71
AC Line power receptable (J1)
Line Fuse (F2)
Line Supply Fuse (El)
Ohms Trip Pot (R5)
Low Line Switch (S5)
Serial/Model Code Label
Remote Control Connector(J3)
Hipot Interface Connector (54)
2-6
Provides
a
direct reading of
the Resistance of
the
tested
instruments ground loop.
Indicates amount of AC
current in (AMPS) flow
during a test.
Displays a visual warning
that
test
was
a
failure.
Indicates
a
test
in progress.
Comes on a power up.
Emits
a
warning sound
when a test results in
a
failure.
Slide switch toselect
either 115VAC or
230
VAC.
The exposed number
indicates the Line Voltage
range
selected.
Connects topower cable
supplied with instrument.
Provide primary circuit
protection from over-
current conditions.
SAME AS ABOVE
Calibrates Ohms Trip setting.
Compensate for input Low
Line Voltage condition-
normal,
-8%,
and -16%.
Identifies Serial Number and
Model number of
tester.
Allows Remote signal
input and output.
Allows interface with ROD-L
~ii'pottester.

Rear panel
jack
for
chassis
Gnd sense from ROD-L
Hipot
Tester.
Figure
2-2
Controls
and
Indicators

2-22
OPERATlONAL CHECK (25 AMP GROUND TESTER ONLY)
1.
Check line voltage atoutlet. Set rear panel voltage select
switch to closest Line Voltage Range.
2. Connect 25 amp Ground Tester to Power outlet.
3.
Turn AC On Switch to
ON.
a.
AC on Lamp should light
b. READY lamp should light
4.
Insert 25amp banana plug cord into chassis ground plug.
Connect 25amp clamp toany exposed metal part of the
ground tester.
5. Insure that "OHM Trip" on rear panel is
set
to Maximum "10".
6.
Depress START button:
a.
Testing Lamp should come on for approximately 5
seconds.
b.
Current Meter should read approximately
30A.
C.
OHM Meter should read approximately
.005
OHMS
(Record this reading)
7.
Set
"Total OHM Trip" pot to minimum
"0".
a.
Depress START button.
1.
Sonalert should sound
2.
Red FAIL lampshould come on
b. Depress RESET
1.
Sonalert should go off
2.
Red FAIL lamp should go off
If the above conditions are met the 25amp ground tester is operating
properly and is ready for use. If your normal operating voltage
is
different from the specified refer to SET-UP procedure (4-5);
8.
Total Resistance Trip Set
a.
BSI Standard states that the resistance tobe measured
shall not exceed (0.1
+
R) OHMS, where R is the resis-
tance of the supply cord. The 25amp grounding cable
must also be considered, this resistance was measured
in step 6C.

b. Each division on the scale of the total current trip
pot represents approximately .015 OHMS. Thus
a
dial setting of 7..0 would fail all devices under test
with
a total resistance of .105.
A
dial setting 9.0
would fail a resistance of .I35 OHMS.
c. For more accurate failure points, a known value of
resistance may be inserted in the loop and the trip
point adjusted until a failure is indicated.
9.
GROUND TEST
Plug power cord of device under test into the three
pronged receptacle on the front panel of the 25amp
ground tester.
Connect 25amp banana plug into banana jack (chassis
ground) on front panel of tester.
Connect 25amp clamp to exposed metal part of chassis
of device under test. Make sure connections aresolid.
Depress START
Testing Light should come on
If the total resistance of the device under test does not
exceed setting of trip pot, test will run approximately
five seconds.
The Ammeter will indicate current thru the Ground Loop.
The
OHM
meter will indicate the resistance of the
ground loop of the device under test.
If the total resistance of the device under test is higher
than the Trip pot setting
a
failure indication will be
given (Audible
&
Visual).
To test devices that do not have a three pronged supply
cable, the user can make a suitable grounding cable by
using three (3)layers of Beldon 8660 3/16" flat tinned
copper braid and
(2)
Mueller #24a 25amp clamps. To
perform a ground test under these conditions:
a.
Connect banana plug to tester banana jack.
b.
Connect clarnp to the chassis of the device
under test.
c. Connect one clamp of new cable made per above
.
to device under test and other clamp to 25amp
tester chassis. Proceed with Step 9d. (Remember
to compensate Trip point for resistance of the
newly made cable).

2-23 TEST
TIME
ADJUSThlENT PROCEDURE
2-24 The Test Time Adjustment potentiometer is factory set for 5-7 seconds.
The user should reset this control as necessary in accordance with the
regulatory agency suggested test time for the device under test. To
reset the test time duration, proceed as follows:
a. Turn
OFF
power to M25
b. Remove top cover and locate Test Time Adjustment potentiometer
"R22" on board A22.
c. Reapply power to 25amp Ground Tester.
d.
With
top cover removed test a device for ground resistance using
a stopwatch, time the duration the TESTING lamp remains lit.
By adjusting the 'TEST Time Adjustment trimpot and timing the
TESTING lamp duration with the stopwatch, you should be able
to set any duration desired between one second and
90
seconds.
CAUTION
Do not touch any of the other potentiometers on
the PC boards, otherwise the calibration of the
instrument will be destroyed.
2-25
AUTOMATIC TEST PROCEDURES
The ground tester and hipot tester should be stacked with ground tester
on top. (see Figure 2-3)
Connect remote control cable (25 pin connector) to ground tester and
remote operating device (Figure
3)
if Tester is equipped with option
#01.
Connect ground tester hipot interface cable (4 pin LGH connector) to
hipot and ground tester set.
Connect ground tester and hipot tester to the same AC Line Power source.
Turn AC power switch of ground tester on first*.
Turn AC power switch of hipot tester
ON.
*If Hipot is turned on first, Hipot tester may immediately start test when
ground tester is turned on and high voltage will appear on both output
receptacles.
Device to be tested should be plugged into ground tester receptacle for
sequential testing, i.e., 25amp test first and then Hipot test.

Put front panel switch in Ground/HP position for sequential testing. If
ground test only is performed ?laced switch in ground position.
Sequential testing or ground only test will be initiated
by
starting ground
tester. Hipot tester's chassis Gnd voltage must connect to BP-2 Rear
Panel Banana Jack.
If Hipot test only is preferred, test must be initiated at Hipot tester.
A
failure of ground test will not allow Hipot test to start.
If
failure occurs in ground test or Hipot test a reset must be initiated
before any further testing. If failure occurs in Hipot test only, tester
will automatically reset in
3
seconds if tester is equipped with automatic
reset option. The Gnd Tester reset also resets the Hipo Tester.
If the Hipo tester's chassis Gnd voltage is not connected to BP-2 rear
panel Banana Jack, the READY light of the Hipo Tester should be
OFF
and no Hipo Test can be initiated from the Gnd Tester. If the Hipo
Tester's chassis Gnd voltage is connected to BP-2, the total safety Gnd
return from the device under test up to the Hipo Tester is tested and the
READY light should be on if the total resistance presented is less than
the required
(0.5
ohms standard). It is assumed that the Hipo tester
controls are already set up according to the respective operations
Manual.
Ground Tester to
Hipot Interface Connector
Remote Control
Connector
Gnd
Tester
USER
Supplied
To Remote
HIPOT
TESTER
Control
Unit
Powe
Variac
25
AMP
GROUND
CONTINUITY
TESTER/HIPOT
INTERFACE
Figure 2-3
2-1
1

PUSH START BUTTON
1. The READY light ofthe Hipo Tester should go offsince the safety
Gnd return test from the device under test is taken over by the
M25
Gnd tester using the relays K1 and
K2
(seeDwg. #00431-01).
The safety Gnd return is connected tothe Gnd tester chassis and
the chassis Gnd voltage output thru BP-1 is connected to the High
Current Transformer.
2. The test light ofthe
M25
comes
ON
and the Gnd test is performed.
Should a failure occur the
M25
has tobe manually reset and no
Hipotester will be automatically started ifthat occurs.
3.
If
the test performs successfully the TEST light should go
OFF
afterthe preset time and the READY light in the Hipotester should
go
ON
since the Hipotester is now taking over the safety Ground
Return Test when the relays K1 and
K2
in the
M25
return tonormal
position, that is, connecting the safety Gnd return to the Hipotester
chassis through HV return wire and connecting the chassis Gnd
voltage output BP-1 toBP-2 where the chassis Gnd voltage ofthe
Hipotester is connected to.
4.
Afterabout one second the Hipotester is started automatically from
the
M25.
The test light ofthe Hipotester should come on. The
Hipotester should perform as specified in the respective Manual.
The M25 can at any given moment
of
time reset the Hipotester by
manually depressing the RESET button on the M25.
2-27
25AMP
GROUND TESTER
WITH
M488
TESTER SET
UP
The ground tester and hipot tester should be stacked with ground on top
as described before. The ground tester hipot interfacecable, and the
connection between the M488's chassis Gnd voltage and the Bp-2 rear
Panel Banana Jack of
M25,
should be made in the same way as described
before.
The M25 should be equipped with option #01 Remote Control Board and
the Remote control cable
(25
pin connector) must connect toboth the
M25
and the M488.
Turn AC power switch of M488
ON
first.
Turn AC power switch of M25
ON.
Device tobe tested should be plugged into M25 receptacle for sequential
testing, i.e., 25amp test first and then hipot test. Ground only test will
be initiated by starting the ground tester.
Sequential testing will be initiated by starting the M488 Hipotester
according tothe instructions described in the
M488
operations Manual.
The Remote Board should be adjusted
if
needed for giving out 10 VDC
when a 0.1 ohm load resistor is used,for monitoring the resistance
valve in the
M488
side. Refer toOptions Section
VI.

THEORY OF OPERATION SECTION
m
THEORY OF HIGH CURRENT GROUND TESTING
Three production line tests are required by most regular agencies.
These basic stept are
rounding
continuity, dielectric strength, and
leakage current.
3-2
GROUNDING CONTINUITY
The grounding of a product is one of the basic methods of protection
required by both international and domestic safety agencies. Grounding
is considered to be the second level of protection in a two-level system.
The first level is the reliability of the functional insulation system and
the second level is the grounding of all operator-acce~sibledead-metal
parts.
In the event of
an
insulation failure, hazardous levels of voltage and
current are shunted away through the grounding conductor to the
"earth" ground point or the service ground. The reliability and the
capacity of the grounding connector and the grounding systems should
be capable of handling the most severe fault conditions.
In addition to safety of personnel and property, there is another
benefit of the grounding system. The system shunts away to "earth"
electrostatic charges and induced electromagnetic "eddy" currents
from stray fields. The grounding system is an aid to preclude the
malfunctioning of the logic and microelectronic circuits; that is,
.
it assures the proper functioning of the product. Grounding coupled
with
EMC
protective devices can reduce hazards to the customer
and product.
Prototype testing for grounding was instituted in order to assure the
inherent safety of the design of the grounding system. Type testing
is
a
design tool in that it proves the validity of the basic design. It
also established one essential aspect of reliability, namely, the current
carrying capacity of the system should a fault occur. This is accomp-
lished by the test current amplitude which is sufficiently high to
effectively "burn out" weak spots as well as by the actual resistivity
measurement toassure
a
sound path for current flow toground.
Production line testing assures the continuity of the grounding system
and the continuance of the good basic design. Production line tests
can detect latent defects in workmanship, insulation materials, conductor
size, and grounding connections. By applying the ground continuity
test on the production line, each unit or product is tested for the
absence of the vital second level of safety protection. The lack of
which may be a substantial safety hazard. Production line tests are
performed for customer safety, product reliabiltiy and manufacturer
product liability protection.

Grounding continuity tests are also required to assure the safety
and protection of manufacturing personnel during the performance
of subsequent dielectric strength tests and leakage current tests.
The grounding test achieves a two-fold purpose:
(1)
It assures the
satisfactory completion of subsequent tests, and
(2)
assures that
the second test can be accomplished witl~outundue hazard to the
test operator. If grounding continuity were interrupted at any point,
the dielectric strength test between the internal circuitry and the
ungrounded segment would not be adequately tested
if,
in fact, there
was any electrical stress applied to the associated insulation.
Similarly, if the grounding conductor were not contiguous to all
"deal netal" parts of the product, the detectable leakage current
would be substantially less; where in fact, the hazard is significant.
If the test operator should come in accidental contact with an
"ungrounded" part, it is possible the operator may become the fault-
current path to the earth ground point or service ground. For di-
electric strength tests, it could be a high voltage injury. For leakage
current, it could be a hazardous energy surge. Consequently, the
application of the grounding continuity test is not only essential
for accurate test results, but also very essential for protection of
test personnel.
Other manuals for ROD-L M25
1
Table of contents
Other Atec Test Equipment manuals