Atefa CJ-C8 User manual
Instruction Manual
Mode: CJ-C8
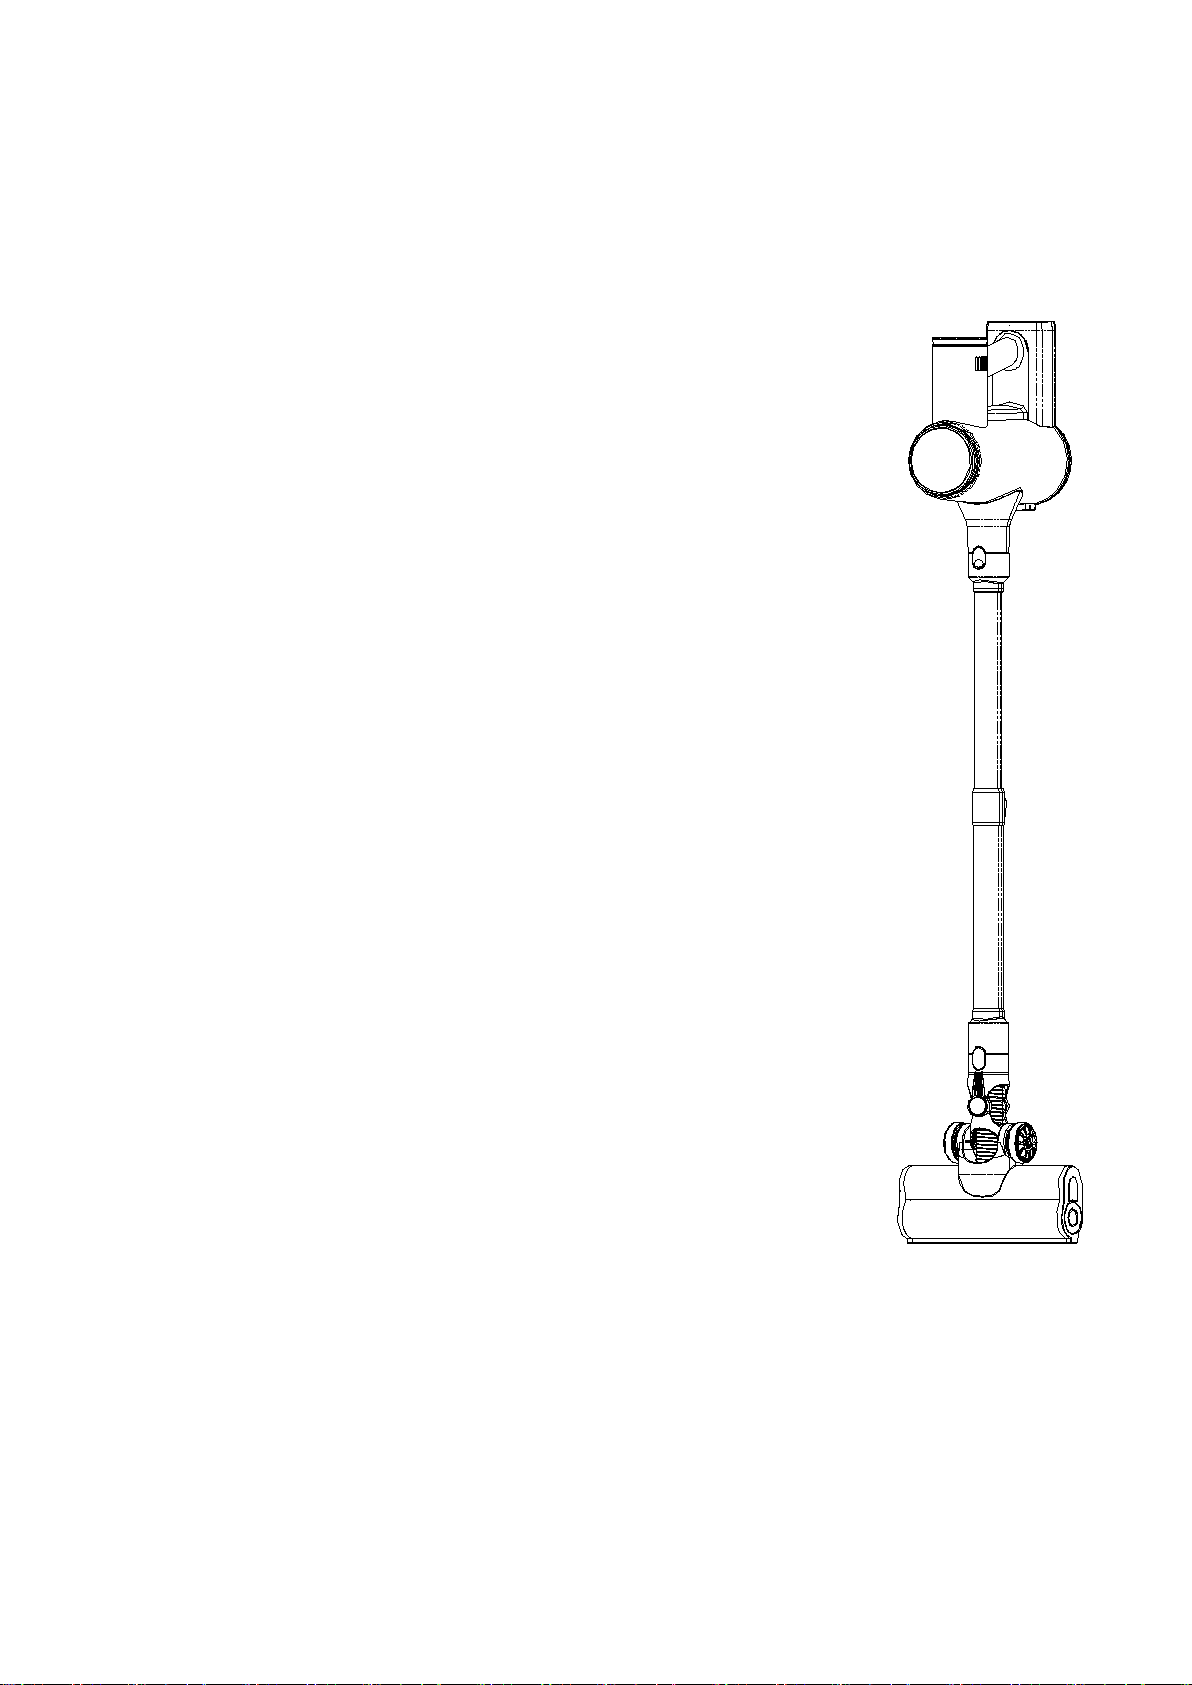
Stick Vacuum Cleaner

Please read all the instructions carefully before using this vacuum cleaner
Important Safety Instructions ---------------------------------------------------------1
Overview --------------------------------------------------------------------------------4
Operation Instruction ------------------------------------------------------------------5
Vacuum Cleaner Assembly ---------------------------------------------------------------5
Battery Pack Disassembly ----------------------------------------------------------------5
Battery Pack Assembly -------------------------------------------------------------------6
Accessories Assembly --------------------------------------------------------------------6
Startup & Shutdown ---------------------------------------------------------------------6
Power Switching Instructions ------------------------------------------------------------7
Battery Indicator Instructions ------------------------------------------------------------7
Vacuum Cleaner Charging ---------------------------------------------------------------8
Daily Maintenance ---------------------------------------------------------------------8
Dust Cup Cleaning -----------------------------------------------------------------------8
Filter Cleaning ----------------------------------------------------------------------------9
Filters Assembly --------------------------------------------------------------------------9
Brushes Cleaning ------------------------------------------------------------------------10
Trouble Shooting ----------------------------------------------------------------------12
Product Parameters -------------------------------------------------------------------12
Contents

1
SAVE THESE INSTRUCTIONS
Household use only
When using an electrical appliance, basic precautions should always be followed, including the
following: READ ALL INSTRUCTIONS BEFORE USING (THIS APPLIANCE),
Failure to follow the warnings and instructions may result in electric shock, fire, and/or serious injury.
WARNING – To reduce the risk of fire, electric shock, or injury
1. This appliance can be used by children aged 8 years and above and persons with reduced physical,
sensory, or mental capabilities or lack of experience and knowledge if they have been given
supervision or instruction concerning the use of the appliance in a safe way understand the hazards
involved. Children shall not play with the appliance. Cleaning and user maintenance shall not be made
by children without supervision
2. The appliance is not to be used by persons (including children) with reduced physical, sensory, or
mental capabilities, or lack of experience and knowledge unless they have been given supervision or
instruction
3. Do not use outdoors or on wet surfaces
4. Do not allow it to be used as a toy. Close attention is necessary when used by or near
children, pets, or plants
5. Use only as described in this manual. Use only the manufacturer's recommended attachments
6. Do not use a damaged cord or plug. If the appliance is not working as it should, has been
dropped, damaged, left outdoors, or dropped into water, return it to the service center
7. Do not handle chargers, including charger plugs, and charger terminals with wet hands
8. Do not put any object into openings. Do not use with any opening blocked; keep free of dust, lint, hair,
Important Safety Instructions

2
and anything that may reduce airflow
9. Keep hair, loose clothing, fingers, and all parts of the body away from opening sand moving parts
10. Use extra care when cleaning stairs
11. Do not use to pick up flammable or combustible liquids, such as gasoline, or use in areas where they
may be present
12. Do not pick up anything that is burning or smoking, such as cigarettes, matches, or hot ashes
13. Do not use without a filter
14. Prevent unintentional starting. Ensure the switch is in the off position before connecting to the battery
pack, picking up, or carrying the appliance. Carrying the appliance with your finger on the
15. Disconnect the battery pack from the appliance before making any adjustments, changing accessories,
or storing the appliance Such preventive safety measures reduce the risk of starting the appliance
accidentally
16. For the purposes of recharging the battery, only use the detachable supply unit provided with this
appliance. A charger that is suitable for one type of battery pack may create a risk of fire when used
with another battery pack
17. Use appliances only with specifically designated battery packs. Use of any other battery packs may
create a risk of injury and fire
18. When the battery pack is not in use, keep it away from other metal objects, like paper clips, coins, keys,
nails, screws, or other small metal objects, that can make a connection from one terminal to another.
Shorting the battery terminals together may cause burns or a fire
19. Under abusive conditions, liquid may be ejected from the battery; avoid contact. If contact accidentally
occurs, flush with water. If liquid contacts the eyes, additionally seek medical help. Liquid ejected from
the battery may cause irritation or burns.
20. Do not use a battery pack or appliance that is damaged or modified. Damaged or modified

3
batteries may exhibit unpredictable behavior resulting in fire, explosion, or risk of injury
21. Do not expose a battery pack or appliance to fire or excessive temperature. Exposure to
fire or temperature above 266°F ( 130°C ) may cause an explosion
22. Follow all charging instructions and do not charge the battery pack or appliance outside of the
temperature range specified in the instructions. Charging improperly or at temperatures outside of the
specified range may damage the battery and increase the risk of fire
23. Have servicing performed by a qualified repair person using only identical replacement
parts. This will ensure that the safety of the product is maintained
24. This appliance contains battery cells that are non-replaceable. Do not modify or attempt to
repair the appliance or the battery pack except as indicated in the instructions for use and care
25. Always turn off this appliance before connecting or disconnecting the motorized nozzle
26. Do not charge or store the appliance outdoors or inside the car. Only charge, store or use the battery
in a dry indoor area where the temperature is higher than 39.2°F ( 4°C ) but lower than 104°F ( 40°C ).
The charger is for indoor use only

4
○
5
○
3
○
4
○
2
①
○
6
○
7
⑩
⑧
○
9
⑪
① Suction Adjustment ⑦ Flexible Extension Wand
② Power Switch ⑧ 2 in 1 Dusting Brush
③ Battery Pack ⑨ Crevice Tool
④ Suction Position ⑩ Sofa Tool
⑤ Dust Cup Release Button ⑪Adaptor
⑥ Full-size LED Power Brush ⑫Hair Cleaning Tool
Important Safety Instructions
Overview
⑫
5
Release
Button
Release
Button
Take Out the
Battery Pack
Battery Pack
Release Button
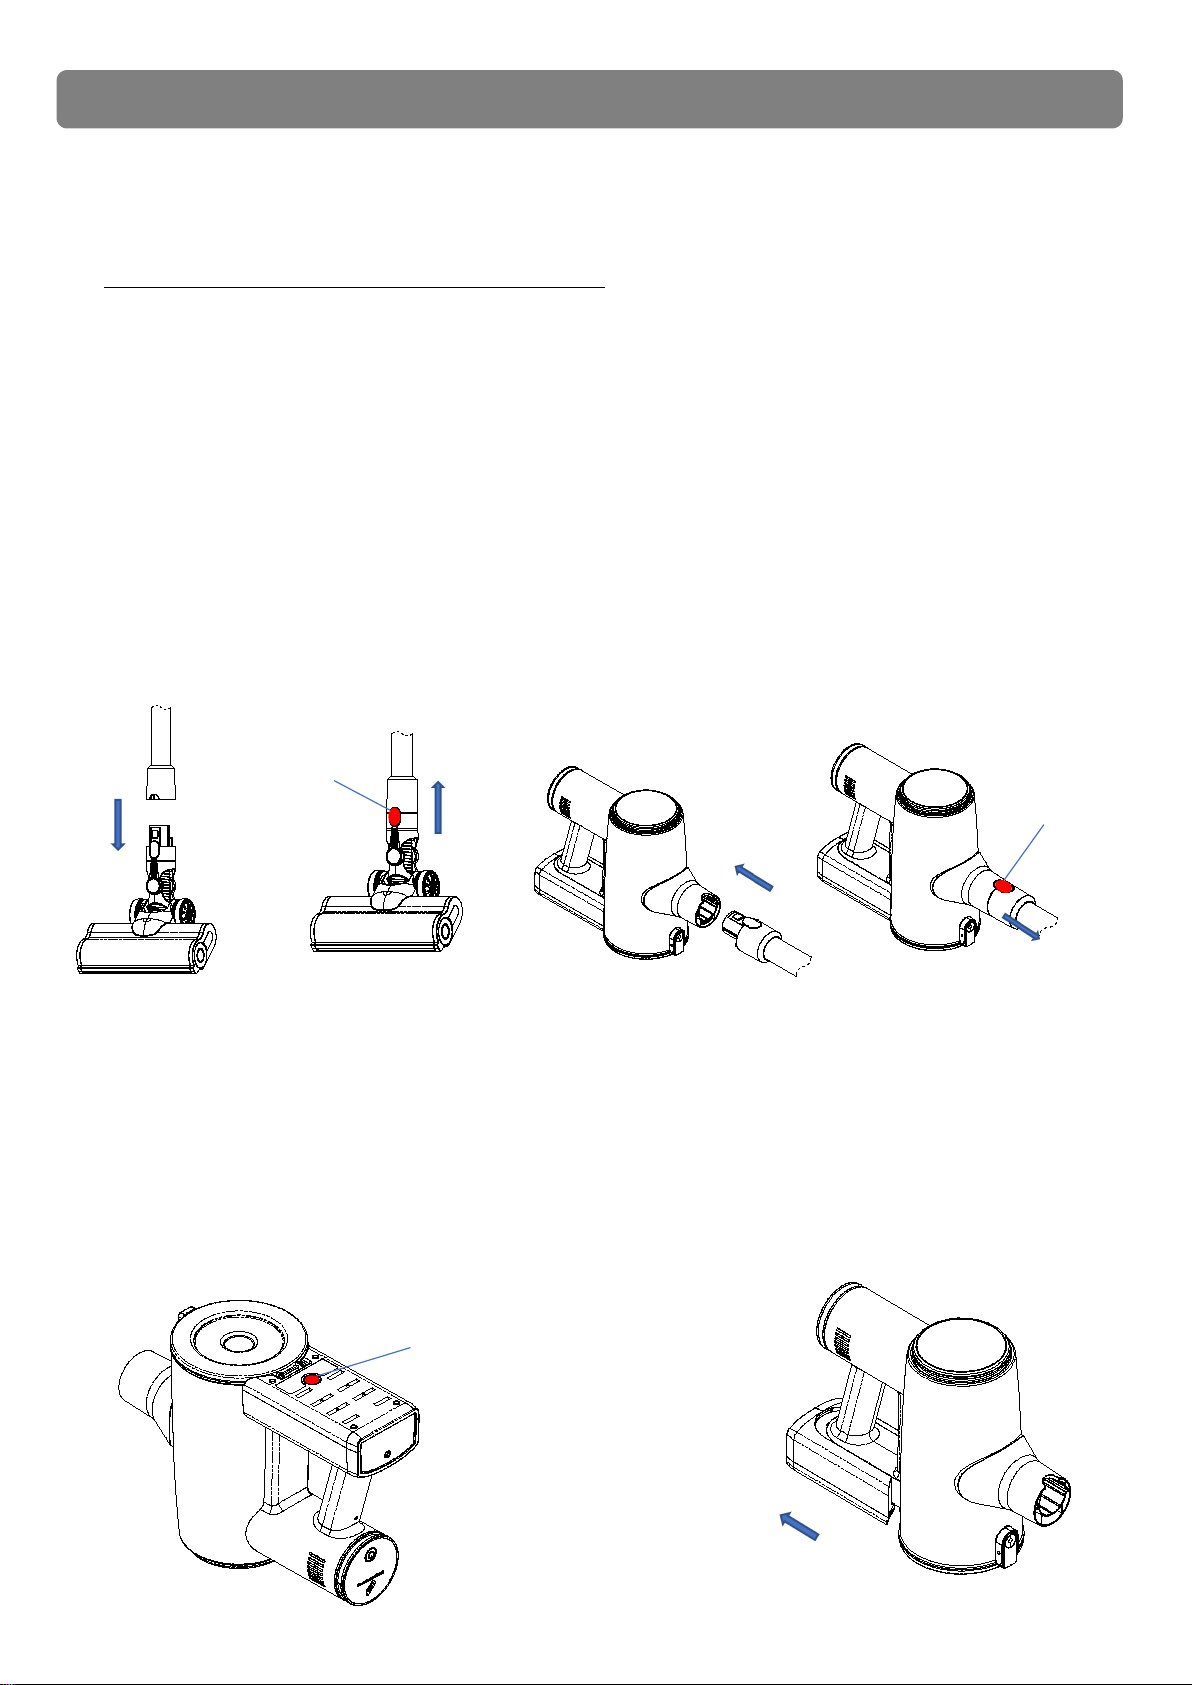
Vacuum Cleaner Assembly
Note: Do not operate when charging or power-on
Install the Wand(
Pic 1
)
1. Insert the wand into the vacuum cleaner
2. Press the release button and remove the wand
Install the Brush(
Pic 2
)
1. Insert the wand into the motorized power brush
2. Press the release button and remove the brush
Battery Pack Disassembly
1. Press the battery pack release button
2. Take out the battery pack as
Pic 3
Operation Instruction
Pic 1
Pic 2
Pic 3

6
Install the Battery
Pack as this Direction
Release
Button
Battery Pack Assembly
Install the battery pack as the direction as the
Pic 4
Accessories Assembly
Install the accessory into the vacuum cleaner as the
Pic 5
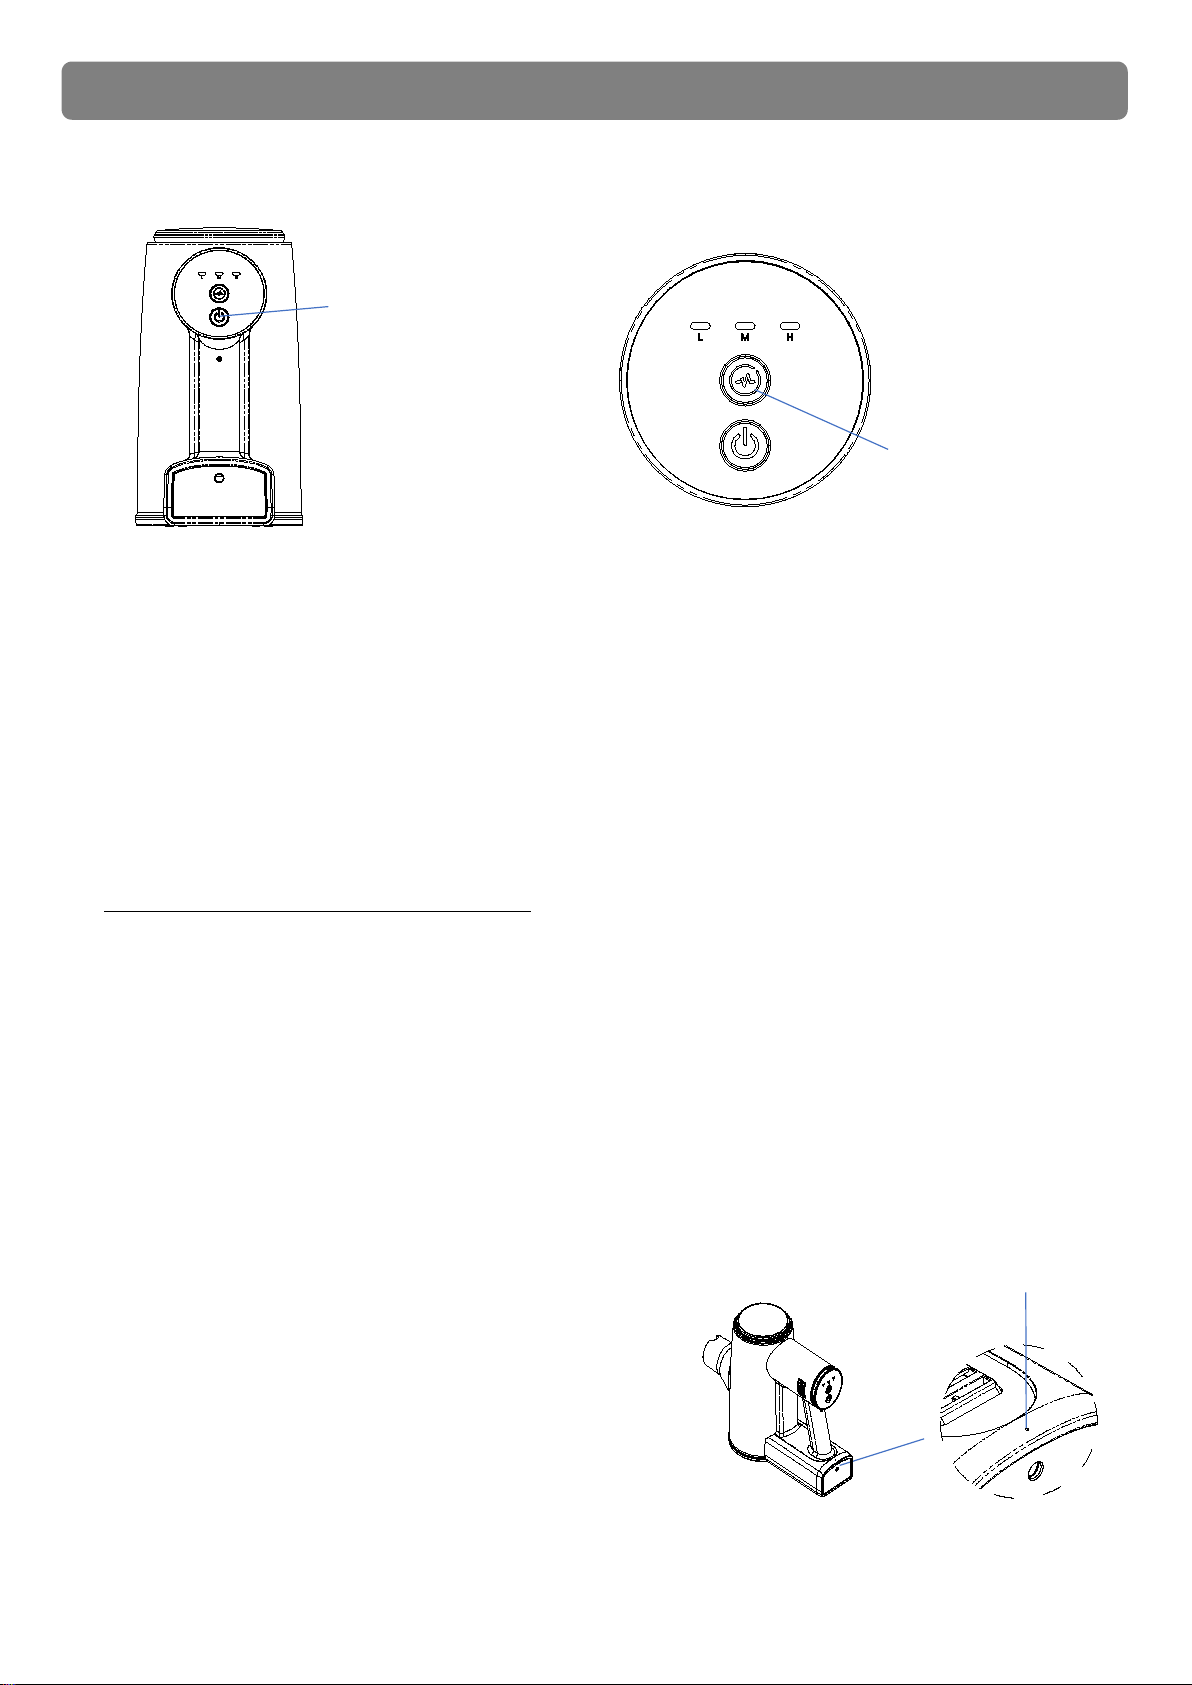
Startup & Shutdown
Note: Please take out the charger before using the vacuum cleaner
If the vacuum cleaner is charging or low battery status, the vacuum cleaner will not work.
Press the Power Button(as the
Pic 6
), the unit is ON; press it again, it is OFF.
Operation Instruction
Pic 4
Pic 5
7
Power
Switch
Battery Indicator Light
Suction
Adjustment
Power Switching Instructions
When the vacuum cleaner is turned on, the machine is in the lowest power class.
Press the Power Switch Button to switch to mid-range power level, as the
Pic 7
Press again to switch to high-range power class.
Press one time to change one power class.
L
Indicator means working on low-range power class
M
Indicator means working on middle-range power class
H
Indicator means working on high-range power class
Battery Indicator Instructions
Charging status: Blue light blinking, as the
Pic 8
Fully charged status: Blue Light keeping on all the time.
Operation Instruction
Pic 6
Pic 7
Pic 8
8
Press the Dust
Release Button
Fasten the Bottom
Buckle up
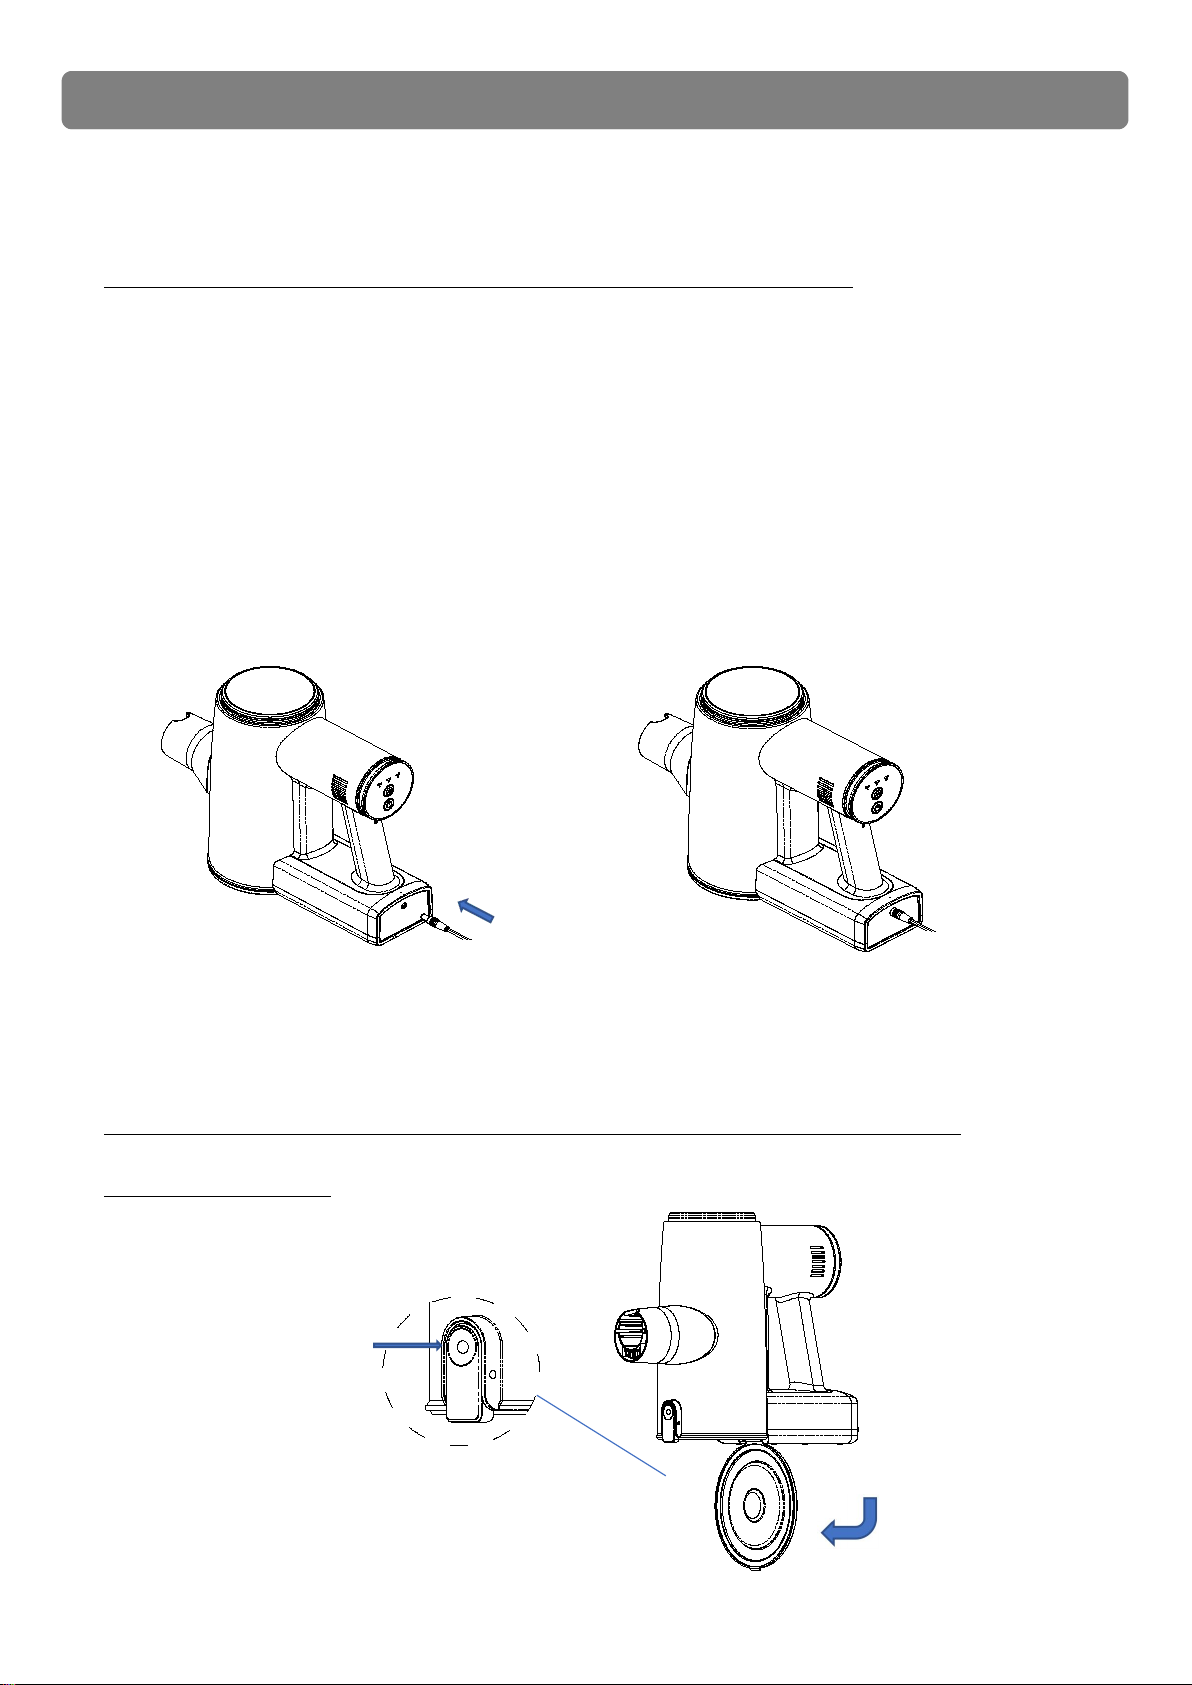
Vacuum Cleaner Charging
Note: The handheld vacuum cleaner will not work while it is being charged
Put the power port into the vacuum cleaner charging socket as the
Pic 9
1. Connect the power adapter to the power socket
2. The battery indicator will start blinking when it is charging
3. The battery indicator will stop blinking when it is fully charged
4. Unplug the power supply after finishing charging
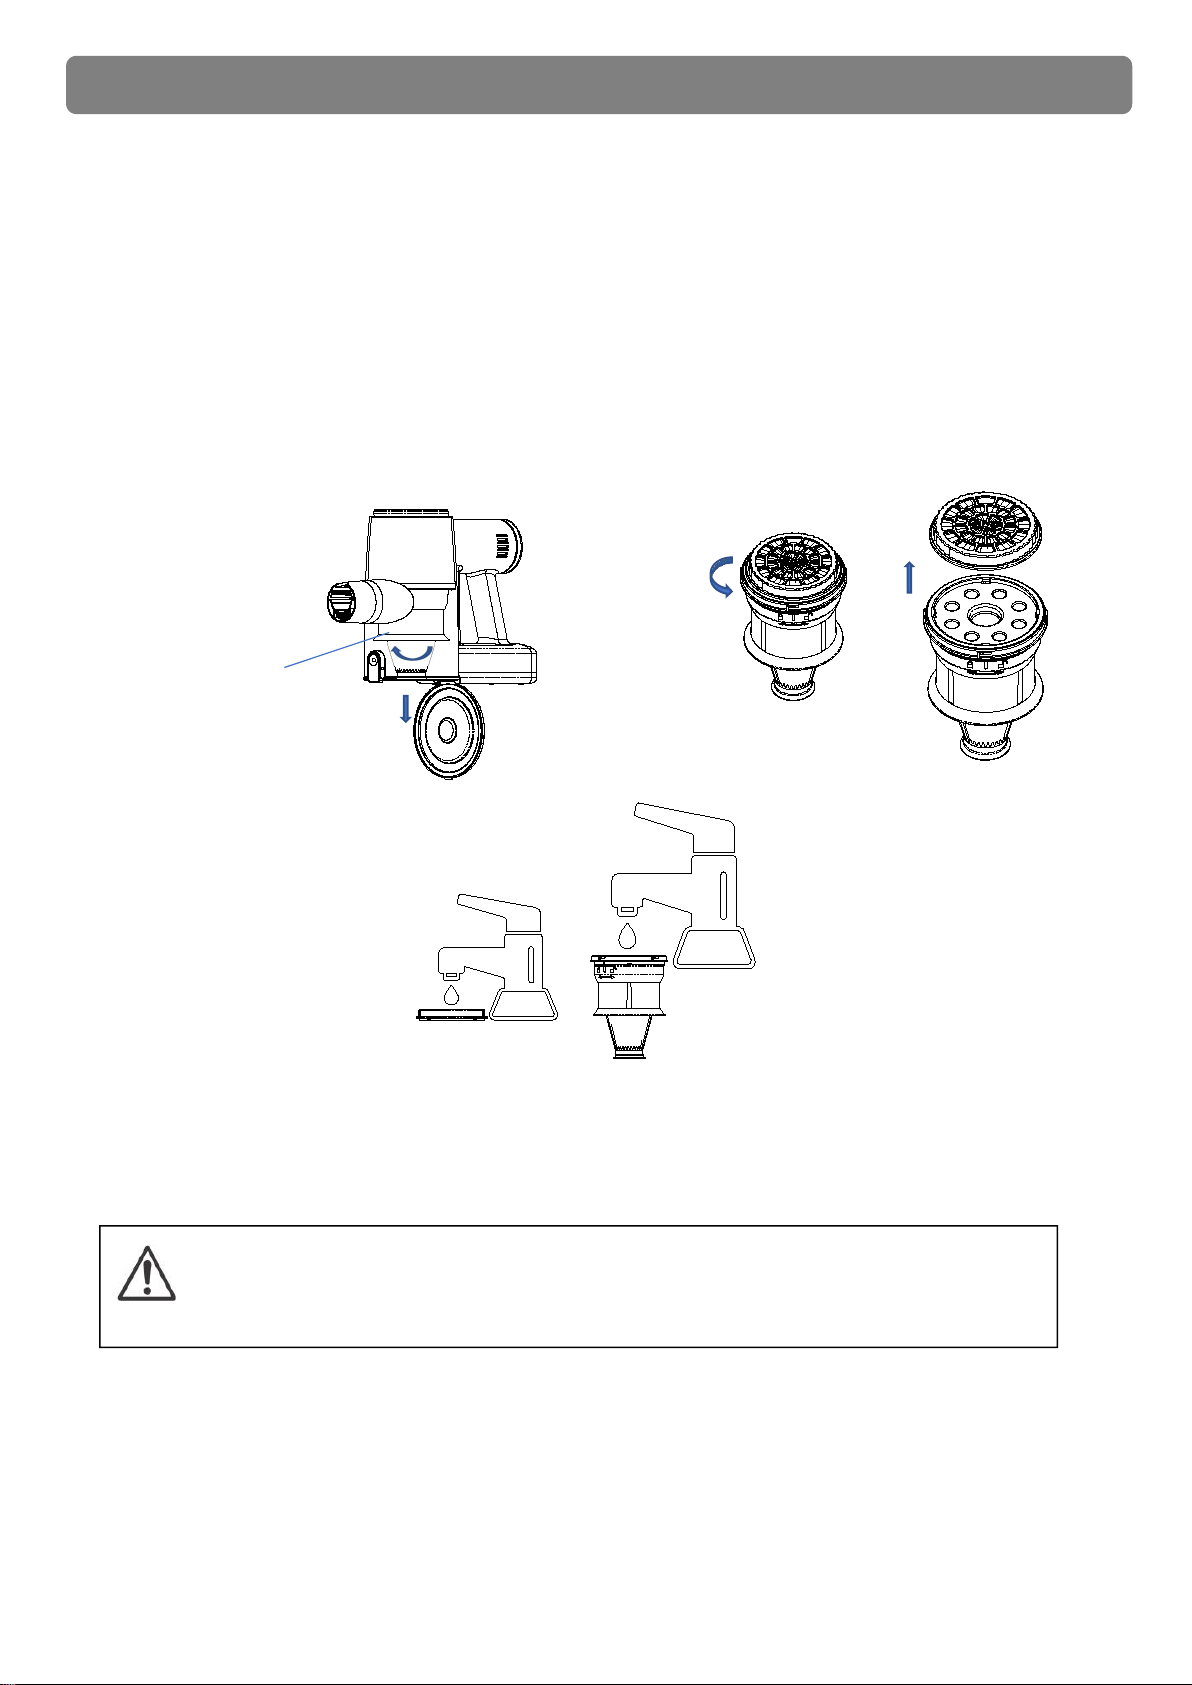
Dust Cup Cleaning
Note: To get the best performance, empty the dust container and clean the dust filter
after every 5 cleanings
Operation Instruction
Pic 8
Pic 9
Operation Instruction
9
Rotate the Filter
Counterclockwis
e
Filter Cleaning
1. Hold the vacuum cleaner. Rotate the filter counterclockwise,
and take it out from the dust cup, as the
Pic 10
2. Separate the
HPEA Filter
from the it, as the
Pic 11
3. Clean the filters with the water ( as the
Pic 12
) and then dry
Filters Assembly
Rotate the filter element clockwise to install it into the dust cup, as the
Pic 13
Make sure the filters are assembled rightly, otherwise, the fine dust will come
into the motor and destroy it
WARNING
Daily Maintenance
Pic 9
Pic 11
Pic 12
10
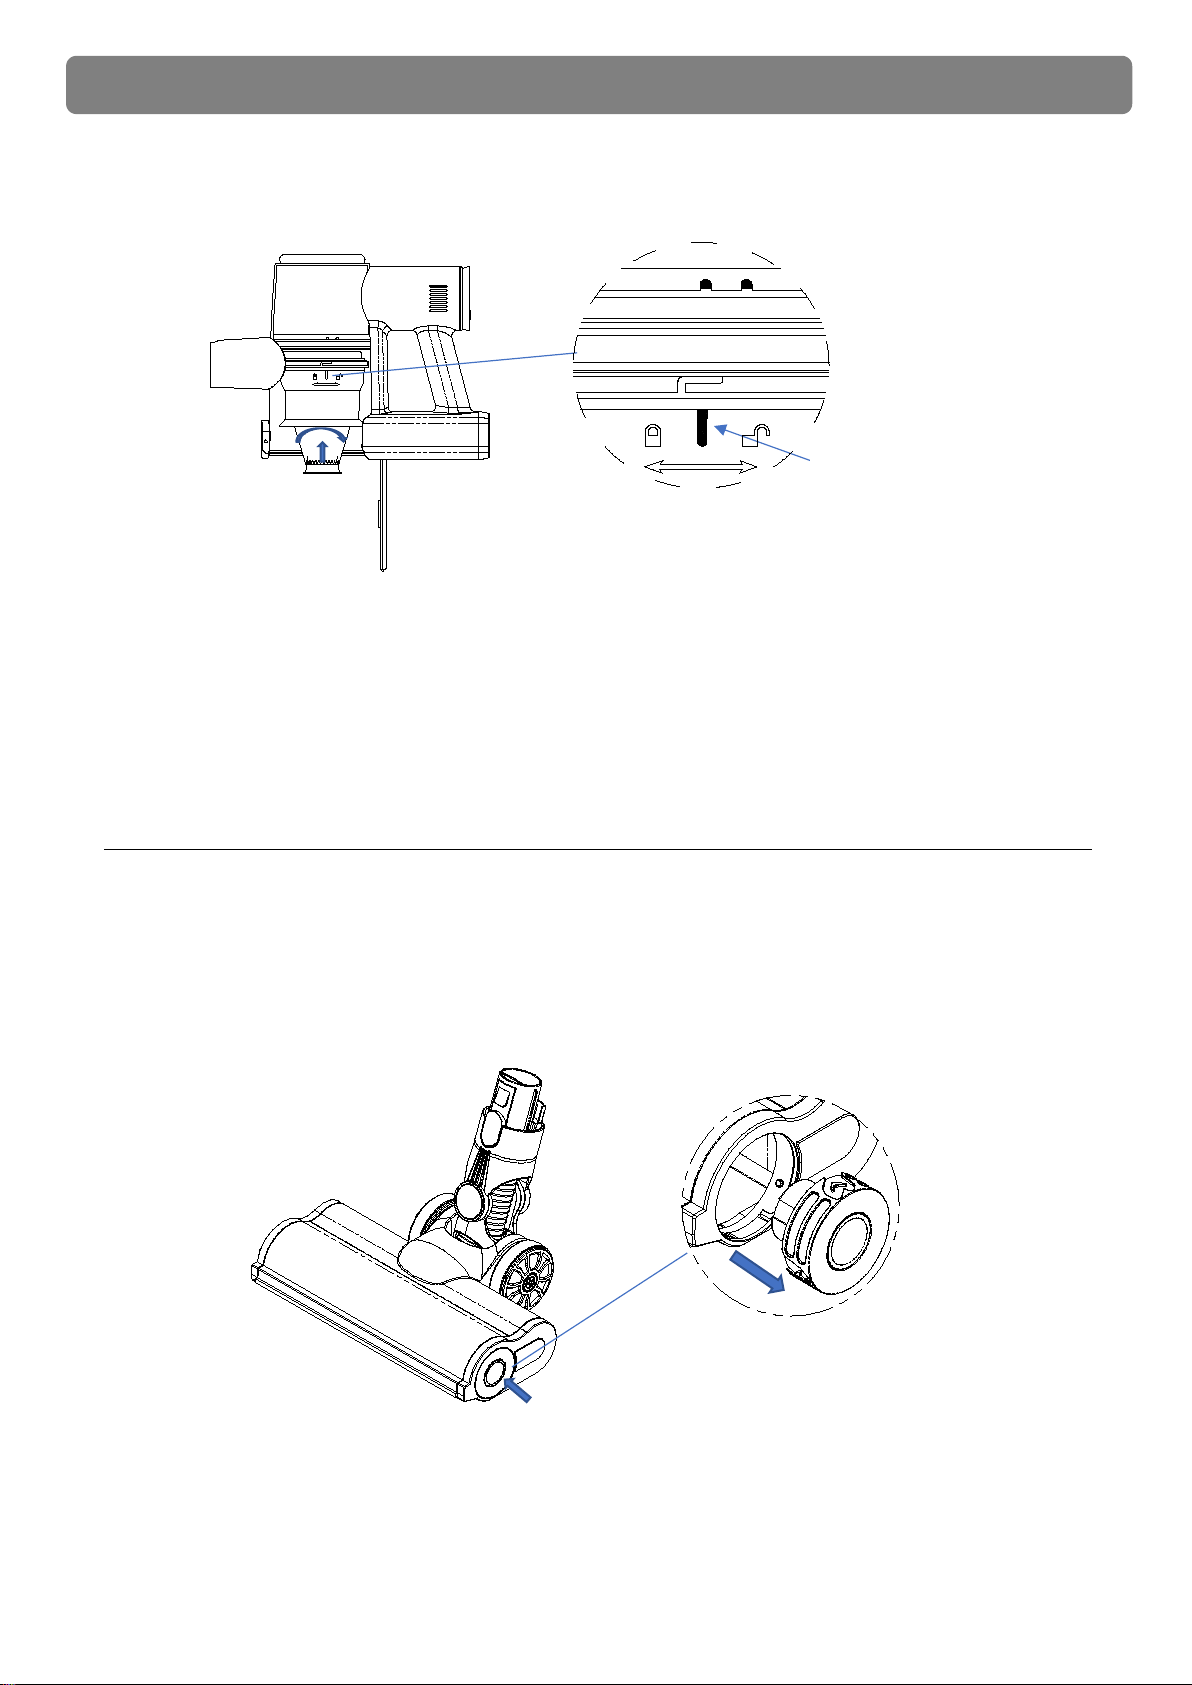
Brush Cleaning
Note: Make sure the handheld vacuum is shut down when cleaning and separating the floor brush
1. Push the roller cover button, as the
Pic 14
2. Take out the brush, as the
Pic 15
3. Clean the brush
4.
Install the brush, as the
Pic 16
Lock Position
Daily Maintenance
Press the Roller Cover
Pic 13
Pic 14

11
Note:
1. All the maintenance must be held after the vacuum cleaner was shut off
2. Clean the dust cup regularly to avoid malfunction
3. Do not wipe the vacuum cleaner with gasoline or other oily matter
Please uses a soft cloth or neutral detergent
Do not leak water or any liquid into the vacuum cleaner
4. Please keep the vacuum cleaner dry
5. No heavy things on the vacuum cleaner
Take out the Roller
Install the Roller
Pic 15
Pic 16

12
Trouble Shooting
The user can correct the unit once something happens as below:
Note: Please turn off the vacuum cleaner once something happens as below to avoid any danger
Product Parameters
Problem
Reason
Solution
Unable to turn ON
Out of battery
Recharge
No battery pack
Assemble the battery pack
Damage accessories
Contact manufacturer and replace
Abnormal noise
Too much dust, clogged air hole
Take out the dust cup and clean the air hole
Low suction
Too much dust; filter too dirty
Clear the dust cup or clean the filter (The
filter must be competently dried out before
being put back into the vacuum.)
Low power
Recharge
Dust coming out
from the vacuum
Filter broken
Replace a new filter
No filter inside
After-sale service
Unable to charge
No adaptor
Plug the adaptor
Adaptor not in the socket of the unit
Plug the adaptor into the socket
Adaptor broken
After-sale service
Broken component
After-sale service and change a new one
Model
CJ-C8
Voltage of battery
DC22.2V
Power
250W
Noise
≤80dBA
Battery capacity
2200mAh
Charging time
4-5h
Working time
15-45min
Size of product
314*123*226mm
G.W.
3.1kg
N.W.
2.5kg
Vacuum
≥27kPa(MAX )
Airflow
≥1.1M3(MAX)
Daily maintenance
Product Parameters
Daily Maintenance & Correct Disposal
Table of contents


