ATEQ TPM QUICKSET User manual

TPM QuickSet Installation Guide 2009
- 1 –
TPM QUICKSET USER MANUAL
NEW SMART TPMS RESET DIY TOOL
RESET YOUR TPMS FROM HOME

TPM QuickSet Installation Guide 2009
- 2 –
TABLE OF CONTENTS
1.LEGAL NOTICE..................................................................................................................... 3
2.INTRODUCTION ...................................................................................................................4
3.WHAT IS TPM QUICKSET? .................................................................................................5
4.COMPANY PROFILE ............................................................................................................6
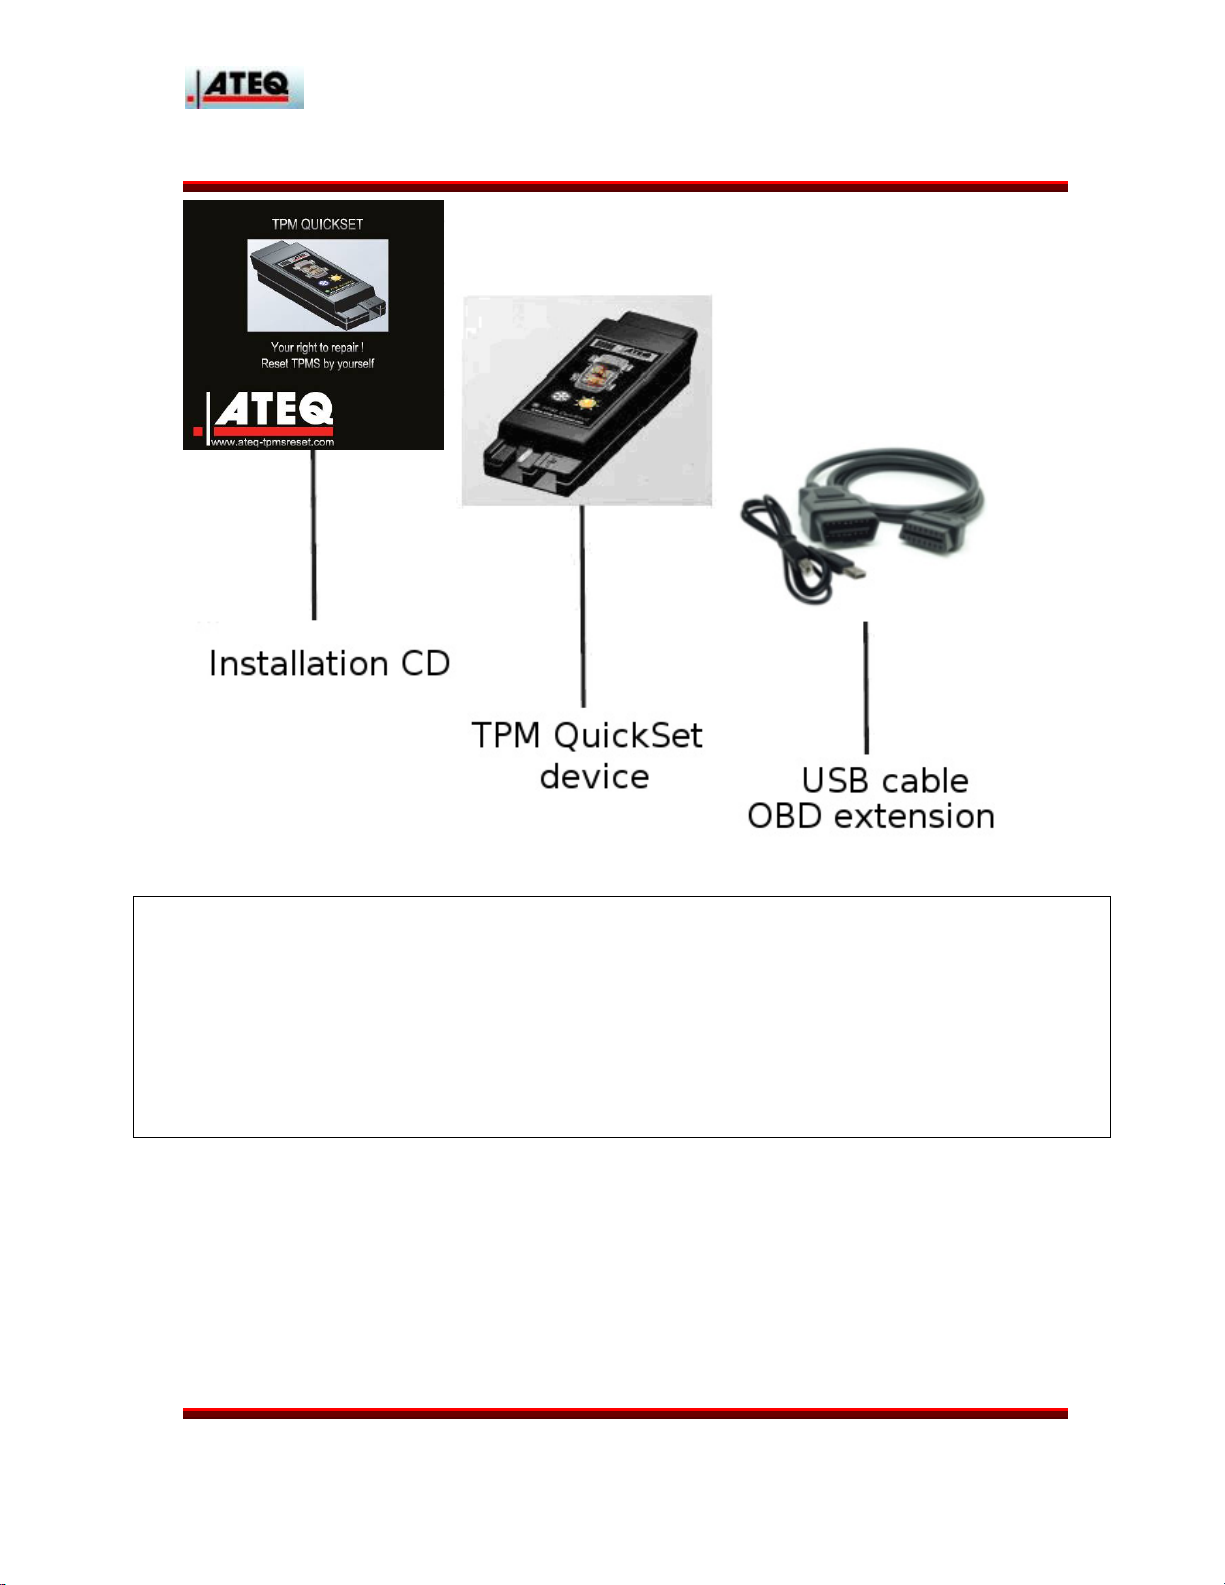
5.KIT COMPONENTS AND INSTRUCTIONS .......................................................................7
6.QUICKSET OVERVIEW........................................................................................................8
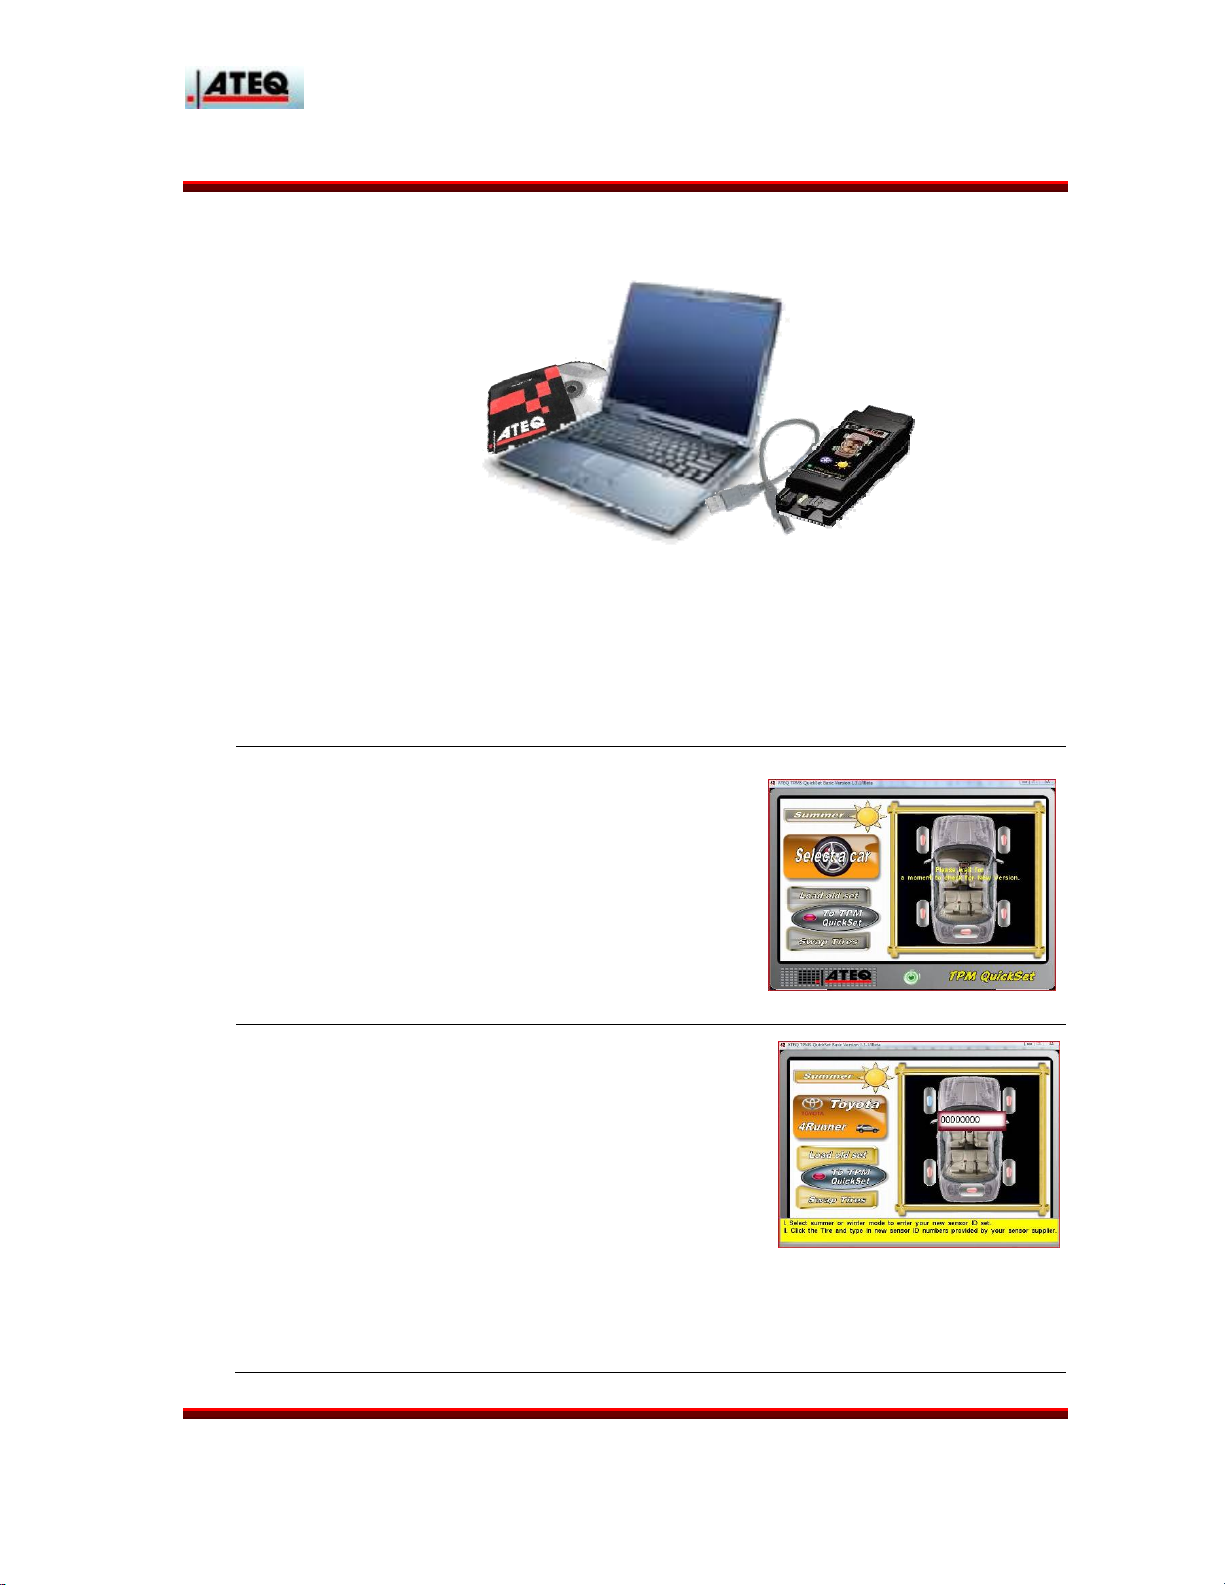
7.SOFTWARE SETUP............................................................................................................... 9
8.MAIN FUNCTIONS ............................................................................................................. 11
9.STARTUP ..............................................................................................................................13
10.CAR SELECTION .................................................................................... 15
I.Car Selection First steps ................................................................................................................15
II.Car Plug in step ..........................................................................................................................16
III.Car selection last steps ...............................................................................................................18
11.ENTERING IDENTIFIERS .........................................................19
12.LOADING OLD CONFIGURATION AND RESETING ............21
13.TRACKING RECORDS AFTER SWAPPING TIRES .............................22
14.TROUBLESHOOTING.....................................................................................................24
15.CUSTOMER /AFTER SALES SERVICE........................................................................25
16.WARNINGS .......................................................................................................................26
17.CERTIFICATION AND GARANTEE..............................................................................27

TPM QuickSet Installation Guide 2009
- 3 –
1. LEGAL NOTICE
⇒COPYRIGHT
No part of this manual may be reproduced, stored in a retrieval system or transmitted, in
any form or by any means, electronic, mechanical, photocopying, recording, or otherwise,
without the prior written permission of ATEQ Corp.
⇒DISCLAIMER
All information, illustrations, and specifications contained in this technical instruction
manual are based on the latest information available at the time of publication.
The right is reserved to make changes at any time without an obligation to notify any
person or organization of such revisions or changes.
Further, ATEQ shall not be liable for errors contained herein or for incidental or
consequential damages in connection with the furnishing, performance or use of this
material.

TPM QuickSet Installation Guide 2009
- 4 –
2. INTRODUCTION
Congratulations on your purchase of the TPM QuickSet. This is a valuable tool to help
you maintain the Tire Pressure Monitoring System (TPMS) when replacing sensors or
swaping tire sets on your vehicle.
The ATEQ TPM QuickSet is designed to reset your Tire Pressure Monitoring System
after changing two sets of tires, for instance winter to summer, or when one or more tires
has been replaced. The tool also has a “swaping tires” function to assist you to track and
record the TPM sensor information after rotating tires.
The PC software provides easy, step-by-step instructions for you to reset the TPMS
without having an expensive “professional” perform the same function.
Note:
TPM QuickSet can reset the TPMS warning light on your dashboard when the following
conditions are met:
•Vehicle must be equipped with Direct Tire Pressure Monitoring System (Direct
TPMS)
•CORRECT TPM sensors MUST be installed in all 4 or 5 tires
•The TPM sensors in the tires are working properly
•The TPMS ECU must be working properly
•All 4 or 5 tires are properly inflated according to the specified placard value
•Correct TPMS sensor ID numbers are entered into the TPM QuickSet software
before recording them to the vehicle ECU through the OBDII connector
If you have any questions or concerns with regards to conditions specified, please contact your dealer or sensor
supplier to obtain the proper information. You may also call our Toll Free Help Desk at 1-888-621-TPMS for
further assistance.

TPM QuickSet Installation Guide 2009
- 5 –
3. WHAT IS TPM QUICKSET?
THE TPM QUICKSET IS THE NEW DO-IT-YOURSELF TOOL THAT ALLOWS CAR
OWNERS TO REPROGRAM THE TPMS BY THEMSELVES!!
Features TPM
QUICKSET
Compatible with future applications. (Internet upgradable)
Advanced stream decoding for faster signal recognition
ECU reprogramming extension
Easy, Step-By-Step instructions
Tire rotation tracking and recording
Save and restore old tire configuration

TPM QuickSet Installation Guide 2009
- 6 –
4. COMPANY PROFILE
ATEQ is the first company in the world to introduce the full range of TPMS instruments for
industrial and individual users.
ATEQ is the only brand you can trust when it comes to TPMS Reset Tools. With the
background of working with car manufacturers’ assembly lines, service stations and OE
sensor manufacturers, it is our promise to provide our customers the best service in
TPMS.
Please visit our website for further information: www.ateq.com www.ateq-
tpmsreset.com
Or contact us by email to: t[email protected]

TPM QuickSet Installation Guide 2009
- 7 –
5. KIT COMPONENTS AND INSTRUCTIONS
Recommended system configuration for installing and running TPM QuickSet on a PC:
⇒Operation System: Windows XP or Windows Vista.
⇒Processor: Pentium ≥ 333 MHz or faster.
⇒RAM: 512 MB or above.
⇒Hard disk space: ≥ 30 MB.
⇒USB port: USB 2.0 is required.

TPM QuickSet Installation Guide 2009
- 8 –
6. QUICKSET OVERVIEW
1. Install TPM QuickSet Software and USB Driver.
2. Follow the step-by-step instructions
to select your vehicle.
3. Select “Summer” and/or “Winter”
set and enter your tire pressure sensor ID
numbers.

TPM QuickSet Installation Guide 2009
- 9 –
4. Connect the TPM QuickSet to the
OBDII connector on your car to
reprogram new sensor ID numbers to the
ECU.
7. SOFTWARE SETUP
Before launching the installation
program, the USB cable must be
plugged into the TPM QuickSet box and
to your computer.
If not, or if any component is missing,
click on Cancel to stop the installation.
The default installation folder is chosen
by your system. You can choose the
installation folder by clicking on Browse
button.
To install the software a minimum of
30MB of free disk space is required.
Check the memory of your computer
before the setup.

TPM QuickSet Installation Guide 2009
- 10 –
The USB installer will be launched after
copying the program files to your
system. If your TPM QuickSet is not
recognized by your system, cancel the
installation and re-launch the installer.
If your TPM QuickSet device is still not
recognized by your system, please
contact us for further assistance.

TPM QuickSet Installation Guide 2009
- 11 –
8. MAIN FUNCTIONS
Ð
The first button allows you to select the
vehicle brand and model. When this is
done, the button will change and will
represent your choice in the example
below.
Warning! On the TPM QuickSet Basic
version, after choosing a car model, and
successfully reading your car information,
you can’t choose a new model. The TPM
QuickSet Basic version allows you storing
up to 4 vehicles or 8 sets of tire sensor
information.
This button is used to determine how you
want to store your tire ID’s, in summer or
winter mode.
It’s not just limited to the summer<->winter
tire sets. In other words, it could be used
whenever one or more TPM sensors are
being replaced.

TPM QuickSet Installation Guide 2009
- 12 –
This button allows you to review sensor
data you have entered. The record is
stored until a new TPM sensor information
is entered and confirmed. You must click
this button every time after you enter new
sensor information to this device.
This button helps you to track and record
the correct TPM sensor location when
rotating or changing tires.
This button lets you select the sensor set
information previously stored. When you
are too busy to remember what
information you entered and stored
months ago, this is the handy function to
use.
If you wish to delete the information has
been stored, click which allows you
to clear the memory and start over. You
can also use this button in case there’s
any wrong data entered during the
process.
Warning! Data will be cleared once the
is clicked.
Power OFF button: At any time you want
to close the program, please click on the
green button to end the operation.

TPM QuickSet Installation Guide 2009
- 13 –
9. STARTUP
1. The first message appears on your display
is as left.
Click on OK when all connections have been
confirmed.
If this message does not appear after more
than 2 minutes from launching the program,
check if the previous steps have been
completed.
2. The computer will begin the initialization of
the setting up for the TPM QuickSet PC
program.
If this message does not appear, ensure that
the device is properly connected.
If it does not appear after several minutes,
close and launch the program again. Make
sure the internet is connected.
3. The TPM QuickSet program connects to
internet to check if there is any new update
available. ATEQ provides real-time
software update service for newer model
applications.
4. The Congratulation message informs that
you have installed the latest program
version from Internet.
Click on OK to continue.

TPM QuickSet Installation Guide 2009
- 14 –
5. If your software version is not up to date,
you will be asked to update it. By clicking
“OK” you will launch the update process.
This will close the TPM QuickSet program
and will launch the TPM QuickSet Update
tool. By clicking “Ignore” you will prevent
the TPM QuickSet program from lauching
the Update tool.
6. During the update process, just wait while
the progression bar is showing the amount
of data downloaded to your TPM QuickSet
device in order to make it recognize more
cars. When finishing, this window will be
closed automatically then continue the
installation of the new update.

TPM QuickSet Installation Guide 2009
- 15 –
10. CAR SELECTION
I. Car Selection First steps
1. You are now ready to select your car.
If you do not see this screen, please close the
program and start over.
If there’s already car model shown on the screen
that is not the one you wish to select, please click
the bracket of “Load old set” and then click “reset”
to start over.
By clicking the Selection button (“Select a car” if
no car selected, or the picture of the latest car
that has been selected) you can choose or switch
to a new car.
2. If you have more than one car (up to 4) for
you and your family, you can still use the
same TPM QuickSet for all your cars! For
each car, you can select a new car model,
and give it a name by clicking the “Type
name” zone, then click ”Select a car” to
continue the car model selection.
Note : you can switch from a car to another by
clicking the car selection button (see step1)

TPM QuickSet Installation Guide 2009
- 16 –
3. Click the proper icon to select the Make.
If you do not find the brand you wish to select,
make sure you are connected to the internet.
Please contact us if you could not find the right
icon for your vehicle.
4. After selecting your car model, click on
to advance to the next screen.
To cancel, click on and select a new
car model.
II. Car Plug in step
1. When seeing this screen, please disconnect
the TPM Quickset device from your PC and
read the instruction carefully.
Warning! The TPM QuickSet device MUST be
disconnected from PC at this step. Failure to
disconnect will cause damage to the device.
2. You can now unplug the TPM QuickSet
device from your computer then plug it into

TPM QuickSet Installation Guide 2009
- 17 –
your car
OBD II connector (Location of OBDII connector
varies from model to model. Please refer to your
owner manual to find the location).
•A flashing green TPM QuickSet LED light
confirms the communication has been
successfully established.
•Press either summer or winter button on
the TPM QuickSet to start collecting
data.
•The LED light turns to solid green to
confirm the communication is complete.
•Wait for 5 seconds and disconnect the
TPM QuickSet from OBDII connector
and plug it back on your computer.

TPM QuickSet Installation Guide 2009
- 18 –
III. Car selection last steps
3. This screen confirms that you are
ready to finish the car selection
procedure, click on to continue.
4. Select Summer mode or Winter mode
to save the TPM sensor data retrieved
from the vehicle ECU.
Warning: If your car TPMS Warning
light is flashing, the data you have
retrieved may not be correct.

TPM QuickSet Installation Guide 2009
- 19 –
11. ENTERING IDENTIFIERS
1. Click on the tire to enter the ID
number provided by your sensor
supplier on each tire. Tire color
will change from red to blue
Î . Confirms the sensor
ID number has been stored.
2. Enter sensor information
carefully.

TPM QuickSet Installation Guide 2009
- 20 –
3. Click .to write
the information into the TPM
QuickSet.
4. Double check the data just
entered and click “confirm” to
continue.
5. This screen confirms the data has
been stored successfully. Read
carefully and follow the instruction
displayed to complete the TPMS
reprogram procedure.
Table of contents
Other ATEQ Automobile Accessories manuals
Popular Automobile Accessories manuals by other brands

Dakota Digital
Dakota Digital LED Tail Lights for 1959 Chevrolet Impala, Bel Air, Biscayne... installation instructions

MSW
MSW MSW-TC-S user manual

AMP Research
AMP Research BedStep 75321-01A manual

Suzuki
Suzuki 99177-78R00 installation instructions

Ranger
Ranger 1525-MM installation guide

Kolpin
Kolpin 50-0020 Product instructions