Introduction
Thank
you
for
purchasing
Atlantic
SOL
Lighting.
Atlantic's
all
new
SOL
lighting
features
solid
brassbodies
with
an oil-rubbed bronze
finish.
Theselights
work
under
water
and
in
open
air
applications
to
give
your
water
feature
a
soothing,
warming
glow
afterthesungoes
down.
Multiple
LEDs
canbeconnected to be
run
through on
one
transformer.
Prior
to
Operation and Installation
Caution:
• DO
NOT
operate thisproduct underanycondition otherthan those for
which
it
isspecified. Failureto observe these precautions can lead to electrical shock,
product failure, or otherproblems.
•
Follow
allaspects of electricalcodes when
installing
SOL
Lighting.
• Toreducethe
risk
of
electrical
shock,
connectonlyto a 110voltreceptacle
protected bya ground faultcircuitinterrupter
(GFCI).
• The input power to the
Driver
is12voltAC.Thedriverislocated approximately
5' from
the
end
of
the
cord,
and
is labeled
"DO
NOT REMOVE". The Driver
can be connected to a larger outdoor lightingtransformer; however this must
be done on
the
12 voltAC input side of
Driver.
Removingthe Driveror
tampering with
the
cord between
the
Driverand
the
light fixture
will
damage
the
LEDs
and void warranty.
Installation
Fixture
Installation
SOLSpotlightsofferthree differentmountingoptions for yourconvenience:
•Adjustable stand: forplacementon rockledges, underwaterfalls orfor
highlighting streambeds
•Ground stake:for installationaround
the
perimeterof the water feature or
inconventional landscape installations
•Nested: without
the
stand or stake, amongst
the
pond stones
SOL
Light
Ring
is
ideal
for
illuminating
fountains
and up
lighting
waterfalls.
• Proper
light
placement isimportant for
every
project.
Whenever
possible
lights
should
be
positioned
facing
away
from
the
viewing
areato
minimize
hot
spots.
•
When
camouflaging
the
light
cord
with
rocks
and
gravel,
always
leave
enough
slack
inthecordsothatthe
fixture
canbe
raised
abovewater
level
for
servicing.
•
Always
verify
thatthe
lens
cover
is
tightly
secured
before
submersing
the
fixture
•
Never
cutor
shorten
the
light
cord
between
the
Control
Module
andthe
light
fixture.
Altering
the
light
cord
will
damage
the
LEDs
and
void
warranty.
•
Extension
cords
(part
#
SOLWEXT)
are
available
to
add
an
additional
20'
of
cord
to
any
SOL
Light
Only
one
cord
can
be
used
on
each
light.
Never
connect
multiple
extension
cordstogether.
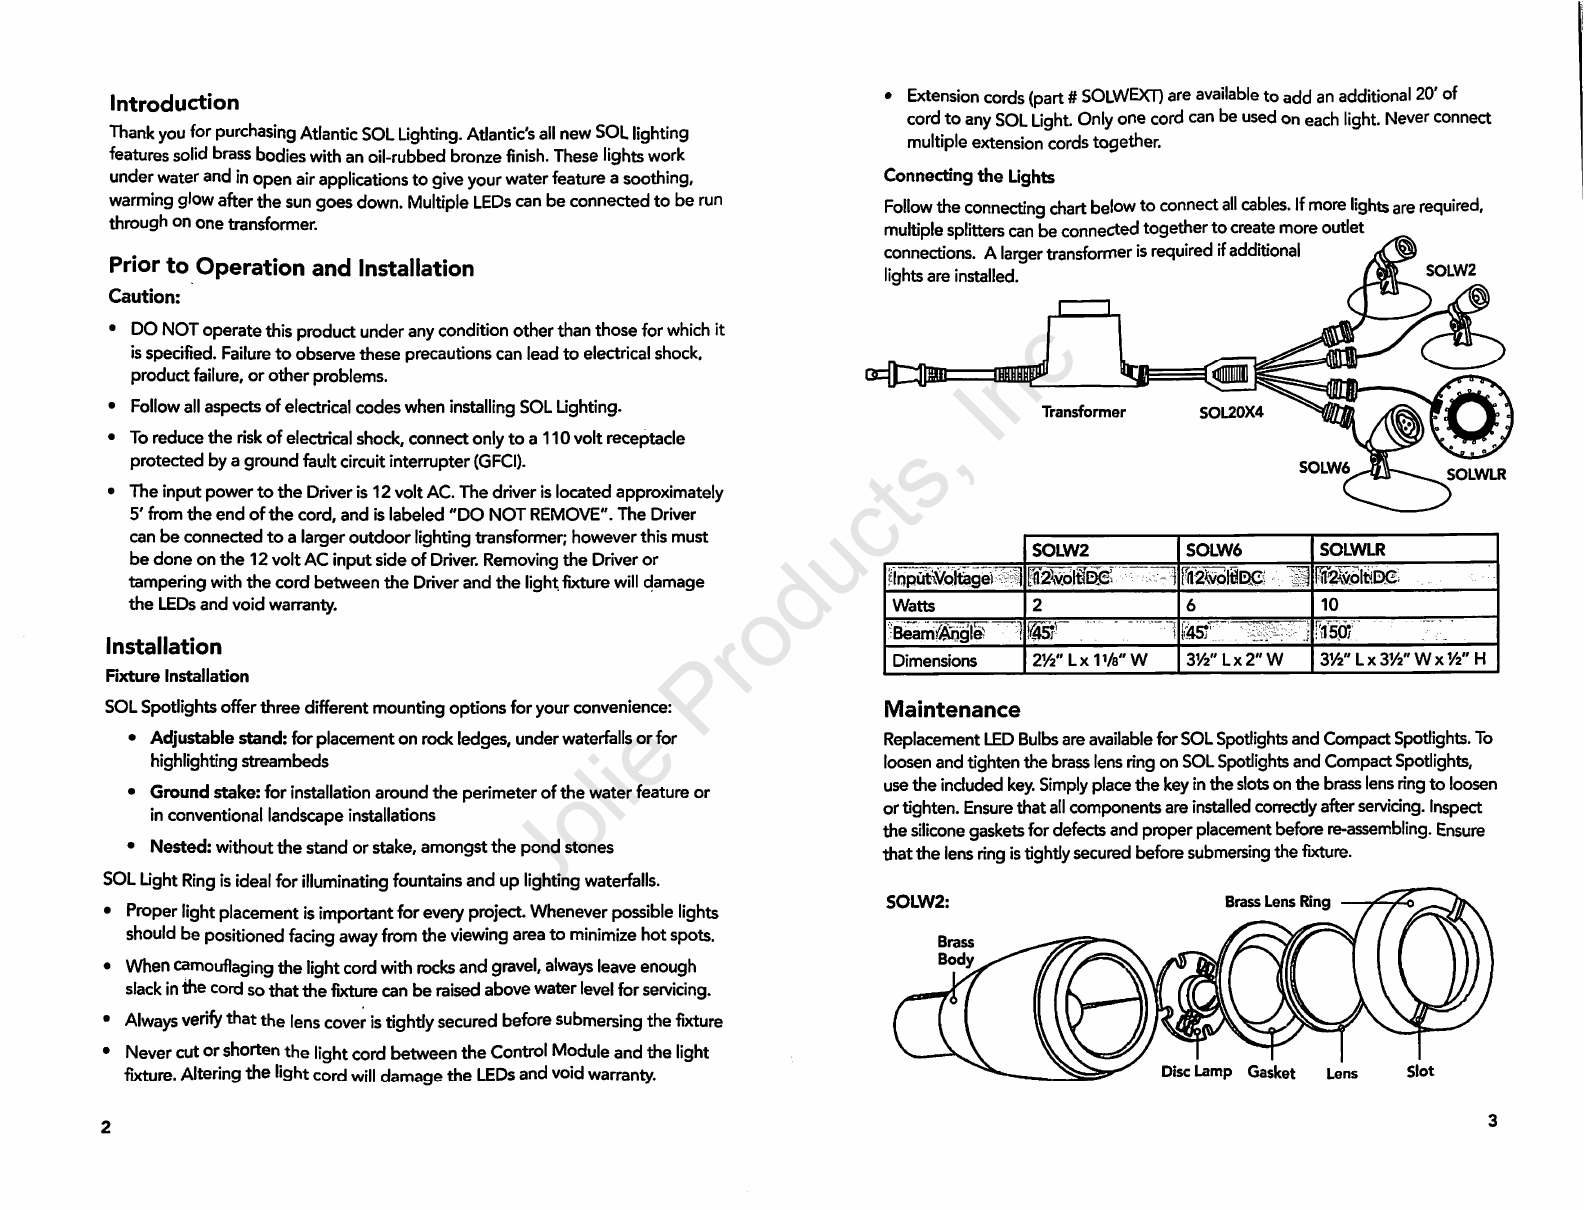
Connecting
the
Lights
Follow
the
connecting
chart
below
to
connect
all
cables.
If
more
lights
are
required,
multiple
splitters
can
be
connected
togetherto
create
more
outlet
connections.
A
larger
transformer
is
required
if
additional
lightsare installed.
1
GcjJrflSffi
SOLW2
SOLW6
SOLWLR
lilnputiVoJtagei^l
[fl^lfD^"^^
Halite
-H
ll^teiDC;
.....
Watts
26
10
•Beamsi^ngle-
]
mr
.'•'•;
~;
~i
^v.':.'."-"^:-v-"--j
;'i50/
Dimensions
21/2"Lx1V8"W
31/2"Lx2"W
3%"Lx3%"Wx%"H
Maintenance
Replacement
LED
Bulbs
areavailable forSOL
Spotlights
and CompactSpotlights. To
loosenand tightenthe brasslensringon
SOL
Spotlights
and Compact
Spotlights,
usethe
included
key.
Simply
placethe
key
inthe
slots
onthe brasslens
ring
to
loosen
ortighten.
Ensure
that
all
componentsare
installed
correctly
after
servicing.
Inspect
the
silicone
gaskets fordefects andproper
placement
before
re-assembling.
Ensure
thatthe lens
ring
is
tightly
securedbefore
submersing
the
fixture.
SOLW2:
Brass
Body
Brass Lens Ring
Disc Lamp
Gasket
Lens


