ATLASIO SHD+ User manual

Smart Height
Adjustable Desk+SHD+
MONTAGEANLEITUNG SHD+ SMARTER
HÖHENVERSTELLBARER SCHREIBTISCH+
ASSEMBLY INSTRUCTION SHD+ SMART HEIGHT ADJUSTABLE DESK+
www.atlasio.de
DE EN

2
DE SMARTER HÖHENVERSTELLBARER SCHREIBTISCH+SHD+
BAUTEILE
EIN TEIL DER MONTAGE SOLLTE VON
ZWEI PERSONEN DURCHGEFÜHRT WERDEN.
Bie überprüfen Sie, ob alle unterstehenden Teile vorhanden sind.
x1 > Tischplae
1x2 > Hubsäule
2
x2 > Füße
3x1 > 2m Stromkabel
4
MITGELIEFERTES MONTAGEMATERIAL
Bie überprüfen Sie, ob alle unterstehenden Teile vorhanden sind.
ANMERKUNG:
x8 > M6 x 30 mm Schraube x8 > 16 mm Unterlegscheibe
x8 > M8 x 15 mm Schraube
x1 > M4 Inbusschlüssel
x8 > 18 mm Unterlegscheibe
A B C
D E x1 > M5 Inbusschlüssel
F

3
Smart Height Adjustable Desk+SHD+
SCHRITT 2
Hubsäulen mit Schrauben
Füße an den Hubsäulen
mit Schrauben und
2
2
2
1
2
2
2
3
3
3
MONTAGEPLAN
SCHRITT 1
zu zweit durch. legen Sie die
ausreichend geschützt wird um
Schäden zu vermeiden.
Die Hubsäulen an
der dafür vorgesehen Stelle
platzieren.
1
2
2
2
2
1
2
2
2
3
3
33
2A
C
D
F

4
4
4
3
1
2
SCHRITT 3
1. Die Leitung der Hubsäule
in den Schaltkasten einführen.
2. Die Leitung der anderen
Hubsäule in das Gelenk
in der Bohrung einführen.
3. Netzkabel in den
Schaltkasten einstecken.
4
SCHRITT 4
TIPP: Nach dem Einschalten wird
das Display des Tischs „ “ anzeigen.
3 Sekunden gedrückt halten,
um Tisch freizuschalten. Für weitere
Bedienungsanleitung weiter unten.
Vor dem Erstgebrauch muss
das Gerät resetet werden wie in
folgender Darstellung abgebildet.
für 8 Sekunden bis das Display „ “ anzeigt.
kurz bewegen und anschließend stoppen, was
M

5
Smart Height Adjustable Desk+SHD+
??
TECHNISCHE DATEN
ART.-NR.
Spannung AC100V-240V / 50-60HZ
Nenn-Eingangsspannung 100-240 V
Frequenz 50/60 Hz
Eingangsstrom 0.48-1.16A
Nenn-Ausgangsspannung 29V-3A
Ausgangsstrom 3A
Leistung 240 W
Zulässige
Umgebungstemperatur
Ladeleistung 10W für kabelloses Laden
18W für USB-Laden
KABELLOSE
LADEFUNKTION
entsprechende Lade-Symbol und prüfen
bewegen Sie es auf dem Symbol hin
und her bis die Verbindung erfolgreich
unterstützen. Informieren Sie sich hierzu
Symbol für die kabellose Ladefunkon
BEDIENUNGSANLEITUNG
Anzeigefenster
Höhenspeicherfunkonstaste
Speichertaste 1
Speichertaste 2
Hoch
Runter
Speichertaste 3
Sitz-Steh-Erinnerung
Höhe
Gesperrt
s. Fehlerbehebung
SPERREN UND ENTSPERREN
gedrückt für 3 Sekunden halten
um zu sperren oder zu entsperren.
M
HÖHENEINSTELLUNG
Hoch:
Um den Tisch nach oben zu fahren, Pfeiltaste nach oben gedrückt halten bis gewünschte Höhe erreicht ist.
Runter:
Um den Tisch nach unten zu fahren, Pfeiltaste nach unten gedrückt halten bis gewünschte Höhe erreicht ist.
ANZEIGEFENSTER:

6
VOREINGESTELLTE HÖHEN EINSPEICHERN
Es ist möglich drei Höheneinstellungen zu speichern.
1. Pfeiltasten nutzen um die gewünschte Höhe einzustellen. Diese wird im Anzeigefeld angezeigt.
2. Speichertaste drücken. „ “ wird im Anzeigefeld angezeigt.
3.
wird im Anzeigefeld angezeigt. Das Anzeigefeld wird anschließend die gespeicherte Höhe anzeigen.
4. Für jede der Tasten , & wiederholen.
5. Abfrage des Speicherplatzes. , oder kurz drücken, das Display wird die zugehörige
eingespeicherte Höhe anzeigen.
6. Einstellen einer gespeicherten Höhe: , oder doppelt drücken oder lange halten,
kann jede andere Taste gedrückt werden um die Bewegung zu unterbrechen.
M
1 2 3
1 2 3
1 2 3
1 2 3
WERKSEINSTELLUNGEN WIEDERHERSTELLEN
Wiederherstellung erfolgreich war.
Wenn „ “ oder „ “ angezeigt wird, die Pfeiltaste nach unten für 5 Sekunden gedrückt halten. Sobald
des Werksmodus erfolgreich durchgeführt.
EINSTELLUNG UND BETRIEB DES TIMERS
Timer Einstellung / Start:
kurz drücken und durch wiederholtes Drücken zwischen T30, T45 und T60 wechseln, entsprechend
T30 ausgewählt, so beginnt das Display herunterzuzählen (T29, T28 bis T00). Das Display leuchtet
anschließend auf und zeigt CHR an. Jeder beliebige Knopf kann gedrückt werden um das Blinken zu
Timer Modus beenden:
kurz drücken, aktuelle Höheneinstellung wird angezeigt, Timer Modus ist beendet.
Weitere Informaonen:
entsprechend die Tischhöhe an. T21/T20 wird nach der Höheneinstellung wieder angezeigt.
USB LADEFUNKTION
Bie entsprechend der Abbildung Ladekabel korrekt verbinden.
T
T
T
M
USB: QC3.0 18WTyp C: PD45W

7
Smart Height Adjustable Desk+SHD+
FEHLERBEHEBUNG
PROBLEM URSACHE FEHLERBEHEBUNG
Display zeigt E01 an
Motor A Verbindungskabel prüfen.
Display zeigt E02 an
Motor B Verbindungskabel prüfen.
Display zeigt E03 an A Motorüberstrom
Display zeigt E04 an B Motorüberstrom
Display zeigt E05 an A Fehler im Motorraum
Display zeigt E06 an B Fehler im Motorraum
Display zeigt E07 an Abnormale Hauptstromversorgung Kann nach Abschalten des Geräts nicht
Display zeigt E08 an A Motorstrom-Anomalie Kann nach Abschalten des Geräts nicht
Display zeigt E09 an B Motorstrom-Anomalie Kann nach Abschalten des Geräts nicht
Display zeigt E10 an A Motorvorrichtung ist defekt Kann nach Abschalten des Geräts nicht
Display zeigt E11 an B Motorvorrichtung ist defekt Kann nach Abschalten des Geräts nicht
Display zeigt E12 an Abnormale Lernhaltung
Display zeigt E13 an Überhitzungsschutz Abwarten bis die Temperatur sinkt.
Display zeigt E14 an A Motor blockiert
Display zeigt E15 an B Motor blockiert
Display zeigt E16 an Werkseinstellungen wiederherstellen.
Display zeigt E17 an Verlust der Tastendaten An den Hersteller wenden.
PROBLEMLÖSUNG
PROBLEM URSACHE ABHILFE
Display zeigt
nichts an
Netzkabel nicht korrekt eingesteckt. Steckdose hat
keinen Strom. Der Strom ist nicht eingeschaltet.
Die Buchse muss elektrisch sein.
Den Stecker fest drücken. Power einschalten.
Kabelloses Laden
funkoniert nicht
Keine Stromversorgung. Endgerät ist nicht
Stromversorgung prüfen.

8
Diese Kennzeichnung bedeu-
tet, dass dieses Produkt nicht
in der gesamten EU mit ande-
ren Haushaltsabfällen entsorgt
werden darf. Um die Umwelt
oder die menschlichen Ge-
sundheit vor unkontrollierter Entsorgung
zu schützen, muss es verantwortungsvoll
recycelt werden. Um das verwendete Gerät
zu entsorgen, verwenden Sie bitte die örtli-
chen Rücknahme- und Sammelsysteme oder
wenden Sie sich an den Händler, bei dem das
Produkt gekauft wurde.
Zudem ist dieses Produkt konform gemäß:
EMC Directive 2014/30/EU, EN 61000-6-3:2007+A1
,
EN 61000-6-1:2007 LVC Directive 2014/35/EU,
EN 60335-1:2012+A1, EN 6223:2008
HERSTELLER:
Pantes GmbH, Maria-Theresia-Str. 11,
81675 München, Germany
München, 30.09.2021
WARNUNG! BITTE BEACHTEN SIE DIESE ANLEITUNG GENAU. ES BESTEHT VER-
LETZUNGSGEFAHR. WICHTIGE INFORMATION Lesen Sie aufmerksam diese An-
leitung bevor Sie mit der Montage beginnen.
Kinder dürfen dieses Produkt nicht ohne Aufsicht benutzen! Dieses Produkt enthält kleine Ge-
Dieses Produkt darf nur in Innenräumen verwendet werden. Die Verwendung im Freien kann zu
Schäden am Produkt und/oder Verletzungen führen.
Kinder dürfen nicht mit diesem Produkt spielen!
Dieses Produkt kann von Kindern ab 10 Jahren und Personen mit eingeschränkter körperlicher,
Bedienung und mögliche Gefahren unterrichtet wurden.
Reinigung und Wartung dürfen nicht von Kindern ohne Aufsicht durchgeführt werden.
Wenn das Netzkabel beschädigt ist, muss dieses vom Hersteller, seinem Kundendienst oder
WICHTIG:-
ten-Checkliste erhalten haben. Wenn Teile fehlen oder defekt sind, wenden Sie sich an Ihren
örtlichen Händler. Die Schrauben dürfen während der Montage NICHT überdreht werden!
VORSICHT:
• Dieses Produkt kann nur unter den technischen Standardparametern verwendet werden.
• Verwenden Sie das Produkt nicht in der Nähe von korrosivem Gas, Wasser
oder in staubiger Umgebung.
SICHERHEIT UND
WICHTIGE HINWEISE
• Dieser Tisch entspricht den vorgeschriebenen Sicherheits-
-
den an Personen und zu Beschädigungen des Tisches führen.
und schützt somit Sie und Ihre Kinder vor Verletzungen und
vermeidet Schäden am Tisch.
-
ben Sie sie an einen eventuellen neuen Besitzer weiter.
VERWENDUNG
• Elektromotorisch höhenverstellbare Tische sind aus-
-
fenlos höhenverstellbar, für bestmögliche ergonomische
Arbeitsbedingungen.
• Der Tisch wurde nicht für andere Zwecke als die im Hand-
buch enthaltenen konzipiert, z.B. darf er nicht in Räumen mit
-
sonen verwendet werden. Jede andere Verwendung erfolgt
auf eigene Gefahr!
• Nicht unter das Tischgestell kriechen, dort liegen oder sich dort
bewegen, und nicht auf dem Tischgestell sitzen oder stehen.
• Kinder sollten den Tisch ausschließlich unter Aufsicht von
Schäden, die durch unsachgemäße Verwendung oder Hand-
habung des Tischgestells, oder andere Verwendung oder
Handhabung als die in dieser Bedienungsanleitung beschrie-
benen, verursacht wurden.
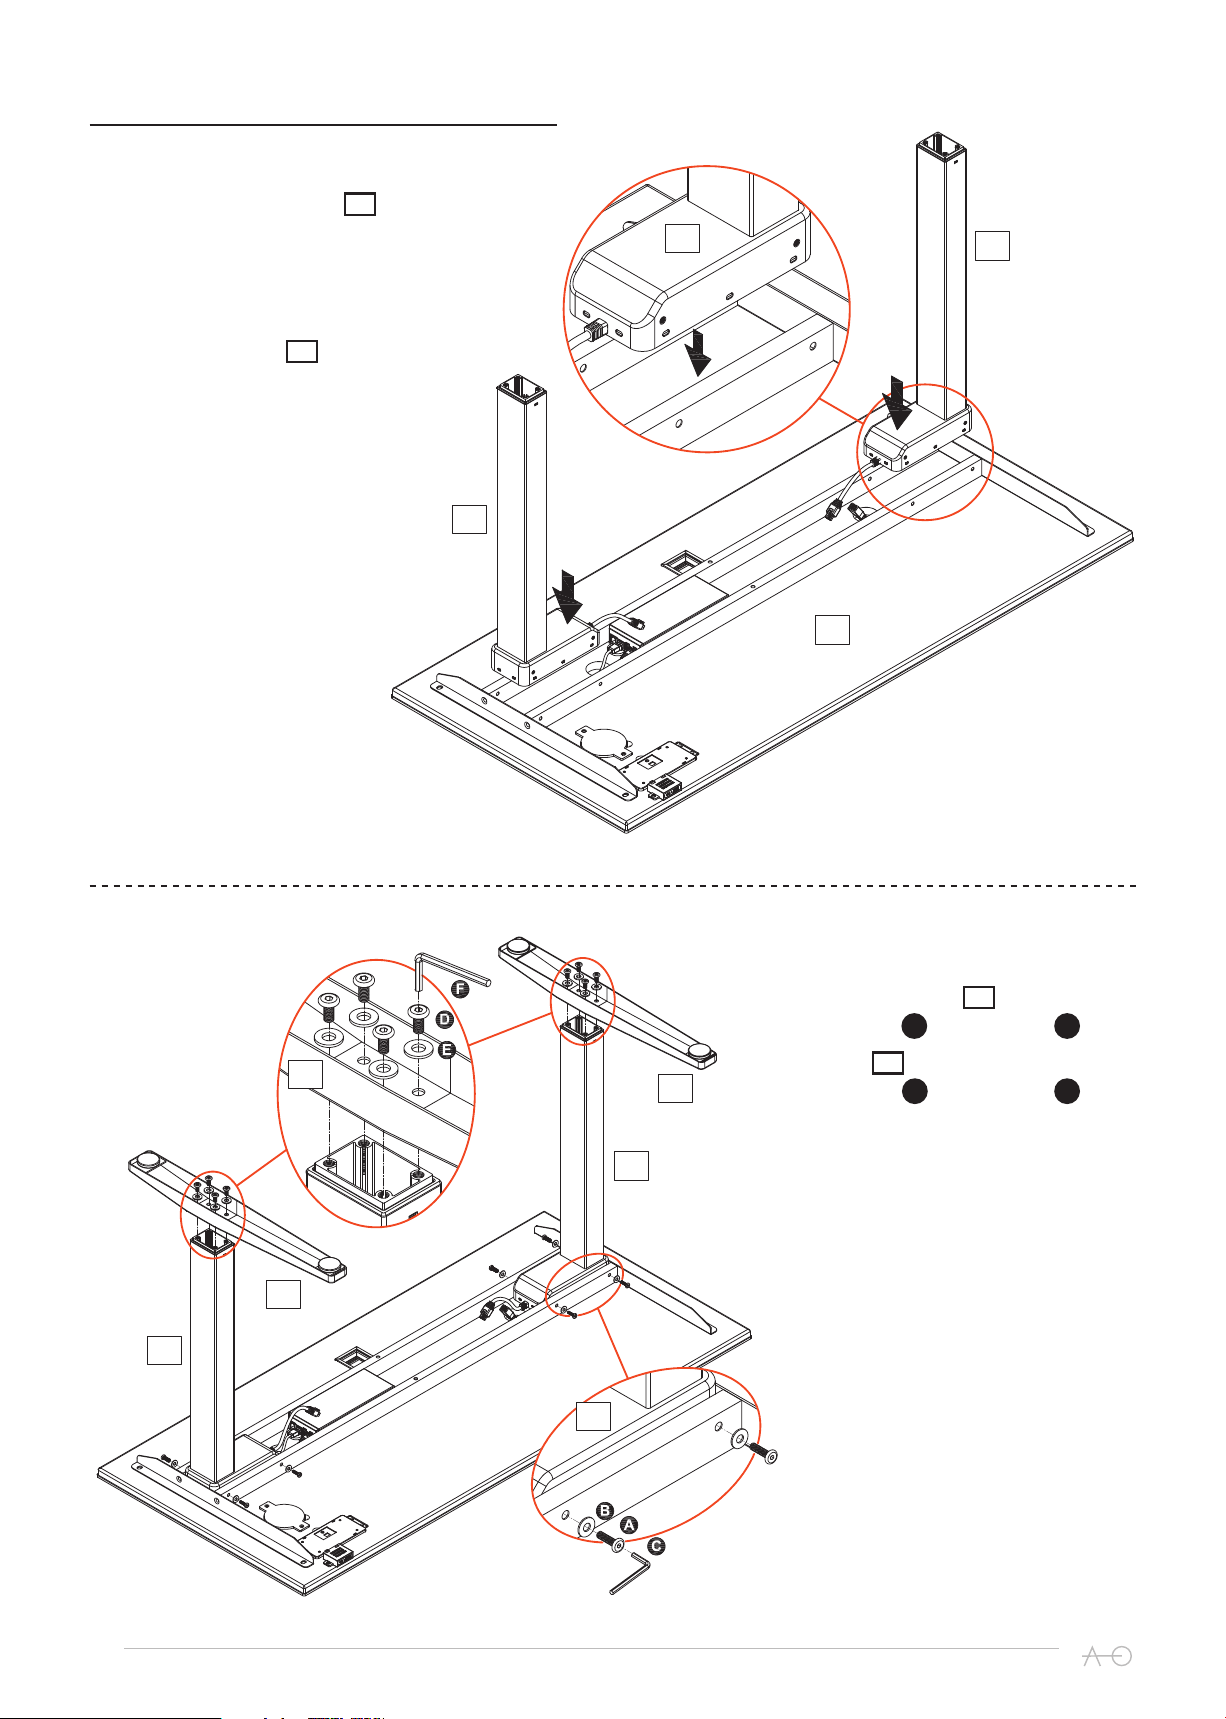
AUFBAU UND INSTALLATION
installiert, ist der Tisch eben und lässt sich nicht verschieben, so wird der
Tisch mit dem 100-240 VAC Stromanschluss verbunden und der Tisch ist
einsatzbereit.
• Stellen Sie sicher, dass keine Kabel eingeklemmt werden können. Dies gilt
auch für Telefon-, Rechner- oder Lampenkabel. Stellen Sie auch sicher, dass
alle Kabel stolperfrei verlegt werden.
• Stellen Sie den Tisch in einem sicheren Abstand zu Fenstern, Heizkörpern,
Mobiliar usw. auf, so dass sich niemand und nichts dazwischen eingeklemmt
werden kann.
• Platzieren Sie keine Gegenstände, die höher als 55cm sind unter dem Tisch.
REINIGUNG
insbesondere von den Führungsrohren und vergewissern Sie sich, dass keine
-
ben auf festen Sitz sowie alle Steckverbindungen, Kabel und Stecker, sowie die
dürfen nur mit einem trockenen oder leicht befeuchteten Tuch gereinigt wer-
einem pH-Wert von 6-8 benutzt werden. Es darf keine Flüssigkeit in das Sys-
tem (Steuerung, Bedienteil, Kabel und Gestell) gelangen. Personengefährdung!
KONFORMITÄTSERKLÄUNG
Wir erklären hiermit unter alleiniger Verantwortung, dass das Produkt –
ATLASIO
des Europäischen Parlaments und des Rates vom 17. Mai 2006 über Ma-
schinen und der Änderung der Richtlinie 95/16/EG (Neufassung) In Bezug
Steh Tische als eine Maschine betrachtet werden und - Ein Sitz-Steh Tisch
ist und nach den zuvor genannten Anweisungen installiert wurde.
MEHR INFORMATIONEN
ENTSORGUNG

9
Smart Height Adjustable Desk+SHD+
EN
MAIN COMPONENTS
PART OF THE STEPS SUGGEST
TWO PEOPLE INSTALL.
Please check you have all the parts listed below.
x1 > Desk top
1x2 > Liing column
2
x2 > Foot
3x1 > 2m Power cable
4
FIXINGS, FITTINGS AND TOOLS
Please check you have all the parts listed below.
NOTE:
may be supplied than are required.
x8 > M6 x 30 mm Screw x8 > 16 mm Washer
x8 > M8 x 15 mm Screw
x1 > M4 Allen key
x8 > 18 mm Washer
A B C
D E x1 > M5 Allen key
F
SMART HEIGHT ADJUSTABLE DESK+SHD+

10
STEP 2
with screw and wrench .
2
2
2
1
2
2
2
3
3
3
ASSEMBLY DIAGRAM
STEP 1
With help, place desk top
surface. Ensure the surface is
suitably protected to prevent any
damage to top.
slot on the table top.
1
2
2
2
2
1
2
2
2
3
3
33
2
A C
D F

11
Smart Height Adjustable Desk+SHD+
4
4
3
1
2
STEP 3
1.
2. Insert the line of the other
in the hole.
3. lnsert power cord
4
STEP 4
TIP:
screen will display “ ”. Hold down
the key for 3 seconds to
unlock it. For details, refer to the
You need to reset the device
for 8 seconds to display “ ” and then release,
is successful.
M
??
??

12
??
TECHNICAL SPECIFICATION
ITEM NO.
Voltage AC100V-240V / 50-60HZ
Rated Input Voltage 100-240 V
Frequency 50/60 Hz
Input Current 0.48-1.16A
29V-3A
3A
Power 240 W
Applicable Ambient
Temperature
10W for wireless charger
18W for USB charger
WIRELESS CHARGING
FUNCTION
devices, please put the phone on the wireless
charging indicator and check if the phone
is successfully connected to the charging
Wireless charging will only work with wireless
wireless charging funcon
USER GUIDE
Display window
Funcon Memory key
Key 1
Key 2
Up
Down
Key 3
Sit stand reminder
Height
Locked
See Trouble Shoong
LOCK AND UNLOCK
Press and hold the key
for 3 seconds to unlock or lock.
M
DESK HEIGHT ADJUSTMENT
Up:
Down:
DISPLAY WINDOW:
??
??

13
Smart Height Adjustable Desk+SHD+
PROGRAMME PRE-SET HEIGHT
It is possible to store 3 pre-set height posions.
1. Use the keys to set the desired height. This is shown in the display window.
2. Press the memory key. “ ” is shown in the display window.
3. Press one of the pre-set height number keys , , . The number corresponding to the number
key selected is shown in the display window: “ ”, “ ”, “ ”. The display window will return to
showing the set height.
4. Repeat for each of the pre-set keys , , .
5.
the corresponding memory height.
6.
M
1 2 3
1 2 3
1 2 3
RESTORE FACTORY MODE
When “ ” or “ ” is displayed on the LCD, hold down for 5 seconds. When “ ” is displayed
TIMER SETTING AND OPERATION
Time seng / start:
Cancel ming mode:
Other instrucons:
USB CHARGER
Please connect correctly with type C and the USB charger with desk.
T
T
T
M
USB: QC3.0 18WType C: PD45W
??
??
1 2 3
??
??
??
T

14
TROUBLE SHOOTING
PROBLEM ROOT CAUSE CORRECTIVE ACTION
Display indicate E01 A motor line open
Display indicate E02 B motor line open
Display indicate E03 A motor over current
a professional and replace motor A or reduce the load.
Display indicate E04 B motor over current
a professional and replace motor B or reduce the load.
Display indicate E05 A motor hall fault
Display indicate E06 B motor hall fault
Display indicate E07 Abnormal main power supply
Display indicate E08 A motor current abnormality
Display indicate E09 B abnormal motor current
Display indicate E10 A motor power device is broken
and it needs to be returned to the factory.
Display indicate E11 B motor power device is broken
and it needs to be returned to the factory.
Display indicate E12
Display indicate E13 Wait for temperature to drop.
Display indicate E14 A motor is blocked
a professional and replace motor A or reduce the load.
Display indicate E15 B motor block
a professional and replace motor B or reduce the load.
Display indicate E16 Restore factory mode.
Display indicate E17 Key data loss Return to factory for processing.
TROUBLE SHOOTING
and solve the problem, if these are of no help, please refer to a professional.
PROBLEM PROBLEM CAUSE REMEDY
No power display
Power plug not inserted properly.
There is no power in the socket.
The power is not switched on.
The jack must be electrical.
Press the plug.
Turn on the power.
No wireless charging
Power not connected.
Mobile device does not have wireless
Check power is connected and on.
Check your mobile device has wireless
charging capability.

15
Smart Height Adjustable Desk+SHD+
This label means that this prod-
uct must not be disposed of
with other household waste an-
ywhere within the EU. In order
to protect the environment or
human health from uncontrolled
disposal, it must be recycled responsibly. To
dispose of the device after use, please use
the local waste return and collection systems
or contact the dealer from whom the product
was purchased.
In addition, this product also complies with:
EMC Directive 2014/30/EU, EN 61000-6-3:2007+A1
,
EN 61000-6-1:2007 LVC Directive 2014/35/EU,
EN 60335-1:2012+A1, EN 6223:2008
MANUFACTURER:
Pantes GmbH, Maria-Theresia-Str. 11,
81675 Munich, Germany
Munich, 30.09.2021
WARNING! PLEASE FOLLOW THESE INSTRUCTIONS CAREFULLY. THERE IS RISK
OF INJURY. IMPORTANT INFORMATION Read these instructions carefully before
beginning assembly.
Children must not use this product without supervision! This product contains small items
which may present a serious choking hazard if swallowed.
-
sonal injury.
Children must not be allowed to play with this product!
This product may be used by children aged 10 years and above and persons with restricted
physical, sensory or mental capacity, provided they have been previously instructed in its oper-
Cleaning and maintenance must not be carried out by children without supervision.
If the power cord is damaged, it must be replaced by the manufacturer, the manufacturer’s cus-
IMPORTANT: Before assembly, make sure that you have received all the parts according to the
CAUTION:
• This product can only be used in accordance with the standard technical guidelines.
• Do not use this product near corrosive gas, water or in dusty environments.
• Please do not disassemble all components, otherwise claims under the warranty will be void.
SAFETY AND IMPORTANT
INFORMATION
-
proper use can result in personal injury and damage to the desk.
-
desk and therefore protects you/your children from injury and
prevents damage to the desk.
on to a any new owner.
USE
• Electric motor-driven height-adjustable desks are intend-
-
• The desk has not been designed for any purpose other
not be used in rooms with high humidity or moisture levels,
-
en at your own risk!
• Do not crawl under the desk frame, lie there or move
around there, and do not sit or stand on the desk frame.
• Children should only use the desk under adult supervision.
Liability: Under no circumstances does the manufacturer
assume liability for damage caused by the improper use or
handling of the desk frame, or for any use or handling other
ASSEMBLY AND INSTALLATION
feet are installed and the desk is level and secured against movement, the
desk is then connected to the 100~240 VAC power outlet and the desk is
ready for use.
• Make sure that no cables can become pinched or clamped. This also ap-
plies to telephone, computer or lamp cables. Also make sure that all cables
• Place the desk at a safe distance away from windows, radiators, furniture,
etc. so that no persons or objects can become trapped in between.
• Do not place objects taller than 55 cm under the desk.
CLEANING
Periodically remove dust and dirt from the desk frame, especially the guide
tubes, and make sure there is no sign of damage or cracks. Check that all
and connectors, and that they are working properly. The control unit, the
control panel and the desk frame must only be cleaned with a dry or slight-
ly moistened cloth. Risk of personal injury! Aggressive cleaning agents can
cause damage or color changes to the product. Therefore only agents with
a pH value of 6~8 should be used. Do not allow liquids to enter the system
(control unit, control panel, cable, and frame). Risk of personal injury!
DECLARATION OF CONFORMITY
We hereby declare under our sole responsibility that the product – ATLASIO
-
an Parliament and the Council of 17 May, 2006 on machines and the amend-
– A sit-stand desk must not be used before it has been completely assembled
MORE INFORMATIONS
DISPOSAL

www.atlasio.de
Table of contents
Languages:
Other ATLASIO Indoor Furnishing manuals
Popular Indoor Furnishing manuals by other brands

Cooper Lighting
Cooper Lighting Shaper 499-RP specification

Cooper Lighting
Cooper Lighting Shaper 420-RP SERIES specification

Bedz King
Bedz King BK981EL Assembly instructions

HARTO
HARTO Camille manual

Home affaire
Home affaire Anna 31199355 Assembly instructions

MAVAULAR moveis
MAVAULAR moveis Premium RM3940 manual

Furniture of America
Furniture of America CM3336PC-2PK Assembly instructions

Studio Designs
Studio Designs HOME CORBEL 74000 Assembly instructions

Furinno
Furinno FNAK-11173 Assembly instruction

Poliman
Poliman Kit Ravena Assembling instructions

Case
Case Cross Care Instructions

Poliform
Poliform SENZAFINE Assembly instructions