ATTICCO Solo User manual
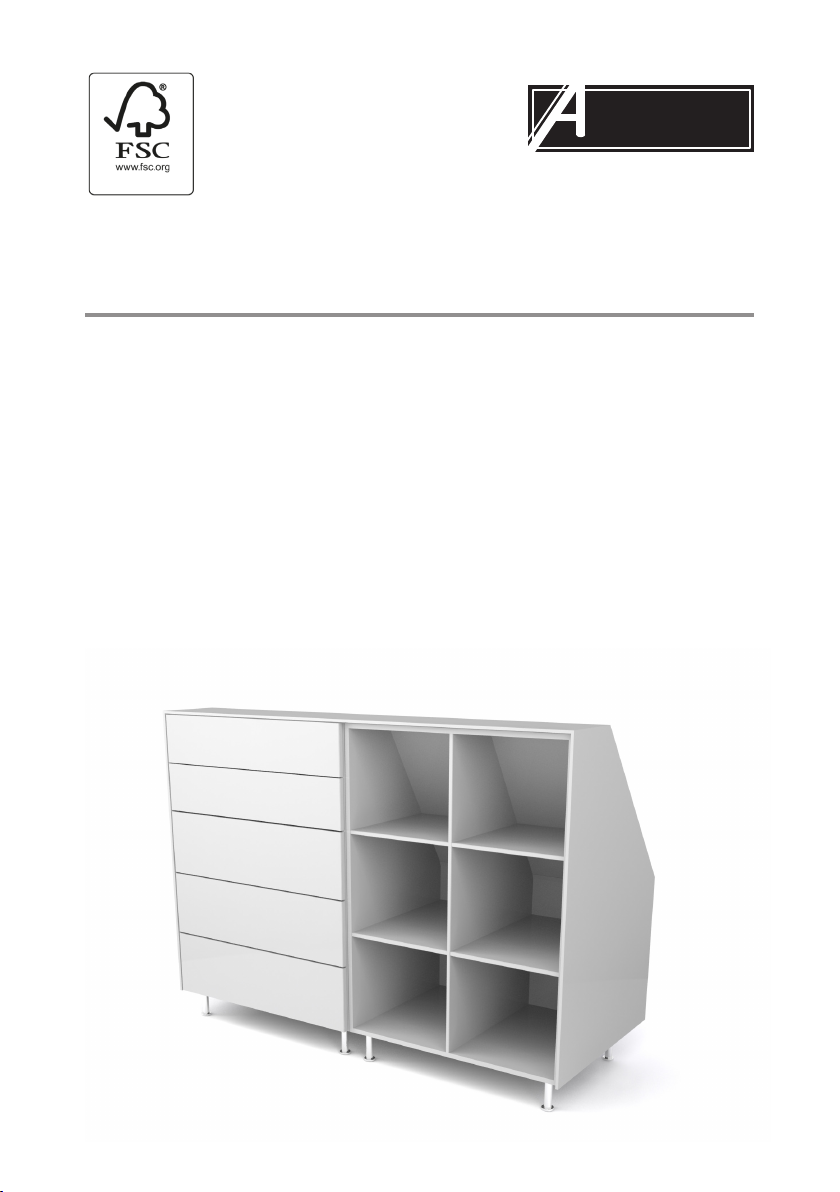
Assembly Instructions
Furniture - High
Freestanding & Built-in
Shelving unit, Cabinet & Dresser
Solo, duo, trio & quattro
TTICCO
See more at www.atticco.dk under“Assembly”
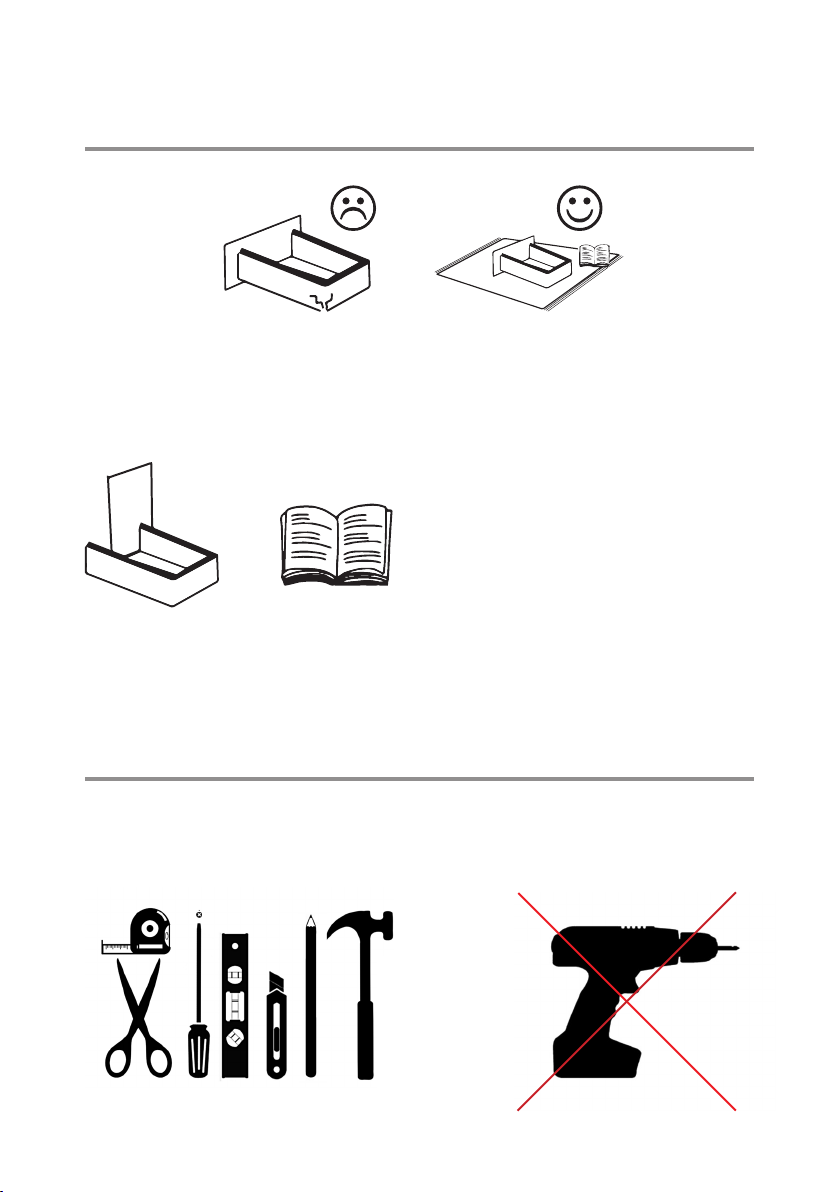
Tools
Protect underlying layer and the furniture
??www.atticco.dk
Tel: +45 23 29 79 47
+ =
Tools you will need ...and NOT use
x2
Get started
2
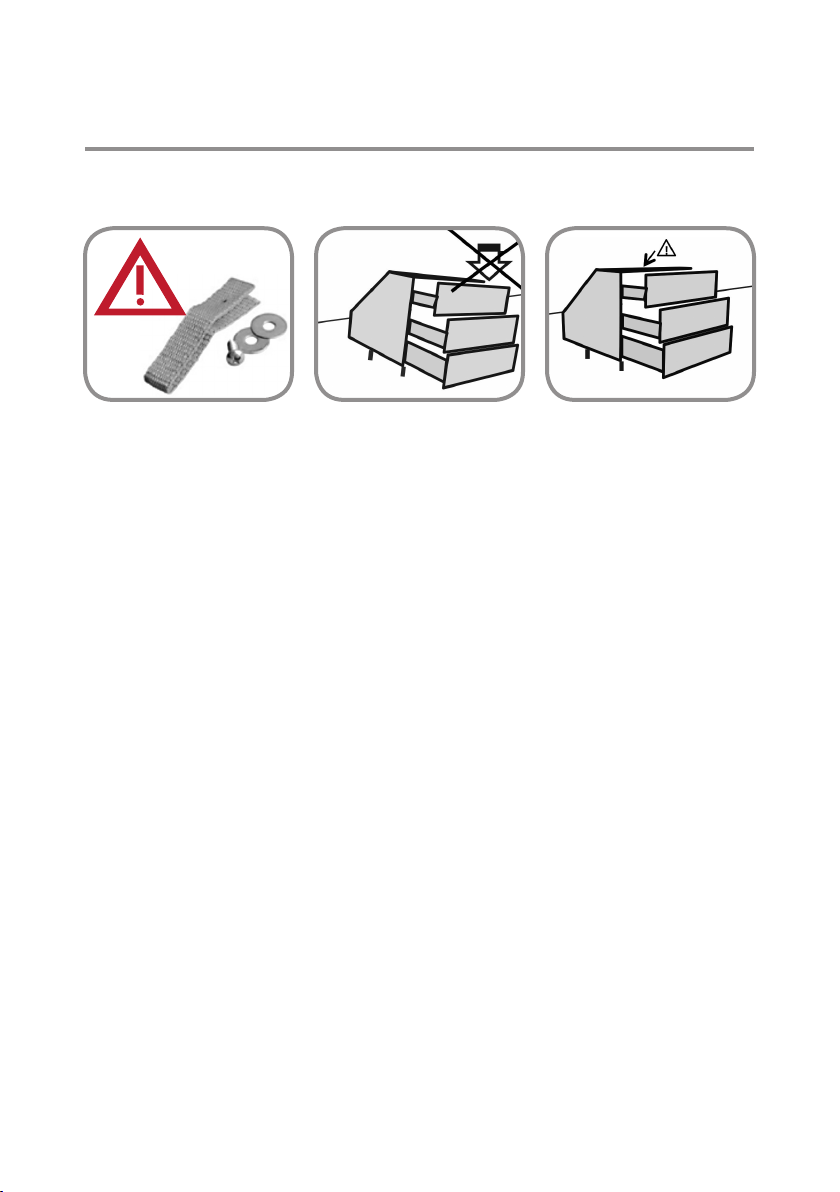
…. to fasten your new furniture to the wall by use
of the balance bracket included.
Dierent types of walls require dierent types of
screws and raw plugs, so it is important to choose
the type best suited for the wall where your furni-
ture will be placed - and these anchoring parts are
therefore not included.
The assembly instructions will show how to t the
balance bracket. If in any doubt about which screws
and raw plugs to use for your wall, please contact
your local DIY-store.
Remember
3

ALWAYS lift the side pieces in the part
WITHOUT cutting lines!
ATTENTION!
The cover plates provided for FREESTANDING
FURNITURE are more fragile than the other
plates of the ATTICCO furniture due to the
cutting lines.
The box with the plates with cutting lines are
marked as shown in the graphics below:
4

1
2
3
4
5
6
7
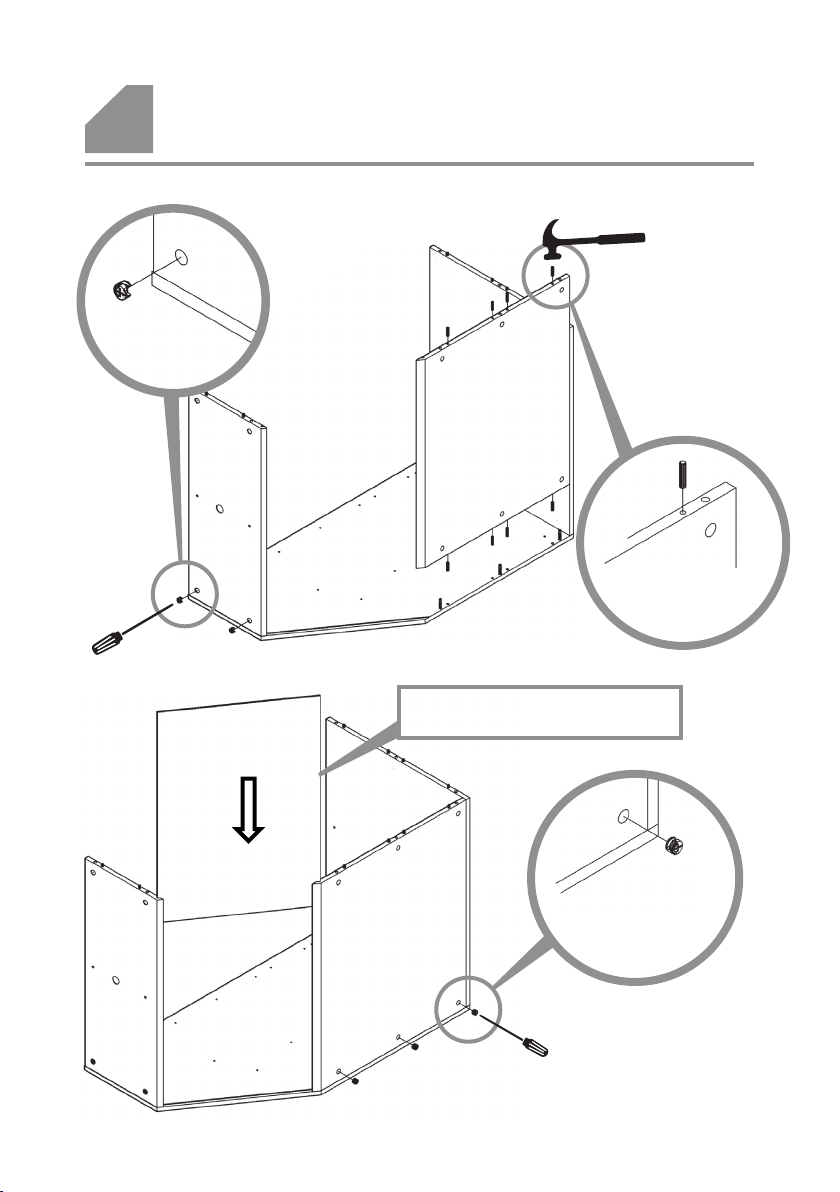
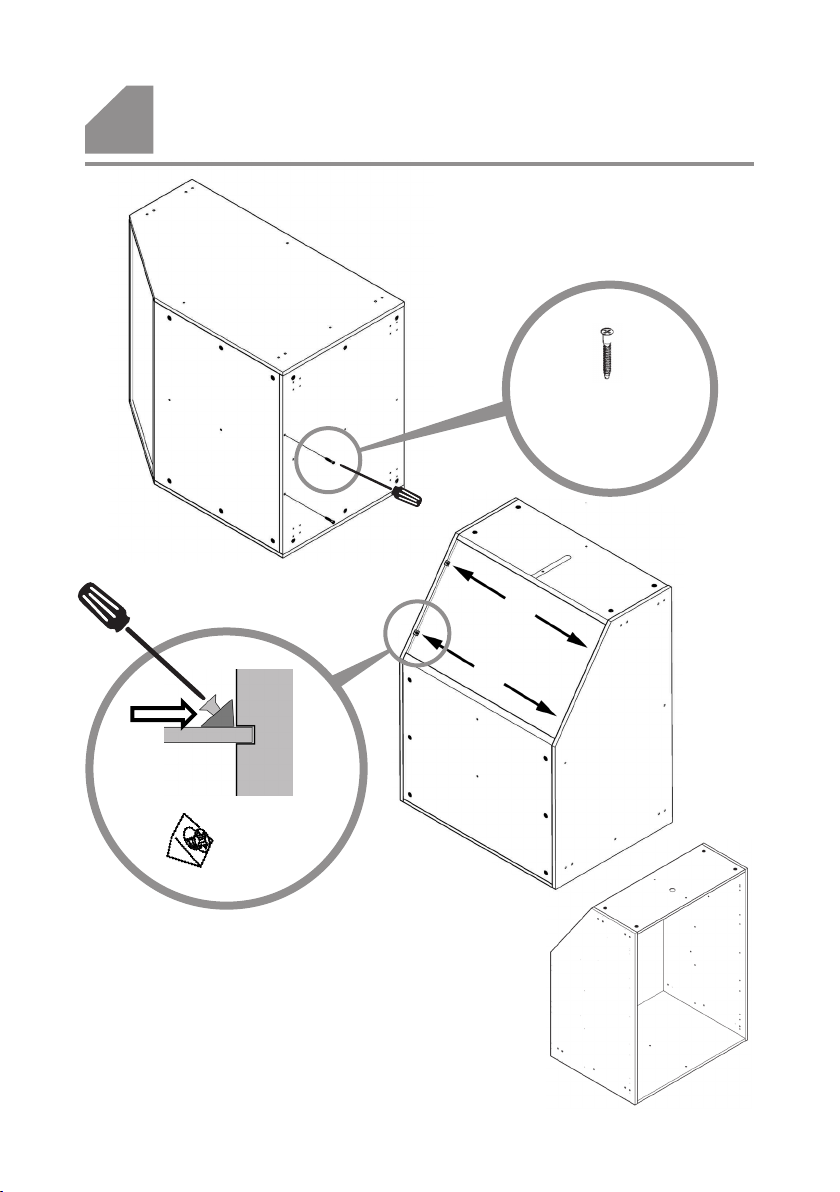
Assembly of corpus
Mounting the middle piece
(only shelving unit and
cabinet)
Choosing furniture
expression
Assembly of Duo, Trio &
Quattro
Mounting the cover plate
(only freestanding)
Assembly of shelving unit,
cabinet and dresser
Mounting the strips
(only freestanding)
5

Assembly of corpus
1
X 8
329566
X 8 pr. plate
313116
334556
X 1
323769
X 1
306488
X 1
313116
X 16
ATTENTION:
Make sure holes are clean of sawdust.
ALWAYS insert the dowels in the direction of
length of the plate as shown.
Use hammer with caution!
329125
X 16
329566
X 20
309104
X 2
313748
X4
6

Assembly of corpus
1
X 3
329125
X 4
329566
7
Assembly of corpus
1
X 3
329125
White side inwards
X 8
329566
X 2
329125
8

Assembly of corpus
1
X 8
329125
9
X 2
309104
X 4
313748
Optional:
If the backplate sits loose in the milled depression,
you can fasten it with the triangular clips.
Assembly of corpus
1
10

Mounting the middle piece
2
Shelving unit and cabinet only
X 7
309104
The middle piece and bracket are in the
package marked“Shelving Unit”
309104
X 7
11
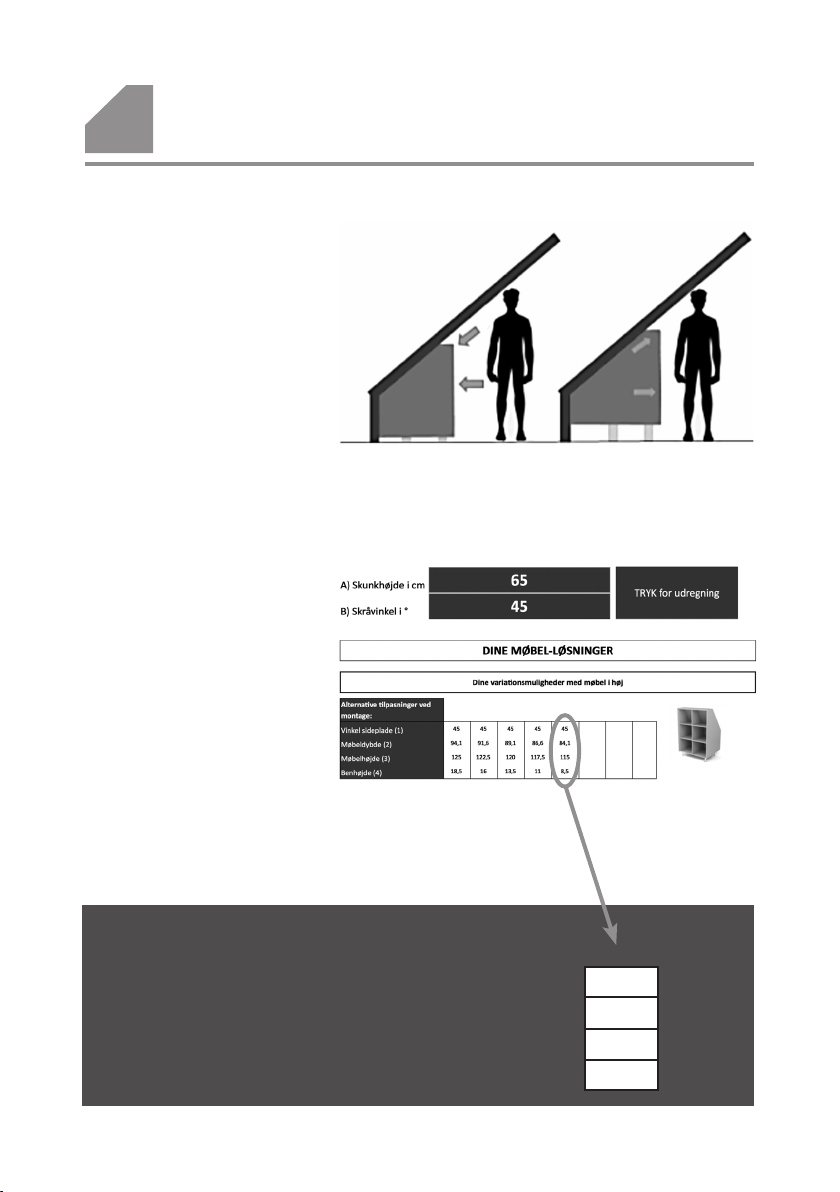
Choosing furniture expression
3
Freestanding furniture only
Your freestanding furniture can be assembled
with dierent furniture expressions and leg
heights. Find your options on atticco.dk
under the main menu“Your Furniture”
and the sub menu ”Your Solution”
Enter the knee wall measures A
and angle B (measured where
the furniture will be placed).
Then choose furniture expression
in the form of furniture height
and depth represented by each
column:
Example:
Your choice:
For the assembly instructions:
1 Up rounded angle
2 Furniture depth
3 Furniture height
4 Furniture leg height
12

Choosing furniture expression
3
Built-in furniture only
The standard“default”plinth height for built-in furniture is 3cm.
Should you want a lower plinth height than the 3 cm, this can be done without problems.
If you want a higher plinth, please check whether the space under the knee wall allows for
this.You can check it with the calculator tool at atticco.dk.When you enter the values into the
calculator tool, you should subtract the default 3cm from the wanted plinth height.The result
of this calculation should again be subtracted from the height of the knee wall, and then
entered in the calculator. See the below example:
Example:
You want a plinth height of 18 cm and your
knee wall height is 120 cm.
Enter the angle in question and enter an
adjusted knee wall height of 120 cm - 15 cm
= 105 cm.
The 15 cm to be deducted from the knee wall
height is the wanted plinth height (18cm)
subtracted the default/standard 3 cm.
If the calculator accepts your numbers - ne!
If not, please nd the highest possible plinth
height by reducing the plinth height step
by step downwards until the calculator tool
accepts the given plinth height.
You can read more about the build-in process
at www.atticco.dk under the menu point
“Assembly”
13

Choosing furniture expression
3
Freestanding furniture only
Furniture leg parts (= 1 leg)
In the above form you can nd how to put your furniture legs together when you know the nal
leg height.You can also visit atticco.dk under the menu point“Assembly”. Enter the requested
leg height and nd the composition of your furniture legs.
103190
X 16
Furniture legs
X 4
Mounting piece
low
Mounting piece
high
Foot thread
cover
spacers
A furniture leg consists of a low or high mounting piece, a number of spacers,
a furniture foot and a cover to conceal the thread.The exibility of the furniture leg is reached
by using a varying number of spacers and by the threaded rod on the mounting piece.
Put your 4 furniture legs together so they reach the height stated in the furniture expression
form (Page 12).
Leg height in mm Composition of the furniture legs
70-86 Low mountingplate + furniture foot
87-100 High mountingplate + furniture foot
101-118 Low mountingplate + 1x spacer + furniture foot
119-132 High mountingplate + 1x spacer + furniture foot
133-149 Low mountingplate + 2x spacer + furniture foot
150-164 High mountingplate + 2x spacer + furniture foot
165-181 Low mountingplate + 3x spacer + furniture foot
182-196 High mountingplate + 3x spacer + furniture foot
197-213 Low mountingplate + 4x spacer + furniture foot
214-227 High mountingplate + 4x spacer + furniture foot
228-244 Low mountingplate + 5x spacer + furniture foot
245-250 High mountingplate + 5x spacer + furniture foot
14

Choosing furniture expression
3
X 4, Leg
X 16, 103190
Select mounting plate (low or high) and mount the number of spacers indicated by the
diagram.The threaded cover must have a length in mm = [Total leg length according to
the calculation minus 20].
Use a hobby knife to shorten the threaded cover. Be careful when using the knife.
Slide the threaded cover (the cutted end rst) over
the spacers (if any) and the mounting plate.
Mount the furniture foot on the free thread and
tighten. Repeat the process for all 4 furniture legs,
and mount them on the corpus.
Freestanding furniture only
Lift and turn the furniture around. The furniture
legs may be damaged if the furniture is pushed
around!
It is best to be two persons, when handling the
furniture
15
3
(1)
(2)
(3)
(4)
Choosing furniture expression
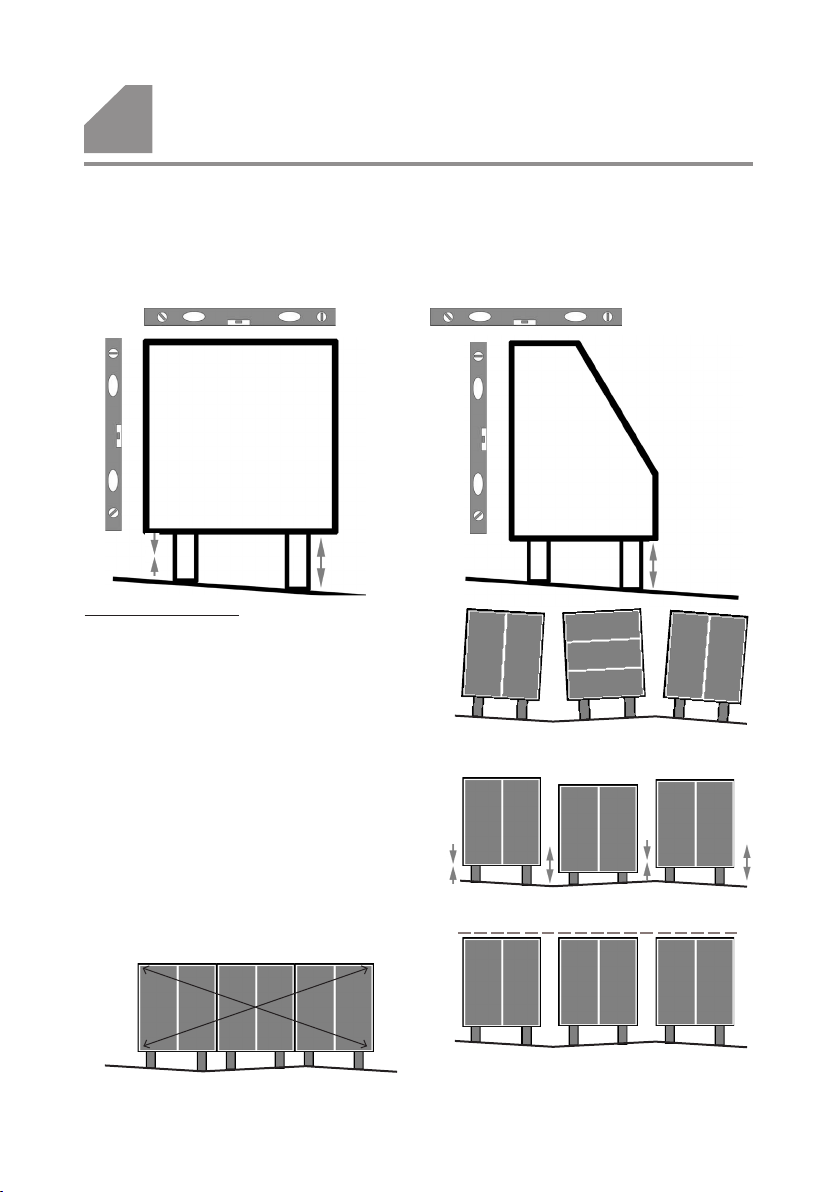
ATTICCO must be adjusted by the exible furniture legs so the furniture is at an angle both
horizontally and vertically. Place the furniture at its nal location and check the angles.
Adjust the furniture legs until the furniture is at the correct angle. Use a spirit level.
Adjustments
Duo, Trio & Quattro
(1) Place each individual corpus at its nal location.
(2) Adjust the legs until the furniture is at an angle.
(3) Adjust the height of the legs of each corpus so all
corpuses are at the same height.
(4) Check the angles; horizontal and vertical. Adjust
the furniture legs so that they all support the furni-
ture (all have contact with the oor).
Check by measuring diagonally.
16
4
X 7
317778 X 7
303125
303125
X 7
X 14
X 21
317778
X 7
X 14
X 21
Duo
Trio
Quattro
329563
X 4
X 8
X12
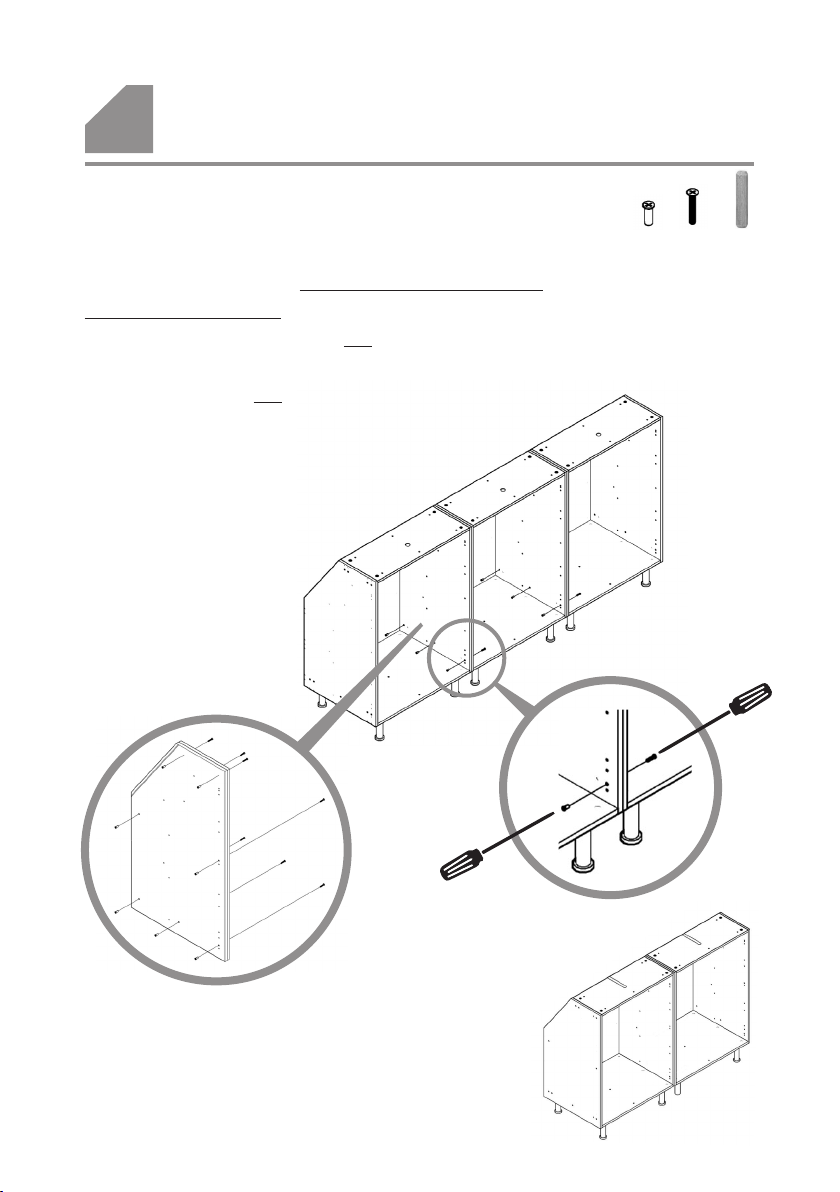
Assembly of Duo, Trio, Quattro
Assemble the number of corpus units needed for the nal
furniture; Duo,Trio or Quattro. Place the corpus units at their
nal location at the wall and close to each other.
Remember to lift the corpus, do not push it!
Insert the 4 dowels (do not use a hammer!) in one
of the 2 side pieces of the corpus to be assembled.
Lift and press the two corpuses together.
Then x the the furniture by use of
clamps, if needed.
Fix the side pieces meeting
each other by 7 screws.
Use male and female screws.
Brackets can be found in the
bag packaged with the deck
plate for duo or trio
ATTENTION!
If you later want to move your furniture - Separate
the furniture and move each corpus separately!
17

Mounting the cover plate
5
Freestanding furniture only
Notes for assembly:
1 Up rounded angle
2 Furniture depth
3 Furniture height
4 Furniture leg height
B
A
The cover plate system is tted by furniture parts and brackets found in the cover plate and
deck plate boxes.The two cover plates are more fragile than the other plates because of the
cutting lines.Therefore ALWAYS lift the plates at the part WITHOUT cutting lines!
Be careful when using the hobby knife!
Place the cover plate on top of a blanket and 2-3 layers of cardboard from the packaging.
Find the cutting line (angle in degrees) of the cover plate corresponding to the gure in the
form for chosen furniture expression (above). Pull a hobby knife along the
line from A in direction towards B.
After 3-9 pulls, depending on sharpness of the knife and
the pressure applied, split the plate in two.
HINT: If necessary, place some paint tape on the front side where the split occurs, to reduce
the risk of burs. Pull the knife towards yourself with a constant pressure on the blade. Use a
hobby knife with a sharp, stable and short blade.
18

5Mounting the cover plate
Freestanding furniture only
Find the cutting line (furniture depth in cm) of the cover plate
that corresponds to the gure in the form for chosen furniture
expression.
Pull a hobby knife along the specied line. Optional
direction. After 3-9 pulls, depending of the sharpness
of the knife and the pressure applied, split the
plate in two.
Repeat the process with the other
cover plate.
To reduce curvature and deformation of the side cover plates, place a number of small spacers
in every third cutting. Place the cover plates on a level, not-scratching surface with the cutting
lines facing upwards.Then carefully press the spacers down to the bottom of the cutting
lines approximately in the middle of the
piece with vertical cutting lines.
19

X 8
329583
Same principle for
Solo, Duo,Trio &
Quattro
5
103087
X 14
329563
X 8
ATTENTION!
Do NOT use a hammer!
Mounting the cover plate
Freestanding furniture only
ATTENTION!
Make sure holes are clean of sawdust, before
inserting the dowels.
20
This manual suits for next models
4
Table of contents
Other ATTICCO Indoor Furnishing manuals

Popular Indoor Furnishing manuals by other brands


BLACK RED WHITE
BLACK RED WHITE STYLIUS B169-RTV1D1S Assembly

Jysk
Jysk HEBY 712-17-1002 manual

EXPEDO
EXPEDO DITA R3SZ Assembly instruction

Newcastle Systems
Newcastle Systems NB Series 430 Setup and operation manual

Furniture of America
Furniture of America CM6594-LV Assembly instructions

Uplift Desk
Uplift Desk UPL127 instructions