Newcastle Systems NB Series 430 Manual instruction
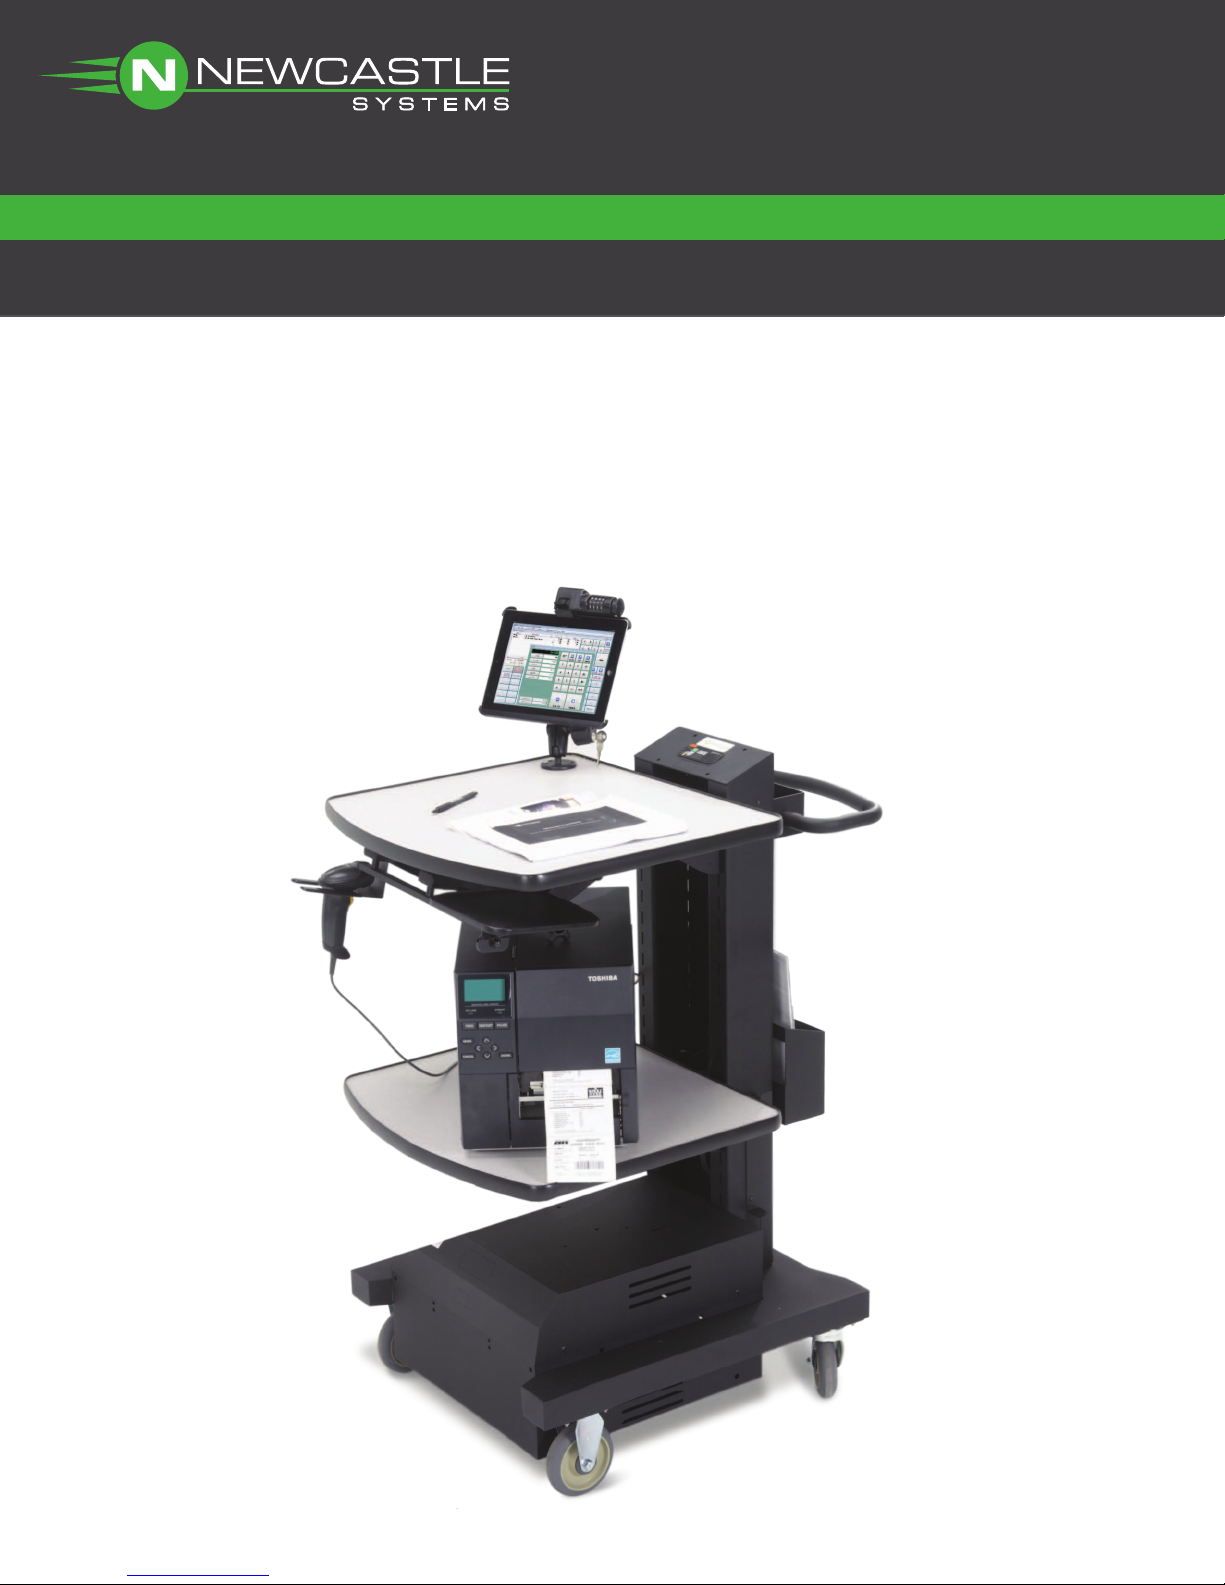
Powered Process Improvement
73 Ward Hill Ave. l Haverhill, MA l 01835 l USA l 781.935.3450 l www.newcastlesys.com
NB Series 430/440
SETUP AND OPERATION MANUAL

TECHNICAL SUPPORT 781.935.3450 EXT. 3 ii
NB Series 430/440
Setup and Operation Manual
Document Number: NS100_NB430_00_C
Revision Date: January, 2018
Release Date: September, 2016

TECHNICAL SUPPORT 781.935.3450 EXT. 3 iii
COPYRIGHT
All copyrights to this document are owned by Newcastle Systems, Inc. No part of the contents of this
document may be reproduced or transmitted in any form or by any means without the prior written con-
sent of Newcastle Systems, Inc.
NOTICE
Newcastle Systems, Inc. shall not be liable for errors contained herein. Newcastle Systems, Inc. shall not
be liable for any damages whatsoever, including, without limitation, damages for loss of business profits,
business interruption, loss of business information, or other pecuniary loss arising out of the use of this
documentation even if Newcastle Systems, Inc. has been made aware of the possibility of such damages.
Information contained in this document is subject to change without notice. While every effort is made
to ensure that the information is accurate as of the publication date, users are reminded to update their
use of this document with documents published by Newcastle Systems, Inc. subsequent to this date. Up-
dates may be available at www.newcastlesys.com or by contacting Newcastle Systems, Inc.
Copyright © 2018 by Newcastle Systems, Inc.
ALL RIGHTS RESERVED
Printed in U.S.A.
Newcastle Systems, Inc.
73 Ward Hill Avenue
Haverhill, MA 01835
(781) 935-3450
www.newcastlesys.com

TECHNICAL SUPPORT 781.935.3450 EXT. 3 iv
Table of Contents
About This Manual
Symbols and Conventions ................................................................................................................ v
Newcastle Systems Technical Support ........................................................................................ v
The NB Series 430/440
Standard Contents .............................................................................................................................. 1
Optional Accessories .......................................................................................................................... 1
Tools Required ...................................................................................................................................... 1
Setting up the NB Series ................................................................................................................... 2
One Battery Setup for NB430 ...................................................................................................................................3
Two Battery Setup for NB440 ..................................................................................................................................5
Testing the Battery Function ........................................................................................................... 7
Tips for Proper Cart Operation ....................................................................................................... 8
Troubleshooting Tips .......................................................................................................................... 8
Frequently Asked Questions ........................................................................................................... 9
Index

TECHNICAL SUPPORT 781.935.3450 EXT. 3 v
Symbols and Conventions
About This Manual
Symbols and Conventions
Symbols are used in this manual and on the product itself to ensure correct usage, to prevent danger to
the user and others and to prevent property damage. The symbols are defined below. It is important that
you read these descriptions and fully understand them.
Caution
This symbol indicates information that, if ignored, could result in personal injury or harm to the
equipment due to incorrect handling.
Warning
This symbol indicates information that, if ignored, could result in death, serious physical injury or
destruction of property due to incorrect handling.
Indicates important procedures
Note: Indicates important related information, reminders and recommendations
Italics
Used for emphasis, for indicating the first occurrence of a new term and for book titles
1. Numbered list - Used when the order of the items is important
• Bulleted list - Used when items are of equal importance, but the order is unimportant
Newcastle Systems Technical Support
You can reach Technical Support by telephone. Dial (781) 935-3450, then select 3 for technical support.
When requesting assistance, please be ready to provide the following information:
• Your name and telephone number
• Product model and serial number
• Brief description of the problem and list of symptoms
• Steps you have already taken to try to resolve the problem
If the Product is Damaged
If any portion of the unit is damaged, forward an immediate request to the delivering carrier to perform
an inspection of the product and to prepare a damage report. Save the container and all packing materi-
als until the contents are verified.
Also report the damage, along with the model and serial numbers, to Newcastle Systems Customer Ser-
vice at (781) 935-3450 so that action can be initiated to either repair or replace the damaged items. Do
not return any items to Newcastle Systems until you obtain instructions from Customer Service.
Upon receipt of this information, Newcastle Systems will provide service instructions, or a return authori-
zation number and shipping information.

TECHNICAL SUPPORT 781.935.3450 EXT. 3 1
Standard Contents
The NB Series 430/440
Standard Contents
Each cart will come with the following standard contents:
• Cart (assembled)
• Battery and hardware
• Trash can holder and green can
Optional Accessories
Any optional accessories that were ordered with the cart will either be installed on the cart or shipped
separately in a box with the cart.
Note: Some accessories may be placed in the power cabinet for shipping purposes.
Tools Required
One 10 mm open end or socket wrench
Your Power to Productivity
73 Ward Hill Ave. lHaverhill,MAl01835 lUSA l781.935.3450 lwww.newcastlesys.com
1 BATTERY SET-UP FOR NB SERIES
What you’ll need
battery
hardware
10 mm
Hardware
bolts
washers
flat
washers
lock
Wire Connections
black
black
red
A B C
Battery Wire Connections Overview
C
A
B
3.
4.
A
B C
battery
optional
shelf
10 mm

TECHNICAL SUPPORT 781.935.3450 EXT. 3 2
Setting up the NB Series
Setting up the NB Series
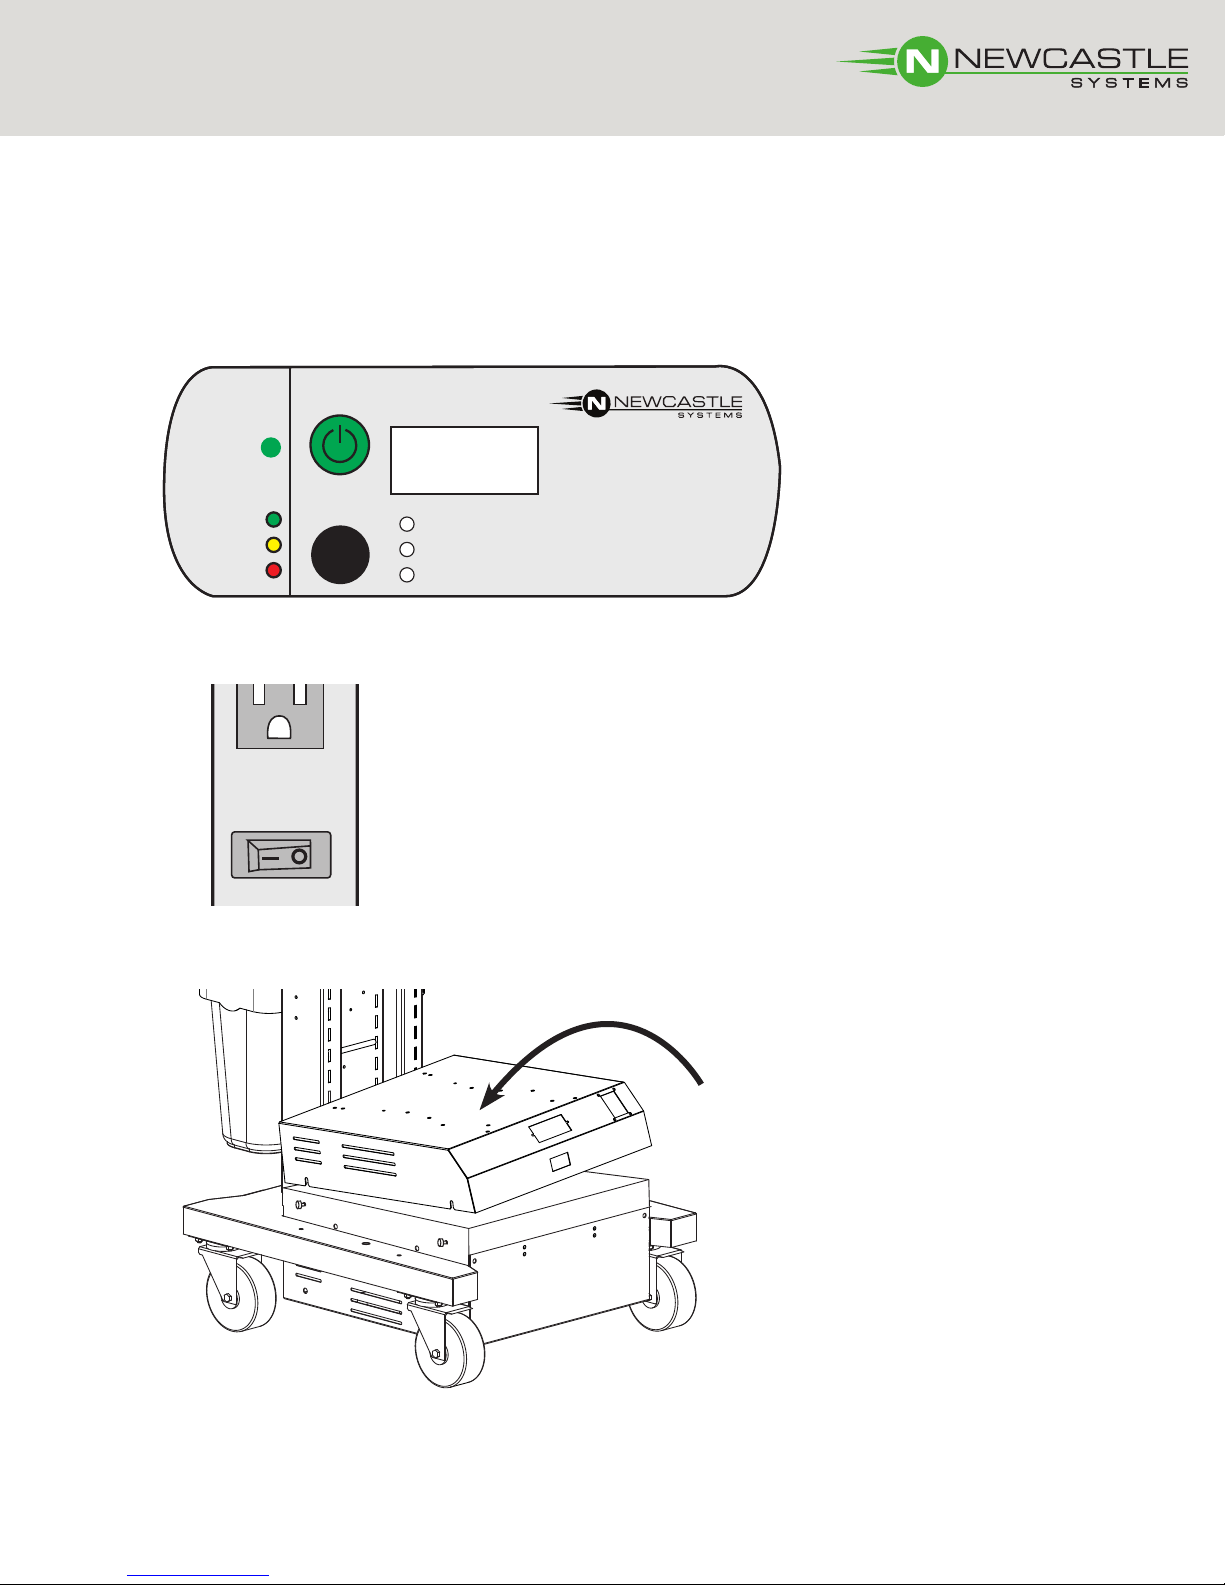
1. Open the power box by loosening the (4) thumbscrews.
2. Next, remove the power box cover.
Once the cover has been removed from the power box, proceed to the appropriate section on battery
installation according to the number of batteries your cart has.
• For one battery installation, see “One Battery Setup for NB430” on page 3.
• For two battery installation, see “Two Battery Setup for NB440” on page 5.

TECHNICAL SUPPORT 781.935.3450 EXT. 3 3
Setting up the NB Series
Your Power to Productivity
73 Ward Hill Ave. lHaverhill,MAl01835 lUSA l781.935.3450 lwww.newcastlesys.com
1 BATTERY SET-UP FOR NB SERIES
What you’ll need
battery
hardware
10 mm
Hardware
bolts
washers
flat
washers
lock
Wire Connections
black
black
red
A B C
Battery Wire Connections Overview
C
A
B
3.
4.
A
B C
battery
1
Your Power to Productivity
73 Ward Hill Ave. lHaverhill,MAl01835 lUSA l781.935.3450 lwww.newcastlesys.com
1 BATTERY SET-UP FOR NB SERIES
What you’ll need
battery
hardware
10 mm
Hardware
bolts
washers
flat
washers
lock
Wire Connections
black
black
red
A B C
Battery Wire Connections Overview
C
A
B
3.
4.
A
B C
battery
2
3
Your Power to Productivity
73 Ward Hill Ave. lHaverhill,MAl01835 lUSA l781.935.3450 lwww.newcastlesys.com
1 BATTERY SET-UP FOR NB SERIES
What you’ll need
battery
hardware
10 mm
Hardware
bolts
washers
flat
washers
lock
Wire Connections
black
black
red
A B C
Battery Wire Connections Overview
C
A
B
3.
4.
A
B C
battery
One Battery Setup for NB430

TECHNICAL SUPPORT 781.935.3450 EXT. 3 4
Setting up the NB Series
Your Power to Productivity
73 Ward Hill Ave. lHaverhill,MAl01835 lUSA l781.935.3450 lwww.newcastlesys.com
1 BATTERY SET-UP FOR NB SERIES
What you’ll need
battery
hardware
10 mm
Hardware
bolts
washers
flat
washers
lock
Wire Connections
black
black
red
A B C
Battery Wire Connections Overview
C
A
B
3.
4.
A
B C
battery
*
*
*Tighten bolts with 10 mm wrench
Sparking is normal during initial connection.
**Pull rubber boot over tightened
terminal
After performing step 5, proceed to “Testing
the Battery Function” on page 7.
4
5
**
Your Power to Productivity
73 Ward Hill Ave. lHaverhill,MAl01835 lUSA l781.935.3450 lwww.newcastlesys.com
1 BATTERY SET-UP FOR NB SERIES
What you’ll need
battery
hardware
10 mm
Hardware
bolts
washers
flat
washers
lock
Wire Connections
black
black
red
A B C
Battery Wire Connections Overview
C
A
B
3.
4.
A
B C
battery

TECHNICAL SUPPORT 781.935.3450 EXT. 3 5
Setting up the NB Series
1. 2. 3.
4.
5.
6.
black
C
red
A
black
B
B
C
red
E
D1
black
D1 D2
D2
E
A
bolts
washers
flat
washers
lock
battery
AE
B D1 C D2
Battery Wire Connections Overview
Hardware
Your Power to Productivity
73 Ward Hill Ave. lHaverhill,MAl01835 lUSA l781.935.3450 lwww.newcastlesys.com
2 BATTERY SET-UP FOR NB SERIES
What you’ll need
battery
hardware
Wire Connections
10 mm
1
2
1. 2. 3.
4.
5.
6.
black
C
red
A
black
B
B
C
red
E
D1
black
D1 D2
D2
E
A
bolts
washers
flat
washers
lock
battery
AE
B D1 C D2
Battery Wire Connections Overview
Hardware
Your Power to Productivity
73 Ward Hill Ave. lHaverhill,MAl01835 lUSA l781.935.3450 lwww.newcastlesys.com
2 BATTERY SET-UP FOR NB SERIES
What you’ll need
battery
hardware
Wire Connections
10 mm
3
Two Battery Setup for NB440
1. 2. 3.
4.
5.
6.
black
C
red
A
black
B
B
C
red
E
D1
black
D1 D2
D2
E
A
bolts
washers
flat
washers
lock
battery
AE
B D1 C D2
Battery Wire Connections Overview
Hardware
Your Power to Productivity
73 Ward Hill Ave. lHaverhill,MAl01835 lUSA l781.935.3450 lwww.newcastlesys.com
2 BATTERY SET-UP FOR NB SERIES
What you’ll need
battery
hardware
Wire Connections
10 mm

TECHNICAL SUPPORT 781.935.3450 EXT. 3 6
Setting up the NB Series
1. 2. 3.
4.
5.
6.
black
C
red
A
black
B
B
C
red
E
D1
black
D1 D2
D2
E
A
bolts
washers
flat
washers
lock
battery
AE
B D1 C D2
Battery Wire Connections Overview
Hardware
Your Power to Productivity
73 Ward Hill Ave. lHaverhill,MAl01835 lUSA l781.935.3450 lwww.newcastlesys.com
2 BATTERY SET-UP FOR NB SERIES
What you’ll need
battery
hardware
Wire Connections
10 mm
*Tighten bolts with 10 mm wrench
Sparking is normal during initial connection.
**Pull rubber boot over tightened
terminal
*
*
*
*
4
5
7
6
** **
1. 2. 3.
4.
5.
6.
black
C
red
A
black
B
B
C
red
E
D1
black
D1 D2
D2
E
A
bolts
washers
flat
washers
lock
battery
AE
B D1 C D2
Battery Wire Connections Overview
Hardware
Your Power to Productivity
73 Ward Hill Ave. lHaverhill,MAl01835 lUSA l781.935.3450 lwww.newcastlesys.com
2 BATTERY SET-UP FOR NB SERIES
What you’ll need
battery
hardware
Wire Connections
10 mm
TECHNICAL SUPPORT 781.935.3450 EXT. 3 7
Testing the Battery Function
Testing the Battery Function
Make sure all fittings are tight and that the battery is strapped down in the cabinet. Test the unit before
replacing the power box cover.
1. Turn the unit on by pressing the green power button.
2. Turn the power strip on. The light should turn red.
3. Place the power box cover on and tighten the thumb screws..
Input Voltage (V)
Input Current (A)
SELECT
Output Power (Kw)
Battery
Utility
Status
Fault
12.0
CHARGING
YOUR UNIT
MAKE SURE YOUR OUTLET
SWITCH IS TURNED ON
READING YOUR BATTERY METER
METER LIGHT INDICATORS
POWER SWITCH
*MAKE SURE THIS IS TURNEDON
( A REDLIGHT WILL INDICATE THIS )
AVOID BATTERY
REACHING
RED LEVELS
PLUG INVERTER
CHORD INTO A
NEARBY OUTLET
AVAILABLE OUTLETS
VOLTAGE
LIGHT #
COLOR
12.6
10 9 8 7 6 5 4 3 2 1
12.4 12.3 12.1 12.0 11.8 11.7 11.5 11.4 11.2
TECHNICAL SUPPORT 781.935.3450 EXT. 3 8
Tips for Proper Cart Operation
Tips for Proper Cart Operation
• Charge your battery before using it to ensure it is fully charged. Simply plug the charger
cord (located on the side of the unit) into a standard wall outlet.
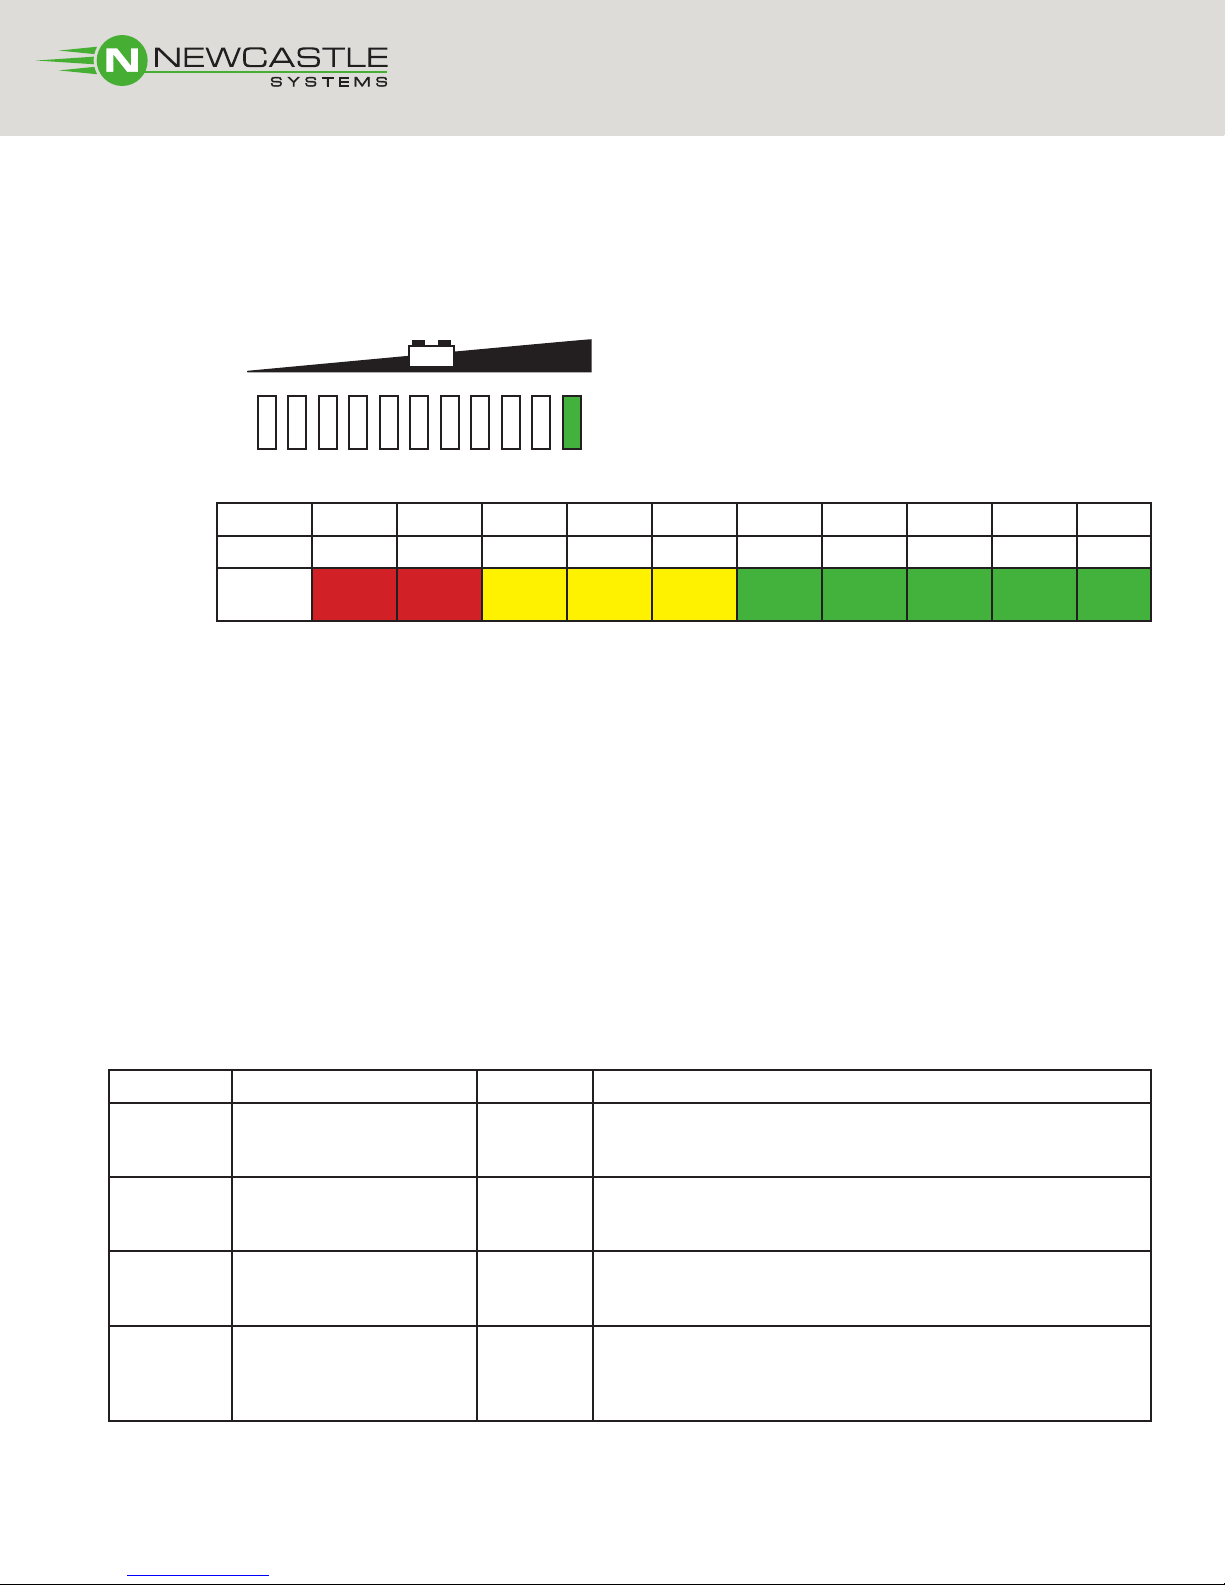
• Monitor the battery status meter on the cart.
Battery Light Meter Indicators
Voltage 11.2 11.4 11.5 11.7 11.8 12.0 12.1 12.3 12.4 12.6
Light # 1 2 3 4 5 6 7 8 9 10
Color Red
Blinks
Red
Blinks Yellow Yellow Yellow Green Green Green Green Green
• Batteries should not be discharged below 11.5 volts because this will shorten the life of the
battery.
• Batteries
should not
be stored in a discharged state. They should be charged as soon as
possible after each use (otherwise it can void the warranty). If a battery is left in a dis-
charged state for a period of time, it may no longer take a charge.
• Avoid exposing battery to heat, service life is shortened at ambient temperatures above
85F.
• When powering equipment on the cart, it’s okay to have the charger plugged in if neces-
sary. In this case, the AC power will pass through the charger and power your equipment
directly.
• When the cart is not in use, the system charger can be plugged into a wall outlet to ensure
the battery remains in its optimal state. Turn the unit to the OFF position.
Troubleshooting Tips
Is your cart displaying an error code? Here’s what those mean:
ERROR CONDITION MODE SUGGESTED ACTION
E01
Low battery voltage
shutdown, depends on
settings
Inverting
• Check battery status meter and recharge if necessary
• Check that cables are connected properly
• Make sure that cables are secured tightly
E02
High battery voltage
shutdown, greater than
15.5v
Inverting • Check for external charging sources, such as an over
voltage alternator - disconnect if necessary
E03AC output overload shut-
down Inverting
• Reduce the amount of loads connected
• Check the appliances for high-surge ratings and discon-
nect if necessary
E04Over temperature shut-
down Inverting
• Reduce the amount of loads connected
• Check for proper ventilation
• Check for ambient temperature and move to a cooler
location when possible

TECHNICAL SUPPORT 781.935.3450 EXT. 3 9
Frequently Asked Questions
Frequently Asked Questions
QUESTION ANSWER
What does ABS/BUL or FUL mean?
• These are normal codes you should see every charging
cycle
BUL = Bulk mode
ABS = Absorption mode
FUL = Full
What are my 1000w or 1800w inverter/charger
settings?
• While plugged in and charging, press the “select” button to
view your current settings
• Recommended settings:
1000w system: 20A, 1NI, AL1, SDL
Why is my unit not charging?
• Loose connections. Ensure that all wiring is correct and
tight
• Check that charger is not set to a low setting
• Batteries may be old and depleted
Where do the LED battery meters plug in?
Red #1 - fuse to slot 1 (top right)
Black - battery to slot 2 (top left)
Red #2 - slot 1 to slot 4 (bottom right)
How old are my batteries?
• Located on the top center of your battery there is a date
code
• It is a five digit code followed by one or two letters
• The first two digits are the month and the last digit is the
year (ex: 11243 would indicate the batteries are from No-
vember 2013)

TECHNICAL SUPPORT 781.935.3450 EXT. 3 10
Index
A
Accessories 1
B
Battery 8
Age 9
Light Meter 8
C
Caution v
Contents, Standard 1
Conventions v
Customer Service v
D
Damaged Unit v
E
Error Codes 8
I
Inverter/Charger Settings 9
L
Light Meter 8
O
One Battery Setup 3
S
Settings, Inverter/Charger 9
Setup
One Battery 3
Two Battery 5
Symbols v
T
Technical Support v
Testing the Battery 7
Tips for Proper Operation 8
Tools Required 1
Troubleshooting Tips 8
Two Battery Setup 5
W
Warning v


73 Ward Hill Ave. l Haverhill, MA l 01835 l USA l 781.935.3450 l www.newcastlesys.com
This manual suits for next models
1
Table of contents
Other Newcastle Systems Indoor Furnishing manuals


Popular Indoor Furnishing manuals by other brands


Emmezeta
Emmezeta VERO 850593 Assembling instructions

Wholesale Beds
Wholesale Beds CHARLES Assembly instructions

Urban Barn
Urban Barn Macklin Assembly instructions

DURAVIT
DURAVIT White Tulip WT 7051 Mounting instructions

Forever Redwood
Forever Redwood MAYNARD WOOD SHOWER BENCH Assembly instructions

Artesano
Artesano 24801 Assembling instructions


