ATTO Technology Celerity FC-164E User manual

ATTO Celerity Fibre Channel Host Adapters
Installation and Operation Manual
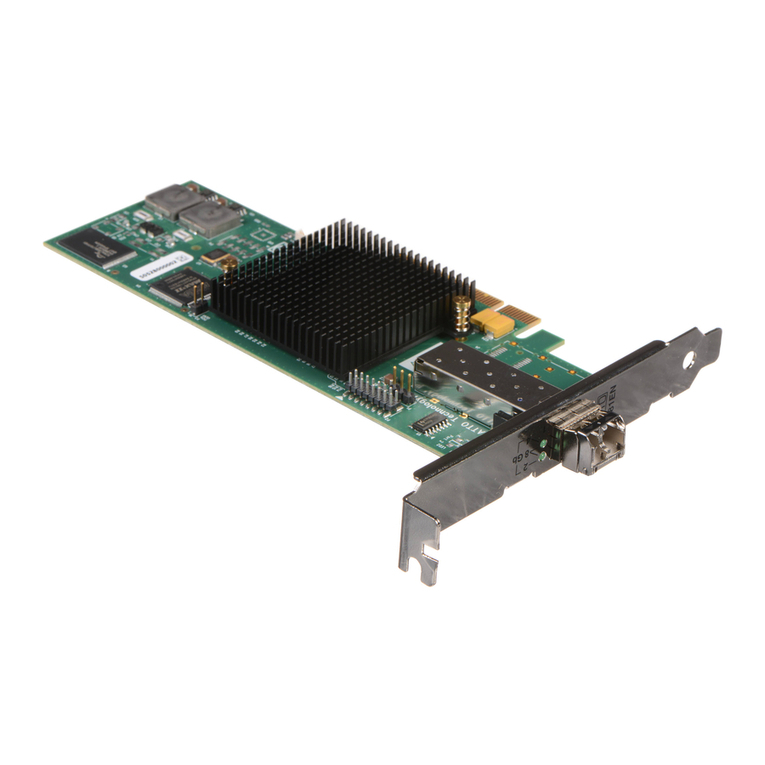
Celerity FC-164E
16Gb FC quad channel PCIe 3.0 host adapter
Celerity FC-162E
16Gb FC dual channel PCIe 3.0 host adapter
Celerity FC-161E
16Gb FC single channel PCIe 3.0 host adapter
Celerity FC-84EN
8Gb FC quad channel PCIe 2.0 host adapter
Celerity FC-82EN
8Gb FC dual channel PCIe 2.0 host adapter
Celerity FC-81EN
8Gb FC single channel PCIe 2.0 host adapter

ATTO Technology, Inc.
155 CrossPoint Parkway
Amherst, New York 14068 USA
www.attotech.com
Tel (716) 691-1999
Fax (716) 691-9353
Sales support: [email protected]
Technical support: Please visit
https://www.attotech.com/support/
for hours of operation.
(716) 691-1999 ext. 242
© 2016 ATTO Technology, Inc. All rights reserved. All brand or product names are trademarks of their respective
holders. No part of this manual may be reproduced in any form or by any means without the express written
permission of ATTO Technology, Inc.
1/2016 PRMA-0344-000

Contents
1 ATTO Celerity HBA Features & Overview ........................................................1
Celerity Getting started
Celerity 164E technical specifications
Celerity 162E Technical specifications
Celerity 161E Technical specifications
Celerity 84EN Technical specifications
Celerity 82EN Technical specifications
Celerity 81EN Technical specifications
2 Install Drivers .....................................................................................................8
Windows
OS X
Linux
VMware ESXi 5
VMware ESX/ESXi 4
FreeBSD
Specialized configurations
3 Hardware Installation..........................................................................................14
Bracket details
Adapter board details
4 Updating Hardware Flash, Drivers ....................................................................20
5 Troubleshooting .................................................................................................22
General suggestions
Mac OS X
Windows
Linux
VMware
Celerity FreeBSD
Celerity Supplemental Guide for VMware ESX/ESXi
Celerity Virtual Ports (NPIV)
Appendix A Glossary ............................................................................................i
Appendix B Accessories ......................................................................................iii
Appendix C Standards, Compliances: 16Gb adapters ......................................ix
FCC standards: radio and television interference
Canadian standards
European standards

Appendix D Standards, Compliances: 8Gb adapters ........................................x
FCC standards: radio and television interference
Canadian standards
European standards
Appendix E Safety, Warranty ...............................................................................xii
Safety
ATTO Technology, Inc. limited warranty

1
1 ATTO Celerity HBA Features & Overview
The ATTO Celerity Fibre Channel family of storage products provides connectivity, intelligence and scalability.
Celerity FC host adapters simplify advanced storage
networking needs such as switching, backup and data
management. Specifically designed to enhance the
functionality of third party fabric hardware and
software, Celerity FC products are the industry-
leading platform for storage connectivity.
Fibre Channel is a serial communications technology
designed to transfer large amounts of data among a
variety of hardware systems over long distances. It is
a key technology for applications that require shared,
high bandwidth access to storage.
Fibre Channel provides a logical, point-to-point, serial
channel for the transfer of data between a buffer at a
source device and a buffer at a destination device. It
moves buffer contents from one port to another,
without regard to the format or meaning of the data so
different upper level protocols are able to run over
Fibre Channel hardware.
The Fibre Channel architecture is structured as a
hierarchical set of protocol layers. Defined within these
layers are rules for signal interfaces, serial encoding
and decoding, error control, frame format and
communications protocols.
Getting started
In general, to install the ATTO Celerity FC host
adapter, you must:
1 Ensure you have the equipment and software
you need for the installation:
• Celerity FC adapter
• ATTO Celerity drivers, downloaded from the
ATTO website (https://www.attotech.com/)
• A computer with an available expansion slot
• Storage, cables and connectors
2 Install drivers for your operating system. Refer
to Install Drivers.
3 Install the configuration software from the
ATTO download pages.
4 Install the Celerity adapter. Refer to Hardware
Installation.
5 Attach storage.
6 If required, configure your Celerity adapter
using the ATTO Configuration Tool.
Note
Default settings are appropriate for most
systems but you may change settings using
the ATTO Configuration Tool.
2 ATTO Technology Inc. Celerity FC Host Adapters Installation and Operation Manual
Celerity Fibre Channel 16Gb Adapters
The ATTO Celerity 16Gb HBAs leverage two next-
generation storage technologies: PCIe 3.0
interconnect and 16-Gigabit Fibre Channel.
With 16-Gb FC speeds of up to 1600 MB/sec. per
channel, 16Gb Celerity adapters support the most
demanding application requirements, including high-
definition video, rich content databases and other
high-bandwidth environments.
ATTO Celerity host adapters are an integrated family
of advanced storage connectivity solutions that are
designed to provide reliable connectivity, intelligence
and scalability.
164E technical specifications
• Four independent Fibre Channel ports
• 16-Gigabit data transfer rates
• 3200 MB/sec. maximum full-duplex throughput
per channel
• Supports all FC topologies: fabric, arbitrated
loop and point-to-point
• ANSI Fibre Channel: FC-FS, FC-AL, FCP, FC-
AL2, FC-PLDA, FC-FLA
• Flash ROM for easy field upgrades
• FC Class 3 support
• Local management and diagnostics
• Buffer credits: 81
• ATTO Advanced Data Streaming (ADS™)
Technology
• Length: 6.600 inches
• Height: 4.376 inches
• Operating temperature and Airflow: 0-40 ºC (32-
104 ºF) 100lfm minimum recommended;
40-55 ºC (104-132
ºF) 300lfm minimum
recommended
• Storage temperature: -40 to 70 ºC (-40 to 158 ºF)
• Relative humidity: 10 to 95% non-condensing
• RoHS compliant
162E Technical specifications
• Two independent Fibre Channel ports
• 16-Gigabit data transfer rates
• 3200 MB/sec. maximum full-duplex throughput
per channel
• Supports all FC topologies: fabric, arbitrated
loop and point-to-point
• ANSI Fibre Channel: FC-FS, FC-AL, FCP, FC-
AL2, FC-PLDA, FC-FLA
• Flash ROM for easy field upgrades
• FC Class 3 support
• Local management and diagnostics
• Buffer credits: 81
• ATTO Advanced Data Streaming (ADS™)
Technology
• Length: 6.600 inches
• Height: 2.731 inches
• Operating temperature and Airflow: 0-40 ºC (32-
104 ºF) - 60lfm minimum recommended;
40-55 ºC (104-132
ºF) 100lfm minimum
recommended
• Storage temperature: -40 to 70 ºC (-40 to 158 ºF)
• Relative humidity: 10 to 95% non-condensing
• RoHS compliant

3
161E Technical specifications
• One Fibre Channel port
• 16-Gigabit data transfer rates
• 3200 MB/sec. maximum full-duplex throughput
per channel
• Supports all FC topologies: fabric, arbitrated
loop and point-to-point
• ANSI Fibre Channel: FC-FS, FC-AL, FCP, FC-
AL2, FC-PLDA, FC-FLA
• Flash ROM for easy field upgrades
• FC Class 3 support
• Local management and diagnostics
• Buffer credits: 81
• ATTO Advanced Data Streaming (ADS™)
Technology
• Length: 6.600 inches
• Height: 2.731 inches
• Operating temperature and Airflow: 0-40 ºC (32-
104 ºF) - 60lfm minimum recommended;
40-55 ºC (104-132 ºF) 100lfm minimum
recommended
• Storage temperature: -40 to 70 ºC (-40 to 158 ºF)
• Relative humidity: 5 to 95% non-condensing
• 10.97W
• RoHS compliant

4 ATTO Technology Inc. Celerity FC Host Adapters Installation and Operation Manual
Celerity Fibre Channel 8Gb Adapters
The ATTO Celerity 8Gb HBAs leverage two next-
generation storage technologies: PCIe 2.0
interconnect and 8-Gigabit Fibre Channel.
With 8-Gb FC speeds of up to 800 MB/sec. per
channel, 8Gb Celerity adapters support the most
demanding application requirements, including high-
definition video, rich content databases and other
high-bandwidth environments.
ATTO Celerity host adapters are an integrated family
of advanced storage connectivity solutions that are
designed to provide reliable connectivity, intelligence
and scalability.
84EN Technical specifications
• Four independent Fibre Channel ports 8-Gigabit
data transfer rates
• 1600 MB/sec. maximum full-duplex throughput
per channel
• Supports all FC topologies: fabric, arbitrated
loop and point-to-point
• ANSI Fibre Channel: FC-FS, FC-AL, FCP, FC-
AL2, FC-PLDA, FC-FLA
• Flash ROM for easy field upgrades
• FC Class 3 support
• Local management and diagnostics
• Buffer credits: 41
• ATTO Advanced Data Streaming (ADS™)
Technology
• Length: 6.6 inches
• Height: 3.987 inches
• Operating temperature: 0-40 ºC (32-104 ºF)
• Storage temperature: -40 to 70 ºC (-40 to 158 ºF)
• Relative humidity: 10 to 90% non-condensing
• 7.8 W (typical)
• 100 lf/m (minimum) airflow recommended
• RoHS compliant
82EN Technical specifications
• Two independent Fibre Channel ports
• 1600 MB/sec. maximum throughput per channel
in full-duplex mode
• 8-Gigabit data transfer rates
• Conforms to PCI Express Low Profile form-
factor specifications
• Supports all FC topologies: fabric, arbitrated
loop and point-to-point
• ANSI Fibre Channel: FC-FS, FC-AL, FCP, FC-
AL2, FC-PLDA, FC-FLA
• Flash ROM for easy field upgrades
• FC Class 3 support
• Local management and diagnostics
• Buffer credits: 41
• ATTO Advanced Data Streaming (ADS™)
Technology
• Length: 6.6 inches
• Height: 2.731 inches
• Operating temperature: 0-40 ºC (32-104 ºF)
• Storage temperature: -40 to 70 ºC (-40 to 158 ºF)
• Relative humidity: 10 to 90% non-condensing
• 5.9W (typical)
• 100 lf/m (minimum) airflow recommended
• RoHS compliant

5
81EN Technical specifications
• One independent Fibre Channel port
• 8-Gigabit FC data transfer rates
• 1600 MB/sec. throughput in full-duplex mode
• Supports all FC topologies: fabric, arbitrated
loop and point-to-point
• ANSI Fibre Channel: FC-FS, FC-AL, FCP, FC-
AL2, FC-PLDA, FC-FLA
• Flash ROM for easy field upgrades
• FC Class 3 support
• Local management and diagnostics
• Buffer credits: 41
• ATTO Advanced Data Streaming (ADS™)
Technology
• Length: 6.6 inches
• Height: 2.731 inches
• Operating temperature: 0-45ºC (32-113ºF)
• Storage temperature: -40 to 70ºC (-40 to 158ºF)
• Relative humidity: 10 to 90% non-condensing
• 5.3 W (typical)
• 100 lf/m (minimum) airflow recommended
• RoHS compliant

6 ATTO Technology Inc. Celerity FC Host Adapters Installation and Operation Manual
Selection guide: Celerity 16Gb adapters
Product Features FC-164E FC-162E FC-161E
Fibre Channel Ports 421
FC protocol 16-Gb 16-Gb 16-Gb
Maximum Transfer Rate (full duplex) 6400 MB/sec 3200 MB/sec 1600 MB/sec.
Bus type PCIe 3.0 PCIe 3.0 PCIe 3.0
Bus characteristics 8 lane 8 lane 8 lane
Optical interface SFP+ LC SFP+ LC SFP+ LC
Maximum cable length (OM2 type cable) 50m@8-Gb
35m@16-Gb
50m@8-Gb
35m@16-Gb
50m@8-Gb
35m@16-Gb
Low profile form factor
Advanced Data Streaming (ADS™) Technology
Software RAID support1
Developer's kit (Target Mode & API)
Windows support
Linux driver support
Macintosh OS X driver support
FreeBSD driver support
VMware ESXi Server 6.0, 5.5 and 5.1
Windows Hyper-V
1 ATTO Express Power Center recommended

7
Selection guide: Celerity 8Gb adapters
Product Features FC-84EN FC-82EN FC-81EN
Fibre Channel Ports 421
FC protocol 8-Gb 8-Gb 8-Gb
Maximum Transfer Rate (half duplex) 3.2 GB/sec 1.6 GB/sec 800 MB/sec.
Maximum Transfer Rate (full duplex) 6.4 GB/sec 3.2 GB/sec 1.6 GB/sec.
Bus type PCIe 2.0 PCIe 2.0 PCIe 2.0
Bus characteristics 8 lane 8 lane 4 lane
Optical interface SFP+ LC SFP+ LC SFP+ LC
Maximum cable length
300m@2-Gb
150m@4-Gb
50m@8-Gb
300m@2-Gb
150m@4-Gb
50m@8-Gb
300m@2-Gb
150m@4-Gb
50m@8-Gb
Low profile form factor
Advanced Data Streaming (ADS™) Technology
Software RAID support1
Developer's kit (Target Mode & API)
Windows support
Linux driver support
Macintosh OS X driver support
VMware ESXi Server 5.x
VMware ESX/ESXi Server 4.x
VMware ESX Server 3.5
Windows Hyper-V
1 ATTO Express Power Center recommended

8 ATTO Technology Inc. Celerity FC Host Adapters Installation and Operation Manual
2 Install Drivers
Before installing your Celerity adapter, you must configure your system to recognize and use it by installing drivers
for your operating system.
Your adapter was properly flashed before shipment.
However, you must add Celerity drivers to your
computer before continuing with installation.
If you already have one or more Celerity adapters
installed and you have the latest drivers found on the
ATTO website, or you followed the instructions in the
Getting Started Guide, you do not need to perform
any
of these procedures.
Drivers are provided on the ATTO website.
at
http://www.attotech.com/downloads.php. Log in, if
previously registered, or register to proceed to the
download pages. Once downloaded, continue with
the driver installation procedures (below) for your
operating system.
Downloading drivers from the ATTO website
Use this procedure if you need to update drivers. The
latest driver for your adapters can be found on the
ATTO website.
1Go to www.attotech.com.
2 On the home page menu, put your cursor over
SUPPORT then click on Downloads.
3 Register or log in if previously registered.
4Select Fibre Channel HBAs from the product
list.
5 Select your model.
6 From the table, find your Operating System.
7 Click on the entry for the latest driver.
8 A download window appears. Follow the
instructions for downloading the driver.
Internet Explorer users may select Run to
automatically run the downloaded self-
extracting executable file.
All other browser users select a download
destination and run the self-extracting
executable file.
Continue with the driver installation as described on
the following pages for your Operating System.
Windows
Installing from the ATTO Technology
website
1 Power on your system.
2 Log on to Windows as the system
administrator.
3 Locate the ATTO driver on your system and
click unzip. The driver files are extracted and
the driver installer is launched.
4 If you have User Account Control enabled,
you are asked for permission for the installer to
continue. If you do not have administrator
privileges, you are also asked for an
administrator user name and password. Fulfill
the required fields and click Continue.
5 Click Install.
6 Follow the on-screen instructions to complete
the driver installation.
7 Continue on to Install Hardware.
Installing from a directory containing the
Celerity driver
1 Power on your system.
2 Log on as the system administrator.
3 Navigate to the directory containing the Celerity
driver.
4Run Setup.exe.
5 Click Install.
If you have User Account Control enabled,
you are asked for permission for the installer to
continue. If you do not have administrator
privileges, you are also asked for an
administrator user name and password. Fulfill
the required fields and click Continue.
6 Follow the on-screen instructions to complete
the installation.
Note
Continue on to Install Hardware.

9
OS X
Note
Some ATTO Celerity FC drivers are included
on the Mac OS X (10.8.x and later)
Distribution CD and do not require additional
installation steps, however we recommend
you visit the ATTO website to check for, and
download, the latest drivers and firmware.
Note
The ATTO Celerity FC host adapters (except
for FC-164E) support OS X operating
systems. ATTO 16Gb and 8Gb FC adapters
also have EFI boot support on Intel based
systems.
Driver Installation (for all ATTO FC host
adapters)
1 Power on your system.
2 Double-click the downloaded driver file to
launch the installer
3 Follow the on-screen instructions.
4 Continue on to Install Hardware.
5 Launch
Installing a fresh copy of OS X onto a disk
attached to a Celerity FC adapter (only for
8Gb FC adapters)
Note
Boot support is available on Intel-based
systems only.
Note
The EFI boot driver is disabled by default. To
enable it, use the ATTO Configuration Tool in
an existing OS X installation, or use the EFI
Configuration utility built into the EFI driver
(see the procedure below for launching the
utility).
Note
This is a two step process. First step is to
adjust adapter settings with the EFI
Configuration utility. Second step is to install
the OS X onto a disk attached to the adapter.
Please review thoroughly to ensure you are
using the second step corresponding to the
OS X version available in your system.
Adjusting adapter settings with the EFI
Configuration Utility
Note
Depending on your configuration, it may be
necessary to adjust adapter NVRAM
settings prior to performing the OS X
installation. For example, you may need to
modify the connection mode or data rate.
The EFI configuration utility can be launched
from the EFI shell.
Note
An EFI shell is not included with Intel Macs.
ATTO recommends rEFIt, which is available
for free from
http://refit.sourceforge.net
.
Once you have downloaded the DMG or
rEFIt, follow these steps to open the EFI
Configuration Utility.
1 Burn the rEFIt DMG file to a CD. Do not remove
the CD.
2 Shut down the system and install the Celerity
adapter
3 With the rEFIt CD inserted, boot the system
while pressing and holding ‘C’ key. This will
boot the rEFIt CD.
4 The rEFIt boot menu will appear which contains
a series of icons. Release the ‘C’ key and use
the arrows to highlight the “Start EFI Shell” icon.
Press ‘Return’ to access the EFI Shell.
5 At the prompt, enter the ‘driver-b’ command.
Scroll through the list of installed EFI drivers
and find the ATTO Celerity driver. There may
be more than one entry based on the number
and type of adapter(s). Note the two or three
digit hexadecimal driver handle on the far left of
the screen.
6 At the prompt, enter ‘drvcfg -s {handle}’ where
{handle} is the hexadecimal number from the
previous step. This will launch the EFI
Configuration Utility for the associated adapter.
7 Use the on-screen menus to configure your
adapter. Help is available at the bottom of the
screen.
8 When exiting the configuration utility, if you
changed any settings, the system will restart
the adapter so the new settings take effect.
9 At the prompt, enter ‘exit’ to return to the rEFIt
boot menu or ‘reset’ to restart the system.

10 ATTO Technology Inc. Celerity FC Host Adapters Installation and Operation Manual
Installing OS X Mavericks, Mountain Lion,
Lion or Snow Leopard onto a disk
attached to a Celerity adapter
Models: 162E, 161E, 84EN, 82EN, 81EN
1 Install your Celerity adapter and connect your
storage.
2 If you are launching the OS X installation by
booting the installation DVD:
a. Launch the installation and proceed to the
“Select the disk where you want to install
Mac OS X” screen
b. If you need to partition your disk, open Disk
Utility from the Utilities menu. Once you
partition your disk and exit, the newly
created volume will appear in the installer
window.
3 If you are launching the OS X installation from
an existing OS X installation:
a. If you need to partition disk, open Disk
Utility from /Applications/Utilities. Partition
your disk and exit.
b. Launch the installation DVD and proceed
to the “Select the disk where you want to
install Mac OS X” screen.
4 Select the volume on the disk where you want
to install OS X.
5 Click ‘Install’ and proceed with the rest of OS X
installation.
6 When OS X installation completes, install the
latest Celerity driver from the ATTO Technology
website.
Installing OS X Leopard or Tiger onto a
disk attached to a Celerity adapter (only
for 8Gb FC adapters)
Models: 84EN, 82EN, 81EN
Note
Due to limitations of the Mac OS X Installer,
two systems are required to complete this
procedure. These will be referred to as the
“target” and “host” systems. The target
system will contain your Celerity adapter and
storage. The host system will only be used
during the installation and must be an Intel-
based system capable of booting the OS X
installation CD. However, it does not have to
be the same type of system as the target
system. For example, you may use a
MacBook Pro to install OS X on a Mac Pro
containing your Celerity adapter. Both
systems must have an available FireWire
port.
1 On the target system, install the Celerity
adapter and connect your storage.
2 Connect the target and host systems with a
FireWire cable.
3 Power on the target system while pressing and
holding ‘T’, this will boot the target system in
target disk mode. You may release the key
when the FireWire symbol appears.
4 On the host system, insert the OS X installation
disc and begin installation. Proceed through the
installation wizard until you reach the
destination volume selection window.
5 Select a volume on the storage attached to the
Celerity adapter. If a volume is not present,
open the Disk Utility from the OS X Installer
menu to create a volume. The storage will
appear in Disk Utility as ‘AAPL FireWire Media’.
Exit the Disk Utility when finished and select the
newly created volume.
6 Finish the OS X installation, restart the host
system when prompted, and complete the OS
X setup wizard. You may now remove the OS X
installation disc.
7 On the host system, obtain and install the latest
version of the Celerity OS X driver from the
software CD that came with your adapter or the
ATTO Technology website.
8 On the host system, open System Preferences
and restore the Startup Disk to the disk that the
host system booted from before performing this
procedure. After restarting, you may disconnect
the FireWire cable from the target system. The
host system is no longer needed.
9 Power off the target system and power it back
on again normally. If you previously had an OS
X installation present, it will boot that version of
OS X. Otherwise, the new OS X installation will
be booted.
10 On the target system, open System
Preferences and set the Startup Disk to the new
OS X installation and restart.

11
Linux
Note
Newer PCs may ship with UEFI firmware
with Secure Boot enabled. With Secure
Boot the operating system boot loaders,
Linux kernel, and all kernel modules must be
signed with a private key and authenticated
with a corresponding public key.
When trying to load an unsigned ATTO driver
on a secure boot system, you will see the
following error: modprobe: ERROR: could
not insert '<driver-name>': Required key not
available
Refer to the Linux driver read me file
(readme.html) contained in the driver bundle
for instructions on signing and authenticating
your ATTO Linux drivers.
1 Power on your system.
2 Log in as root.
3 Verify that the kernel header files, usually
included with the Linux kernel development
package, are installed.
4 Locate the downloaded driver and copy the
driver file to a directory such as /usr/src
5 Open a Terminal session and change to the
directory where you stored the driver.
6 Open your File Browser and browse to
/mnt/cdrom/Linux/Drivers.
7 Click on the driver
8 Copy the driver file to a directory such as
/usr/src.
9 Open a Terminal session.
10 Change to the directory where you stored the
driver.
11 Extract the driver source
Navigate to that directory.
12 Compile and install the driver using ./install.sh.
The driver is now installed and ready to use.
13 Continue on to Install Hardware.
VMware ESXi 5
Including driver in boot image
Note
8Gb and 16Gb Celerity support.
VMware vSphere 5 includes the ability to dynamically
construct boot images for your ESXi 5 servers using
vCenter 5. This allows you to include ATTO drivers as
part of a boot image, then using PXE boot you can
start an ESXi 5 host with that image. The end result is
that your server(s) will boot and have ATTO drivers
included without any additional steps. Consult the
VMware vSphere 5 documentation for more
information on this feature.
Driver CD as an Update
Adding an ATTO adapter and installing the driver after
you have installed ESXi 5
1 Download the Driver Bundle, from the VMware
or ATTO website, for the appropriate ATTO
adapter. Unzip the contents of the bundle on
your local workstation. Within the bundle you
will find the Driver VIB file (.vib) for your ATTO
Adapter.
2 Use the Datastore Browser in the vSphere
Client to upload the VIB file to your ESXi host.
Note
Alternatively, you can utilize programs like
WinSCP (Windows) or SCP (Linux) to
upload the file directly to your ESX host.
3 Log in to the ESXi host on the Local Tech
Support Console (ESXi), or through an SSH
client.
4 Install the VIB using the following command on
the ESXi host:
# esxcli software install -v <full path to VIB file>
5 Once the VIB is installed, reboot the ESXi host.
For detailed instructions or driver parameters, please
reference the
Supplemental Guide for VMware
ESX/ESXi
.

12 ATTO Technology Inc. Celerity FC Host Adapters Installation and Operation Manual
VMware ESX/ESXi 4
Driver CD usage during ESX installation
(ESX only)
Note
8Gb Celerity support only.
During ESX 4.x installation, you may choose to install
additional drivers. This will allow you to install ESX
onto storage that is attached to your ATTO adapter.
You will need to write the appropriate ATTO driver ISO
image to CD media.
1 During ESX installation, select Yes to install
custom drivers and chose Add.
2 The installer will prompt you to insert the media
containing the ATTO device driver.
3 After you add the ATTO driver, the installer will
prompt you to reinsert the ESX installation
media and continue with the installation.
4 When the installer prompts you to choose the
location for the ESX install, you may choose
local storage or storage that is attached to your
ATTO adapter.
Driver CD as an Update CD (ESX or ESXi)
Adding an ATTO adapter and installing the driver after
you have installed ESX/ESXi 4
1 Mount the Driver CD ISO on your local
workstation.
This may require the use of a third-party ISO reader.
Microsoft Windows Vista and later include a built-in
ISO reader. On Linux, use the mount command and
the loopback interface. For example:
# mkdir -p /mnt/cdrom
# mount -r -l loop <path to driver ISO> /mnt/cdrom
2 Copy the offline bundle from the ISO image to a
local folder on your workstation. This ZIP file is
located in the offline-bundle folder of the ISO
image (ex. offline-bundle/celerity8fc.zip).
3 Use the Datastore Browser in the vSphere
Client to upload the ZIP file to your ESX/ESXi
host.
Note
Alternatively, you can utilize programs like
WinSCP (Windows) or SCP (Linux) to
upload the file directly to your ESX host.
4 Log in to the ESX/ESXi host on the Service
Console (ESX) or the Local Tech Support
Console (ESXi), or through an SSH client.
5 Install the offline bundle using the following
command on the ESX/ESXi host:
# esxupdate --maintenancemode --nosigcheck
update --bundle <path to driver bundle ZIP file>
6 Once the package is installed, reboot the
ESX/ESXi host.
For detailed instructions or driver parameters, please
reference the
Supplemental Guide for VMware
ESX/ESXi
.
FreeBSD
Note
FreeBSD is supported only on 16Gb Celerity
adapters. 16Gb Celerity Adapters are not
supported for versions of FreeBSD prior to
9.1
1 Power on your system.
2 Login as root or execute the following
command to become root (you will be prompted
to enter root’s password):
• su
3 Verify the kernel header files are installed.
4 Locate the downloaded driver tarball and copy
it to a directory such as /usr/src/ Make sure
that none of the directories in the path have
any spaces in their names.
5 Change to the directory where you stored the
driver
• cd /usr/src
6 Extract the files from the driver tarball by
executing the following command, where XXX
is the driver’s version number:
• tar xvf fbsd_drv_cltryfc16_XXX.txz
7 The driver files are extracted to a directory
called fbsd_drv_cltryfc16_XXX where XXX is
the driver’s version number.
8 Change to the directory created by the tar
command as follows, where XXX is the driver’s
version number:
• cd fbsd_drv_cltryfc16_XXX
9 Compile and install the driver by executing the
install script as follows:

13
• ./install.sh
10 You will be prompted a number of times to
provide the installer with your installation
options. Answer each of the questions until the
installation is complete.
Continue on to Install Hardware
Specialized configurations
Some specialized applications may benefit from
modification of adapter settings. The ATTO Utilities
Installation and Operation Manual provides detailed
information on using ATTO Technology configuration
utilities found on the Installation CD or downloaded
from the
ATTO website
.

14 ATTO Technology Inc. Celerity FC Host Adapters Installation and Operation Manual
3 Hardware Installation
You need a basic understanding of Fibre Channel before installing the Celerity FC host adapter. Please refer to
Appendix A for a list of related websites.
CAUTIONCAUTION
Back up your system data before
changing or installing any hardware.
System requirements
For Celerity FC-164E only, external power cables are
also included. Please contact your ATTO authorized
sales representative if any items are missing.
To install and use the Celerity Fibre Channel host
adapter you need:
• A computer with an available PCI Express
expansion slot
• The complete Celerity FC host adapter package
Fibre Channel address
Celerity FC adapters are configured with a unique
address designated by the Institute of Electrical and
Electronic Engineers. The WorldWide Port Name
(WWN) and Node Name are the two components of
the address assigned to Fibre Channel products. This
address, stored in flash memory, allows the system to
recognize the Celerity host adapter as a unique part of
your configuration. The address is clearly marked on
the back of the board for easy identification. Please
keep a reference copy of the number in a safe place or
write in the space provided on this page.
Celerity FC host adapter WWNs are assigned for each
channel. The WWN listed on your host adapter is
assigned to the first channel (1). Sequential WWNs
apply for additional channels.
Installation
CAUTIONCAUTION
Celerity FC host adapters contain
components that are sensitive to
electrostatic discharge (ESD). ESD can
cause damage to the Celerity FC host
adapter. Please follow standard methods
to avoid ESD.
1 Install the latest drivers. Refer to Install Drivers.
2 Power down the computer and unplug the
computer from all power sources.
3 Open the case.
4Install the Celerity FC host adapter in any open
PCI Express expansion slot. For Celerity FC-
164E only, install the appropriate external
power cable (supplied). If you have questions
about how to install an expansion card in your
system, consult your computer’s
documentation.
Drawings of Celerity brackets begin on page 22
and drawings of boards begin on page 24.
CAUTIONCAUTION
Celerity 16Gb Quad Fibre Channel Host
Adapters (FC-164E) require external
power supply and adequate cooling to
ensure proper system operation and
prevent data loss.
5 Connect Fibre Channel devices by inserting a
Fibre Channel cable from the devices to the
connectors on the Celerity FC host adapter until
you hear a click.
6 Close the case on the computer and power it
up.
WWN 1: all adapters
WWN 2: 82EN, 84EN, 162E, 164E
WWN 3: 84EN, 164E
WWN 4: 84EN, 164E

15
Bracket details
Exhibit 3-1 FC-164E
Exhibit 3-2 FC-162E
Exhibit 3-3 FC-161E

16 ATTO Technology Inc. Celerity FC Host Adapters Installation and Operation Manual
Exhibit 3-4 FC-84EN
Exhibit 3-5 FC-82EN full height and low profile
Exhibit 3-6 FC-81EN full height and low profile
Exhibit 3-7
Other manuals for Celerity FC-164E
1
This manual suits for next models
5
Table of contents
Other ATTO Technology Adapter manuals

ATTO Technology
ATTO Technology ExpressSAS User manual

ATTO Technology
ATTO Technology EPCI-UL4D User manual

ATTO Technology
ATTO Technology FC 3300 User manual

ATTO Technology
ATTO Technology ATTO ExpressPCI FC 2600 User manual

ATTO Technology
ATTO Technology Celerity FC-22XH User manual

ATTO Technology
ATTO Technology ATTO Celerity FC-81EN User manual

ATTO Technology
ATTO Technology Celerity FC-21PS User manual

ATTO Technology
ATTO Technology ATTO Celerity FC-41XS User manual

ATTO Technology
ATTO Technology Celerity FC-24XL User manual

ATTO Technology
ATTO Technology ThunderStream User manual